Loading ...
Loading ...
Loading ...

›
Insert the wheel wrench onto the wheel bolt to the stop. Use the associated
attachment for the anti-theft wheel bolts » Fig. 246 on page 212.
›
To loosen the screws, grasp the key end and turn the screw about one turn
rotation in the direction of the arrow » Fig. 247.
›
To tighten the screws grasp the key end and turn the screw against the di-
rection of the arrow » Fig. 247, until it is tight.
WARNING
If it proves difficult to undo the bolts, carefully apply pressure to the end of
the wrench with your foot. Keep hold of the vehicle when doing so, and
make sure you keep your footing - danger of injury.
Raising the vehicle
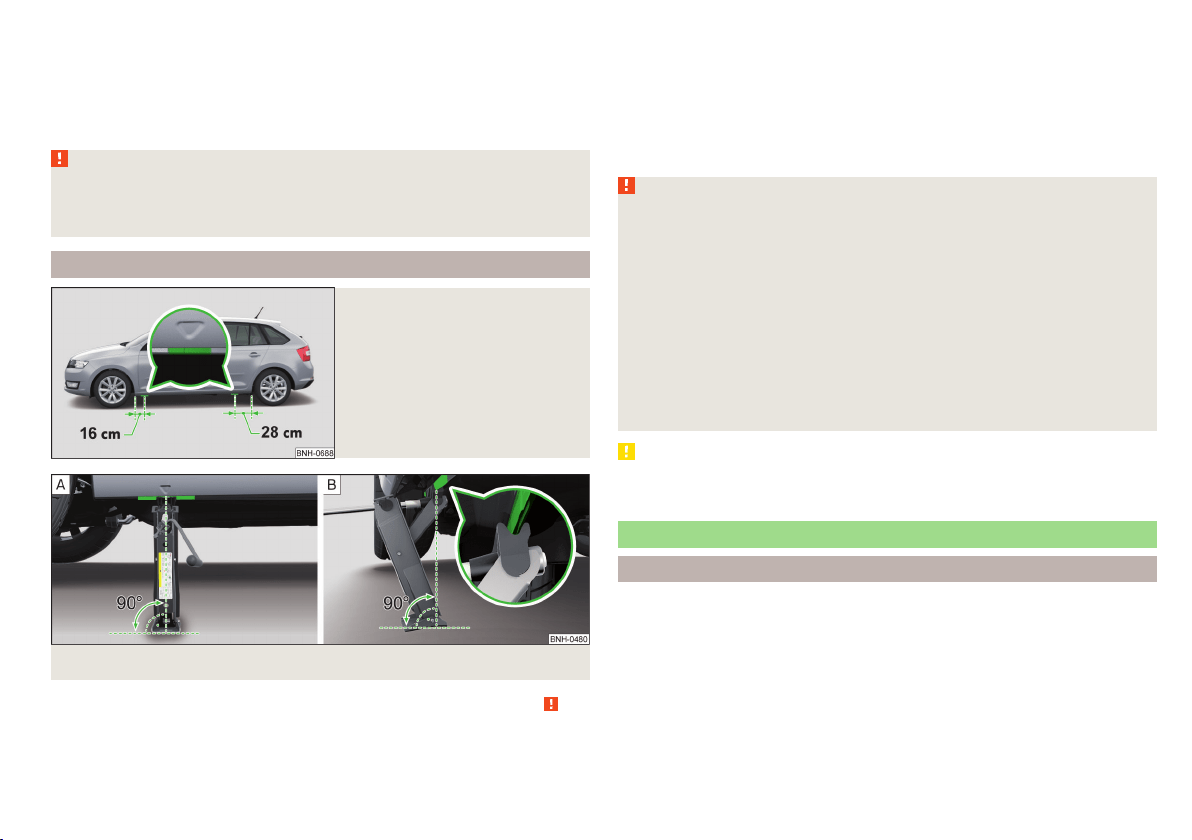
Fig. 248
Jacking points for the jack
Fig. 249 Attach lifting jack
Before the vehicle is raised, please take note of the safety instructions » .
In order to raise the vehicle, the jack from the tool kit is to be used. Position
the jack at the jacking point closest to the wheel to be replaced.
The jacking points are located on the lower sill » Fig. 248.
›
Position the base plate of the jack with its full area resting on level ground
and ensure that the jack will fit in the jacking point when raised » Fig. 249 -
.
›
Use the crank to raise the jack until its pawl covers the jacking point
» Fig. 249- .
›
Raise the vehicle until the wheel is a little off the floor.
WARNING
The following instructions must be observed, otherwise there is risk of in-
jury.
■
Ensure the vehicle cannot unexpectedly roll away.
■
Always ensure the base plate of the lifting jack cannot slip.
■
Place a wide and stable base material under the jack if on a loose surfa-
ces (e.g. gravel).
■
Place an anti-slip base material (e.g. a rubber mat) under the jack if on a
smooth surface (e.g. cobblestones).
■
Always raise the vehicle with the doors closed.
■
Never position any body parts (e.g. arms or legs) under the vehicle while
the vehicle is raised.
■
When the vehicle is raised, never start the engine.
CAUTION
It is important to ensure that the jack is correctly attached to the bar of the
lower beam – otherwise there is a risk of damage to the vehicle.
Breakdown kit
Introduction
The following information applies for the breakdown kit supplied ex-factory.
The breakdown kit can be used to seal punctures with a diameter of up to
about 4 mm.
A repair made using the breakdown kit is never intended to replace a perma-
nent repair on the tyre. Its purpose is to get you to the nearest specialist ga-
rage.
Replace the tyre that was repaired using the breakdown kit as soon as possi-
ble, or consult a specialist garage about repair options.
213
Emergency equipment and self-help
Loading ...
Loading ...
Loading ...