Loading ...
Loading ...
Loading ...
›
Tighten the wheel bolts opposite each other using the wheel wrench (“pull-
ing crossways”) » page 212.
›
Replace the wheel trim » page 211 and caps » page 212.
When fitting a wheel with directional tyres, ensure that the direction of rota-
tion is correct » page 205.
All bolts must be clean and must turn easily. If screws are corroded and diffi-
cult to move, these must be replaced.
WARNING
■
Undo the wheel bolts just a little (about one turn), provided the vehicle
has not yet been jacked up. Otherwise the wheel could come loose and fall
off – risk of injury.
■
Under no circumstances must the bolts be greased or oiled - cause an ac-
cident.
Subsequent steps
After changing the wheel, the following work must be carried out.
›
Stow the replaced wheel in the well under the floor covering of the luggage
compartment and secure with a locking screw.
›
Stow the tool kit in the space provided and secure using the band.
›
Check tyre pressure on the mounted wheel and adjust if necessary and, with
vehicles with tyre pressure monitoring, save the tyre pressure values in the
system » page 182.
›
Have the tightening torque of the wheel bolts checked as soon as possible.
The prescribed tightening torque is 120 Nm.
Replace the damaged tyre. Repairing the tyre is not recommended.
WARNING
Tightening torque which is too high can damage the threads and this can
result in permanent deformation of the contact surfaces on the rim. Where
tightening torque is too low, the wheels may become loose while driving -
risk of accident. Therefore, drive cautiously and only at a moderate speed
until the tightening torque has been checked.
Removing/stowing the emergency or spare wheel
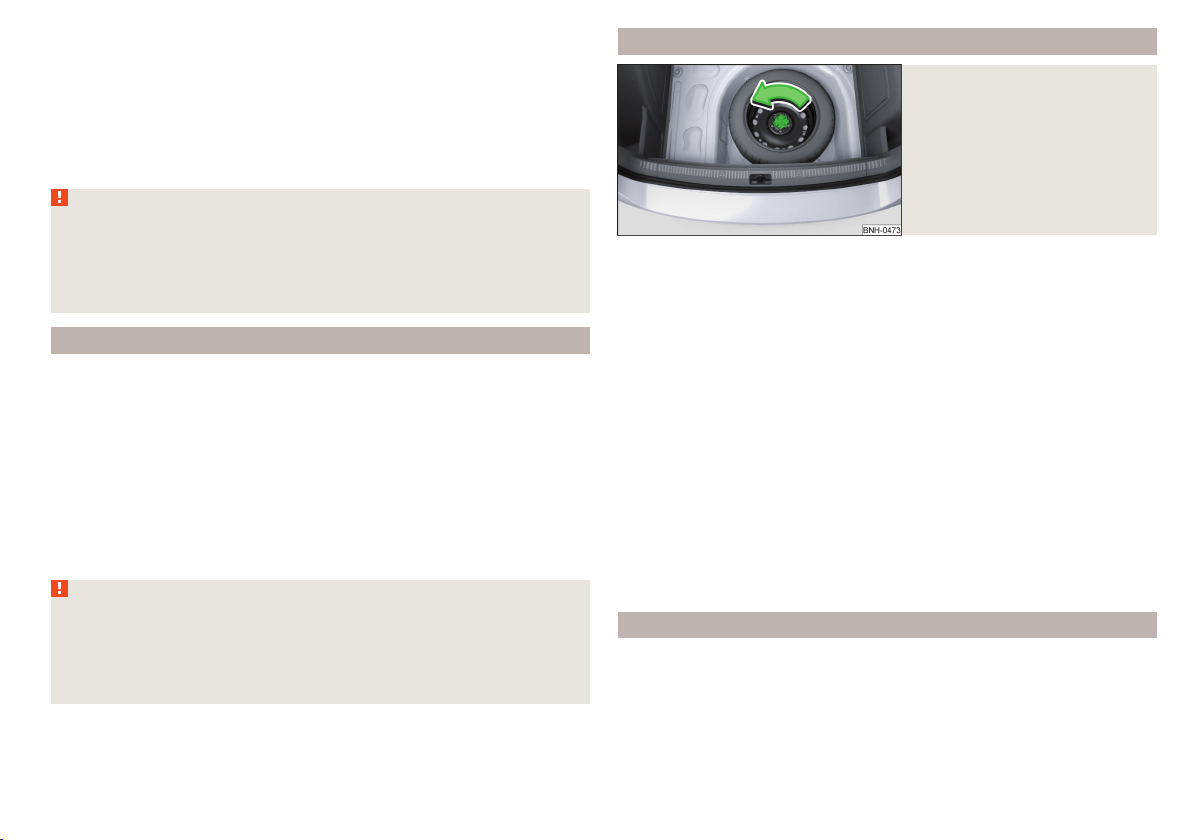
Fig. 244
Take out the wheel
The spare wheel is located in a well under the floor covering in the luggage
compartment and is fixed in place with a fastening screw » Fig. 244.
Take out the wheel
›
Lift up the floor in the luggage compartment.
›
Loosen the retaining belt and take out the box with the tool kit.
›
Unscrew the fastening screw in the direction of arrow » Fig. 244 and the re-
move the wheel.
Stow the wheel
›
Place the wheel into the wheel well with the wheel rim pointing downward.
On vehicles with the vehicle battery in the boot, lay down the wheel with the
outer face upward.
›
Pull the fixing band through the opposite holes in the wheel rim.
›
Screw the fastening screw opposite to the direction of arrow until it stops
» Fig. 244.
›
Place the box with the tool kit back inside the wheel and secure it with the
tape.
›
Fold back the floor in the luggage compartment.
Full wheel trim
Remove trim
›
Hang the clamps for removing the full wheel trims at the edge of one of the
ventilation openings in the full wheel trim.
›
Push the wheel wrench through the clamp, support on the tyre and pull off
the wheel trim.
211
Emergency equipment and self-help
Loading ...
Loading ...
Loading ...