Loading ...
Loading ...
Loading ...
Jacking points for the car jack are directly under the marking on the bottom
beam panel» Fig. 315 - ,
›
Insert the crank
5
into the mount on the jack
4
» page 273.
›
Support the base plate of the jack with its full area resting on level ground
and ensure that the jack is located in a vertical position at the jacking point
» Fig. 315 - .
›
Use the crank to raise the jack until its claw encloses the bar » Fig. 315 - .
›
Continue to lift the vehicle until the wheel is just off the floor.
WARNING
Observe the following instructions, otherwise there is risk of injury.
■
Secure the vehicle from unexpectedly rolling away.
■
Always ensure the base plate of the lifting jack cannot slip.
■
Provide a wide and stable base under the jack on loose surfaces (e.g.
such as gravel).
■
Create a non-slip base (e.g. a rubber floor mat) under the jack on a
smooth surface (e.g. cobblestones).
■
Always raise the vehicle with the doors closed.
■
Never position any body parts, such as arms or legs, under the vehicle,
while the vehicle is raised with a lifting jack.
■
When the vehicle is raised, never start the engine.
CAUTION
It is important to ensure that the jack is correctly attached to the bar of the
lower beam – otherwise there is a risk of damage to the vehicle.
Puncture repair kit
Introduction
The following information applies to the factory-fitted puncture repair kit.
Use the puncture repair kit to seal tyre punctures with a diameter of up to
about 4 mm.
Performing a repair with the breakdown kit not at all intended to replace a
permanent repair on the tyre. Its purpose is to get you to the nearest specialist
garage.
Immediately replace the tyre that was repaired using the puncture repair kit, or
consult a specialist garage about repair options.
Do not remove foreign bodies which have penetrated into the tyre (e.g. nails
etc.).
Do not use the puncture repair kit in the following instances.
▶
The rim is damaged.
▶
The outdoor temperature is below the minimum temperature indicated in
the instruction manual of the tyre filling bottle with sealant.
▶
Tyre punctures of more than 4 mm.
▶
There is damage to the tyre wall.
▶
The expiration date (see inflation bottle) has passed.
WARNING
■
If the sealant comes into contact with skin, wash the affected area imme-
diately.
■
Observe the instructions provided in the puncture repair kit manufactur-
er's instructions for use.
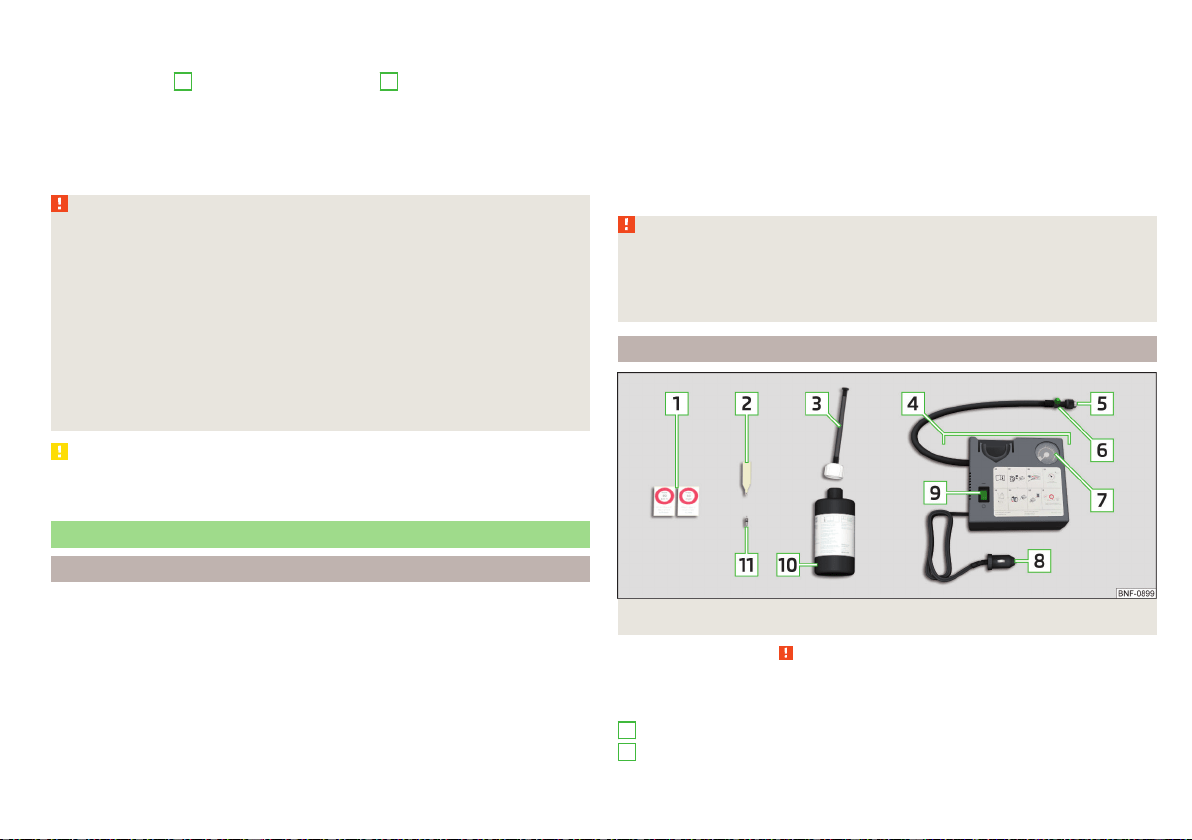
Description of puncture repair kit
Fig. 316
Description of puncture repair kit
Read and observe on page 277 first.
The kit is located in a box under the floor covering in the luggage compart-
ment.
Sticker with speed designation “max. 80 km/h”/“max. 50 mph”
Valve remover
1
2
277
Emergency equipment and self-help
Loading ...
Loading ...
Loading ...