Home
Bookmarks
Home
Canon
Canon 4507C002 User Manual
Page 176
Canon 4507C002 EOS C70 Cinema Camera RF Mount
User Manual - Page 176
For 4507C002.
PDF File Manual
,
215 pages
,
Read Online
|
Download pdf file
Safety Instructions
Introduction
About this Manual
Conventions Used in this Manual
Supplied Accessories
Names of Parts
Camera
Handle Unit
Microphone Holder
Preparations
Preparing the Power Supply
Using a Battery
Using a Power Outlet
Using the LCD Screen
Date, Time and Language Settings
Setting the Date and Time
Changing the Language
Using the Menus
Selecting an Option from the Menu
Using the Customized Menus (My Menu)
Preparing the Camera
Examples of Camera Configurations
Preparing the Lens
In-Camera Lens Correction
Attaching the Handle Unit
Attaching the Microphone Holder
Preparing Recording Media
Compatible Recording Media
Inserting and Removing an SD Card
Initializing Cards
Setting a Cardâs Volume Label
Switching Between Card Slots
Checking the Remaining Recording Time on a Card
Recovering Recordings
Selecting the Video Recording Method
Setting the File Name for Recordings
XF-AVC Clips File Names
MP4 Clip and Photo Numbering
Using the Fan
Adjusting the Black Balance
Recording
Recording Video and Photos
Recording
Onscreen Displays
Reviewing a Recording
Adjusting Camera and Recording Settings
Performing Basic Settings with Direct Touch Control
Direct Setting Mode (FUNC Button)
Video Recording Configuration: Video Format, Sensor Mode, System Frequency, Resolution and Frame Rate
Selecting the System Frequency
Selecting the Sensor Mode
Selecting the Main Recording Format
Selecting the Resolution and Bit Rate of Primary Clips
Selecting the Frame Rate
Sub Recording Clips
Proxy Clips
Shutter Speed
ISO Speed/Gain
Manual ISO Speed/Gain Value
Automatic ISO Speed/Gain
ND Filter
Aperture
Aperture Mode of the Lens
Manual Aperture: Changing the Aperture Value
Momentary Automatic Aperture - Push Auto Iris
Automatic Aperture
Exposure Compensation - AE Shift
Light Metering Mode
White Balance
White Balance Mode
Custom White Balance
Color Temperature/Preset White Balance
Auto White Balance (AWB)
Focus
Focus Mode on the Lens
Manual Focus
Using the Focus Assistance Functions
One-Shot AF
AF-Boosted MF
Continuous AF
Changing the AF Frame Type and Position
Face Detection
Image Stabilization
Powerful Image Stabilization
Zoom
Zoom Modes of the Lens
Adjusting the Zoom
Onscreen Markers, Zebra Patterns and False Color
Displaying Onscreen Markers
Displaying Zebra Patterns
Displaying False Color
Setting the Time Code
Selecting the Time Code Mode
Selecting Drop or Non-Drop Frame
Setting the User Bit
Synchronizing with an External Device
Connecting an External Device
Time Code Signal Input
Time Code Signal Output
Recording Audio
Audio Format for MP4 Clips
Connecting an External Microphone or External Audio Input Source to the Camera
Selecting the Built-in Microphone Mode
Selecting the Audio Input Source for Audio Channels
Adjusting the Audio Recording Level
Advanced Audio Input Settings
Monitoring the Audio with Headphones
Colors Bars/Audio Reference Signal
Color Bars
Audio Reference Signal
Video Scopes
Displaying a Video Scope
Changing the Waveform Monitor Settings
Changing the Vectorscope Settings
Adding Marks to Clips in CAMERA Mode
Adding a Shot Mark while Recording
Adding an OK Mark or Check Mark to the Last Clip Recorded
Using Metadata
Setting a User Memo Created with Canon XF Utility
Entering Slate Information About the Recording
Special Recording Modes
Slow & Fast Motion Recording
Pre-recording
Continuous Recording
Using Anamorphic Lenses
Using the RC-V100 Remote Controller
Customization
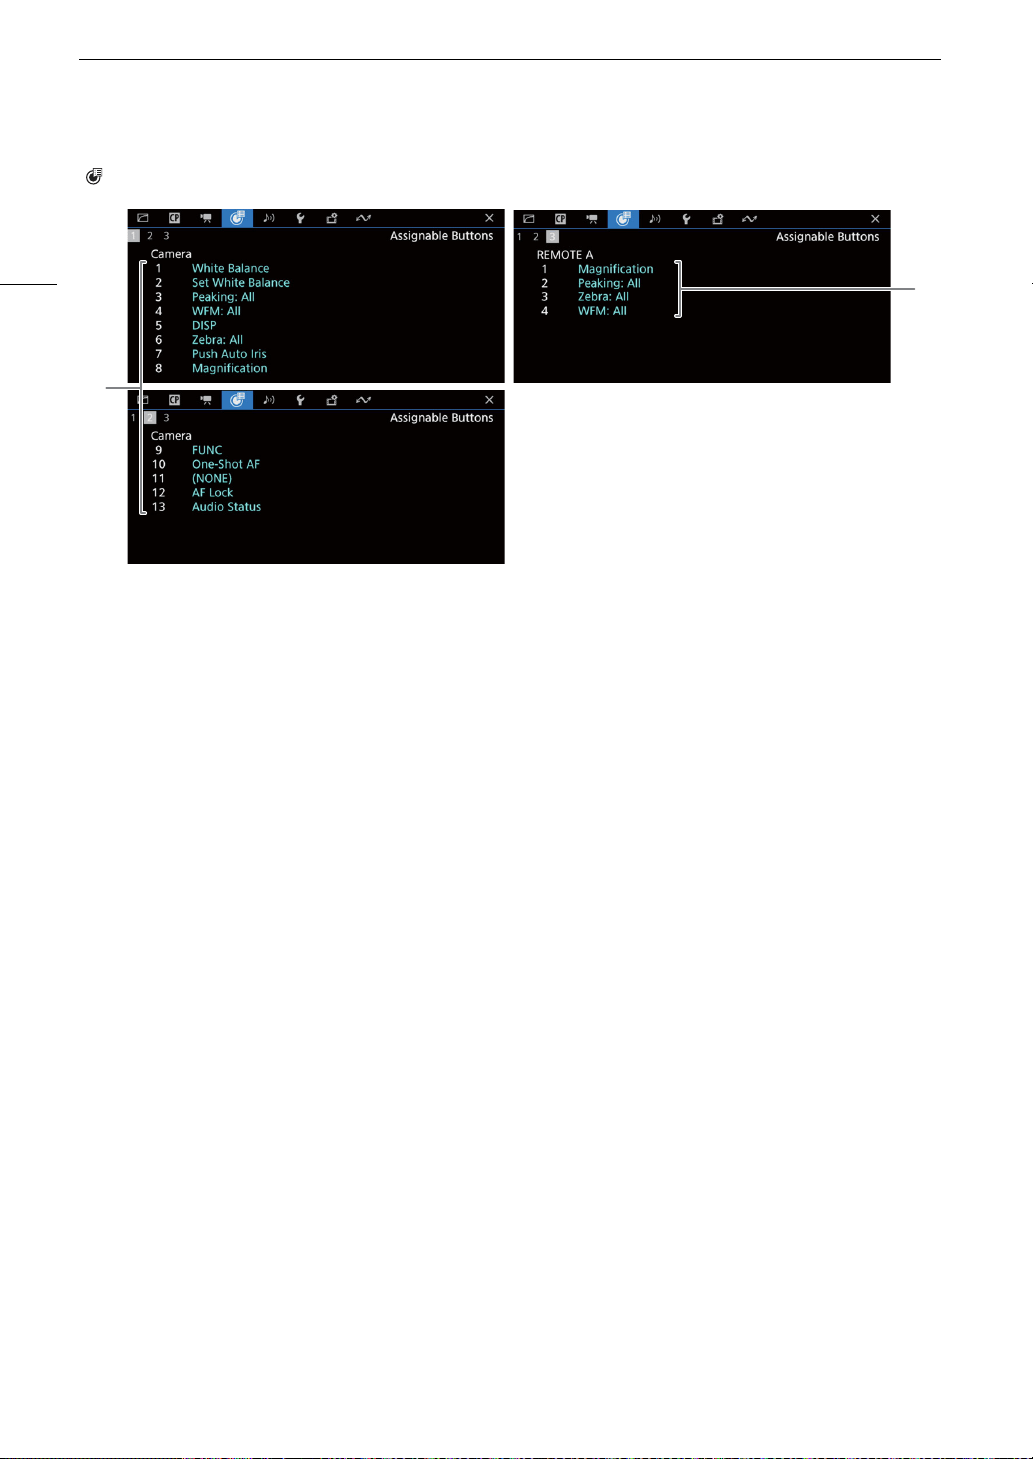
Assignable Buttons
Changing the Assigned Function
Assignable functions
Custom Picture Settings
Selecting Custom Picture Files
Preset Picture Settings
Editing a Custom Picture Fileâs Settings
Look Files
Saving a Custom Picture File
Available Custom Picture Settings
Saving and Loading Menu Settings
Saving Menu Settings
Loading Menu Settings
Playback
Playback
Displaying the Index Screen
Switching Index Screens
Playing Back Recordings
Onscreen Displays During Clip Playback
Clip Playback Controls
Adjusting the Volume
File Operations
File Menu Operations
Displaying Clip Information
Adding OK Marks or Check Marks
Deleting OK Marks or Check Marks
Adding/Deleting Shot Marks
Deleting All the Shot Marks from a Clip
Deleting Recordings
Deleting the User Memo and GPS Information from a Clip
External Connections
Video Output Configuration
HDMI OUT Terminal Video Output Configuration (Recording/Playback)
Connecting to an External Monitor or Recorder
Using the HDMI OUT Terminal
Superimposing Onscreen Displays on Video Outputs
Changing the Opacity Level of Onscreen Displays
Selecting the Output Range
Applying a LUT to the LCD Screen
Adjusting the Gain Difference When Converting HDR to SDR
Audio Output Channels
Working with Files on a Computer
Saving Files
Saving MP4 Clips
Saving Audio Files (WAV)
Network Functions
Network functions and connection types
Using a Wi-Fi Network
Using a Wired (Ethernet) Network
Configuring Connection Settings
Activating a Network Connection
Adding a New Connection Setting Using the Wizard
Function Settings
Other Connection Methods
Other Network Settings
Checking and Changing Connection Settings (SET)
Checking and Changing Communication Settings (NW)/Function Settings (MODE)
Checking the Networkâs Status
FTP File Transfer
Transferring a Single Clip
Transferring All Clips
IP Streaming
Browser Remote: Controlling the Camera from a Network Device
Starting Browser Remote
Using Browser Remote
Additional Information
Menu Options
Displaying the Status Screens
Troubleshooting
List of Messages
Handling Precautions
Maintenance/Others
Optional Accessories
Specifications
Camera
Accessories
Compatible Lenses and Functions
Reference Tables
Approximate Recording Time on a Card
Charging Times
Appendix: Camera Dimensions
Index
Page 176/215
Page 1
Page 2
Page 3
Page 4
Page 5
Page 6
Page 7
Page 8
Page 9
Page 10
Page 11
Page 12
Page 13
Page 14
Page 15
Page 16
Page 17
Page 18
Page 19
Page 20
Page 21
Page 22
Page 23
Page 24
Page 25
Page 26
Page 27
Page 28
Page 29
Page 30
Page 31
Page 32
Page 33
Page 34
Page 35
Page 36
Page 37
Page 38
Page 39
Page 40
Page 41
Page 42
Page 43
Page 44
Page 45
Page 46
Page 47
Page 48
Page 49
Page 50
Page 51
Page 52
Page 53
Page 54
Page 55
Page 56
Page 57
Page 58
Page 59
Page 60
Page 61
Page 62
Page 63
Page 64
Page 65
Page 66
Page 67
Page 68
Page 69
Page 70
Page 71
Page 72
Page 73
Page 74
Page 75
Page 76
Page 77
Page 78
Page 79
Page 80
Page 81
Page 82
Page 83
Page 84
Page 85
Page 86
Page 87
Page 88
Page 89
Page 90
Page 91
Page 92
Page 93
Page 94
Page 95
Page 96
Page 97
Page 98
Page 99
Page 100
Page 101
Page 102
Page 103
Page 104
Page 105
Page 106
Page 107
Page 108
Page 109
Page 110
Page 111
Page 112
Page 113
Page 114
Page 115
Page 116
Page 117
Page 118
Page 119
Page 120
Page 121
Page 122
Page 123
Page 124
Page 125
Page 126
Page 127
Page 128
Page 129
Page 130
Page 131
Page 132
Page 133
Page 134
Page 135
Page 136
Page 137
Page 138
Page 139
Page 140
Page 141
Page 142
Page 143
Page 144
Page 145
Page 146
Page 147
Page 148
Page 149
Page 150
Page 151
Page 152
Page 153
Page 154
Page 155
Page 156
Page 157
Page 158
Page 159
Page 160
Page 161
Page 162
Page 163
Page 164
Page 165
Page 166
Page 167
Page 168
Page 169
Page 170
Page 171
Page 172
Page 173
Page 174
Page 175
Page 176
Page 177
Page 178
Page 179
Page 180
Page 181
Page 182
Page 183
Page 184
Page 185
Page 186
Page 187
Page 188
Page 189
Page 190
Page 191
Page 192
Page 193
Page 194
Page 195
Page 196
Page 197
Page 198
Page 199
Page 200
Page 201
Page 202
Page 203
Page 204
Page 205
Page 206
Page 207
Page 208
Page 209
Page 210
Page 211
Page 212
Page 213
Page 214
Page 215
Contents
Table of Contents
Search
Previous
Next
Troubleshooting
Bookmarks
Loading ...
Loading ...
Loading ...
Di
s
playing the
S
tatu
s
S
creen
s
176
[ A
ss
ignable Button
s
]
s
tatu
s
s
creen
s
1
2
Current functions of the assignable buttons
(
A
105)
1
On the camera’
s body
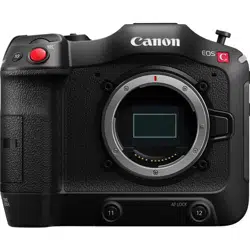
2
O
n the RC-V100 Remote Controller
Loading ...
Loading ...
Loading ...
File type: PDF
File name: 72545581_4507c002.pdf
File size: 10.92 MB
File Language: English
Pages: 215
Author: Canon
File created: 2023-10-11
Published: 2023-10-16
Updated: 2023-10-16
Download File
Table of Contents
×
Safety Instructions
2
Introduction
9
About this Manual
9
Conventions Used in this Manual
9
Supplied Accessories
10
Names of Parts
11
Camera
11
Handle Unit
16
Microphone Holder
16
Preparations
17
Preparing the Power Supply
17
Using a Battery
17
Using a Power Outlet
19
Using the LCD Screen
21
Date, Time and Language Settings
22
Setting the Date and Time
22
Changing the Language
22
Using the Menus
23
Selecting an Option from the Menu
23
Using the Customized Menus (My Menu)
24
Preparing the Camera
26
Examples of Camera Configurations
26
Preparing the Lens
26
In-Camera Lens Correction
28
Attaching the Handle Unit
29
Attaching the Microphone Holder
30
Preparing Recording Media
31
Compatible Recording Media
31
Inserting and Removing an SD Card
32
Initializing Cards
32
Setting a Cardâs Volume Label
33
Switching Between Card Slots
33
Checking the Remaining Recording Time on a Card
33
Recovering Recordings
34
Selecting the Video Recording Method
35
Setting the File Name for Recordings
37
XF-AVC Clips File Names
37
MP4 Clip and Photo Numbering
38
Using the Fan
39
Adjusting the Black Balance
40
Recording
41
Recording Video and Photos
41
Recording
41
Onscreen Displays
43
Reviewing a Recording
47
Adjusting Camera and Recording Settings
49
Performing Basic Settings with Direct Touch Control
49
Direct Setting Mode (FUNC Button)
50
Video Recording Configuration: Video Format, Sensor Mode, System Frequency, Resolution and Frame Rate
52
Selecting the System Frequency
53
Selecting the Sensor Mode
53
Selecting the Main Recording Format
53
Selecting the Resolution and Bit Rate of Primary Clips
53
Selecting the Frame Rate
53
Sub Recording Clips
54
Proxy Clips
56
Shutter Speed
57
ISO Speed/Gain
59
Manual ISO Speed/Gain Value
59
Automatic ISO Speed/Gain
60
ND Filter
61
Aperture
62
Aperture Mode of the Lens
62
Manual Aperture: Changing the Aperture Value
62
Momentary Automatic Aperture - Push Auto Iris
64
Automatic Aperture
64
Exposure Compensation - AE Shift
65
Light Metering Mode
65
White Balance
66
White Balance Mode
66
Custom White Balance
67
Color Temperature/Preset White Balance
67
Auto White Balance (AWB)
68
Focus
69
Focus Mode on the Lens
69
Manual Focus
70
Using the Focus Assistance Functions
70
One-Shot AF
72
AF-Boosted MF
73
Continuous AF
73
Changing the AF Frame Type and Position
75
Face Detection
75
Image Stabilization
78
Powerful Image Stabilization
78
Zoom
79
Zoom Modes of the Lens
79
Adjusting the Zoom
79
Onscreen Markers, Zebra Patterns and False Color
80
Displaying Onscreen Markers
80
Displaying Zebra Patterns
82
Displaying False Color
82
Setting the Time Code
83
Selecting the Time Code Mode
83
Selecting Drop or Non-Drop Frame
84
Setting the User Bit
84
Synchronizing with an External Device
85
Connecting an External Device
85
Time Code Signal Input
85
Time Code Signal Output
86
Recording Audio
87
Audio Format for MP4 Clips
88
Connecting an External Microphone or External Audio Input Source to the Camera
88
Selecting the Built-in Microphone Mode
89
Selecting the Audio Input Source for Audio Channels
90
Adjusting the Audio Recording Level
90
Advanced Audio Input Settings
92
Monitoring the Audio with Headphones
93
Colors Bars/Audio Reference Signal
94
Color Bars
94
Audio Reference Signal
94
Video Scopes
95
Displaying a Video Scope
95
Changing the Waveform Monitor Settings
95
Changing the Vectorscope Settings
96
Adding Marks to Clips in CAMERA Mode
97
Adding a Shot Mark while Recording
97
Adding an OK Mark or Check Mark to the Last Clip Recorded
97
Using Metadata
98
Setting a User Memo Created with Canon XF Utility
98
Entering Slate Information About the Recording
99
Special Recording Modes
100
Slow & Fast Motion Recording
100
Pre-recording
101
Continuous Recording
102
Using Anamorphic Lenses
103
Using the RC-V100 Remote Controller
104
Customization
105
Assignable Buttons
105
Changing the Assigned Function
105
Assignable functions
106
Custom Picture Settings
109
Selecting Custom Picture Files
109
Preset Picture Settings
109
Editing a Custom Picture Fileâs Settings
110
Look Files
111
Saving a Custom Picture File
112
Available Custom Picture Settings
113
Saving and Loading Menu Settings
117
Saving Menu Settings
117
Loading Menu Settings
117
Playback
119
Playback
119
Displaying the Index Screen
119
Switching Index Screens
120
Playing Back Recordings
120
Onscreen Displays During Clip Playback
121
Clip Playback Controls
122
Adjusting the Volume
122
File Operations
123
File Menu Operations
123
Displaying Clip Information
124
Adding OK Marks or Check Marks
125
Deleting OK Marks or Check Marks
125
Adding/Deleting Shot Marks
125
Deleting All the Shot Marks from a Clip
126
Deleting Recordings
126
Deleting the User Memo and GPS Information from a Clip
126
External Connections
127
Video Output Configuration
127
HDMI OUT Terminal Video Output Configuration (Recording/Playback)
127
Connecting to an External Monitor or Recorder
128
Using the HDMI OUT Terminal
128
Superimposing Onscreen Displays on Video Outputs
129
Changing the Opacity Level of Onscreen Displays
129
Selecting the Output Range
130
Applying a LUT to the LCD Screen
131
Adjusting the Gain Difference When Converting HDR to SDR
132
Audio Output Channels
133
Working with Files on a Computer
134
Saving Files
134
Saving MP4 Clips
134
Saving Audio Files (WAV)
135
Network Functions
137
Network functions and connection types
137
Using a Wi-Fi Network
138
Using a Wired (Ethernet) Network
139
Configuring Connection Settings
140
Activating a Network Connection
140
Adding a New Connection Setting Using the Wizard
141
Function Settings
141
Other Connection Methods
144
Other Network Settings
147
Checking and Changing Connection Settings (SET)
148
Checking and Changing Communication Settings (NW)/Function Settings (MODE)
149
Checking the Networkâs Status
152
FTP File Transfer
153
Transferring a Single Clip
153
Transferring All Clips
153
IP Streaming
154
Browser Remote: Controlling the Camera from a Network Device
156
Starting Browser Remote
156
Using Browser Remote
158
Additional Information
163
Menu Options
163
Displaying the Status Screens
173
Troubleshooting
182
List of Messages
188
Handling Precautions
194
Maintenance/Others
196
Optional Accessories
197
Specifications
198
Camera
198
Accessories
201
Compatible Lenses and Functions
203
Reference Tables
205
Approximate Recording Time on a Card
205
Charging Times
205
Appendix: Camera Dimensions
206
Index
208
Search:
×
Search