
Loading ...
Loading ...
Loading ...
›
Press on the two sides to the upper side of the cover in the region of the
mounts
C
. The fixtures
B
must lock into place in the mounts
C
on both
sides of the luggage compartment.
›
On both sides of the boot lid, unhook the straps
A
.
WARNING
Do not place any objects on the cover during the trip - There is a risk of
injury if you brake or have a collision!
CAUTION
■
Observe the following instructions to avoid canting and the subsequent
damage to the cover or the side trim.
■
The cover must be inserted properly and the load must not exceed the
height of the cover.
■
The cover must not be jammed in the surrounding seal of the luggage com-
partment lid when it is in the raised position.
■
There must be no object in the gap between the cover in the raise position
and the rear backrest.
Other positions of the luggage compartment cover
Fig. 108
Luggage compartment cover: stowed behind the rear seats/in
the lower position
Read and observe and on page 81 first.
The luggage compartment cover behind the rear seat backrests can be stored
» Fig. 108 - or in the lower position » Fig. 108 - .
Store cover in the lower position
›
Press the top of the cover in the arrow direction » Fig. 108 -
.
In the front area, slots
B
» Fig. 107 on page 83 on the cover must be fully en-
gaged with the mounts on the side trim. In the back, the cover must be se-
cured at both ends under the latching.
In the lower position, the cover is designed for storing small objects up to a
weight of 2.5 kg in total.
WARNING
Do not place any objects on the cover during the trip - There is a risk of
injury if you brake or have a collision!
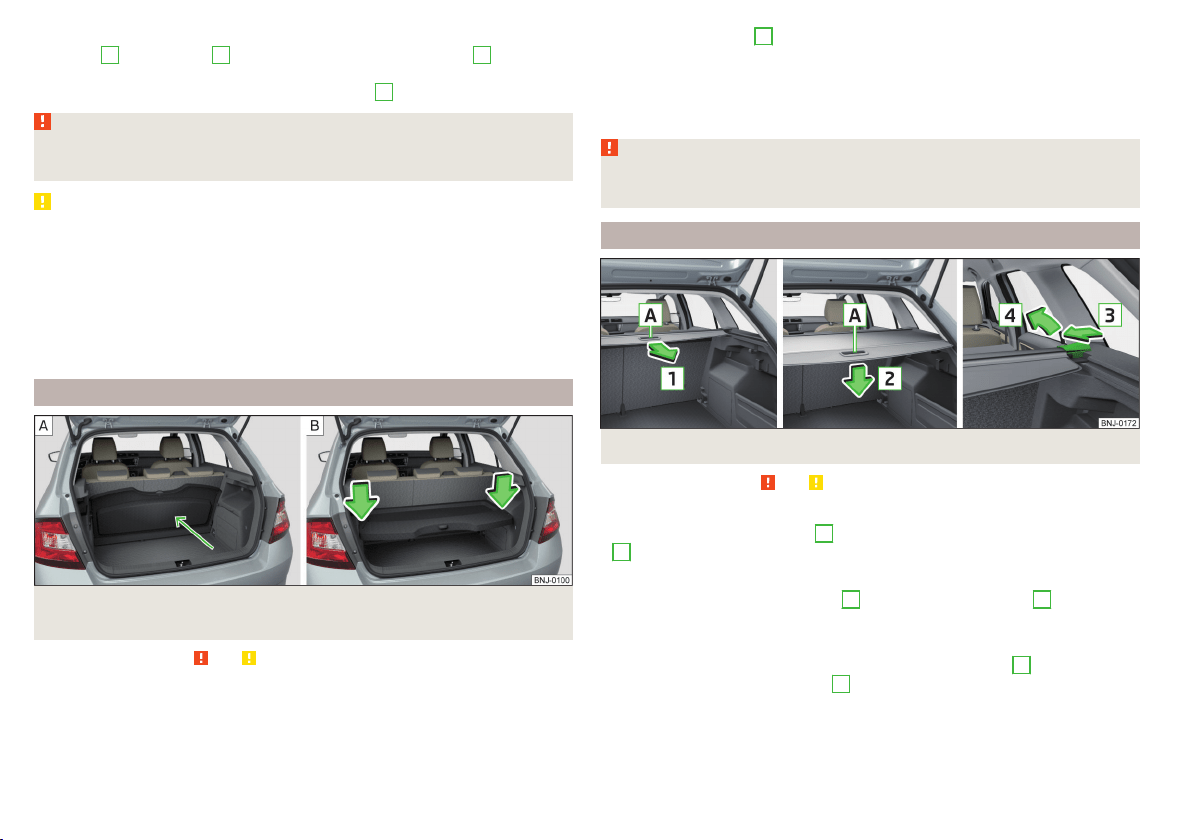
Roll-up cover
Fig. 109
Roll-up cover: extending/retracting/removing
Read and observe and on page 81 first.
Extending
›
Grasp the cover at grip-point
A
and pull it out in the direction of the arrow
1
until it audibly clicks into place
» Fig. 109.
Retracting
›
Push the cover in the handle area
A
in the direction of arrow
2
» Fig. 109.
The cover rolls up automatically. The rolled-up cover can now be removed.
Removing/inserting
›
Press on the side of the cross bar in the direction of arrow
3
and remove
the cover in the arrow direction
4
» Fig. 109.
Insertion takes place in reverse order.
84
Operation
Loading ...
Loading ...
Loading ...