Loading ...
Loading ...
Loading ...
RIP CUT HAZARDS AND PRECAUTIONS
Two hazards are specificallyassociatedwithrip
cutting:ouffeedzone and wrongway feed.
In the outfeedzone (behindthe blade), the blade
teethpointdown. The slightestcontactwhilethe blade
isstillspinningcan snag clothing,jewelry, the work-
piece, or even skin,causing seriouspersonalinjury.
Wrongway feed occurswhen the workpiececontacts
the bladefrom the outfeedside. Itisvery hazardous
and willjerk the workpieceviolently.You could be cut
ifyou are holdingtheworkpiece.
_, WARNING: Failureto observeany ofthese
precautionscan resultinserious injury.
• The firstprecautionis, ofcourse, simplytostay
completelyaway from theouffeed zone. Keep
handsaway from the outfeedzone.
• Pointtheanti-kickbackpawlsaway from the blade
teeth tosnag a workpieceifthe blade grabs..They
shouldbe positionedtorest lightlyon the
workpiece.The flat side of the pawlsshouldbe
level and horizontal.
• Set the rivingknifetojust clear the table.
• Set the holddown infrontofthe bladetojust clear
the workpiece.
• Start and finish yourcutfrom the infeedside.
• Push theworkpiecepastthe pawls with push-
blocksand pushsticksto finishthe cut.
• If the bladejams, turnthe saw offwiththe switch
on the arm, remove the yellowkey, and waitfor the
bladeto fully stop beforefreeingJt.
• Make sure the blade isparallelto thefence and the
workpieceis notwarpedor twisted.
• Make sure no pressureisappliedto theworkpiece
on the outfeedside.
• Make sure the bladeguard islowered and is
workingproperly.
• Always set up the workpiecesothe widerpart of
thewood isbetween the bladeand thefence. This
stabilizestheworkpiecabetter.
• Do not release theworkpieceuntil ithasmoved
pastthe pawls.Keep pushsticksfirmly inplace.
• Use pushsticksand pushblocks,notyourhands,
when the trailingedge ofthe workpieceiswithin
3 in.ofthe blade. Ifthe blade isset 2 in.or more
from thefence, usea pushstick.Use a pushblock
and auxiliaryfence when the blade is between2 in.
and 1/2 in. from the fence. (Ifthe cutis narrower
than 1/2 in., usea differentsaw.) For largepanel
ripcuts, usea featherboard insteadof pushblocks
or pushsticks.See the sectionon CuttingAids.
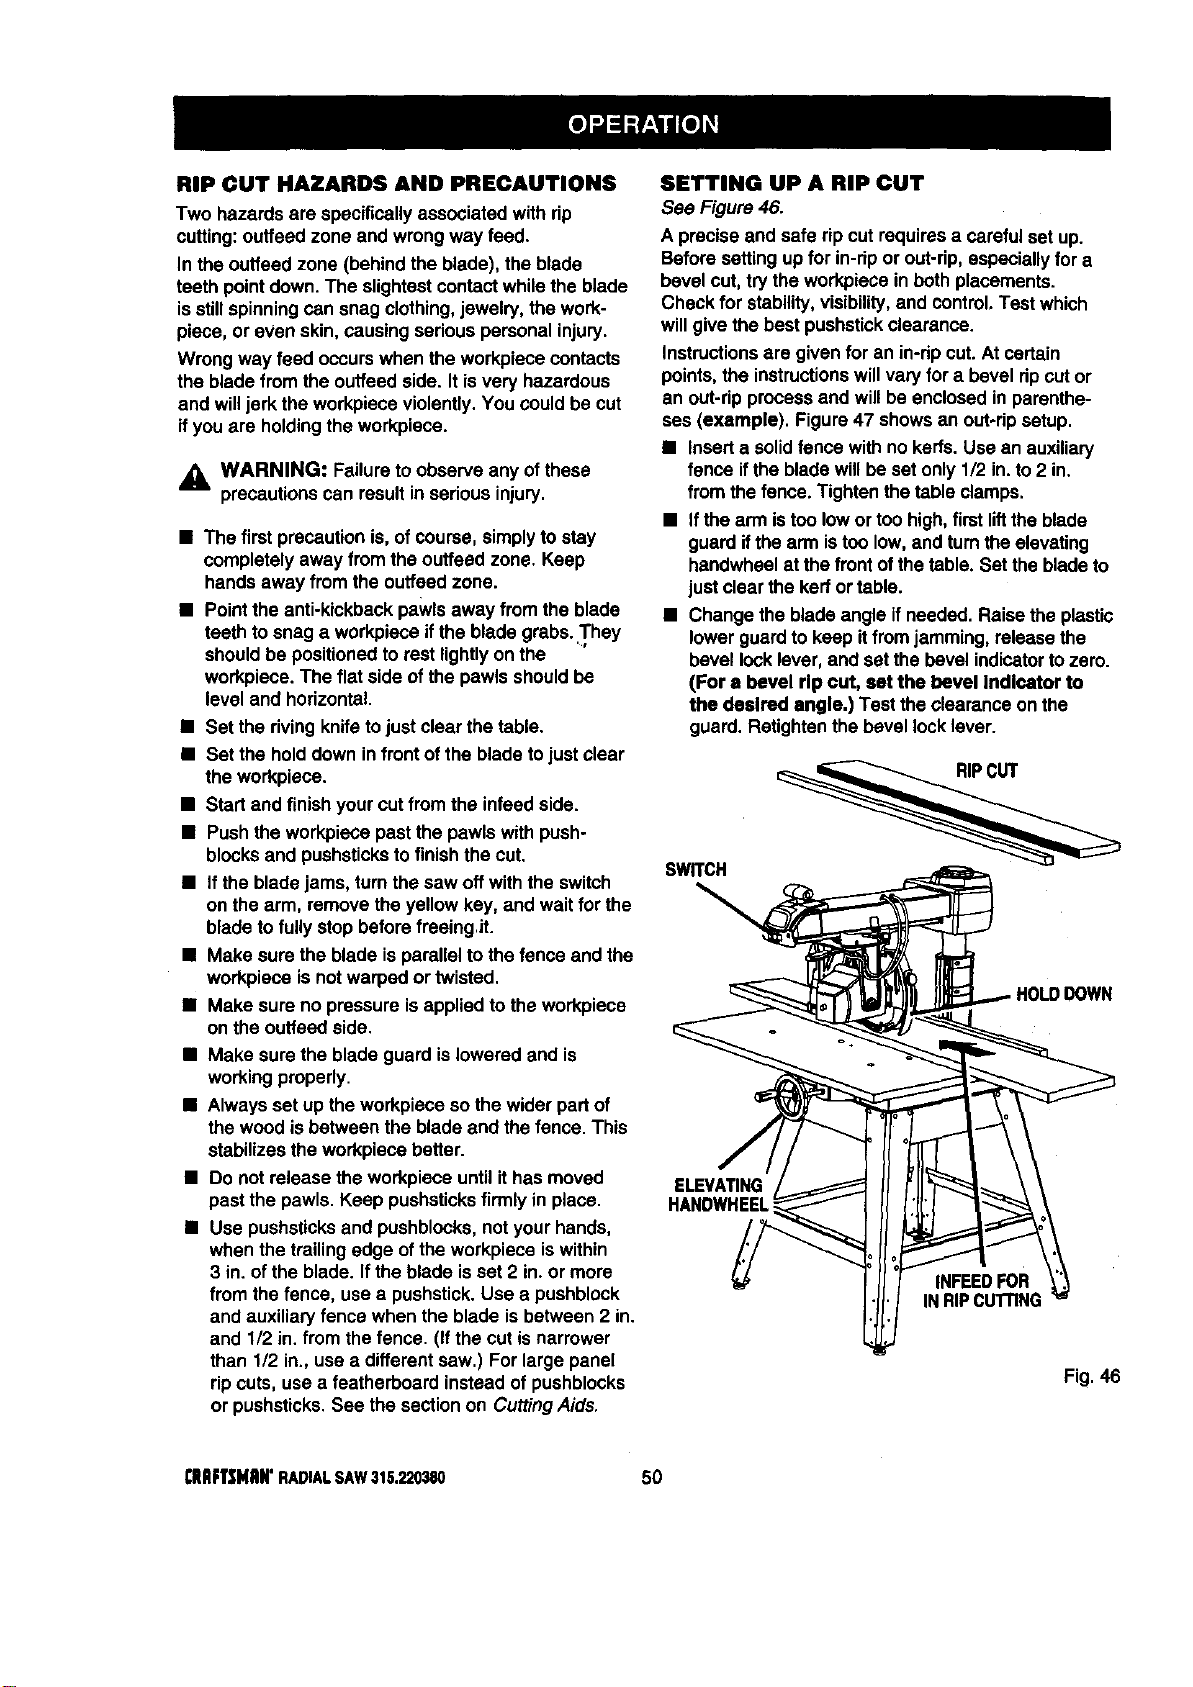
SETTING UP A RIP CUT
See Figure 46.
A preciseand safe ripcutrequiresa careful set up.
Beforesettingupfor in-ripor out-rip,especiallyfor a
bevel cut,try the workpieceinbothplacements.
Check for stability,visibility,and control.Testwhich
willgive thebest pushstickclearance.
Instructionsare givenfor an in-ripcut.At certain
points,the instructionswillvaryfor a bevel ripcutor
an out-ripprocessand willbe enclosedin parenthe-
ses (example). Figure47 showsan out-ripsetup.
• Inserta solidfence withno kerfs.Use an auxiliary
fence ifthe bladewillbeset only1/2 in.to 2 in.
from thefence. Tightenthetable clamps.
• Ifthe arm istoo lowor toohigh,firstliftthe blade
guardifthe arm istoo low,and turnthe elevating
handwheelat the front ofthe table. Set the bladeto
just clear thekerfor table.
• Change the bladeangle ifneeded. Raisethe plastic
lowerguardto keep itfrom jamming,releasethe
bevel locklever,and setthe bevel indicatortozero.
(For a bevel rip cut, set the bevel Indicator to
the desired angle.) Test theclearanceonthe
guard. ReUghtenthe bevel locklever.
SWRCH
IOWN
HANDWHEEL
INFEEOFOR
INRIPCUTrlNG
Fig.46
I;RllFTSHItN'RADIALSAW315.220380 50
Loading ...
Loading ...
Loading ...