Loading ...
Loading ...
Loading ...
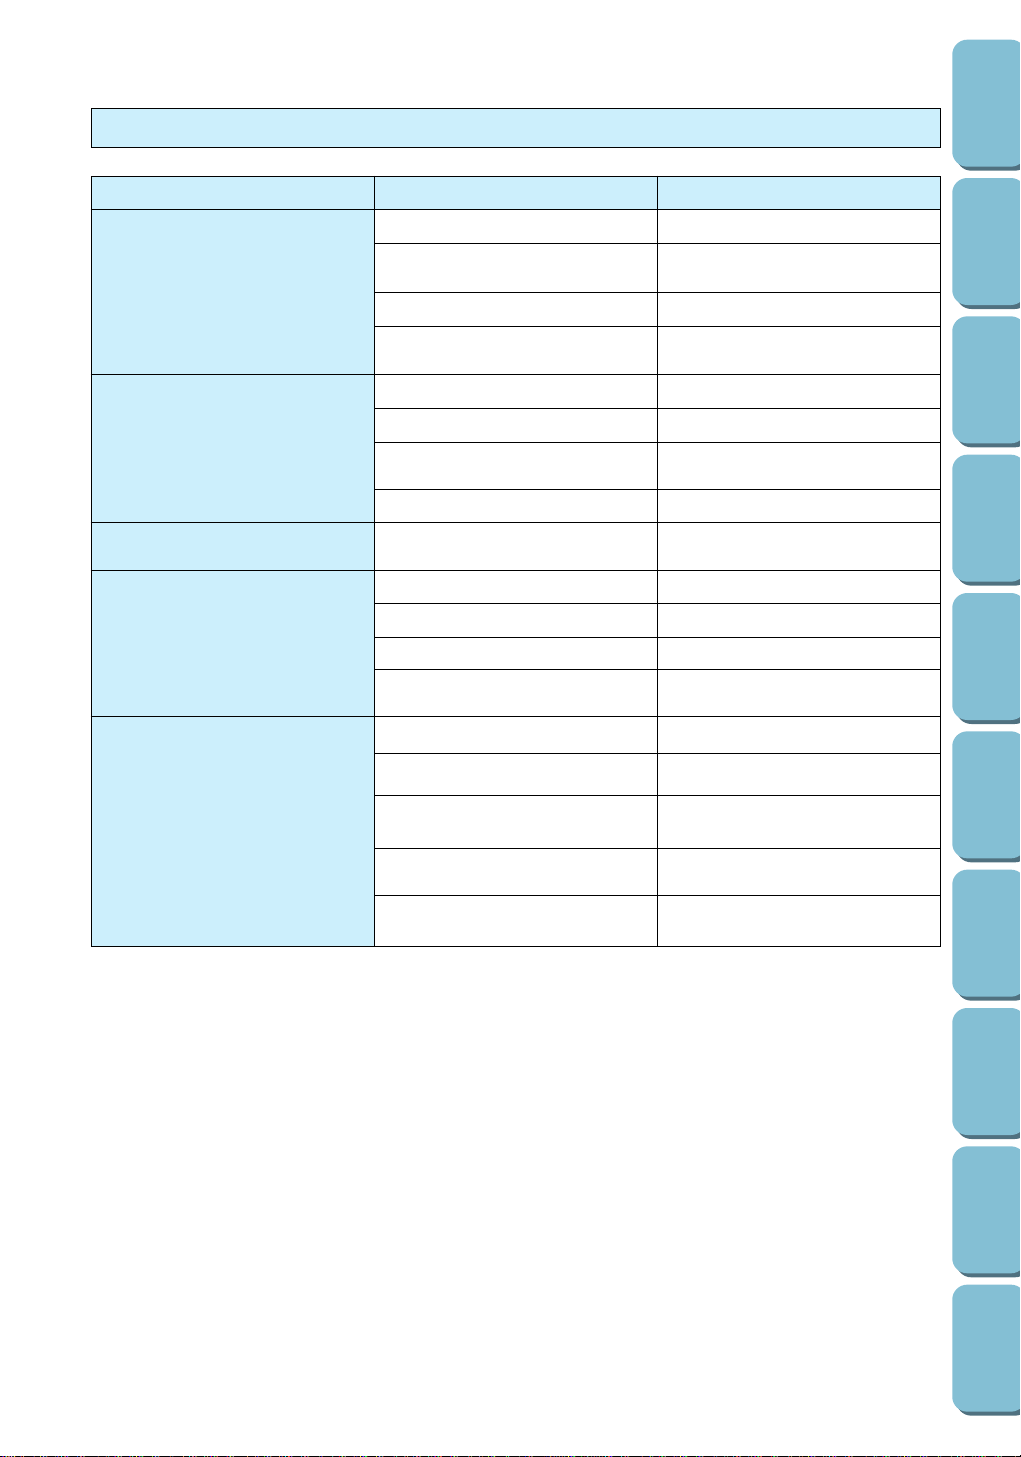
Symptom
1. Fabric is not fed properly
2. Needle breaks
3.
Machine is noisy, or running at a slow
speed, or thread trimming is not good
4. Machine does not start
5. Embroidery unit does not work
Remedy
1. Raise feed dogs.
2. Attach correct presser foot.
3. Install correct needle.
4. Remove thread ends from race or
inner shuttle.
1. Insert needle correctly.
2. Install proper needle.
3. Check “FABRIC/THREAD/NEEDLE
COMBINATIONS” chart on page 19.
4. Sew without pulling fabric; just guide it.
1. Remove dust by cleaning with a brush.
1. Press start/stop button.
2. Set main power switch to “ I ”.
3. Lower presser foot lever.
4. Refer to “ERROR MESSAGES” on
page 125.
1. Set main power switch to “ I ”.
2. Correctly attach embroidery unit to
sewing machine.
3. Turn off machine, then insert memory
card.
4. Refer to “ERROR MESSAGES” on
page 125.
5. Refer to “Initializing the embroidery
unit” on page 87.
Probable cause
1. Feed dogs are lowered.
2. Combination of selected stitch and
presser foot is not correct.
3. Correct needle is not being used.
4. Thread is entangled.
1. Needle is not correctly inserted.
2. Correct needle is not used.
3. Combination of fabric, thread and
needle is not correct.
4. Fabric is pulled too much.
1. Dust is clinging to bottom of needle
plate.
1. Start/stop button is not pressed.
2. Machine is turned off.
3. Presser foot is not lowered.
4. Check for error messages on LCD.
1. Machine is turned off.
2. Embroidery unit is not correctly
attached.
3. Memory card is not inserted.
4. Check for error messages on LCD.
5. Embroidery unit was not correctly
initialized.
Mechanical problems
131
CONTENTS
SETTING UP
SEWING
UTILITY
STITCHES
MY CUSTOM
STITCH
TM
(CREATE YOUR OWN
STITCH DESIGNS)
EMBROIDERING
MAINTENANCE
ERROR
MESSAGES
SEWING CHART
PATTERNS
(PROGRAMMED
IN MACHINE)
Loading ...
Loading ...
Loading ...