Loading ...
Loading ...
Loading ...
Emergencies
Changing the number plate bulbs
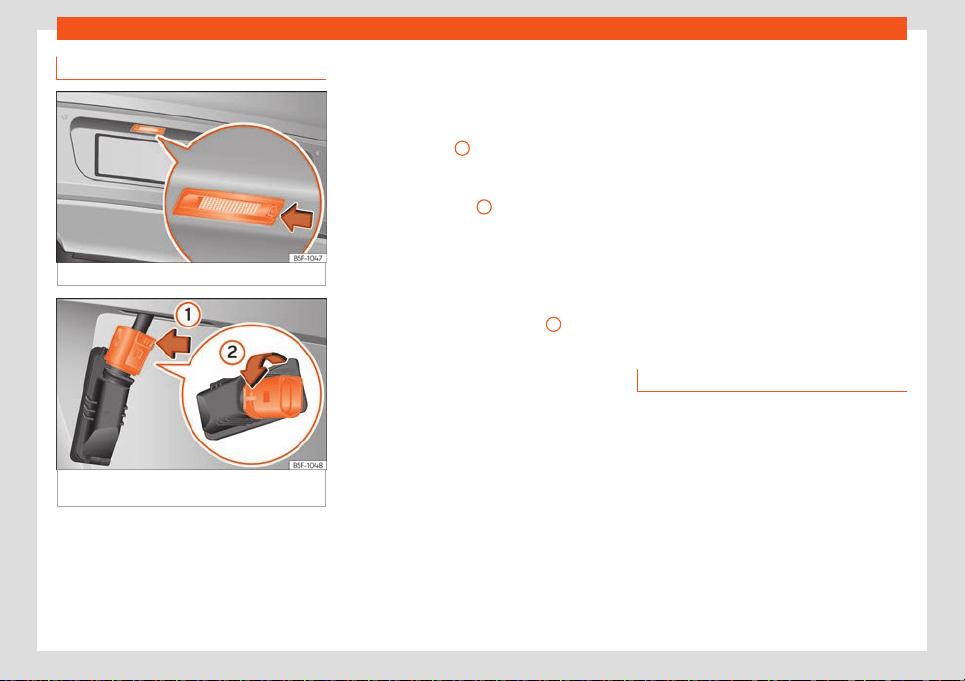
Fig. 72
In the rear bumper: Number plate light.
Fig. 73
number plate light: remove the bulb
hol
der.
Follow the steps indicated:
Fix
ed number plate light
–
Use the flat part of the screwdriver included
in the vehicle tool kit (
›››
page 41) to press
in the direction of the arrow, in the groove of
the number plate light
›››
Fig. 72.
–
Detach the number plate light.
–
Turn the connector lock
›››
Fig. 73 in the di-
rection of arrow
1
and pull on the connec-
t
or.
–
Rotate the bulb holder in the direction of
the arrow
›››
Fig. 73
2
and extract it to-
gether with the bulb
.
–
Replace the faulty bulb with a new identical
bulb.
–
Insert the bulb holder into the number plate
light and rotate all the way in the opposite
direction to the arrow
›››
Fig. 73
2
.
–
Plug the connector into the bulb holder.
–
Insert the number plate light carefully into
the opening on the bumper
. Ensure that the
number plate light is in the correct position.
–
Insert the number plate light into the bump-
er until it audibly clicks into place.
Bolted number plate light
–
Unscrew the number plate light screws us-
ing the screwdriver from the vehicle tool kit
(
›››
page 41).
–
Detach the number plate light.
–
Separate the attachment tabs from the
rear panel of the number plate light by
pressing.
–
Take the bulb holder out of the number
plate light.
–
Replace the faulty bulb with a new identical
bulb.
–
Insert the bulb holder into the number plate
light.
–
Press on the attachment tabs. The bulb
holder must be firmly attached to the num-
ber plate light.
–
Insert the number plate light carefully into
the opening on the bumper. Ensure that the
number plate light is in the correct position.
–
Tighten the attachment screws for the
number plate light using the screwdriver.
Additional brake light
Taking into account that it consists of LED
bulbs, the change shoul
d be made at a tech-
nical service centre.
66
Loading ...
Loading ...
Loading ...