Loading ...
Loading ...
Loading ...
Driver assistance systems
ACC operation
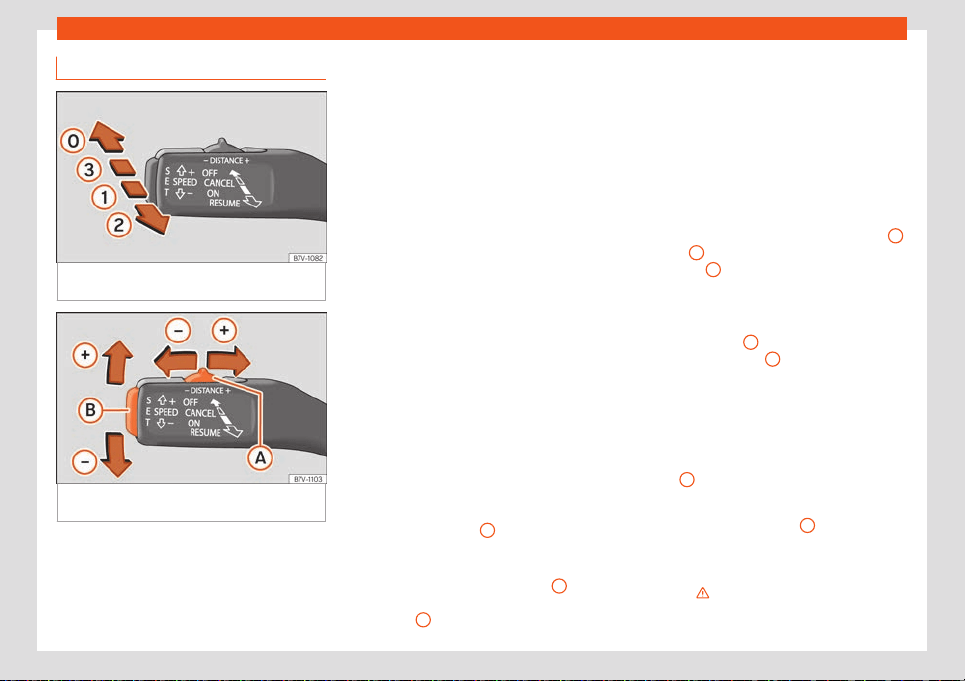
Fig. 256
On the left of the steering column:
oper
ating the ACC with the third lever.
Fig. 257 On the left of the steering column: op-
er
ating the ACC with the third lever.
When the ACC is connected, the green con-
tr
ol lamp will light up on the instrument
panel, and the programmed speed and ACC
status will be displayed
›››
Fig. 255.
What ACC settings are possible?
●
Connecting and activating the ACC
›››
page 271.
●
Setting your speed
›››
page 271.
●
Setting your distance
›››
page 271.
●
Disconnecting and deactivating the ACC
›››
page 272.
●
Adjusting the default distance level at the
start of your journey
›››
page 272.
●
Adjusting the driving profile
›››
page 272.
●
Conditions in which the ACC does not re-
act
›››
page 272.
Connecting and activating the ACC
To connect and activate the ACC, the posi-
tion of the gearbox lever, the vehicle speed
and the position of the third level of the ACC
must all be taken into account.
●
With manual transmission, the gear lever
must be in any gear except first. With auto-
matic transmission, the gear lever must be in
position D or S. Speed must be higher than
30 km/h (18 mph) approx.
●
To activate the ACC, move the third lever to
position
›››
Fig. 256
1
. At this time, the
ACC is not activ
e and there is no program-
med speed.
●
Next, press button
›››
Fig. 257
B
or
mo
ve the lever to position
›››
Fig. 256
2
. At this moment the ACC is ac-
tivated and the current speed and distance
ar
e programmed. The picture in the box will
change to Active mode
›››
Fig. 255 .
While ACC is active, the vehicle travels at a
set speed and distance from the vehicle
ahead. Both speed and distance can be
changed at any time.
Setting speed
●
To set the speed, move the third lever up
+
or down
–
to the desired speed
›
››
Fig. 255
6
. The speed adjustment is
made at 10 km/h (6 mph) int
ervals.
●
If you wish to increase speed by intervals of
1 km/h (0.6 mph), move the lever to position
›››
Fig. 256
2
, or to decrease it press
butt
on
›››
Fig. 257
B
.
The set speed can be changed when the v
e-
hicle is stopped or during driving.
Setting your distance level
●
To increase or reduce the distance, press
button
A
to the right or left
›
››
Fig. 257.
The instrument panel display modifies the se-
lected distance
›››
Fig. 255
4
. There are 5
dist
ance levels to choose from. SEAT recom-
mends level 3. The set distance can be
changed when the vehicle is stopped or while
driving
›››
.
»
271
Loading ...
Loading ...
Loading ...