Loading ...
Loading ...
Loading ...
– 136 –
Chapter 5 Shooting — Special recording function
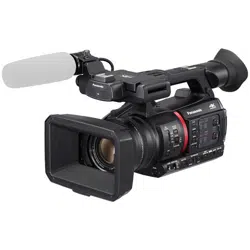
Interval recording
The camera will record one frame at each set time interval.
1 frame recording 1 frame recording 1 frame recording
(Time)
Time set in [INTERVAL TIME] Time set in [INTERVAL TIME]
1
Select the [RECORDING] menu → [REC FUNCTION] → [REC MODE] → [INTERVAL].
[INTRVL] is displayed in the special recording function display of the camera image screen.
f This cannot be selected when the recording mode is set to AVCHD.
2
Set the time in the [RECORDING] menu → [REC FUNCTION] → [INTERVAL TIME].
3
Press the REC button.
f [I-REC] is displayed in red in the special recording function display of the camera image screen.
f The camera will repeat the operation of one frame recording at set time interval.
f To stop recording, press the REC button.
f Set [NORMAL] in the [RECORDING] menu → [REC FUNCTION] → [REC MODE] to clear the setting.
f Set whether to keep the settings after turning off the power in the [RECORDING] menu → [REC FUNCTION] → [REC MODE HOLD].
@
NOTE
t Audio is not recorded.
t Recorded data (data recorded until recording was stopped) is included in one clip.
t The [RECORDING] menu → [TC/UB] → [FREE/REC RUN] is xed to [REC RUN].
t The [RECORDING] menu → [TC/UB] → [DF/NDF] is xed to [NDF].
t [SDI REC REMOTE] and [HDMI REC REMOTE] will not operate.
t If the length of the clip is less than three seconds when the recording is stopped, the image of the nal frame will be recorded to make the length of the
clip to three seconds.
t The recording is stopped once when the length of the clip exceeds ten hours in the interval recording. The recording is automatically resumed after
few seconds.
t For recording limitations of the interval recording, refer to “Recording function that cannot be used simultaneously” (page 198).
IR recording
A night time shooting using the IR light can be performed.
r Assigning [IR REC] to the USER button
1
Select the [CAMERA] menu → [USER SW] → [USER1] to [USER12] → [IR REC].
Set so enable/disable of the IR recording can be switched with an arbitrary USER button.
r Performing IR recording
1
Press the USER button to which [IR REC] is assigned or touch the USER button icon.
The camera will enter the IR recording mode.
2
Press the REC button.
IR recording is started.
@
NOTE
t This can also be set with the [CAMERA] menu → [SW MODE] → [IR REC].
Loading ...
Loading ...
Loading ...