Loading ...
Loading ...
Loading ...
– 119 –
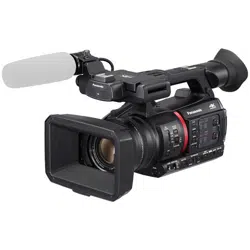
Chapter 5 Shooting — Adjustable settings when shooting
Adjustable settings when shooting
Adjust the iris and gain when shooting.
Iris
1
Switch to manual mode with the <AUTO/MANUAL> switch. (page 116)
2
Press the <IRIS> button to switch the adjustment method for the lens aperture.
Auto iris: Adjusts the iris setting automatically.
Manual iris: Adjust the lens iris manually.
3
When on manual iris, rotate the iris ring to adjust the lens iris.
When the auto iris level function for auto iris is enabled, the target value of the auto iris level can be adjusted by turning the iris ring. However, the
value is not applied to the setting in the [SCENE FILE] menu → [A.IRIS LEVEL EFFECT].
Gain
If the camera screen is dark, increase the gain to brighten the screen.
1
Switch to manual mode with the <AUTO/MANUAL> switch. (page 116)
2
Switch gain with the <GAIN> switch.
<L>: Normally set to this position. (Factory setting is 0 dB)
<M>: Increases the gain of the camera image amp. (Factory setting is 6 dB)
<H>: Increases the gain of the camera image amp. (Factory setting is 12 dB)
The gain values for <L>, <M>, and <H> can be changed in the [CAMERA] menu → [SW MODE] → [LOW GAIN], [MID GAIN], and [HIGH GAIN].
(page 65)
When in auto mode, selecting the [CAMERA] menu → [AUTO SW] → [AGC] → [ON] will set the camera to auto gain regardless of the position of the
<GAIN> switch. (page 68)
Super gain
When shooting in dark locations, you can set super gain regardless of whether the camera is in auto mode or manual mode.
Select either [24dB], [30dB], [36dB], or [ALL] in the [CAMERA] menu → [SW MODE] → [SUPER GAIN].
Press the USER button to which [SUPER GAIN] is assigned or touch the USER button icon to toggle the gain that is selected. (page 52)
Toggles [24dB], [30dB], [36dB], and the normal gain in order each time the USER button is pressed or the USER button icon is touched when set to
[ALL].
Brightness adjustment
When the external light is strong, you can switch the ND lter (brightness adjustment lter) to use with the <ND FILTER> switch.
1
Change the setting of the <ND FILTER> switch.
<1/64>: Reduces the amount of light entering the MOS sensor to 1/64.
<1/16>: Reduces the amount of light entering the MOS sensor to 1/16.
<1/4>: Reduces the amount of light entering the MOS sensor to 1/4.
<CLR>: Does not use the ND lter.
Macro
Macro function can be switched [ON]/[OFF].
1
Press the USER button to which [MACRO] is assigned or touch the USER button icon.
f When [ON] is set,
is displayed at the top of the focus display on the viewnder or LCD monitor.
@
NOTE
t This can also be set with the [CAMERA] menu → [SW MODE] → [FOCUS MACRO].
Focusing (manual focus)
1
Switch the method of controlling the focus with the <FOCUS> switch.
<A>: Changes to the auto focus mode. The auto focus mode adjusts the focus automatically.
<M>: Changes to the manual focus mode. Control the focus ring manually to adjust the focus.
<c>: Changes to the manual focus mode after the focus distance is set to innity.
This switch is the spring switch. Even when the <FOCUS> switch is pushed towards the <c> side, the switch returns to the <M> position.
@
NOTE
t Since the auto focus control may not operate properly if there is a icker, select a shutter speed that is appropriate to the light.
t If you set the camera to auto focus mode at times other than 60i (50i) and 60P (50P), the time required for the focus control will be slightly longer than
when in normal focus mode.
t When the [CAMERA] menu → [AUTO SW] → [AF] → [ON] is selected while the camera is in auto mode, auto focusing is performed regardless of the
position of the <FOCUS> switch.
Loading ...
Loading ...
Loading ...