Loading ...
Loading ...
Loading ...
GETTING TO KNOW YOUR VEHICLE 51
6. Using the provided #40 Torx head driver and ratchet,
tighten the Torx screws by turning them clockwise.
Secure them until they are snug (refer to the table
below for recommended torque specifications), being
careful not to cross-thread the screws or overtighten.
Repeat on the opposite side.
Lift Assist Mechanism In Place
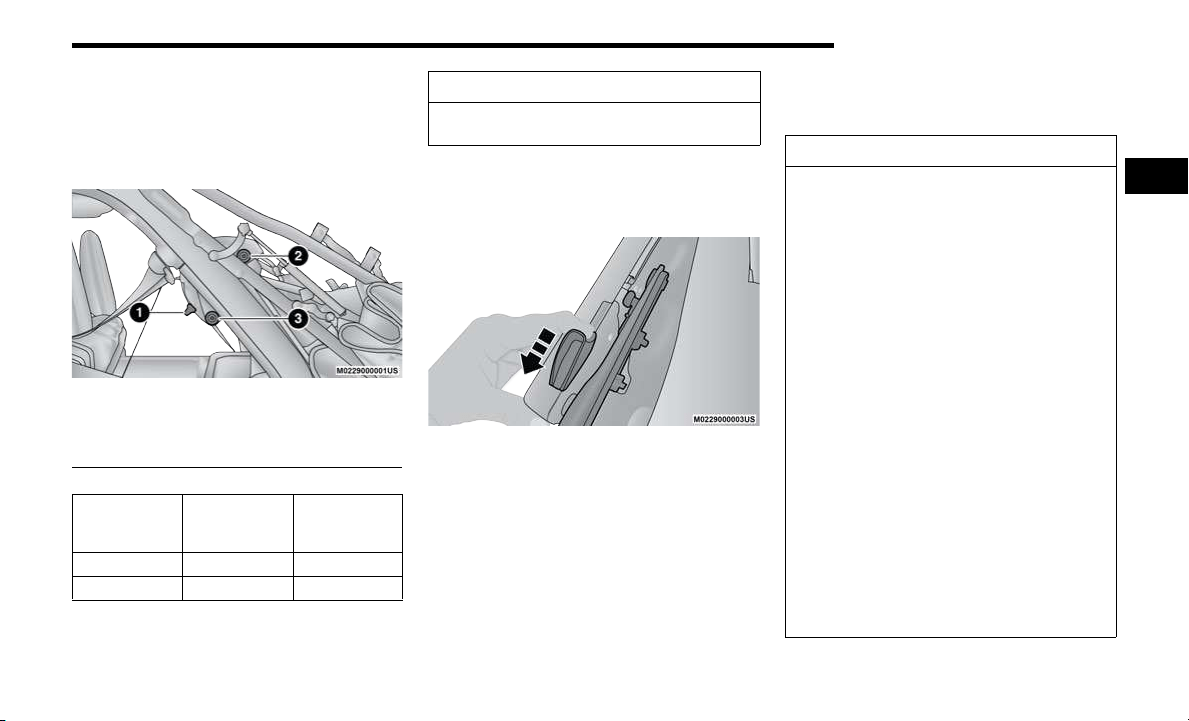
7. While pulling the release lever on the top of the rail
rearward, place the side link into the guide track on
the top of the rail then release the lever.
Step Seven
8. Unsnap and remove the black boot cover. This cover
should be discarded. It was intended as a protective
cover for shipping only.
NOTE:
A visual instruction sheet is included with the vehicle.
9. Raise the soft top. Refer to “Raising The Soft Top” in
this section.
NOTE:
Be sure the wire harness in the left rear corner is not
tangled in the soft top bows before you lift the top.
FREEDOM TOP THREE-PIECE MODULAR
HARD TOP — IF EQUIPPED
1 — Lock Position
2 — Torx Head Screw
3 — Torx Head Screw
Torque
Specification For
Torx Screws
Maximum Minimum
119.5 in-lbs 150.5 in-lbs 106.2 in-lbs
13.5 N·m 17.0 N·m 12.0 N·m
CAUTION!
Do not overtighten the screws. You can strip the screws
if they are overtightened.
CAUTION!
The hard top is not designed to carry any additional
loads, such as after-market roof racks, spare tires,
building materials, hunting or camping supplies, etc.
For optional Mopar accessory roof racks, refer to the
Roof Luggage Rack portion of this Owner’s Manual
for additional information.
Do not move your vehicle until the top has been
either fully attached to the front header, sport bar,
and body side or fully removed.
Failure to follow these cautions may cause interior
water damage, stains or mildew:
It is recommended that the top be free of water prior
to panel removal. Removing the top, opening a door
or lowering a window while the top is wet may allow
water to drip into the vehicle’s interior.
The hard top assembly must be positioned properly
to ensure sealing. Improper installation can cause
water to leak into the vehicle’s interior.
Careless handling and storage of the removable roof
panels may damage the seals, causing water to leak
into the vehicle’s interior.
The front panel(s) must be positioned properly to
ensure sealing. Improper installation can cause
water to leak into the vehicle’s interior.
2
20_JL_OM_EN_USC_t.book Page 51
Loading ...
Loading ...
Loading ...