Loading ...
Loading ...
Loading ...
Self-help
●
Alw
ays stop the engine, apply the hand
brake and put it in gear when using a man-
ual gearbox, in order to reduce the risk of
involuntary movement of the vehicle.
WARNING
A tyre filled with sealant does not have the
same perf
ormance pr
operties as a conven-
tional tyre.
●
Never drive faster than 80 km/h
(50 mph).
●
Avoid heavy acceleration, hard braking
and fast cornering.
●
Drive for only 10 minutes at a maximum
speed of 80 km/h (50 mph) and then check
the tyre.
For the sake of the environment
Dispose of used or expired sealant observ-
ing any legal r
equirements.
Note
A new bottle of sealant can be purchased
at SEAT dealerships.
Note
Take into account the separate instruction
manual of the tyr
e mobility set* manufac-
turer.
Anti-puncture kit contents*
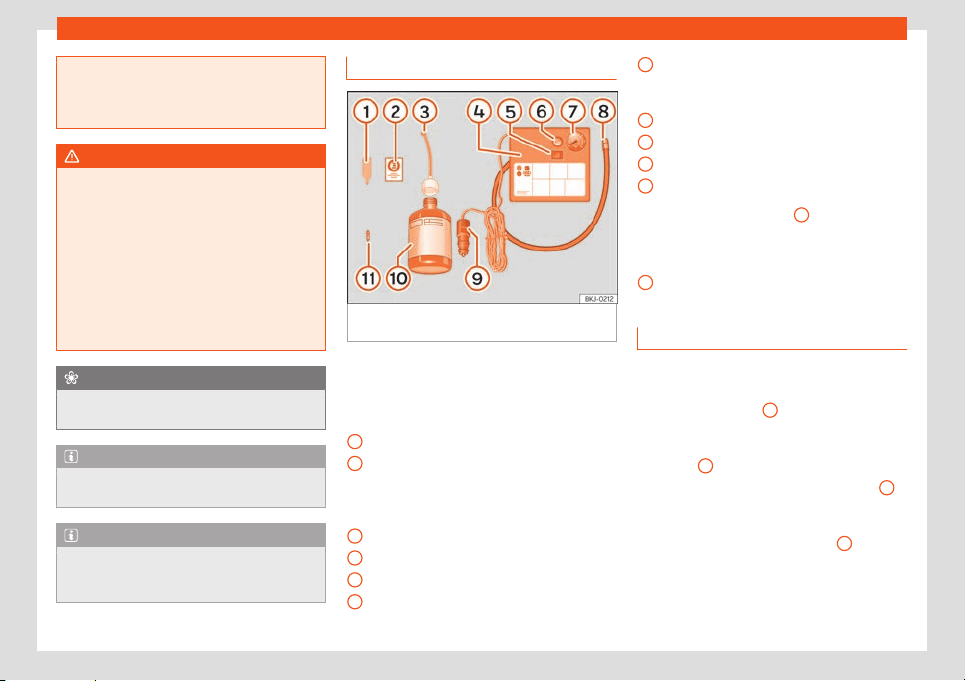
Fig. 29
Standard display: contents of the anti-
punct
ur
e kit.
The anti-puncture kit is located underneath
the fl
oor co
vering in the luggage compart-
ment. Includes the following components
›››
Fig. 29:
Valve insert remover
A sticker to be adhered to the instrument
cluster, within the driver's visual field, to
remind that the maximum advisable
speed “max. 80 km/h” or “max. 50 mph”
Filler tube with cap
Air compressor
ON/OFF switch
Air bleed screw (it can also be integrated
in the inflator tube).
1
2
3
4
5
6
Warning provided by tyre pressure moni-
t
oring syst
em (it can also be integrated in
the inflator tube).
Tube for inflating tyres
12 volt connector
Bottle of sealant
Spare tyre valve
The valve insert remover
1
has a gap at
the l
o
wer end for a valve insert. The valve in-
sert can only be screwed or unscrewed in this
way. This also applies to its replacement part
11
.
Sealing and inflating a tyre
Sealing the tyre
●
Unscrew the tyre valve cap and insert. Use
the de
vice
›
››
Fig. 29
1
to remove the howit-
z
er
. Place it on a clean surface.
●
Shake the tyre sealant bottle vigorously
›››
Fig. 29
10
.
●
Screw the tyre inflation hose
›
›
›
Fig. 29
3
into the tyre sealant bottle. The bottle's seal
will br
eak aut
omatically.
●
Remove the filler cap
›››
Fig. 29
3
and
scr
e
w the open end of the tube into the tyre
valve.
●
With the bottle upside down, empty all of
the contents into the tyre.
»
7
8
9
10
11
37
Loading ...
Loading ...
Loading ...