Loading ...
Loading ...
Loading ...
AX1600 OM Full (EN,CN,MY).indd 24/04/1470 1:00 AM
2 Make sure the water tank is
removed and press START.
1 Press Back/Info,
turn the Knob to
select DRAIN
WATER and press
Enter.
E-8
Perform the Drain Water function at least once a day
after using SuperSteam Convection or Steam mode. It
takes up to 8 minutes.
Drain Water function is very useful to prevent scale
build up and the use of stale water. It causes evapora-
tion of the internal steam system.
NOTE:
The water tank must be removed before starting this
procedure.
3 After the oven has cooled, wipe oven cavity.
Wait a few minutes, then empty the drip tray.
White or gray grains, also called scale, may form in
the water circuit inside the oven during steam
generation, which could cause the oven to malfunc-
tion.
When DESCALING IS NECESSARY. is shown in the
display, be sure to carry out Descale function
immediately. It takes about 1 hour.
IMPORTANT INSTRUCTIONS
Drain Water Function
Descale Function
1
P R O C E D U
R E
Press Back/Info,
turn the Knob to
select DESCALE
and press Enter
2
Pure citric acid, available at some drugstores, or bottled
100% lemon juice with no pulp are used for descaling.
Choose one and prepare the descaling solution.
To use pure citric acid, dissolve 1 tablespoon of pure
citric acid crystals in 500ml of water in a non-porous
container. Stir well and pour into the water tank.
To use 100% bottled lemon juice, check that there is
absolutely no pulp in it. If there is pulp or you are not
sure, strain through a ne strainer. Measure 70ml of the
strained lemon juice and add it to 500ml of water. Stir
well and pour into the water tank.
Place the water tank in the oven correctly and push rmly
into place.
P R O C E D U
R E
3
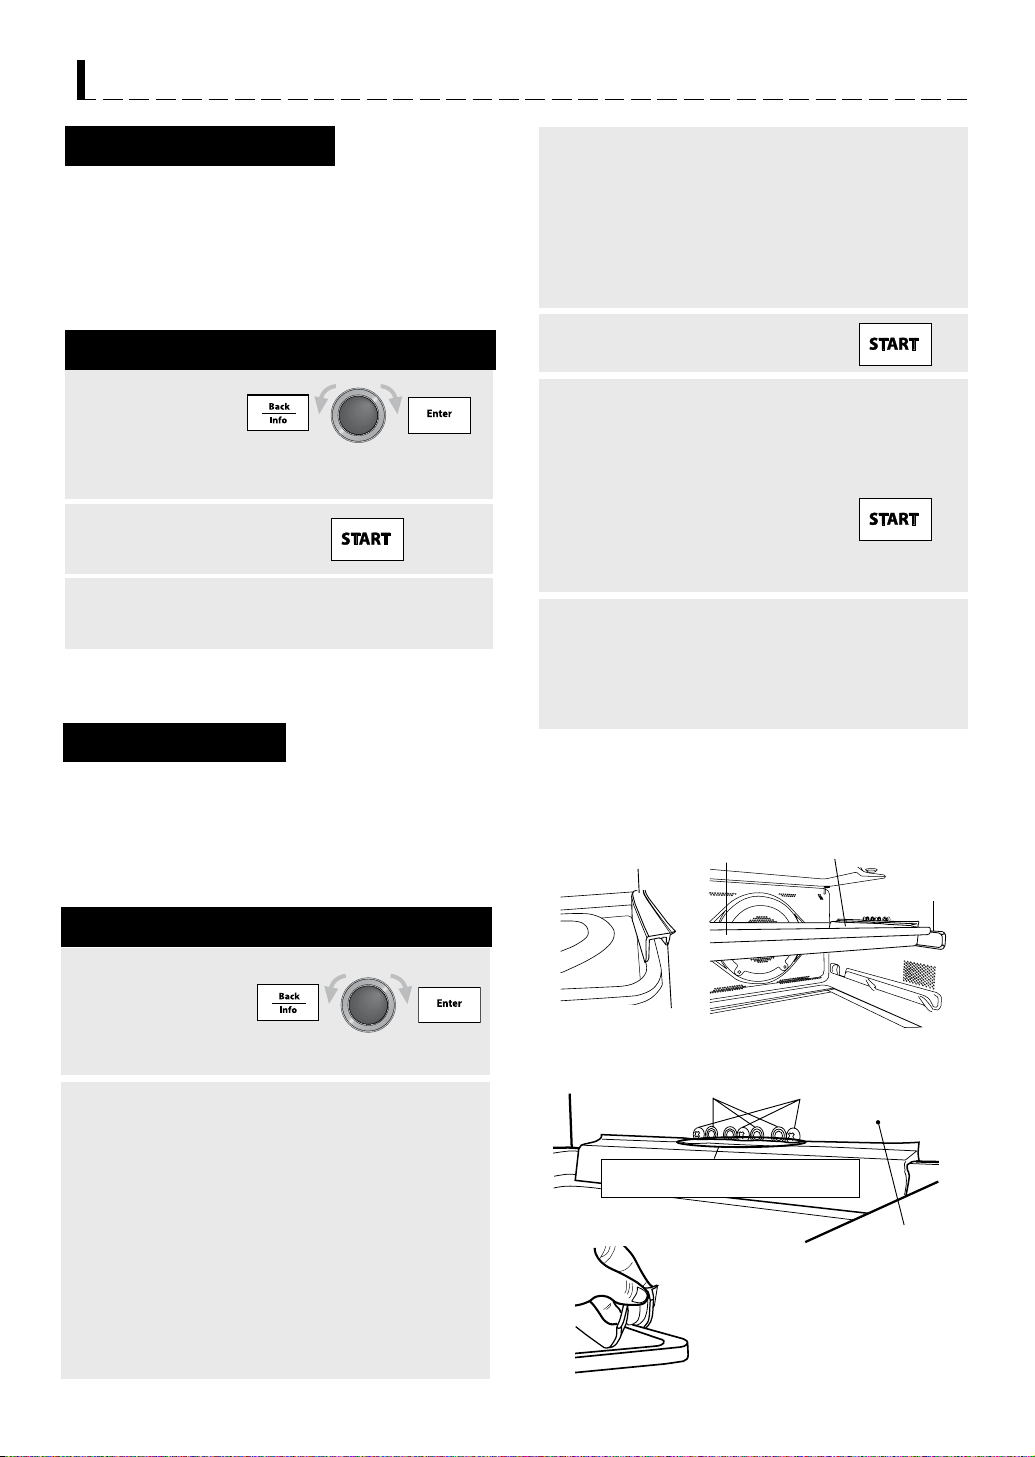
Place baking tray on upper level.
Place descaling guide on the right side edge of baking
tray as shown in Figure 1.
Push down the right side edge of descaling guide to in-
sert the projection between the wall and the baking tray
as shown in Figure 2.
Check that the edge of the descaling guide is below all
steam outlets/screw heads as shown in Figure 3.
4
Do not place any food in the oven.
Press START to begin descaling.
5
When the oven has stopped and is cool, remove
water tank, empty, rinse and rell with room
temperature water suitable for drinking (ltered).
Replace water tank. Remove the descaling
guide as shown in Figure 4.
Remove baking tray, empty, rinse
and dry. Follow step 3 to replace
baking tray and descaling guide.
Press START. Rinsing will start.
6
When rinsing has ended and the oven is cool,
remove water tank and empty. Then remove
descaling guide as shown in Figure 4. Remove
baking tray and empty. Wipe oven cavity to dry.
Wait a few minutes and then empty the drip tray.
WARNING:
The area around the steam outlets becomes hot. Pay
extra attention to attach or remove descaling guide.
NOTE:
Oven light goes off after Enter is pressed at Step 1.
Descaling guide
Baking tray Descaling guide
Upper level
Projection Oven cavity
Figure 1 Figure 2
Steam outlets Screw heads
Check that steam outlets/screw heads
are not covered by the descaling guide.
Figure 3
Right side of
the oven wall
Figure 4
Removing descaling guide.
Loading ...
Loading ...
Loading ...