Loading ...
Loading ...
Loading ...

MINIMUM
C-U ARD CLEARANCE
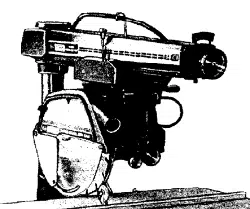
Figure 51
SPREADER
ANTI-KICKBAC K
PAWL
DIRECTION
OF KICKBACK
i
_DIRBCTION OF FEED
22--
ANTI-KICKBACK POSITION
(Make sure by trial before starting the
cut that the Anti-Kickback Pawls will
stop a Kick-back once it has started)
Figure 52
ADJUSTING GUARD, ANTI-KICKBACK AND
SPREADER ASSEMBLY, FOR RIPPING
WARNING: Never position the guard or
anti-kickback assembly with power ON; nor
position anti-kickback pawls by grasping
pawls or spreader.
1.
Check and Adjust the Spreader as follows:
a. Loosen the wing screw and with tab (C, figure 49)
position the anti-kickback and spreader assembly
to near the bottom of the blade. Tighten the wing
screw.
b.
Sight (visually) to check for proper alignment of
spreader with saw blade, as shown in figure 50.
If the spreader is not aligned, adjust it as follows:
(1) Loosen two hex nuts, one on each side of
spreader figure 50).
(2) Rotate hex nuts with fingers until the
spreader is directly in line with saw blade.
(3) Tighten both hex nuts firmly.
Adjust the guard and anti-kickback assembly as
follows:
a. Position the saw blade the proper distance from
the fence to produce the desired width of the rip
cut. Tighten the carriage lock knob. Also, make
sure the arm latch handle, yoke clamp handle and
bevel lock knob are tight.
b. Plug in the power cord, pull out the on-off switch
lever to start the motor.
c. Carefully lower the saw blade with the elevation
crank until the saw blade cuts into the table
surface to a depth of approximately 1!32-inch.
d. Push in the on-off switch to stop the motor and
allow the blade to come to a complete stop.
e.
f.
Place the workpiece to be ripped in the position
shown in figure 51.
Loosen the guard clamp knob (figure 50) and
rotate the guard so that it just clears the workpiece
(figure 51). Tighten the guard clamp knob.
g. Loosen the wing screw (figure 49) and with tab "C"
position the anti-kickback and spreader assembly
until the pawls assume the approximate position
shown (See figure 52). Tighten the wing screw.
h. Before making the cut, check the effectiveness of
the anti-kickback pawls by sliding the workpiece
under the pawls in the direction of feed and then
attempting to slide it in the reverse direction - the
direction of kickback. If the pawls do not catch,
readjust with wing screw and tab "'C" (figure 49).
i. Periodically check and maintain sharp tips on the
anti-kickback pawls.
PRECISION INDEXING
Experienced operators of precision equipment, such as this
Craftsman Radial Saw, normally acquire the habit of
indexing the machine in one direction only, whenever a
new setting is made in preparation for a different operation.
For example: when moving the radial arm to a new
position, it is advisable to move it slightly past the desired
index position, then return it slowly and carefully to latch
and lock it. Figure 48 shows the radial arm being securely
indexed by "tapping" it with the palm of the hand. Swivel
indexing and bevel indexing can be accomplished in a
similar manner. This indexing technique tends to neutralize
any stresses imposed upon saw components and contributes
to the high degree of accuracy the saw is capable of
producing when operated expertly.
17
Loading ...
Loading ...
Loading ...