Loading ...
Loading ...
Loading ...
23 Philips · NeoPix 320
The following settings are available on this
screen:
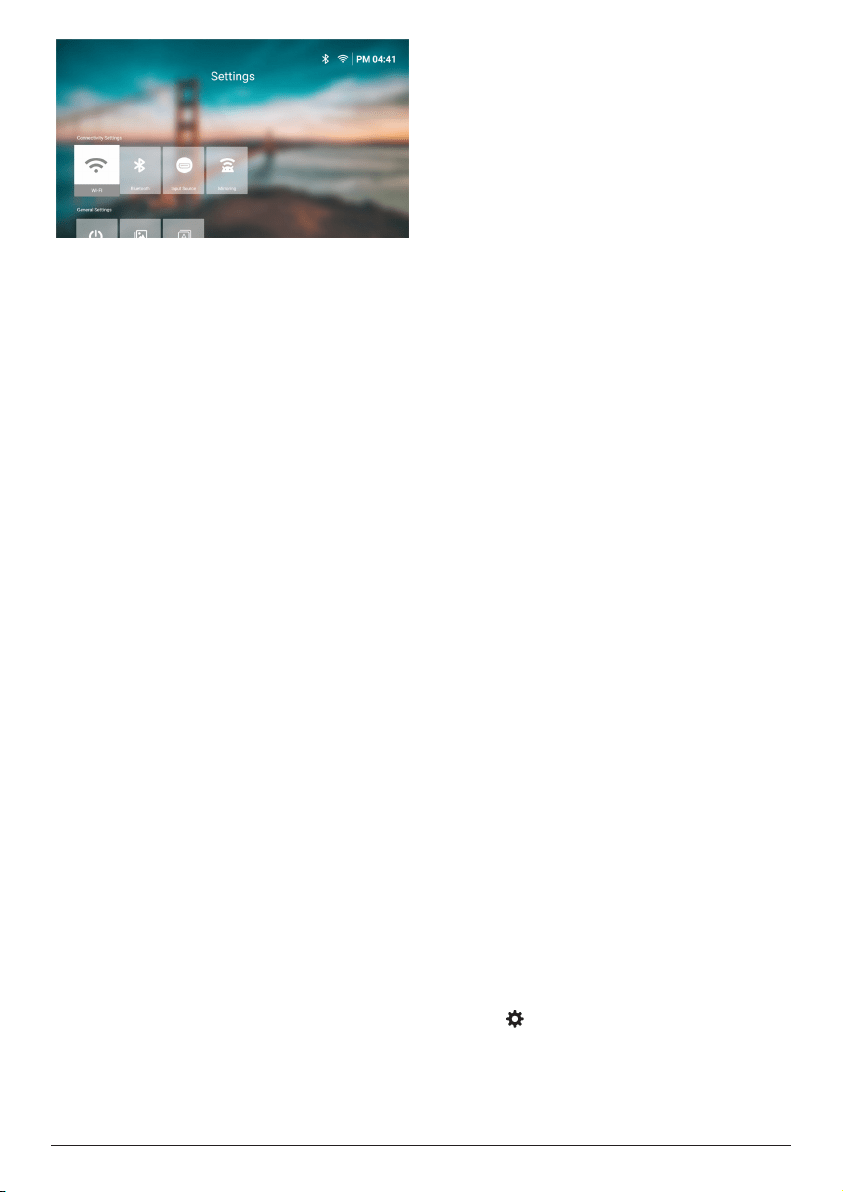
Connectivity Settings
• WI-FI: Access the Wireless Network screen.
To learn how to connect the projector to
a Wi-Fi network, see Step 3: Connect to a
Wi-Fi network, page 11.
• Bluetooth: Access the Bluetooth screen. To
learn how to connect a Bluetooth device,
see Connect to a Bluetooth device, page
16.
• Input Source: Toggle the input source
between Built-in Android (Philips OS) and
HDMI.
• Mirroring: Access the Screen Mirroring
screen. The following settings are available:
• Android: Wirelessly mirror the screen
of an Android device or Windows
computer. For more details, see
Wireless projection with Android
devices/Windows computers, page
20.
• IOS: View and change the settings
for AirPlay. To learn how to wirelessly
mirror the screen of an iOS device
or Mac computer using AirPlay, see
Wireless projection with iOS devices/
Mac computers, page 21.
General Settings
• Power: Access the Power screen. The
following settings are available:
• Shutdown: Select this to turn off the
projector immediately
.
• Timed Shutdown: Select this to turn off
the projector after a specific period of
time
.
• Image Settings: Access the Image Settings
screen. The following settings are available:
• Projection Direction: Adjust the
projection to the correct direction based
on how the projector is installed.
• Auto Keystone Correction: Turn auto
keystone correction on or off by
pressing
the OK button.
• 4-Corner Correction: Select this to
manually make the image rectangular
by moving four corners of the image.
This setting is visible only when auto
keystone correction is off.
• H/V Correction: Select this to manually
make the image rectangular by
adjusting the horizontal and vertical
keystone angles. This setting is visible
only when auto keystone correction is
off.
• Digital Zoom: Scale down the screen
to up to 60% of its full size. The default
value is 100% (no scale-down).
• Language/Input: Access the Language/
Input screen. The following settings are
available:
• Language: Select your preferred display
language.
• Time Zone: Set the time zone used by
the projector by selecting a city.
• Keyboard Input Method: Select your
preferred on-screen keyboard or input
method.
System Settings
• System Clean: Optimize the operating
system by automatically clearing junk files
and the system cache.
• Software Update: Update the projector's
software or factory reset the projector.
• Online Upgrade: For more details, see
Update software online, page 26.
• Offline Upgrade: For more details, see
Update software offline, page 26.
• Factory Reset: Restore the product to
its factory default settings. After the
factory reset, the projector will restart
and allow you to set it up as new.
• About: View the model, software version,
MAC address, serial number, launcher
version and built-in storage of this product.
Change settings using
settings menu
1 Press on the remote control to access
the projector's settings menu.
2 Use
the navigation buttons and the OK
button to select a menu item.
Loading ...
Loading ...
Loading ...