Loading ...
Loading ...
Loading ...
En
25
Advanced operation
Using DUAL DECK mode
DUAL DECK mode is a function allowing you to control both decks
simultaneously when mixing two different tracks on deck 1 and deck
3 (or on deck 2 and deck 4). A feature of this function is that it enables
such operations as scratching, looping and hot cueing of two different
tracks that have been mixed by mashing them up or blending them, as if
they were a single track.
The explanation below describes an example of the operation for
controlling decks 1 and 3 simultaneously.
1 Press the [DECK3] button while pressing the
[DECK1] button, or press the [DECK1] button while
pressing the [DECK3] button.
DUAL DECK mode turns on, the [DECK] button, which was pressed first,
flashes, and the [DECK] button, which was pressed later, lights.
Status display in the dual deck mode
! When entering DUAL DECK mode, the deck status of the [DECK]
button, which was pressed first, is displayed.
2 Press the [DECK1] or [DECK3] button.
DUAL DECK mode turns off, and the [DECK] button lights.
The controller switches to the deck of the pressed [DECK] button.
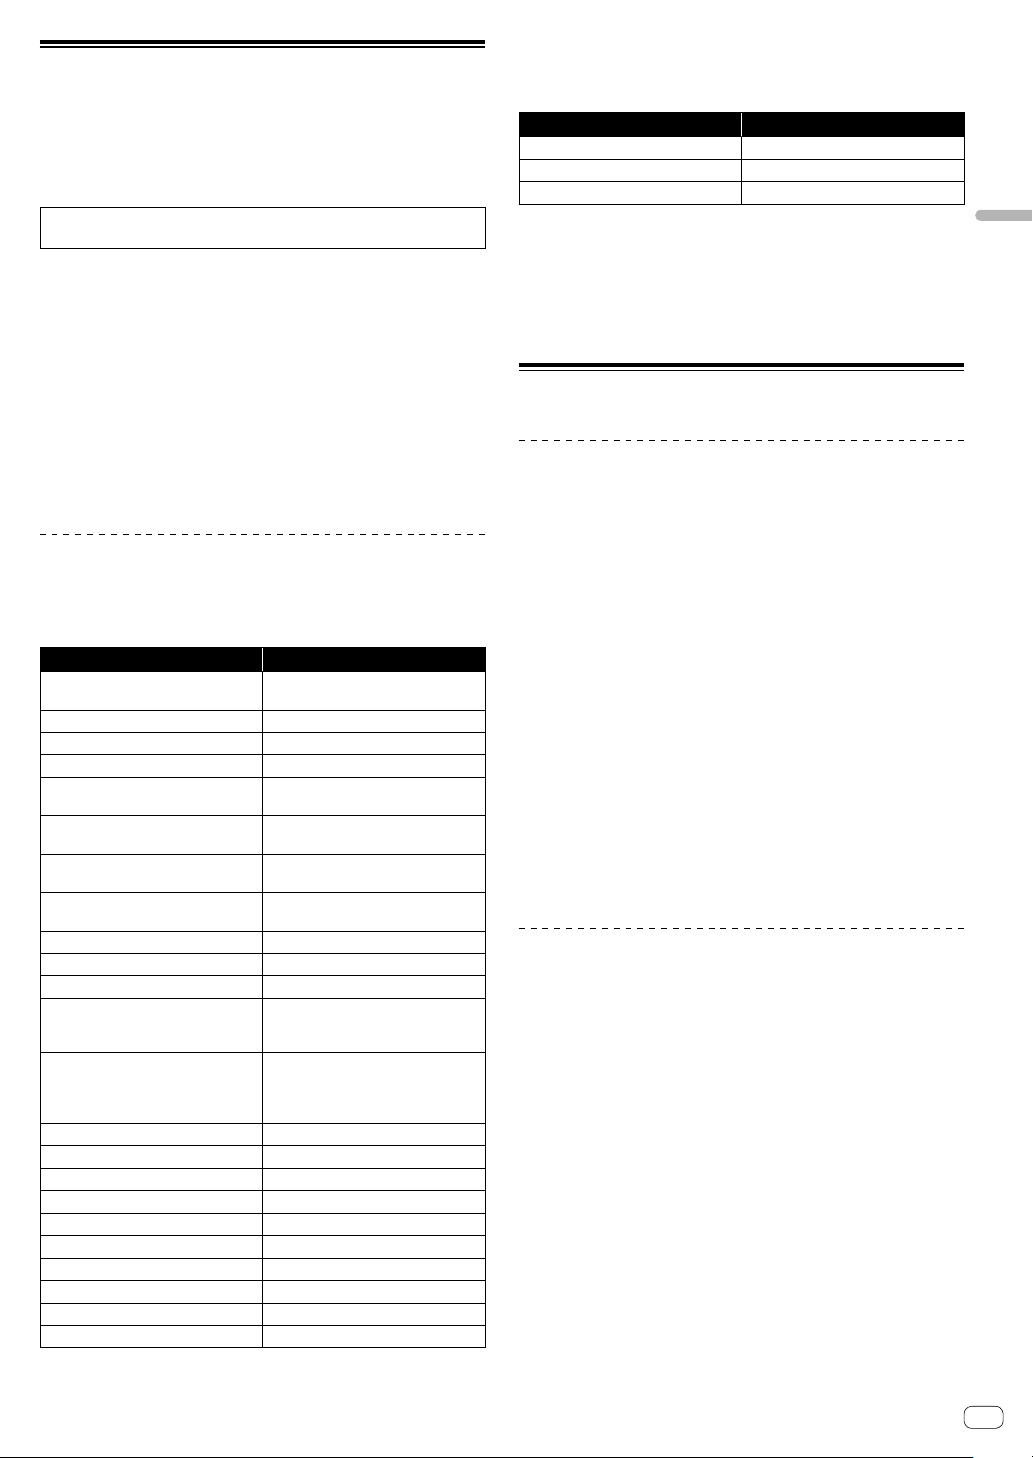
Functions that can be controlled in DUAL
DECK mode
The following functions can be controlled on the two decks
simultaneously in DUAL DECK mode.
Button or control that is operated
Function
Jog wheel Scratch, pitch bend, skip mode, slip
scratch
SLIP button Slip mode, VINYL mode
KEY LOCK button Key lock, tempo reset
AUTO LOOP button Auto loop, active loop, auto slip loop
LOOP 1/2X button Auto loop beat selection, half loop,
loop shift
LOOP 2X button Auto loop beat selection, double loop,
loop shift
LOOP IN button Loop in, loop in adjust, loop slot
selection, manual slip loop
LOOP OUT button Loop out, loop out adjust, re-loop/exit,
manual slip loop
HOT CUE mode button Hot cue mode, Cue loop mode
ROLL mode button Roll mode, Saved loop mode
SLICER mode button Slicer mode, Slicer loop mode
Performance pads Hot cue trigger, Hot cue deletion, Slip
hot cue, Loop roll trigger, Slicer trigger,
Cue loop trigger, Saved loop trigger
PARAMETER button, PARAMETER
button
Loop roll beat selection, SLICER
QUANTIZATION selection, SLICER
DOMAIN selection, Loop half, Loop
double, Loop shift
PLAY/PAUSE f button
Play, pause, slip braking
CUE button Cue setting, back cue, cue sampler
SYNC button Sync, sync off
CENSOR button Censor, reverse
NEEDLE SEARCH pad Needle search
FLIP REC button Sequence loop
FLIP START button Sequence start, Sequence on
FLIP SLOT button Sequence slot selection
KEY UP/SYNC button Key up, key sync
KEY DOWN/RESET button Key down, key reset
Functions that are limited in DUAL DECK mode
In DUAL DECK mode, the following functions can only be operated on
the deck where the [DECK] button is flashing.
Button or control that is operated
Function
TEMPO slider Tempo adjustment
KEY LOCK button Tempo range
FLIP REC button Sequence REC
Deck status mirroring function
When the following modes are in the different status for each deck,
the status is automatically set to the one in which the [DECK] button is
flashing.
! Vinyl mode status, pad mode status, slip mode status
Using the fader start function
Using the channel fader start function
1 Set the cue.
Pause at the position from which you want to start playback, then press
the [CUE] button for the corresponding deck.
! Cues can also be set by moving the channel fader from the back
to the position nearest you while pressing the [SHIFT] button in
the pause mode.
2 While pressing the [SHIFT] button, move the
channel fader from the position nearest you towards
the back.
Playback of the track starts from the set cue point.
! When the channel fader is moved back to the position nearest
you while pressing the [SHIFT] button during playback, the track
moves instantaneously back to the set cue point and the pause
mode is set. (Back Cue)
! If no cue is set, playback starts from the beginning of the track.
! It is also possible to change the setting in utilities mode so that
the sync mode is set simultaneously when playback is started
with the channel fader start function.
! When the channel fader is moved from the back to the position
nearest you while pressing the [SHIFT] button when standing by
at a cue, track playback starts from the set cue.
Using the crossfader start function
To use the crossfader start function, set the [CROSS FADER ASSIGN]
switch of the channel you want to move to [A] or [B].
1 Set the cue.
Pause at the position from which you want to start playback, then press
the [CUE] button for the corresponding deck.
! Cues can also be set by moving the crossfader to the left edge
or the right edge while pressing the [SHIFT] button in the pause
mode.
2 Move the crossfader to the left edge or right edge
position.
Set to the edge opposite the side on which the channel you want to use
with the fader start function is set.
Loading ...
Loading ...
Loading ...