
Loading ...
Loading ...
Loading ...
- 8
Switch off the blower.
With surface cleaning:
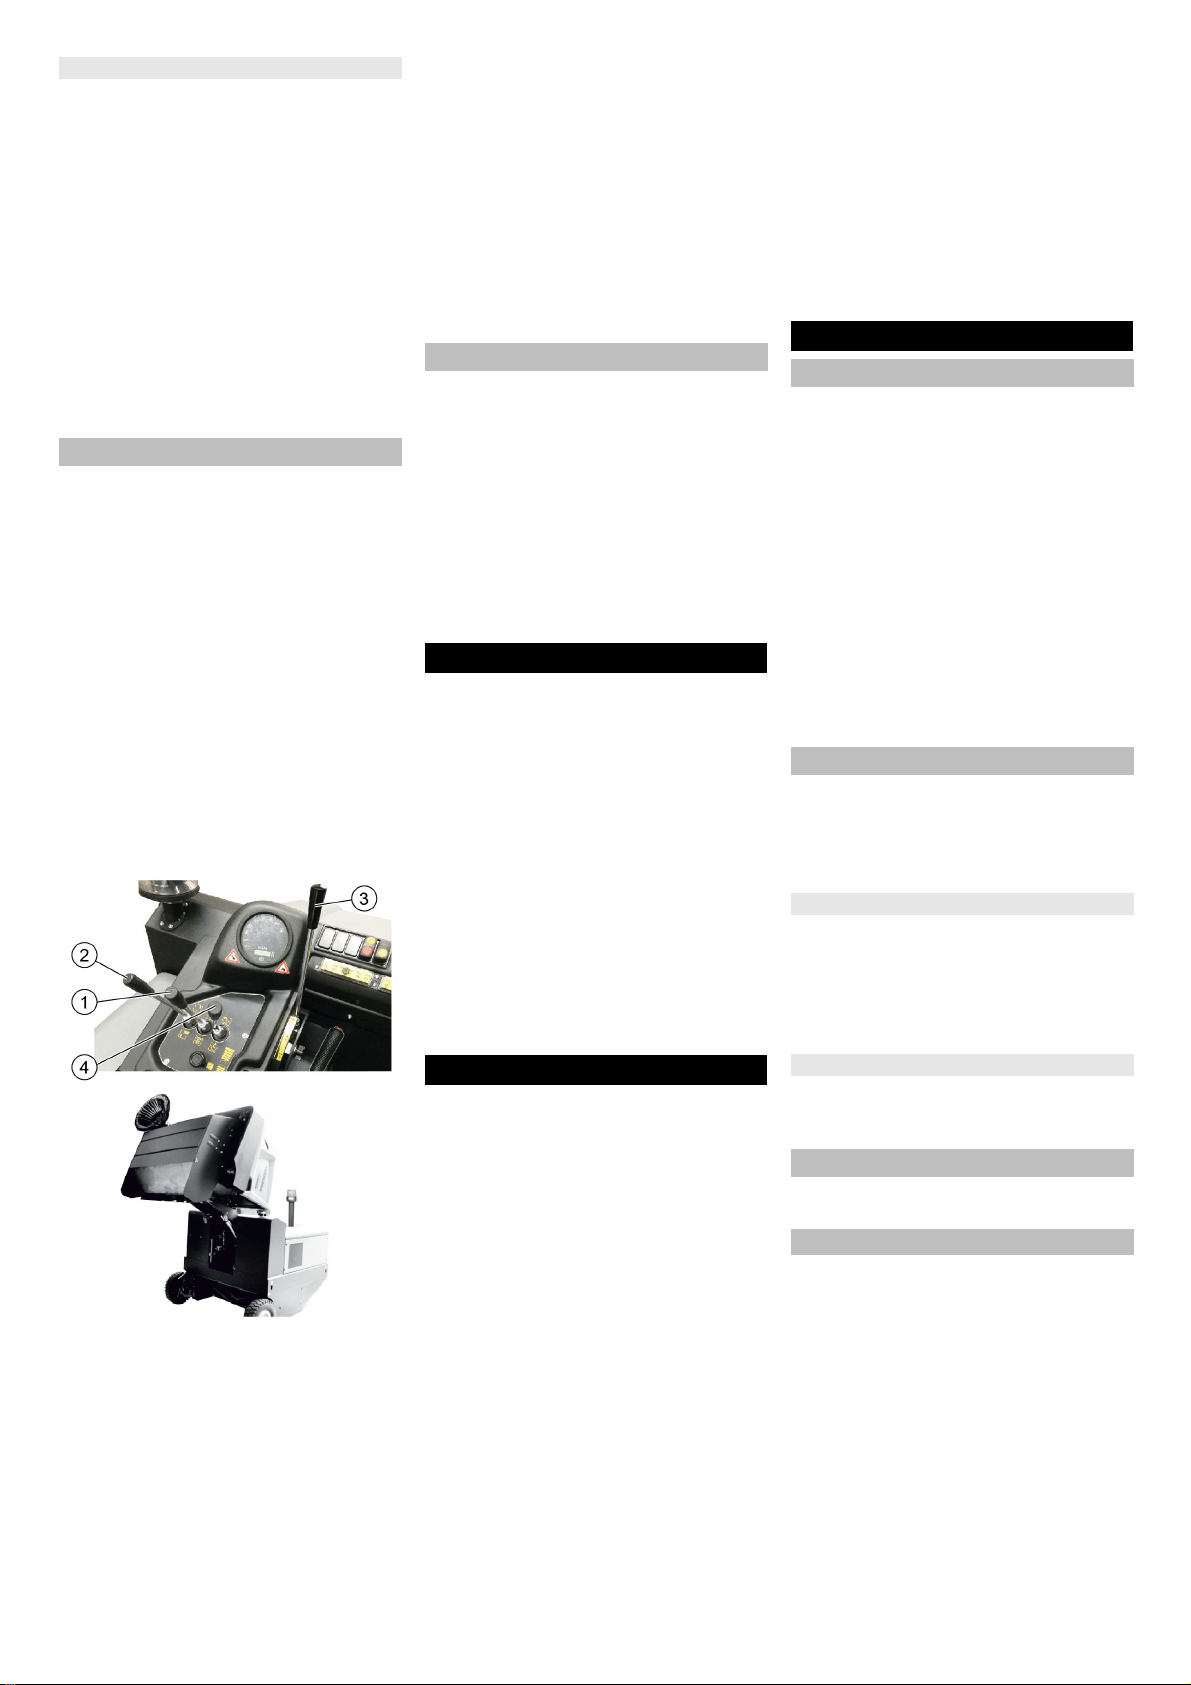
Roller brush and side brush control le-
ver (1) backwards: Switches the roller
brush on.
Roller brush control lever (3) back-
wards: Lowers the roller brush.
Control lever container flap (4) to the
front: Container flap opens.
With cleaning of side edges:
Roller brush and side brush control le-
ver (1) forwards: Switches the roller
brush on, switches the side brushes on
and lowers them.
Roller brush control lever (3) back-
wards: Lowers the roller brush.
DANGER
Risk of injury!
During the emptying process, persons
and animals must not stay within the
swivelling range of the waste container.
Danger of tipping!
Place the device on an even surface
during the emptying process.
몇 WARNING
Risk of crushing!
Never reach into the rod assembly for
the drainage mechanism. Do not stay
under the raised container.
ATTENTION
Risk of personal injury or damage!
Material of the rotating roller brush may
be catapulted off during the emptying
process. Keep an appropriate distance.
Raise the roller brush and side brushes
using the control levers: Control lever 1
to middle position and control lever 3
forwards.
Close the container flap, in order to do
so, move the control lever (4) to the
back:
Raise the container flap, in order to do
so, move the waste container control le-
ver (2) to the back:
Slowly drive towards the collection con-
tainer.
Lock parking brake.
Open the container flap, in order to do
so, push the container flap operating le-
ver (4) to the front and empty the waste
container.
Close the container flap, in order to do
so, push the container flap operating le-
ver (4) to the back until it is tipped in-
wards in the end position.
Release parking brake.
Drive away the collection container slowly.
Lower the waste container into the end po-
sition, in order to do so, move the waste
container control lever (2) to the front
Raise the roller brush and side brushes
using the control levers: Control lever 1
to middle position and control lever 3
forwards.
Close the container flap, in order to do so,
move the control lever (4) to the back:
Pull the motor speed adjustment all the
way to the back.
Press brake pedal and keep it de-
pressed.
Lock parking brake.
Turn ignition key to "0" and remove it.
DANGER
Transport damage!
Observe the net weight (transport
weight) of the device during transport
on trailers or vehicles.
When transporting in vehicles, secure
the appliance according to the guide-
lines from slipping and tipping over.
Turn ignition key to "0" and remove it.
Close gas drawing valve by turning it in
clock-wise direction.
Lock parking brake.
Secure the appliance at the lashing
points (4x) using tension belts, ropes or
chains.
Secure the wheels of the machine with
wheel chocks.
DANGER
Risk of injury and damage! Note the weight
of the appliance in case of storage.
Park the sweeper on a level surface in
a dry, frost protected area. Protect it
against dust by means of covering ma-
terial.
Raise the roller brush and the side-
brushes to prevent the bristles from be-
ing damaged.
Close the container flap.
Turn ignition key to "0" and remove it.
Close gas drawing valve by turning it in
clock-wise direction.
Unscrew the gas hose with union nut (use
30 mm spanner).
Lock the gas bottle with the safety cap
and store upright in a suitable storage
area (also see Chapter "Safety instruc-
tions).
Lock parking brake.
Lock the sweeper to ensure that it does
not roll off.
Additionally observe the following points if
the sweeper is not used over a longer peri-
od of time:
Change engine oil.
Drain off the cooling water if frost is ex-
pected and check whether there is ade-
quate anti-frosting agent.
Clean the inside and outside of the
sweeper.
Disconnect battery.
Charge battery and recharge it approx.
every 2 months.
ATTENTION
Risk of damage!
Do not rinse out the dust filter.
Maintenance work may only be carried
out by approved customer service outlets
or experts in this field who are familiar
with the respective safety regulations.
Always disconnect the battery when
working on the electrics.
Mobile appliances used for commercial
purposes are subject to safety inspec-
tions according to VDE 0701.
Park the sweeper on an even surface.
Turn ignition key to "0" and remove it.
Lock parking brake.
Close the gas inlet.
CAUTION
Risk of damage!
Do not clean the appliance with a water
hose or high-pressure water jet (danger
of short circuits or other damage).
DANGER
Risk of injury!
Wear dust mask and protective goggles.
Clean machine with a cloth.
Blow through machine with com-
pressed air.
Clean the machine with a damp cloth
which has been soaked in mild detergent.
Note: Do not use aggressive cleaning agents.
Note: The elapsed-time counter shows the
timing of the maintenance intervals.
Note: Where maintenance is carried out by
the customer, all service and maintenance
work must be undertaken by a qualified
specialist. If required, a specialised Kärch-
er dealer may be contacted at any time.
Daily maintenance:
Check engine oil level.
Check the filling level in the coolant ex-
pansion tank.
Check the sweeping roller and the side
brush for wear and wrapped belts.
Check the centrifugal separator and the
air filter, clean if required.
Check function of all operator control el-
ements.
Check appliance for damages.
Sweeping damp or wet floors
Emptying waste container
Turn off the appliance
Transport
Storage/decommissioning
Care and maintenance
General notes
Cleaning
Cleaning the inside of the machine
External cleaning of the appliance
Maintenance intervals
Maintenance by the customer
26 EN
Loading ...
Loading ...
Loading ...