Loading ...
Loading ...
Loading ...

7102
User's Guide
4-2
4.2 Setup
Caution:
DO NOT operate this instrument without fluid.
Place the calibrator on a flat surface with at least 6 inches of free space around
the instrument. Plug the power cord into a grounded mains outlet. Observe that
the nominal voltage corresponds to that indicated on the back of the calibrator.
Carefully insert the probe basket into the well. Fill the well with the appropriate
fluid. The set-point temperature and the number of and size of probes determine
the fluid level. Be sure to keep the fluid level an adequate distance below the top
of the well to prevent overflowing the fluid when the probes are inserted. For
example, placing200.05 oil at room temperature (25 °C) into the bath and heating
the unit to 125 °C, causes a 1-inch (2.54 cm) expansion of the fluid inside the
well.
Keep the fluid level at least 1.9 cm (0.75 inches) below the top of the well at
all times. With the probe (probes) in the well fill the tank 3/4 full. Heat to the
maximum temperature of the fluid. Slowly fill the well to 2.54 cm (1 inch) below
the top of the basket at the maximum temperature of the fluid.
Turn on the power to the calibrator by toggling the switch on the power entry
module. The fan should begin blowing air through the instrument and the
controller display should illuminate after 3 seconds. After a brief self test the
controller should begin normal operation. If the unit fails to operate please check
the power connection.
The display shows the well temperature and the well TEDs start operating to
bring the temperature of the well to the set-point temperature. Insure that the fluid
is being stirred.
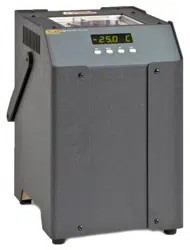
4.3 Power
Plug the Micro-Bath power cord into a mains outlet of the proper voltage,
frequency, and current capability. Refer to Section 3.1, Specifications, for power
details. Turn the bath on using the rear panel “POWER” switch. The Micro-Bath
will turn on and begin to heat to the previously programmed temperature set-
point. The front panel LED display will indicate the actual bath temperature.
4.4 Setting the Temperature
Section 9.2 explains in detail how to set the temperature set-point on the
calibrator using the front panel keys. The procedure is summarized here.
1. Press “SET” twice to access the set-point value.
2. Press “UP” or “DOWN” to change the set-point value.
3. Press “SET” to store the new set-point.
4. Press “EXIT” to return to the temperature display.
When the set-point temperature is changed the controller switches the heater on
or off to raise or lower the temperature. The displayed well temperature gradually
changes until it reaches the set-point temperature. The well may require 25
minutes to reach the set-point depending on the span. Another 10 to 15 minutes
is required to stabilize within ±0.03 °C of the set-point. Ultimate stability may take
20 to 30 minutes more of stabilization time.
1.888.610.7664 sales@GlobalTestSupply.com
Fluke-Direct.com
Loading ...
Loading ...
Loading ...