Loading ...
Loading ...
Loading ...
Cooktop
On
Indicator
Light
Each
cooktop
control
has
a
Cooktop
On
indicator
light.
When
the
control
knob
is
on,
the
light
will
glow.
Ce
fon
some
moce
The
surface
cooking
area
will
glow
red
when
an
element
is
on.
Some
parts
of
the
surface
cooking
area
may
not
glow
red
when
an
element
is
on.
This
is
normal
operation.
It
may
cycle
on
and
off
to
maintain
the
selected
heat
level.
It
is
normal
for
the
surface
of
light
colored
ceramic
glass
to
appear
to
change
color
when
surface
cooking
areas
are
hot.
As
the
glass
cools,
it
will
return
to
its
original
color.
Cleaning
off
the
cooktop
before
and
after
each
use
will
help
keep
it
free
from
stains
and
provide
the
most
even
heating.
On
cooktops
with
light
colored
ceramic
glass,
soils
and
stains
may
be
more
visible,
and
may
require
more
cleaning
and
attention.
Cooktop
cleaner
and
a
cooktop
scraper
are
recommended.
For
more
information,
see
“General
Cleaning”
section.
m
Avoid
storing
jars
or
cans
above
the
cooktop.
Dropping
a
heavy
or
hard
object
onto
the
cooktop
could
crack
the
cooktop.
m
Toavoid
damage
to
the
cooktop,
do
not
leave
a
hot
lid
on
the
cooktop.
As
the
cooktop
cools,
air
can
become
trapped
between
the
lid
and
the
cooktop,
and
the
ceramic
glass
could
break
when
the
lid
is
removed.
m
For
foods
containing
sugar
in
any
form,
clean
up
all
spills
and
soils
as
soon
as
possible.
Allow
the
cooktop
to
cool
down
slightly.
Then,
while
wearing
oven
mitts,
remove
the
spills
using
a
scraper
while
the
surface
is
still
warm.
If
sugary
spills
are
allowed
to
cool
down,
they can
adhere
to
the
cooktop
and
can
cause
pitting
and
permanent
marks.
m
To
avoid
scratches,
do
not
slide
cookware
or
bakeware
across
the
cooktop.
Aluminum
or
copper
bottoms
and
rough
finishes
on
cookware
or
bakeware
could
leave
scratches
or
marks
on
the
cooktop.
m
Do
not
cook
popcorn
in
prepackaged
aluminum
containers
on
the
cooktop.
They
could
leave
aluminum
marks
that
cannot
be
removed
completely.
m
To
avoid
damage
to
the
cooktop,
do
not
allow
objects
that
could
melt,
such
as
plastic
or
aluminum
foil,
to
touch
any
part
of
the
entire
cooktop.
m
Toavoid
damage
to
the
cooktop,
do
not
use
the
cooktop
as
a
cutting
board.
m
Use
cookware
about
the
same
size
as
the
surface
cooking
area.
Cookware
should
not
extend
more
than
12"
(1.3
cm)
outside
the
area.
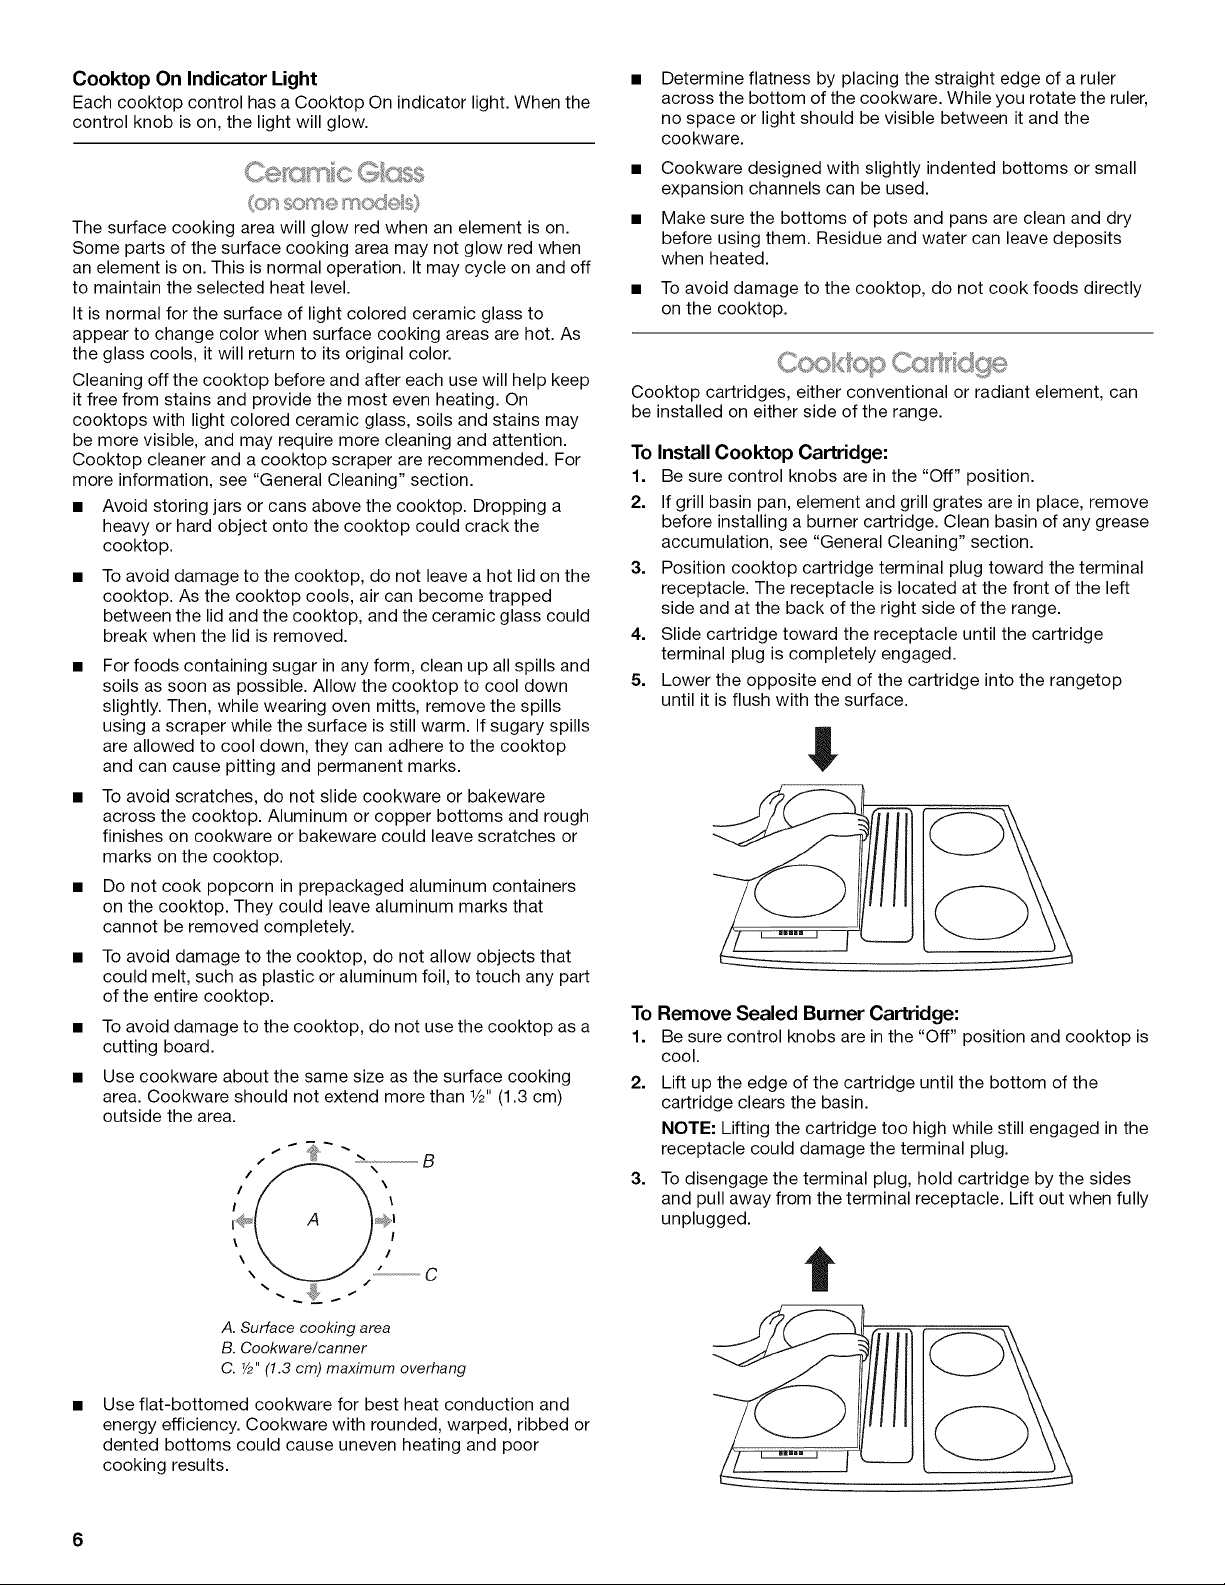
A.
Surface
cooking
area
B.
Cookware/canner
C.
%"
(1.3
cm)
maximum
overhang
m
Use
flat-bottomed
cookware
for
best
heat
conduction
and
energy
efficiency.
Cookware
with
rounded,
warped,
ribbed
or
dented
bottoms
could
cause
uneven
heating
and
poor
cooking
results.
m
Determine
flatness
by
placing
the
straight
edge
of
a
ruler
across
the
bottom
of
the
cookware.
While
you
rotate
the
ruler,
no
space
or
light
should
be
visible
between
it
and
the
cookware.
m
Cookware
designed
with
slightly
indented
bottoms
or
small
expansion
channels
can
be
used.
m
Make
sure
the
bottoms
of
pots
and
pans
are
clean
and
dry
before
using
them.
Residue
and
water
can leave
deposits
when
heated.
m_
To
avoid
damage
to
the
cooktop,
do
not
cook
foods
directly
on
the
cooktop.
oO
©
sn,
sn,
6
se
yo
ve,
OO
gpg
py
os
Cookiop
Cartridge
Cooktop
cartridges,
either
conventional
or
radiant
element,
can
be
installed
on
either
side
of
the
range.
To
Install
Cooktop
Cartridge:
1.
Be
sure
control
knobs
are
in
the
“Off”
position.
2.
If
grillbasin
pan,
element
and
grill
grates
are
in
place,
remove
before
installing
a
burner
cartridge.
Clean
basin
of
any
grease
accumulation,
see
“General
Cleaning”
section.
3.
Position
cooktop
cartridge
terminal
plug
toward
the
terminal
receptacle.
The
receptacle
is
located
at
the front
of
the
left
side
and
at
the
back
of
the
right
side
of
the
range.
4.
Slide
cartridge
toward
the
receptacle
until
the
cartridge
terminal
plug
is
completely
engaged.
5.
Lower
the
opposite
end
of
the
cartridge
into
the
rangetop
until
it
is
flush
with
the
surface.
¥
To
Remove
Sealed
Burner
Cartridge:
1.
Be
sure
control
knobs
are
in
the
“Off”
position
and
cooktop
is
cool.
2.
Lift
up
the
edge
of
the
cartridge
until
the
bottom
of
the
cartridge
clears
the
basin.
NOTE:
Lifting
the
cartridge
too
high
while
still
engaged
in
the
receptacle
could
damage
the
terminal
plug.
3.
To
disengage
the
terminal
plug,
hold
cartridge
by
the
sides
and
pull
away
from
the
terminal
receptacle.
Lift
out
when
fully
unplugged.
Loading ...
Loading ...
Loading ...