Loading ...
Loading ...
Loading ...
Energy
Saver
To
save
energy,
the
display
can
be
set
to
go
dark
if it
is
not
being
used.
To
set
the
Energy
Saver
feature:
1.
Press
SETUP.
2.
Use
right
Quickset
pad
to
scroll
to
ENERGY
SAVER.
3.
Select
ENERGY
SAVER
using
the
left
Quickset
pad.
4.
Select
ON
or
OFF
using
the
Quickset
pads.
5.
Press
SETUP
to
exit.
Press
any
pad
to
“wake
up”
the
display.
Service
This
area
of
the
oven
control
displays
the
Jenn-Air
eXperience
Center
toll-free
phone
number.
1.
Press
SETUP.
2.
Use
right
Quickset
pad
to
scroll
to
SERVICE.
3.
Select
SERVICE
using
the
left
Quickset
pad
to
display
the
number.
4.
Press
SETUP
to
exit.
Demo
When
Demo
is
selected,
you
will
see
a
short
presentation
highlighting
the
features
of
the
range.
1.
Press
SETUP.
Use
right
Quickset
pad
to
scroll
to
DEMO.
Select
DEMO
using
the
left
Quickset
pad.
Select
ON
using
the
left
Quickset
pad.
Press
SETUP
to
exit.
oP
oh
OVEN
USE
Odors
and
smoke
are
normal
when
the
oven
is
used
the
first
few
times,
or
when
it
is
heavily
soiled.
IMPORTANT:
The
health
of
some
birds
is
extremely
sensitive
to
the
fumes
given
off.
Exposure
to
the
fumes
may
result
in
death
to
certain
birds.
Always
move
birds
to
another
closed
and
well-
ventilated
room.
Aluminum
Foll
IMPORTANT:
To
avoid
permanent
damage
to
the
oven
bottom
finish,
do
not
line
the
oven
bottom
with
any
type
of
foil
or
liner.
m_
For
best
cooking
results,
do
not
cover
entire
rack
with
foil
because
air
must
be
able
to
move
freely.
m
Tocatch
spills,
place
foil
on
rack
below
dish.
Make
sure
foil
is
at
least
%"
(1.3
cm)
larger
than
the
dish
and
that
it
is
turned
up
at
the
edges.
m
Position
racks
before
turning
on
the
oven.
=
Do
not
position
racks
with
bakeware
on
them.
m
Make
sure
racks
are
level.
To
Remove
Oven
Racks:
Pull
rack
out
to
the
stop
position,
raise
the
front
edge,
and
then
pull
out.
To
Replace
Oven
Racks:
Place
rack
on
the
rack
support
in
the
oven.
Tilt
the
front
edge
up
slightly,
and
slide
rack
back
until
it
clears
the
stop
position.
Lower
front
and
slide
back
into
the
oven.
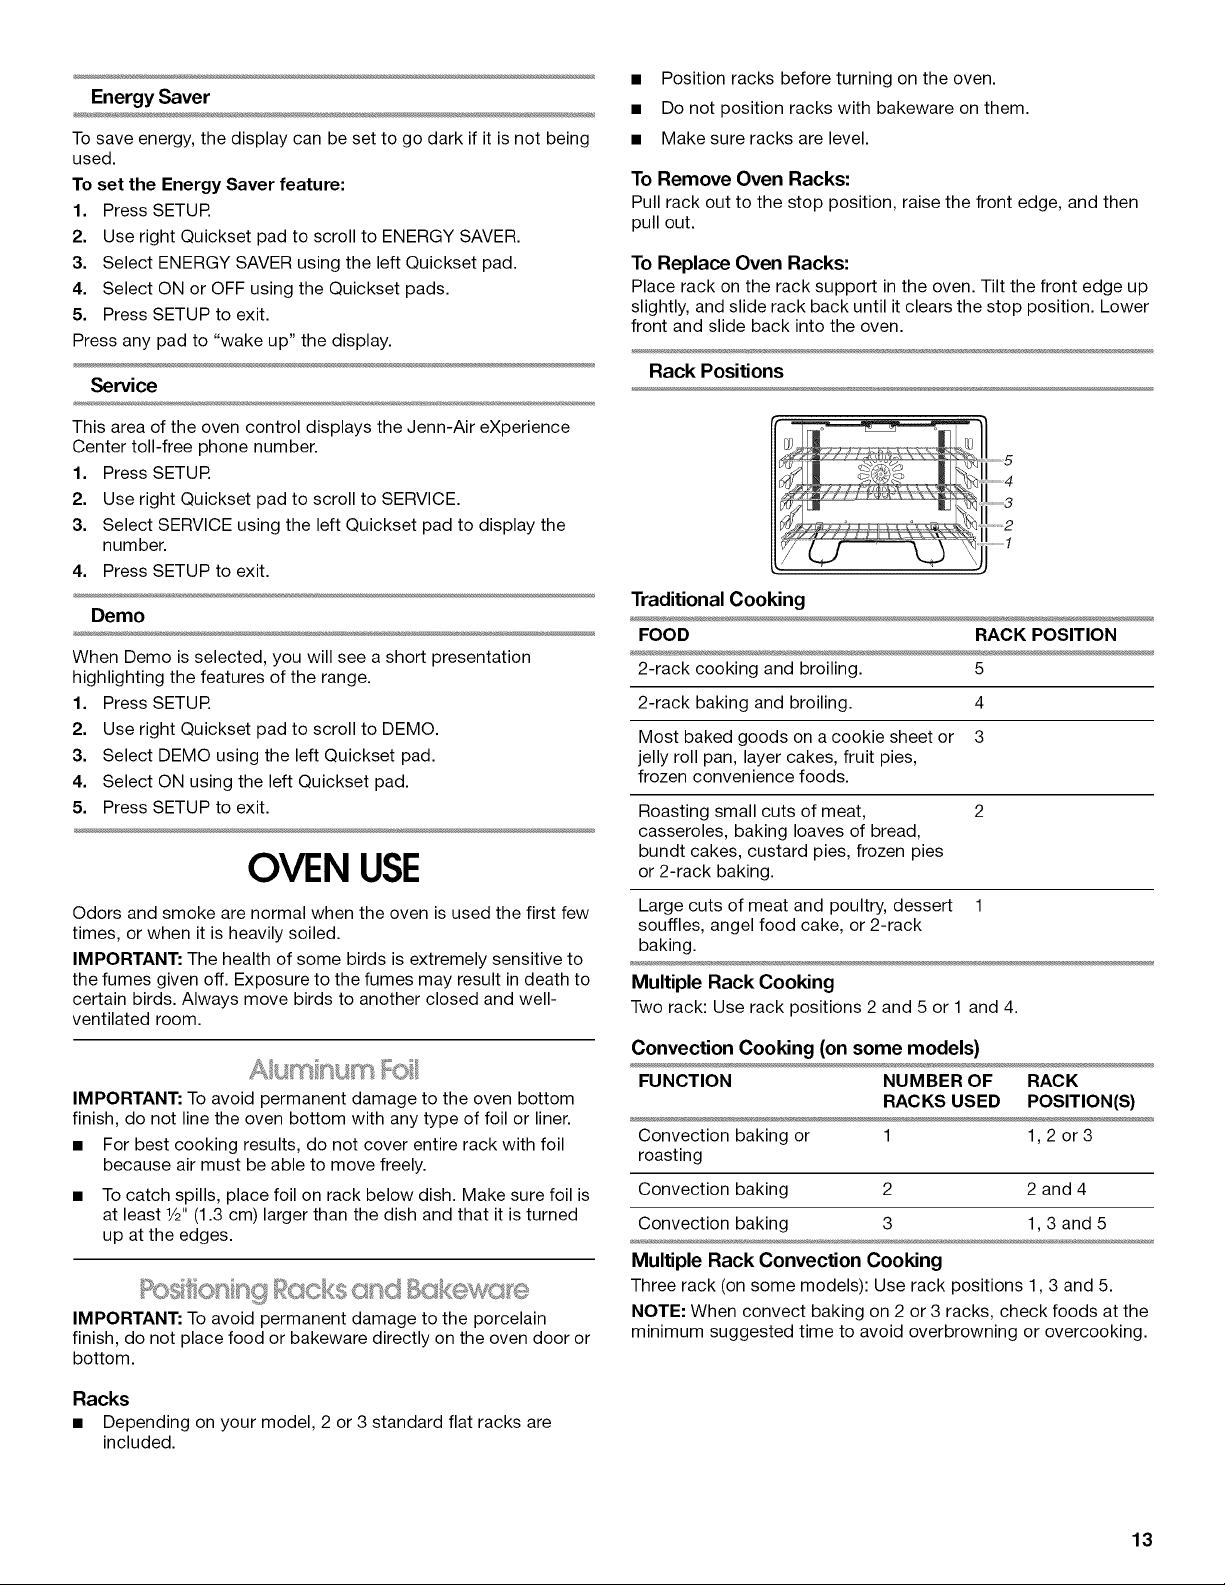
Rack
Positions
ah
GAG
Traditional
Cooking
FOOD
RACK
POSITION
2-rack
cooking
and
broiling.
5
2-rack
baking
and
broiling.
4
Most
baked
goods
on
a
cookie
sheet
or
3
jelly
roll
pan,
layer
cakes,
fruit
pies,
frozen
convenience
foods.
Roasting
small
cuts
of
meat,
2
casseroles,
baking
loaves
of
bread,
bundt
cakes,
custard
pies,
frozen
pies
or
2-rack
baking.
Large
cuts
of
meat
and
poultry,
dessert
1
souffles,
angel
food
cake,
or
2-rack
baking.
Multiple
Rack
Cooking
Two
rack:
Use
rack
positions
2
and
5
or
1
and
4.
Convection
Cooking
(on
some
models)
FUNCTION
NUMBER
OF
RACK
RACKS
USED
__
POSITION(S)
Convection
baking
or
1
1,20r3
roasting
Convection
baking
2
2and4
Convection
baking
3
1,3
and5
Positioning
Racks
and
Bakewc
IMPORTANT:
To
avoid
permanent
damage
to
the
porcelain
finish,
do
not
place
food
or
bakeware
directly
on
the
oven
door
or
bottom.
Racks
m
Depending
on
your
model,
2
or
3
standard
flat
racks
are
included.
Multiple
Rack
Convection
Cooking
Three
rack
(on
some
models):
Use
rack
positions
1,
3
and
5.
NOTE:
When
convect
baking
on
2
or
3
racks,
check
foods
at
the
minimum
suggested
time
to
avoid
overbrowning
or
overcooking.
13
Loading ...
Loading ...
Loading ...