
Loading ...
Loading ...
Loading ...
CONTENTS
Warranty .................................................................... 2
Safety instructions for Table Saw .......................... 2
Additional Instructions for Rip Type Cuts ............... 4
Additiona_ Instructions for Cross Cut Type Cuts ...5
Glossary of Terms for Woodworking ..................... 5
Motor Specifications and
Electrical Requirements ...................................... 6
Motor Specifications ............................................. 6
Changing Motor Voltage ........................................ 7
Motor Thermal Overload Protector ........................ 8
Wire Sizes .............................................................. 8
Unpacking and Checking Contents ........................ 9
Tools Needed ......................................................... 9
List of Loose Pads ............................................... 10
AssembSy ................................................................ 13
installing Handwheels .......................................... 13
Checking Table Insed ......................................... 13
Checking Blade Squareness to Table ................. 14
Assembling Steel Legs ........................................ 14
Mounting Saw ...................................................... ! 5
Attaching and Assembling Table Extensions ....... 16
Mounting Switch .................................................. 17
installing Right Front Rip Fence
Guide Bar ........................................................ 17
installing Left Front Rip Fence
Guide Bar ........................................................ 18
Installing Rear Rip Fence Guide Bars .................. 19
Adjusting Rip Fence Guide Bars .......................... 21
Assembling Rip Fence ......................................... 24
Rip Fence Self Aligning Pad Adjustment ............ 25
Rip Fence Lock Lever Adjustment ....................... 26
Rip Fence Alignment Adjustment ........................ 26
Installing Measuring Tapes .................................. 27
Installing Blade Guard ......................................... 29
Positioning Motor on Motor Mounting Base ......... 31
Mounting the Motor .............................................. 32
Installing Belt Guard ............................................. 33
Motor Connections ............................................... 35
Plugging in Motor ................................................. 35
Getting to Know Your Saw .................................... 36
On-Off Switch ....................................................... 36
Elevation Handwheel ........................................... 37
Tilt Handwheel ..................................................... 37
Tilt Lock Handle ................................................... 37
Rip Fence ............................................................. 37
Miter Gauge ......................................................... 3-7
BBade Guard ......................................................... 37"
"]'able Insert ........................................................... 3"7
Removing and Instal{ing Sawblade .....................
Exact-I-Cut ...................................
Micro-Adjust Rip Fence ....................................... 3._;-_
Basic Saw Operation .............................................
Work Helpers ....................................................... 3 g
Push Stick and Push Block .............................. 3_°J
Auxiliary Fence/Work Support ......................... 4.0
Auxiliary Panel/Work Support .......................... z$O
Safety Instructions for Basic Saw Operations ....
Using the Miter Gauge ......................................
Crosscutting .....................................................
Repetitive Cutting ............................................ 4_-_
Miter Cutting ....................................................
Bevel Crosscutting ...........................................
Compound Mfter Cutting .................................. 45
Using the R_p Fence ..........................................
Ripping ............................................................ 46
Bevel Ripping Narrow Work ............................ 4.6
Using Featherboards for Thru Sawing ............. 4-7
Resawing ......................................................... 49
Cutting Panels ................................................. 50
Using Featherboards for Non Thru-Sawing ..... 50
Rabbeting ............................................................ 5 1
P_oughing and Molding ........................................ 53
Dadoing ................................................................ 52
Molding Cutting .................................................... 52
Adjustments ...........................................................
Miter Gauge ......................................................... 53
Heeling Adjustment or Parallelism of Sawbtade
to Miter Gauge Groove .................................... 55
Blade Tilt, or Squareness of Blade to Table ........ 55
90° Position ..................................................... 55
45° Position ...................................................... 56
Tilt Mechanism ..................................................... 5-7
Maintenance ........................................................... 57
Lubrication ..............................................................
Recommended Accessories ................................. 5_
Trouble Shooting ................................................... 59
General ................................................................ 59
Motor .................................................................... 59
Repair Parts ............................................................ 62
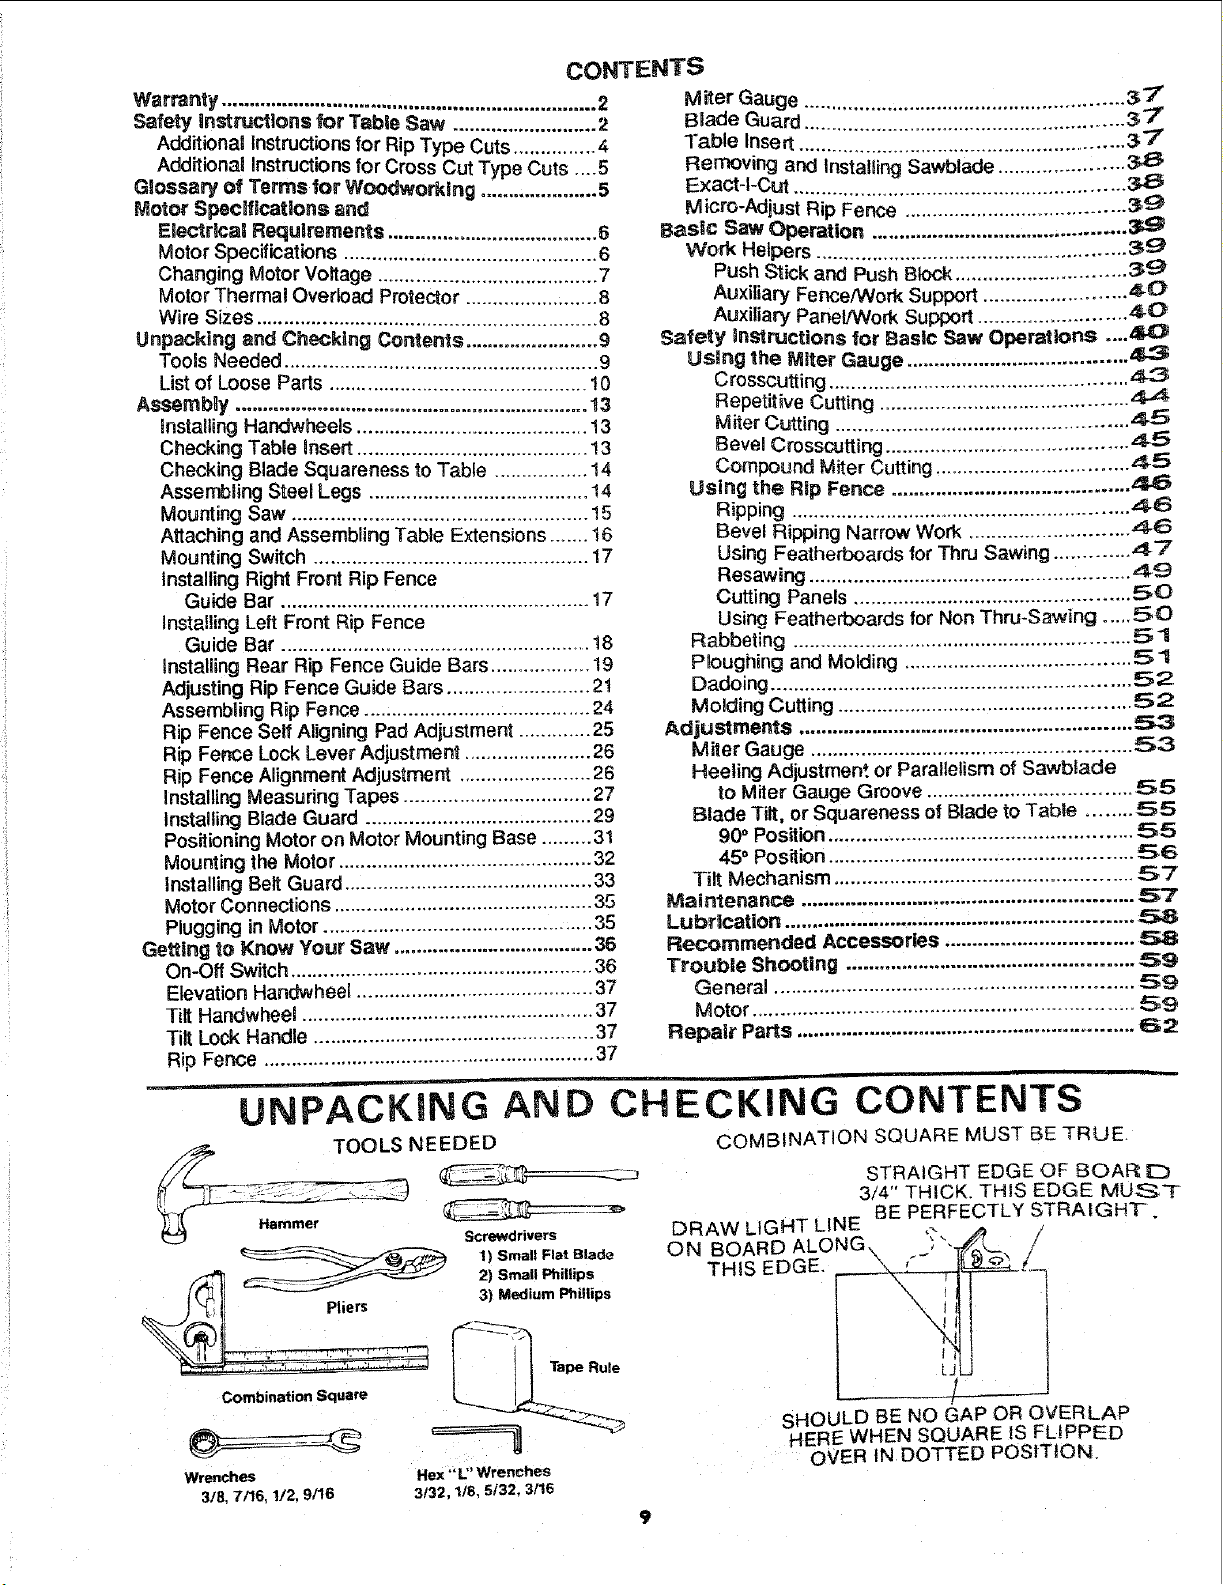
/_p, TOOLS NEEDED
Screwdrivers
'2', °°
i_;]l Pliers 3) Me_lium Phillips
Combination Square
Wrenches Hex ""L" Wrenches
3/8 7/16, 1/2. 9/16 3132, 1/8, 5132, 3/16
UNPACKING AND CHECKING CONTENTS
COMBINATION SQUARE MUST BE TRUE
STRAIGHT EDGE OF BOAF_
3/4" THICK. THIS EDGE MUS*T
BE PERFECTLY STRAIGH'F.
[_RAW LIGHT LINE
ON BOARD
THIS EDGE.
LJ
SHOULD BE NO GAP OR OVERLAP
HERE WHEN SQUARE IS FLIPPED
OVER IN DOTTED POSITION.
Loading ...
Loading ...
Loading ...