Loading ...
Loading ...
Loading ...
• If the skew is used, the principles of the operation are the
same as those employed in cutting a bead - except that
the curve is longer and may be irregular. Use the extreme
heel throughout - start at longer end of curve (if curve is
irregular) and progress toward steeper end.
• If gouge is used, make cut in the same direction. Start with
the handle well back of point - swinging handle in the
direciton of tool travel to overtake the point, if necessary,
when the steep part of the curve is reached. Object is to
have the extreme point doing the cutting throughout with
the bevel as tangent to curve as possible.
Figure 48 - Chisel Inclined in Direction of Cut
MAKING LONG TAPER CUTS
Long taper cuts are made like long convex cuts, with the skew
or gouge. However, the angle between the cutting edge and
handle is kept constant during the entire cut. The handle is
not swung around.
• Always cut downhill. Do not cut too deeply at the center of
the taper.
SPINDLE TURNINGS
PLOTTING THE SHAPE
Once the basic cuts have been mastered, you are ready to
turn out finished work.
• The first step is to prepare a plan for the proposed turning.
This can be laid out on a suitable sheet of paper. The lay-
out should be to full size.
• Next, prepare the turning stock by squaring it up to the
size of the largest square or round section in your plan.
The stock can be cut to the exact length of the proposed
turning. However, in most cases, it is best to leave the
stock a little long at one or both ends to allow for trimming.
• Mount the stock in the lathe and rough it off to a maxi-
mum-size cylinder.
• Now, project your plan onto the turning by pencil marking
the various critical dimensions along the length of the spin-
dle. These dimensions can be laid out with an ordinary
ruler or by using a template. Make the pencil marks about
_12"long so they will be visible when the work is revolved
under power. The lines can be quickly traced around the
spindle by touching each line with the pencil.
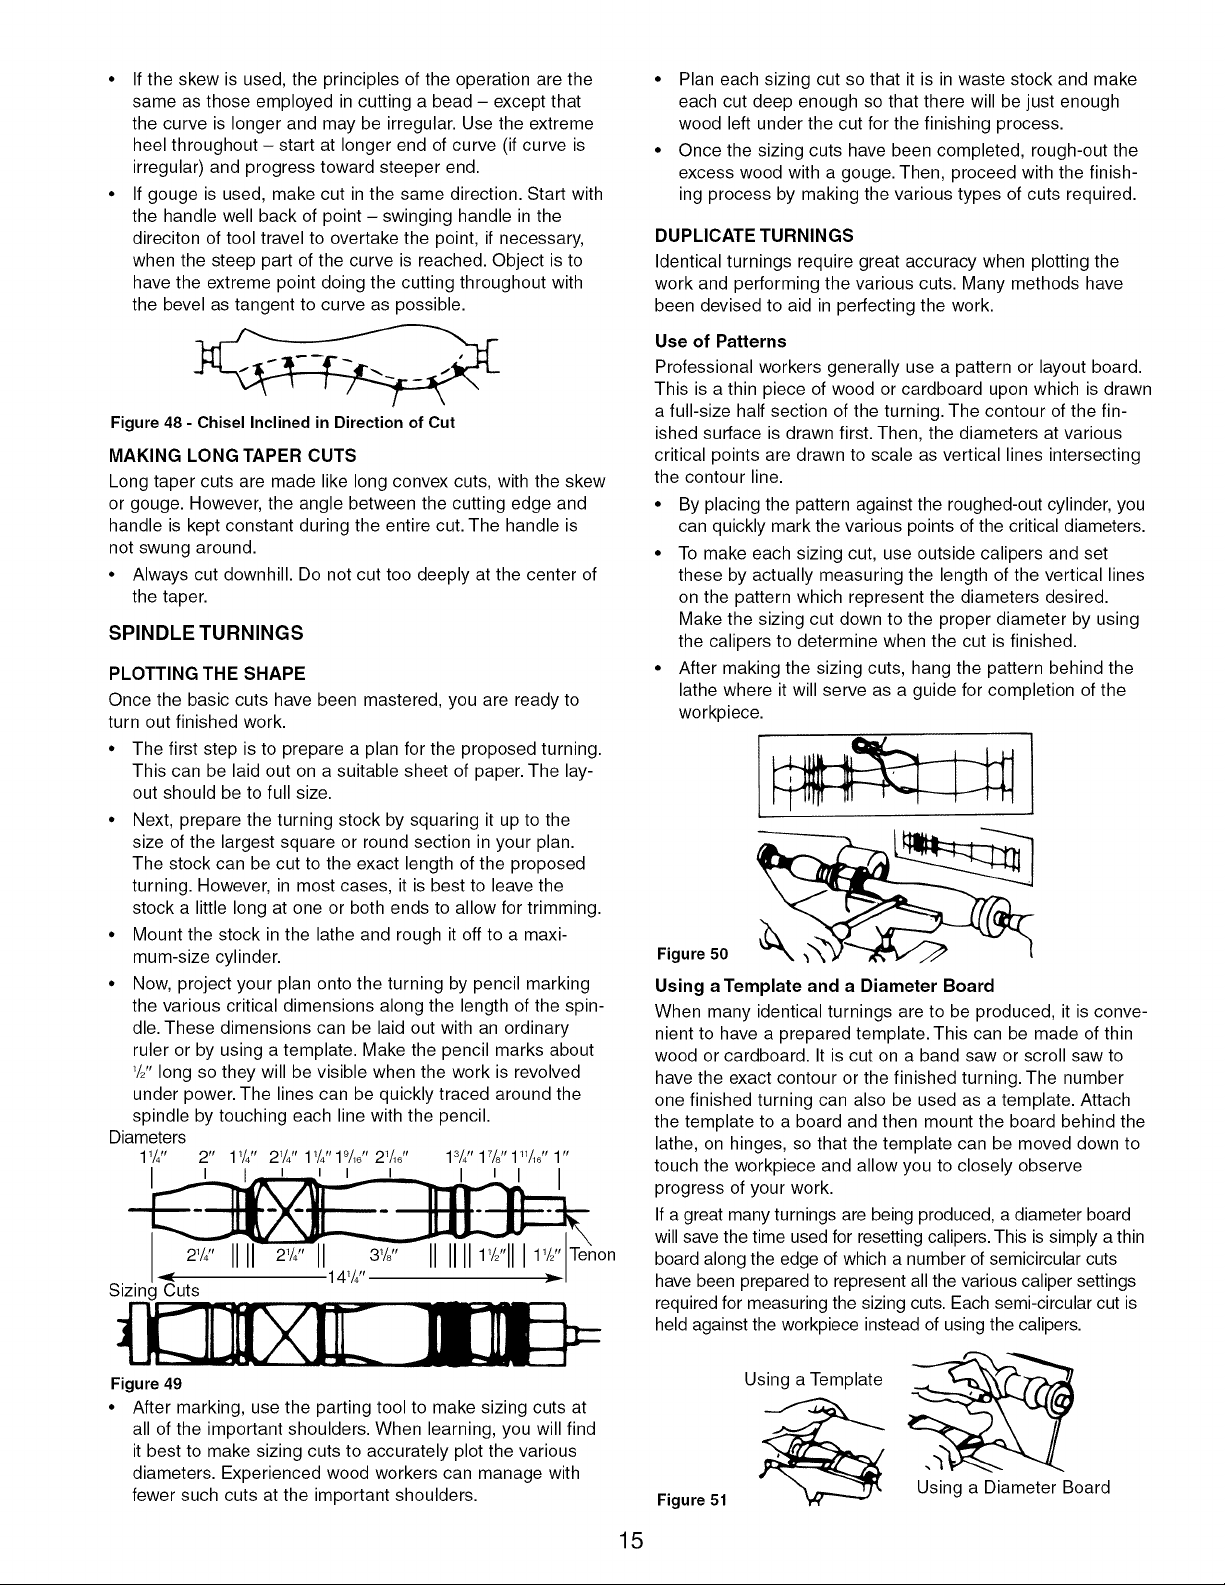
Diameters
1_/4'' 2" 1_/4'' 21/41'1_/4"19/_6'' 21/16'' 13/41'17/8"111/16'' 1"
_non
Sizin / _uts 141/4't _1
Figure 49
• After marking, use the parting tool to make sizing cuts at
all of the important shoulders. When learning, you will find
it best to make sizing cuts to accurately plot the various
diameters. Experienced wood workers can manage with
fewer such cuts at the important shoulders.
• Plan each sizing cut so that it is in waste stock and make
each cut deep enough so that there will be just enough
wood left under the cut for the finishing process.
• Once the sizing cuts have been completed, rough-out the
excess wood with a gouge. Then, proceed with the finish-
ing process by making the various types of cuts required.
DUPLICATE TURNINGS
Identical turnings require great accuracy when plotting the
work and performing the various cuts. Many methods have
been devised to aid in perfecting the work.
Use of Patterns
Professional workers generally use a pattern or layout board.
This is a thin piece of wood or cardboard upon which is drawn
a full-size half section of the turning. The contour of the fin-
ished surface is drawn first. Then, the diameters at various
critical points are drawn to scale as vertical lines intersecting
the contour line.
• By placing the pattern against the roughed-out cylinder, you
can quickly mark the various points of the critical diameters.
• To make each sizing cut, use outside calipers and set
these by actually measuring the length of the vertical lines
on the pattern which represent the diameters desired.
Make the sizing cut down to the proper diameter by using
the calipers to determine when the cut is finished.
• After making the sizing cuts, hang the pattern behind the
lathe where it will serve as a guide for completion of the
workpiece.
Figure 50 _
Using a Template and a Diameter Board
When many identical turnings are to be produced, it is conve-
nient to have a prepared template. This can be made of thin
wood or cardboard. It is cut on a band saw or scroll saw to
have the exact contour or the finished turning. The number
one finished turning can also be used as a template. Attach
the template to a board and then mount the board behind the
lathe, on hinges, so that the template can be moved down to
touch the workpiece and allow you to closely observe
progress of your work.
If a great many turnings are being produced, a diameter board
will save the time used for resetting calipers. This is simply a thin
board along the edge of which a number of semicircular cuts
have been prepared to represent all the various caliper settings
required for measuring the sizing cuts. Each semi-circular cut is
held against the workpiece instead of using the calipers.
Figure 51
Using a Template
Using a Diameter Board
15
Loading ...
Loading ...
Loading ...