Loading ...
Loading ...
Loading ...
Tilt the cutting edge, with handle raised up so that only the
extreme heel does this cutting.
If shoulder is at end of work, the process is called squaring
the end. In this case, reduce outer portion to a diameter
about 1/4"larger than tool center diameter.Then, later, saw
off the waste stock.
Wrong Right
Figure 43
CUTTING VEES
Vee grooves can be cut with either the toe or heel of the skew.
• When the toe is used, the cutting action is exactly the
same as when trimming a shoulder except that the skew is
tilted to cut at the required bevel. Light cuts should be
taken on first one side and then the other, gradually
enlarging the vee to the required depth and width.
• When the heel is used, the skew is rotated down into the
work, using the rest as a pivot. Otherwise, cutting position
and sequence of cuts are the same. As when using the
toe, it is important that cutting be done only by extreme
end of cutting edge.
• If deep vees are planned, it is quicker to start them by
making a sizing cut at the center of each vee.
• Vees can also be scraped with the spear point chisel or a
three-sided file.
Figure 44
CUTTING BEADS
This operation requires considerable practice.
• First, make a pencil line to locate the tops (highest points)
of two or more adjoining beads.
• Then, make a vee groove at the exact center between two
lines and down to the desired depth of the separation
between the beads. Be careful not to make the groove too
wide or you will remove portions of the desired beads. The
sides of the two adjoining beads are now cut with the heel of
the skew. Use a 1/2"skew, unless beads are very large.
• Place skew at right angles with the work axis, flat against the
surface, and well up near the top. The extreme heel should
be just inside the pencil line that marks the top of the bead.
• Now, draw skew straight back while raising handle slowly -
until edge of the heel at the pencil line starts to cut.
• As edge begins to cut, roll skew in the direction of the vee
so that the exact portion of the edge which started cutting
will travel in a 90 ° arc down to bottom of the vee.
• Upon reaching bottom of the vee, the skew should be on edge.
• Reverse the movements to cut side of the adjacent bead.
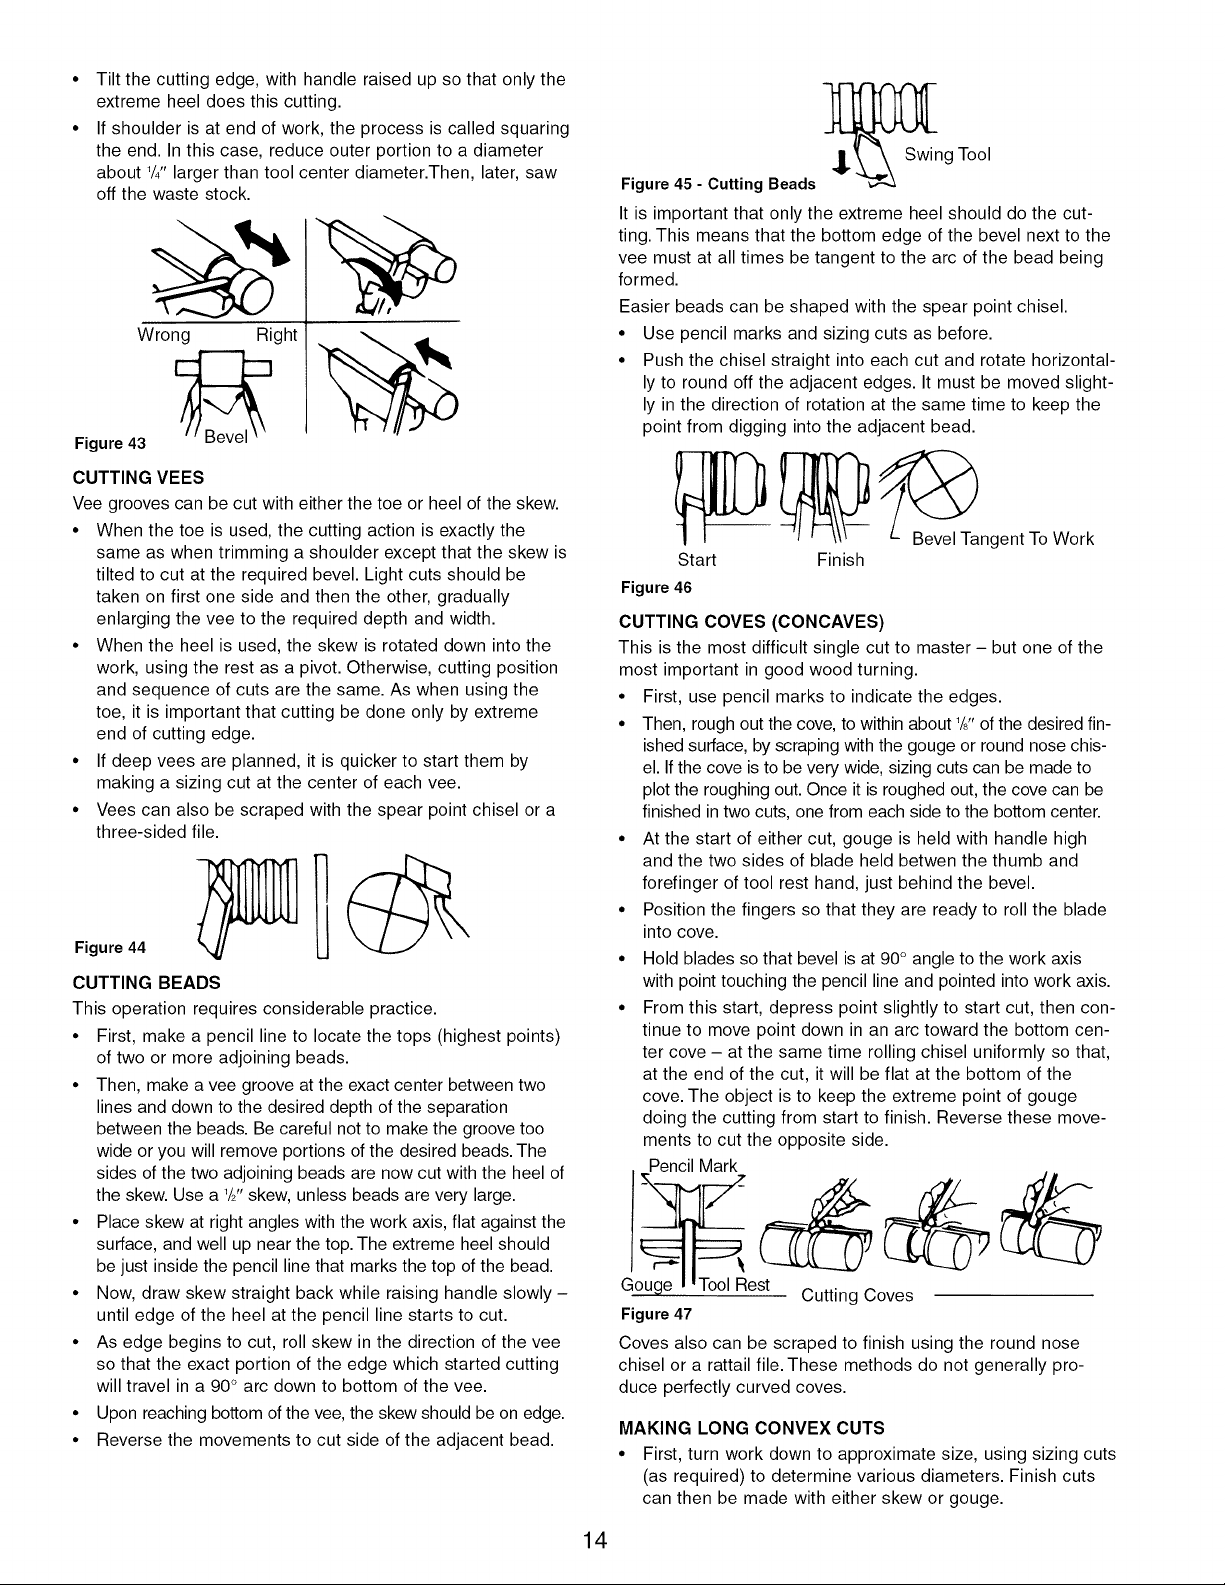
__Swing Tool
Figure 45 - Cutting Beads
It is important that only the extreme heel should do the cut-
ting. This means that the bottom edge of the bevel next to the
vee must at all times be tangent to the arc of the bead being
formed.
Easier beads can be shaped with the spear point chisel.
• Use pencil marks and sizing cuts as before.
• Push the chisel straight into each cut and rotate horizontal-
ly to round off the adjacent edges. It must be moved slight-
ly in the direction of rotation at the same time to keep the
point from digging into the adjacent bead.
Start
Figure 46
Finish
B_evel Tangent To Work
CUTTING COVES (CONCAVES)
This is the most difficult single cut to master - but one of the
most important in good wood turning.
• First, use pencil marks to indicate the edges.
• Then, rough out the cove, to within about '/J' of the desired fin-
ished surface, by scraping with the gouge or round nose chis-
el. If the cove is to be very wide, sizing cuts can be made to
plot the roughing out. Once it is roughed out, the cove can be
finished in two cuts, one from each side to the bottom center.
• At the start of either cut, gouge is held with handle high
and the two sides of blade held betwen the thumb and
forefinger of tool rest hand, just behind the bevel.
• Position the fingers so that they are ready to roll the blade
into cove.
• Hold blades so that bevel is at 90° angle to the work axis
with point touching the pencil line and pointed into work axis.
• From this start, depress point slightly to start cut, then con-
tinue to move point down in an arc toward the bottom cen-
ter cove - at the same time rolling chisel uniformly so that,
at the end of the cut, it will be flat at the bottom of the
cove. The object is to keep the extreme point of gouge
doing the cutting from start to finish. Reverse these move-
ments to cut the opposite side.
Pencil Mark
Gouge I WToolRest Cutting Coves
Figure 47
Coves also can be scraped to finish using the round nose
chisel or a rattail file. These methods do not generally pro-
duce perfectly curved coves.
MAKING LONG CONVEX CUTS
• First, turn work down to approximate size, using sizing cuts
(as required) to determine various diameters. Finish cuts
can then be made with either skew or gouge.
14
Loading ...
Loading ...
Loading ...