Loading ...
Loading ...
Loading ...
Many operations require that the cutting chisels be used for
scraping, but scraping chisels are practically never used for
cutting. Scraping dulls a chisel much faster, especially the
razor sharp cutting chisels.
Cutting is faster than scraping and produces a smoother finish
which requires less sanding. However, it is far more difficult to
master. Scraping, on the other hand, is far more precise and
easier to control.
When You Can Cut and When You Must Scrape
There are two different approaches:
• One approach is toward a circumference of the workpiece (for •
example turning down the outer surface of a cylinder or the
inner wall of a hollow round box). In this approach, the surface
being turned travels under the chisel edge like an endless belt.
• The second approach is toward the diameter of a workpiece
(as when turning the face of a faceplate turning, or the side of
a large shoulder on a spindle turning). In this approach, the
surface being turned rotates like a disc under the chisel edge.
• Sometimes the optimum approach will be a combination of
both methods.
!
J _Circumference
"--" t - Approach
Diameter
Approach
Figure 24
Either a cutting or scraping action can be used when the
approach is toward a circumference - the shaving is removed
like a peeling from a potato. Scraping can only be used when
the approach is toward a diameter. The reason is obvious
when you consider that faceplate turning practically always
requires removal of wood across the grain. Wood does not
peel easily across the grain and attempts to use any inappro-
priate cutting methods will likely result in damage to the work-
piece. There is also danger that the tool could be pulled from
the hands of the operator.
In general, a cutting action is used for the majority of spindle
turning operations while faceplate turning is usually accom-
plished by the scraping method. When a combination
approach is to be used, the operator will have to judge, by the
feel of the work, when to stop cutting and start scraping.
Never try to cut when it becomes difficult to hold the chisel
against the roughness of the wood grain.
How to Position Tool Rest for Circumference Cutting
When cutting, the object is to pierce the outer skin of wood to
a certain desired depth and then to hold the chisel steady
with the bevel edge parallel to the work circumference so that
it will peel off a shaving at this desired depth.
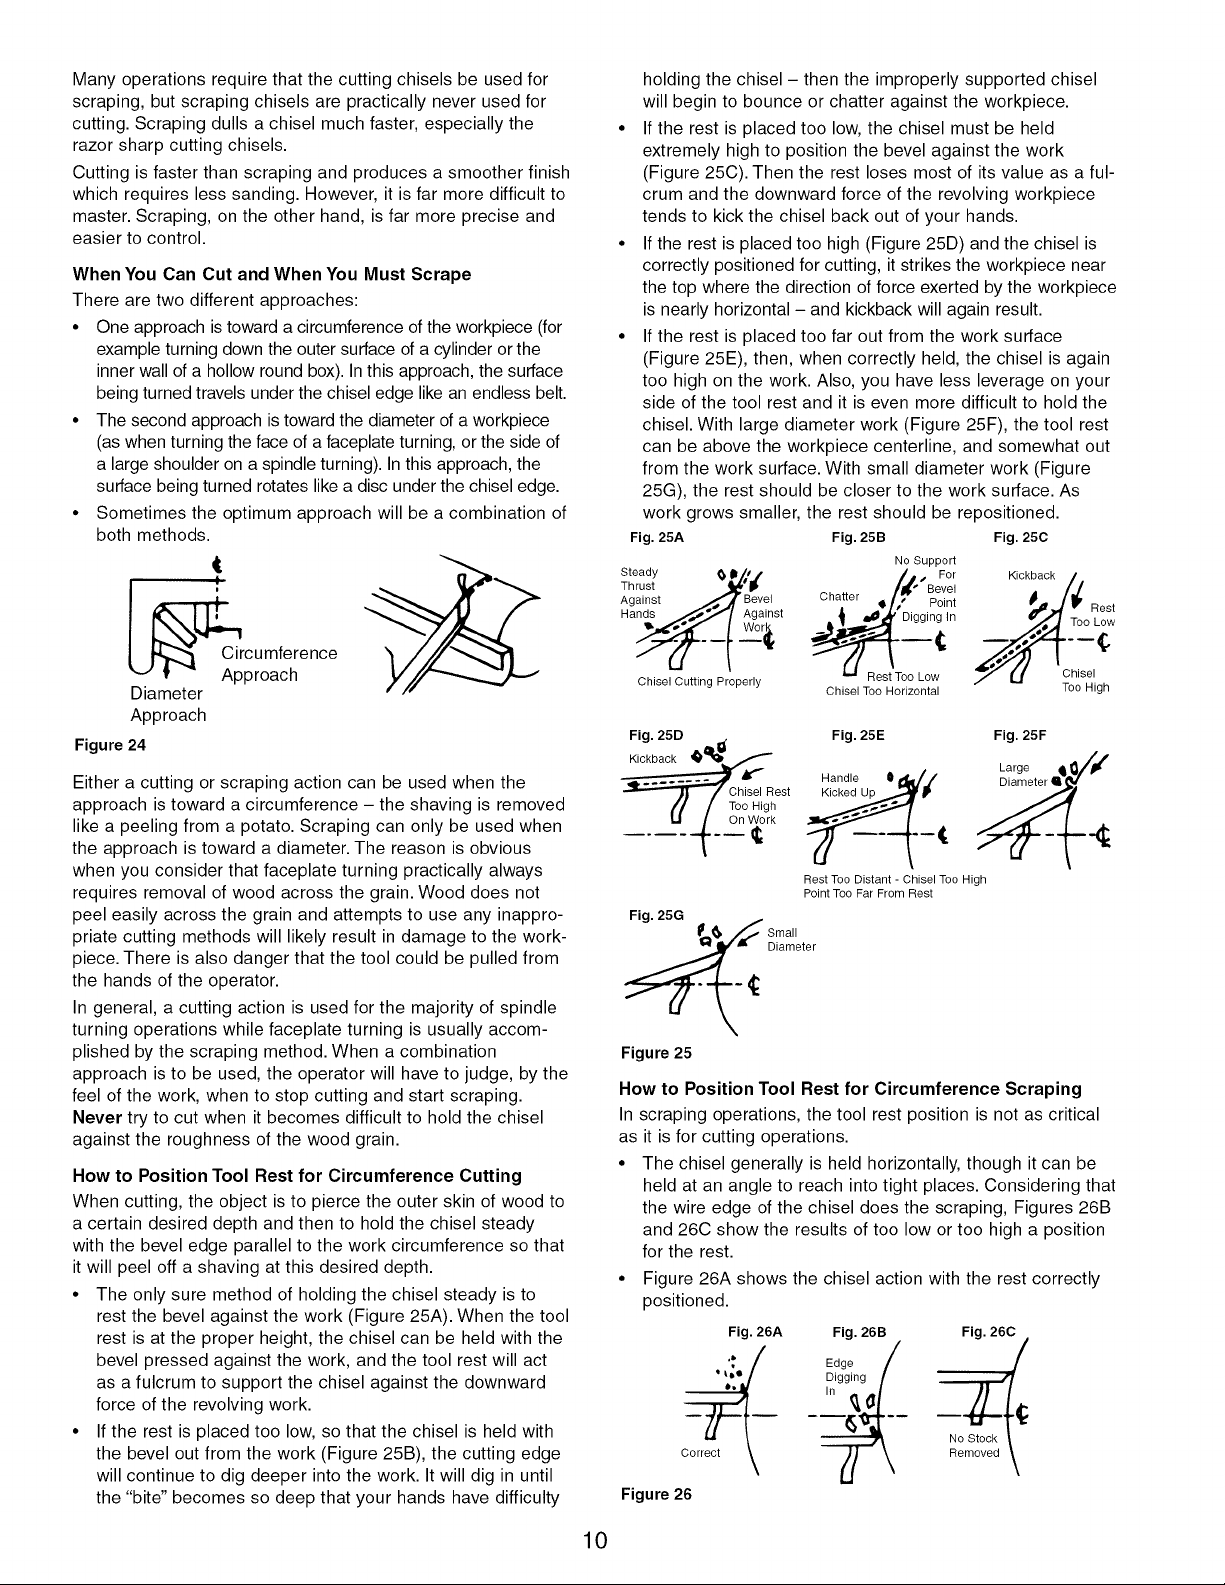
• The only sure method of holding the chisel steady is to
rest the bevel against the work (Figure 25A). When the tool
rest is at the proper height, the chisel can be held with the
bevel pressed against the work, and the tool rest will act
as a fulcrum to support the chisel against the downward
force of the revolving work.
• If the rest is placed too low, so that the chisel is held with
the bevel out from the work (Figure 25B), the cutting edge
will continue to dig deeper into the work. It will dig in until
the "bite" becomes so deep that your hands have difficulty
holding the chisel - then the improperly supported chisel
will begin to bounce or chatter against the workpiece.
If the rest is placed too low, the chisel must be held
extremely high to position the bevel against the work
(Figure 25C). Then the rest loses most of its value as a ful-
crum and the downward force of the revolving workpiece
tends to kick the chisel back out of your hands.
If the rest is placed too high (Figure 25D) and the chisel is
correctly positioned for cutting, it strikes the workpiece near
the top where the direction of force exerted by the workpiece
is nearly horizontal - and kickback will again result.
If the rest is placed too far out from the work surface
(Figure 25E), then, when correctly held, the chisel is again
too high on the work. Also, you have less leverage on your
side of the tool rest and it is even more difficult to hold the
chisel. With large diameter work (Figure 25F), the tool rest
can be above the workpiece centerline, and somewhat out
from the work surface. With small diameter work (Figure
25G), the rest should be closer to the work surface. As
work grows smaller, the rest should be repositioned.
Fig. 25A Fig. 25B Fig. 25C
Steady 1) II/o I
Thrust "_,' I1
Against __,,,'_.A Bevel
Hands .,,,,L_.,_.,,_[ Against
Chisel Cutting Properly
No Support
/j.,, For
IL" Bevel
Chatter
ff' Point
Chisel Too Horizontal
Kickback
Rest
Too Low
Chisel
Too High
Fig. 25D
Kickback __
Chisel Rest
Too High
On Work
Fig. 25E Fig. 25F
H_andle 0 l_J' LargeDiarneterIili_ f
Rest Too Distant - Chisel Too High
Point Too Far From Rest
Fig. 25G _
_ sm_leter
Figure 25
How to Position Tool Rest for Circumference Scraping
In scraping operations, the tool rest position is not as critical
as it is for cutting operations.
• The chisel generally is held horizontally, though it can be
held at an angle to reach into tight places. Considering that
the wire edge of the chisel does the scraping, Figures 26B
and 26C show the results of too low or too high a position
for the rest.
• Figure 26A shows the chisel action with the rest correctly
positioned.
Fig. 26A Fig. 26B Fig. 260
'_ Edge
• _o,_° Digging
• In
Figure 26
10
Loading ...
Loading ...
Loading ...