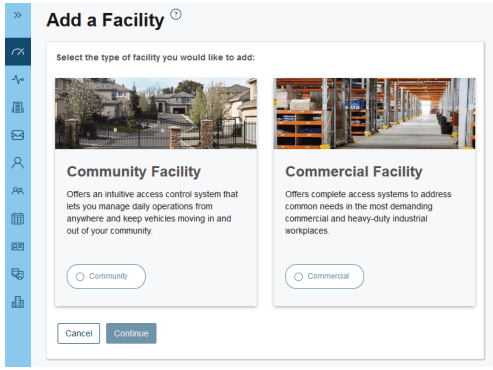
1. A. If existing facility: Skip to Step 3. B. If new facility: On left navigation bar, click Dashboard, then Facilities tab. Click the Add New Facility button.
2. Select the Facility type (Community Facility or Commercial Facility).
3. Click Continue.
4. Click Confirm. (You will not be able to change facility type once the facility is created.)
5. Enter the Facility information and click Save.
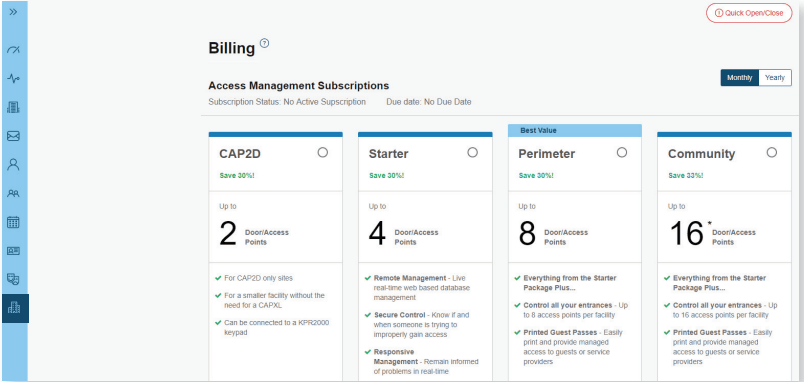
2. SELECT A SUBSCRIPTION PLAN
Click profile name in upper right corner then select Billing.
Select a subscription Plan and Add on features if desired.
Enter payment information and select monthly or yearly payments.
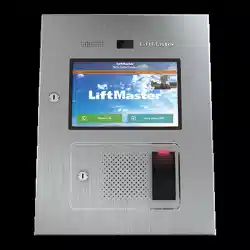
3. ADD CAPXLV TO THE FACILITY
Open the CAPXLV box and locate the CP # on the inside of the enclosure.
On the Left navigation bar, select Facility, then click the Device Management tab.
Click on the Add Devices button, Select CAPXLV [+], and enter the CP # and name the CAPXLV.
Click Save.
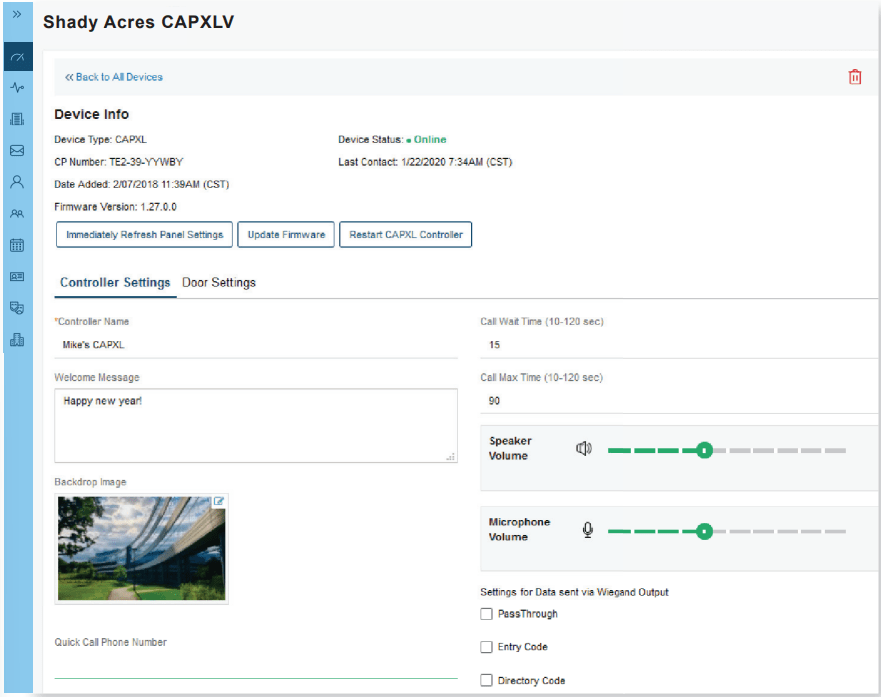
4. CONFIGURE CAPXLV SETTINGS
Enter CAPXLV settings such as the welcome message, custom background image, and register or link with Phone.com for VoIP calling service.
Click Save.
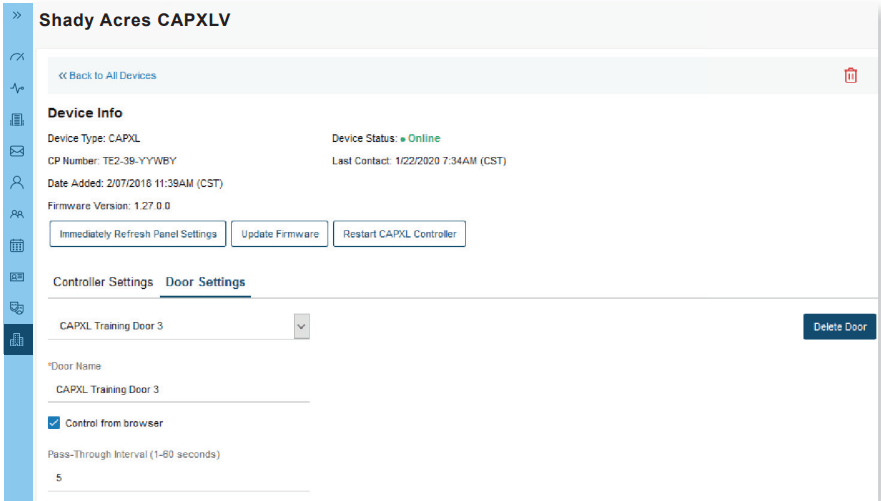
5. CONFIGURE DOOR SETTINGS
Click the Doors Settings tab to edit Door settings including hold open schedule, relay hold durations, DTMF tone, and Door name.
Click the Add Door button to add additional doors [max 4 per CAPXLV].
Click Save.
6. CONFIGURE CAMERA SETTINGS
Enter camera name
Select which doors will trigger event clips
Select Recording (on/off)
Click Save
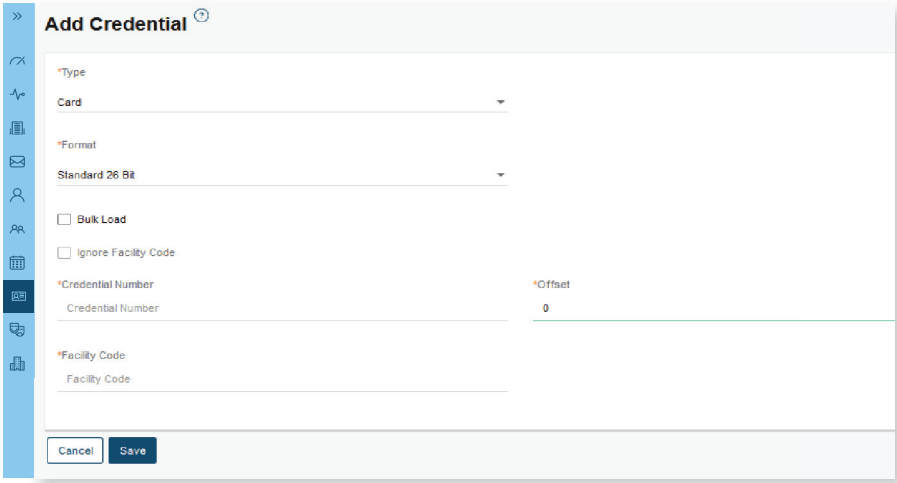
7. ADD CREDENTIALS
On the left navigation bar, click Credentials.
Click the Add Credential button to add transmitters, cards, etc. Individually or in bulk to the Facility.
Click Save.
NOTE: A credential must be associated to a person for it to be active. See Step 8.
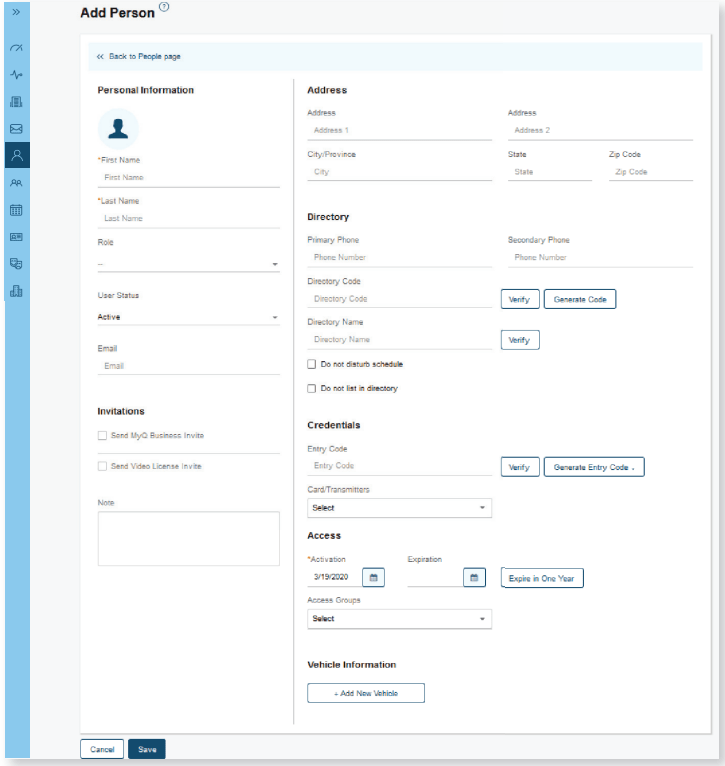
8. INVITE FACILITY OWNER AND ADMINISTRATORS
From the People menu, click the Add Person button.
Enter first and last name. You may enter other optional information on this page (Email, Role, Address, Directory, Credentials, Access, and Vehicles).
Click Save.
The person will receive an email invite to log into the Facility with rights determined by their role. The ranking of roles, from highest are Dealer Owner and Facility Owner, which have the most control, followed by Dealer Manager, Facility Manager, Dealer Tech, and Access Manager.
9. ADD PERSON
From the People menu, click the Add Person Button.
Add staff, residents, and vendors. This includes phone number(s), entry code(s), credentials, group(s), and activation dates.
Click Save.
NOTE: A person must be in a group to access any entrances in the community
10. CONFIRM SETUP PRIOR TO INSTALLATION
Confirm settings match those in myQ® Business™.
Make a test phone call (this can be done by calling a name in the directory or using the SIP test function under Network in the CAPXLV Admin mode. Disconnect power and Internet after settings have been confirmed.
11. VERIFY VIDEO CAMERA OPERATION
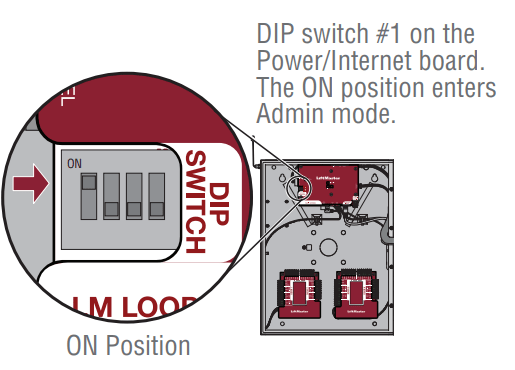
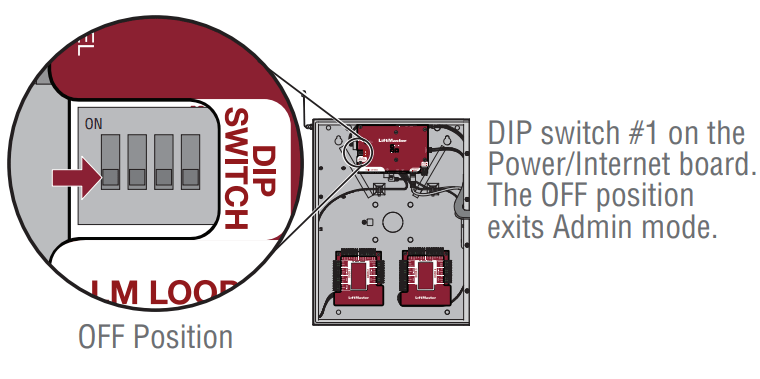
Turn on CAPXLV Admin mode, Locate and turn on DIP Switch 1 (located on Power & Internet board).
Make a test phone call using the SIP test function under Network > Test Sip. Enter a phone number and press the green phone icon.
Open the Audio/Video tab to confirm the video feed is working.
Turn off CAPXL Admin mode. Locate and turn off DIP Switch 1 (located on Power & Internet board).
Perform multiple access events at the CAPXLV and confirm archived video clips appear in the Activity Log.
INSTALLATION
1. INSTALL CAPXLV
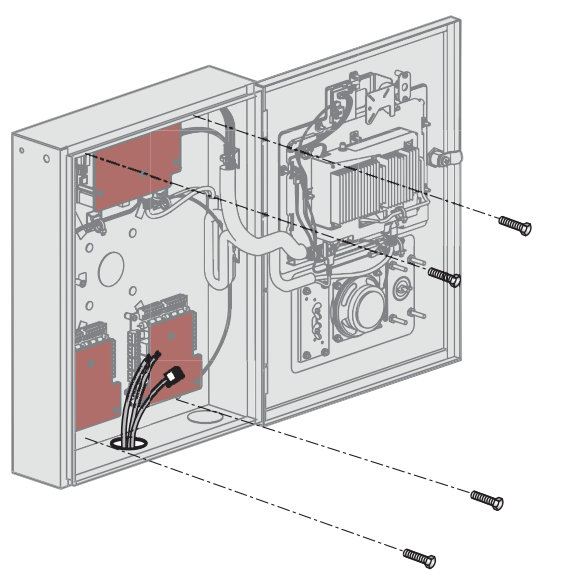
Remove knock outs as required and mount the CAPXLV to a pedestal, a flat solid surface, or into the optional trim kit and back box accessory (CAPXLTK).
2. INSTALL ACCESSORIES
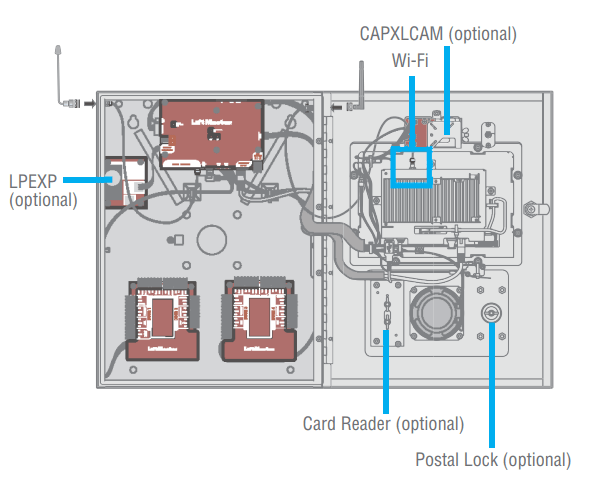
Install radio and Wi-Fi antennas, postal lock, optional card reader, and optional quick call input board as required.
NOTE: CAPXLV includes a camera.CAPXL retrofit accessory kit (CAPXLCAM) for CAPXL or for replacement.
3. CONNECT POWER AND GROUND
Route power wires from included Power Supply to CAPXLV and plug transformer into a 120 Vac outlet. Confirm CAPXLV powers on. Connect ground lug to earth ground. See the full manual for more information.
4. ENTER ADMIN MODE
Enter Admin mode using the DIP switch #1
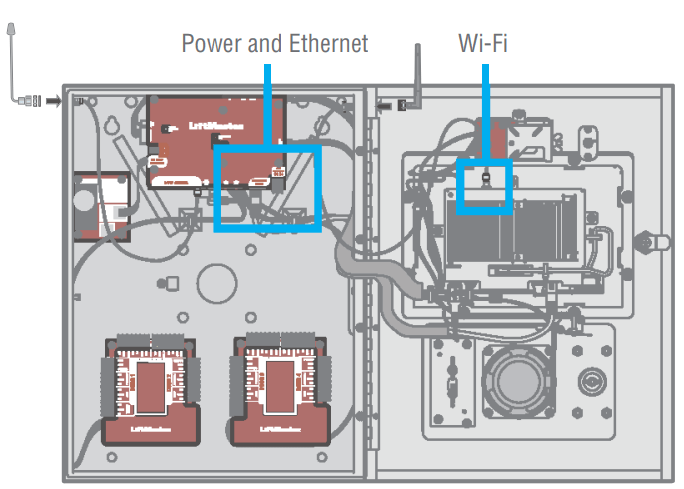
5. CONNECT AND CONFIGURE INTERNET
Make necessary connections for Internet at the job site (wired or Wi-Fi) and configure network settings in the CAPXLV Admin mode Network tab.
6. CONNECT ACCESS CONTROL WIRING
Route all necessary Wiegand, request to exit, and other input wiring into the CAPXLV and make necessary connections to the gate operator or mag lock being controlled.
If connecting to LiftMaster Gate Operators wirelessly, press LEARN Button on operator twice and LEARN Button for the desired relay in the Outputs tab in the CAPXLV Admin mode.
7. DOWNLOAD DATABASE
Select the Internet connection method and confirm valid connection. After a few minutes, the welcome message, background image, time, and directory will be downloaded to the CAPXLV.
8. VALIDATE PROPER OPERATION
Exit Admin mode using the DIP switch #1. Make a test phone call, test each credential type, and ensure proper behavior of each gate/door connected to CAPXLV. Test video functions.
Video Call Instructions
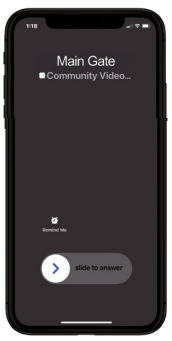
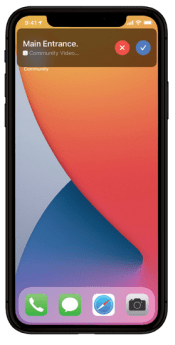
Answering Video Calls (iOS)
Locked phone
Unlock phone
Unlock phone
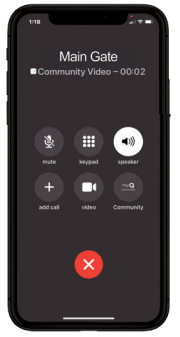
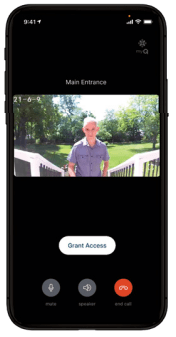
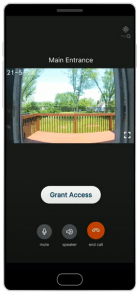
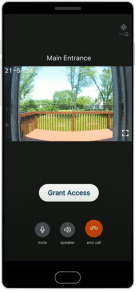
Answer call and grant or deny access
Unlocked phone
Click the accept button
Answer call and grant or deny access
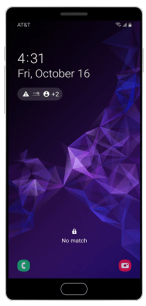
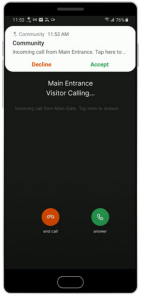
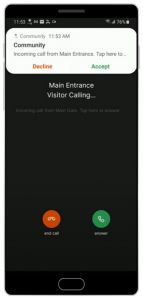
Answering Video Calls (Android)
Locked phone
Unlock Phone and open notification
Click and Accept notification
Grant or deny access
Unlocked phone
Click and Accept notification
Grant or deny access
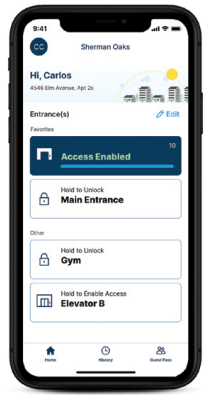
Press to Unlock Instructions
Open App
Press and HOLD to Unlock.
Unlocked button will be displayed until the entrance relocks.
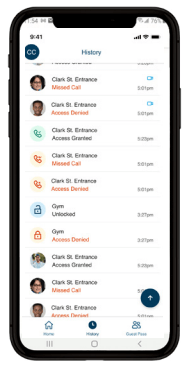
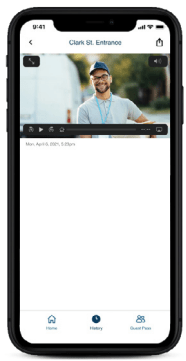
Event History and Video Playback Instructions
Shows all of your app activity. If your community has video, clips of all of your access events will be available for 24 hours**.
Click on any available video clips and it will play and allow you to share or download.
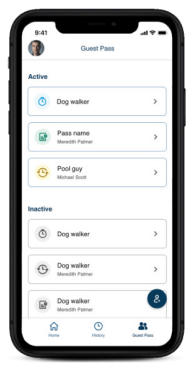
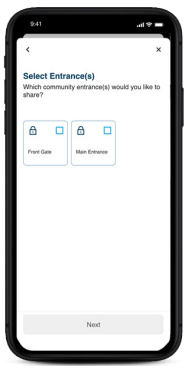
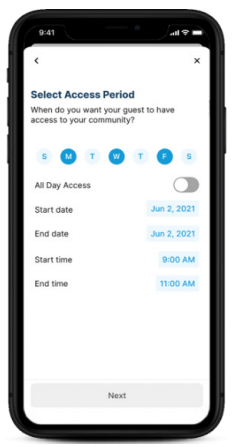
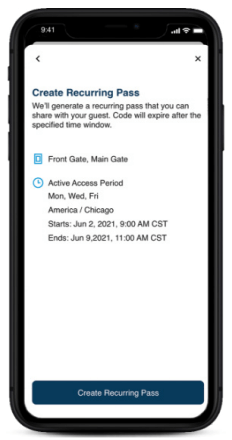
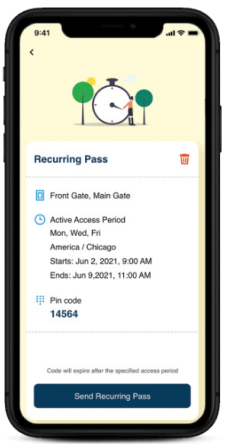
Create Virtual Passes for Guests or Deliveries
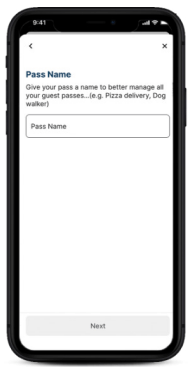
Navigate to Guest Pass, tap create icon and select a pass type.
2. Name your pass.
3. Select Entrance(s)
4. Select access period
5. Review and create pass.
6. Share via text messages or email.
Common Questions
Answering a Video Call:
Will I see the video as soon as I answer the call?
Once you follow the steps above to answer the call, you may see a green screen for a few seconds while the video is loading.
What happens when I miss a video call from my guest?
The call will roll over to an audio call, that you can answer and grant access as you normally do. Missed called will go to voice mail.
I can’t hear the person at the entrance and/or they can’t hear me, what is wrong?
Did you allow access to your phone speaker and microphone during set up? If you did not, go to your phone settings, look for the myQ Community app, and allow access to the speaker and microphone.
Why isn’t my video displaying properly?
A strong Wi-Fi or cellular connection is critical for video to work properly. A weak signal or connection could result in a compromised video image or an audio only call.
Event History / Video Clips:
How long are video clips stored in the app’s event history?
The community subscription comes with 24 hours of history storage of videos call events, guest pass events, and press to unlock events. Anything beyond that time period will not be accessible via the app. A community can purchase 30 days video storage to increase the event history in the app to 30 days.
How do I download a video clip from my history?
Navigate to app history menu option, select the video that you want to download, tap on the save video icon on top right corner of the app and then select “Save Video”. This action will download the video to your gallery or photos.
Is sound/audio available with video clips stored in my history?
To maintain your privacy and the privacy of your guest’s audio is not available in historic video clips. You will be able to interact two ways when you are in a video call with your visitor/guest but that same event if reviewed after the fact will not contain the associated audio in the history logs.
Press to Unlock:
What does it mean when I get an “Access Denied/Out of Schedule” message when I press to unlock?
A community may have a schedule for certain entry points. For example, if the gym is open from 9am-5pm, you will not be able to use the app to unlock the gym entrance outside the scheduled timeframe.
Guest Management:
Why am I not seeing amenity doors like the gym and pool to share with my guest?
Guest passes are only allowed for entrances that are on 24/7 schedule. If an amenity door’s schedule is 9am-5pm then that door will not be allowed to be shared with guests.
When do I use each of the pass types?
Delivery Pass can be used for food or package deliveries. It is valid for ten days but will be revoked shortly after the first use. Temporary Pass can be used for a weekend guest or service provider that requires access for a longer duration. Recurring Pass can be used for recurring visitors like baby sitters or dog walkers that require weekly access.
Is there another way to share a guest pass other than emails or text messages?
If you want to share the guest pass out of the community app, you have the ability to do so by selecting Send Recurring Pass and use “share via” option. This will allow you to share using any 3rd party apps that are installed on your phone.
I see an option to create a guest pass, however, when I start creating one I do not see any entrances to share with my guest
Your property manager will have to authorize doors that can be shared with a guest in order for it to appear during pass creation.
General App Questions:
Can I share my app license with other people in my household?
No, Your app license may not be used on another device, even if they are using your credentials to login.