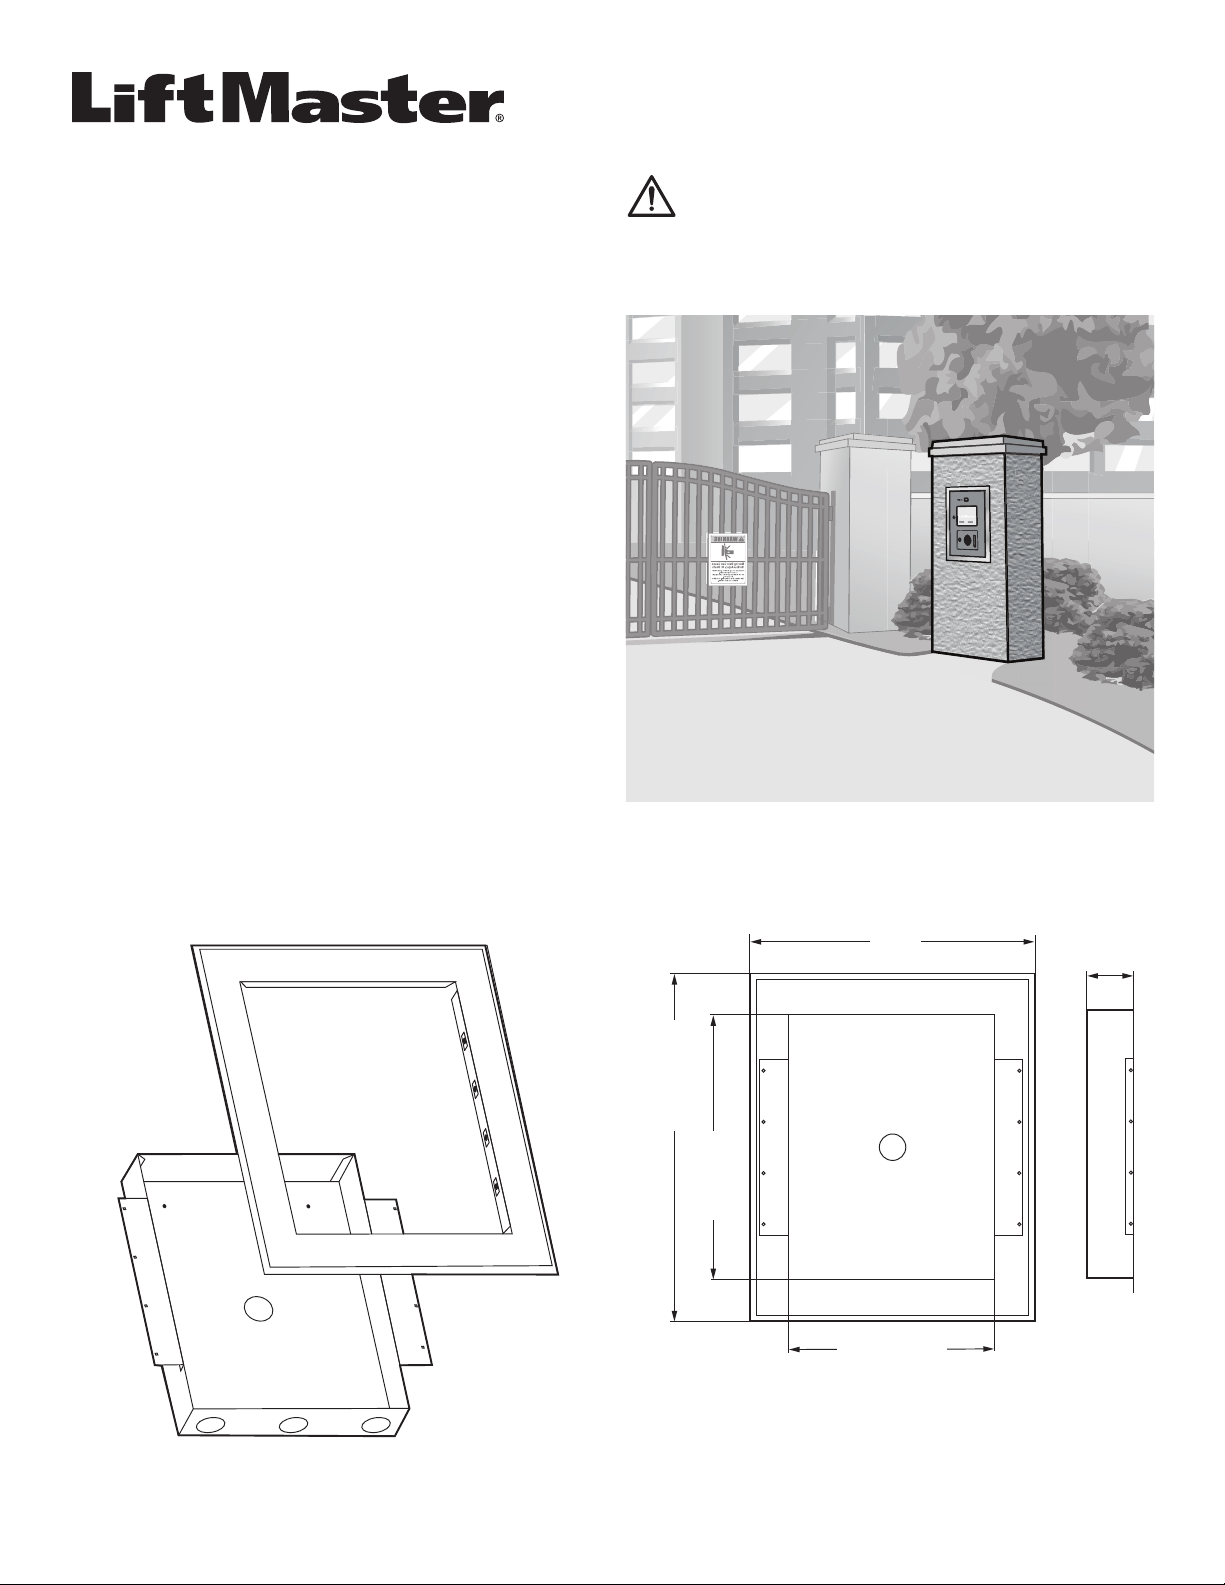
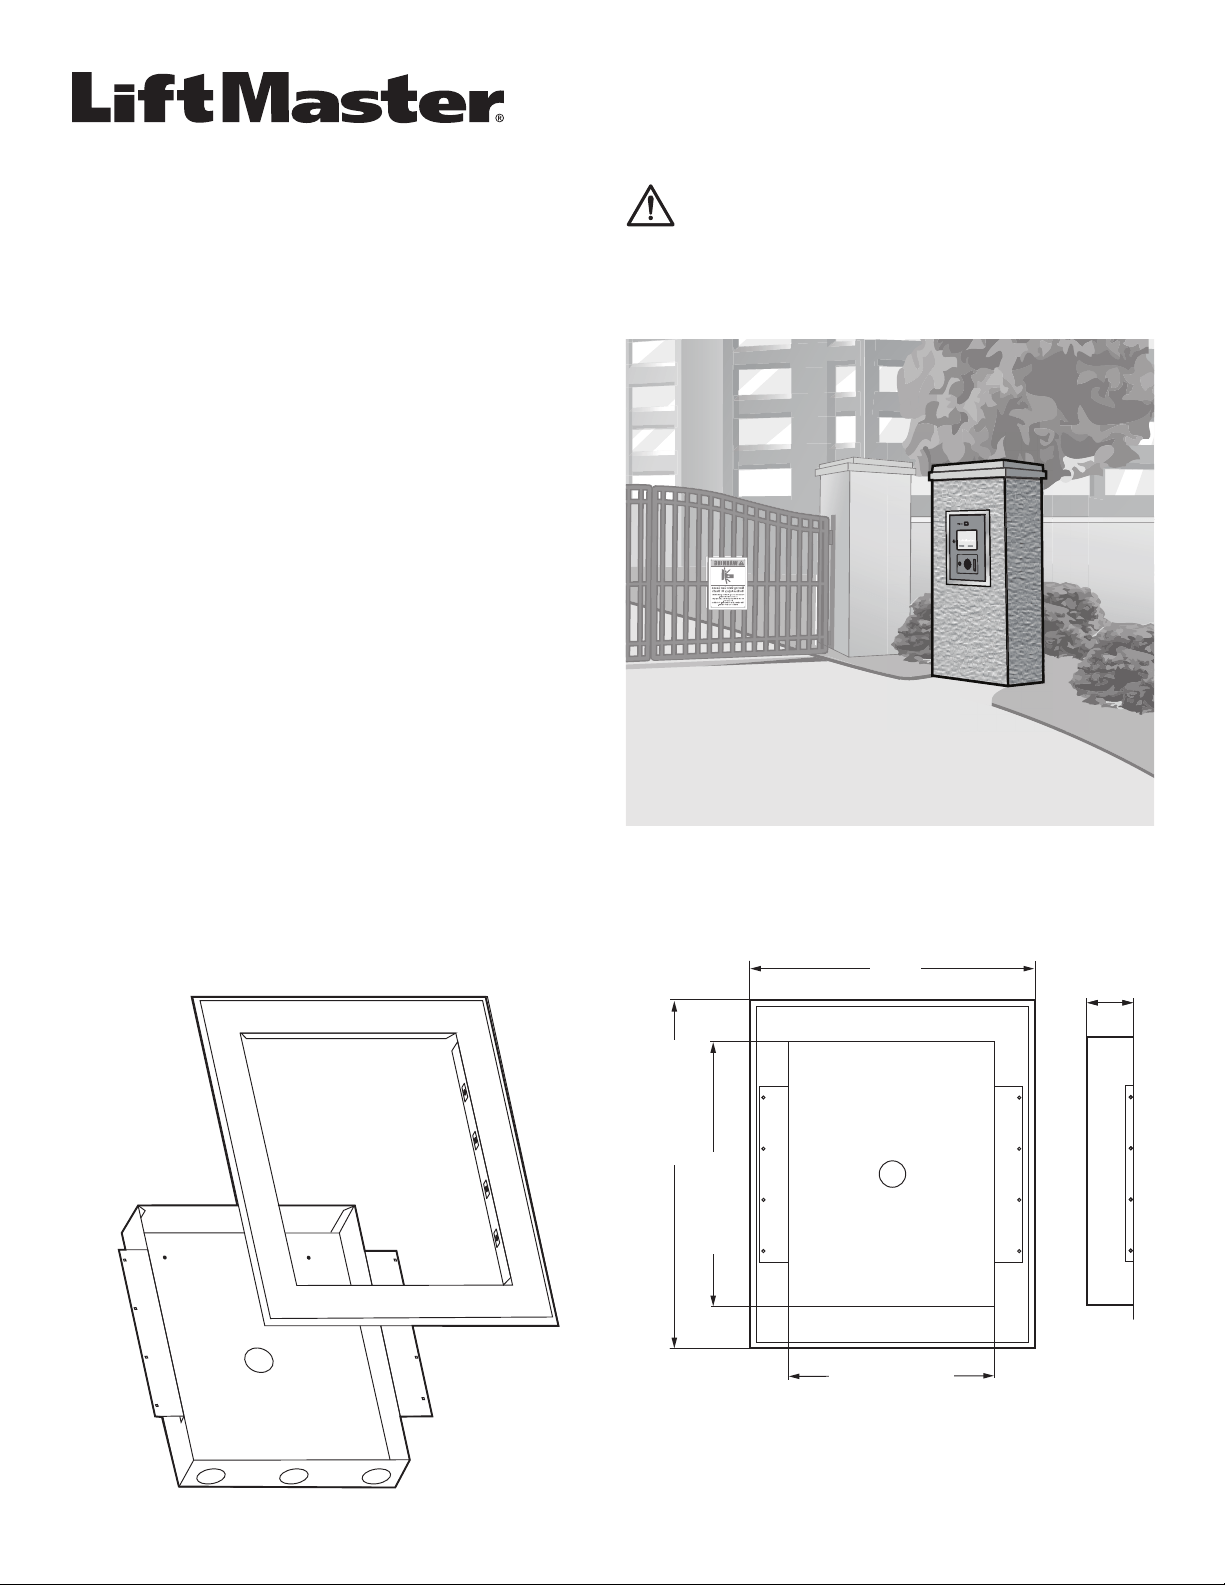
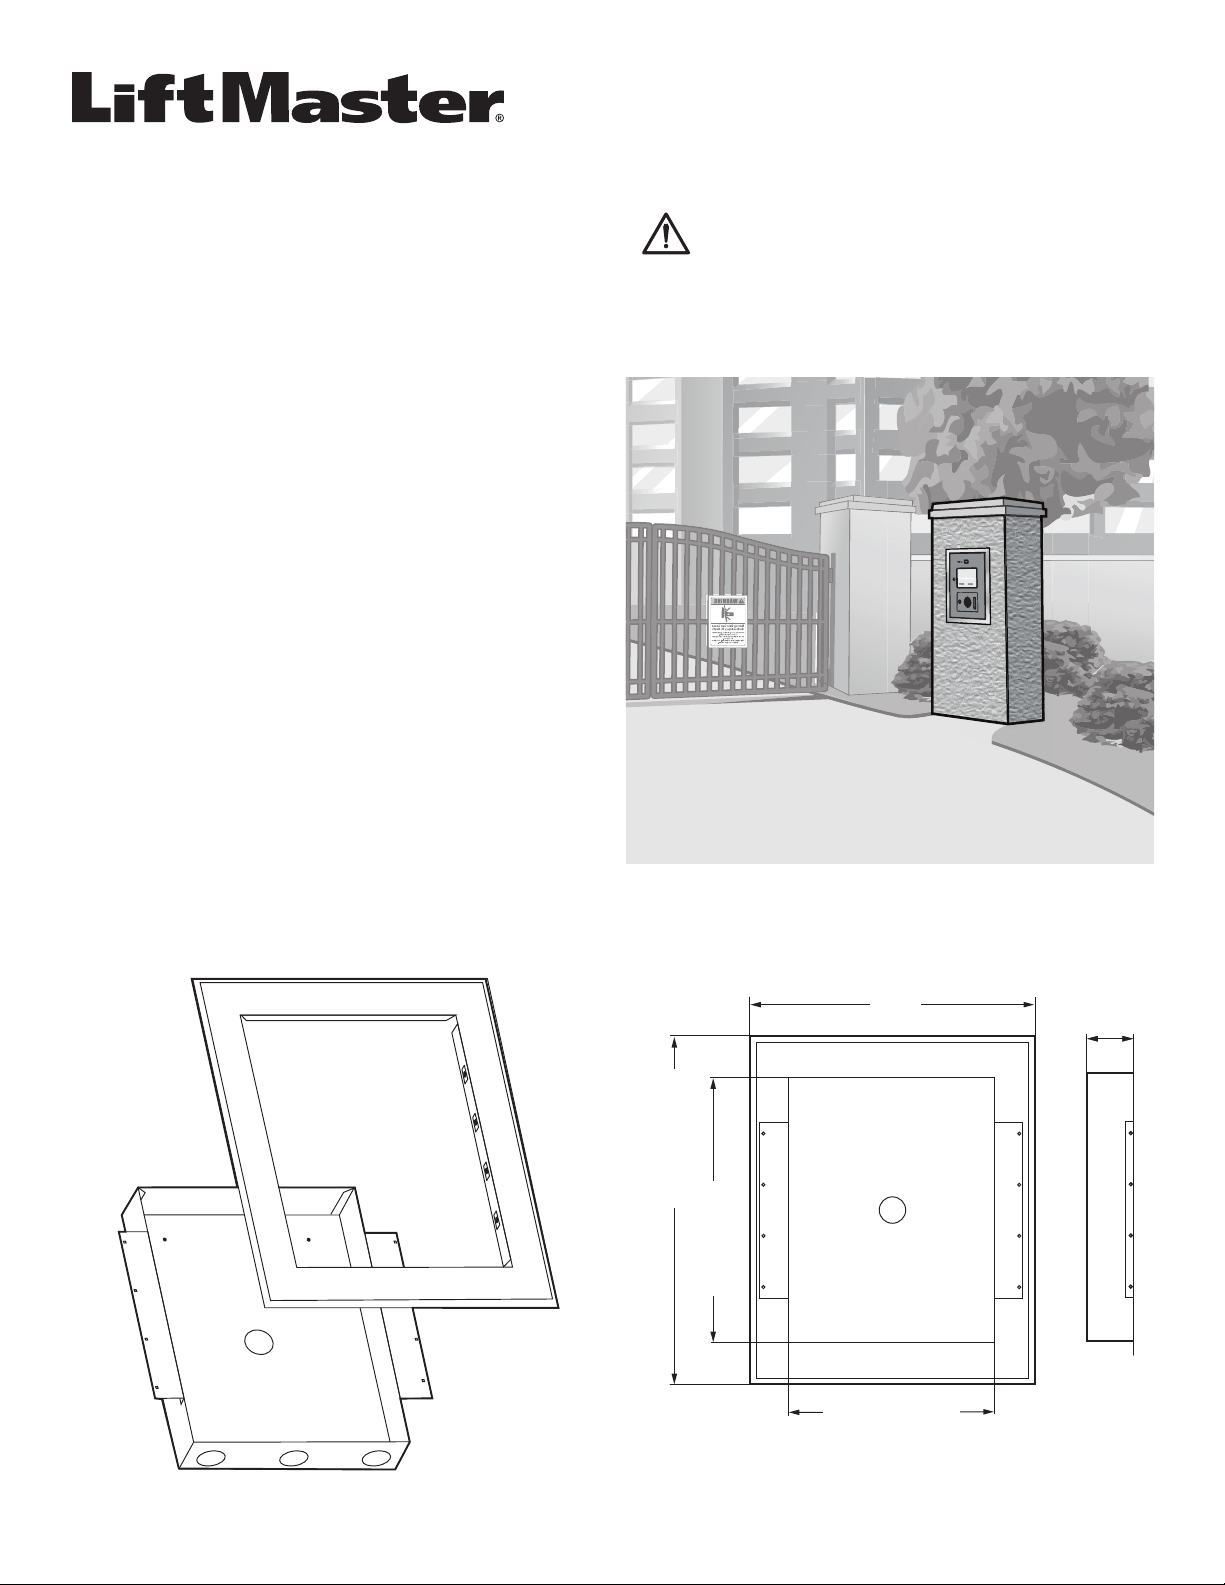
BACK BOX AND TRIM KIT
MODEL CAPXLTK
INTRODUCTION
The CAPXLTK back box and trim kit allows you to fl ush
mount an CAPXL/CAPXLV unit into a cutout of a wall (or
other fl at surface). The CAPXLTK is used for new installations
or retrofi ts ELITE Icon26 and Sentex Infi nity L systems.
INSTALLATION
1. Cut a hole in the wall to accommodate the back box of the trim kit
(back box dimensions: 18-1/2" x 14-13/16" [47 cm x 37.6 cm]).
2. Separate the trim plate from the back box by carefully pulling the trim
plate away from the back box.
3. Place the back box into the cutout. Use metal shims or hold the box
level while marking the mounting holes through the side brackets.
4. Fasten the back box and side bracket assembly to the wall or mounting
surface.
5. Snap the trim plate onto the back box ensuring the slots in the trim
plate are fully engaged with the screw heads.
6. Remove the four mounting knockouts found on the rear face of the
CAPXL/CAPXLV back box.
7. Install the CAPXL/CAPXLV using Phillips head screws 6-32 x .25" (4)
and #8 lock washers (4)(not provided).
Carton Inventory: Back box assembly, trim plate, instructions.
Additional Items You May Need: Phillips head screws 6-32 x .25" (4) and
#8 lock washers (4).
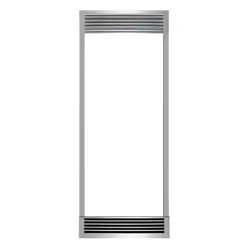
Trim Plate
Side
Bracket
Side
Bracket
Back Box
19-7/16"
(49.4 cm)
23-49/64" (60.4 cm)
18-1/2" (47 cm)
14-13/16"
(
37.6 cm
)
3-3/10"
(8.4 cm)
WARNING: This product can expose you to chemicals
including lead, which are known to the State of California to
cause cancer or birth defects or other reproductive harm. For
more information go to www.P65Warnings.ca.gov.
2
Plaque décorative
Support
latéral
Support
latéral
Boîtier arrière
ENSEMBLE DE BOÎTIER DE CONNEXION ET DE
PLAQUE DÉCORATIVE
MODEL CAPXLTK
INTRODUCTION
L’ensemble de boîtier de connexion et de plaque décorative CAPXLTK
vous permet d’encastrer une unité de contrôle d’accès CAPXL/CAPXLV
dans le découpage d’un mur (ou de toute autre surface plane). L’ensemble
CAPXLTK peut servir aux nouvelles installations ou à mettre à niveau les
systèmes ELITE Icon26 et Sentex Infi nity L.
INSTALLATION
1. Découper une ouverture dans le mur pouvant accueillir le boîtier arrière
du nécessaire de garniture (dimensions du boîtier arrière : 47 cm x
37,6 cm [18,5 po x 14,8 po]).
2. Séparer la plaque avant du boîtier arrière en tirant délicatement sur la
plaque pour la détacher de la boîte.
3. Placer le boîtier dans l’ouverture découpée. Placer le boîtier de niveau
avec des cales ou en le maintenant afi n de tracer les trous de montage
dans les supports latéraux.
4. Fixer le boîtier arrière et l’ensemble de supports latéraux au mur ou à la
surface de montage.
5. Emboîter la plaque décorative sur le boîtier en veillant à ce que les
fentes de la plaque soient entièrement engagées sur les têtes de vis.
6. Retirer les quatre pastilles défonçables situées dans la face arrière du
boîtier de l’unité CAPXL/CAPXLV.
7. Installer l’unité d’accès CAPXL/CAPXLV à l’aide de quatre vis
cruciforme no 6-32 x 0,25 po (4) et de rondelles d’arrêt n° 8 (4) (non
incluses).
49,4 cm
(19-7/16 po)
60,4 cm (23-49/64 po)
47 cm (18-1/2 po)
37,6 cm (14-13/16 po)
8,4 cm
(3-3/10 po)
Contenu de la Boîte D’emballage: Ensemble de boîtier, plaque décorative,
instructions.
Articles supplémentaires dont vous pourriez avoir besoin :
Vis cruciforme
no 6-32 x 0,25 po (4) et de rondelles d’arrêt n° 8 (4).
AVERTISSEMENT : Ce produit peut vous exposer à des produits
chimiques comme le plomb, reconnu par l’État de la Californie
comme cause de cancers, d’anomalies congénitales et d’autres
problèmes liés à la reproduction. Pour plus d’informations, visitez
www.P65Warnings.ca.gov.
3
CAJA TRASERA Y JUEGO DE AJUSTE
MODELO CAPXLTK
Placa de ajuste
Soporte
lateral
Soporte
lateral
Caja
49.4 cm
(19-7/16 pulg.)
60.4 cm (23-49/64 pulg.)
47 cm (18-1/2 pulg.)
37.6 cm
(
14-13/16
p
ul
g
.
)
8.4 cm
(3-3/10 pulg.)
INTRODUCCIÓN
La caja trasera y el juego de ajuste CAPXLTK le permite hacer un montaje
empotrado de una unidad CAPXL/CAPXLV en la abertura de una pared (u
otra superfi cie plana). El CAPXLTK se utiliza en instalaciones nuevas o se
adapta a los sistemas ELITE Icon26 y Sentex Infi nity L.
INSTALACIÓN
1. Hacer una abertura en la pared para alojar la caja del juego adaptador
(dimensiones: 47 cm x 37.6 cm [18.5 pulg. x 14.8 pulg.]).
2. Separe la placa de ajuste de la caja trasera jalando cuidadosamente la
placa hacia afuera de la caja.
3. Coloque la caja trasera en la abertura. Calce o sostenga el nivel de la
caja y marque los agujeros para el montaje a través de los soportes
laterales.
4. Ajuste la caja y el soporte lateral a la pared u otra superfi cie
de montaje.
5. Coloque la placa de ajuste en la caja trasera, asegurándose de que las
ranuras de la placa estén enganchadas con las cabezas de los tornillos.
6. Retire los cuatro orifi cios precortados para montaje que se encuentran
en la parte posterior de la caja trasera CAPXL/CAPXLV.
7. Instale la CAPXL/CAPXLV y use cuatro tornillos de 8-32 x 0.38 pulg.
(4) y arandelas de presión núm. 8 (4) (no incluidas).
Contenido de la caja: Montaje de la caja trasera, anillo de ajuste,
instrucciones.
Elementos adicionales que posiblemente necesite: Cuatro tornillos de
8-32 x 0.38 pulg. (4) y arandelas de presión núm. 8 (4).
ADVERTENCIA: Este producto puede exponerle a productos
químicos (incluido el plomo), que a consideración del
estado de California causan cáncer, defectos congénitos u
otros daños reproductivos. Para más información, visite
www.P65Warnings.ca.gov.

114A5011B
© 2017, LiftMaster
All Rights Reserved
Tous droits réservés
Todos los derechos reservados
LiftMaster
300 Windsor Drive
Oak Brook, IL 60523
LiftMaster.com