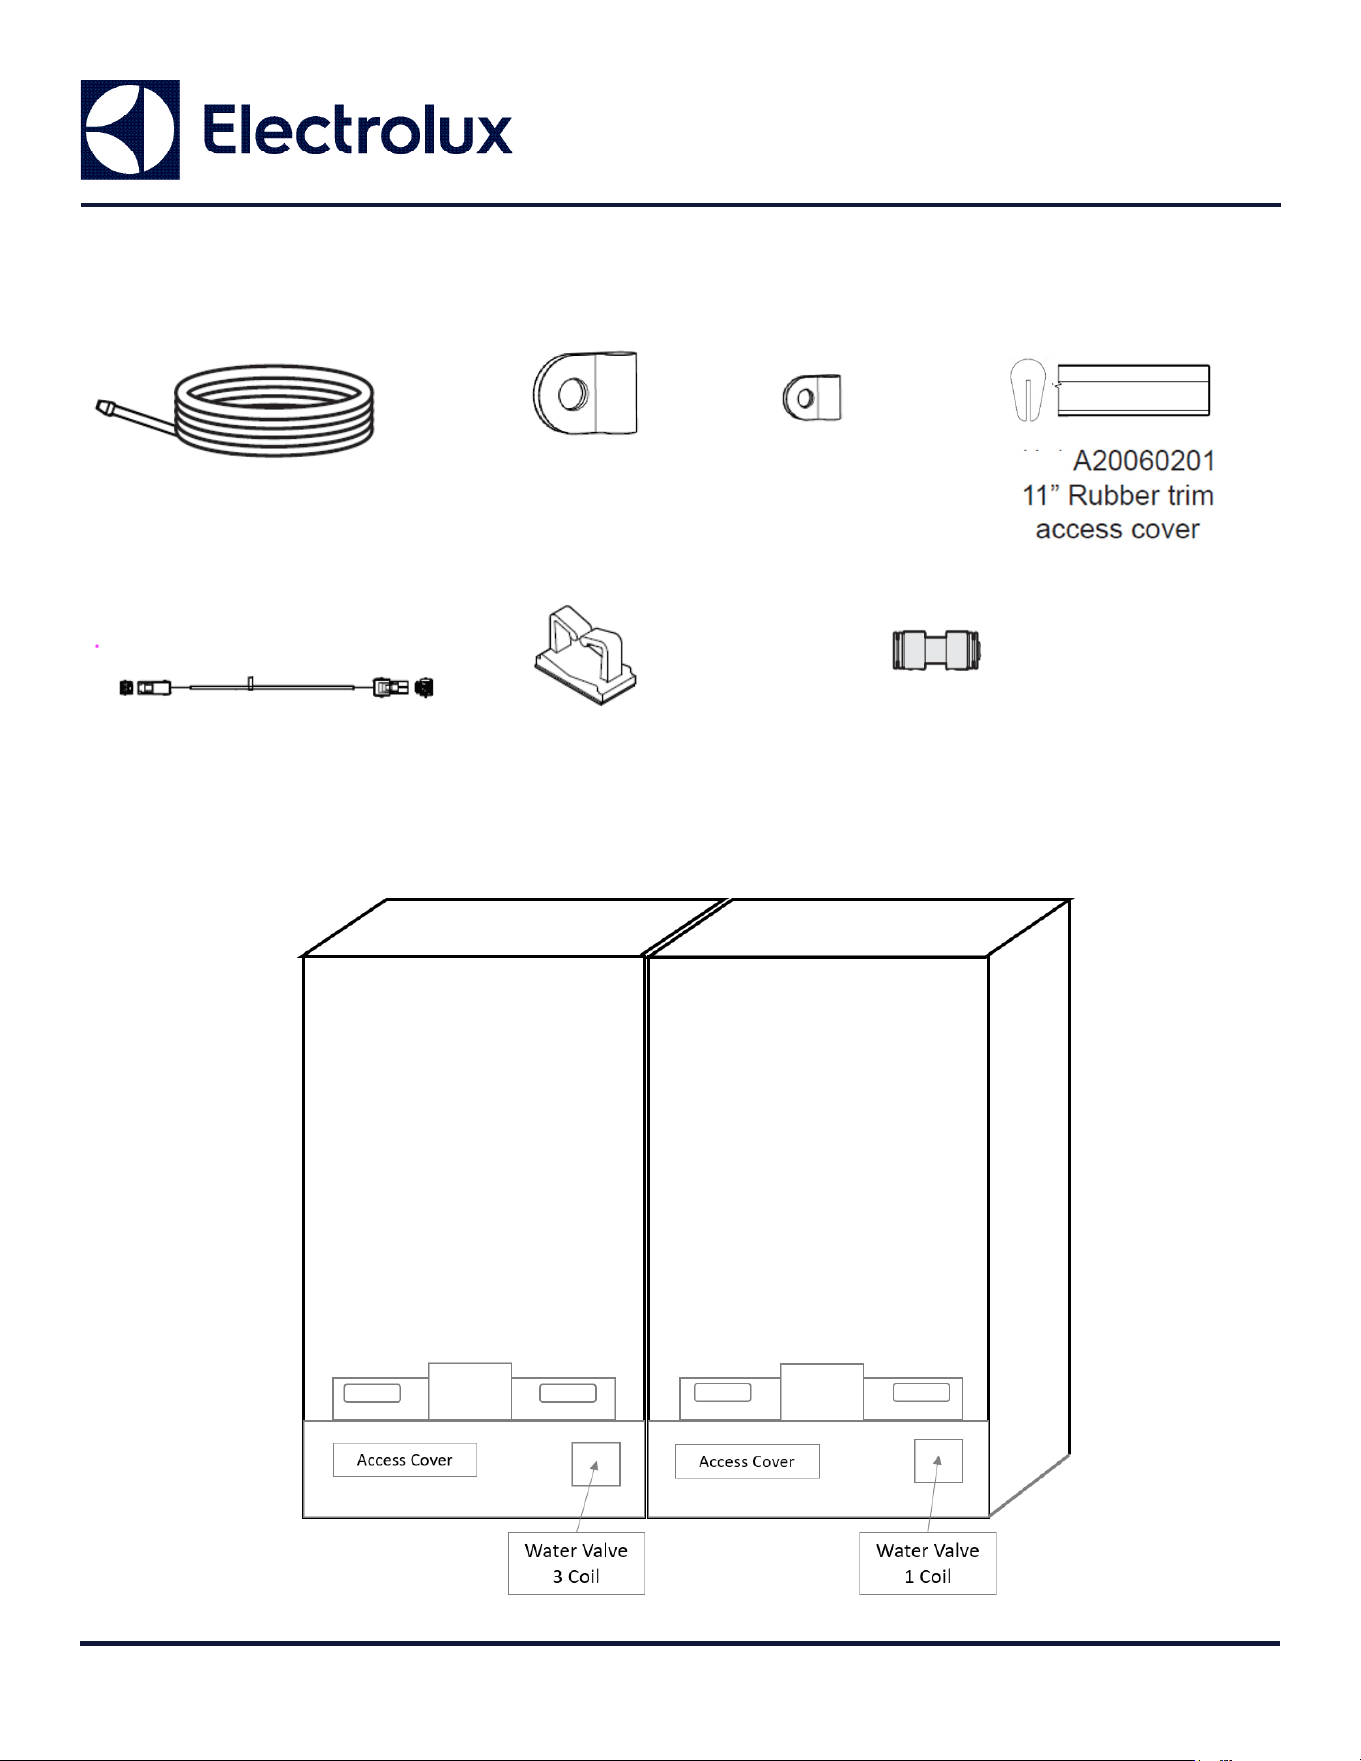
Kit Contents:
Instructions: A20113803
1 of 5
© 2016 Electrolux Home Products, Inc.
INSTRUCTION SHEET
Models: FPFU19F8WF
FPRU19F8WF
EI33AF80WS
EI33AR80WS
FILTERED ICE KIT: TTFLTRICEKIT
(1x) 218976831
1/4” Green water line,
16 feet
C
B
A
(2x) 240396804
1/4” Green water line
strain relief
(2x) 240396805
1/8” Wiring harness
strain relief
C
E
(1x) A19408101
Wiring Harness
19 Feet
(2x) 305346-00
Wiring Harness
support clips
F
ORIGINAL CONFIGURATION
D
Rear View
Refrigerator
Rear View
Freezer
(2x)
G
(1x) 1/4" Union
5304518370
Instructions: A20113803
2 of 5
© 2016 Electrolux Home Products, Inc.
INSTRUCTION SHEET
FILTERED ICE KIT: TTFLTRICEKIT
NOTE: This kit is designed to provide ltered water to the freezer ice maker when a single-door freezer
is installed next to a single-door refrigerator.
NOTE: An authorized service technician is recommended to install the ltered ice kit.
Tools Required: 1/4” nut driver
NOTE: Disconnect electrical power prior to servicing this product.
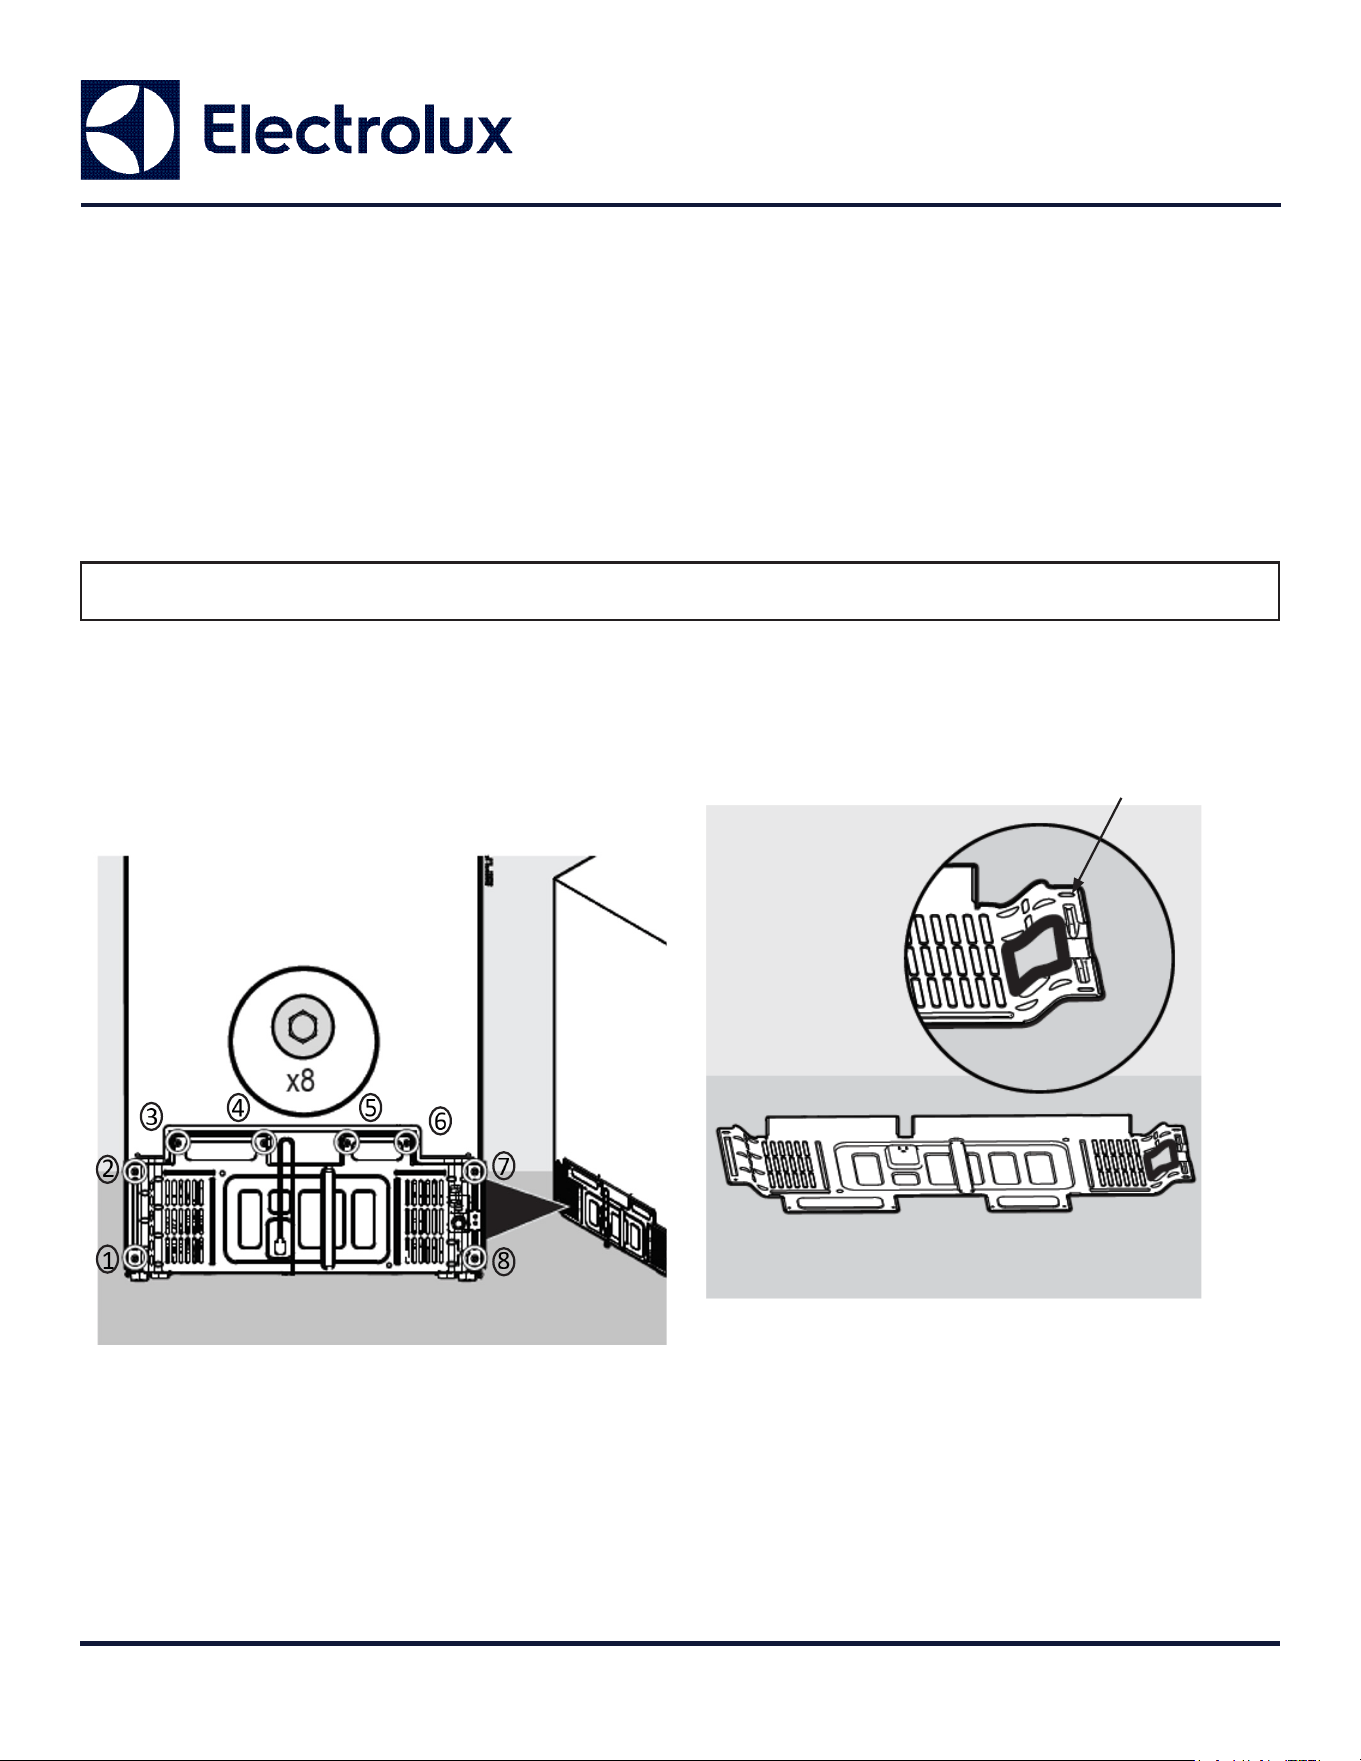
Access Cover Removal
CAUTION: Wear gloves and use extreme CAU-
TION when installing the PROTECTIVE rubber
trim. The opening may have sharp edges.
1. Remove the 8 access panel screws on the
refrigerator and Freezer.
2. Apply the protective rubber trim (D) to the
inside edge of water valve opening on both
access covers.
(D)
Models: FPFU19F8WF
FPRU19F8WF
EI33AF80WS
EI33AR80WS
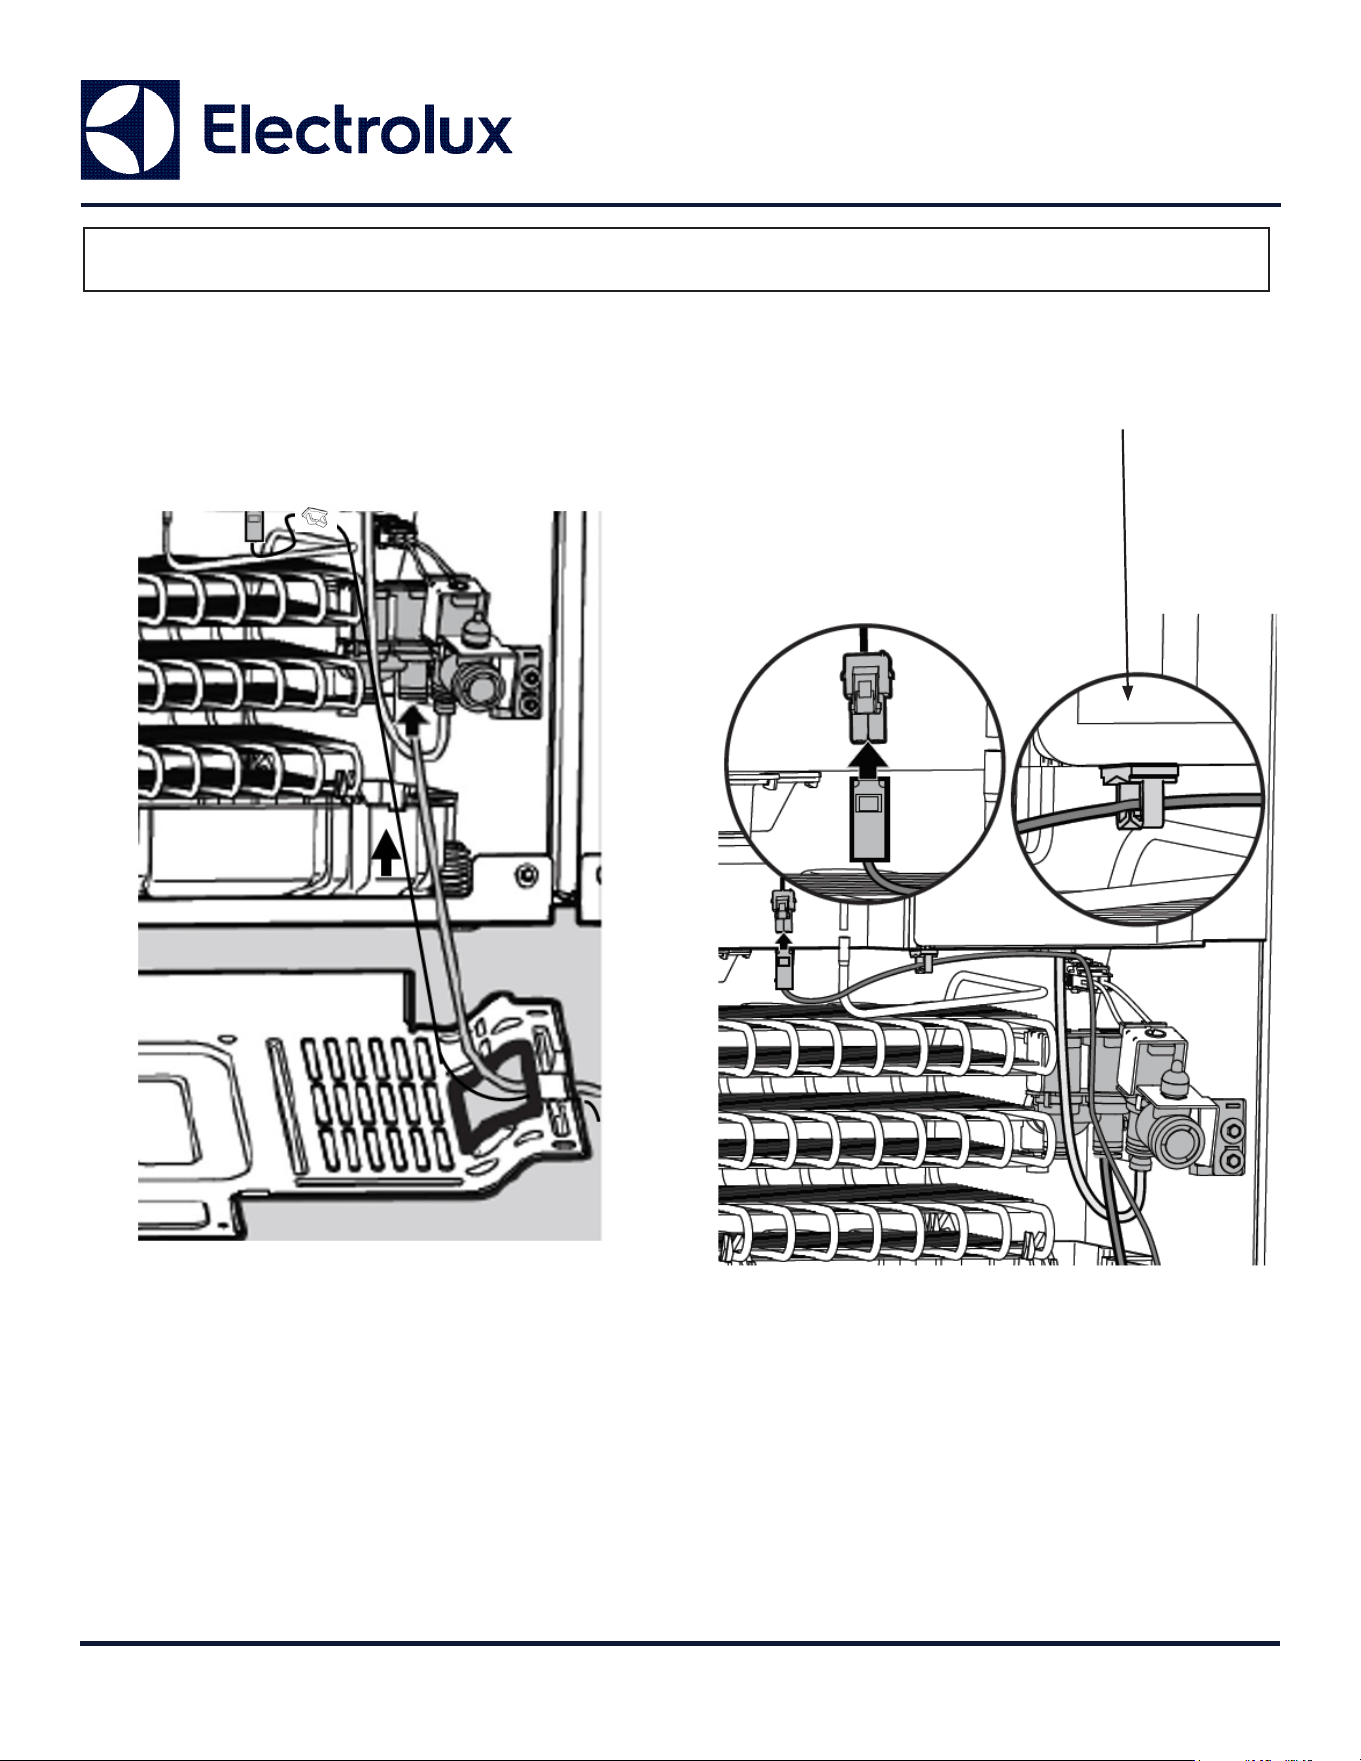
1. Feed the green water line (A) and wiring har-
ness (E) through the opening of the refrigerator
access cover.
2. Push the green water line into the green port of
the water valve.
Instructions: A20113803
3 of 5
© 2016 Electrolux Home Products, Inc.
Refrigerator Connections
INSTRUCTION SHEET
3. Connect the wiring harness (E), to the connec-
tor on the refrigerator.
4. Locate wiring harness support clip at top of
refrigerator machine compartment (F), and insert
wiring harness to secure.
(F)
(E)
(A)
(E)
Models: FPFU19F8WF
FPRU19F8WF
EI33AF80WS
EI33AR80WS
Instructions: A20113803
4 of 5
© 2016 Electrolux Home Products, Inc.
INSTRUCTION SHEET
Models: FPFU19F8WF
FPRU19F8WF
EI33AF80WS
EI33AR80WS
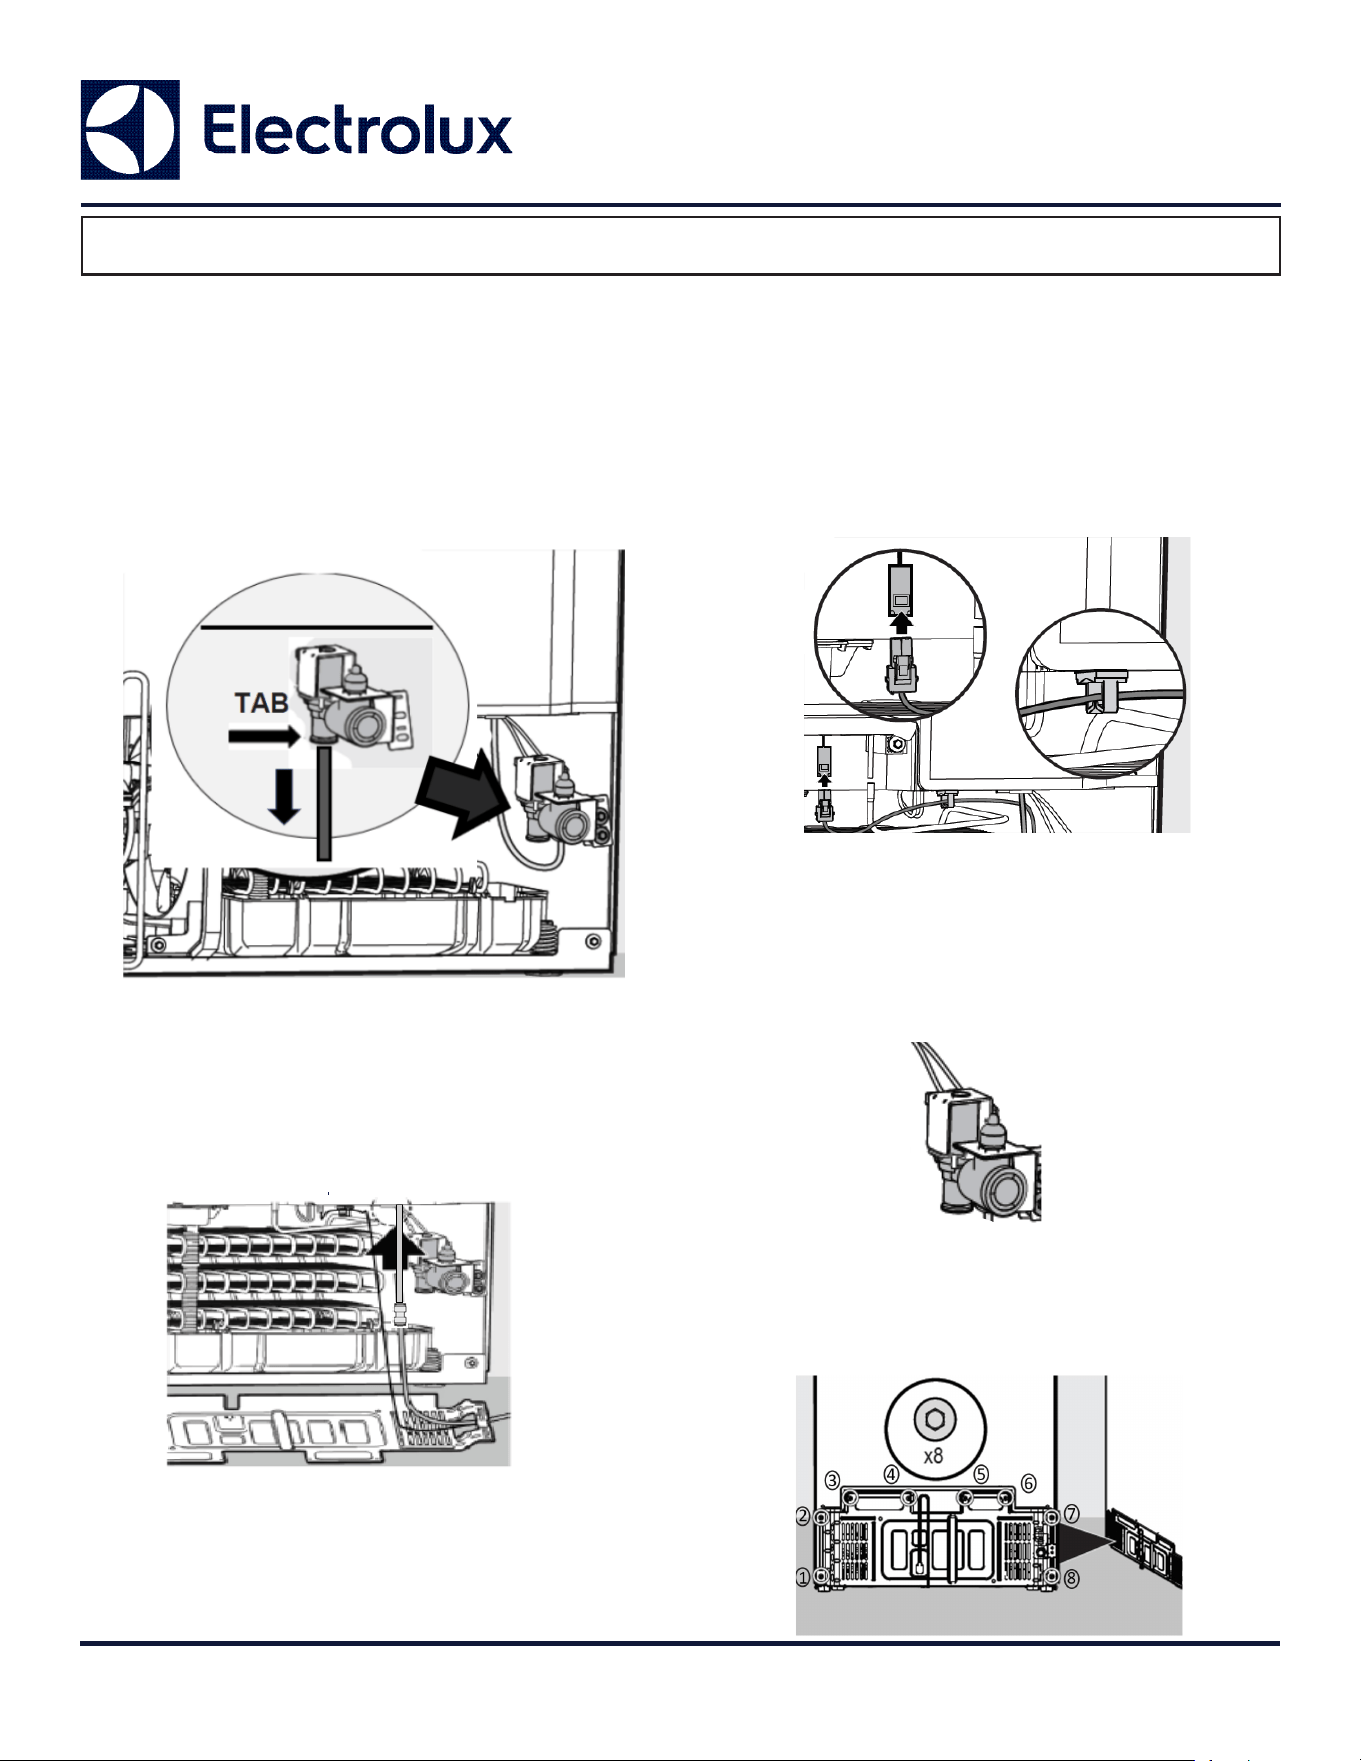
Freezer Connections
NOTE: The freezer water valve and the connect-
ing harness are not used when this kit is installed
for ltered water provided by the paired refrigera-
tor.
1. Disconnect the 10" Gray water line from the
water valve by pushing upward on the port tab,
while pulling out the line. Install union fitting on
the end of the gray line.
TAB
2. Feed the green water line (A) coming from the
refrigerator along with the wiring harness (E)
through the opening of the access cover.
3. Push the green and gray water line into 1/4"
union (G) to connect the two together.
4. Connect the harness (E) from the refrigerator
to the connector for the freezer. Locate wiring
harness support clip at top of refrigerator ma-
chine compartment (F), and insert wiring harness
to secure.
6. Reinstall access cover for both units.
5. Disconnect the harness connection from the
water valve. Not required. Water will be supplied
from the refrigerator water valve.
X
(E)
(A)
(E)
(F)
TAB
(A)
(E)
(G)
Instructions: A20113803
5 of 5
© 2016 Electrolux Home Products, Inc.
Models: FPFU19F8WF
FPRU19F8WF
EI33AF80WS
EI33AR80WS
INSTRUCTION SHEET
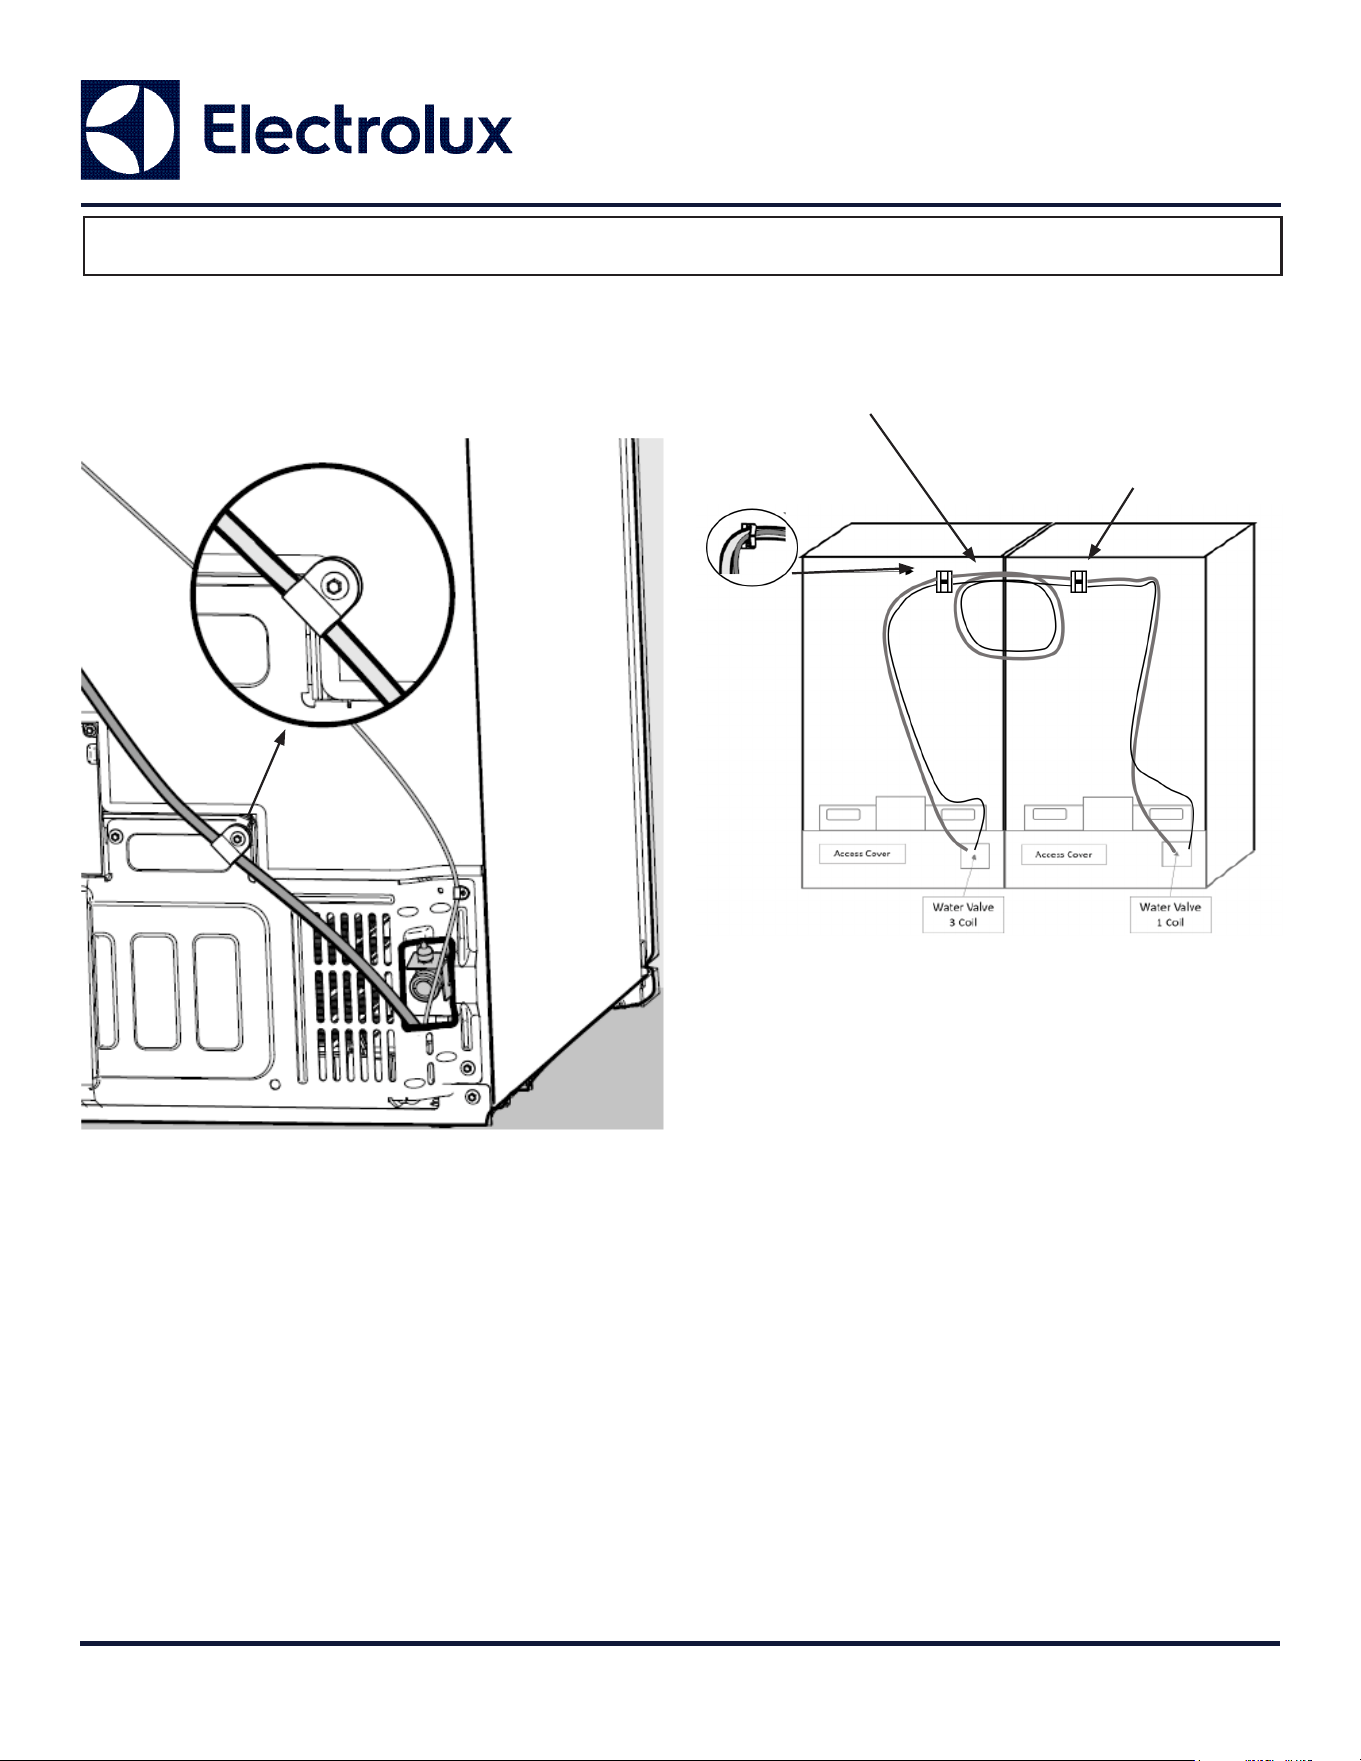
Water Line Final Connections
1. Fasten the strain reliefs for green water line
(B) and for wiring harness on each unit. (C)
(B)
(C)
2. Attach the two adhesive support clips (F) and
insert the green water line and harness.
3. Loop the water line and wire harness in the
center of the two units.
4. Connect and turn on water supply.
5. Purge air from water lines by dispensing water
from refrigerator water dispenser.
(See Use and Care manual for details on water
dispenser operation and purging method)
(F)
(F)
(F)