Your garage door opener is equipped with features to provide you with greater control over your garage door operation.
ALERT2CLOSE
The Alert2Close feature provides a visual and an audible alert that an unattended door is closing.
TIMER-TO-CLOSE (TTC)
The TTC feature automatically closes the door after a specified time period that can be adjusted using a TTC enabled door control (Models 881LMW or 880LMW). Prior to and during the door closing the garage door opener lights will flash and the garage door opener will beep.
MYQ
myQ® technology uses a 900MHz signal to provide two-way communication between the garage door opener and myQ® enabled accessories. Your garage door opener is compatible with up to 16 myQ® accessories.
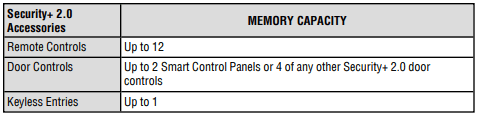
SECURITY+ 2.0 REMOTE CONTROLS AND DOOR CONTROLS
Your garage door opener has already been programmed at the factory to operate with your remote control, which changes with each use, randomly accessing over 100 billion new codes. Compatible with myQ® and Security+ 2.0 accessories, see page 45
NOTE: Older LiftMaster remote controls, door controls, and third party products are not compatible.
THE PROTECTOR SYSTEM® (SAFETY REVERSING SENSORS)
When properly connected and aligned, the safety reversing sensors will detect an obstruction in the path of the infrared beam. If an obstruction breaks the infrared beam while the door is closing, the door will stop and reverse to full open position. If the door is fully open, and the safety reversing sensors are not installed, or are misaligned, the door will not close from a remote control. However, you can close the door if you hold the button on the door control or keyless entry until the door is fully closed. The safety reversing sensors do not effect the opening cycle.
LIGHTS
The garage door opener light bulbs will turn on when the opener is initially plugged in; power is restored after interruption, or when the garage door opener is activated. The lights will turn off automatically after 4-1/2 minutes. Use an incandescent A19 light bulb (100 watt maximum).
USING YOUR GARAGE DOOR OPENER
The garage door opener can be activated through a wall-mounted door control, remote control, wireless keyless entry or myQ® App.
When the door is closed and the garage door opener is activated the door will open. If the door makes contact with an obstruction while opening, the door will stop, opener beeps and lights flash 5 times. When the door is in any position other than closed and the garage door opener is activated, the door will close. If the garage door makes contact with an obstruction while closing, the door will reverse, opener beeps and lights flash 5 times. However, you can close the door if you hold the button on the door control or keyless entry until the door is fully closed.
The safety reversing sensors do not affect the opening cycle. The safety reversing sensor must be connected and aligned correctly before the garage door opener will move in the down direction.
BATTERY BACKUP*
The battery backup system allows access in and out of your garage, even when the power is out. When the garage door opener is operating on battery power, the garage door opener will run slower, the light will not function, the Battery Status LED will glow solid orange, and a beep will sound approximately every 2 seconds.
*if applicable
Connect With Your Smartphone
The Wi-Fi Garage Door Opener is compatible with up to 16 myQ® enabled accessories. Up to 10 devices can be paired to the Wi-Fi garage door opener’s internal gateway. These devices can be controlled with the myQ® App. These devices include any combination of myQ® garage door openers, Wi-Fi garage door openers, myQ® light controls, myQ® gate operators or myQ® commercial door operators. A LiftMaster Internet Gateway (828LM) can be added if you need to control more than 10 devices using the myQ® App. Up to 6 devices can be paired to garage door opener itself (controlled by garage door opener through 900MHz). These devices include any combination of myQ® light controls or a garage door and gate monitor.
YOU WILL NEED:
• Wi-Fi enabled smartphone, tablet or laptop • Broadband Internet Connection • Wi-Fi signal in the garage (2.4 GHz, 802.11b/g/n required), see page 4 • Password for your home network (router's main account, not guest network) • myQ® serial number located on the garage door opener
DOWNLOAD THE myQ® APP TO SET UP AN ACCOUNT AND CONNECT
Open and close your door, get alerts and set schedules from anywhere. Connected smart garage door openers also receive software updates to ensure the opener has the latest operational features. The garage door opener must run through a complete cycle before it will activate Wi-Fi® programming.
1. Download the myQ® App.
2. Set up an account and connect.
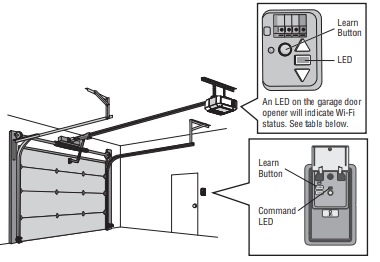
WI-FI STATUS
LED
Definition
Blu
Off - Wi-Fi is not turned on.
Blinking - Garage door opener is in Wi-Fi learn mode.
Solid - Mobile device connected to the garage door opener.
Blue and Green
Blinking - Attempting to connect to router.
Green
Blinking - Attempting to connect to the Internet server.
Solid - Wi-Fi has been set up and garage door opener is connected to the internet.
NOTES:
myQ® App control WILL NOT work if the garage door opener is operating on battery power.
To erase the Wi-Fi settings, see page 41.
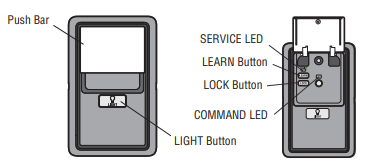
Using the Multi-Function Door Control 882LMW
SYNCHRONIZE THE DOOR CONTROL
To synchronize the door control to the garage door opener, press the push bar until the garage door opener activates (it may take up to 3 presses). Test the door control by pressing the push bar, each press of the push bar will activate the garage door opener.
PUSH BAR
Press the push bar to open or close the door.
LIGHT BUTTON
Press the LIGHT button to turn the garage door opener lights on or off. When the lights are turned on they will stay on until the LIGHT button is pressed again, or until the garage door opener is activated. Once the garage door opener is activated the lights will turn off after the specified period of time (the factory setting is 4-1/2 minutes). The LIGHT button will not control the lights when the door is in motion.
The following features are accessible by lifting up the push bar:
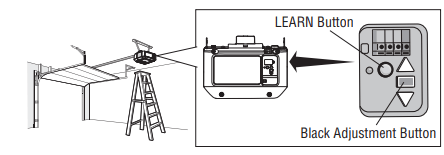
LEARN A DEVICE
Any compatible remote controls, wireless keyless entry, or myQ® accessories can be programmed to the garage door opener by pressing the LEARN button of the door control, see page 40.
LOCK
The LOCK feature is designed to prevent activation of the garage door opener from remote controls while still allowing activation from the door control and keyless entry. This feature is useful for added peace of mind when the home is empty (i.e. vacation).
MAINTENANCE ALERT (MAS)
This feature assists the homeowner in ensuring the garage door opener system stays in good working condition. When the garage door opener needs to be serviced (approximately 4500 garage door opener cycles) the command (yellow) and service (red) LEDs will begin to alternately flash back and forth. The factory setting for the MAS feature is off and can be activated at time of installation. Contact your installing dealer for service.
To Erase the Memory
ERASE ALL REMOTE CONTROLS AND KEYLESS ENTRIES
1. Press and hold the LEARN button on garage door opener until the learn LED goes out (approximately 6 seconds). All remote control and keyless entry codes are now erased. Reprogram any accessory you wish to use.
ERASE ALL DEVICES INCLUDING myQ® ENABLED ACCESSORIES
1. Press and hold the LEARN button on garage door opener until the learn LED goes out (approximately 6 seconds).
2. Immediately press and hold the LEARN button again until the learn LED goes out. All codes are now erased. Reprogram any accessory you wish to use.
ERASE THE Wi-Fi® NETWORK FROM THE GARAGE DOOR OPENER
1. Press and hold the black adjustment button on the garage door opener until 3 beeps are heard (Approximately 6 seconds).
To Open the Door Manually
FOR T-RAIL
Disconnect the trolley
The door should be fully closed if possible.
Pull down on the emergency release handle.
Reconnect the trolley
The lockout feature prevents the trolley from reconnecting automatically.
Pull the emergency release handle down and back (toward the opener). The door can then be raised and lowered manually as often as necessary.
To disengage the lockout feature, pull the handle straight down. The trolley will reconnect on the next UP or DOWN operation, either manually or by using the door control or remote control.
Maintenance
Maintenance Schedule
EVERY MONTH
Manually operate door. If it is unbalanced or binding, call a trained door systems technician.
Check to be sure door opens and closes fully. Adjust if necessary, see page 30.
Test the safety reversal system. Adjust if necessary, see page 31.
EVERY YEAR
Oil door rollers, bearings and hinges. The garage door opener does not require additional lubrication. Do not grease the door tracks.
Test the battery and consider replacing the battery to ensure the garage door opener will operate during an electrical power outage, see page 32 to test the battery backup.
EVERY TWO TO THREE YEARS - T-RAIL ONLY
Use a rag to wipe away the existing grease from the garage door opener rail. Reapply a small layer of white lithium grease to the top and underside of the rail surface where the trolley slides.
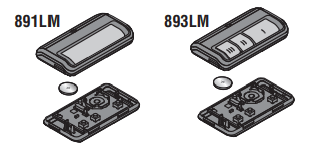
The Remote Control Battery
To replace the battery, pry open the case in the middle, then at each side with the visor clip. Insert replacement battery positive side up (+). Replace the batteries with only 3V CR2032 coin cell batteries. Dispose of old batteries properly.
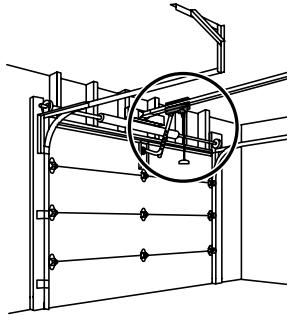
INSTALLATION
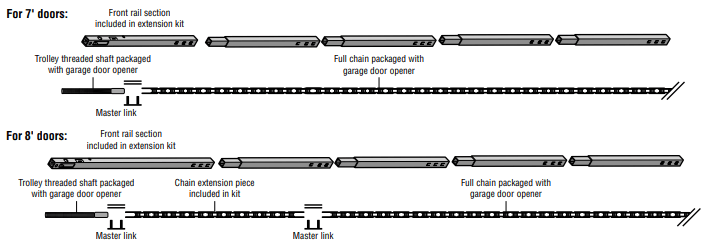
When installing your opener on a 7' door, be sure to use the shorter of the two front rail segments. The longer segment is not used and should be discarded. In addition, the extra chain segment and master link will not be used.
When installing on an 8' door, the longer front rail segment should be used and the shorter front rail segment is not used.
WARNING: This product can expose you to chemicals including lead, which are known to the State of California to cause cancer or birth defects or other reproductive harm.
STEP 1 ASSEMBLE THE RAIL AND INSTALL THE TROLLEY
CAUTION To prevent INJURY from pinching, keep hands and fingers away from the joints while assembling the rail.
To avoid installation difficulties, do not run the garage door opener until instructed to do so.
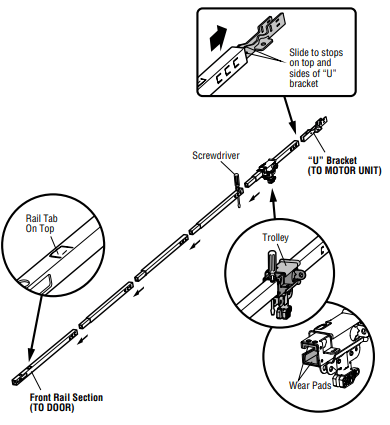
The front rail has a cut out “window” at the door end. The rail tab MUST be on top of the rail when assembled.
Remove the straight door arm and hanging bracket packaged inside the front rail and set aside for Installation. NOTE: To prevent INJURY while unpacking the rail carefully remove the straight door arm stored within the rail section.
Align the rail sections on a flat surface as shown and slide the tapered ends into the larger ones. Tabs along the side will lock into place.
Place the motor unit on packing material to protect the cover, and rest the back end of the rail on top. For convenience, put a support under the front end of the rail.
As a temporary stop, insert a screwdriver into the hole in the second rail section from the motor unit, as shown.
Check to be sure there are 4 plastic wear pads inside the inner trolley. If they became loose during shipping, check all packing material. Snap them back into position as shown.
Slide the trolley assembly toward the screwdriver as shown.
Slide the rail onto the “U” bracket, until it reaches all the stops on the top and sides of the “U” bracket.
STEP 2 FASTEN THE RAIL TO THE MOTOR UNIT
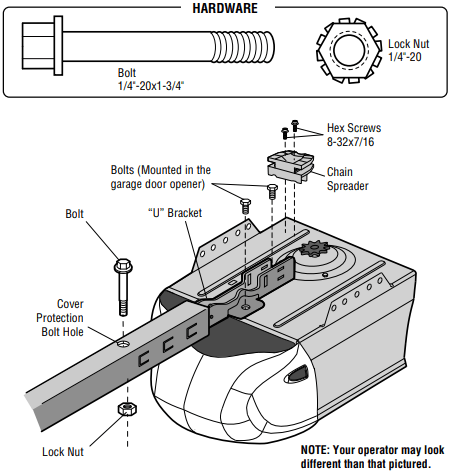
CAUTION To avoid SERIOUS damage to garage door opener, use ONLY those bolts/fasteners mounted in the top of the opener.
Insert a 1/4"-20 x 1-3/4" bolt into the cover protection bolt hole on the back end of the rail as shown. Tighten securely with a 1/4"-20 lock nut. DO NOT overtighten.
Remove the bolts from the top of the motor unit.
Use the carton to support the front end of the rail.
Place the “U” bracket, flat side down onto the motor unit and align the bracket holes with the bolt holes.
Fasten the “U” bracket with the previously removed bolts; DO NOT use any power tools. The use of power tools may permanently damage the garage door opener.
Attach chain spreader to the motor unit with two screws.
NOTE: This step applies only to the following models: 8164W, 8165W, 8365W-267
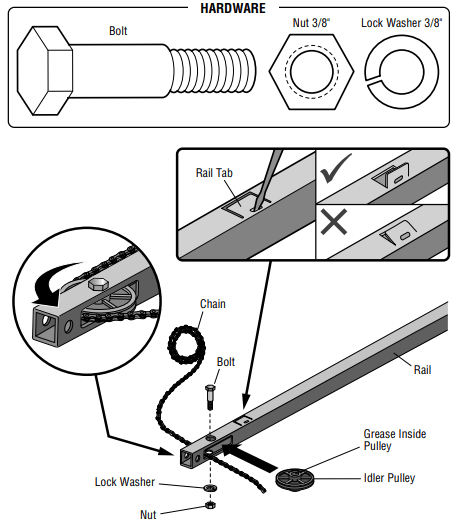
STEP 3 INSTALL THE IDLER PULLEY
Lay the chain beside the rail, as shown. Grasp the end of the chain and pass approximately 12" (30 cm) of chain through the window. Allow it to hang until Assembly Step 4.
Remove the tape from the idler pulley. The inside center should be pre-greased. If dry, regrease to ensure proper operation.
Place the idler pulley into the window as shown.
Insert the idler bolt from the top through the rail and pulley. Tighten with a 3/8" lock washer and nut underneath the rail until the lock washer is compressed.
Rotate the pulley to be sure it spins freely.
Locate the rail tab. The rail tab is near the idler pulley on the front rail section. Use a flat head screwdriver and lift the rail tab until the tab is vertical (90º).
STEP 4 INSTALL THE CHAIN
WARNING
To avoid possible SERIOUS INJURY to finger from moving garage door opener:
• ALWAYS keep hand clear of sprocket while operating opener.
• Securely attach sprocket cover BEFORE operating
NOTE: If you have an 8' door, be sure to use the additional chain segment and master link.
1. Pull the chain around the idler pulley and toward the trolley.
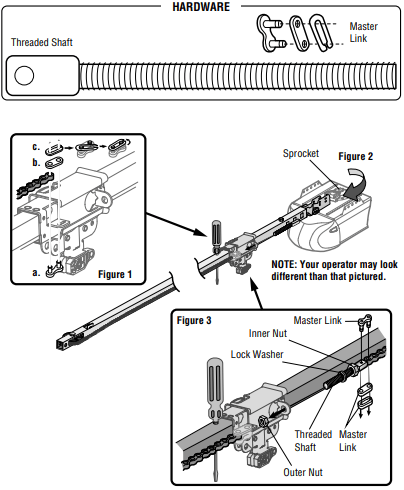
2. Connect the chain to the retaining slot on the trolley, as shown. (Figure 1)
a. Push pins of master link bar through chain link and trolley slot.
b. Push master link cap over pins and past pin notches.
c. Slide the closed end of the clip-on spring over one of the pins. Push the open end of the clip-on spring onto the other pin.
3. With the trolley against the screwdriver, dispense the remainder of the chain along the rail toward the motor unit around the sprocket and continuing to the trolley assembly. The sprocket teeth must engage the chain. (Figure 2)
4. Check to make sure the chain is not twisted, then connect it to the threaded shaft with the remaining master link.
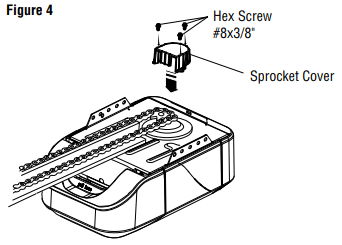
5. Thread the inner nut and lock washer onto the trolley threaded shaft.
6. Insert the trolley threaded shaft through the hole in the trolley. Be sure the chain is not twisted. (Figure 3)
7. Loosely thread the outer nut onto the trolley threaded shaft.
8. Remove the screwdriver.
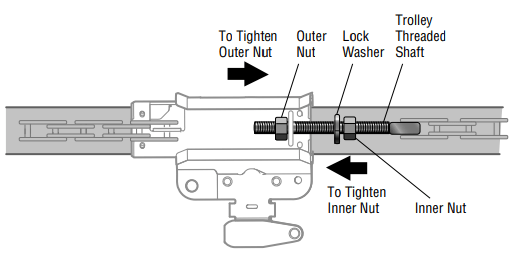
9. Install the sprocket cover by attaching the cover over the garage door opener sprocket with three hex screws (Figure 4).
NOTE: This step applies only to the following models: 8160W, 8160WB, 8360W.
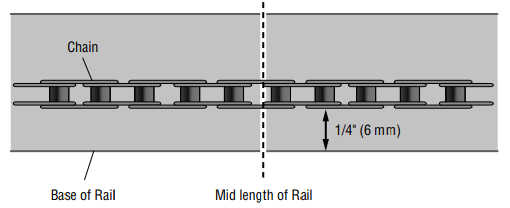
STEP 5 TIGHTEN THE CHAIN
Spin the inner nut and lock washer down the trolley threaded shaft, away from the trolley.
To tighten the chain, turn the outer nut in the direction shown.
When the chain is approximately 1/4" (6 mm) above the base of the rail at the midpoint, retighten the inner nut to secure the adjustment.
Sprocket noise can result if the chain is too loose. When installation is complete, you may notice some chain droop with the door closed. This is normal. If the chain returns to the position shown when the door is open, do not re-adjust the chain.
NOTE: During future maintenance, ALWAYS pull the emergency release handle to disconnect the trolley before adjusting the chain.
AFTER COMPLETING THE RAIL INSTALLATION, PLEASE RETURN TO THE INSTALLATION SECTION OF THE MANUAL TO CONTINUE THE INSTALLATION OF THE OPENER.
ADDENDUM PAGE: STORE WITH OPERATOR USER GUIDE
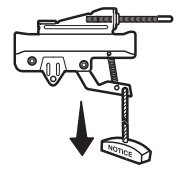
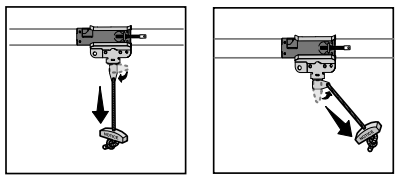
TO OPEN THE DOOR MANUALLY - SQUARE RAIL
DISCONNECT THE TROLLEY
The door should be fully closed if possible.
Pull down on the emergency release handle so the trolley release arm snaps to the vertical position. The door can now be raised and lowered as often as necessary.
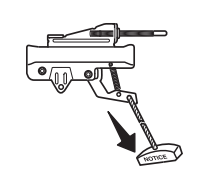
TO RE-CONNECT THE TROLLEY
Pull the emergency release handle toward the garage door opener so the trolley release arm snaps to the horizontal position. The trolley will reconnect on the next UP or DOWN operation, either manually or by using the door control or remote control.
WARNING
To prevent possible SERIOUS INJURY or DEATH from a falling garage door:
If possible, use emergency release handle to disengage trolley ONLY when garage door is CLOSED. Weak or broken springs or unbalanced door could result in an open door falling rapidly and/or unexpectedly.
NEVER use emergency release handle unless garage doorway is clear of persons and obstructions.
NEVER use handle to pull door open or closed. If rope knot becomes untied, you could fall.
Troubleshooting
Diagnostic Chart
Your garage door opener is programmed with self-diagnostic capabilities. The UP and DOWN arrows on the garage door opener flash the diagnostic codes.
DIAGNOSTIC CODE
SYMPTOM
SOLUTION
Up Arrow Flash(es)
Down Arrow Flash(es)
1
1
The garage door opener will not close.
Safety reversing sensors are not installed, connected, or wires may be cut. Inspect sensor wires for a disconnected or cut wire.
1
2
The garage door opener will not close.
There is a short or reversed wire for the safety reversing sensors. Inspect safety sensor wire at all staple and connection points, replace wire or correct as needed.
1
3
The door control will not function.
The wires for the door control are shorted or the door control is faulty. Inspect door control wires at all staple and connection points, replace wire or correct as needed.
1
4
The garage door opener will not close.
Safety reversing sensors are misaligned or were momentarily obstructed. Realign both sensors until both LEDs are glowing steady. Make sure nothing is hanging or mounted on the door that would interrupt the sensor’s path while closing.
1
5
Door moves 6-8" (15-20 cm) stops or reverses.
Manually open and close the door. Check for binding or obstructions, such as a broken spring or door lock, correct as needed. Check wiring connections at travel module and at the logic board. Replace travel module if necessary.
No movement, only a single click.
Manually open and close the door. Check for binding or obstructions, such as a broken spring or door lock, correct as needed. Replace logic board if necessary.
Opener hums for 1-2 seconds no movement.
Manually open and close the door. Check for binding or obstructions, such as a broken spring or door lock, correct as needed. Replace motor if necessary.
1
6
Door coasts after it has come to a complete stop.
Program travel to coasting position or have door balanced by a trained door systems technician.
2
1-5
No movement, or sound.
Replace logic board.
3
2
Unable to set the travel or retain position.
Check travel module for proper assembly, replace if necessary.
3
3
The battery status LED is constantly flashing green.*
Door is moving, stops or reverses. Opener beeps and lights flash.
Manually open and close the door. Check for binding or obstructions, such as a broken spring or door lock, correct as needed. If the door is binding or sticking, contact a trained door systems technician. If door is not binding or sticking attempt to reprogram travel (refer to page 30).
4
5
Opener runs approximately 6-8" (15-20 cm), stops and reverses.
Communication error to travel module. Check travel module connections, replace travel module if necessary.
4
6
The garage door opener will not close.
Safety reversing sensors are misaligned or were momentarily obstructed. Realign both sensors to ensure both LEDs are steady and not flickering. Make sure nothing is hanging or mounted on the door that would interrupt the sensor’s path while closing.
The garage door opener will NOT enter Wi-Fi® LEARN mode:
After the initial installation of the garage door opener, the garage door opener must complete a full cycle (open and closed) before the Wi-Fi LEARN mode can be activated.
If there has been a recent power outage, the garage door opener must complete a full cycle before the Wi-Fi LEARN mode can be activated.
See page 36 to activate Wi-Fi LEARN mode.
Cannot connect garage door opener to home Wi-Fi network:
Ensure the myQ® Serial number was entered correctly and try again. The myQ® characters are between A-F and 0-9 only.
Weak Wi-Fi signal in the garage. Ensure the Wi-Fi signal is reaching the garage, see page 4 or visit LiftMaster.com/Customer-Support for more information.
My door will not close:
The safety reversing sensor must be connected and aligned correctly before the garage door opener will move in the down direction.
Check for binding or obstructions anywhere along the track to garage floor.
The safety reversing sensor must be connected and aligned correctly before the garage door opener will move in the down direction.
Verify the safety reversing sensors are properly installed, aligned and free of any obstructions.
My neighbor’s remote control opens my garage door:
Erase the memory from your garage door opener and reprogram the remote control(s).
My vehicle's Homelink® is not programming to my garage door opener:
Depending on the make, model, and year of your vehicle an external adapter may be required.