

DO NOT RETURN THIS PRODUCT TO THE STORE
If you have questions or need assistance, please call customer service at 855-944-3571.
User
Manual
WHT 20V / WHTT 20V
22 in. Cordless Hedge Trimmer
2
|
English
TABLE OF CONTENTS
Introduction .................................................................................................................................................................................................................2-3
Safety ...........................................................................................................................................................................................................................4-6
Components ...................................................................................................................................................................................................................7
Assembly........................................................................................................................................................................................................................8
Operation ........................................................................................................................................................................................................................9
Maintenance ................................................................................................................................................................................................................. 10
Troubleshooting .......................................................................................................................................................................................................... 11
Parts Page .................................................................................................................................................................................................................... 12
Service Hot Line/Company Address ............................................................................................................................................................ Back Page
INTRODUCTION
WARNING
Operating, servicing, and main-
taining this equipment may expose you to chemicals
which are known to the State of California to cause
cancer and birth defects or other reproductive harm.
To minimize exposure, wear gloves or wash your
hands frequently when servicing this equipment. For
more information go to www.P65warnings.ca.gov.
DISCLAIMERS
All information, illustrations, and specications in this
manual were in effect at the time of publishing. The illus-
trations used in this manual are intended as representa-
tive reference views only. We reserve the right to make
any specication or design change without notice.
ALL RIGHTS RESERVED
All rights reserved. No reproduction allowed in any form without
written permission from Westinghouse Outdoor Power Equipment.
DANGER
Read this manual before using
or performing maintenance on this product.
Failure to follow the instructions and safety pre-
cautions in this manual can result in serious in-
jury or death.
UPDATES
The latest User Manual for your Westinghouse products
can be found under our support tab. wpowereq.com/
pages/manuals
Or scan the following QR code with your smartphone
camera to be directed to the link.
PRODUCT REGISTRATION
For trouble-free warranty coverage, it
is important to register your Westing-
house product.
You can register by:
z Completing and mailing the product
registration card included in the
carton.
z Registering your product on-line at: wpowereq.com/
pages/warranty-registration
z Scanning the above QR code with your smartphone cam-
era to be directed to the mobile registration link.
For Your Records
Date of Purchase:
Model Number:
Serial Number:
Place of Purchase:
z Sending the following product information to:
Westinghouse Outdoor Power
Warranty registration
777 Manor Park Drive
Columbus, OH 43228
IMPORTANT: Keep your purchase receipt for trouble-free warranty
coverage.

English
|
3
INTRODUCTION
SPECIFICATIONS
DC Voltage .................................................................................................................................................................. 20V
No Load Speed..................................................................................................................................................2600 RPM
Weight ........................................................................................................................................................5.1 lbs (2.3 kg)
NOTICE
This product is designed and rated for continuous operation at ambient temperatures above 23°F (–5°C).
If needed, this product can be operated in extremely hot or extremely cold temperatures for short periods. If the
product is exposed to extreme temperatures during storage, it should be brought back within the optimal tempera-
ture range before operation.
NOTICE
Thank you for choosing Westinghouse! PLEASE READ THIS MANUAL BEFORE RETURNING THIS
PRODUCT FOR ANY REASON.
If you have a question or experience a problem with your Westinghouse purchase, call us at 1-855-944-3571 to
speak with an agent.
RETAIN THIS MANUAL FOR FUTURE REFERENCE.
HAVE QUESTIONS?
Email us at [email protected]
or call 1-855-944-3571
NOTICE
This product is designed for optimal compatibility with the Westinghouse batteries and chargers listed
below. Use with any other batteries or chargers not listed below may result in serious personal injury or death.
Model Motor Westinghouse Battery Pack Westinghouse Charger
WHT 20V / WHTT 20V 20V DC
W20V2AH
W20V4AH
W20V5AH
W20V2AMP
W20V2DP

4
|
English
SAFETY DEFINITIONS
The words DANGER, WARNING, CAUTION, and NOTICE are used
throughout this manual to highlight important information. Be sure
that the meanings of this safety information is known to all who op-
erate, perform maintenance on, or are near the trimmer.
DANGER
Indicates a hazardous situation
which, if not avoided, will result in death or serious
injury.
WARNING
Indicates a hazardous situation
which, if not avoided, could result in death or serious
injury.
CAUTION
Indicates a hazardous situation
which, if not avoided, could result in minor or moder-
ate injury.
NOTICE
Indicates a situation which can cause dam-
age to the trimmer, personal property, and/or the envi-
ronment, or cause the equipment to operate improp-
erly.
NOTE: Indicates a procedure, practice or condition
that should be followed for the trimmer to function in
the manner intended.
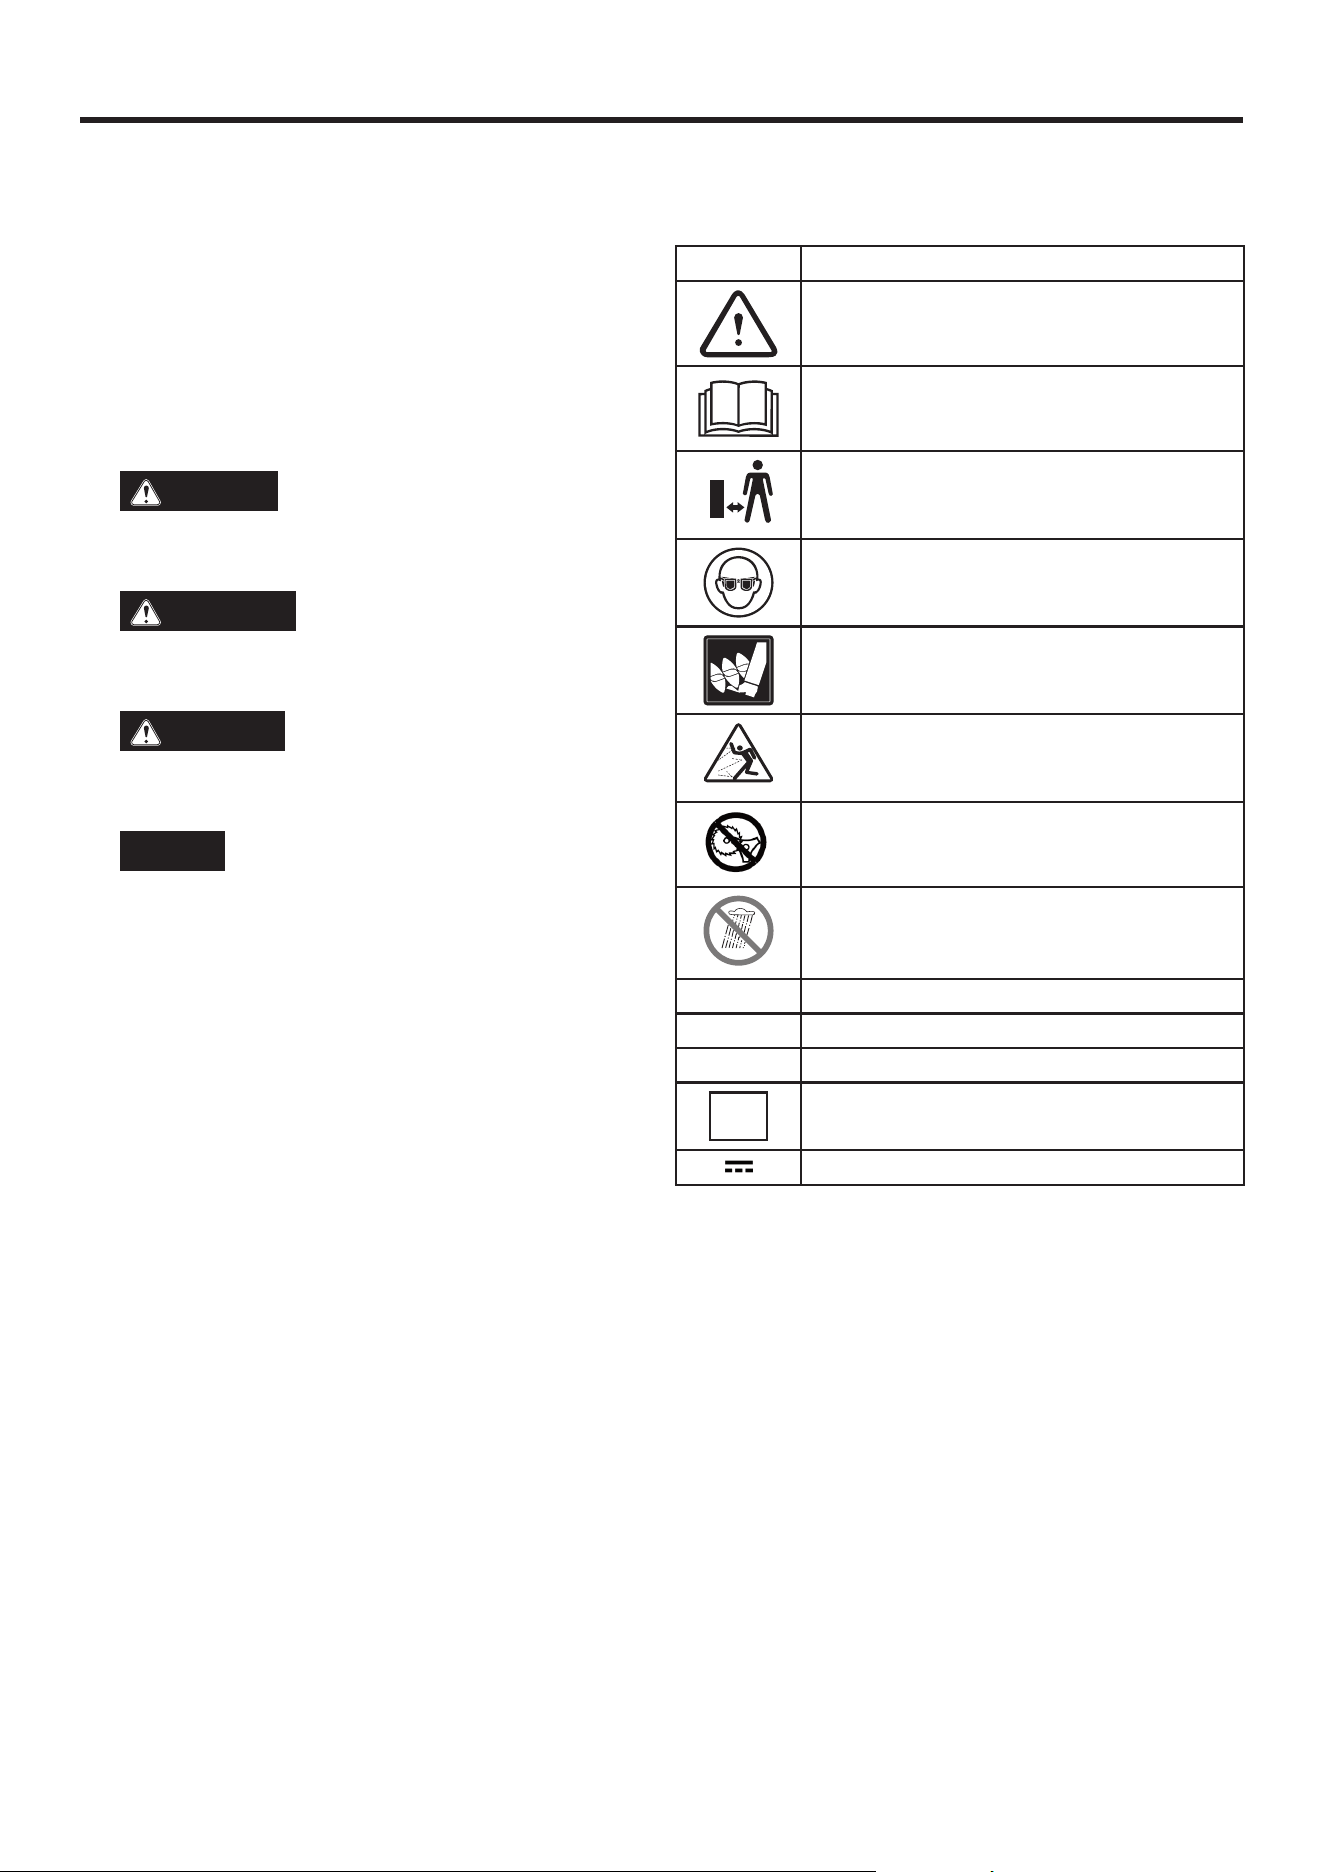
SAFETY SYMBOLS
Follow all safety information contained in this user manual as well
as the information on the product labeling.
SYMBOL
DESCRIPTION
Safety Alert Symbol. Indicates a potential personal
injury hazard.
Read User Manual. To reduce the risk of injury, user
must read and understand user manual before using
this product.
Keep all bystanders 50 ft. away.
Wear Eye Protection. Always wear eye protection
with side shields marked to comply with ANSI Z87.1.
Thrown objects can ricochet and result in personal
injury or property damage.
Wet Conditions Alert. Do not expose the battery
pack, battery compartment, or electronic compo-
nents to water or rain.
Wear non-slip, heavy-duty protective gloves when
handling the blades.
Wear non-slip safety footwear when using this
equipment.
Hz
Hertz
n
o
No Load Speed
Direct Current
SAFETY

English
|
5
SAFETY
WARNING
READ AND UNDERSTAND ALL
INSTRUCTIONS. Failure to follow all instructions list-
ed below and on the machine may result in electric
shock, re, and/or serious personal injury.
z For safe operation, read and understand all instructions
before using this product. Follow all safety instructions.
Failure to follow all safety instructions listed can result in
serious personal injury.
z Do not allow children or untrained individuals to use this
unit.
z Inspect the work area before each use. Remove all objects
that can be thrown or become entangled in the machine.
z Always wear eye protection with side shields marked to
comply with ANSI Z87.1. Following this rule will reduce
the risk of serious personal injury.
z Use Safety Glasses – Wear a face or dust mask if the
operation is dusty. Always wear safety glasses with side
shields. Everyday glasses have only impact resistant
lenses. They are NOT safety glasses. Following this rule
will reduce the risk of eye injury.
z Protect your lungs. Wear a face or dust mask if the op-
eration is dusty. Following this rule will reduce the risk of
serious personal injury.
z Dress Properly – Do not wear loose clothing or jewelry.
They can be caught in moving parts. Use of rubber gloves
and substantial footwear is recommended when working
outdoors. Wear heavy, long pants, long sleeves, boots, and
gloves. Do not wear short pants, sandals, or go barefoot.
Do not wear jewelry of any kind.
z Secure long hair above shoulder level to prevent entan-
glement in moving parts.
z Keep children away – Keep all bystanders, children, and
pets at least 50 ft. away.
z Stay alert – Do not operate this unit when you are tired,
ill, upset, or under the inuence of alcohol, drugs, or
medication.
z Do not operate in poor lighting.
z Keep all body parts away from any moving part on this unit.
z Do not operate power tools in explosive atmospheres,
such as in the presence of ammable liquids, gases, or
dust. Power tools create sparks which may ignite the
dust or fumes.
z Avoid body contact with grounded surfaces such as pipes,
radiators, ranges, and refrigerators. There is an increased
risk of electric shock if your body is grounded.
z Avoid Dangerous Environments – Don’t expose the hedge
trimmer to rain or wet conditions. Water entering the hedge
trimmer will increase the risk of electric shock.
z Use Right Appliance – Do not force the tool. Use the cor-
rect tool for your application. The correct tool will operate
better and safer at the rate for which it is designed.
z Don’t Force Appliance – It will operate better and with
less likelihood of a risk of injury at the rate for which it
was designed.
z Do not operate the equipment while barefoot or when
wearing sandals or similar lightweight footwear. Wear
protective footwear that will protect your feet and improve
your footing on slippery surfaces.
z Do not overreach – Keep rm footing and balance. Over-
reaching can result in a loss of balance.
z Avoid accidental starting – Be sure the switch trigger is
in the locked or off position before inserting the battery
pack. Carrying tools with your nger on the switch trigger
or inserting the battery pack into a tool with the switch on
increases the risk of injury.
z Do not use the tool if the switch trigger does not turn it on
or off. Any tool that cannot be controlled with the switch
trigger is dangerous and must be repaired.
z Disconnect battery pack – Disconnect the battery pack from
the appliance before servicing or changing accessories.
Preventive safety measures reduce the risk of starting
the tool accidentally.
z Only use identical replacement parts and accessories
from the manufacturer. Use of any other parts may create
a hazard or cause product damage.
z Maintain appliance with care – Do not use the hedge
trimmer if it is cracked, chipped, or damaged. Keep the
handles dry, clean, and free from oil and grease.
z Inspect for damaged parts – Before use of the tool, any
part that is damaged should be carefully inspected to
determine that it will operate properly and perform its
intended function. Inspect for alignment of moving parts,
binding of moving parts, breakage of parts, mounting,
and any other conditions that may affect the operation.
z Be sure all guards, straps, deectors and handles are
attached securely.
z Never operate the unit without the guard in place and in
good condition.
z Maintain a rm grip on both handles while trimming.
z Store idle appliances indoors – When not in use, the
hedge trimmer should be stored in a dry, locked place
out of the reach of children.
z Inspect the area to be cut. Remove objects that can be
thrown or become entangled in the blade.
z Keep the air vents clean and free of debris to avoid
over-heating the motor. Clean after each use.

6
|
English
z Before cleaning or performing any maintenance, stop the
motor. Wait until all moving parts have come to a complete
stop, and remove the battery pack.
z Never use water or any liquids to clean or rinse off the
product and do not expose the product to rain or wet
conditions. Store indoors in a dry area. Corrosive liquids,
water, and chemicals can enter the product’s electronic
components and/or battery compartment and damage
electronic components and/or the battery pack, which can
result in a short circuit, increased risk of re, and serious
personal injury. Remove any buildup of dirt and debris
by wiping the product clean with a dry cloth occasionally.
z Stop the unit and disconnect the power source when not
in use. Only carry the unit when the motor is stopped and
blade sheath on the unit.
z Store out of the reach of children.
z Do not hang the unit where the switch trigger is depressed.
z Battery tools do not have to be plugged into an electrical
outlet; therefore, they are always in operating condition.
Be aware of possible hazards when not using the bat-
tery tool or when changing accessories. Following this
rule will reduce the risk of electric shock, re, or serious
personal injury.
z Under abusive conditions, liquid may be ejected from the
battery; avoid contact. If contact occurs, ush skin with
water. If liquid contacts eyes, seek medical attention. Liquid
ejected from the battery may cause irritation or burns.
z Do not use a battery pack or appliance that is damaged
or modied. Damaged or modied batteries may exhibit
unpredictable behavior resulting in re, explosion or risk
of injury.
z Do not expose a battery pack or appliance to re or
excessive temperature. Exposure to re or temperature
above 265°F may cause explosion.
z Do not charge the battery tool in rain, or damp or wet
location. Following this rule will reduce the risk of electric
shock.
z Do not use battery-operated appliances in rain.
z Remove or disconnect the battery when not charging,
and before servicing, cleaning, removing material from
the appliance, or storing.
z Only use the battery pack with the charger listed.
SAFETY
z Do not dispose of the batteries in a re. The cell may
explode. Check with local codes for possible special
disposal instructions.
z Do not open or mutilate the batteries. Released electrolyte
is corrosive and may cause damage to the eyes or skin.
It may be toxic if swallowed.
z Do not place battery tools or their batteries near re or heat.
This will reduce the risk of explosion and possibly injury.
z Batteries can explode in the presence of a source of ig-
nition. To reduce the risk of serious personal injury, never
use any cordless product in the presence of an open ame.
An exploded battery can propel debris and chemicals. If
exposed, ush with water immediately.
z Do not crush, drop or damage the battery pack. Do not
use a battery pack or charger that has been dropped or
received a sharp blow. A damaged battery is subject to
explosion. Properly dispose of a dropped or damaged
battery pack immediately.
z Under extreme usage or temperature conditions, battery
leakage may occur. If liquid comes in contact with your
skin, wash skin immediately with soap and water. If liquid
gets into your eyes, ush them with clean water for at
least 10 minutes, then seek immediate medical attention.
z Recharge the battery pack only with the charger specied
by the manufacturer.
z Use the hedge trimmer only with specically designated
battery packs. Use of any other battery packs may create
a risk of injury and re.
z When the battery pack is not in use, keep it away from
other metal objects that can make a connection from one
terminal to another.
z Follow all charging instructions and do not charge the
battery pack or appliance outside of the temperature
range specied in the instructions. Charging improperly
or at temperatures outside of the specied range may
damage the battery and increase the risk of re.
z Have service performed by a qualied repair person using
only identical replacement parts.
z Do not modify or attempt to repair the appliance or the
battery pack except as indicated in the instructions for
use and care.
z Retain these instructions. Refer to them frequently and
use them to instruct anyone who may use this power tool.

English
|
7
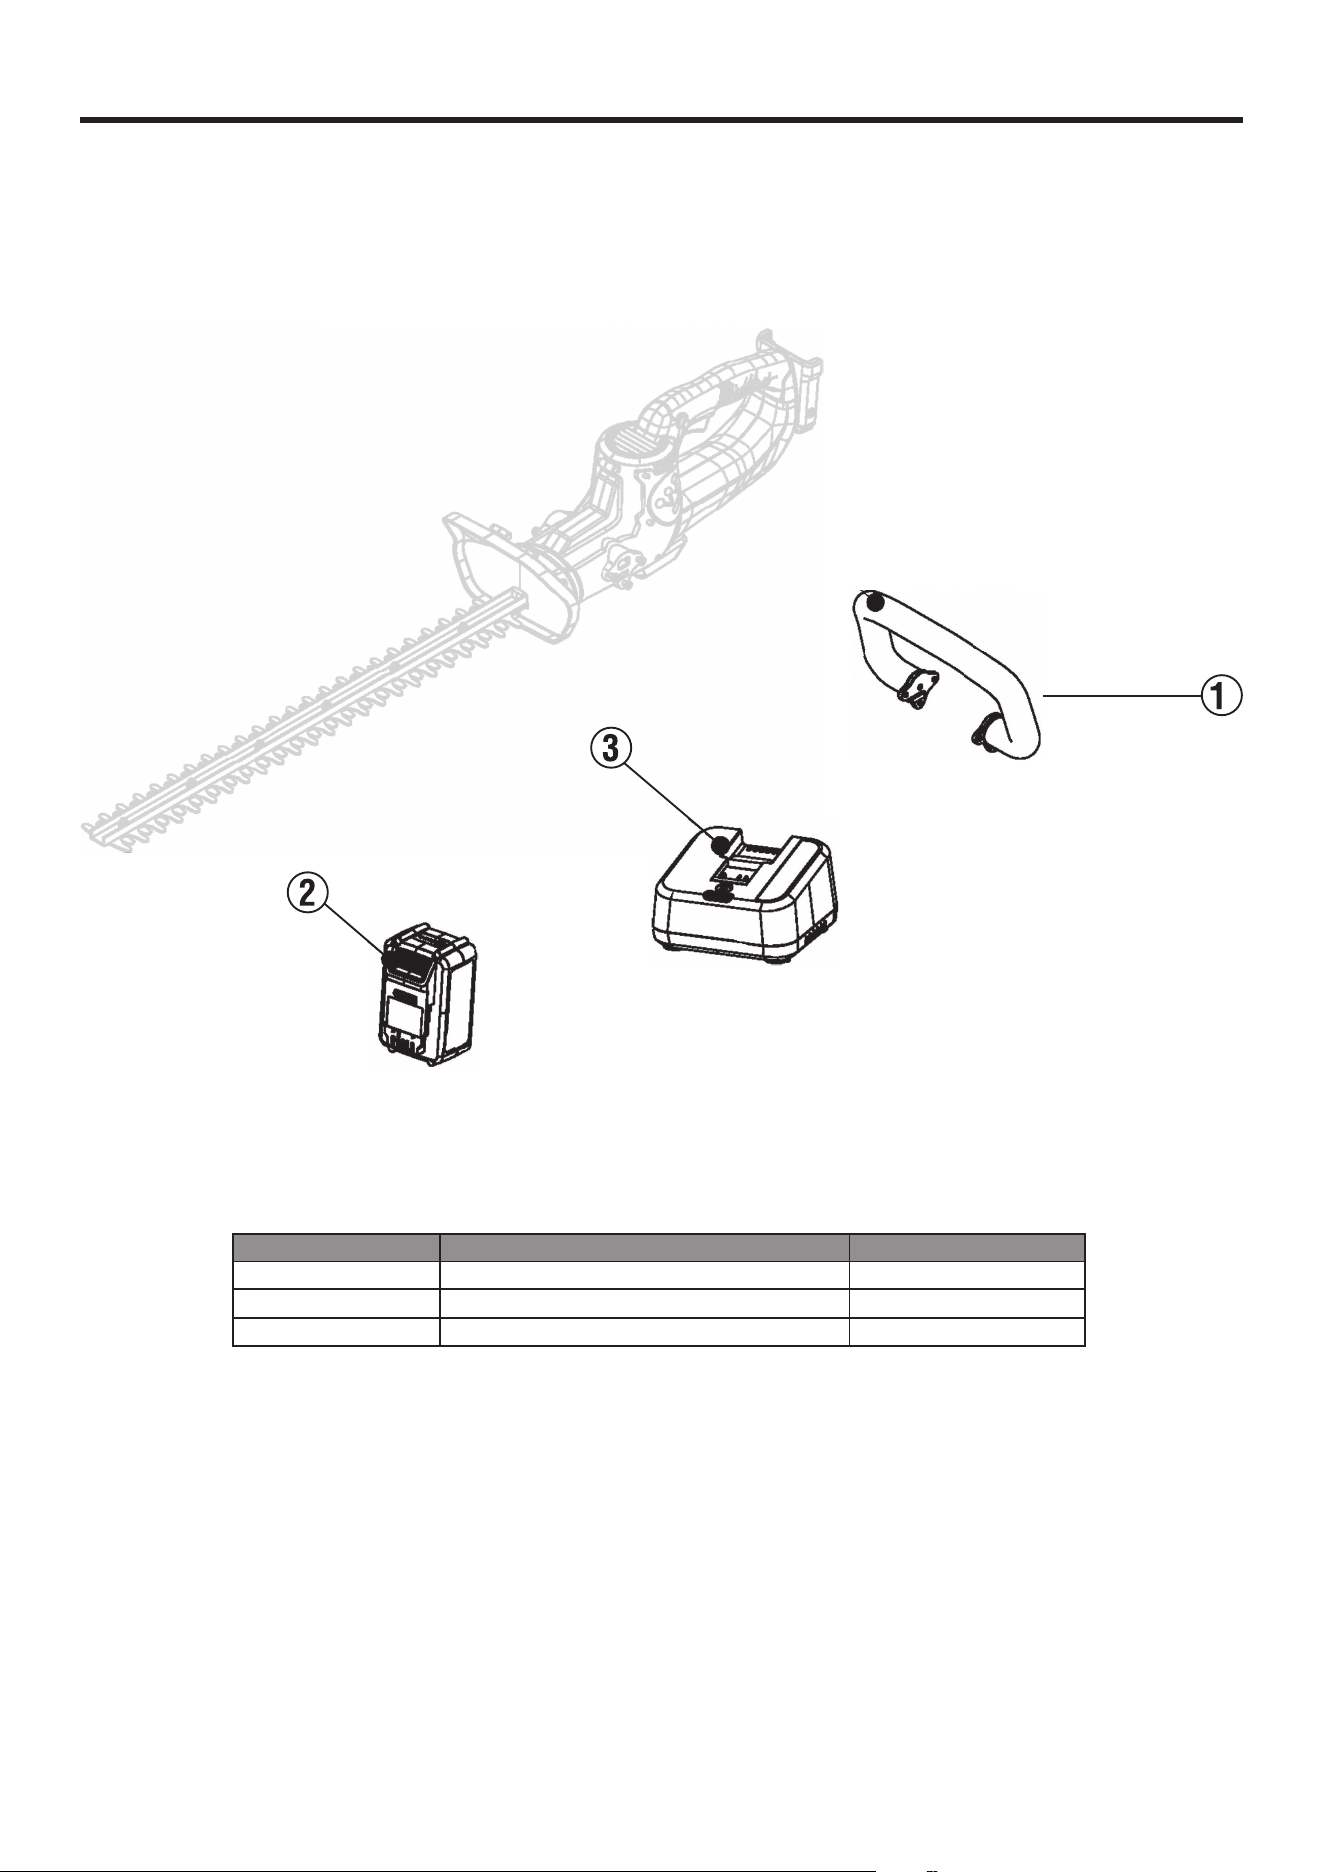
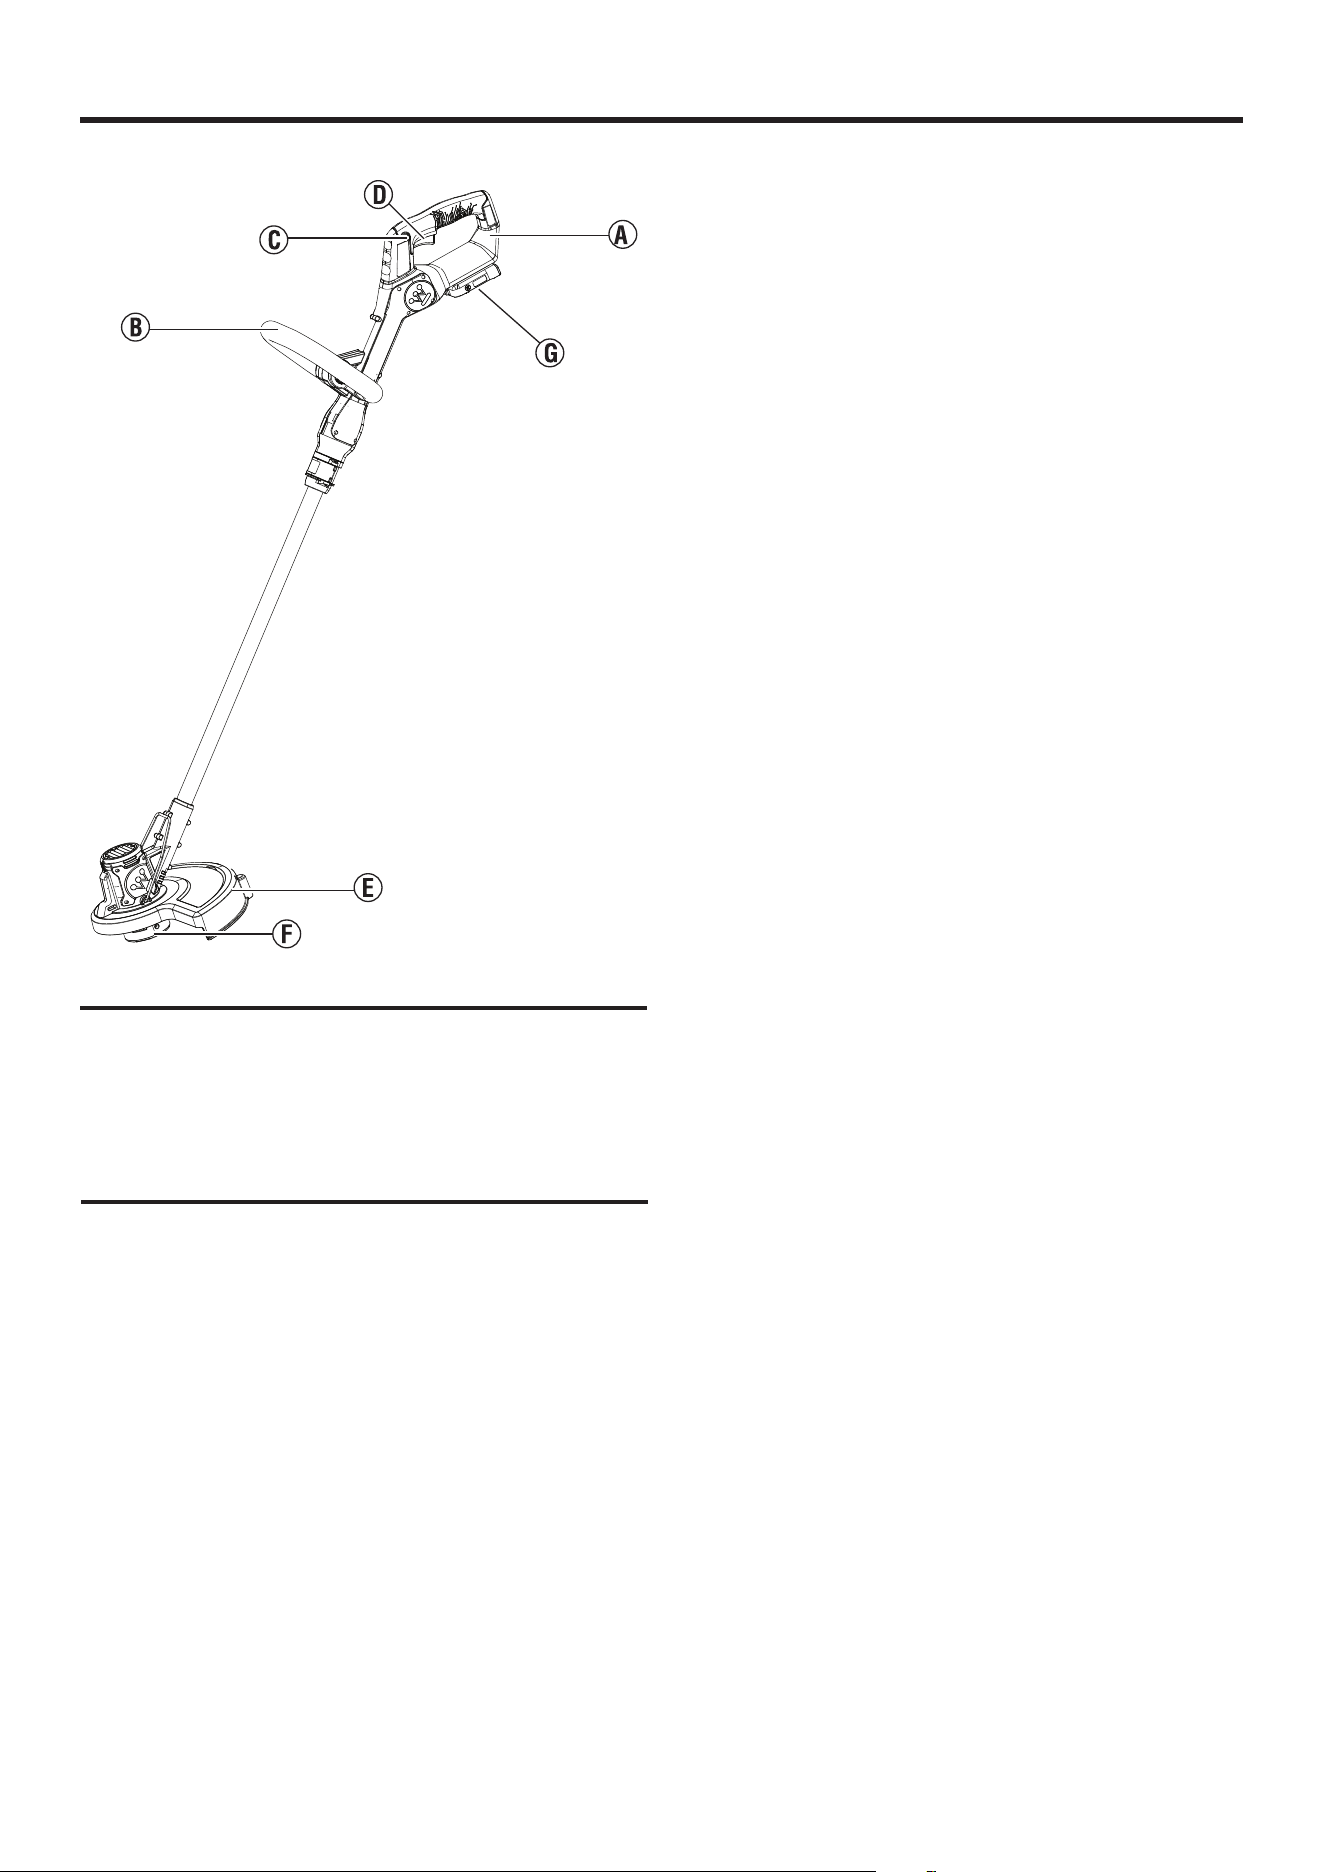
COMPONENTS
A - Blade sheath
B - Blade
C - Guard
D - Front handle
E - Lock-out button
F - Top handle
G - Battery pack housing
H - Switch trigger
UNDERSTANDING THE HEDGE TRIMMER
See Figure 1.
To reduce the risk of personal injury and product failure, read and
understand the information in this user manual and the information
on the product labeling.
BLADE SHEATH (A)
Provides protection from the blade during transport and while the
hedge trimmer is in storage.
BLADE (B)
Trims and shapens hedges and other shrubbery.
GUARD (C)
Provides protection from debris and contact with the trimming blade.
FRONT HANDLE (D)
Provides additional comfort and stability during use.
LOCK-OUT BUTTON (E)
Prevents the hedge trimmer from initiating operation accidentally.
TOP HANDLE (F)
Provides directional control and stability during use.
BATTERY PACK HOUSING (G)
Location of the battery pack for connection and disconnection to
the unit.
SWITCH TRIGGER (H)
Initiates operation when squeezed in conjuction with holding the
lock-out button. The switch trigger must be held throughout use or
the hedge trimmer will not operate.
Figure 1

8
|
English
ASSEMBLY
REMOVING CARTON CONTENTS
WARNING
This product requires assembly. Do not attempt to operate this product if any items in the IN-
CLUDED LIST are already assembled when you remove the carton contents. These items are not assembled by the
manufacturer and should require customer assembly. Using an improperly assembled product can be hazardous
and could result in serious personal injury.
z Carefully open the carton.
z Remove and inspect the carton contents. Verify that all the items in the INCLUDED LIST are present and undamaged.
z Recycle or dispose of the packaging materials properly.
INCLUDED LIST:
Hedge trimmer, blade sheath, and user manual.
If any parts are missing, contact our service team at [email protected] or call 1-855-944-3571.
WARNING
Do not alter or modify this product unless instructed otherwise in this manual or by the man-
ufacturer. Do not use attachments or accessories that are not recommended for use with this product. Making
unauthorized modications and using incompatible accessories can damage the unit and may void your warranty.
WARNING
Do not connect the hedge trimmer to the battery pack until assembly is complete. Failure to
comply could result in accidental starting and possible serious personal injury.
WARNING
Always disconnect the battery pack from the hedge trimmer when assembling parts, making
adjustments, cleaning, or when not in use.
ATTACHING THE BATTERY PACK
z Insert the battery pack into the battery housing.
z Be sure that the latches on each side of the battery pack lock into place.
WARNING
Remove the battery pack and keep hands clear of the lock-out button when carrying or trans-
porting the hedge trimmer.
REMOVING THE BATTERY PACK
z Locate the latches on the side of the battery pack and depress both sides to release the battery pack from the hedge
trimmer.
WARNING
Battery tools are always in operating condition. Therefore, switch should always be locked
with hands free of the lock-out button when not in use. Remove battery pack when transporting or carrying hedge
trimmer to avoid accidental starting, which may result in serious injury.

English
|
9
OPERATION
WARNING
Always wear eye protection with
side shields marked to comply with ANSI Z87.1. Fail-
ure to do so could result in objects being thrown into
your eyes resulting in possible serious injury.
WARNING
Do not use any attachments or
accessories not recommended by the manufacturer of
this product. The use of attachments or accessories
not recommended can result in serious personal injury.
NOTICE
Before each use, inspect the entire
product for damaged, missing, or loose parts such as
screws, nuts, bolts, and caps. Tighten securely all fas-
teners and caps and do not operate this product un-
til all missing or damaged parts are replaced. Please
contact customer service.
WARNING
To avoid serious personal injury,
always remove the battery pack and keep hands clear
of the lock-out button when carrying or transporting
the tool.
STARTING THE HEDGE TRIMMER
z Install the battery pack.
z Press and hold the lockout button. While holding the
lockout button, squeeze the switch trigger.
z To stop the hedge trimmer, release the switch trigger.
HOLDING THE HEDGE TRIMMER
z The unit has both a front and top handle. With the blade
directed away from you, hold the unit by both handles.
WARNING
Always keep both hands on the
hedge trimmer handles. Never hold shrubs with one
hand and operate the hedge trimmer with the other.
Improper operation of the hedge trimmer may result in
serious injury.
OPERATING TIPS
WARNING
Never cut near electric cords or
lines. If blade jams on any electrical cord or line, DO
NOT TOUCH THE BLADE! IT CAN BECOME ELEC-
TRICALLY LIVE AND VERY DANGEROUS. Continue
to hold the hedge trimmer by the insulated rear handle
or lay it down and away from you in a safe manner.
Disconnect the electrical service to the damaged line
or cord before attempting to free the blade from the
line or cord. Contact with the blade, other conductive
parts of the hedge trimmer, or live elec-tric cords or
lines will result in death by electrocution or serious in-
jury.
WARNING
Clear the area to be cut before
each use. Remove all objects such as cords, lights,
wire, or loose string which can become entangled in
the cutting blade and create a risk of serious personal
injury.
z Before starting the hedge trimmer, hold the unit with both
hands with the cutting blades directed away from you.
Always use the hedge trimmer properly.
z Do not force the hedge trimmer through heavy shrubbery.
This can cause the blades to bind and slow down. If the
blades slow down, reduce the pace.
z Do not try to cut stems or twigs that are larger than 3/4 in.
thick, or those obviously too large to feed into the cutting
blade. Use a non-powered hand saw or pruning saw to
trim large stems.
z If blades do become jammed, stop the motor, allow
the blades to stop and remove the battery pack before
at-tempting to remove the obstruction.
z If desired, use a string to help cut your hedge level.
Determine the desired height of the hedge and stretch
a piece of string along the hedge at this height. Trim the
hedge just above this guide line of string. Trim the side
of a hedge so that it will be slightly narrower at the top.
More of the hedge will be exposed when shaped this way,
and it will be more uniform.
z Always hold hedge trimmer with both hands when oper-
ating. Use a rm grip on the handles. The unit is used
for cutting in either direction in a slow, sweeping action
from side to side.
z Wear gloves when trimming thorny or prickly growth.
z When trimming new growth, use a wide sweeping action,
so that the stems are fed directly into the cutting blade.
Older growth will have thicker stems and will be trimmed
easiest by using a sawing movement.

10
|
English
MAINTENANCE
WARNING
Before inspecting, cleaning or servicing the unit, stop the motor, wait for all moving parts to
stop, and disconnect the battery pack from the hedge trimmer. Failure to follow these instructions can result in seri-
ous personal injury or property damage.
WARNING
Always wear eye protection with side shields marked to comply with ANSI Z87.1. Failure to do
so could result in objects being thrown into your eyes resulting in possible serious injury.
WARNING
Never use water or any liquids to clean or rinse off your product and do not expose the product
to rain or wet conditions. Store indoors in a dry area. Corrosive liquids, water, and chemicals can enter the product’s
electronic components and cause damage, which can result in a short circuit, increased risk of re, and serious
personal injury. Remove any buildup of dirt and debris by wiping the product clean with a dry cloth occasionally.
NOTICE
Periodically inspect the entire product for damaged, missing, or loose parts such as screws, nuts,
and caps. Secure all fasteners and caps and do not operate this product until all missing or damaged parts are re-
placed. Please contact customer service.
GENERAL MAINTENANCE
Avoid using solvents when cleaning plastic parts. Most plastics are susceptible to damage from various types of com-
mercial solvents and may be damaged by their use. Use clean cloths to remove dirt, dust, oil, and grease.
WARNING
Do not let brake uids, gasoline, petroleum-based products, or penetrating oils come in contact
with plastic parts. Chemicals can damage, weaken, or destroy plastic which can result in serious personal injury.
LUBRICATING THE BLADE
WARNING
Always allow the blades of the hedge trimmer to come to a stop and remove the battery pack
before lubricating. Failure to do so could result in accidental starting causing possible serious personal injury.
NOTE: For easier operation and longer blade life, lubricate the hedge trimmer blade before and after each use.
z Remove the battery pack from the hedge trimmer.
z Lay the hedge trimmer on a at surface. Apply light weight machine oil along the edge of the top blade.
z Reinstall the battery pack and resume use.
CLEANING THE HEDGE TRIMMER
z Remove the battery pack.
z Remove the blade sheath.
z Clean dirt and debris from the body of the hedge trimmer, using a damp cloth with a mild detergent.
NOTE: Do not use any strong detergents on the plastic housing or the handle. They can be damaged by certain aro-
matic oils such as pine and lemon, and by solvents such as kerosene.
z Moisture can cause a shock hazard. Wipe off any moisture with a soft dry cloth.
z Use a small brush or the air discharge of a small vacuum cleaner brush to clear dust or debris from the air vents on
the motor housing.
STORING THE HEDGE TRIMMER
z Remove the battery pack.
z Clean the trimmer.
z Store the trimmer in a location that is inaccessible to children.
z Keep away from corrosive agents..
z Place the blade sheath over the blade of the trimmer.

English
|
11
TROUBLESHOOTING
PROBLEM POSSIBLE CAUSE CORRECTION
Trimmer will not start
Battery pack not installed properly Check battery pack installation
Battery pack not charged Check battery pack charging requirements
Battery pack will not
charge
Surrounding air temperature too hot or too
cold
Move charger and tool to a surrounding air
temperature of above 40 degree F (4.5°C) or
below 105 degree F (+40.5°C).
Charger not plugged in
Plug charger into a working outlet.
Check current at receptacle by plugging in
another appliance.
Check to see if receptacle is connected to a
light switch which turns power off when you
turn out the lights.
Battery pack not inserted into charger
Insert battery pack into charger until red
LED appears
12
|
English
PARTS PAGE
Index Number Description Part Number
1 Front Handle 120170001
2 Battery Pack 811400211480013
3 Charger 925005

NOTES/NOTAS

DO NOT RETURN THIS PRODUCT TO THE STORE
If you have questions or need assistance, please call customer service at 855-944-3571.
User
Manual
WST 20V / WSTT 20V
12 in. Cordless String Trimmer
2
|
English
TABLE OF CONTENTS
Introduction .................................................................................................................................................................................................................2-3
Safety ...........................................................................................................................................................................................................................4-6
Components ...................................................................................................................................................................................................................7
Assembly.....................................................................................................................................................................................................................8-9
Operation ......................................................................................................................................................................................................................10
Maintenance ................................................................................................................................................................................................................. 11
Troubleshooting ..........................................................................................................................................................................................................12
Parts Page .................................................................................................................................................................................................................... 13
Service Hot Line/Company Address ............................................................................................................................................................ Back Page
INTRODUCTION
WARNING
Operating, servicing, and main-
taining this equipment may expose you to chemicals
which are known to the State of California to cause
cancer and birth defects or other reproductive harm.
To minimize exposure, wear gloves or wash your
hands frequently when servicing this equipment. For
more information go to www.P65warnings.ca.gov.
DISCLAIMERS
All information, illustrations, and specications in this
manual were in effect at the time of publishing. The illus-
trations used in this manual are intended as representa-
tive reference views only. We reserve the right to make
any specication or design change without notice.
ALL RIGHTS RESERVED
All rights reserved. No reproduction allowed in any form
without written permission from Westinghouse Outdoor
Power Equipment.
DANGER
Read this manual before using
or performing maintenance on this product.
Failure to follow the instructions and safety pre-
cautions in this manual can result in serious in-
jury or death.
UPDATES
The latest User Manual for your Westinghouse products
can be found under our support tab. wpowereq.com/
pages/manuals
Or scan the following QR code with your smartphone
camera to be directed to the link.
PRODUCT REGISTRATION
For trouble-free warranty coverage, it
is important to register your Westing-
house product.
You can register by:
z Completing and mailing the product
registration card included in the
carton.
z Registering your product on-line at: wpowereq.com/
pages/warranty-registration
z Scanning the above QR code with your smartphone cam-
era to be directed to the mobile registration link.
For Your Records
Date of Purchase:
Model Number:
Serial Number:
Place of Purchase:
z Sending the following product information to:
Westinghouse Outdoor Power
Warranty registration
777 Manor Park Drive
Columbus, OH 43228
IMPORTANT: Keep your purchase receipt for trouble-free
warranty coverage.

English
|
3
INTRODUCTION
SPECIFICATIONS
DC Voltage .................................................................................................................................................................. 20V
No Load Speed..................................................................................................................................................8000 RPM
Cutting Diameter............................................................................................................................................12 in. (7.6 m)
NOTICE
This product is designed and rated for continuous operation at ambient temperatures above 23°F (–5°C).
If needed, this product can be operated in extremely hot or extremely cold temperatures for short periods. If the
product is exposed to extreme temperatures during storage, it should be brought back within the optimal tempera-
ture range before operation.
NOTICE
Thank you for choosing Westinghouse! PLEASE READ THIS MANUAL BEFORE RETURNING THIS
PRODUCT FOR ANY REASON.
If you have a question or experience a problem with your Westinghouse purchase, call us at 1-855-944-3571 to
speak with an agent.
RETAIN THIS MANUAL FOR FUTURE REFERENCE.
HAVE QUESTIONS?
Email us at [email protected]
or call 1-855-944-3571
NOTICE
This product is designed for optimal compatibility with the Westinghouse batteries and chargers listed
below. Use with any other batteries or chargers not listed below may result in serious personal injury or death.
Model Motor Westinghouse Battery Pack Westinghouse Charger
WST 20V / WSTT 20V 20V DC
W20V2AH
W20V4AH
W20V5AH
W20V2AMP
W20V2DP
4
|
English
SAFETY DEFINITIONS
The words DANGER, WARNING, CAUTION, and NO-
TICE are used throughout this manual to highlight import-
ant information. Be sure that the meanings of this safety
information is known to all who operate, perform mainte-
nance on, or are near the string trimmer.
This safety alert symbol appears with most safety state-
ments. It means attention, become alert, your safety is
involved! Please read and abide by the message that
follows the safety alerts symbol.
DANGER
Indicates a hazardous situation
which, if not avoided, will result in death or serious
injury.
WARNING
Indicates a hazardous situation
which, if not avoided, could result in death or serious
injury.
CAUTION
Indicates a hazardous situation
which, if not avoided, could result in minor or moder-
ate injury.
NOTICE
Indicates a situation which can cause dam-
age to the string trimmer, personal property, and/or the
environment, or cause the equipment to operate im-
properly.
NOTE: Indicates a procedure, practice or condition
that should be followed for the string trimmer to func-
tion in the manner intended.
SAFETY SYMBOLS
Follow all safety information contained in this user manual as well
as the information on the product labeling.
SYMBOL
DESCRIPTION
Safety Alert Symbol. Indicates a potential personal
injury hazard.
Read User Manual. To reduce the risk of injury, user
must read and understand user manual before using
this product.
Keep all bystanders 50 ft. away.
Wear Eye Protection. Always wear eye protection
with side shields marked to comply with ANSI Z87.1.
DANGER! avoid injury from rotating head – Keep
hands, feet, and clothing away.
Thrown objects can ricochet and result in personal
injury or property damage.
Do not install or use any type of blade on a product
displaying this symbol.
Wet Conditions Alert. Do not expose the battery
pack, battery compartment, or electronic compo-
nents to water or rain.
V
Volts
A
Amperes
Hz
Hertz
n
o
No Load Speed
Direct Current
SAFETY

English
|
5
SAFETY
WARNING
READ AND UNDERSTAND ALL
INSTRUCTIONS. Failure to follow all instructions list-
ed below and on the machine may result in electric
shock, re, and/or serious personal injury.
z For safe operation, read and understand all instructions
before using this product. Follow all safety instructions.
Failure to follow all safety instructions listed can result in
serious personal injury.
z Do not allow children or untrained individuals to use this
unit.
z Inspect the work area before each use. Remove all objects
that can be thrown or become entangled in the machine.
z Always wear eye protection with side shields marked to
comply with ANSI Z87.1. Following this rule will reduce
the risk of serious personal injury.
z Use Safety Glasses – Wear a face or dust mask if the
operation is dusty. Always wear safety glasses with side
shields. Everyday glasses have only impact resistant
lenses. They are NOT safety glasses. Following this rule
will reduce the risk of eye injury.
z Protect your lungs. Wear a face or dust mask if the op-
eration is dusty. Following this rule will reduce the risk of
serious personal injury.
z Dress Properly – Do not wear loose clothing or jewelry.
They can be caught in moving parts. Use of rubber gloves
and substantial footwear is recommended when working
outdoors. Wear heavy, long pants, long sleeves, boots, and
gloves. Do not wear short pants, sandals, or go barefoot.
Do not wear jewelry of any kind.
z Secure long hair above shoulder level to prevent entan-
glement in moving parts.
z Keep children away – Keep all bystanders, children, and
pets at least 50 ft. away.
z Stay alert – Do not operate this unit when you are tired,
ill, upset, or under the inuence of alcohol, drugs, or
medication.
z Do not operate in poor lighting.
z Keep all body parts away from any moving part on this unit.
z Do not operate power tools in explosive atmospheres,
such as in the presence of ammable liquids, gases, or
dust. Power tools create sparks which may ignite the
dust or fumes.
z Avoid body contact with grounded surfaces such as pipes,
radiators, ranges, and refrigerators. There is an increased
risk of electric shock if your body is grounded.
z Avoid Dangerous Environments – Don’t expose the string
trimmer to rain or wet conditions. Water entering the string
trimmer will increase the risk of electric shock.
z Use Right Appliance – Do not force the tool. Use the cor-
rect tool for your application. The correct tool will operate
better and safer at the rate for which it is designed.
z Don’t Force Appliance – It will operate better and with
less likelihood of a risk of injury at the rate for which it
was designed.
z Do not operate the equipment while barefoot or when
wearing sandals or similar lightweight footwear. Wear
protective footwear that will protect your feet and improve
your footing on slippery surfaces.
z Do not overreach – Keep rm footing and balance. Over-
reaching can result in a loss of balance.
z Avoid accidental starting – Be sure the switch trigger is
in the locked or off position before inserting the battery
pack. Carrying tools with your nger on the switch trigger
or inserting the battery pack into a tool with the switch on
increases the risk of injury.
z Do not use the tool if the switch trigger does not turn it on
or off. Any tool that cannot be controlled with the switch
trigger is dangerous and must be repaired. Contact
Customer Service.
z Disconnect battery pack – Disconnect the battery pack from
the appliance before servicing or changing accessories.
Preventive safety measures reduce the risk of starting
the tool accidentally.
z Only use identical accessories from the manufacturer.
Use of any other parts may create a hazard or cause
product damage.
z Maintain appliance with care – Replace the string head
if it is cracked, chipped, or damaged. Be sure the string
head is installed properly and fastened securely. Failure
to do so can cause serious injury. Keep the handles dry,
clean, and free from oil and grease.
z Inspect for damaged parts – Before use of the tool, any
part that is damaged should be carefully inspected to
determine that it will operate properly and perform its
intended function. Inspect for alignment of moving parts,
binding of moving parts, breakage of parts, mounting,
and any other conditions that may affect the operation.
z Be sure all guards, straps, deectors and handles are
attached securely.
z Use only the recommended replacement line in the cutting
head. Do not use any other cutting attachment. To install
any other brand of cutting head to this string trimmer can
result in serious personal injury.
z Never operate the unit without the guard in place and in
good condition.
z Maintain a rm grip on both handles while trimming. Keep
the string head below waist level. Never use with the
string head located over 30 in. or more above the ground.

6
|
English
z Store idle appliances indoors – When not in use, the string
trimmer should be stored in a dry, locked place out of the
reach of children.
z Never use blades, ailing devices, wire or rope. The unit
is designed for line trimmer use only. Use of any other
accessories or attachments increase the risk of injury.
z Inspect the area to be cut. Remove objects that can be
thrown or become entangled in the cutting head.
z Keep the air vents clean and free of debris to avoid
over-heating the motor. Clean after each use.
z Before cleaning or performing any maintenance, stop the
motor. Wait until all moving parts have come to a complete
stop, and remove the battery pack.
z Never use water or any liquids to clean or rinse off the
product and do not expose the product to rain or wet
conditions. Store indoors in a dry area. Corrosive liquids,
water, and chemicals can enter the product’s electronic
components and/or battery compartment and damage
electronic components and/or the battery pack, which can
result in a short circuit, increased risk of re, and serious
personal injury. Remove any buildup of dirt and debris
by wiping the product clean with a dry cloth occasionally.
z Stop the unit and disconnect the power source when not
in use. Only carry the unit when the motor is stopped.
z Store out of the reach of children.
z Do not hang unit so that the switch trigger is depressed.
z Battery tools do not have to be plugged into an electrical
outlet; therefore, they are always in operating condition.
Be aware of possible hazards when not using the bat-
tery tool or when changing accessories. Following this
rule will reduce the risk of electric shock, re, or serious
personal injury.
z Under abusive conditions, liquid may be ejected from the
battery pack; avoid contact. If contact occurs, ush skin
with water. If liquid contacts eyes, seek medical attention.
Liquid ejected from the battery pack may cause irritation
or burns.
z Do not use a battery pack or appliance that is damaged
or modied. Damaged or modied batteries may exhibit
unpredictable behavior resulting in re, explosion or risk
of injury.
z Do not expose a battery pack or appliance to re or
excessive temperature. Exposure to re or temperature
above 265°F may cause explosion.
z Do not charge the battery tool in rain, or damp or wet
location. Following this rule will reduce the risk of electric
shock.
z Do not use battery-operated appliances in rain.
z Remove or disconnect the battery pack when not charging,
and before servicing, cleaning, removing material from
the appliance, or storing.
z Only use the battery pack with the charger listed.
SAFETY
z Do not dispose of the batteries in a re. The cell may
explode. Check with local codes for possible special
disposal instructions.
z Do not open or mutilate the batteries. Released electrolyte
is corrosive and may cause damage to the eyes or skin.
It may be toxic if swallowed.
z Do not place battery tools or their batteries near re or heat.
This will reduce the risk of explosion and possibly injury.
z Batteries can explode in the presence of a source of ig-
nition. To reduce the risk of serious personal injury, never
use any cordless product in the presence of an open ame.
An exploded battery can propel debris and chemicals. If
exposed, ush with water immediately.
z Do not crush, drop or damage the battery pack. Do not
use a battery pack or charger that has been dropped or
received a sharp blow. A damaged battery is subject to
explosion. Properly dispose of a dropped or damaged
battery pack immediately.
z Under extreme usage or temperature conditions, battery
leakage may occur. If liquid comes in contact with your
skin, wash skin immediately with soap and water. If liquid
gets into your eyes, ush them with clean water for at
least 10 minutes, then seek immediate medical attention.
z Recharge the battery pack only with the charger specied
by the manufacturer.
z Use the string trimmer only with specically designated
battery packs. Use of any other battery packs may create
a risk of injury and re.
z When the battery pack is not in use, keep it away from
other metal objects that can make a connection from one
terminal to another.
z Follow all charging instructions and do not charge the
battery pack or appliance outside of the temperature
range specied in the instructions. Charging improperly
or at temperatures outside of the specied range may
damage the battery and increase the risk of re.
z Do not modify or attempt to repair the appliance or the
battery pack except as indicated in the instructions for
use and care.
z Retain these instructions. Refer to them frequently and
use them to instruct anyone who may use this power tool.
English
|
7
COMPONENTS
A - Top handle
B - Front handle
C - Lock-out button
D - Switch trigger
E - Guard
F - Spool housing
G - Battery pack housing
UNDERSTANDING THE STRING TRIMMER
See Figure 1.
To reduce the risk of personal injury and product failure, read and
understand the information in this user manual and the information
on the product labeling.
TOP HANDLE (A)
Provides directional control and stability during use.
FRONT HANDLE (B)
Provides additional comfort and stability during use.
LOCK-OUT BUTTON (C)
Prevents the string trimmer from initiating operation accidentally.
SWITCH TRIGGER (D)
Initiates operation when squeezed in conjuction with holding the
lock-out button. The switch trigger must be held throughout use or
the string trimmer will not operate.
GUARD (E)
Provides protection from debris and contact with the trimming wire.
SPOOL HOUSING (F)
Storage for the wire used during operation.
BATTERY PACK HOUSING (G)
Location of the battery pack for connection and disconnection to
the unit.
Figure 1
8
|
English
ASSEMBLY
REMOVING CARTON CONTENTS
WARNING
This product requires assembly.
Do not attempt to operate this product if any items in
the INCLUDED LIST are already assembled when
you remove the carton contents. These items are not
assembled by the manufacturer and should require
customer assembly. Using an improperly assembled
product can be hazardous and could result in serious
personal injury.
z Carefully open the carton.
z Remove and inspect the carton contents. Verify that all the
items in the INCLUDED LIST are present and undamaged.
z Recycle or dispose of the packaging materials properly.
INCLUDED LIST
Front handle, guard, top handle and spool housing, and user manual.
If any parts are missing, contact our service team at service@wpow-
ereq.com or call 1-855-944-3571.
WARNING
Do not alter or modify this prod-
uct unless instructed otherwise in this manual or by the
manufacturer. Do not use attachments or accessories
that are not recommended for use with this product.
Making unauthorized modications and using incom-
patible accessories can damage the unit and may void
your warranty.
WARNING
Do not connect the string trimmer
to the battery pack until assembly is complete. Failure
to comply could result in accidental starting and possi-
ble serious personal injury.
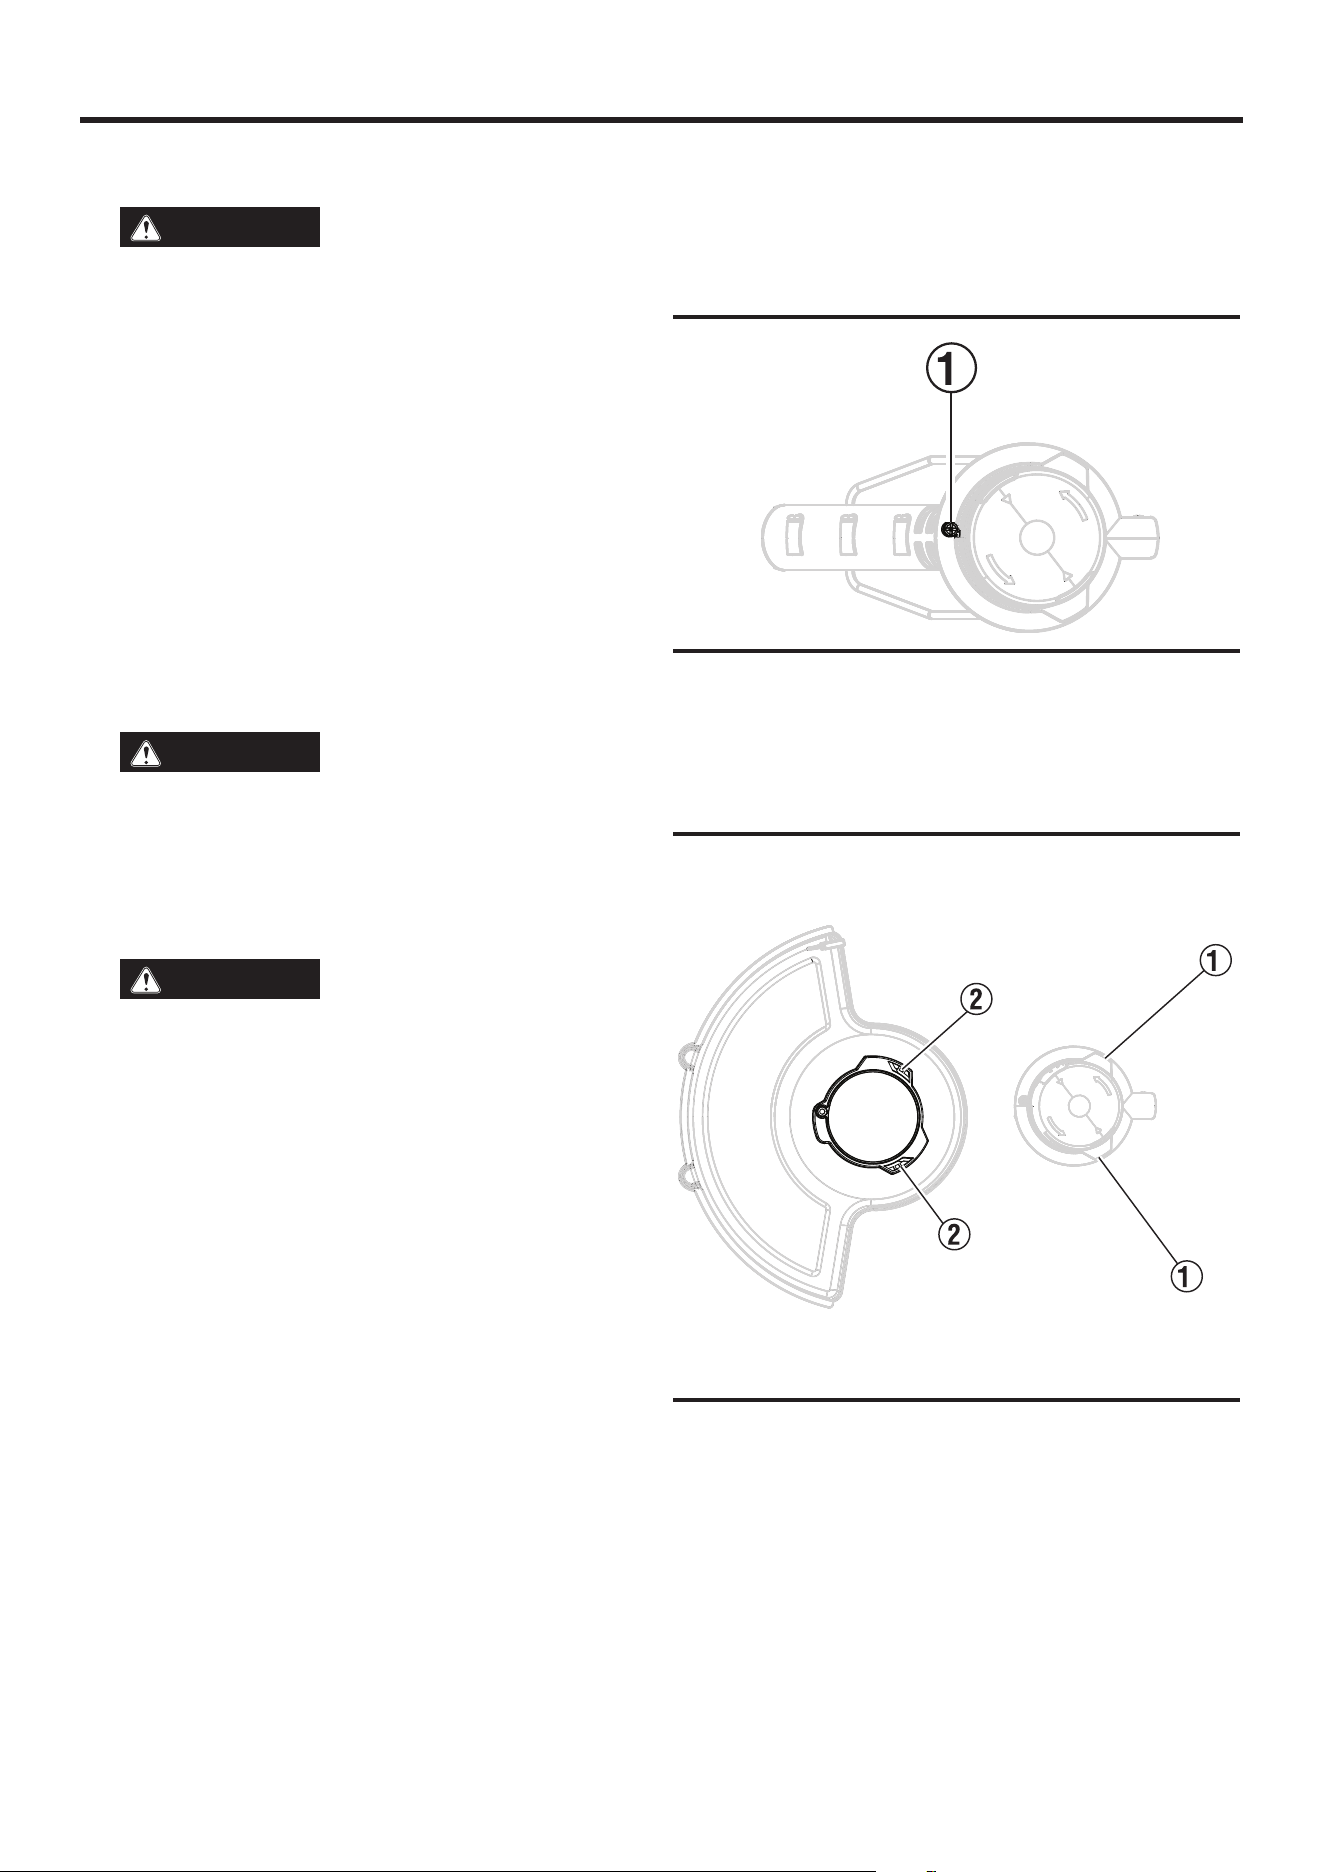
Figure 2
ATTACHING THE GUARD TO THE SPOOL
HOUSING
See Figure 2.
z Remove the screw (1) from the spool housing. Keep the
screw for use later.
(a) underneath view of
the spool housing
Figure 3
See Figure 3.
z Attach the guard to the spool housing.
z Align the markers on the guard (2) with the markers on
the spool housing (1). Rotate the guard until the markers
on the guard are secured into place.
English
|
9
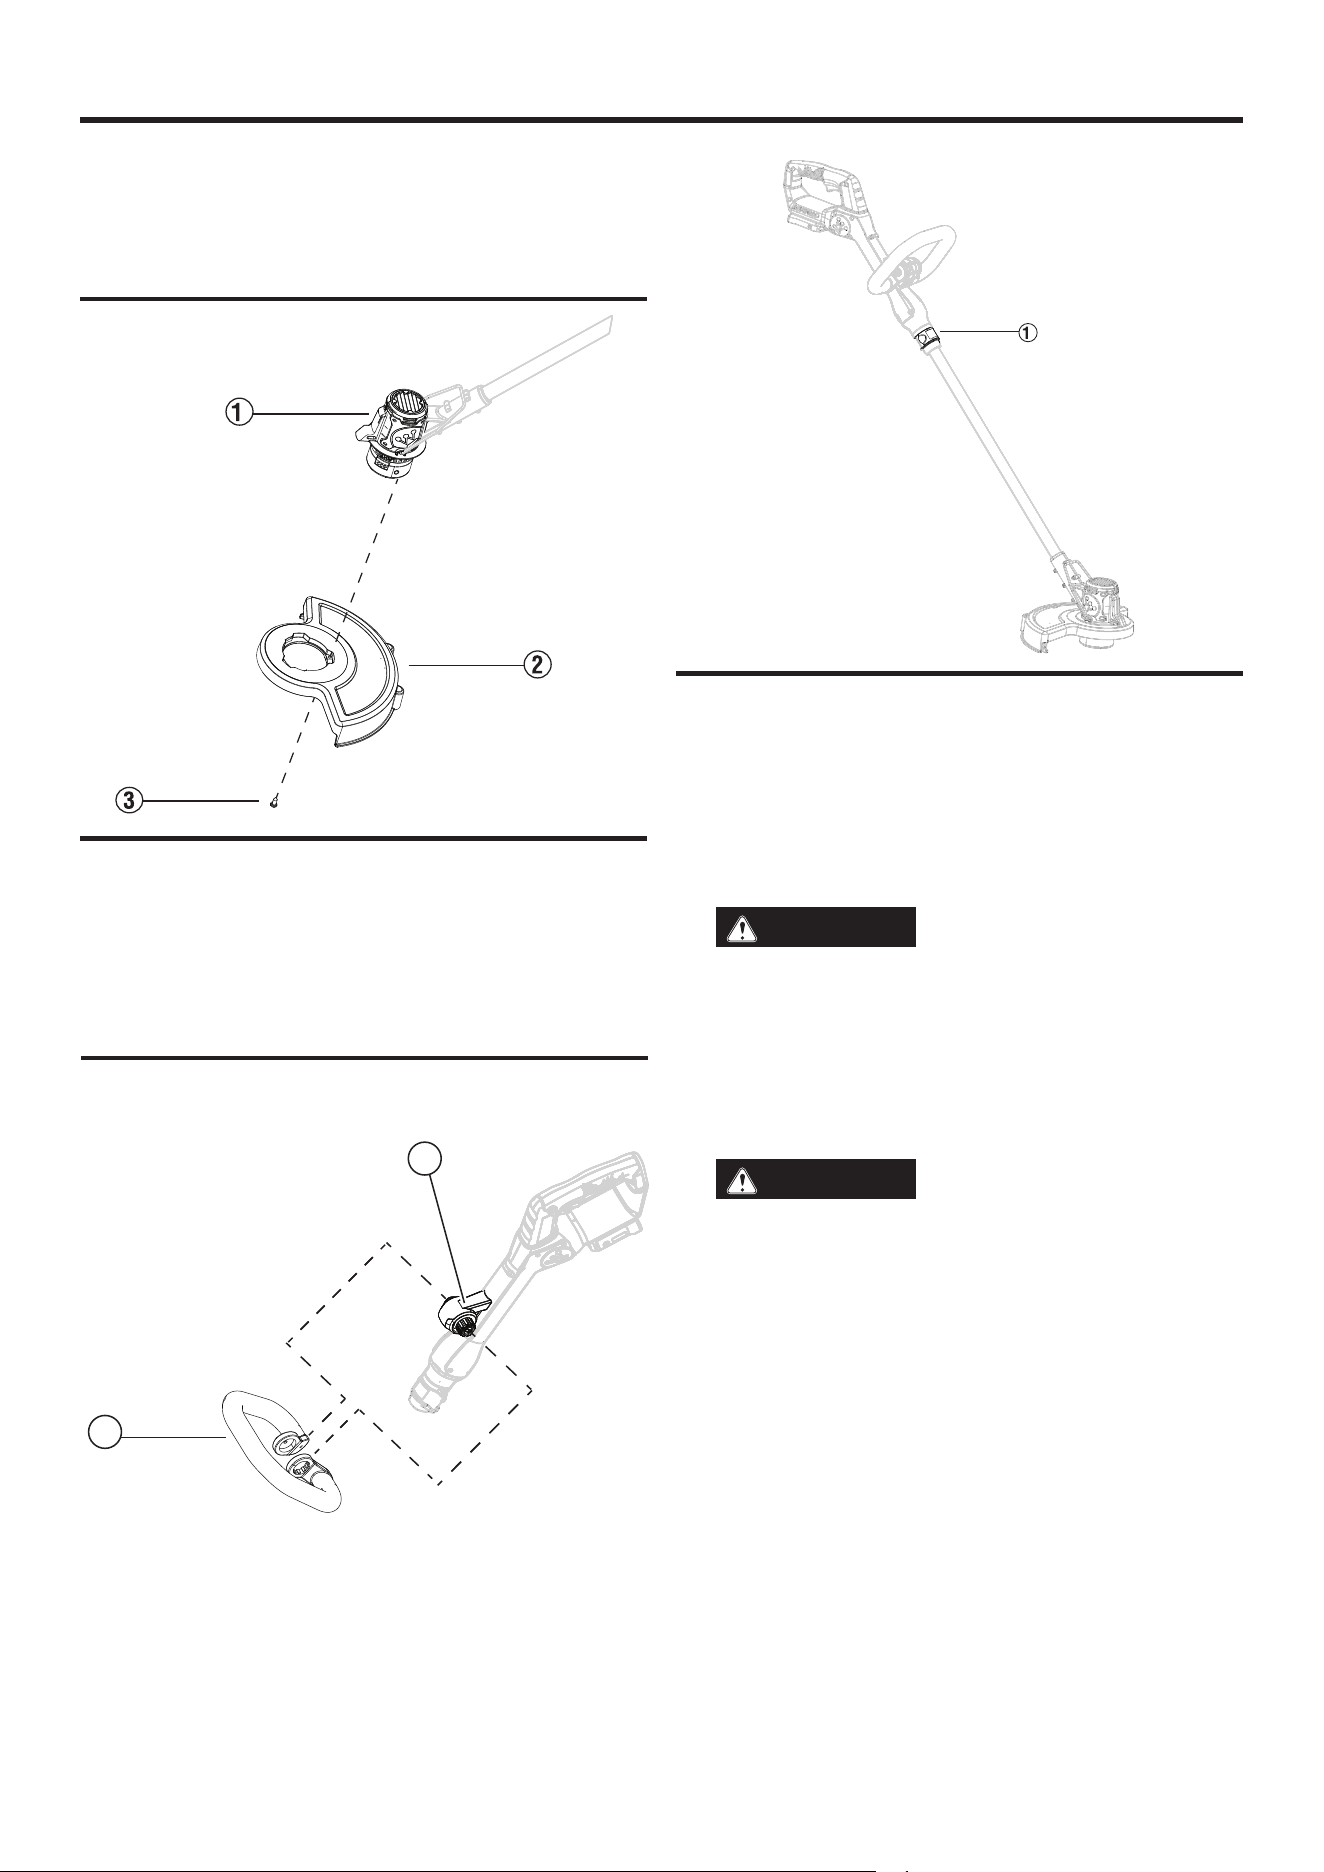
ASSEMBLY
See Figure 4.
z With the guard (2) attached to the spool housing (1),
secure the guard to the spool housing with the screw (3).
ATTACHING THE FRONT HANDLE TO THE
STRING TRIMMER ASSEMBLY
See Figure 5.
z Press the front handle (2) on the attachment body (1)
on the string trimmer. The front handle will click and lock
in place.
Figure 4
1
2
WARNING
Always disconnect the battery
pack from the string trimmer when assembling parts,
making adjustments, cleaning, or when not in use.
ATTACHING THE BATTERY PACK
z Insert the battery pack into the battery housing.
z Be sure that the latches on each side of the battery pack
lock into place.
WARNING
Remove the battery pack and
keep hands clear of the lockout button when carrying
or transporting the string trimmer.
Figure 5
Figure 6
USING THE TELESCOPIC FUNCTION
See Figure 6.
z Raise the latch (1) from the body of the string trimmer.
z Extend the tube as needed to the desired length.
z Close the latch to lock the tube in place.

10
|
English
OPERATION
WARNING
Always wear eye protection with
side shields marked to comply with ANSI Z87.1. Fail-
ure to do so could result in objects being thrown into
your eyes resulting in possible serious injury.
WARNING
Do not use any attachments or
accessories not recommended by the manufacturer of
this product. The use of attachments or accessories
not recommended can result in serious personal injury.
NOTICE
Before each use, inspect the entire
product for damaged, missing, or loose parts such as
screws, nuts, bolts, and caps. Tighten securely all fas-
teners and caps and do not operate this product un-
til all missing or damaged parts are replaced. Please
contact customer service.
WARNING
To avoid serious personal injury,
always remove the battery pack and keep hands clear
of the lock-out button when carrying or transporting
the tool.
STARTING THE STRING TRIMMER
z Install the battery pack.
z Press and hold the lockout button. While holding the
lockout button, squeeze the switch trigger.
z To stop the string trimmer, release the switch trigger.
OPERATING TIPS
z Keep a rm grip with both hands while in operation.
z The string trimmer should be held at a comfortable position
with the top handle about hip height.
z Cut tall grass from the top down. This will prevent grass
from wrapping around the boom housing and string head
which may cause damage from overheating.
z If grass becomes wrapped around the string head:
•Remove the battery pack.
•Remove the grass.
z Keep the trimmer tilted toward the area being cut; this is
the best cutting area.
z The string trimmer cuts when passing the unit from side
to side. This will avoid throwing debris at the operator.
Avoid cutting in the dangerous area shown.
z Use the tip of the line to do the cutting; do not force string
head into uncut grass.
z Wire and picket fences cause extra line wear, even
breakage. Stone and brick walls, curbs, and wood may
wear line rapidly.
z Avoid trees and shrubs. Tree bark, wood moldings, siding,
and fence posts can easily be damaged by the line.
WARNING
Always hold the string trimmer
away from the body. Keep clearance between the body
and the string trimmer. Any contact with the string trim-
mer cutting head while operating can result in serious
personal injury.
ADVANCING THE TRIMMER LINE
NOTICE
The trimmer is equipped with an au-
to-feed head. Bumping the head to try to advance the
line will damage the trimmer and void the warranty.
z With the trimmer running, release the switch trigger.
z Wait two seconds, and press the switch trigger.
NOTICE
The line will extend approximately 1/4
in. with each stop and start of the switch trigger until
the line reaches the length of the grass deector cut-
off blade.
z Resume trimming.
ADVANCING THE LINE MANUALLY
z Remove the battery pack.
z Push the button located on the string head while pulling
on line to manually advance the line.
ADJUSTING THE LINE CUT-OFF BLADE
This trimmer is equipped with a line cut-off blade on the
grass deector. For best cutting, advance line until it
is trimmed to length by the line cut-off blade. Advance
line whenever you hear the engine running faster than
normal, or when trimming efciency diminishes. This will
maintain best performance and keep line long enough to
advance properly.
This trimmer is currently set at the 11 in. cutting swath. To
adjust to a cutting swath of 13 in.
z Remove the battery pack.
z Loosen the blade screw then rotate the line cut-off blade
180°.
z Tighten the blade screw.

English
|
11
MAINTENANCE
WARNING
Before inspecting, cleaning or servicing the unit, stop the motor, wait for all moving parts to
stop, and disconnect the battery pack from the string trimmer. Failure to follow these instructions can result in seri-
ous personal injury or property damage.
WARNING
Always wear eye protection with side shields marked to comply with ANSI Z87.1. Failure to do
so could result in objects being thrown into your eyes resulting in possible serious injury.
NOTICE
Periodically inspect the entire product for damaged, missing, or loose parts such as screws, nuts,
and caps. Secure all fasteners and caps. Do not operate this product if parts are missing or damaged.Please con-
tact customer service.
GENERAL MAINTENANCE
Avoid using solvents when cleaning plastic parts. Most plastics are susceptible to damage from various types of com-
mercial solvents and may be damaged by their use. Use clean cloths to remove dirt, dust, oil, and grease.
WARNING
Do not let brake uids, gasoline, petroleum-based products, or penetrating oils come in contact
with plastic parts. Chemicals can damage, weaken, or destroy plastic which can result in serious personal injury.
SPOOL REPLACEMENT
Use only 0.065 in. diameter round or twisted or 0.080 in. diameter twisted line. Use original manufacturer’s replace-
ment line for best performance.
z Remove the battery pack.
z Push in tabs on side of spool retainer.
z Pull spool retainer up to remove.
z Remove the old spool.
z To install the new spool, be sure the line is captured in the slot on the new spool. Be sure the end of the line is extended
approximately 6 in. beyond the slot.
z Install the new spool so that the line and slot align with the eyelet in the string head. Thread the line into the eyelet.
z Pull the line extending from the string head so the line releases from the slot in the spool.
z Reinstall the spool retainer by depressing tabs into slots and pushing down until spool retainer clicks into place.
LINE REPLACEMENT
z Remove the battery pack.
z Remove the spool from the string head.
NOTE: Remove any old line remaining on the spool.
z Cut a piece of line approximately 9 ft. long.
z Use only 0.065 in. diameter round or twisted or 0.080 in. diameter twisted line.
z Insert the line into the anchor hole in the upper part of the spool. Wind the line around the upper part of the spool
clockwise, as shown by the arrows on the spool. Place line in the slot on upper spool ange, leaving about 6 in. ex-
tended beyond the slot. Do not overll. After winding the line, there should be at least 1/4 in. between the wound line
and the outside edge of the spool.
z Replace the plastic retainer, spool, and the spool retainer.
STORING THE STRING TRIMMER
z Remove the battery pack.
z Clean all foreign material from the trimmer.
z Store it in a place that is inaccessible to children.
z Keep away from corrosive agents..

12
|
English
PROBLEM POSSIBLE CAUSE CORRECTION
Trimmer runs slowly
Check that the spool housing can rotate
freely
Carefully clean it if necessary
Check that the cutting line does not pro-
trude more than approximately 5-3/8 inches
(136mm) from the spool.
If it does, cut it off so that it just reaches the
line trimming blade.
Trimmer will not start
Battery pack not installed properly Check battery pack installation
Battery pack not charged Check battery pack charging requirements
Battery pack will not
charge
Surrounding air temperature too hot or too
cold
Move charger and tool to a surrounding air
temperature of above 40 degree F (4.5°C) or
below 105 degree F (+40.5°C).
Charger not plugged in
Plug charger into a working outlet.
Check current at receptacle by plugging in
a lamp or other appliance.
Check to see if receptacle is connected to a
light switch which turns power off when you
turn out the lights.
Battery pack not inserted into charger
Insert battery pack into charger until red
LED appears
TROUBLESHOOTING
English
|
13
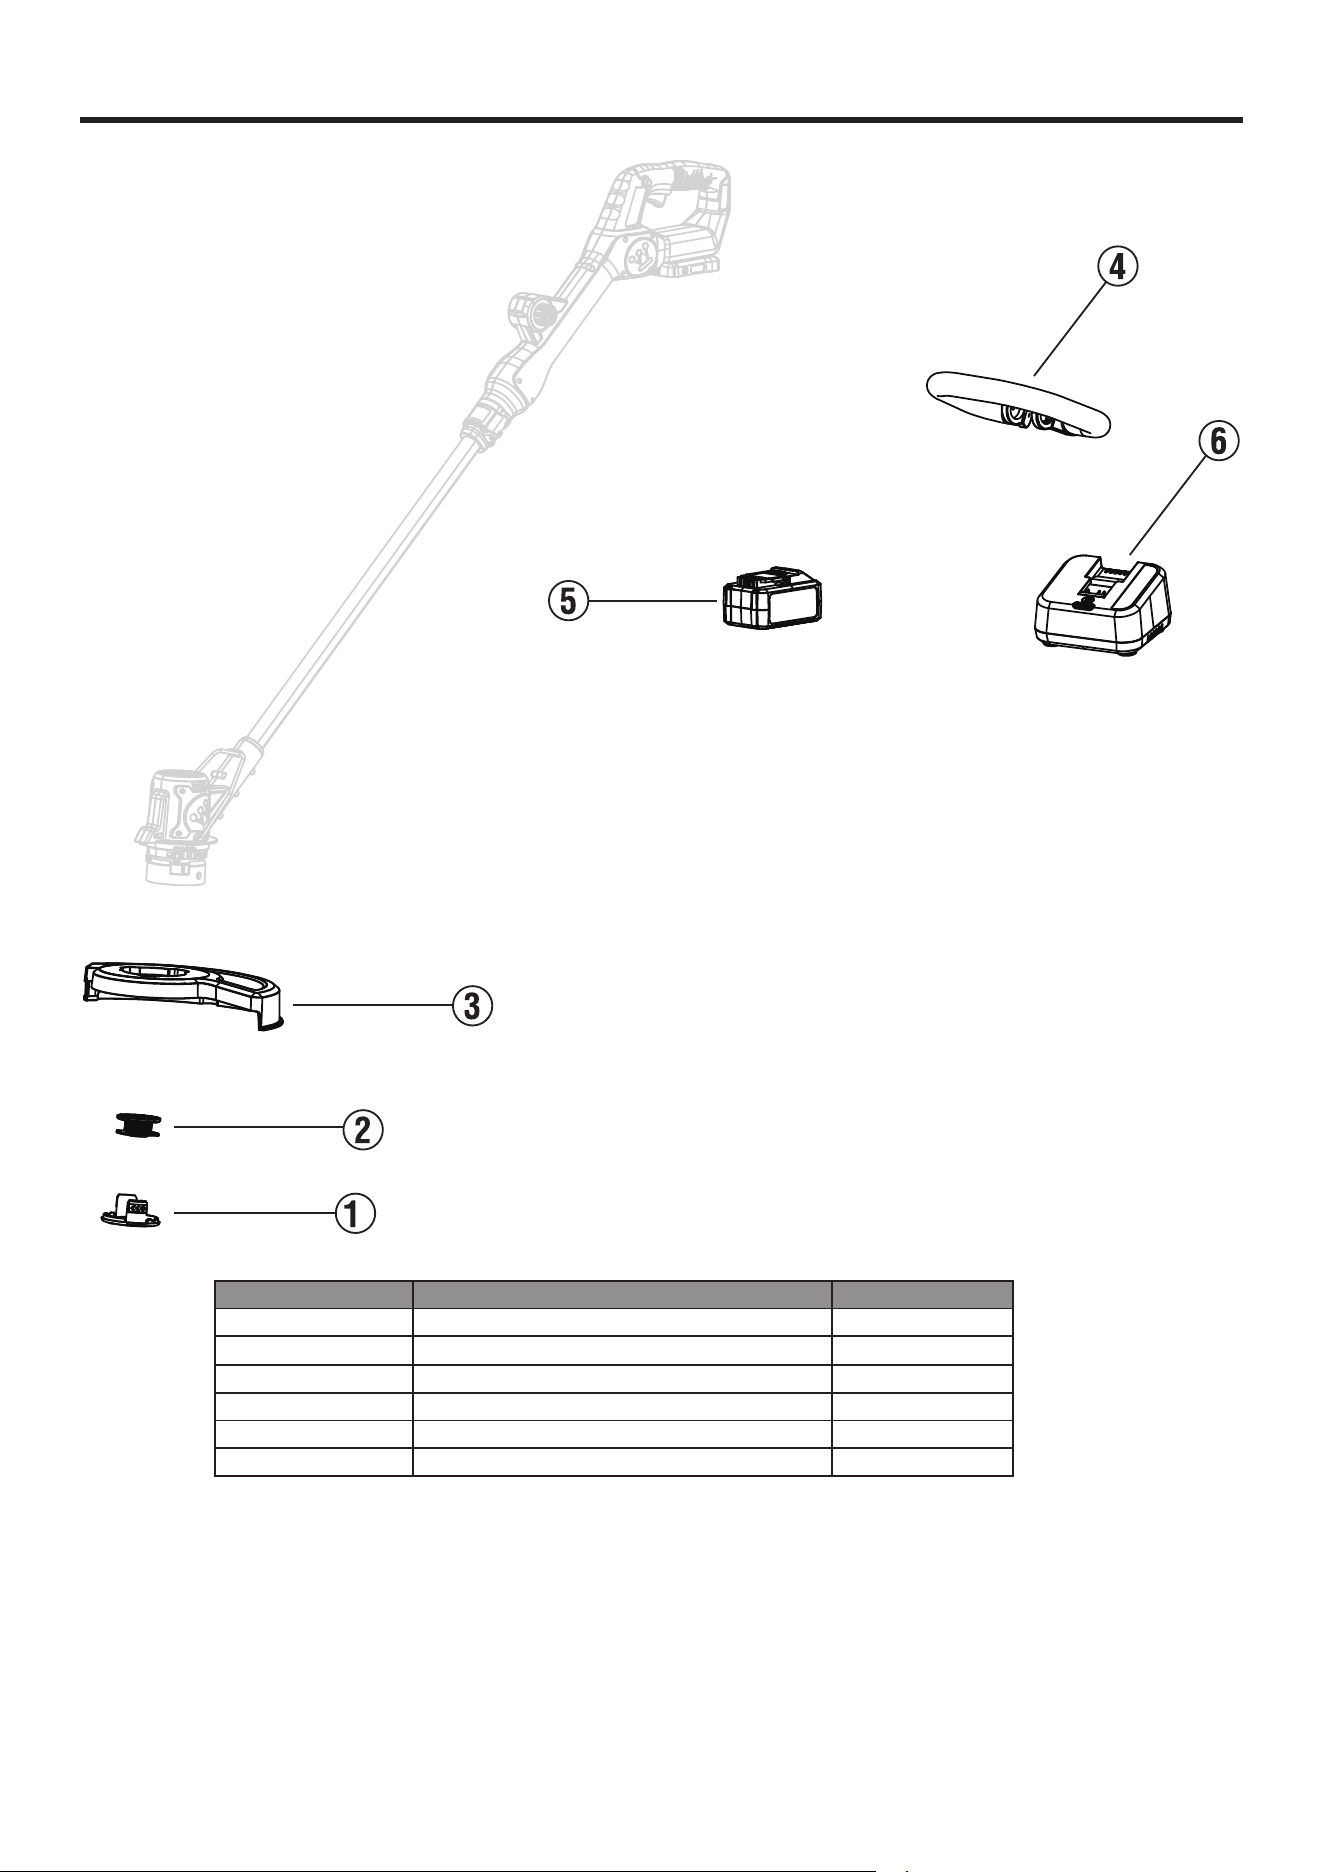
PARTS PAGE
Index Number Description Part Number
1 Lower cover of mower head 120180001
2 Single release cable pack 120190001
3 Kit guard 120160001
4 Assistant handle 120170002
5 Battery pack 811400211480013
6 Charger 925005

NOTES/NOTAS

User
Manual
WLB 20V / WLBT 20V
CORDLESS BLOWER
DO NOT RETURN THIS PRODUCT TO THE STORE
If you have questions or need assistance, please call customer service at 855-944-3571.

2
SAFETY GUIDELINES - DEFINITIONS
It is important to read and understand this manual. The
information it contains relates to protecting YOUR SAFETY
and PREVENTING PROBLEMS. The symbols below are used
to help you recognize this information.
DANGER: Indicates an imminently hazardous situation
which, if not avoided will result in death or serious injury.
WARNING: Indicates a potentially hazardous situation
which, if not avoided, could result in death or serious injury.
CAUTION: Indicates a potentially hazardous situation
which, if not avoided, may result in minor or moderate injury.
NOTICE: Used without the safety alert symbol indicates
potentially hazardous situation which, if not avoided, may result
in property damage.
DISCLAIMERS:
All information, illustrations and specications in this manual
are based on the latest information available at the time of
publishing. The illustrations used in this manual are intended as representative reference views only.
Moreover, because of our continuous product improvement policy, we may modify information,
illustrations and/or specications to explain and/or exemplify a product, service or maintenance
improvement. We reserve the right to make any change at any time without notice. Some images
may vary depending upon which model is shown.
ALL RIGHTS RESERVED:
No part of this publication may be reproduced or used in any form by any means – graphic,
electronic or mechanical, including photocopying, recording, taping or information storage and
retrieval systems – without the written permission of Westinghouse Outdoor Power Equipment.
DANGER: This manual contains important instructions for operating this product. For your safety
and the safety of others, be sure to read this manual thoroughly before operating the equipment.
Failure to properly follow all instructions and precautions can cause you and others to be seriously
hurt or killed.
BLOWER SPECIFICATIONS
Model Motor Air Speed Air Volume Westinghouse Battery Pack Battery Charger
WLB 20V
WLBT 20V
20V DC 110 MPH 350 CFM W20V2AH
W20V4AH
W20V5AH
W20V2AMP
W20V2DP
WHAT COMES WITH TOOL
• Blower body
• Blower tube
• Blower tip
• Warranty
• Battery (WLB 20V)
• Charger (WLB 20V)
• User manual
Some dust created by this product
contains chemicals known to the
State of California to cause cancer,
birth defects or other reproductive
harm. Some examples of these
chemicals are:
• compounds in fertilizers
• compounds in insecticides,
herbicides and pesticides
• arsenic and chromium from
chemically treated lumber
To reduce your exposure to these
chemicals, wear approved safety
equipment such as dust masks that
are specially designed to lter out
microscopic particles.
WARNING

3
SAFETY SYMBOLS
The following symbols may be used on this product. These symbols facilitate safe and ecient
operation of the product.
Symbols Name Designation/Explanation
V Volts Voltage
A Amperes Current
W Watts Power
min Minutes Time
Alternating Current Type of current
Direct Current Type or a characteristic of current
/min Per Minute Revolutions, strokes, surface speed, orbits, per minute
Wet Conditions Alert Do not expose to rain or use in damp locations
Read the User
Manual
To reduce the risk of injury, the user must read and under-
stand the user manual before using this product.
Eye Protection Always wear eye protection with side shields marked to com-
ply with ANSI Z87.1 when operating this equipment.
Safety Alert Precautions that involve safety.
Long Hair Failure to keep long hair away from the air inlet could result in
personal injury.
Loose Clothing Failure to keep loose clothing from being drawn into air
intake could result in personal injury.
Keep Bystanders
Away
Keep all bystanders at least 50 ft. away.
Blower Tubes Do not operate without tubes in place.
Impeller Blades Rotating impeller blades can cause severe injury.
Ricochet Thrown objects can ricochet and result in personal injury or
property damage.
Wet Conditions Alert Do not expose battery, battery compartment, electrical
components to rain, water, or liquids. Do not charge battery
or expose product to rain or damp locations.

4
SAFETY INFORMATION
IMPORTANT SAFETY WARNINGS & INSTRUCTIONS
WARNING: TO REDUCE RISK OF INJURY:
• Before use, be sure everyone using this unit reads and understands all safety instructions and
other information contained in this manual.
• Keep these instructions and review them before use and while instructing others to use the
product.
• Do not point unit discharge at self or bystanders.
• Keep long hair and loose clothing away from openings and moving parts.
WARNING: When using an electric tool, basic safety precautions should always be followed to
reduce risk of re, electric shock, and personal injury.
WARNING: Be aware of your surroundings when the blower is in use. Dust may contain harmful
chemicals. Be sure to wear the approved safety equipment.
GENERAL SAFETY WARNINGS FOR THE BLOWER
BEFORE USING
WARNING:To reduce the risk of re, electric shock, or injury:
• Do not leave the appliance unattended when it is in operation. Disconnect the battery pack from
the blower when it is not in use and before maintenance is performed.
• Do not clean the blower on steps or stairs.
• Only use the blower for the use prescribed in the manual. Only use the recommended attachments
of the manufacturer.
• Keep the blower inside when it is not in use. Do not expose to rain or water. Avoid direct sunshine.
• Do not use the blower with wet hands.
• Do not put any object into openings. Do not use with any opening blocked; keep free of dust,
lint,hair, and anything that may reduce air ow.
• Keep hair, loose clothing, and all body parts away from openings and moving parts.
• Be sure that all of the controls are o before disconnecting the blower from the battery pack.
• Do not use the blower where ammable or combustible materials are located.
WHEN USING
• Never allow children to operate the equipment. Never allow adults to operate the equipment
without proper instruction.
• Do not operate power tools in near explosive materials.
• For household use only.
• Wear eye protection that is compliant with ANSI Z87.1 when operating this product.
• Only use 20V Westinghouse batteries (W20V2AH/W20V4AH/W20V5AH).
• Only use Westinghouse charger (W20V2AMP/W20V2DP).
• DO NOT operate the blower if tired, ill, or under the inuence of alcohol, drugs, or medication.
• Do not operate in poor lighting.
• Keep all body parts away from any moving parts and all hot surfaces of the blower.
• Do not put any object into openings. Do not use with any opening blocked. Keep openings free of
dust, lint, hair, and anything that may reduce air ow.
• Check the work area before each use. Remove all objects that can be thrown or become
entangled in the machine.
• Only use replacement accessories from the manufacturer. Use of any other parts may create a

5
SAFETY INFORMATION
GENERAL SAFETY WARNINGS AND INSTRUCTIONS FOR ALL TOOLS
• A BATTERY OPERATED UNIT with integral batteries or a separate battery pack must be re-
charged only with the specied charger for the battery. A charger that may be suitable for one type
of battery may create a risk of re when used with another battery.
• USE BATTERY OPERATED UNIT ONLY with Westinghouse 20V battery pack. Use of any other
batteries may create a risk of re.
• AVOID accidental starting. Be sure the switch is in the o position before inserting battery pack.
Carrying units with your nger on the switch or inserting the battery pack into a unit with the
switch on may result in accidents.
• DO NOT use the blower if the switch does not turn it on or o. A blower that cannot be turned on
or o with the switch is dangerous, please contact Customer Service for troubleshooting.
• DISCONNECT the battery pack from the unit or place the switch in the locked or o position
before making any adjustments, changing accessories, or storing the unit.
• ALWAYS WEAR EYE PROTECTION – Only wear the approved safety glasses or goggles at all
times when this unit is in use. Also use face or dust mask.
• DO NOT place outlet of sweeper near eyes or ears when operating.
• STORE IDLE UNITS. When not in use, the blower should be stored in a dry, high or locked-up
place - out of reach of children.
• DON’T OVERREACH. Keep level footing and balance at all times.
• MAINTAIN UNIT WITH CARE. Keep the blower clean for best and safest performance. See the
instructions for proper maintenance.
• To ensure product safety and reliability, repairs, maintenance, and adjustments should NOT
be performed. Contact Customer Service for assistance with any questions..
• DO NOT operate the blower near ammable or combustible materials.
• AVOID DANGEROUS ENVIRONMENTAL CONDITIONS – Do not use the blower in damp or wet
locations. Don’t use the blower in the rain.
• STAY ALERT - Do not operate the blower when tired.
• USE THE RIGHT UNIT – Do not use blower for any purpose other than that for which it is intend-
ed.
• DO NOT clean the blower on steps or stairs.
• NOT RECOMMENDED for use by children.
• DO NOT attempt to clear debris from unit without removing battery.
• ONLY USE as described in this manual. Only use the attachments recommended by the manufac-
turer.
• DO NOT put any objects into openings. Do not use with any opening blocked; keep free of dust,
lint, hair and everything that may reduce air ow.
• KEEP hair, loose clothing, and body parts away from openings and moving parts.
• DO NOT immerse any part of the unit in liquid.
• DO NOT handle charger, including charger plug, and charger terminals with wet hands.
hazard or cause product damage.
• Keep all bystanders, children, and pets at least 50 ft. (15 m) away.
• Do not operate the equipment while barefoot or when wearing sandals or similar lightweight
footwear.
• Wear protective footwear that will protect your feet and improve your footing on slippery surfaces.
• Secure long hair so it is above shoulder level to prevent entanglement in any moving parts.
• Keep level footing and balance.

6
SAFETY INFORMATION
WARNING: Do not expose the blower to liquid. Do not use near moisture or wet surfaces. Be sure
to keep the unit in a cool, dry storage area when it is not being used.
IMPORTANT SAFETY INSTRUCTIONS FOR BATTERY CHARGERS
WARNING: Shock hazard. Do not allow any liquid to get inside charger.
CAUTION: Burn hazard. To reduce the risk of injury, charge only designated Westinghouse batter-
ies. Other types of batteries may burst causing personal injury and damage.
CAUTION: Under certain conditions, with the charger plugged in to the power supply, the charger
can be shorted by foreign material. Foreign materials of a conductive nature should be kept away
from charger cavities. Always unplug the charger from the power supply when there is no battery
pack in the cavity. Unplug the charger before cleaning.
• DO NOT attempt to charge the battery pack with any chargers other than the chargers listed in
this manual. The charger and battery pack are specically designed to work together.
• These chargers are not intended for any uses other than charging designated Westinghouse re-
chargeable batteries. Any other uses may result in risk of re, electric shock or electrocution.
• DO NOT expose charger to rain or snow.
• Disconnect the charger from the power supply by pulling the plug.
• Be sure that the cord is located so that it will not be stepped on, tripped over, or otherwise sub-
jected to damage or stress.
• DO NOT use an extension cord unless it is necessary. The use of improper extension cord could
result in risk of re, electric shock, or electrocution.
• DO NOT operate the charger with damaged cord or plug. If the cord or plug is damage, contact
Customer Service.
• DO NOT operate the charger if it has been dropped, or damaged in any way. Contact Customer
Service.
• DO NOT disassemble the charger. contact Customer Service when maintenance or repair is re-
quired. Incorrect reassembly may result in a risk of electric shock, electrocution or re.
• Disconnect the charger from the power supply before cleaning. This will reduce the risk of electric
shock.
• NEVER attempt to connect two chargers together.
• The charger is designed to operate on standard household electrical power (120 V). Do not use it
on any other voltage.
• An extension cord should not be used unless necessary. Use of improper extension cord could
result in a risk of re and electric shock. If extension cord must be used, be sure:
a. That pins on the plug of extension cord are the same number, size and shape as those of the
plug on the charger.
• KEEP CHILDREN, BYSTANDERS AND ANIMALS AWAY from the work area a minimum of 50 ft
(15 m) when starting or operating the unit.
• INSPECT THE AREA before using the blower. Remove all debris and hard objects that can rico-
chet, be thrown, or otherwise cause injury or damage during operation.
• ONLY USE the charger supplied by the manufacturer to recharge.
• USE CAUTION in handling batteries in order not to short the battery with conducting materials
such as rings, bracelets and keys. The battery or conductor may overheat and cause burns.
• DO NOT OPEN the batteries. Released electrolyte is corrosive and may cause damage to the
eyes or skin. It may be toxic if swallowed.
• DO NOT CHARGE the blower outdoors.

7
SAFETY INFORMATION
IMPORTANT SAFETY INSTRUCTION FOR BATTERY PACKS
WARNING: Read this manual and the manuals provided with the tools before using the charger.
The battery pack is not fully charged out of the carton. Read the instructions below before using the
battery pack and charger. Follow the correct charging procedures.
READ ALL INSTRUCTIONS
• DO NOT incinerate the battery pack even if it is severely damaged or is completely worn out. The
battery pack can explode in a re. Toxic fumes and materials are created when battery packs are
burned.
• DO NOT charge or use the battery near ammable or combustible areas.
• If battery liquid comes into contact with the skin, immediately wash area with mild soap and water.
If battery liquid gets into the eye, rinse water over the open eye for 15 minutes or until irritation
ceases. If medical attention is needed, the battery electrolyte for lithium-ion batteries is composed
of a mixture of liquid organic carbonates and lithium salts.
• Contents of opened battery cells may cause respiratory irritation. If symptoms persist, seek
medical attention.
WARNING: Burn hazard. Battery liquid may be ammable if exposed to spark or ame.
• Charge the battery packs only in Westinghouse chargers.
• DO NOT splash or immerse in water or other liquids. This may cause premature cell failure.
• Do not store or use the tool and battery pack in locations where the temperature may reach or
exceed 105°F (40˚C) (such as outside sheds or metal buildings in summer).
WARNING: Never open the battery pack for any reason. If the battery pack casing is cracked
or damaged, do not insert it into the charger. Avoid crushing, dropping, or damaging the battery
pack. Do not use a battery pack or charger that has been dropped, run over, or otherwise damaged.
For disposal of damaged battery packs, contact your local waste management service for proper
recycling procedures.
WARNING: Fire hazard. Do not store or carry the battery where metal objects can contact
exposed battery terminals. Transporting batteries can possibly cause res if the battery terminals
inadvertently come in contact with conductive materials. The US Department of Transportation
Hazardous Material Regulations (HMR) prohibits transporting batteries in commerce or on airplanes
(i.e., packed in suitcases and carry on luggage) UNLESS they are properly protected from short
circuits. Be sure that the battery terminals are protected and insulated from materials that may
contact them and cause a short circuit when transporting individual batteries. NOTE: Lithium-Ion
batteries should not be put in checked baggage.
b. The extension cord is properly wired and in good electrical condition;
c. The wire size is large enough for AC ampere rating of charger as specied below:
Cord Length (ft) 25’ 50’ 100’
Cord Size (AWG) 16 16 16

8
SAFETY INFORMATION
STORAGE RECOMMENDATIONS
1. The optimal storage place is cool and dry, away from direct sunlight and excess heat or cold.
2. Extended storage time will not harm the battery pack or charger.
CHARGING PROCEDURE:
Battery packs are shipped in a low charge condition to prevent possible problems. Charge the
battery packs before rst use. Contact Customer Service if battery does not charge.Charge time
varies and is dependent upon the amp hour capacity of battery pack.
• Be sure the power supply is normal household voltage,120 V, AC only, 60 Hz.
• Connect the charger to a power supply.
• Attach the battery pack to the charger by aligning the raised ribs on the battery pack with the
grooves in the charger, then slide the battery pack onto the charger.
• Press down on the battery pack to be sure contacts on the battery pack engage properly with
contacts in the charger.
• Do not place the charger in an area of extreme heat or cold. It will work best at normal room
temperature.
• The battery pack will become slightly warm to the touch while charging. This is normal and does
not indicate a problem.
• The green LED light remains on after charging is complete.
• Pull the battery pack up to remove the battery pack from the charger.
IMPORTANT CHARGING NOTES
1. Optimal performance can be obtained if the battery pack is charged when the air temperature is
between 65°F and 75°F (18°- 24°C). DO NOT charge the battery pack in an air temperature below
+40°F (+4.5°C), or above +105°F (+40.5°C).
2. The charger and battery pack may become warm to touch while charging. This is a normal
condition and does not indicate a problem. To facilitate the cooling of the battery pack after use,
avoid placing the charger or battery pack in a warm environment.
3. If the battery pack does not charge properly:
a. Check the electrical current at the receptacle by plugging in a lamp or other appliance.
b. Check to see if the receptacle is connected to a light switch that turns o power.
c. Move the charger and battery pack to a location where the surrounding air temperature is
approximately 65°F - 75°F (18°- 24°C).
d. If charging problems persist, contact Customer Service.
4. The pack should be recharged when it fails to produce sucient power on jobs which were easily
done previously. DO NOT CONTINUE to use the battery pack under these conditions. Follow the
charging procedure.
5. Materials of a conductive nature should be kept away from charger cavities. Be sure to unplug the
charger from the power supply when there is no battery pack in the cavity. Unplug charger before
cleaning.
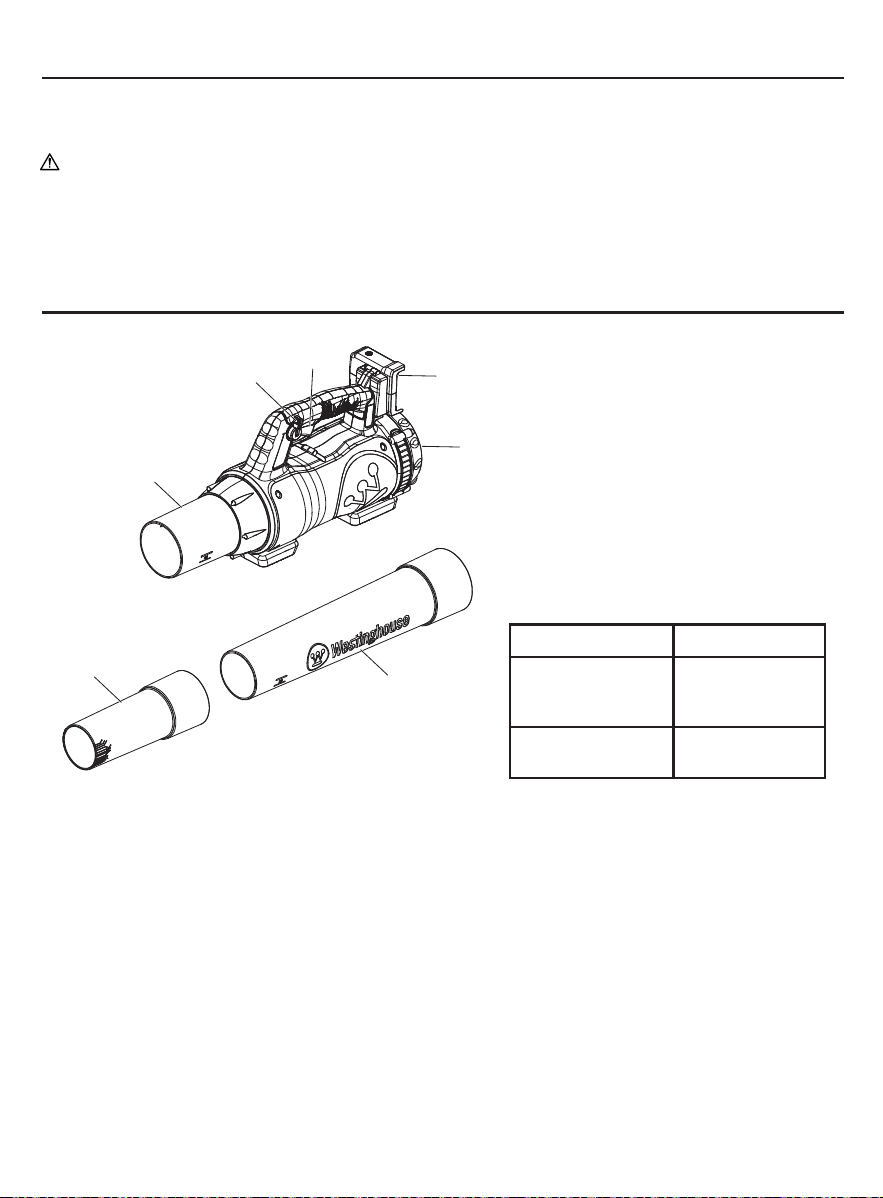
9
SAFETY INFORMATION
6. Do not freeze or immerse the charger in water or any other liquid.
WARNING: Do not allow any liquid to get inside charger. Never attempt to open the battery pack
for any reason. If the plastic housing of the battery pack breaks or cracks, for disposal of damaged
battery packs, contact your local waste management service for proper recycling procedures.
FEATURES
1
3
4
5
6
7
2
Description of the parts
1. Air inlet port
2. Battery location
3. On/o switch
4. Cruise control lever
5. Blower housing outlet
6. Blower tube
7. Nozzle mouth
This product can accept any of the
batteries and chargers listed in the chart
below:
Westinghouse 20V Lithium-Ion Packs
and Chargers
Description Part number
20V Batteries:
LI-ION
W20V2AH
W20V4AH
W20V5AH
Chargers W20V2AMP
W20V2DP
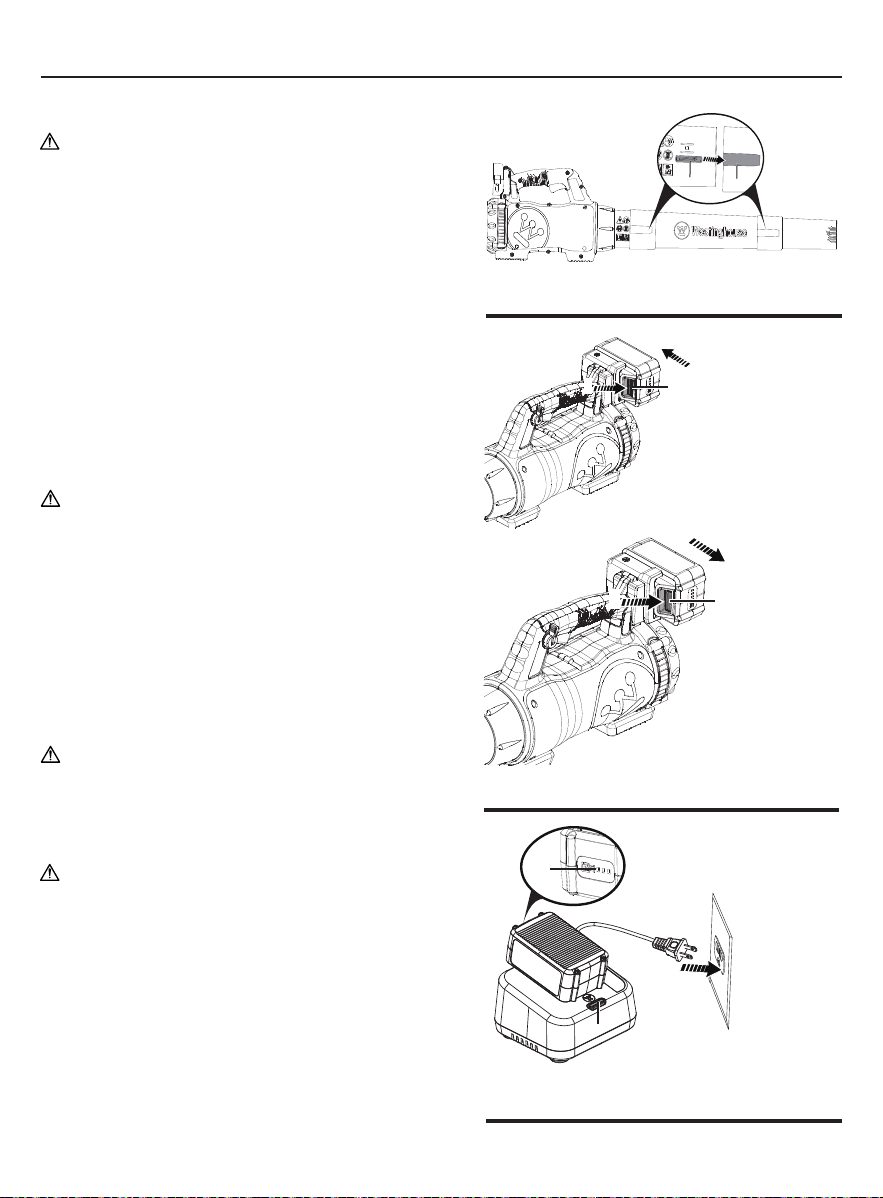
10
ASSEMBLY
INSTALLING BLOW TUBE
WARNING: Do not use the device until the blow
tube has been properly mounted on the blower
housing.
Align the notches on the cordless turbine jet blower
body with the notches on the upper blower tube and
slide together until they click into place. Repeat with
the upper tube and the lower tube, be sure they click
into place.
NOTICE: When correctly assembled, the tube is
dicult to separate. The tube is not locked if it can be
removed. Be sure that the tab is securely fastened on
the latch. The tube can separate during operation if
the tube is not in the locked position.
A
A
1
2
A
1
2
A
CHARGING BATTERIES WITH RAPID CHARGER
WARNING: Only use 20V Westinghouse
rechargeable battery packs and Westinghouse 2A
Rapid Charger.
• Be sure the power supply is normal household
voltage, 120 V, AC only, 60 Hz.
• Connect the charger to a power supply.
•Attach the battery pack to the charger by aligning the
raised ribs on the battery pack with the grooves in the
charger, then slide the battery pack onto the charger.
• Press down on the battery pack to be sure slide on
the battery pack engage properly with contacts in the
charger.
A - Notches
A - Interlock
INSTALLING AND REMOVING THE
RECHARGEABLE BATTERY
WARNING: Turn o the blower before inserting or
removing the rechargeable battery.
Press the interlock of the battery and pull the battery
from the blower to remove the rechargeable battery.
Align the base of the rechargeable battery with the
guide on the housing to insert the rechargeable
battery in the tool. Push the rechargeable battery
into the tool until the locking click is audible. Injury is
possible if the rechargeable battery is not locked into
place.
WARNING: Be sure to turn o battery tools
when not in use. Remove the battery pack when
transporting or carrying the blower to avoid injury.
B
A
A - Battery indicator
B - Charging indicator
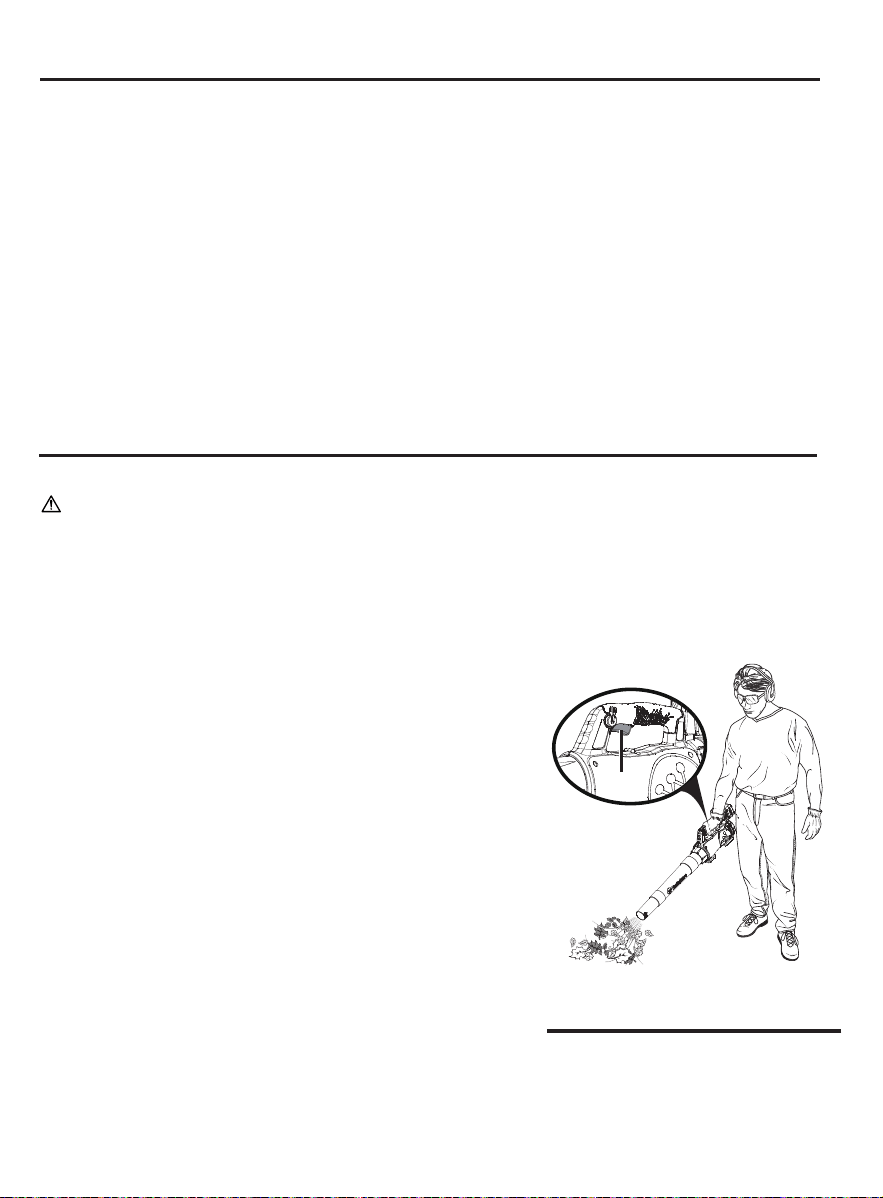
11
OPERATION
ASSEMBLY
• Do not place the charger in an area of extreme heat or cold.
• The battery pack will become slightly warm while charging. This is normal and does not indicate
a problem.
• The green LED light will remain on after charging is complete.
• Pull the battery pack up to remove the battery pack from the charger.
Note: Occasionally, the permissible temperature range may be exceeded during the charging
cycle. In this case, the electronic charging control interrupts the charging cycle to avoid any
damage to the battery. The red control light will then glow continuously. If you should witness this,
pull the battery from the charging station and let it cool down for about 30 minutes. Then, restart
the charging cycle by sliding the battery back onto the charging station.
For complete charging instructions, refer to the user manuals for your Westinghouse battery pack
and charger models.
BEFORE OPERATING
CAUTION: Always wear safety glasses. Wear a lter mask if the operation is dusty. Use of
gloves, long pants and substantial footwear is recommended. Keep long hair and loose clothing
away from openings and moving parts. THIS BLOWER IS FOR HOUSEHOLD USE ONLY.
• Check that all parts are connected properly before operating the device.
• Examine the work area before starting work. Use a rake or broom to remove all objects or
wastes which could be hurled away by the leaf blower.
• If needed, lightly moisten dusty ground.
BLOWING FUNCTION
1. Switch on the device by holding the switch button
upwards.
2. Hold the blower with one hand as shown and sweep
from side to side with the nozzle several inches above
the ground. Advance slowly to keep debris ahead of the
blower.
3. Blow waste material into a heap.
• Do not direct the air jet into the middle of the waste
heap.
• Adjust the blowing power to the requirements.
• Be sure the air jet is not directed at children, animals,
open windows or automobiles.
• Keep the ventilation slots free during operation to
prevent overheating.
• Do not use the device on wet ground.
4. Clean the device after use.
A
A - On/o switch

12
OPERATION
CARE AND MAINTENANCE
WARNING: Remove the rechargeable battery from the device before use.
• Be sure the blower is ready for safe operation by replacing damaged or worn parts.
• Clean ventilation slots and openings with a brush.
• DO NOT use any solvents or cleaning agents containing chemicals that could damage the plastic
parts. Use a dry cloth to clean the house of the blower.
• Keep the blower away from children. Keep the blower in a cool, dry location.
• Store and charge your rechargeable batteries in a cool, dry location. Temperatures above or
below normal room temperature shorten the lifespan of the rechargeable batteries.
• Do not store rechargeable batteries when discharged. Wait until the rechargeable battery has
cooled down and charge it completely.
• Rechargeable batteries gradually lose their charge. The higher the temperature, the quicker they
lose their charge. For longer storage periods, recharge the rechargeable battery every one or two
months. This will extend the lifespan of the rechargeable battery.
• Do not store the blower where the switch trigger may be pressed.
WARNING: Remove the battery pack from the product when cleaning or performing maintenance
to avoid personal injury.
WARNING: Always wear eye protection with side shields marked to comply with ANSI Z87.1,
along with hearing protection. Failure to do so could result in objects being thrown into your eyes
resulting in possible serious injury.
WARNING: Use only identical replacement parts. Use of any other parts can create a hazard or
cause product damage.
WARNING: Never use water or any liquids to clean or rinse o the product and do not expose
the product to rain or wet conditions. Keep the product inside in a cool, dry area when not in use.
Corrosive liquids, water, and chemicals can enter electronic components and battery compartment.
Short circuitry can result when the electrical components or battery pack are damaged. Remove any
buildup of dirt and debris by wiping the product clean with a dry cloth occasionally.
Notice: Inspect the entire product for damaged, missing, or loose parts. Tighten all fasteners and
caps until they are secure. Do not operate this device if parts are damaged or missing. Please
contact customer service .
WARNING: Do not let corrosive, ammable, or combustible chemicals come in contact with
plastic parts. Chemicals can damage, weaken or destroy plastic which can result in serious injury.
USING CRUISE CONTROL
The cruise control can be used to operate the
blower without holding the switch trigger.
To engage the cruise control:
• Press the switch trigger and stop at the desired
speed.
• Push the cruise control lever down.
• Release the switch trigger.
• Pull the cruise control lever up entirely to
release the cruise control function.
A - On/o switch
B - Cruise control lever
A
B

13
TROUBLESHOOTING
PROBLEM POSSIBLE CAUSE POSSIBLE SOLUTION
Unit will not start.
Battery not installed properly Check battery installation
Battery not charged
Check battery charging
requirements
Battery will not charge
Battery not inserted into
charger
Insert battery into charger
until red LED appears
Charger not plugged in
Plug charger into a work-
ing outlet.
Check current at recepta-
cle by plugging in a lamp
or other appliance.
Check to see if receptacle
is connected to a light
switch which turns power
o when you turn out the
lights.
Surrounding air temperature
too hot or too cold
Move charger and tool to
a surrounding air tempera-
ture of above 40 degree
F (4.5°C) or below 105
degree F (+40.5°C).
BATTERY PACK REMOVAL AND PREPARATION FOR RECYCLING
Please recycle or dispose of batteries properly. This product contains lithium-ion batteries. Local, state
or federal laws may prohibit disposal of lithium-ion batteries in ordinary trash. Consult your local waste
authority for information regarding available recycling and disposal options.
WARNING: Cover the battery pack’s terminals with heavy-duty adhesive tape after removal. Do
not attempt to destroy or disassemble battery pack or remove any of its components. Lithium-ion
batteries must be recycled or disposed of properly, never touch both terminals with metal objects
or body parts as short circuit may result. Keep away from children. Failure to comply with these
warnings could result in re and serious injury.
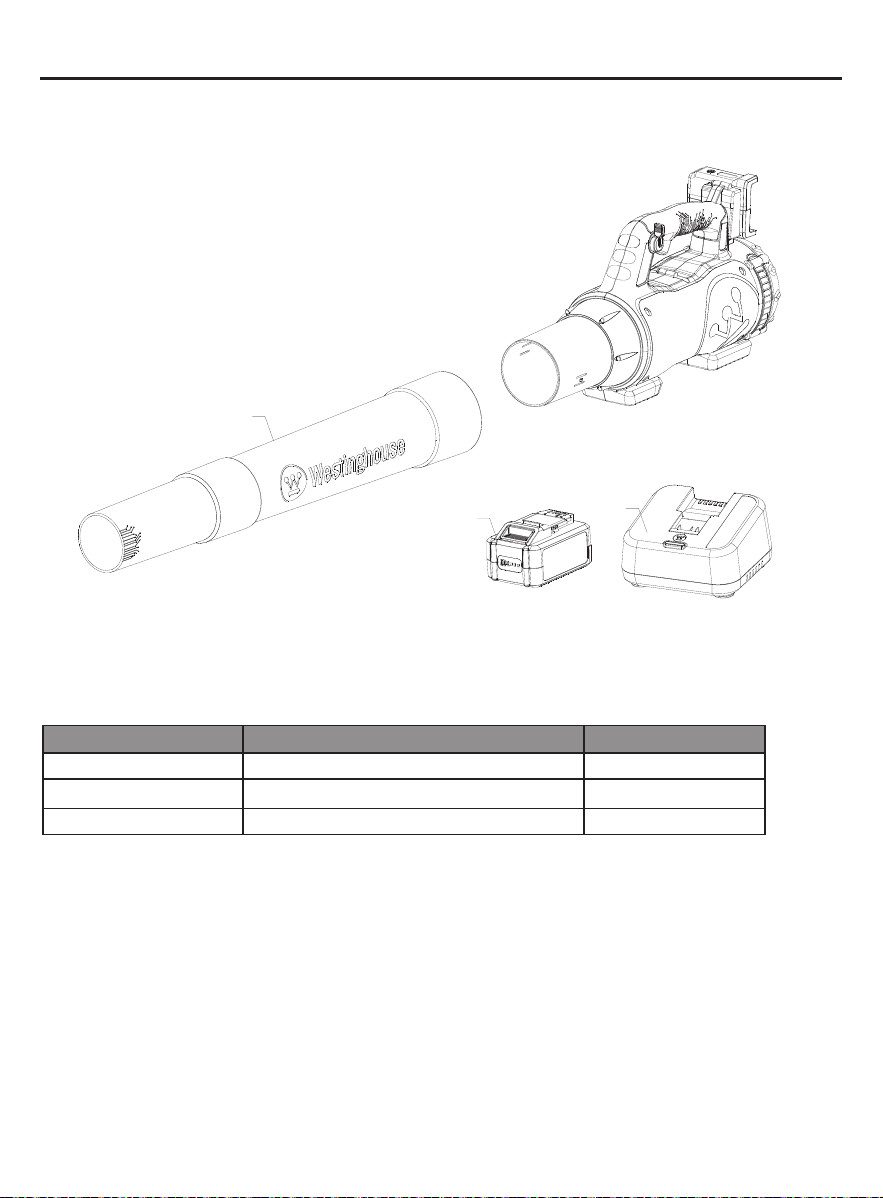
14
PARTS PAGE
2
3
1
Index Number Description Part Number
1 Blower Tube Assembly 120090001
2 Battery Pack 811400211480013
3 Charger 925005

NOTES/NOTAS
