Loading ...
Loading ...
Loading ...
Perlick is committed to continuous improvement. Therefore, we reserve the right to change specications without prior notice
16
PERLICK NITRO BEVERAGE DISPENSING KIT
Operation/Installation Manual
OPERATION #7
–
CONNECTING BEVERAGE LINES TO TOWER
1. Install the tower and drainer or drip pans per dispensing
tower installation instructions (included with this kit and
may also be found at perlick.com)
a) Ensure the appropriate type/model/design. Refer to
the Tower Installation Manual.
NOTICE
The Sexy/Adara Towers’ installation
mirror’s the Lucky and Panther Towers’
installation instructions.
2. Attach the faucets to the tower via the faucet wrench
located in the tapping parts bag.
OPERATION #8
–
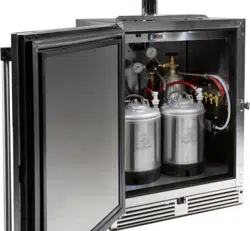
CONNECTING TOWER TO REFRIGERATION UNIT
1. If the connection point sticking out from the tower is
threaded, simply screw on the beverage lines. Otherwise,
follow Steps 2-6.
2. Cut o threaded connector from beverage tubing.
3. Place a worm-drive clamp, from the tapping parts bag,
around the beverage tubing that comes from the output of
the nitrogen infuser.
4. Connect the tubing to the hose barb sticking out from the
tower’s base.
5. Position and tighten the worm-drive clamp(s) using a 1/4”
hex drive bit or nut driver to compress beverage lines onto
the hose barb (Fig. 13).
6. Ensure the newly installed beverage lines are properly
routed through the refrigeration unit before mounting the
tower.
Fig. 13
Tower
Base
Worm
drive
clamp
Beverage
tubing
Fig. 14
Hose
barb
Loading ...
Loading ...
Loading ...