Loading ...
Loading ...
Loading ...
Weil-McLain 94 Series 3 Water and steam boilers — for Gas, Light Oil, & Gas/Light Oil-Fired Burners
20 Part No. 550-110-275/1018
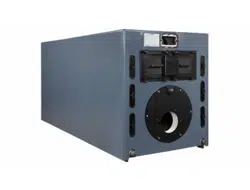
Complete block assembly & install jacket
Before installing jacket
The boiler contains ceramic fiber
and fiberglass materials. Use care
when handling these materials
per instructions on page 36
of this
manual. Failure to comply could
result in severe personal injury.
The boiler must be pressure tested
before proceeding with jacket
installation. See page 11. Failure
to comply could result in severe
personal injury, death or substan-
tial property damage.
Read the following before install-
ing other controls and trim:
These parts MUST be ON the
boiler:
1. Plugs for unused tappings.
2. Supply and return piping and steam supply
header, including supply elbows or top sup-
ply adapters.
3. Tankless heaters (when used), tankless heater
cover plates (when used).
These parts MAY be on the boiler:
1. Burner mounting plate.
These parts MUST be OFF the
boiler:
1. Cleanout plates and cleanout doors.
2. Access panel.
3. Flue collar.
4. Breeching.
5. Burner.
6. Water or steam gauge.
7. Limit control and low water cutoff.
8. Gauge glass and gauge glass cocks, try cocks.
9. Drain cock.
10. Tankless heater piping (when used).
Burner mounting plate
1. The following instructions assume a burner mounting plate supplied
with the boiler. For H-94 boilers, if burner mounting plate was not
ordered, the plate must be made according to burner requirements.
a. Thread two nuts on rounded end of ½" x 4¼" stud, locking them
together. Screw flat end of stud in one of six holes around opening.
b. Remove nuts from stud and save.
c. Repeat for remaining five studs.
d. Apply
1
⁄8" continuous bead of rope adhesive in groove around
opening.
e. Position ½" sealing rope in groove. Overlap ends about 2 inches.
f. Install burner mounting plate with observation port at top of plate.
Use ½" washers and nuts.
Front observation plate
1. Install front observation port assembly over half-moon on burner
mounting plate:
a. Apply
1
⁄8" continuous bead of rope adhesive in groove on assembly.
b. Position
3
⁄8" sealing rope in groove, overlapping ends at least 1 inch.
c. Secure assembly to plate with
1
⁄4" x
3
⁄4" flat-head machine screws.
Cleanout and inspection tappings
1. If cleanout and inspection tappings were ordered, use 1½" brass coun-
tersunk plugs to plug openings.
2. If using "TI" sections, install tankless or storage heaters and gaskets, or
heater plates and gaskets. Use
3
⁄8" cap screws.
Remove jacket parts from cartons and inspect
1. Locate jacket cartons.
2. Remove jacket parts from cartons as needed. Leave in cartons as long
as possible to avoid damage.
3. Inspect all parts before installing.
4. Jacket parts are in the boxes listed in Figure 25, page 21.
Prepare jacket panels for use
1. Determine from the control tapping table (Figure 10, page 12 or Fig-
ure 11, page 13) which of the knockout openings in the jacket panels
will be used.
2. To remove a knockout disc, bend one side inward until it can be
grasped with a pair of pliers; then, bend the disc back and forth until
it breaks loose.
The jacket side panels are reversible and can be placed
on either the left or right side of the boiler. If the boiler was
ordered with tankless coils (supplied with intermediate sec-
tions with tankless coil openings), the jacket side panels with
tankless coil knockouts must be properly positioned on the
right-hand side of the boiler ONLY.
Loading ...
Loading ...
Loading ...