Loading ...
Loading ...
Loading ...
14
Controls and displays
02
The remote has been conveniently color-coded according to component control using the following system:
! White – Receiver control, TV control
! Blue – Operation of other devices and each input (TUNER, etc.) (See pages 63 , 64 , 66 , 67 and 96 .)
1 u STANDBY/ON
This switches between standby and on for this receiver.
2 SLEEP
Use to put the receiver in sleep mode and select the amount of time before sleep (page 90 ).
3 MAIN RECEIVER
Switches the remote to control the receiver (used to select the white commands).
4 Input function buttons
Switches the input. Also, switches remote control operation mode for operating other devices or each input
(TUNER, etc.) (page 93 ).
The input for HDMI , NET and ALL switches each time these buttons are pressed.
5 Receiver Control buttons
! STATUS – Displays the IP address and information such as selected/set functions and input signals on the
display (page 90 ).
! SP-A/B – Switches the speaker output on/off. No sounds will be made from the speaker when SP OFF is
selected.
! CH LV. (CHANNEL LEVEL) – Press repeatedly to select a channel, then use k/l to adjust the level (pages
89 and 108 ).
! RETURN – Press to confirm and exit the current menu screen.
6 Receiver setting buttons
Press MAIN RECEIVER first to access:
! AUDIO P. (AUDIO PARAMETER) – Use to access the Audio options (page 85 ).
! VIDEO P. (VIDEO PARAMETER) – Use to access the Video options (page 87 ).
! HOME MENU – Use to access the Home Menu (pages 59 , 60 , 82 , 99 and 106 ).
7 i/j/k/l/ENTER
Use the arrow buttons when setting up your surround sound system (see page 99 ) and the Audio or Video
options (page 85 or 87 ).
8 Component control buttons
The main buttons (d, g, etc.) are used to control a component after you have selected it using the input function
buttons.
The BD, DVD, and CD operation using the component control buttons are limited only to Pioneer components.
The controls above these buttons can be accessed after you have selected the corresponding input function but-
ton (BD, DVD and CD). These buttons also function as described below.
Press TUNER first to access:
Use TUNE +/– can be used to find radio frequencies and PRESET +/– can be used to select preset radio stations
(page 66 ).
9 SHIFT
It is not used with this receiver.
10 u SOURCE
Press to turn on/off the power to the Pioneer device connected to the receiver.
11 DIMMER
Dims or brightens the display (page 90 ).
12 TV control buttons
Operates a TV. When operating other manufacturer’s TV, setup as follows.
! u – Use to turn on/off the power of the TV.
! INPUT – Use to select the TV input signal.
! CH +/– – Use to select channels.
! VOL +/– – Use to adjust the volume on your TV.
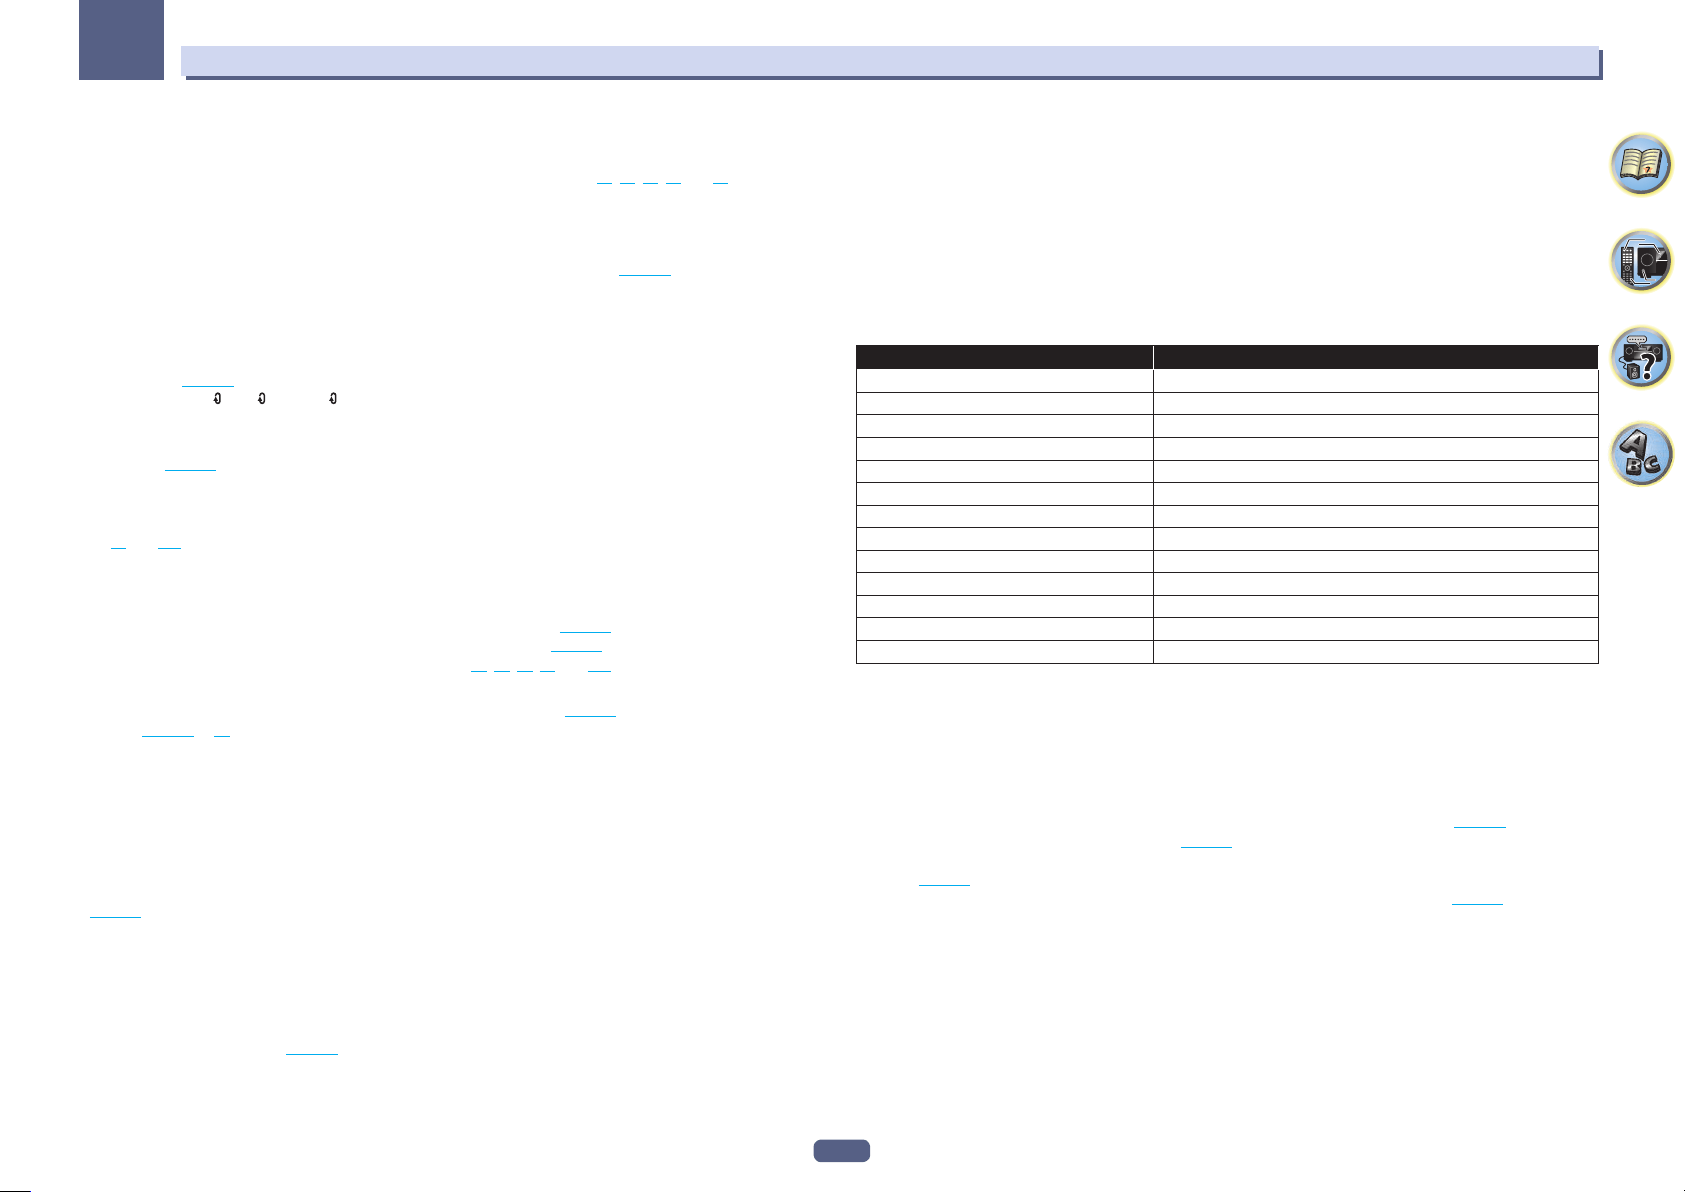
While holding down TV u button, press the input function buttons (listed in the table below) for component you
want to control for about five seconds.
This may not operate depending on the TV.
Default setting: Pioneer
TV preset
Input function button TV Brand
MAIN RECEIVER Pioneer
BD
Panasonic
HDMI
Sharp
ALL
Sony
DVD
Toshiba
SAT
Mitsubishi
MHL
Philips/AOC/TPV
iPod
Vizio
CD
Samsung
BT
LG Electric
TUNER
Skyworth
TV
Hisense
NET
TCL
13 MUTE
Mutes the sound or restores the sound if it has been muted (adjusting the volume also restores the sound).
To mute the sound volume, press MAIN RECEIVER first and then press this button.
14 VOLUME +/–
Use to set the listening volume.
15 LISTENING MODE buttons
! AUTO (AUTO SURROUND/ALC/STREAM DIRECT) – Switches between Auto Surround (page 71 ), Auto
Level Control mode and Stream Direct mode (page 72 ).
! SURR (STANDARD SURROUND) – Press for Standard decoding and to switch various modes (Dolby, DTS,
etc.) (page 71 ).
! ADV (ADVANCED SURROUND) – Use to switch between the various surround modes (page 72 ).
Loading ...
Loading ...
Loading ...