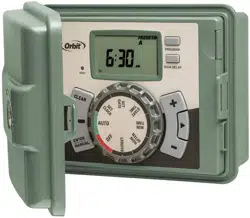
Documents: Go to download!
User Manual
- User Manual - (English, Spanish)
- Get to know your timer
- Programming with Easy-Set Logic™
- Reference
- Troubleshooting
- Display Error Indicators
- DOWNLOAD THE ORBIT B-HYVE APP
Table of contents
User manual
Get to know your timer
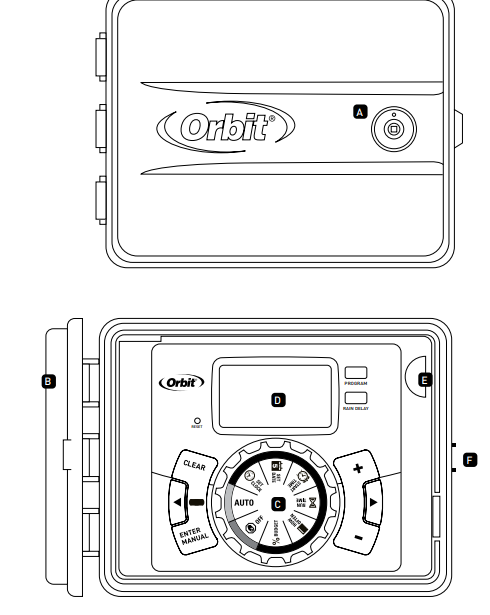
- Lock and latch
- Weather Resistant Cover
- Dial
- Digital Display
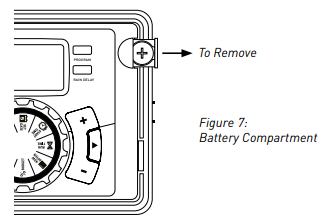
- Battery Compartment
- Swing Door panel
Buttons | Function |
ENTER MANUAL | To confirm a new setting To water manually |
CLEAR | To clear a setting |
PROGRAM | To move to different programs: A, B, and C |
ARROW [ > ] | To skip to the next setting / watering station or move to other programs/settings |
ARROW [ < ] | To go back to the previous setting / watering station or move to other programs/settings |
RAIN DELAY | To pause operation for 24-72 hours due to rain or other factors |
[ + ] | To increase a numeric setting |
[ – ] | To decrease a numeric setting |
Dial Position | Function |
AUTO | Set Program is running |
| Set clock time |
| Year, Month, and Day |
| Set time to begin watering Year, Month & Day |
| Set watering duration for each station |
| Set frequency of watering days |
| Adjust overall watering as a percentage |
| Turn all stations/functions off |
Programming with Easy-Set Logic™
A note about multiple programs
Your sprinkler timer provides the flexibility of using 3 independent programs (A,B,C). A program is where you store all of your sprinkler settings. It consists of a group of stations set to specific start times and run times. Multiple programs allow you to run different valves on different days with different run times. While many applications only require one program (A), using multiple programs can be useful for drip areas, newly planted lawn, or rotary sprinkler stations. Using programs to group stations with similar water needs will maximize irrigation efficiency.
Primary programming can be accomplished in just a few basic steps.
Primary Programming
Press the [RESET] to clear any previous factory programming
1. Set Clock
- Turn dial to [SET CLOCK]
- Press the [+/–] buttons to set the current time of day
Tip: To increase or decrease more rapidly, hold down either the [+] or [-] buttons until the display goes into rapid advance mode.
- Press the [
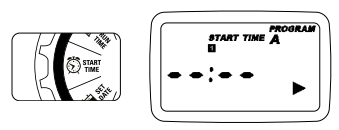
Please note that [START TIME] is the time of day that your programmed watering starts. You can set up to 4 start times. All stations that have a programmed run time (how long) will run in sequence at these times
Note: Start-Time Stacking
When a start time is set before the previous program has completed, that start time will be “stacked” or delayed, and will start upon completion of the previous program.Example: Bill just planted new grass seed and wants to water three times per day. He sets START TIME 1 for 5am, START TIME 2 for 12pm, and START TIME 3 for 5 pm.
He also sets HOW OFTEN to INT (interval) EVERY 1 DAYS (see section 3, HOW OFTEN).
In AUTO mode the system will water 3 times per day. Once Bill’s sod is established he can CLEAR start times 2 and 3 and return to watering just once per day
4. Run Time
- Turn the dial to [RUN TIME]
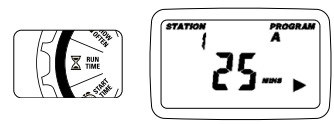
STATION is the area that will be watered by each valve. On this screen the RUN TIME or duration for each station is set.
- Press the [
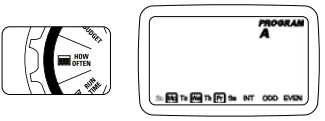
- Your dial should be set to [HOW OFTEN] - Display will show the current program (A,B, or C)
- Press the [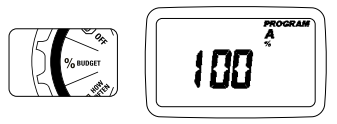
- To adjust press [+/–] buttons, press [ENTER]
- If using multiple programs (A, B, or C) Press the [PROGRAM] button to move to the desired program and make the needed adjustment
- Turn the dial to AUTO.
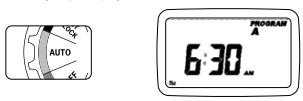
- Press the [MANUAL] button. Display will show ABC and ALL. After a few seconds or by pressing [ENTER] the timer will begin manual watering
- All stations will water consecutively for their programmed duration
- To specify a specific program or stations, Press the [
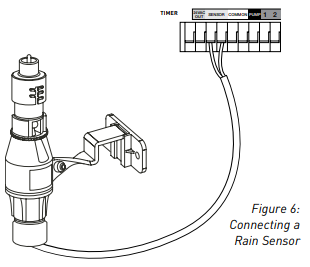
Pump Start & Master Valve
This sprinkler timer allows a master valve or pump start relay to operate whenever a station is on.
Note: If you are activating a pump from this timer, you must purchase a Pump Start Relay. From the pump start relay (or master valve); connect one wire to the “Pump” terminal and the other wire to the “Common” terminal. Use of an Orbit® Pump Start Relay is recommended as other pump start relays may cause pump faults on the timer.
Replacing the Battery
Timer requires a CR2032 Lithium battery
- The battery will maintain your program in case of an AC power loss
- Battery should last approximately one year
- Open by sliding the battery tray out to the right
- Insert one CR2032 battery into the compartment with the + side up
- Slide back into place.
A weak or missing battery can cause the time, date, and program to be erased after a power failure. If this happens, you will need to install a fully charged battery and reprogram the timer.
Tip: Replace battery every year, to avoid loss of programming
Note: A battery alone will not operate the valves in your sprinkling system. The sprinkler timer has a built-in transformer that must be connected to an AC line voltage source.
Reference
TERM
DEFINITION
START TIME The time the program begins watering the first programmed station VALVE Supplies water to a specific station or area. The opening and closing of the valve is accomplished through electrical current supplied by the sprinkler timer MASTER VALVE Typically located at the main water source. Turns on and off water for the entire irrigation system when not in use. MULTIPLE START TIMES A controller feature that allows a program to be operated multiple times on the same watering day. OVERLAPPING PROGRAMS When a “Start Time” is set for a program before the previous program has completed PROGRAM (A, B, OR C) Individual programs as set by the user. Each program operates independently. If one program overlaps the other the programs will be “stacked.” After the first program finishes the next program will begin. RAIN DELAY A feature that postpones the running of a scheduled watering program for a specific duration. SOLENOID The electrical part on an irrigation valve that opens and closes the valve SPRINKLER TIMER A device which instructs the station valves to operate. STATION A grouping of sprinklers operated by a single valve which is controlled by the timer WATERING BUDGETING Adjusts your overall watering program as a percentage of total watering duration Troubleshooting
PROBLEM POSSIBLE CAUSE One or more valves do not turn on 1. Faulty solenoid connection 2. Wire damaged or severed 3. Flow control stem screwed down, shutting valve off 4. Programming is incorrect Stations turn on when they are not supposed to 1. Water pressure is too high 2. More than one start time is programmed 3. AM/PM is incorrect One station is stuck on and will not shut off 1. Faulty valve 2. Particles of dirt or debris stuck in valve 3. Valve diaphragm faulty All valves do not turn on 1. Transformer defective or not connected 2. Programming is incorrect Timer will not power up 1. Transformer not plugged into a working outlet Valves continue to turn on and off when they are not programmed 1. More than one start time is programmed with overlapping schedules 2. Excessive pressure Display Error Indicators
ERROR
CAUSE/FIX
STATION FAULT A display that shows the word, “FAULT” indicates that a station had a short. The faulted station number will show on the top left of the display. If more than one station had a fault, the station number shown on the display will be the last station with a fault. The faulted station(s) will be skipped during a watering cycle. Common reasons for a station fault include: 1) a defective solenoid, 2) damaged or faulty wiring, or 3) poor wire connections.
Once you have checked and fixed the wiring or solenoid, you can clear FAULT from the display by turning the dial from AUTO to another position then turning it back to AUTO. It can also be cleared by running a manual cycle.
PUMP FAULT A display that shows the word, “FAULT” and the letter “P” in the top left corner indicates a pump fault. No watering will occur if there is a pump fault. Common reasons for a pump fault include: 1) a defective solenoid on the master valve, 2) incompatible or defective pump start relay, or 3) the wire run between the timer and relay is too long.
If a master valve is being used, it may be a defective solenoid or faulty wiring. Conduct a resistance check on the circuit to verify the fault. If you are using a pump start relay check the wire size and run to the relay. Verify that it the relay is working and ensure you have good wire connections. To clear FAULT from the display turn the dial from AUTO to another position then turn it back to AUTO. It can also be cleared by running a manual cycle.
NO AC A display that shows “NO AC” indicates that there has been a power failure. No watering will occur. LOW BATTERY A display that shows an illustration of a low battery indicates that the battery needs to be changed. A lithium CR2032 battery is required. Please see page 11 for battery replacement. Watering will continue. DOWNLOAD THE ORBIT B-HYVE APP
- Let the Orbit B-hyve app take the guess work out of programming your sprinkler timer.
- Download the “Orbit Bhyve” app. After download, the app will guide you through setting up an account and entering information about your landscape.

See other models: 57894 21005 56233D 58573N 55662
Days of the Week
Example: Bill’s watering duration is set at 60 minutes however; it is the spring time so he wants to water half as long so he sets his budgeting to 50%, his timer will now water for 30 minutes.
MANUAL WATERING
Your timer has the ability to allow you to manually water without disturbing the preset program.
Note: If the run times have not been set, the timer will not initiate manual watering and the screen will return to the current time.
- Turn the dial to [RUN TIME]
 SET CLOCK
 SET DATE
 START TIME
 RUN TIME
 HOW OFTEN
 BUDGET
 OFF
OFF