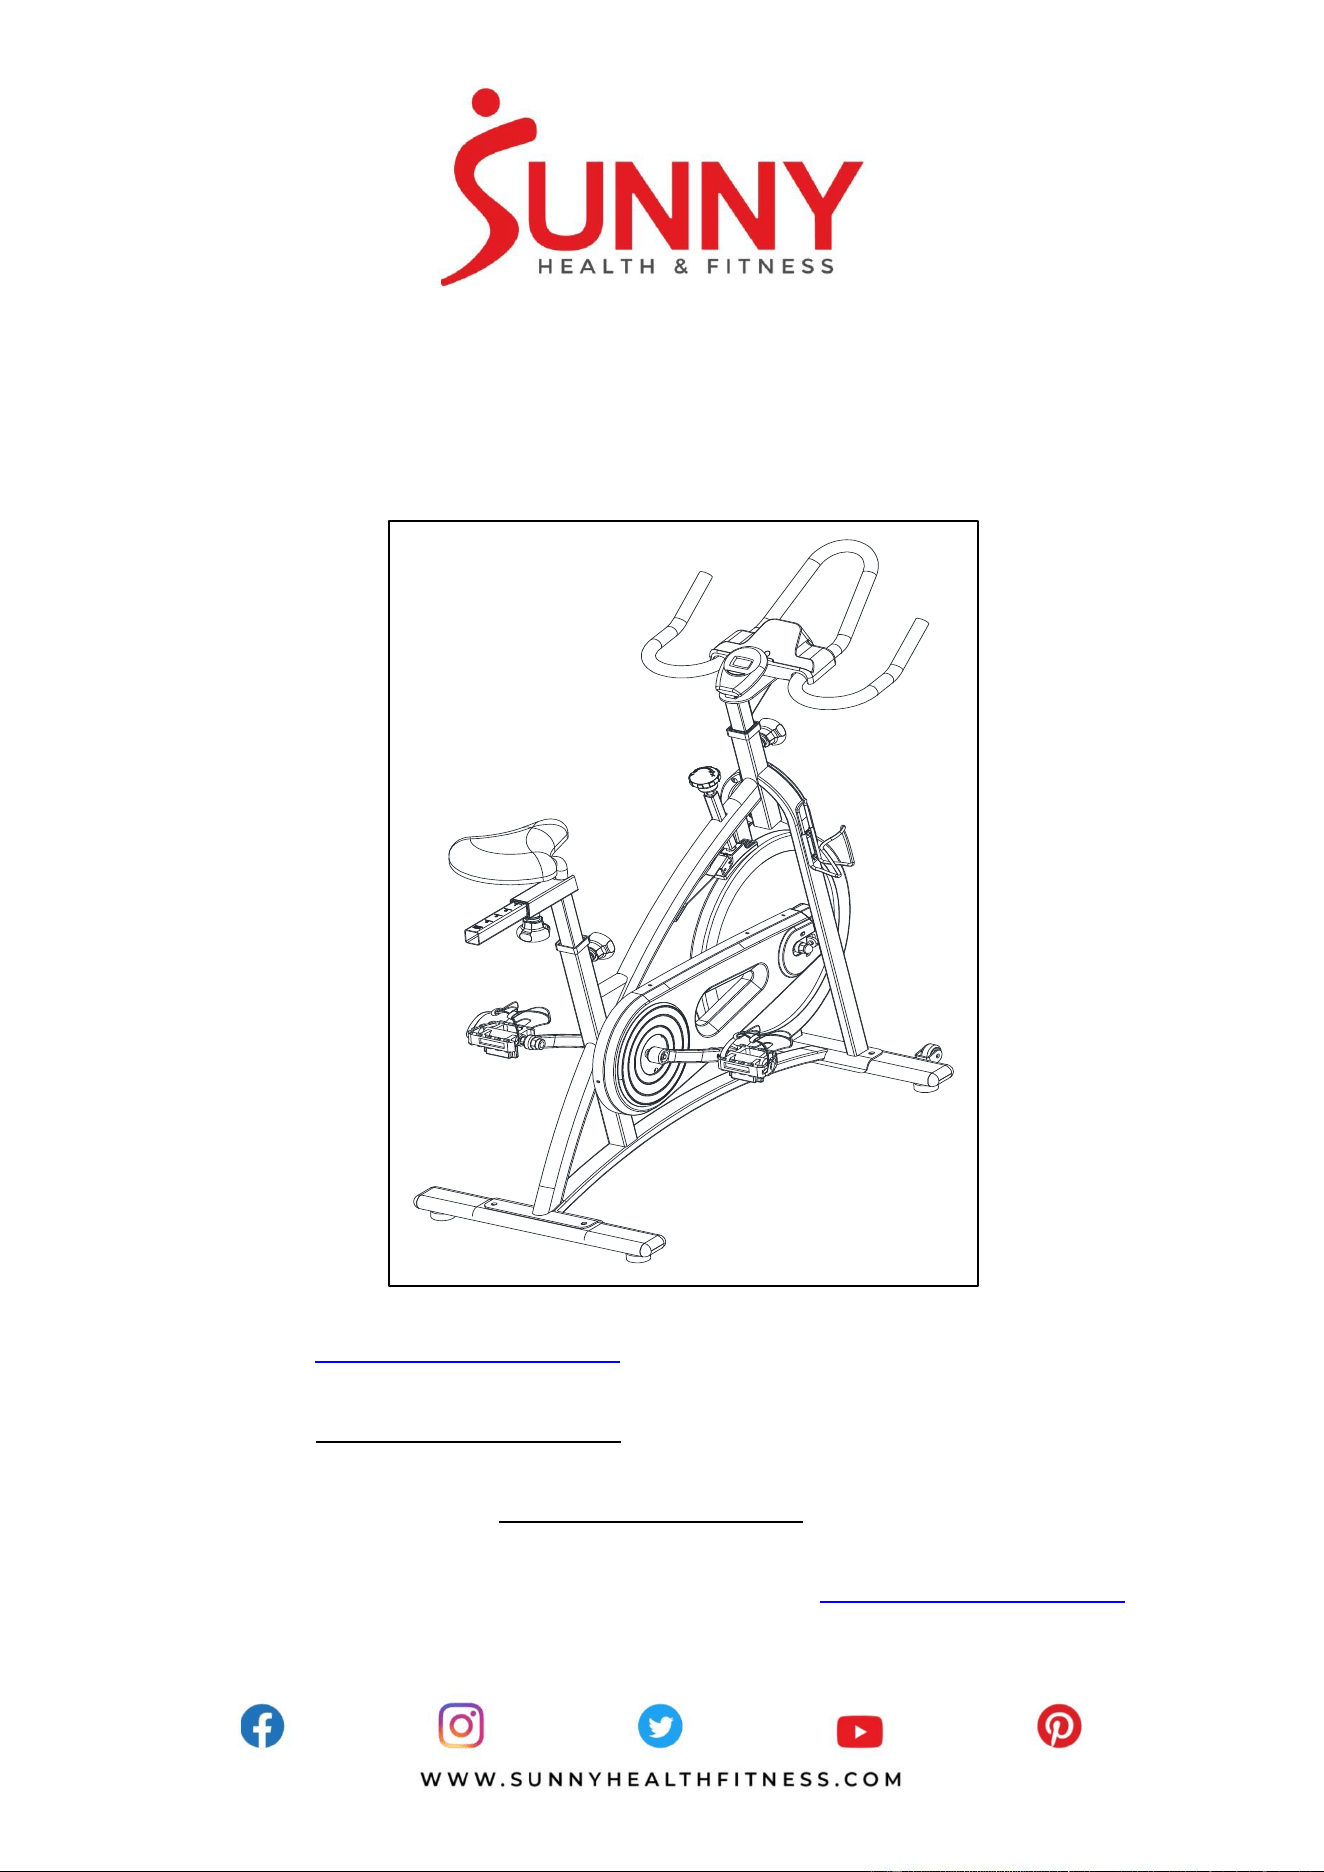
CHAIN DRIVE INDOOR CYCLING BIKE
SF-B1423C
USER MANUAL
English, Page 9~15 IMPORTANT! Please retain owner’s manual for maintenance and adjustment instructions. Your satisfaction is
very important to us, PLEASE DO NOT RETURN UNTIL YOU HAVE CONTACTED US:
support@sunnyhealthfitness.com or 1- 877 - 90SUNNY (877-907- 8669).
Español, Page 16~22 ¡IMPORTANTE! Conserve el manual del propietario para las instrucciones de mantenimiento y ajuste. Su
satisfacción es muy importante para nosotros, NO DEVUELVA HASTA HABERNOS CONTACTADO:
support@sunnyhealthfitness.com ó 1- 877 - 90SUNNY (877-907-8669).
Français, Page 23~29 IMPORTANT! Veuillez conserver le manuel du propriétaire pour les instructions de réglage et d’entretien. Votre
satisfaction est très importante pour nous, VEUILLEZ NE PAS EFFECTUER DE RETOUR AVANT DE NOUS
Deutsch, Seite 30~36 WICHTIG! Bitte bewahren Sie das Benutzerhandbuch für Wartungs- und Einstellanweisungen auf. Ihre
Zufriedenheit ist besonders wichtig für uns, BITTE SCHICKEN SIE DAS PRODUKT NICHT ZURÜCK, BEVOR
SIE SICH MIT UNS IN VERBINDUNG GESETZT HABEN: support@sunnyhealthfitness.com oder 1- 877 -
90SUNNY (877-907- 8669).

1
IMPORTANT SAFETY INFORMATION
We thank you for choosing our product. To ensure your safety and health, please use this equipment correctly. It is important to read this entire manual
before assembling and using the equipment. Safe and effective use can only be achieved if the equipment is assembled, maintained, and used
properly. It is your responsibility to ensure that all users of the equipment are informed of all warnings and precautions.
1. Before starting any exercise program, you should consult your physician to determine if you have any medical or physical conditions that could put
your health and safety at risk or prevent you from using the equipment properly. Your physician’s advice is essential if you are taking medication
that affects your heart rate, blood pressure, or cholesterol level.
2. Be aware of your body’s signals. Incorrect or excessive exercise can damage your health. Stop exercising if you experience any of the following
symptoms: pain, tightness in your chest, irregular heartbeat, shortness of breath, lightheadedness, dizziness, or feelings of nausea. If you do
experience any of these conditions, you should consult your physician before continuing with your exercise program.
3. Keep children and pets away from the equipment. The equipment is designed for adult use only.
4. Use the equipment on a solid, flat level surface with a protective cover for your floor or carpet. To ensure safety, the equipment should have at
least 2 feet (60 CM) of free space all around it.
5. Ensure that all nuts and bolts are securely tightened before using the equipment. The safety of the equipment can only be maintained if it is
regularly examined for damage and/or wear and tear.
6. Always use the equipment as indicated. If you find any defective components while assembling or checking the equipment, or if you hear any
unusual noises coming from the equipment during exercise, discontinue use of the equipment immediately and do not use until the problem has
been rectified.
7. Wear suitable clothing while using the equipment. Avoid wearing loose clothing that may become entangled in the equipment.
8. Do not place fingers or objects into the moving parts of the equipment
9. The maximum weight capacity of this unit is 265 pounds (120 KG).
10. The equipment is not suitable for therapeutic use.
11. To avoid bodily injury and/or damage to the product or property, proper lifting and moving are required.
12. Your product is intended for use in cool and dry conditions. You should avoid storage in extreme cold, hot or damp areas as this may lead to
corrosion and other related problems.
13. This equipment is designed for indoor and home use only; it is not intended for commercial use.
INFORMACIÓN IMPORTANTE DE SEGURIDAD
Gracias por haber elegido nuestro producto. Para garantizar su seguridad y salud, utilice este equipo correctamente. Es importante leer todo el
manual antes de instalar y usar el equipo. Solo se puede garantizar el uso seguro y eficaz del equipo si se instala, mantiene y utiliza correctamente.
Es su responsabilidad asegurarse de que todos los usuarios de los equipos conozcan todas las advertencias y precauciones.
1. Antes de comenzar cualquier programa de ejercicios, consulta con su médico para determinar si tiene alguna condición médica o física que
puede poner en riesgo su salud y seguridad o que podría impedir que utilice el equipo adecuadamente. El consejo de su médico es esencial en
caso de que esté tomando algún medicamento que podría afectar su ritmo cardíaco, presión arterial o nivel de colesterol.
2. Esté atento a las señales de su cuerpo. Ejercitarse de manera incorrecta o excesiva puede dañar su salud. Deje de hacer ejercicio si
experimenta alguno de los siguientes síntomas: dolor, opresión en el pecho, latidos cardíacos irregulares, falta de aliento, sensación de
desmayo, mareos o sensación de náuseas. Si presenta alguna de esas condiciones, consulta con su médico antes de continuar con su
programa de ejercicios.
3. Mantenga el equipo lejos del alcance de niños y mascotas. El equipo está diseñado para el uso exclusivo de adultos.
4. Utilice el equipo en una superficie plana y sólida con una cubierta protectora para su piso o alfombra. Para garantizar su seguridad, el equipo
debe tener al menos 60CM (2 pies) de espacio libre a su alrededor.
5. Asegúrese de que todas las tuercas y pernos estén bien ajustados antes de usar el equipo. Solo puede conservarse la seguridad del equipo si
se inspecciona regularmente para detectar daños o desgaste.
6. Siempre utilice el equipo como se indica. Si encuentra algún componente defectuoso mientras instala o revisa el equipo, o si escucha ruidos
extraños que provienen del equipo durante el ejercicio, deje de utilizarlo inmediatamente y no lo utilice hasta que el problema se ha corregido.
7. Use ropa adecuada cuando utilice el equipo. Evite usar ropa suelta que pueda enredarse en el equipo.
8. No coloque los dedos u objetos en las partes móviles del equipo.
9. La capacidad máxima de peso de esta unidad es de 120 KG (265 libras).
10. El equipo no es adecuado para uso terapéutico.
11. Muévase con cuidado cuando levante y mueva el equipo a fin de que no se dañe la espalda. Siempre utilice la técnica de levantamiento
adecuada y pida ayuda en caso de que sea necesario.
12. Su producto está diseñado para usar en condiciones frescas y secas. Debe evitar de tenerlo en lugares extremadamente frías, calientes o
húmedas, ya que pueden provocar corrosión y otros problemas relacionados.
13. ¡Este equipo está diseñado solamente para uso interior! ¡No es para uso comercial!

2
INFORMATIONS DE SÉCURITÉ IMPORTANTES
Nous vous remercions d’avoir choisi notre produit. Pour votre santé et votre sécurité, veuillez utiliser correctement cet appareil. Il est important de
lire entièrement le présent manuel avant d’assembler l’appareil et de l’utiliser. L’utilisation sûre et efficace n’est possible que si l’appareil est
correctement assemblé, entretenu et utilisé. Il vous incombe de vous assurer que tous les utilisateurs de l’appareil soient informés de tous les
avertissements et précautions.
1. Avant d’entamer un programme d’exercices, consultez votre médecin pour déterminer si vous avez une quelconque disposition physique ou
médicale susceptible de mettre en danger votre santé et votre sécurité ou de vous empêcher d’utiliser cet appareil correctement. L’avis de votre
médecin est essentiel si vous prenez un médicament pouvant affecter le rythme cardiaque, la pression ou le niveau de cholestérol.
2. Soyez conscient des signaux de votre corps. Des exercices incorrects ou excessifs peuvent nuire à votre santé. Arrêtez l'exercice si vous
ressentez l'un des symptômes suivants : douleur, oppression thoracique, pouls irrégulier, essoufflement, étourdissements, vertiges ou nausées.
Si vous rencontrez l'une de ces conditions, vous devriez consulter votre médecin avant de poursuivre votre programme d'exercices
3. Gardez les enfants et les animaux de compagnie à distance de l’appareil. L’appareil est conçu pour l’utilisation exclusive par des adultes.
4. Utilisez l’appareil sur une surface dure, plane et de niveau, avec une protection pour votre parquet ou tapis. Pour un usage sûr, l’appareil doit
disposer d’au moins 60 cm (2 pi) d’espace libre tout autour de lui.
5. Assurez-vous que tous les boulons et écrous soient bien serrés avant d’utiliser l’appareil. La sécurité de l’appareil ne peut être entretenue qu’à
condition de régulièrement vérifier l’absence de dommages ou d’usure.
6. Utilisez toujours l'équipement comme indiqué. Si vous trouvez des composants défectueux lors de l'assemblage ou du contrôle de l'équipement,
ou si vous entendez des bruits inhabituels provenant de l'équipement pendant l'exercice, arrêtez immédiatement d'utiliser l'équipement et
n'utilisez plus jusqu'à ce que le problème soit résolu.
7. Portez des vêtements adéquats lors de l’utilisation de l’appareil. Évitez les vêtements amples qui risqueraient de se prendre dans l’appareil.
8. Ne mettez pas le doigt ni aucun objet dans les pièces mobiles de l’appareil.
9. La capacité de poids maximale de cet appareil est de 120 kg (265lb).
10. Cet appareil n’est pas adapté à un usage thérapeutique.
11. Soulevez et déplacez l’appareil avec précaution. Utilisez toujours les techniques adéquates de levage et demandez de l’aide si nécessaire.
12. Votre produit est conçu pour usage dans un endroit sec et frais. Éviter de l’entreposer dans un endroit extrêmement froid, chaud ou humide, car
cela peut entraîner de la corrosion et des problèmes du même ordre.
13. Cet appareil est conçu pour un usage intérieur uniquement; Il n’est pas fait pour une utilisation commerciale.
WICHTIGE SICHERHEITSHINWEISE
Wir danken Ihnen, dass Sie sich für unser Produkt entschieden haben. Zur Gewährleistung Ihrer Sicherheit und Gesundheit
verwenden Sie dieses Gerät bitte ordnungsgemäß. Es ist wichtig, diese gesamte Bedienungsanleitung zu lesen, bevor Sie das Gerät
montieren und in Betrieb nehmen. Eine sichere und effektive Nutzung kann nur erreicht werden, wenn das Gerät ordnungsgemäß
montiert, gewartet und verwendet wird. Sie sind dafür verantwortlich, dass alle Benutzer des Geräts über alle Warnungen und
Vorsichtsmaßnahmen informiert werden.
1. Vor Beginn eines jeden Trainingsprogramms ist es ratsam, einen Arzt zu konsultieren, um festzustellen, ob Sie medizinische
oder körperliche Beschwerden haben, die Ihre Gesundheit und Sicherheit gefährden oder verhindern könnten, dass Sie das
Gerät ordnungsgemäß benutzen. Der Rat Ihres Arztes ist unerlässlich, wenn Sie Medikamente einnehmen, die Ihre
Herzfrequenz, Ihren Blutdruck oder Ihren Cholesterinspiegel beeinflussen.
2. Achten Sie auf die Signale Ihres Körpers. Falsches oder übermäßiges Training kann Ihre Gesundheit schädigen. Hören Sie auf
zu trainieren, wenn Sie eines der folgenden Symptome verspüren: Schmerzen, Engegefühl in Ihrer Brust, unregelmäßiger
Herzschlag, Kurzatmigkeit, Benommenheit, Schwindel oder Übelkeit. Wenn Sie einen dieser Zustände bemerken, sollten Sie
Ihren Arzt konsultieren, bevor Sie mit Ihrem Trainingsprogramm fortfahren.
3. Kinder und Haustiere dürfen nicht in der Nähe des Geräts sein. Das Gerät ist nur für den Gebrauch durch Erwachsene
bestimmt.
4. Verwenden Sie das Gerät auf einer festen, ebenen Fläche mit einer Schutzabdeckung für Ihren Boden oder Teppich. Um die
Sicherheit zu gewährleisten, sollte das Gerät ringsum mindestens 120 cm (4 ft) Freiraum haben.
5. Vergewissern Sie sich, dass alle Muttern und Bolzen fest angezogen sind, bevor Sie das Gerät benutzen. Die Sicherheit des
Gerätes kann nur gewährleistet werden, wenn es regelmäßig auf Beschädigungen und/oder Verschleiß überprüft wird.
6. Verwenden Sie das Gerät immer entsprechend den Angaben. Wenn Sie bei der Montage oder Überprüfung des Geräts
defekte Komponenten feststellen oder ungewöhnliche Geräusche vom Gerät während des Trainings hören, stellen Sie die
Verwendung des Geräts sofort ein. In diesem Fall sollten Sie es erst dann wieder in Betrieb nehmen, wenn das Problem
behoben ist.
7. Tragen Sie bei der Benutzung des Gerätes geeignete Kleidung. Vermeiden Sie das Tragen von loser Kleidung, die sich in der
Ausrüstung verfangen kann.
8. Stecken Sie keine Finger oder Gegenstände in die beweglichen Teile des Gerätes.
9. Die maximale Gewichtsbelastbarkeit dieser Einheit beträgt 120 kg (265 Pfund).
10. Dieses Gerät ist nicht für den therapeutischen Einsatz geeignet.
11. Um Personenschäden und/oder Schäden am Produkt oder Eigentum zu vermeiden, ist ein ordnungsgemäßes Hochheben und
Transportieren erforderlich.
12. Ihr Produkt ist für den Einsatz unter kühlen und trockenen Bedingungen bestimmt. Sie sollten die Lagerung in extrem kalten,
heißen oder feuchten Räumen vermeiden, da dies zu Korrosion und anderen damit verbundenen Problemen führen kann.
13. Dieses Gerät ist nur für den Innen- und Heimgebrauch bestimmt; es ist nicht für die gewerbliche Nutzung bestimmt.
3
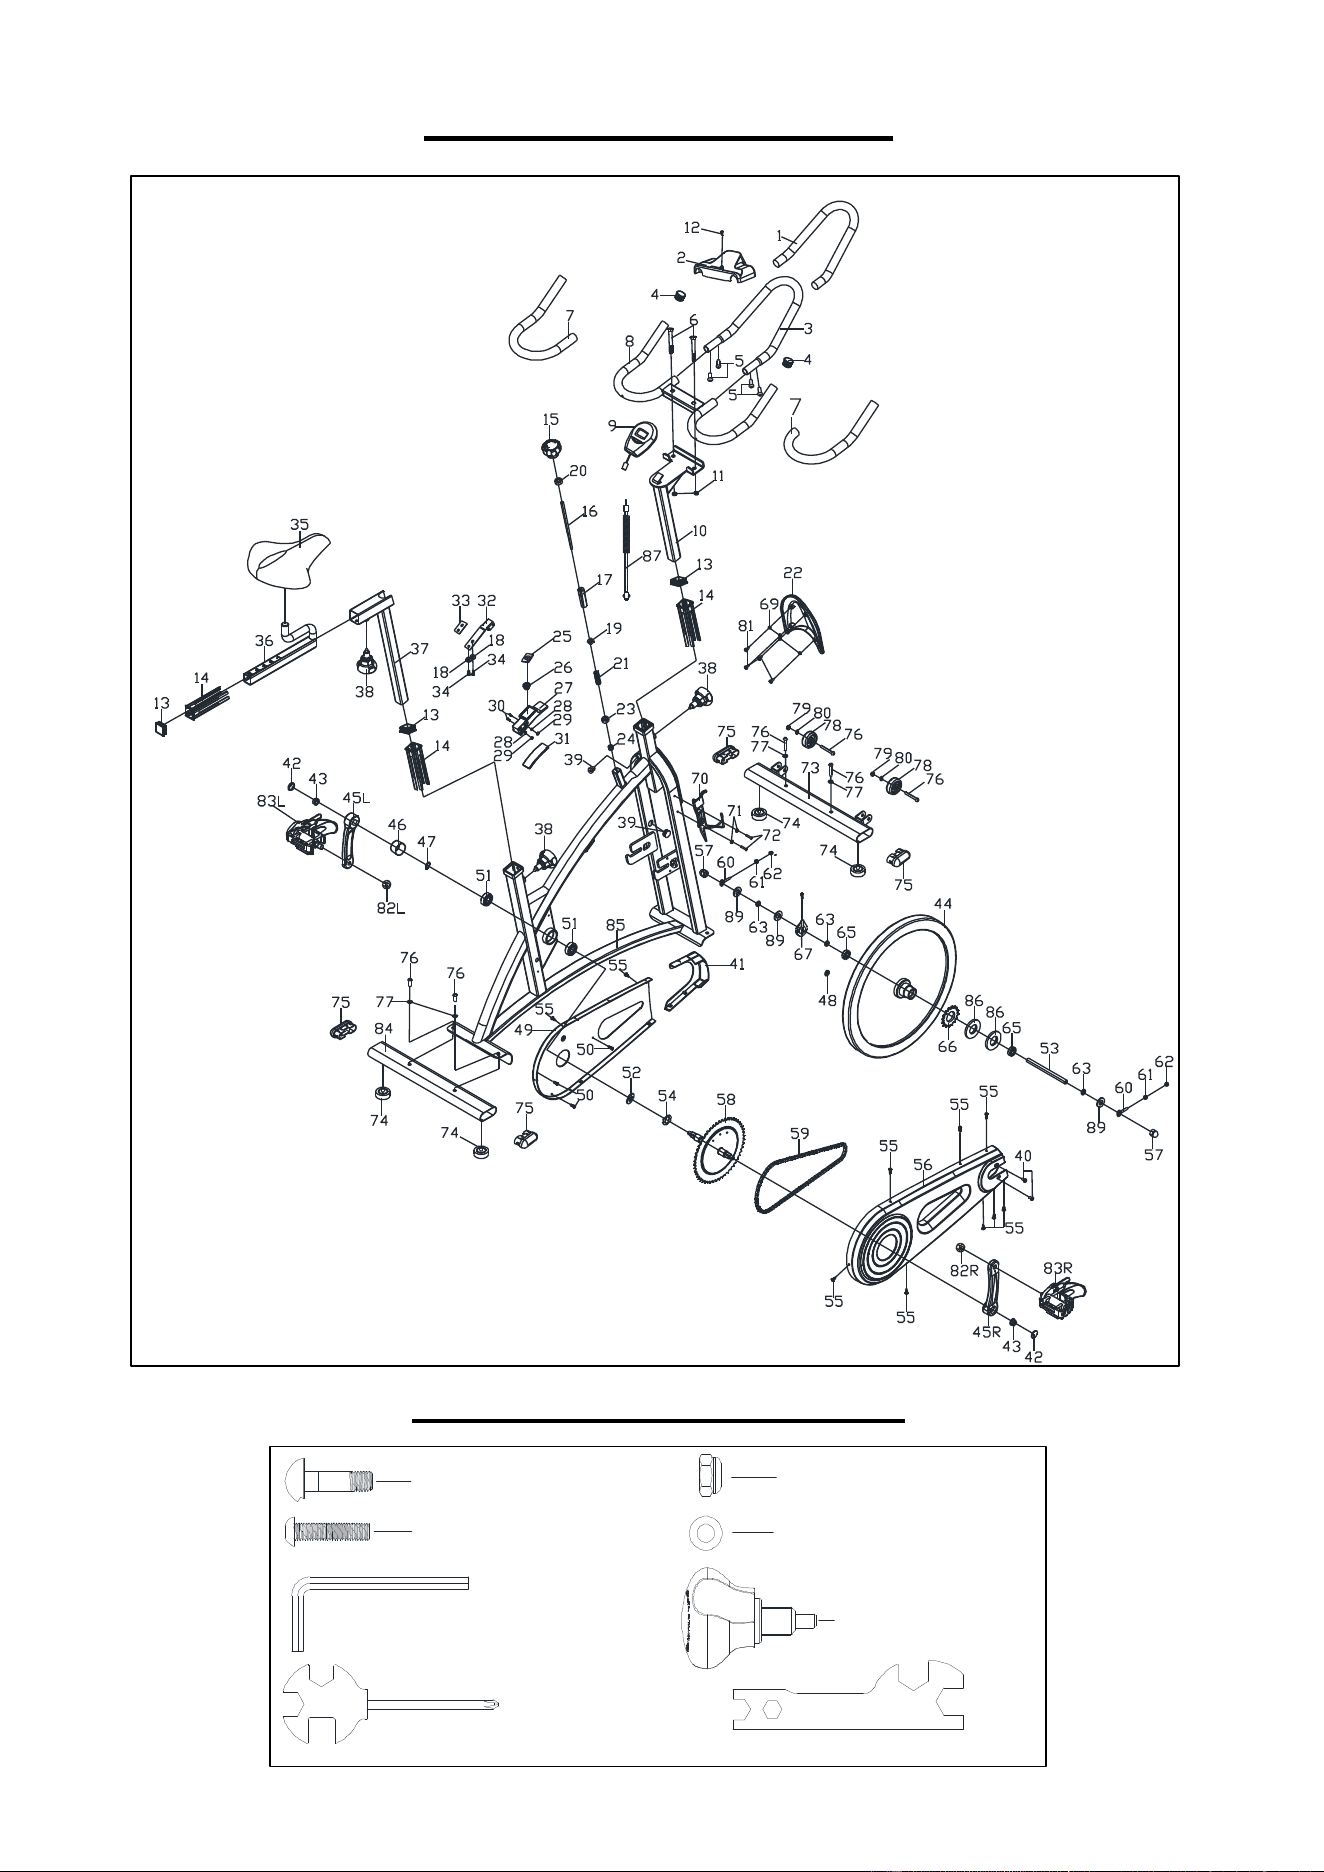
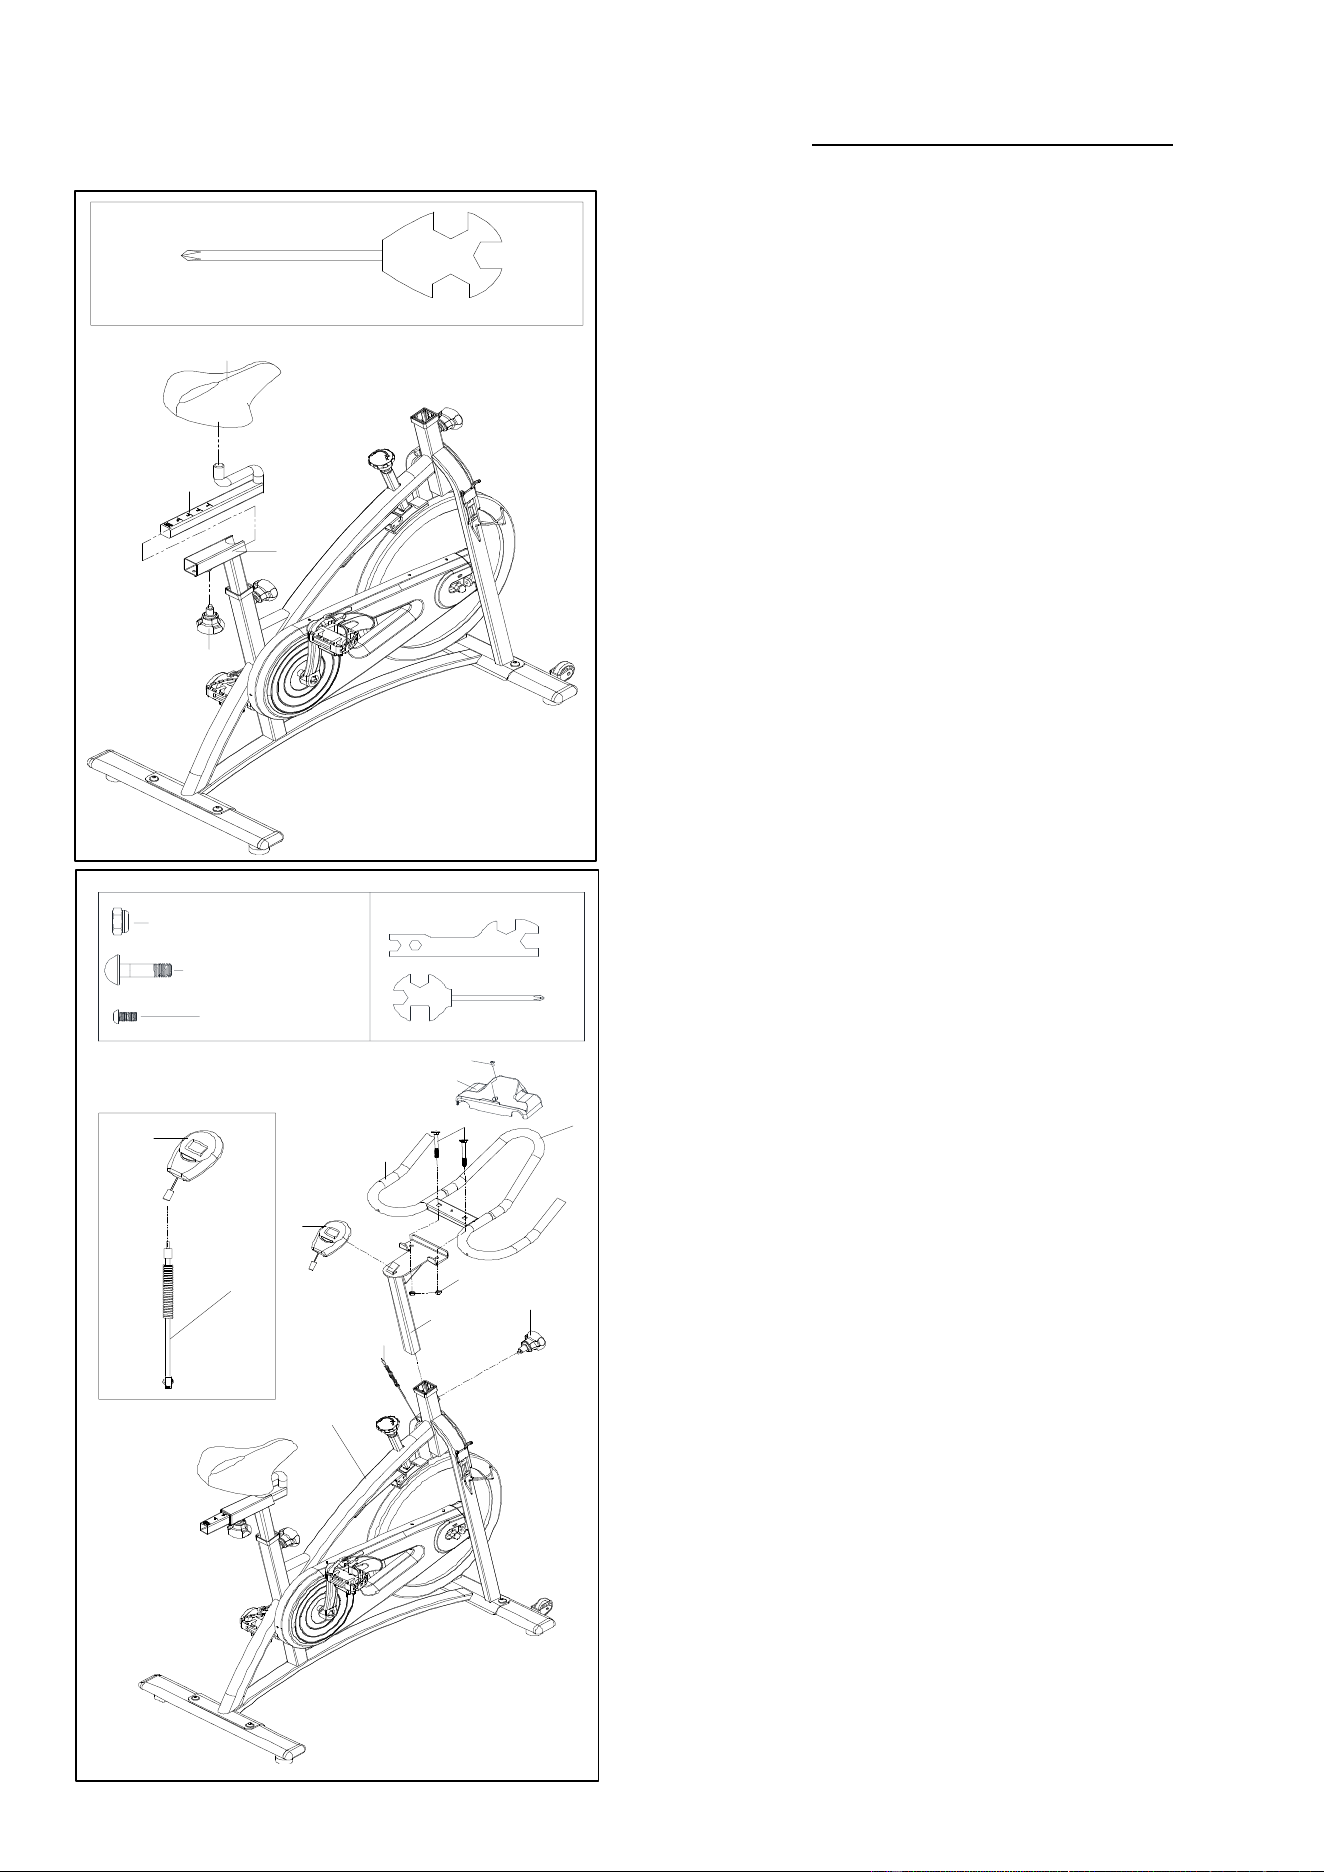
EXPLODED DIAGRAM
HARDWARE PACKAGE
#38 M16*1.5 1pc
#90 S6 1pc
#76 M8*40*20*S6 4pcs
#77 Φ16*Φ8*H1.5 4pcs
#68 S10-13-17-19 1pc
#88 S13-14-15 1pc
#11 M10*H9.5*S17 2pcs
#6 M10*35*15*H6 2pcs

4
PARTS LIST
No.
Description
Spec.
Qty
No.
Description
Spec.
Qty
1
Foam (A)
Φ23*3*550
1
46
Cover for Middle
Axle
Φ56*28
1
2
Tablet Bracket
1
47
C-clip
D17
1
3
Handlebar (A)
1
48
Magnet
Φ10*T3
1
4
End Cap
Φ25*16
2
49
Inner Chain Cover
504*259*23
1
5
Screw
M6*16*S4
4
50
Screw
ST4.2*16*Φ8
3
6
Bolt
M10*35*15*H6
2
51
Bearing
6203-2RS
2
7
Foam Grip
Φ23*3*460
2
52
Spacer
Φ22*Φ17.05*3
1
8
Handlebar (B)
1
53
Inertial Axle
Φ12*165*M12*1*32*52
1
9
Computer
1
54
Wave Washer
D17*Φ22*0.3
1
10
Handlebar Post
1
55
Screw
ST4.2*13*Φ8
10
11
Nut
M10*H9.5*S17
2
56
Outer Chain Cover
648*264*45
1
12
Screw
M5*12
1
57
Nut
M12*1*H19.5*S19
2
13
End Cap
F30*30*16
3
58
Middle Axle with Big
Chain Wheel
1
14
Bushing
F38*F30*153.3
3
59
Chain
1/2"*1/8"*106 KYC
1
15
Tension
Control Knob
Φ58*44*M8*18
1
60
Adjusting Screw
M6*50*Φ12*5
2
16
Brake Rod
Φ10*210*M8*15*M6*7*M10*95
1
61
Nut
M6*H5*S10
2
17
Bushing
20*20*65
1
62
Nut
M6*H6*S10
2
18
Washer
D6*Φ12*1.2
2
63
Nut
M12*1*H6*S19
3
19
Square Nut
15*15*25*M10
1
64
Refer to Part #90
20
Nut
M8*H5.5*S14
1
65
Bearing
6001-2RS C&U
2
21
Spring
Φ2.0*Φ15*54*N12
1
66
Small Chain Wheel
1
22
Decorative
Cover
195*161*31
1
67
Inductor
1
23
Nut
M10*H5.5*S17
1
68
Spanner
S10-13-17-19
3
1
24
Nut
M6*H11*S10
1
69
Washer
D5*Φ13*1.0
4
25
Brake Stopper
35*24*2
1
70
Water Bottle Holder
1
26
Spring
Φ2*Φ24*Φ13*17*N4
1
71
Washer
D5*Φ13*1
2
27
Brake Block
110*27*30
1
72
Screw
M5*16*Φ10
2
28
Washer
D5*Φ10*1
2
73
Front Stabilizer
1
29
Nut
M5*H5.5*S10
2
74
Foot Leveler
Φ43*14*M8*25
4
30
Screw
M5*30*Φ8
2
75
End Cap
30*70*1.5t
4
31
Woolen Felt
110*30*10
1
76
Bolt
M8*40*20*S6
6
32
Spring Piece
T2*59*185
1
77
Washer
Φ16*Φ8*H1.5
4
33
Rubber Mat
44*25*3
1
78
Transportation
Wheel
Φ42*18*Φ8*22
2
34
Screw
M6*12*S10
2
79
Nut
M8*H7.5*S13
2
35
Seat
98-2
1
80
Washer
D8*Φ16*1.5
2
36
Seat Slider
1
81
Screw
ST4.8*10*Φ8
4
37
Seat Post
1
82L/R
Nylon Nut
9/16*20*H8*S19
2
38
Adjustment
Knob
M16*1.5
3
83L/R
Pedal
JG-109 9/16”
2
39
Plug
Φ14*14
2
84
Rear Stabilizer
1
40
Screw
M6*10*Φ12
2
85
Main Frame
1
41
Front Cover
157*152*38.5 HIPS
1
86
Nut
M35*1*Φ44*3.5
2
42
Crank Cap
Φ25*7
2
87
Trunk Wire
1
43
Nut
M10*1.25*H7.5*S14
2
88
Spanner
S13-14-15
1
44
Inertial Wheel
Φ460*60
1
89
Spacer
Φ22*Φ12.2*7.5
3
45L/R
Crank
170 “L/R”9/16
2
90
Allen Wrench
S6
1

5
LISTA DE PIEZAS
n.°
Descripción
Espec.
Cant.
n.°
Descripción
Espec.
Cant.
1
Espuma (A)
Φ23*3*550
1
46
Cubierta para Eje
Medio
Φ56*28
1
2
Soporte de Tableta
1
47
C-clip
D17
1
3
Manubrio (A)
1
48
Imán
Φ10*T3
1
4
Tapa de Extremo
Φ25*16
2
49
Cubierta de Cadena
Interior
504*259*23
1
5
Tornillo
M6*16*S4
4
50
Tornillo
ST4.2*16*Φ8
3
6
Perno
M10*35*15*H6
2
51
Cojinete
6203-2RS
2
7
Agarre de Espuma
Φ23*3*460
2
52
Espaciador
Φ22*Φ17.05*3
1
8
Manubrio (B)
1
53
Eje Inercial
Φ12*165*M12*1*32*
52
1
9
Computadora
1
54
Arandela
D17*Φ22*0.3
1
10
Poste de Manubrio
1
55
Tornillo
ST4.2*13*Φ8
10
11
Tuerca
M10*H9.5*S17
2
56
Cubierta Exterior de
Cadena
648*264*45
1
12
Tornillo
M5*12
1
57
Tuerca
M12*1*H19.5*S19
2
13
Tapón Extremo
F30*30*16
3
58
Eje Medio con Rueda
de la Cadena Grande
1
14
Buje
F38*F30*153.3
3
59
Cadena
1/2"*1/8"*106 KYC
1
15
Perilla de Tensión
Φ58*44*M8*18
1
60
Tornillo de Ajuste
M6*50*Φ12*5
2
16
Barra de Freno
Φ10*210*M8*15*M6*7*
M10*95
1
61
Tuerca
M6*H5*S10
2
17
Buje
20*20*65
1
62
Tuerca
M6*H6*S10
2
18
Arandela
D6*Φ12*1.2
2
63
Tuerca
M12*1*H6*S19
3
19
Tuerca Cuadrada
15*15*25*M10
1
64
Refiere a parte n.° 90
20
Tuerca
M8*H5.5*S14
1
65
Cojinete
6001-2RS C&U
2
21
Resorte
Φ2.0*Φ15*54*N12
1
66
Rueda de Cadena
Pequeña
1
22
Cubierta Decorativa
195*161*31
1
67
Inductor
1
23
Tuerca
M10*H5.5*S17
1
68
Llave
S10-13-17-19
1
24
Tuerca
M6*H11*S10
1
69
Arandela
D5*Φ13*1.0
4
25
Tapón de Freno
35*24*2
1
70
Soporte de Botella
1
26
Resorte
Φ2*Φ24*Φ13*17*N4
1
71
Arandela
D5*Φ13*1
2
27
Bloque de Freno
110*27*30
1
72
Tornillo
M5*16*Φ10
2
28
Arandela
D5*Φ10*1
2
73
Estabilizador Frontal
1
29
Tuerca
M5*H5.5*S10
2
74
Nivelador de Pie
Φ43*14*M8*25
4
30
Tornillo
M5*30*Φ8
2
75
Tapón Extremo
30*70*1.5t
4
31
Fieltro de Lana
110*30*10
1
76
Tornillo
M8*40*20*S6
6
32
Pieza de Resorte
T2*59*185
1
77
Arandela
Φ16*Φ8*H1.5
4
33
Tapete de Goma
44*25*3
1
78
Rueda de Rodillo
Φ42*18*Φ8*22
2
34
Perno
M6*12*S10
2
79
Tuerca
M8*H7.5*S13
2
35
Asiento
98-2
1
80
Arandela
D8*Φ16*1.5
2
36
Asiento Deslizante
1
81
Tornillo
ST4.8*10*Φ8
4
37
Poste de Asiento
1
82L/R
Tuerca de Nylon
9/16*20*H8*S19
2
38
Perilla de Ajuste
M16*1.5
3
83L/R
Pedal
JG-109 9/16”
2
39
Ojal
Φ14*14
2
84
Estabilizador Trasero
1
40
Tornillo
M6*10*Φ12
2
85
Estructura Principal
1
41
Cubierta Delantera
157*152*38.5 HIPS
1
86
Tuerca
M35*1*Φ44*3.5
2
42
Tapa de Biela
Φ25*7
2
87
Cable del Tronco
1
43
Tuerca
M10*1.25*H7.5*S14
2
88
Llave
S13-14-15
1
44
Volante de Inercia
Φ460*60
1
89
Espaciador
Φ22*Φ12.2*7.5
3
45L/R
Biela
170 “L/R”9/16
2
90
Llave Allen
S6
1

6
LISTE DES ÉLÉMENTS
N
o
Description
Spécification
Qté
N
o
Description
Spécification
Qté
1
Mousse (A)
Φ23*3*550
1
46
Carter de l’Axe
Central
Φ56*28
1
2
Support de Tablette
1
47
Clip C
D17
1
3
Guidon (A)
1
48
Aimant
Φ10*T3
1
4
Embout d’Extrémité
Φ25*16
2
49
Carter de Chaîne
Intérieur
504*259*23
1
5
Vis
M6*16*S4
4
50
Vis
ST4.2*16*Φ8
3
6
Boulon
M10*35*15*H6
2
51
Roulement
6203-2RS
2
7
Poignée en Mousse
Φ23*3*460
2
52
Bague d'Espacement
Φ22*Φ17.05*3
1
8
Guidon (B)
1
53
Axe d’Inertie
Φ12*165*M12*1*3
2*52
1
9
Ordinateur
1
54
Rondelle Ondulée
D17*Φ22*0.3
1
10
Tige de Guidon
1
55
Vis
ST4.2*13*Φ8
10
11
Écrou
M10*H9.5*S17
2
56
Carter de Chaîne
Extérieure
648*264*45
1
12
Vis
M5*12
1
57
Écrou
M12*1*H19.5*S19
2
13
Embout d’Extrémité
F30*30*16
3
58
Axe Central Avec
Grand Plateau
1
14
Manchon
F38*F30*153.3
3
59
Chaîne
1/2"*1/8"*106 KYC
1
15
Contrôleur de Tension
Φ58*44*M8*18
1
60
Vis de Réglage
M6*50*Φ12*5
2
16
Tige de Frein
Φ10*210*M8*15*M6*7*
M10*95
1
61
Écrou
M6*H5*S10
2
17
Manchon
20*20*65
1
62
Écrou
M6*H6*S10
3
18
Rondelle
D6*Φ12*1.2
2
63
Écrou
M12*1*H6*S19
3
19
Écrou Carré
15*15*25*M10
1
64
Voir la pièce N
o
90
20
Écrou
M8*H5.5*S14
1
65
Roulement
6001-2RS C&U
2
21
Ressort
Φ2.0*Φ15*54*N12
1
66
Petit Plateau
1
22
Cache Décoratif
195*161*31
1
67
Inducteur
1
23
Écrou
M10*H5.5*S17
1
68
Clé Tricoise
S10-13-17-19
1
24
Écrou
M6*H11*S10
1
69
Rondelle
D5*Φ13*1.0
4
25
Butée de Frein
35*24*2
1
70
Porte-bouteille
1
26
Ressort
Φ2*Φ24*Φ13*17*N4
1
71
Rondelle
D5*Φ13*1
2
27
Patin de Frein
110*27*30
1
72
Vis
M5*16*Φ10
2
28
Rondelle
D5*Φ10*1
2
73
Stabilisateur Avant
1
29
Écrou
M5*H5.5*S10
2
74
Pied de Nivellement
Φ43*14*M8*25
4
30
Vis
M5*30*Φ8
2
75
Embout d’Extrémité
30*70*1.5t
4
31
Feutre de Laine
110*30*10
1
76
Boulon
M8*40*20*S6
6
32
Élément à Ressort
T2*59*185
1
77
Rondelle
Φ16*Φ8*H1.5
4
33
Tapis de Caoutchouc
44*25*3
1
78
Roulettes de
Transport
Φ42*18*Φ8*22
2
34
Boulon
M6*12*S10
2
79
Écrou
M8*H7.5*S13
2
35
Siège
98-2
1
80
Rondelle
D8*Φ16*1.5
2
36
Glissoir de Siège
1
81
Vis
ST4.8*10*Φ8
4
37
Tige de Siège
1
82L/R
Écrou de Nylon
9/16*20*H8*S19
2
38
Bouton de Réglage
M16*1.5
3
83L/R
Pédale
JG-109 9/16”
2
39
Fiche
Φ14*14
2
84
Stabilisateur Arrière
1
40
Vis
M6*10*Φ12
2
85
Cadre Principal
1
41
Carter Avant
157*152*38.5 HIPS
1
86
Écrou
M35*1*Φ44*3.5
2
42
Embout Manivelle
Φ25*7
2
87
Câble de Liaison
1
43
Écrou
M10*1.25*H7.5*S14
2
88
Clé Tricoise
S13-14-15
1
44
Volant d’Inertie
Φ460*60
1
89
Bague d’Espacement
Φ22*Φ12.2*7.5
3
45L/R
Capuchon de Manivelle
170 “L/R”9/16
2
90
Clé Allen
S6
1

7
TEILELISTE
Nr.
Bezeichnung
Spezif.
Menge
Nr.
Bezeichnung
Spezif.
Menge
1
Schaumstoff (A)
Φ23 x 3 x 550
1
40
Schraube
M6 x 10 x Φ12
2
2
Tablet-Halterung
1
41
Frontabdeckung
157 x 152 x 38,5
HIPS
1
3
Griffstange (A)
1
42
Kurbelkappe
Φ25 x 7
2
4
Endkappe
Φ25 x 16
2
43
Schraubenmutter
M10 x 1,25 x H7,5 x
S14
2
5
Schraube
M6 x 16 x S4
4
44
Trägheitsrad
Φ460 x 60
1
6
Bolzen
M10*35*15*H6
2
45L/R
Kurbel
170 „L/R“ 9/16
2
7
Schaumstoffgriff
Φ23 x 3 x 460
2
46
Abdeckung für
Mittelachse
Φ56 x 28
1
8
Griffstange (B)
1
47
Benzingring
D17
1
9
Computer
1
48
Magnet
Φ10 x T3
1
10
Lenkerstütze
1
49
Innere
Kettenabdeckung
504 x 259 x 23
1
11
Schraubenmutter
M10 x H9.5 x S17
2
50
Schraube
ST4,2 x 16 x Φ8
3
12
Schraube
M5 x 12
1
51
Kugellager
6203-2RS
2
13
Endkappe
F30 x 30 x 16
3
52
Abstandhalter
Φ22 x Φ17.05 x 3
1
14
Buchse
F38 x F30 x 153,3
3
53
Trägheitsachse
Φ12 x 165 x M12 x
1 x 32 x 52
1
15
Spannungssteuer
ungsknopf
Φ58 x 44 x M8 x 18
1
54
Wellenscheibe
D17 x Φ22 x 0.3
1
16
Bremsstange
Φ10 x 210 x M8 x 15
x M6 x 7 x M10 x 95
1
55
Schraube
ST4,2 x 13 x Φ8
10
17
Buchse
20 x 20 x 65
1
56
Äußere
Kettenabdeckung
648 x 264 x 45
1
18
Beilagscheibe
D6 x Φ12 x 1,2
2
57
Schraubenmutter
M12 x 1 x H19,5 x
S19
2
19
Vierkantmutter
15 x 15 x 25 x M10
1
58
Mittelachse mit
Kettenrad
1
20
Schraubenmutter
M8 x H5.5 x S14
1
59
Ketten
1/2" x 1/8" x 106
KYC
1
21
Sprungfeder
Φ2,0 x Φ15 x 54 x
N12
1
60
Einstellschraube
M6 x 50 x Φ12 x 5
2
22
Dekorative
Abdeckung
195 x 161 x 31
1
61
Schraubenmutter
M6 x H5 x S10
2
23
Schraubenmutter
M10 x H5.5 x S17
1
62
Schraubenmutter
M6 x H6 x S10
3
24
Schraubenmutter
M6 x H11 x S10
1
63
Schraubenmutter
M12 x 1 x H6 x S19
3
25
Bremsenstopper
35 x 24 x 2
1
64
(Siehe Teil Nr. 90)
-
26
Sprungfeder
Φ2 x Φ24 x Φ13 x 17
x N4
1
65
Kugellager
6202-2RS C&U
2
27
Bremsklotz
110 x 27 x 30
1
66
Kleines Kettenrad
1
28
Beilagscheibe
D5 x Φ10 x 1
2
67
Induktor
1
29
Schraubenmutter
M5 x H5.5 x S10
2
68
Schraubenschlüssel
S10-13-17-19
1
30
Schraube
M5 x 30 x Φ8
2
69
Beilagscheibe
D5 x Φ13 x 1,0
4
31
Wollfilz
110 x 30 x 10
1
70
Wasserflaschenhalter
1
32
Federelement
T2 x 59 x 185
1
71
Beilagscheibe
D5 x Φ13 x 1
2
33
Gummimatte
44 x 25 x 3
1
72
Schraube
M5 x 16 x Φ10
2
34
Schraube
M6 x 12 x S10
2
73
Stabilisator Vorne
1
35
Sitz
98-2
1
74
Fußnivellierer
Φ43 x 14 x M8 x 25
4
36
Sattelschlitten
1
75
Endkappe
30 x 70 x 1,5t
4
37
Sattelstütze
1
76
Bolten
M8 x 40 x 20 x S6
6
38
Einstellknopf
M16 x 1,5
3
77
Beilagscheibe
Φ16 x Φ8 x H1.5
4
39
Stecker
Φ14 x 14
2
78
Transportrad
Φ42 x 18 x Φ8 x 22
2

8
Nr.
Bezeichnung
Spezif.
Menge
Nr.
Bezeichnung
Spezif.
Menge
79
Schraubenmutter
M8 x H7,5 x S13
2
85
Hauptrahmen
1
80
Beilagscheibe
D8 x Φ16 x 1,5
2
86
Schraubenmutter
M35 x 1 x Φ44 x 3.5
2
81
Schraube
ST4.8 x 10 x Φ8
4
87
Stammkabel
1
82L/R
Nylonmutter
9/16 x 20 x H8 x S19
2
88
Schraubenschlüssel
S13-14-15
1
83L/R
Pedal
JG-109 9/16”
2
89
Abstandhalter
Φ22 x Φ12. 2 x 7.5
3
84
Stabilisator Hinten
1
90
Inbusschlüssel
S6
1
Ordering Replacement Parts (U.S. and Canadian Customers only)
Please provide the following information in order for us to accurately identify the part(s) needed:
✓ The model number (found on cover of manual)
✓ The product name (found on cover of manual)
✓ The part number found on the “EXPLODED DIAGRAM” and “PARTS LIST” (found near the front of the manual)
Please contact us at support@sunnyhealthfitness.com or 1- 877 - 90SUNNY (877-907-8669).
Pedido de piezas de repuesto (solo para clientes de EE. UU. y Canadá)
Proporcione la siguiente información para que podamos identificar con precisión las piezas necesarias:
✓ El número de modelo (se encuentra en la portada del manual).
✓ El nombre del producto (se encuentra en la portada del manual).
✓ El número de pieza que se encuentra en el “ESQUEMA DE LAS PIEZAS” y en la “LISTA DE PIEZAS” (se
encuentra al principio del manual).
Contáctenos en support@sunnyhealthfitness.com o 1- 877 - 90SUNNY (877-907-8669).
Pour commander des pièces de rechange (clients américains et canadiens seulement)
Veuillez fournir les informations suivantes afin que nous puissions identifier avec précision la pièce ou les pièces
requise(s):
✓ Le numéro de modèle (situé sur la couverture du manuel)
✓ Le nom du produit (situé sur la couverture du manuel)
✓ Le numéro de pièce figurant sur le «SCHÉMA ÉCLATÉ» et la «LISTE DES ÉLÉMENTS» (situé vers le début du
manuel)
Veuillez nous contacter à support@sunnyhealthfitness.com ou 1- 877 - 90SUNNY (877-907-8669).
Bestellung von Ersatzteilen (nur für US-amerikanische und kanadische Kunden)
Bitte geben Sie die folgenden Informationen an, damit wir das/die benötigte(n) Teil(e) genau identifizieren können:
✓ Die Modellnummer (finden Sie auf dem Umschlag der Anleitung)
✓ Die Produktbezeichnung (finden Sie auf dem Umschlag der Anleitung)
✓ Die Teilenummer auf der „EXPLOSIONSDARSTELLUNG“ und der „TEILELISTE“ (finden Sie vorne in der
Anleitung)
Bitte kontaktieren Sie uns unter support@sunnyhealthfitness.com oder 1- 877 - 90SUNNY (877-907-8669).
9
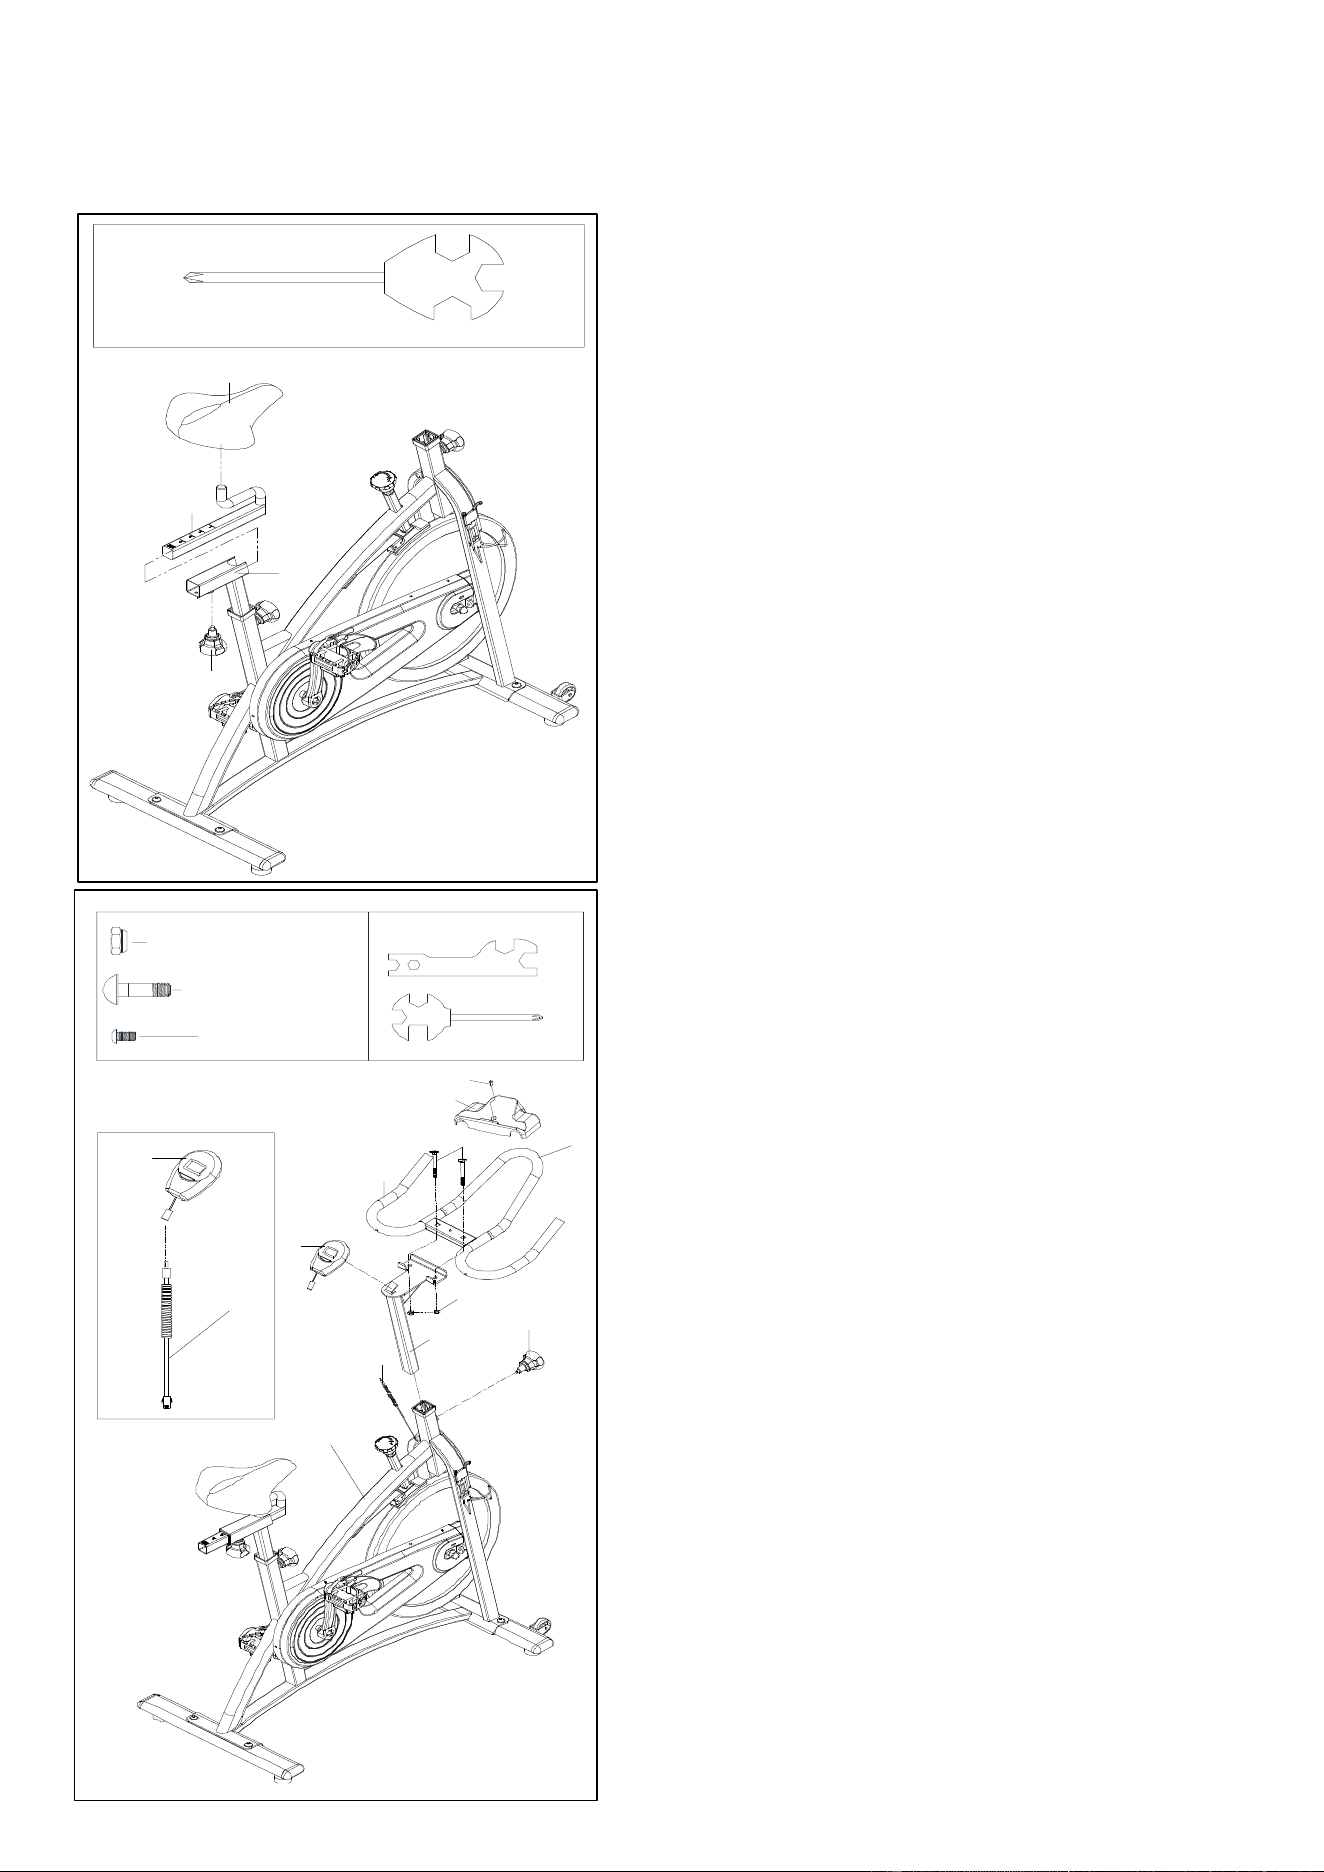
ASSEMBLY INSTRUCTIONS
We value your experience using Sunny Health and Fitness products. For assistance with parts or
(877-907-8669).
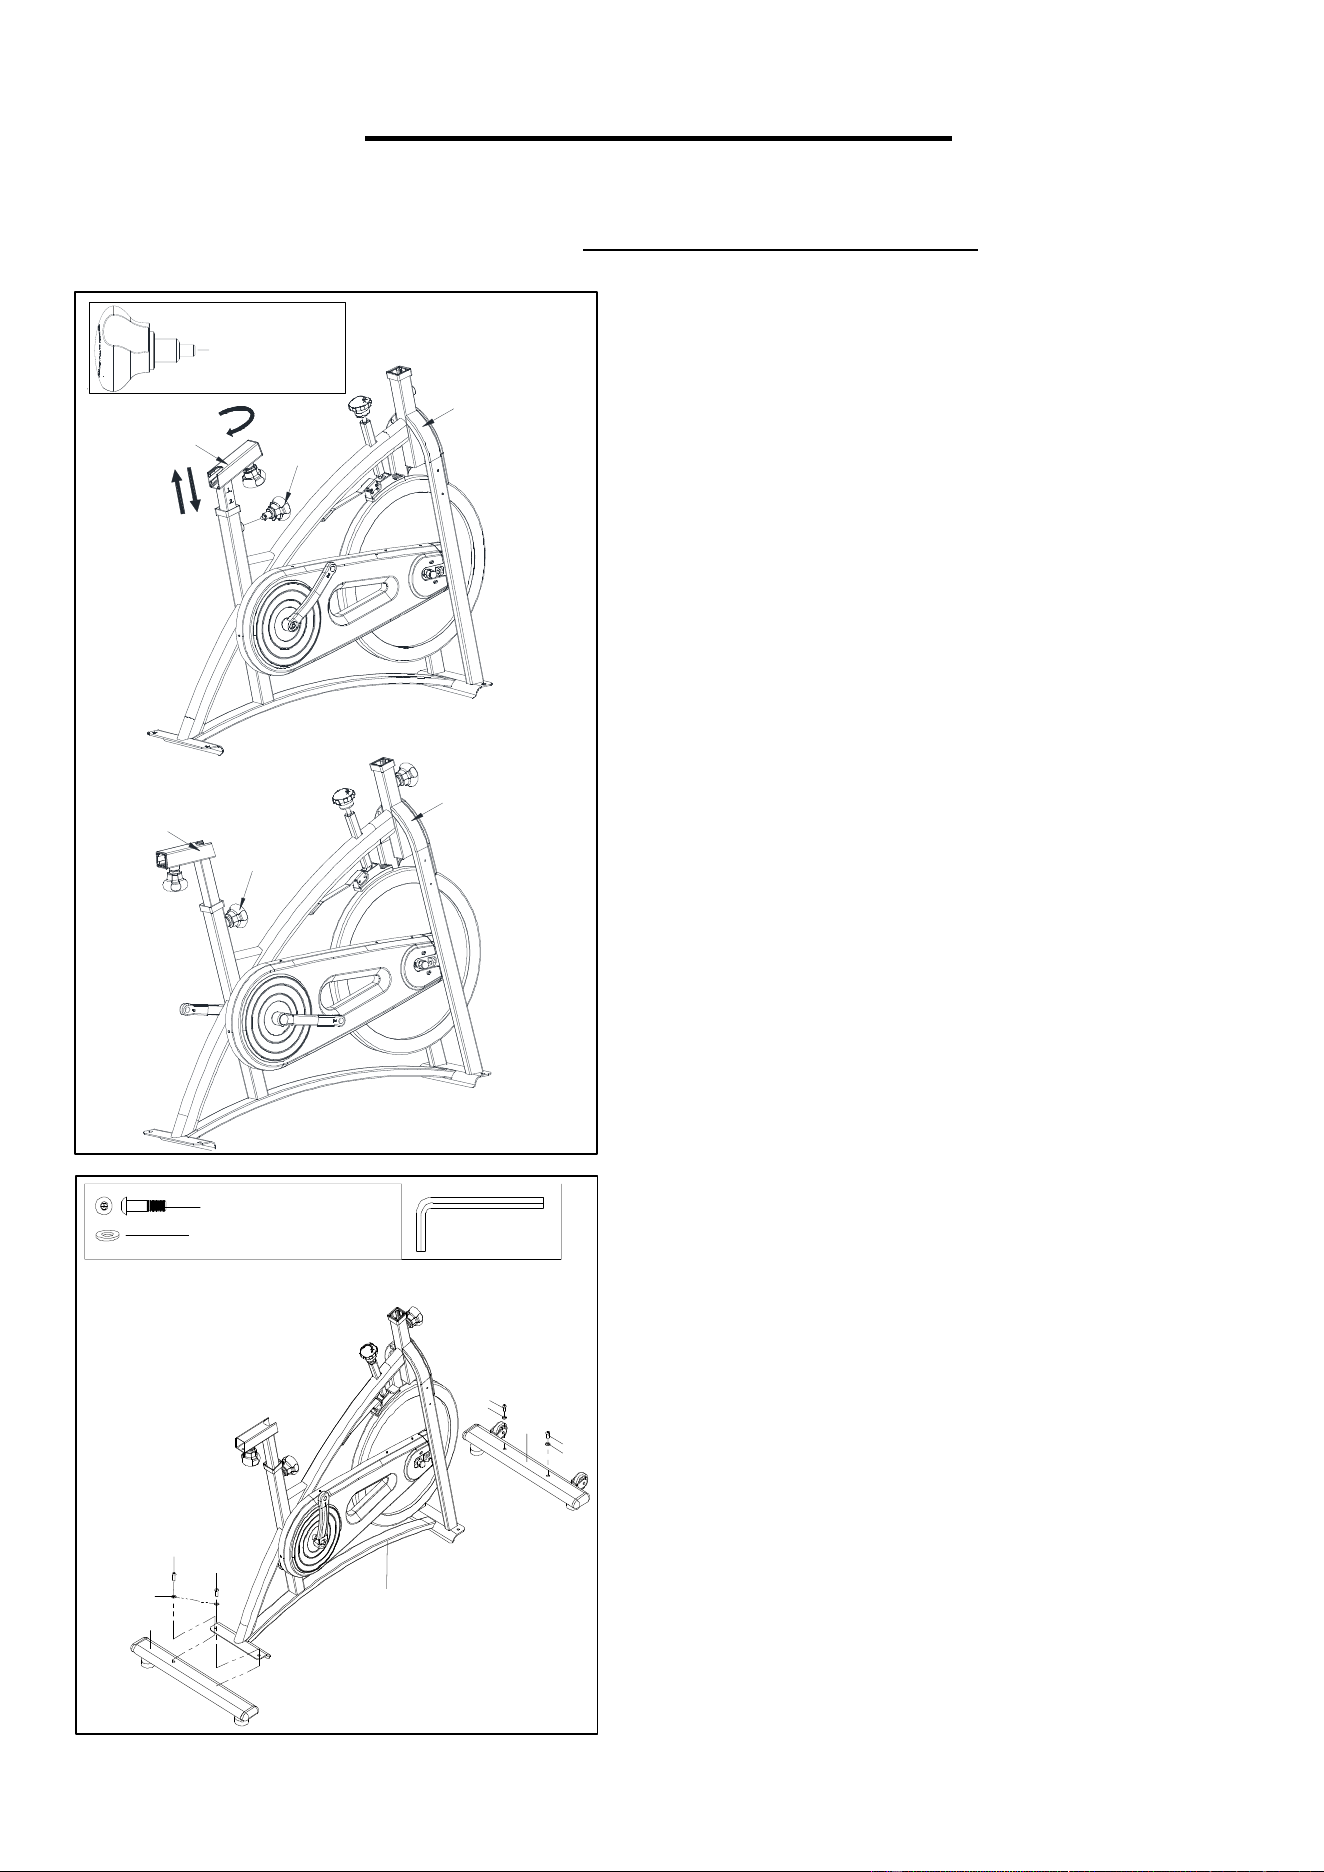
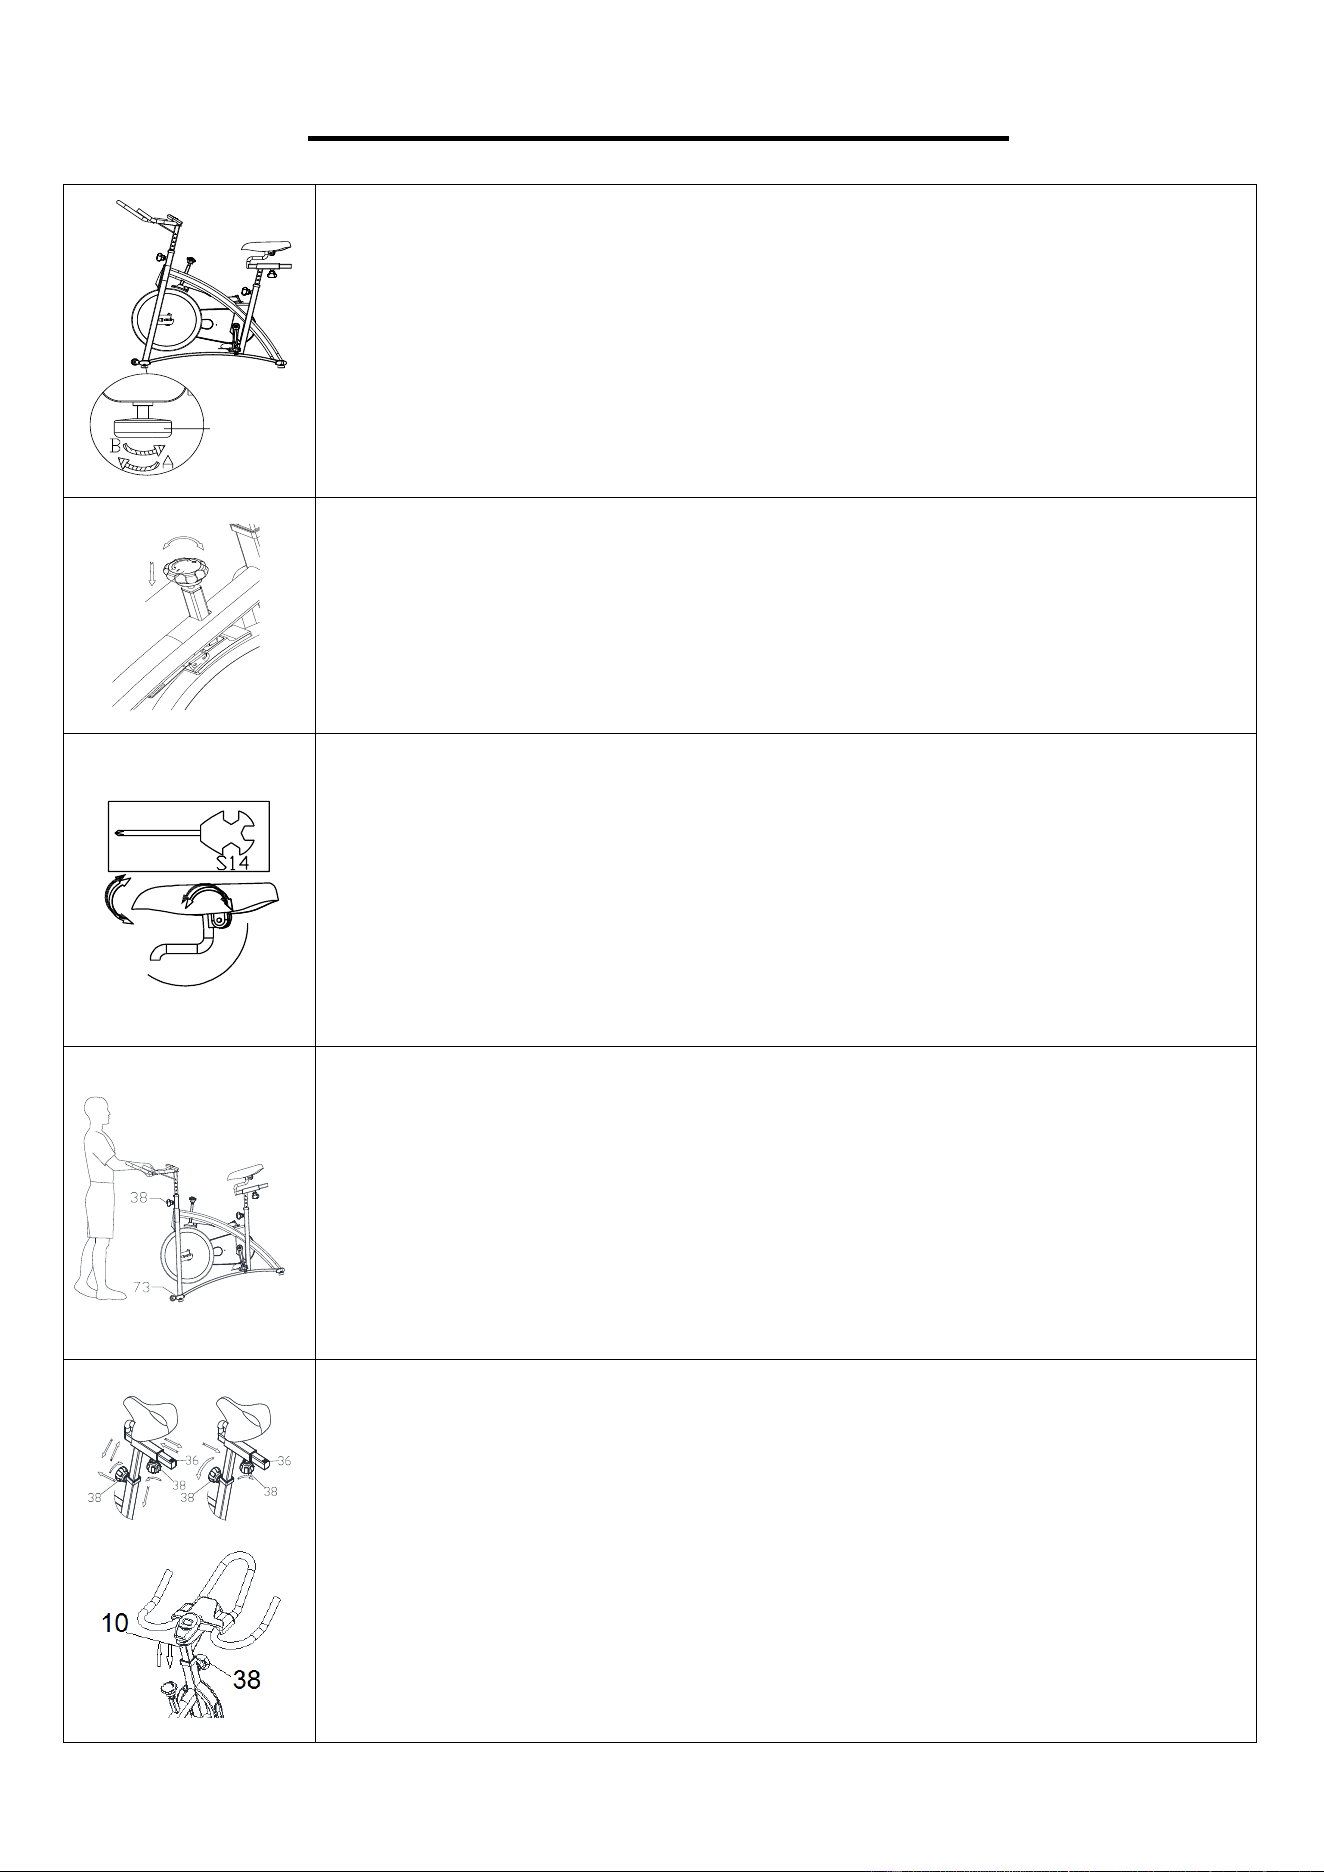
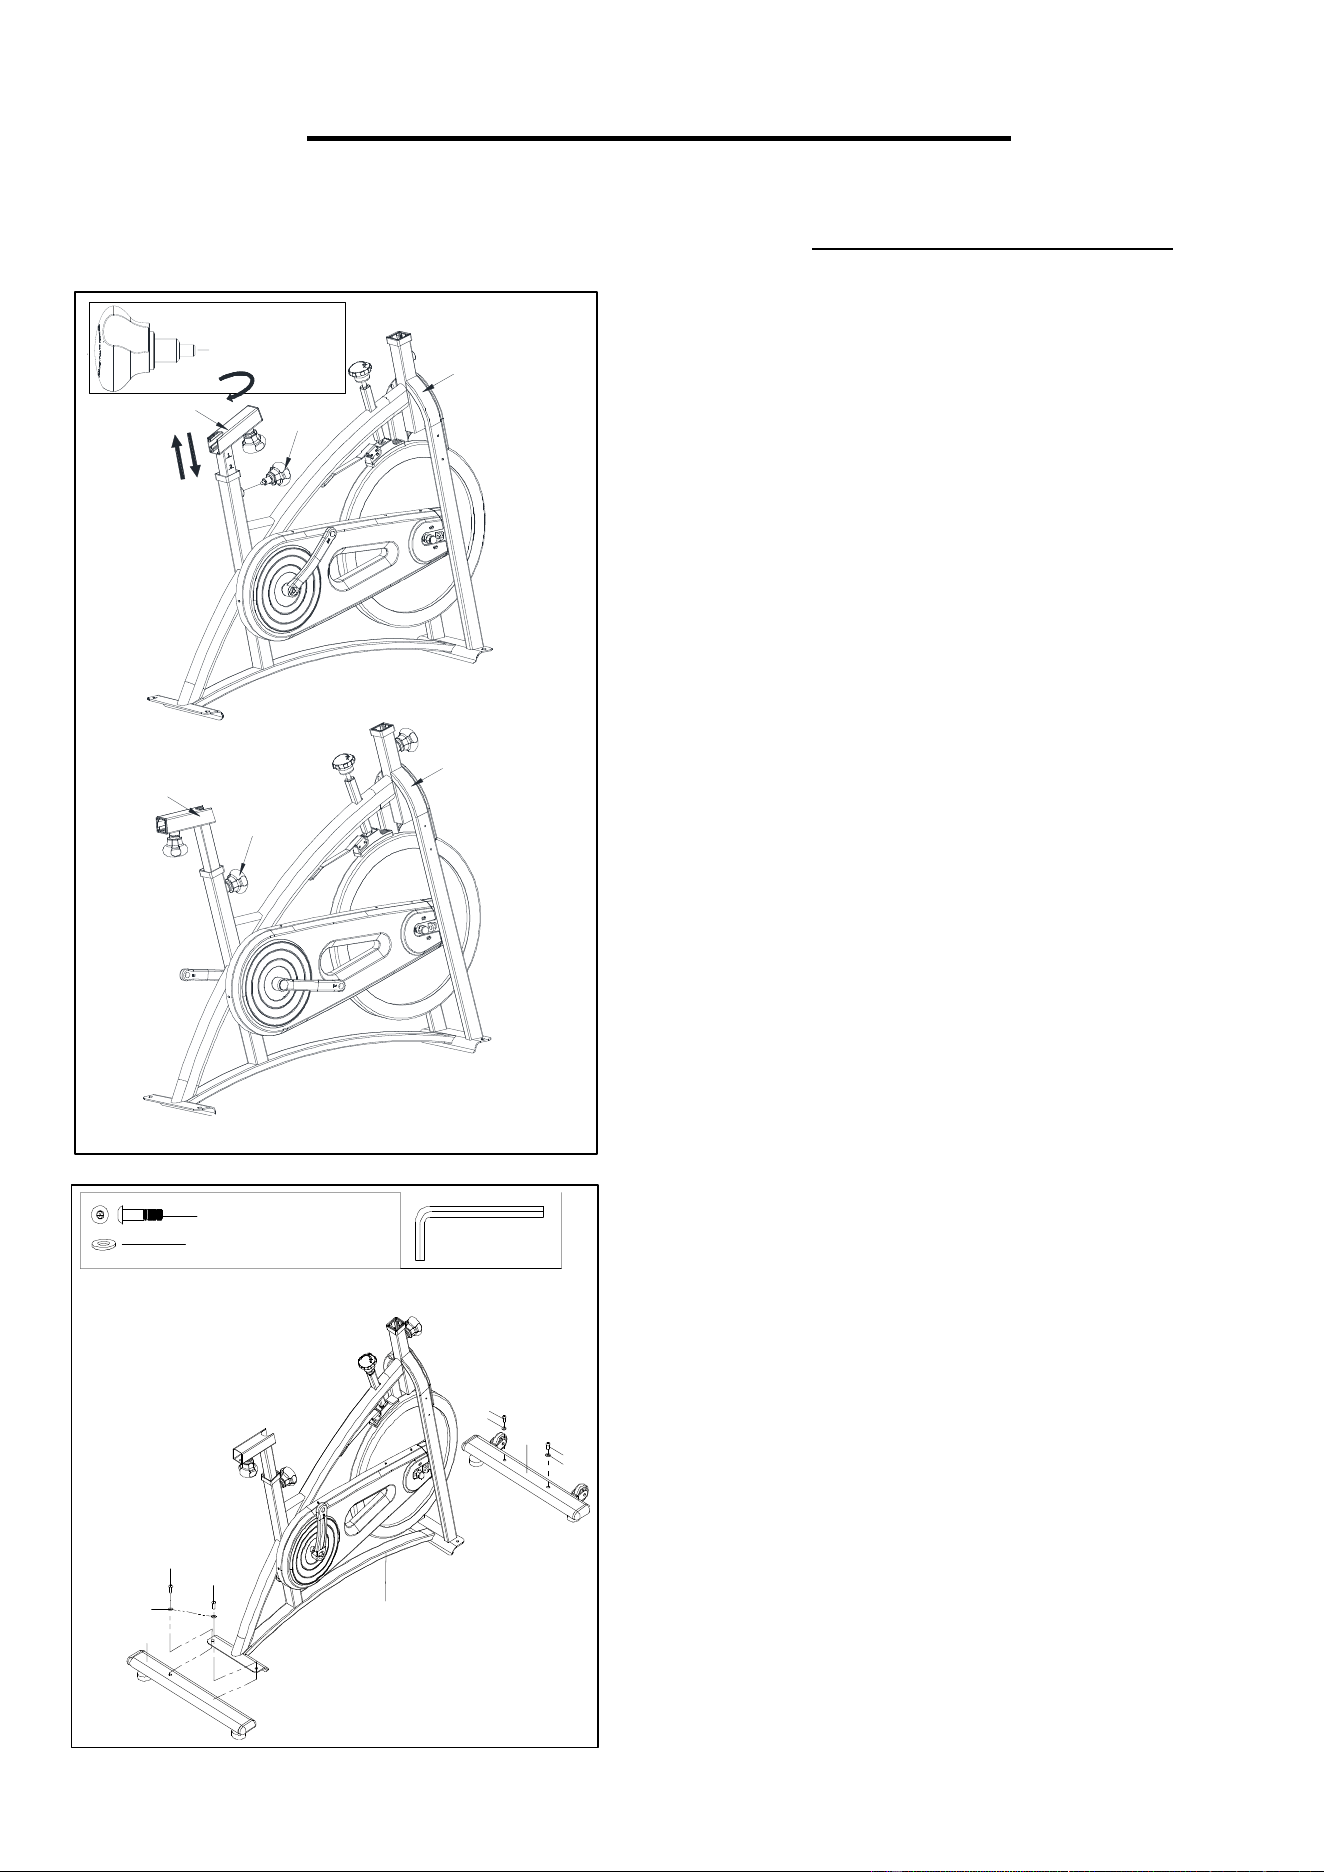
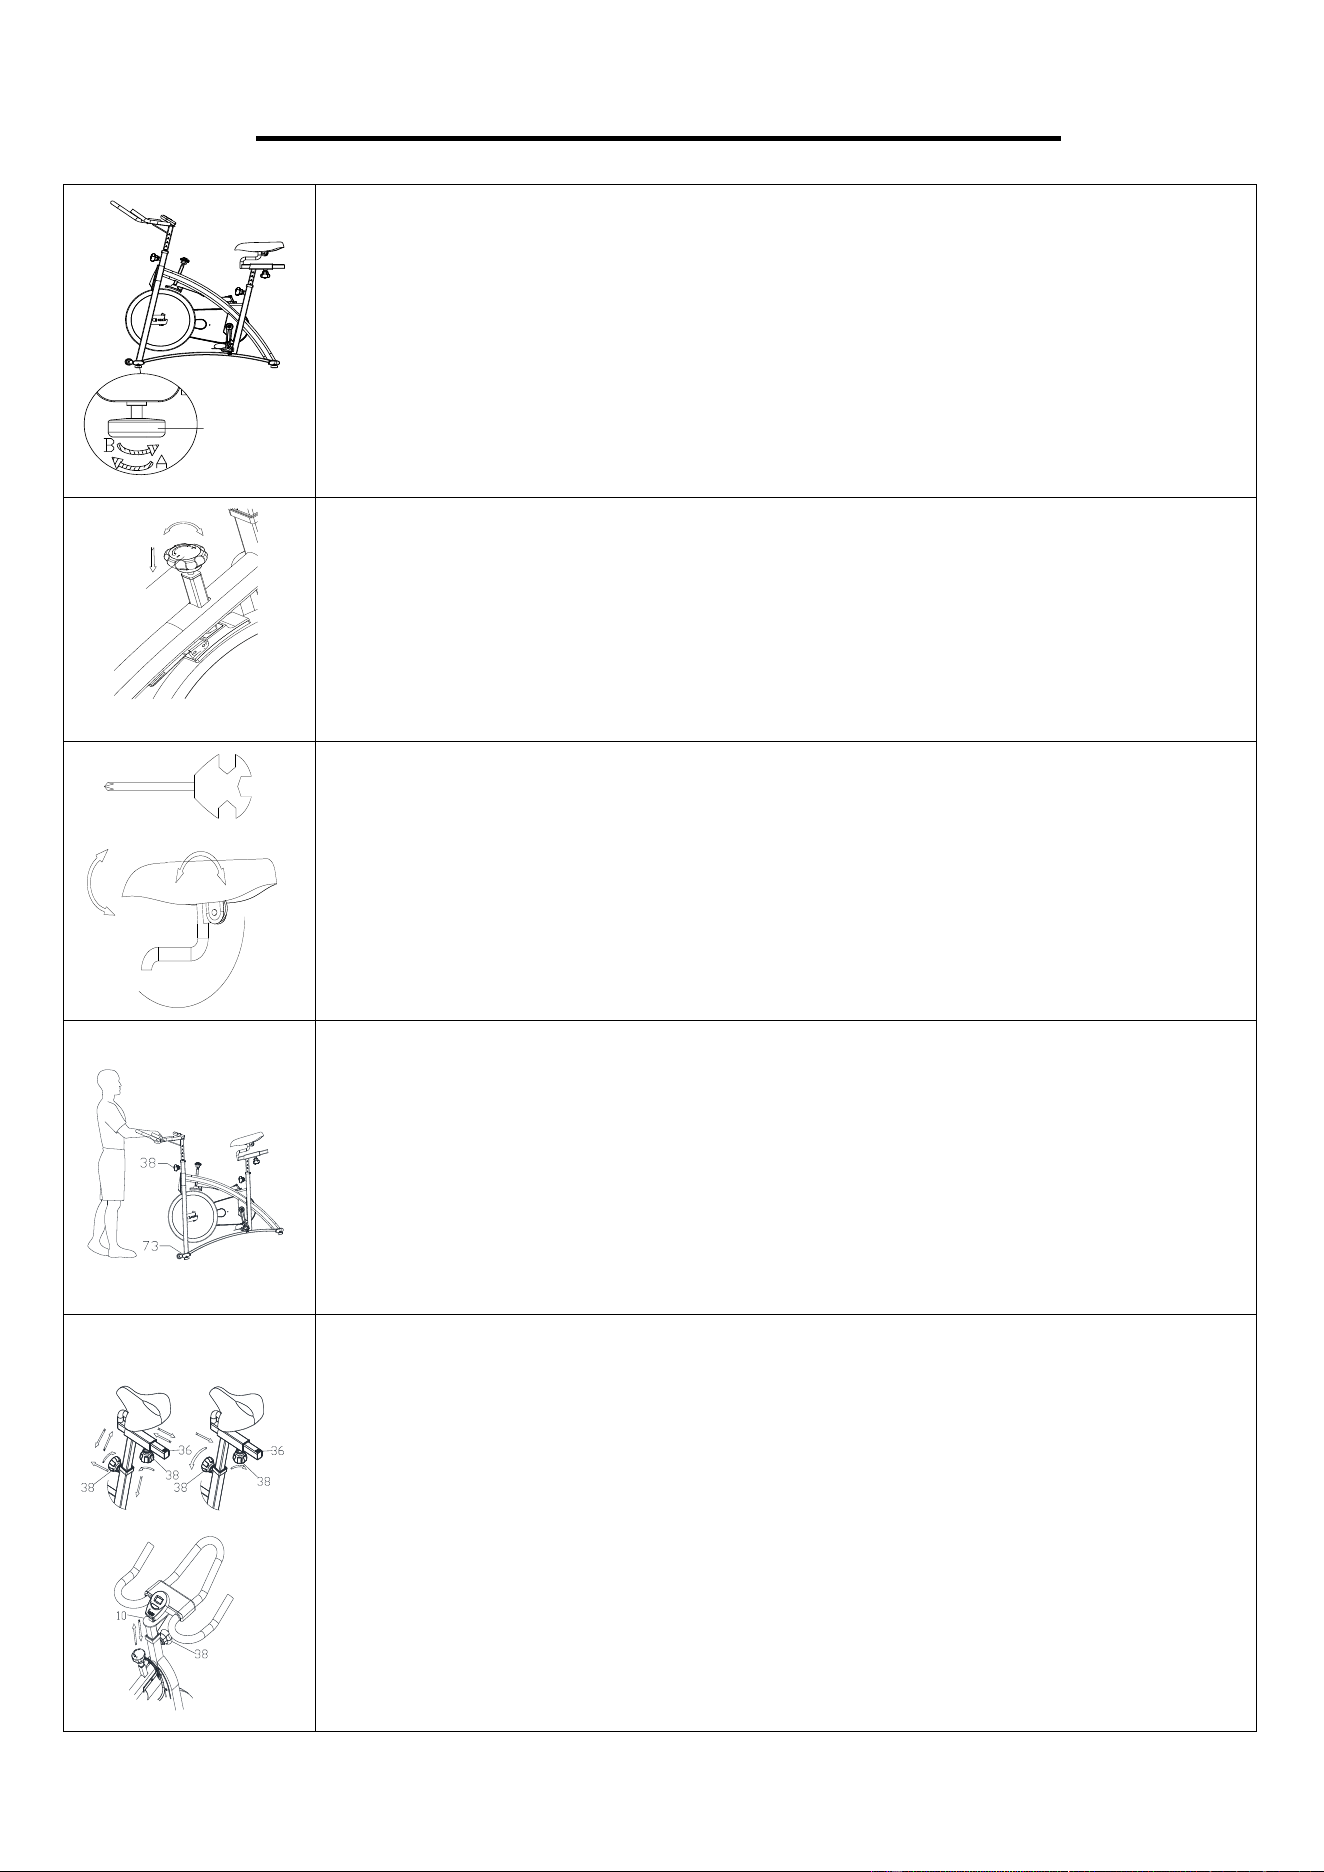
STEP 1:
Pull out the Seat Post (No. 37) from Main Frame
(No. 85). Turn the Seat Post (No. 37) at 180° as left
picture showed. Then re-insert Seat Post (No. 37)
into the sleeve located on the Main Frame (No. 85).
Adjust the Seat Post (No. 37) to the desired position
and tighten with the Adjustment Knob (No. 38).
STEP 2:
Attach the Front and Rear Stabilizers (No. 73 &
No. 84) to the Main Frame (No. 85) using 4 Bolts
(No. 76) and 4 Washers (No. 77). Tighten and
secure with Allen Wrench (No. 90).
#38 M16*1.5 1pc
85
38
37
37
38
85
#90
S6
#77 Φ16*Φ8*H1.5 4pcs
76
77
84
76
77
76
73
76
77
85
#76 M8*40*20*S6 4pcs
10
We value your experience using Sunny Health and Fitness products. For assistance with parts or
(877-907-8669).
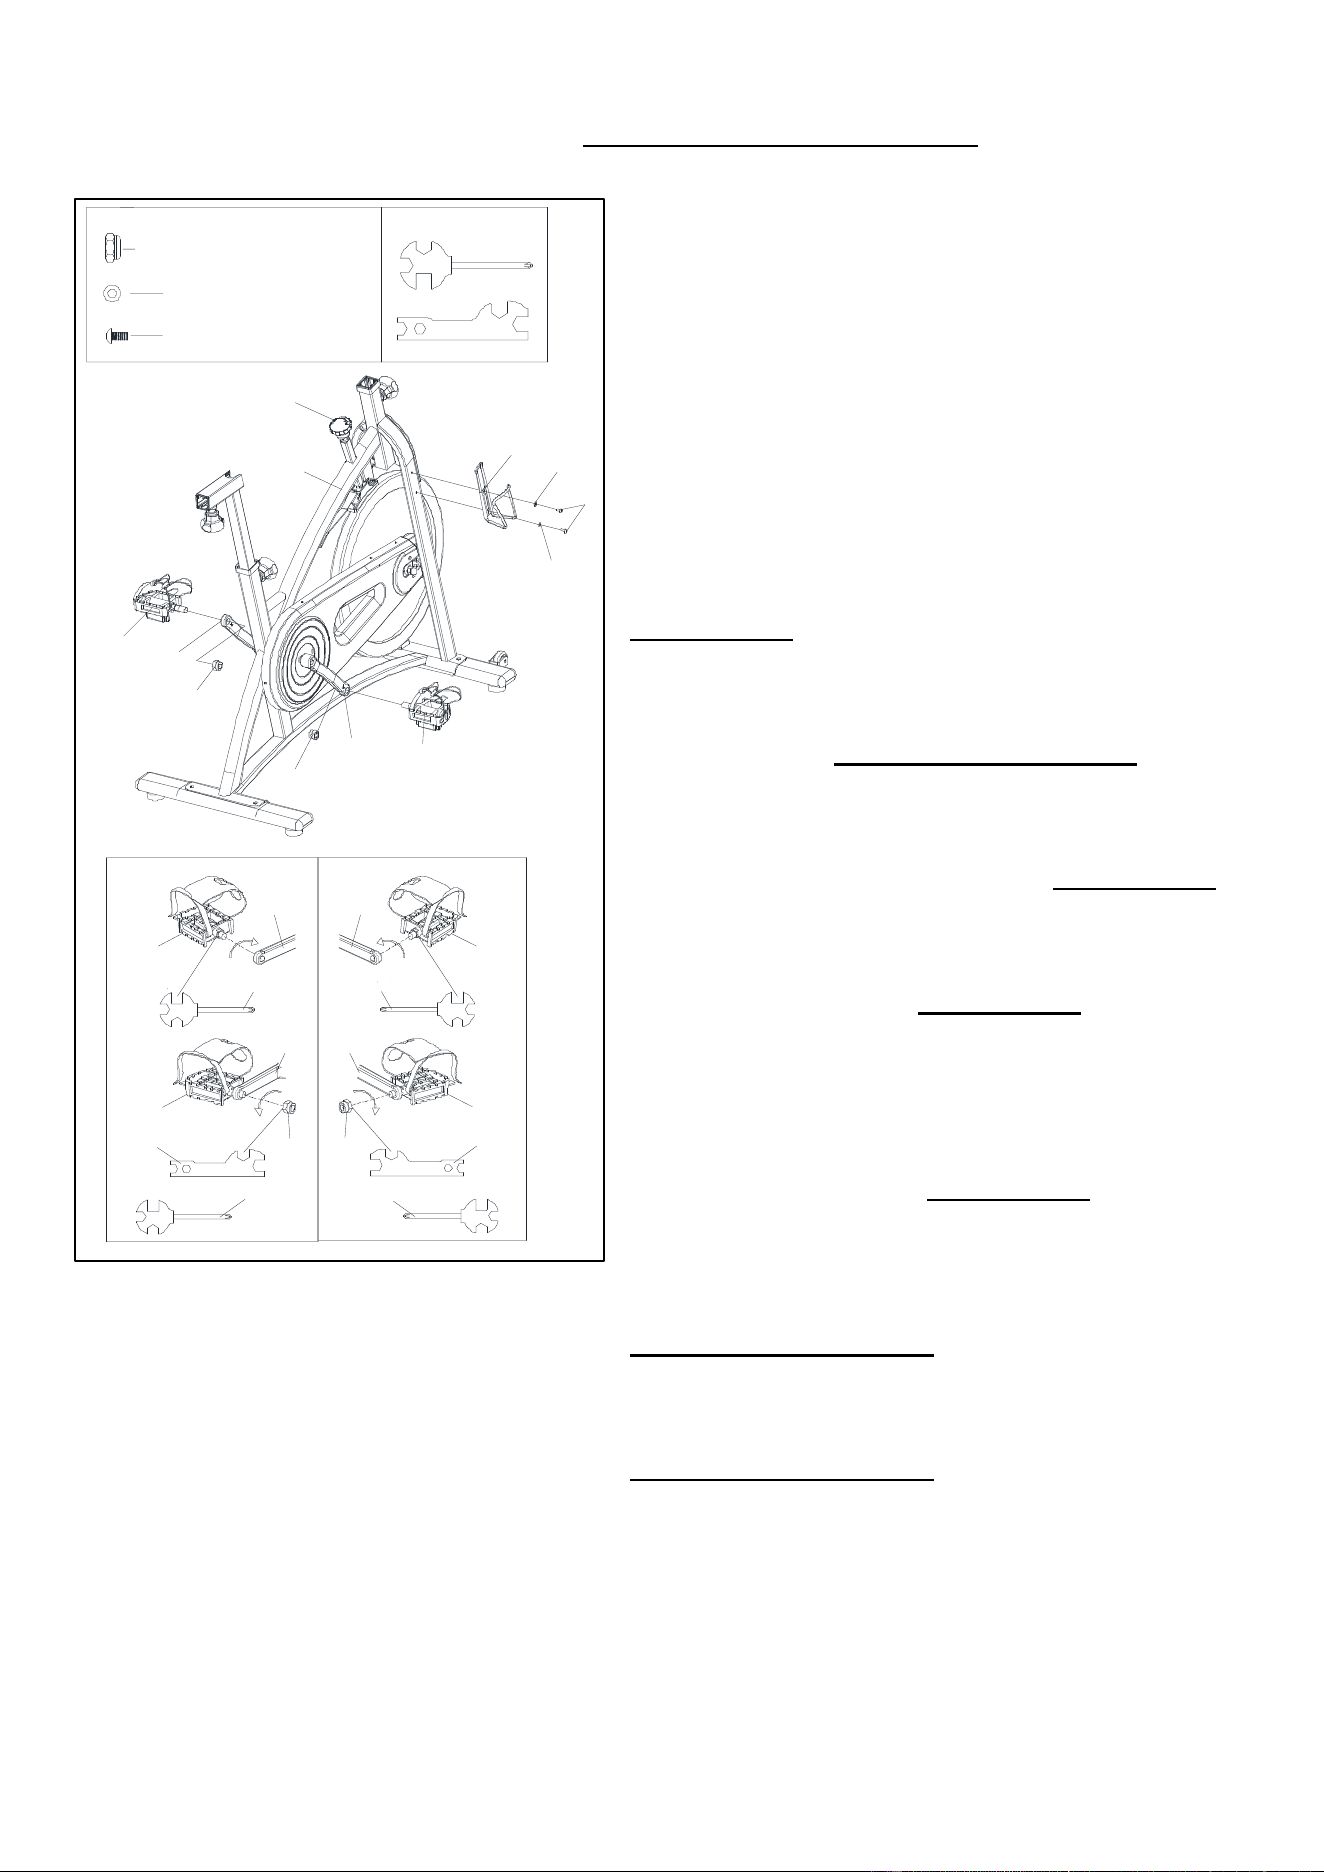
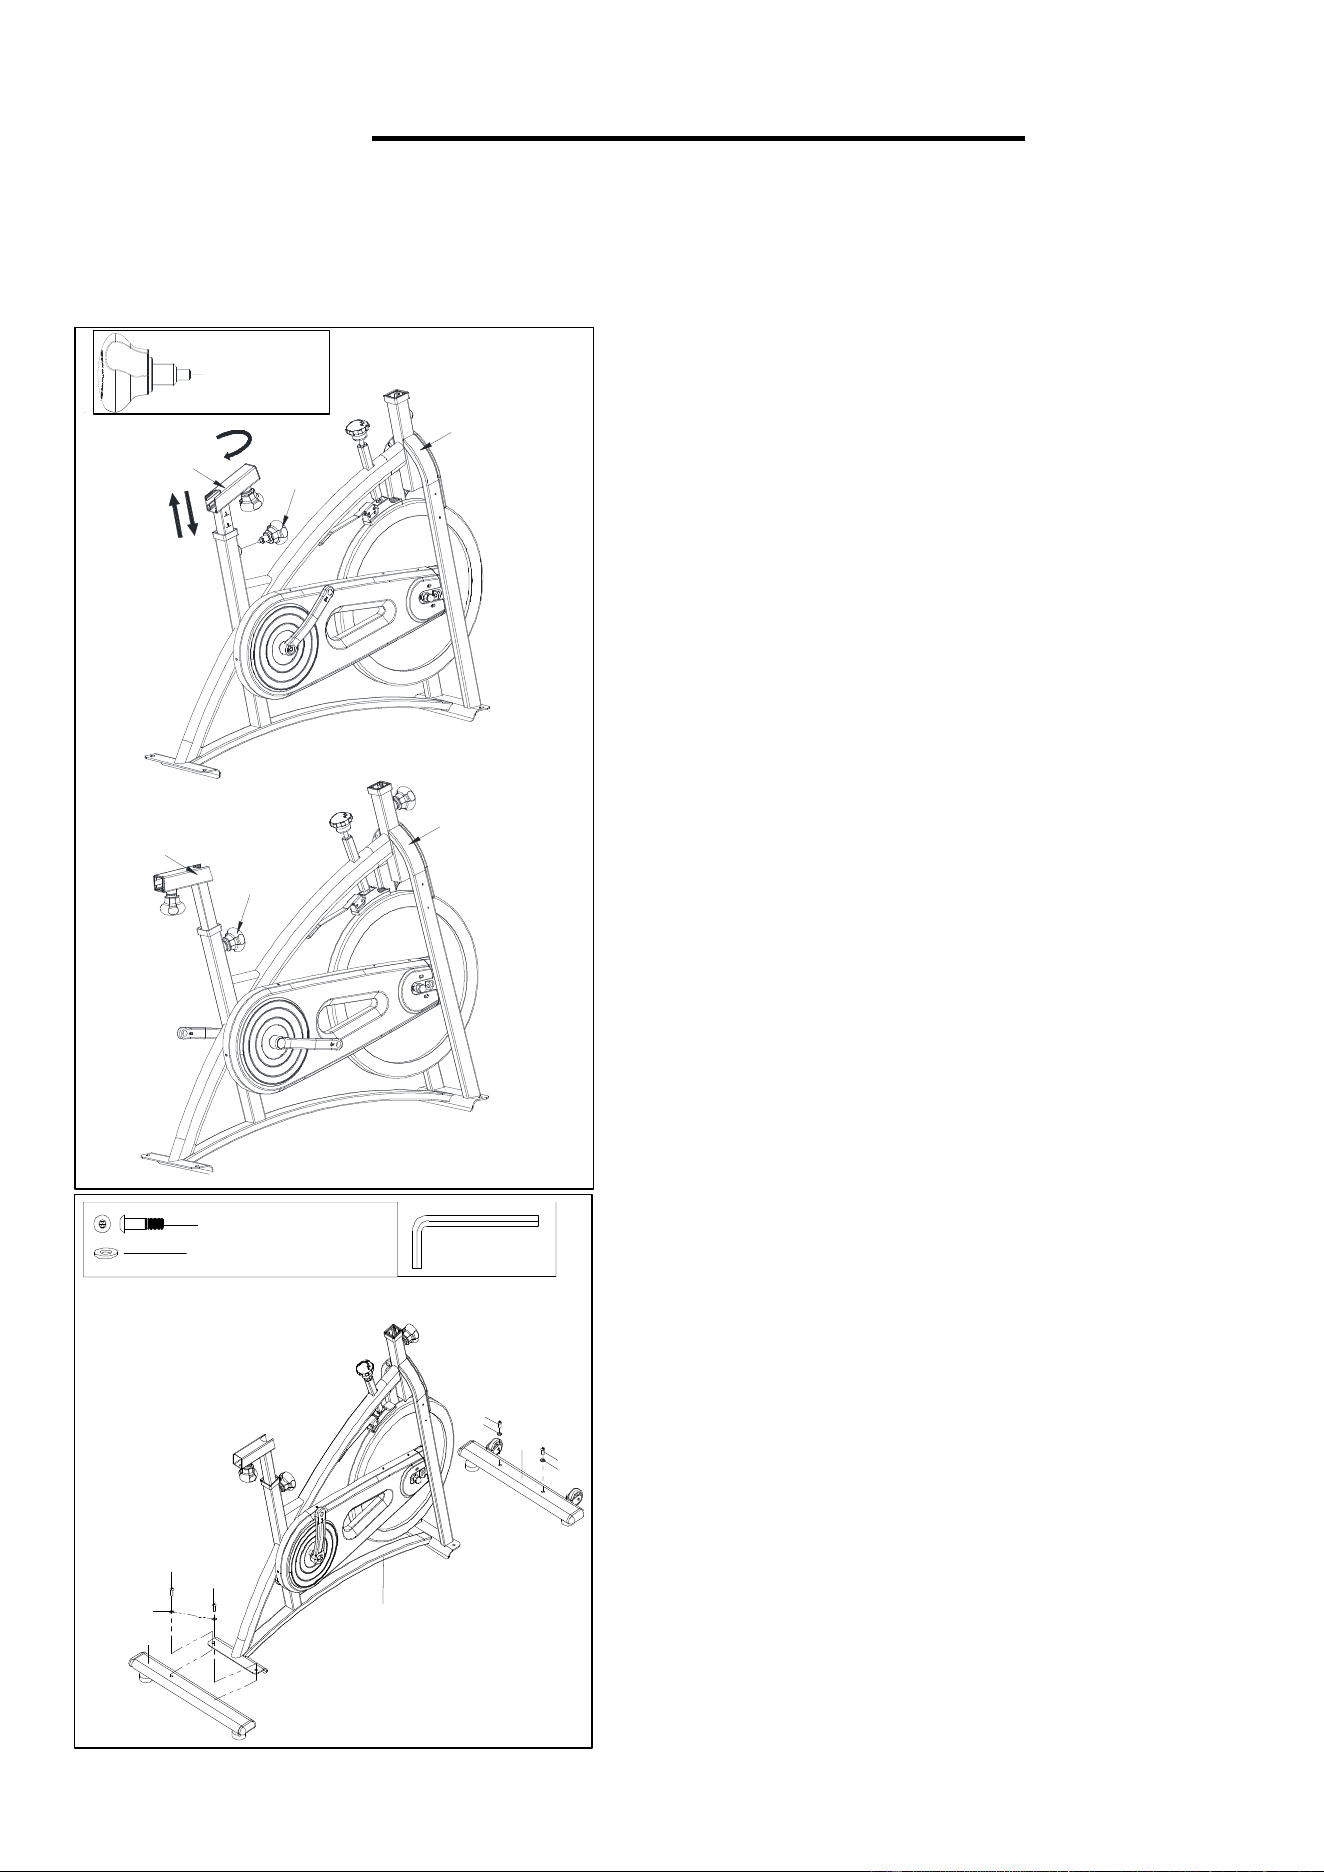
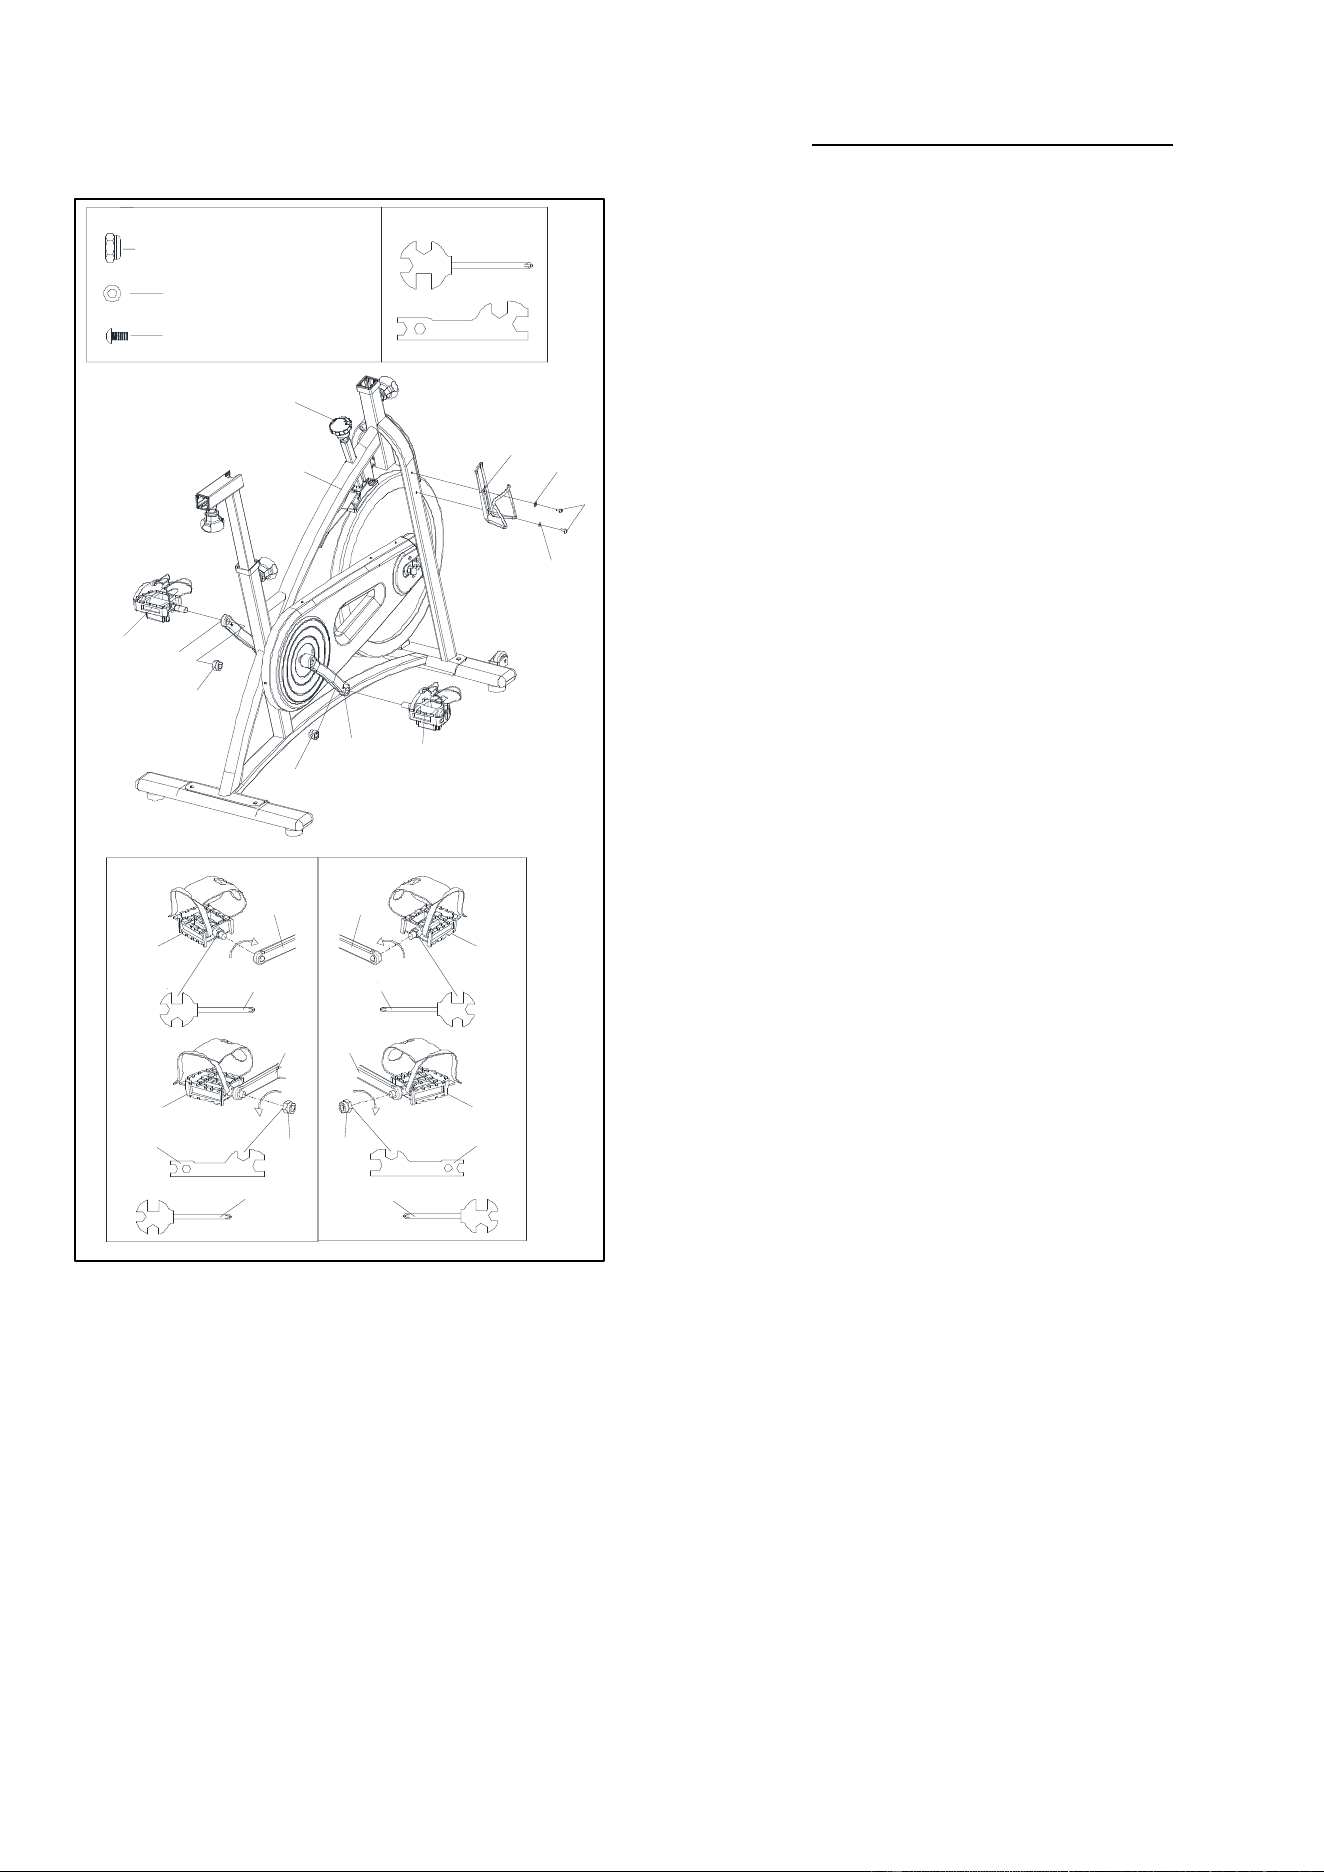
STEP 3:
WARNING! Read instructions carefully as improper
assembly may cause permanent damage to your
bike.
Note: The Pedals (No. 83L/R) are marked "L" and
"R" for Left and Right.
Remove the 2 Nylon Nuts (No. 82L/R) located on
the Pedals (No. 83L/R).
Turn the Tension Control Knob (No. 15)
CLOCKWISE as tightly as you can with your hand.
Align the Left Pedal (No. 83L) with the Left Crank
(No. 45L) at 90°. Turn the pedal bolt on the Left
Pedal (No. 83L) COUNTER-CLOCKWISE as tightly
as you can with your hand. Then, use Spanner (No.
88) to tighten and secure.
Turn the Left Nylon Nut (No. 82L) CLOCKWISE as
tightly as you can with your hand. Use Spanner (No.
88) to hold the pedal bolt on the Left Pedal (No.
83L) and use Spanner (No. 68) to turn the Left
Nylon Nut (No. 82L) CLOCKWISE at the same
time, until it is tightened on to the Left Crank (No.
45L).
Align the Right Pedal (No. 83R) with the Right
Crank (No. 45R) at 90°. Turn the pedal bolt on the
Right Pedal (No. 83R) CLOCKWISE as tightly as
you can with your hand. Then, use Spanner (No. 88)
to tighten and secure.
Turn the Right Nylon Nut (No. 82R)
COUNTER-CLOCKWISE as tightly as you can with
your hand. Use Spanner (No. 88) to hold the pedal
bolt on the Right Pedal (No. 83R) and use Spanner
(No. 68) to turn the Right Nylon Nut (No. 82R)
COUNTER-CLOCKWISE at the same time, until it is
tightened on to the Right Crank (No. 45R).
Remove 2 Screws (No. 72) and 2 Washers (No. 71)
from the Main Frame (No. 85) using Spanner (No.
88). Attach the Water Bottle Holder (No. 70) to the
Main Frame (No. 85) using the 2 Screws (No. 72)
and 2 Washers (No. 71) that were removed. Tighten
and secure with Spanner (No. 88).
S15
S19
#68 1pc
#88 1pc
#82L/R 9/16*20*H8*S19 2pcs
#71 D5*Φ13*1 2pcs
#72 M5*16*Φ10 2pcs
15
85
70
71
72
71
83R
45R
82R
82L
45L
83L
45L
83L
45R
83R
45R
83R
82R
45L
83L
82L
S158888S15
6868
S19
S19
8888
S15 S15
11
We value your experience using Sunny Health and Fitness products. For assistance with parts or
(877-907-8669).
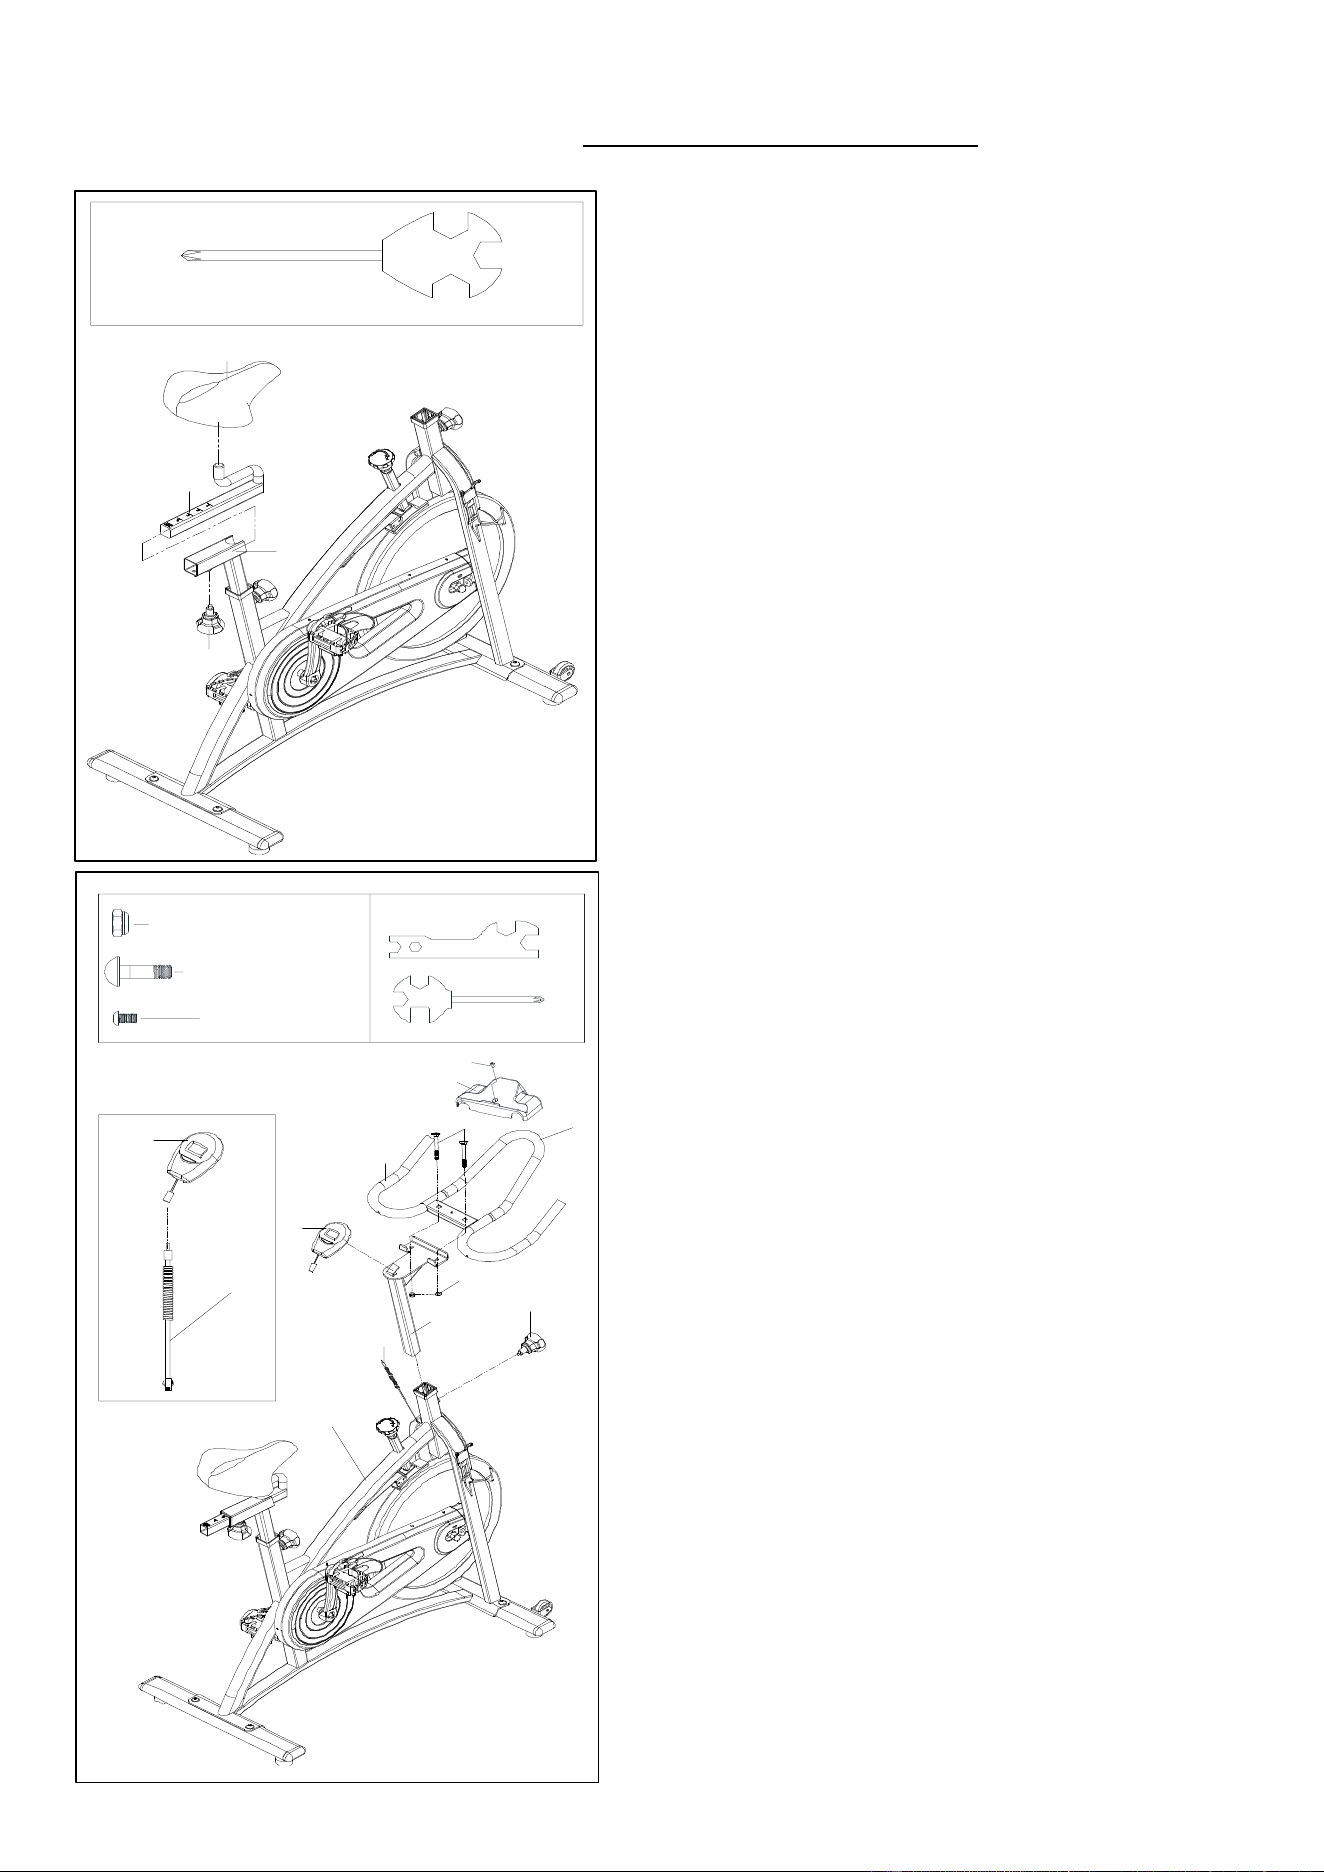
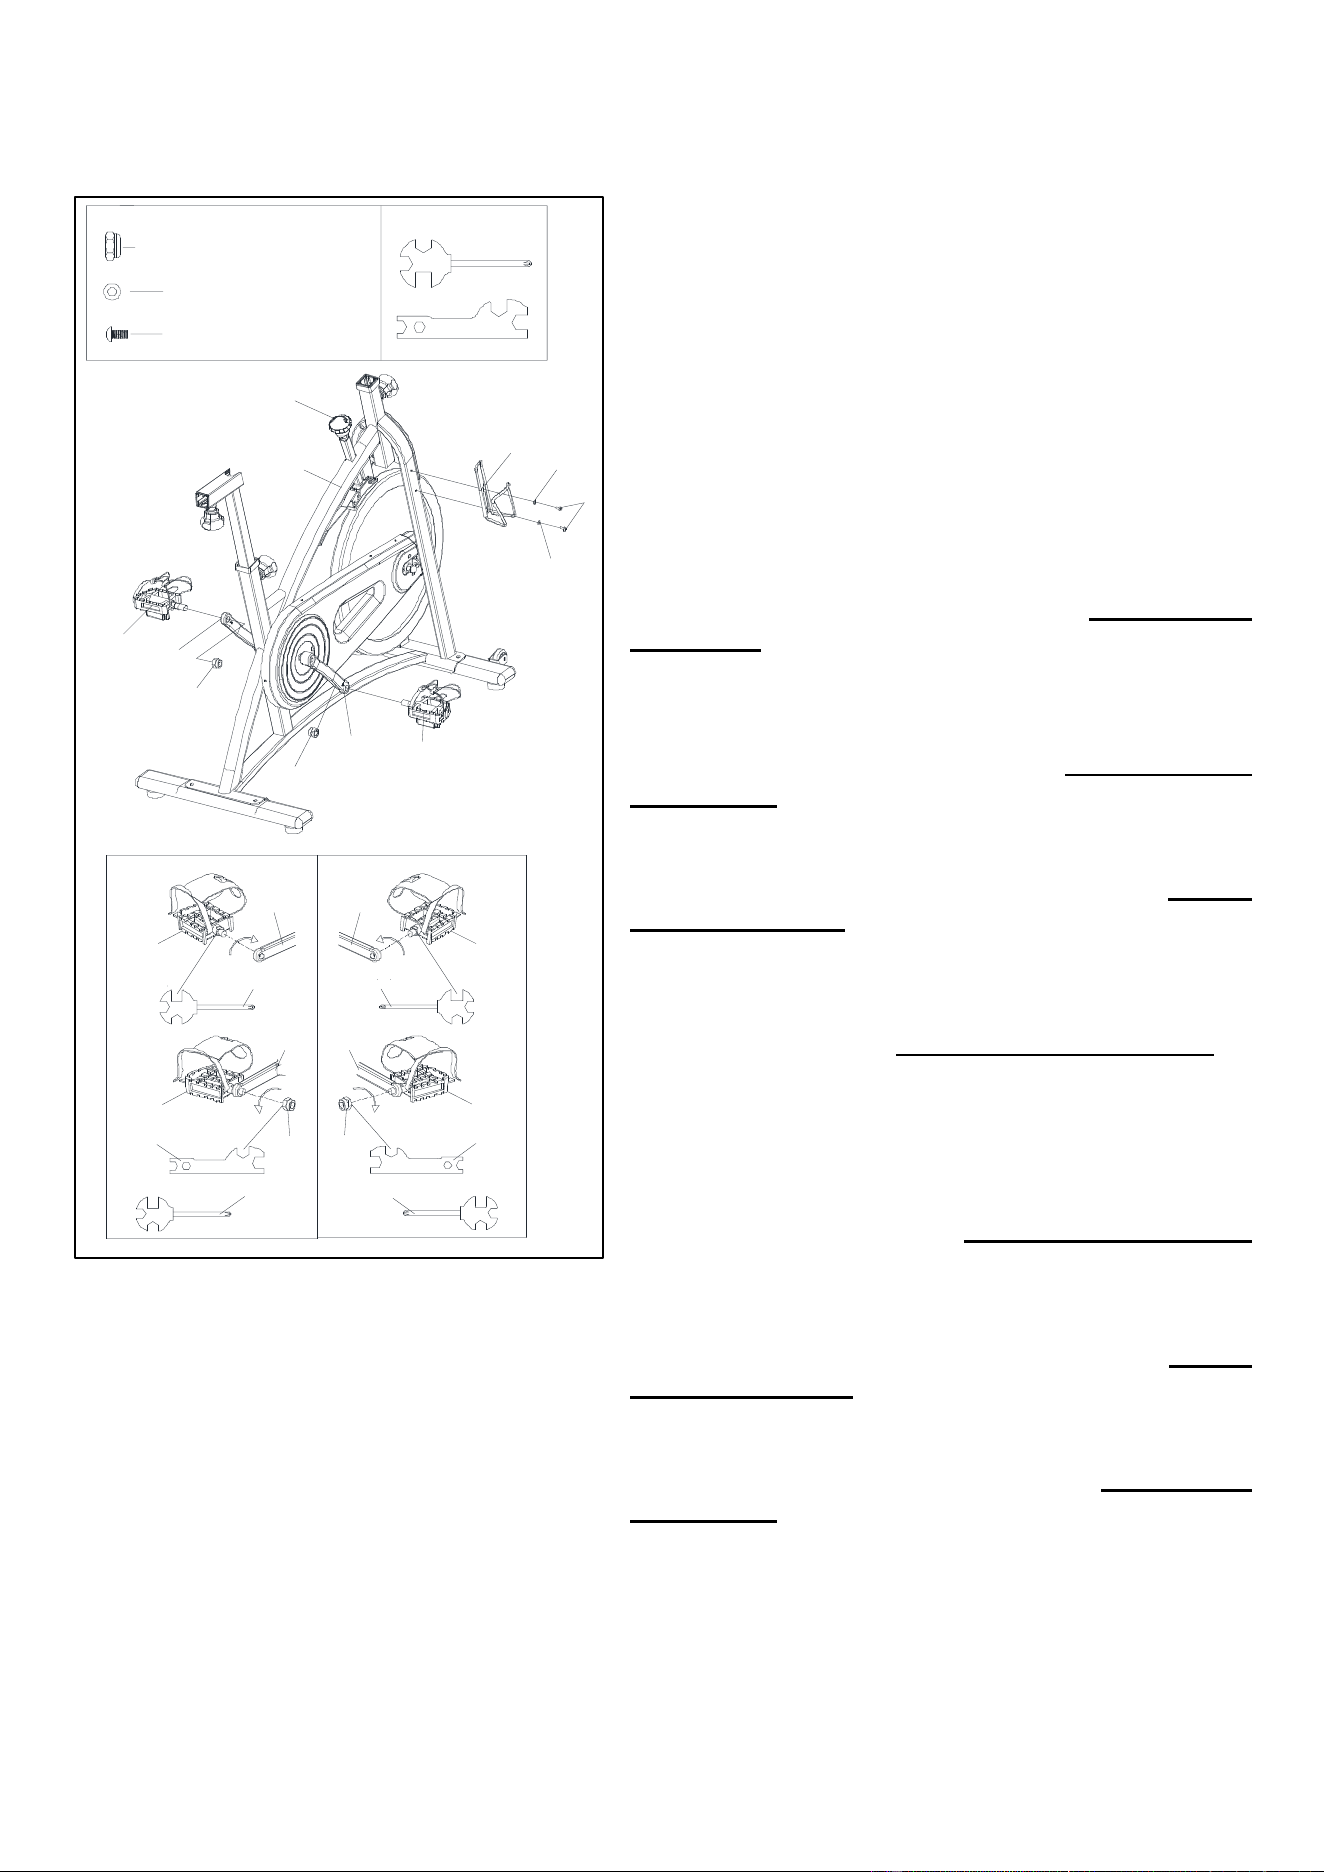
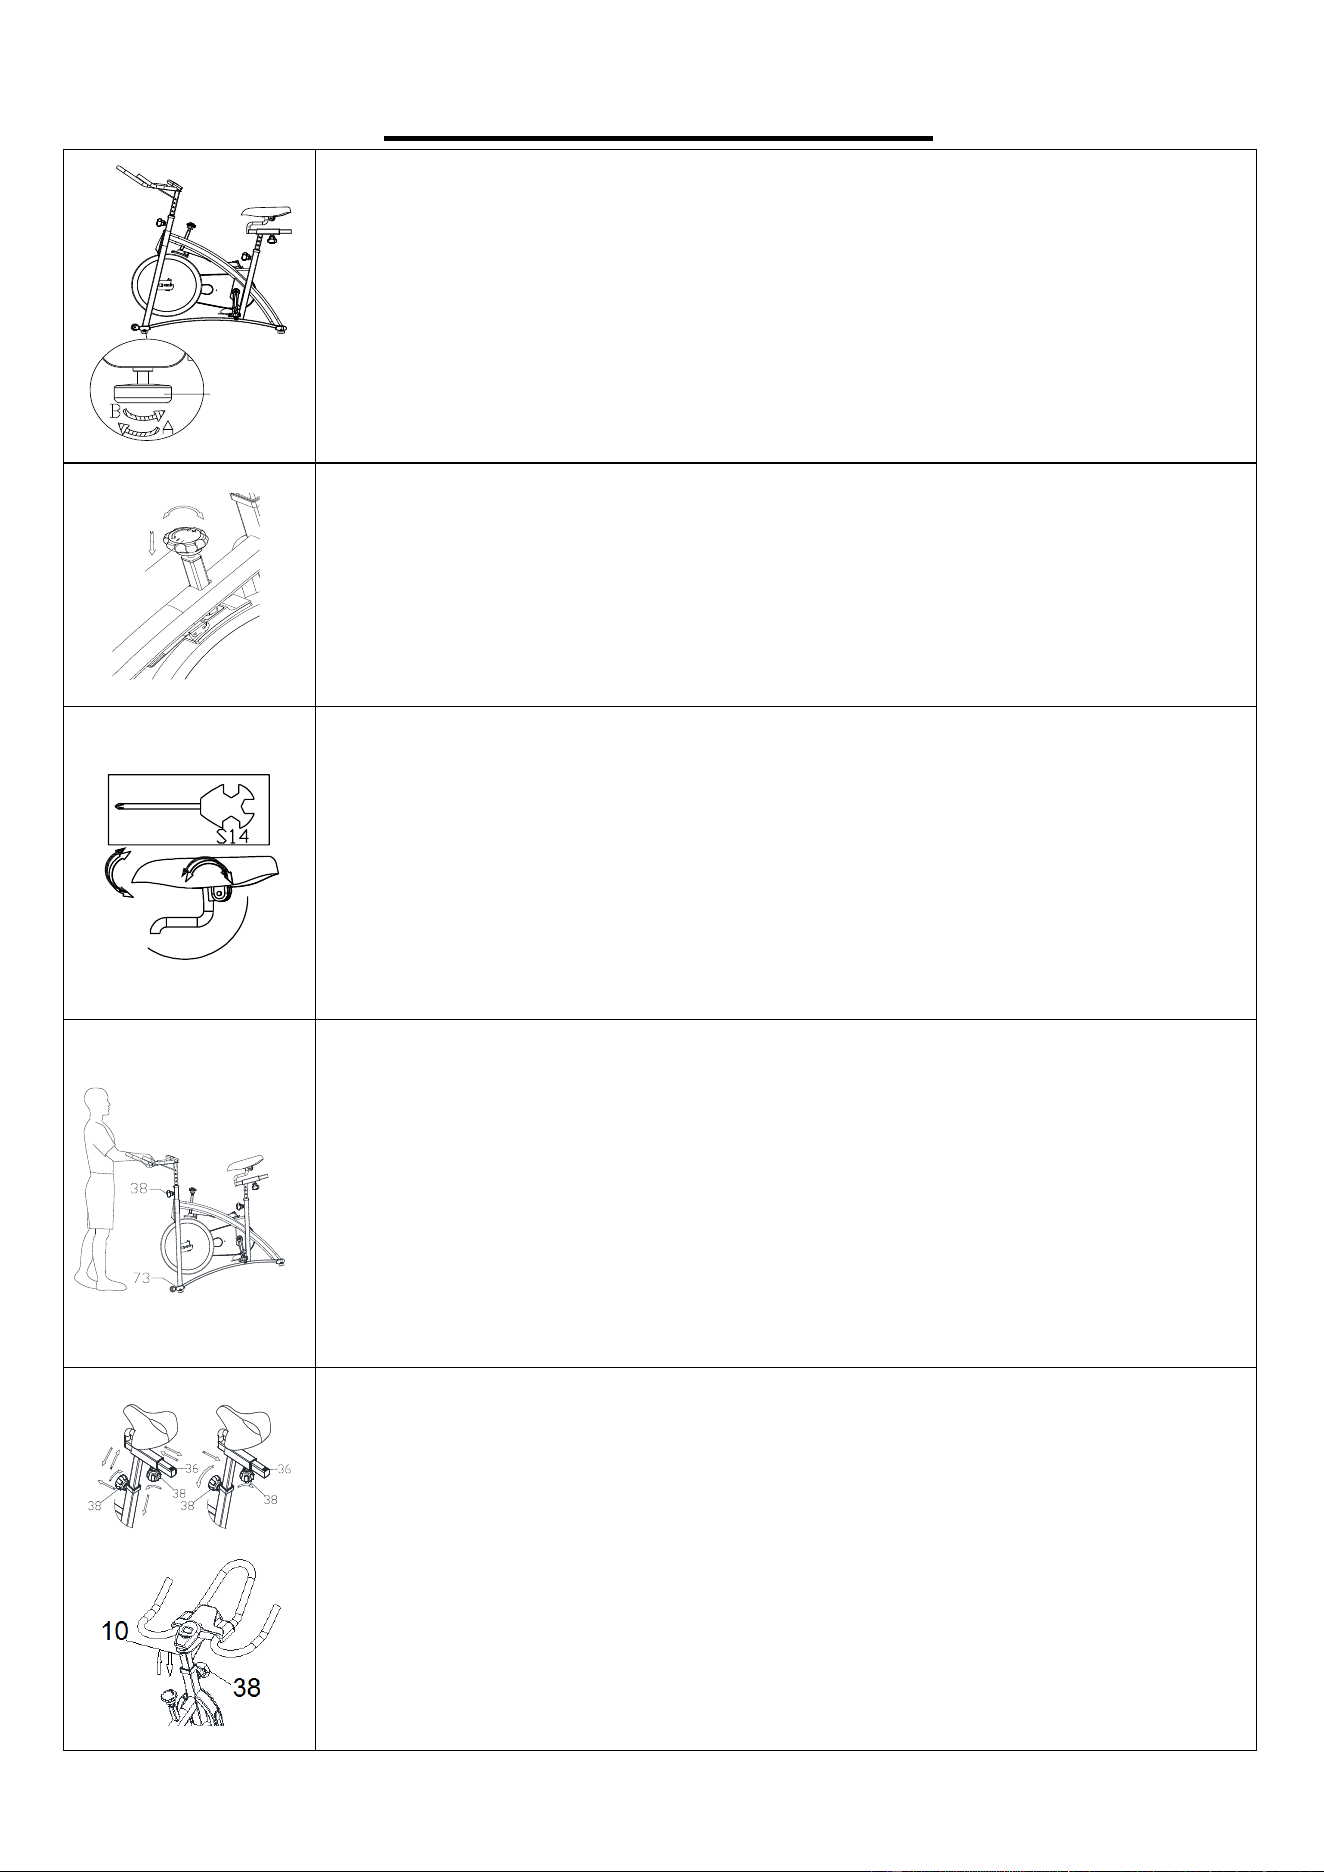
STEP 4:
Loosen and remove the [seat slider] Adjustment
Knob (No. 38). Insert Seat Slider (No. 36) into the
Seat Post (No. 37). Adjust the Seat Slider (No. 36)
to the desired position, re-insert and tighten
Adjustment Knob (No. 38) to secure the post in
place.
Secure Seat (No. 35) to the Seat Slider (No. 36)
with Spanner (No. 88).
NOTE: Before you fully tighten the seat, you can
adjust the front of the seat higher or lower to meet
your needs.
STEP 5:
Loosen and remove the [handlebar] Adjustment
Knob (No. 38). Insert Handlebar Post (No. 10) into
the sleeve located on the front of the Main Frame
(No. 85). Adjust the Handlebar Post (No. 10) to the
desired position and reinsert and tighten the
Adjustment Knob (No. 38) to secure the post in
place.
Secure Handlebar (B) (No. 8) to Handlebar Post
(No. 10) using 2 Bolts (No. 6) and 2 Nuts (No. 11).
Tighten and secure with Spanner (No. 68).
Remove Screw (No. 12) from Handlebar (B) (No. 8)
with Spanner (No. 88). Attach Tablet Bracket (No.
2) onto the Handlebar (B) (No. 8) with Screw (No.
12) that was removed. Tighten and secure with
Spanner (No. 88).
Attach the Computer (No. 9) to the bracket located
on the Handlebar Post (No. 10). Connect the link
wire of the Computer (No. 9) to the Trunk Wire (No.
87).
The assembly is complete!
9
11
6
2
85
38
3
8
10
9
#68
#88
S17
21
87
87
# 1 1 M 1 0 * H 9 . 5 * S 1 7 2 p c s
# 6 M10*35*15*H6 2pcs
# 1 2 M 5 * 1 2 1p c
38
36
35
#88
37
S 14
12
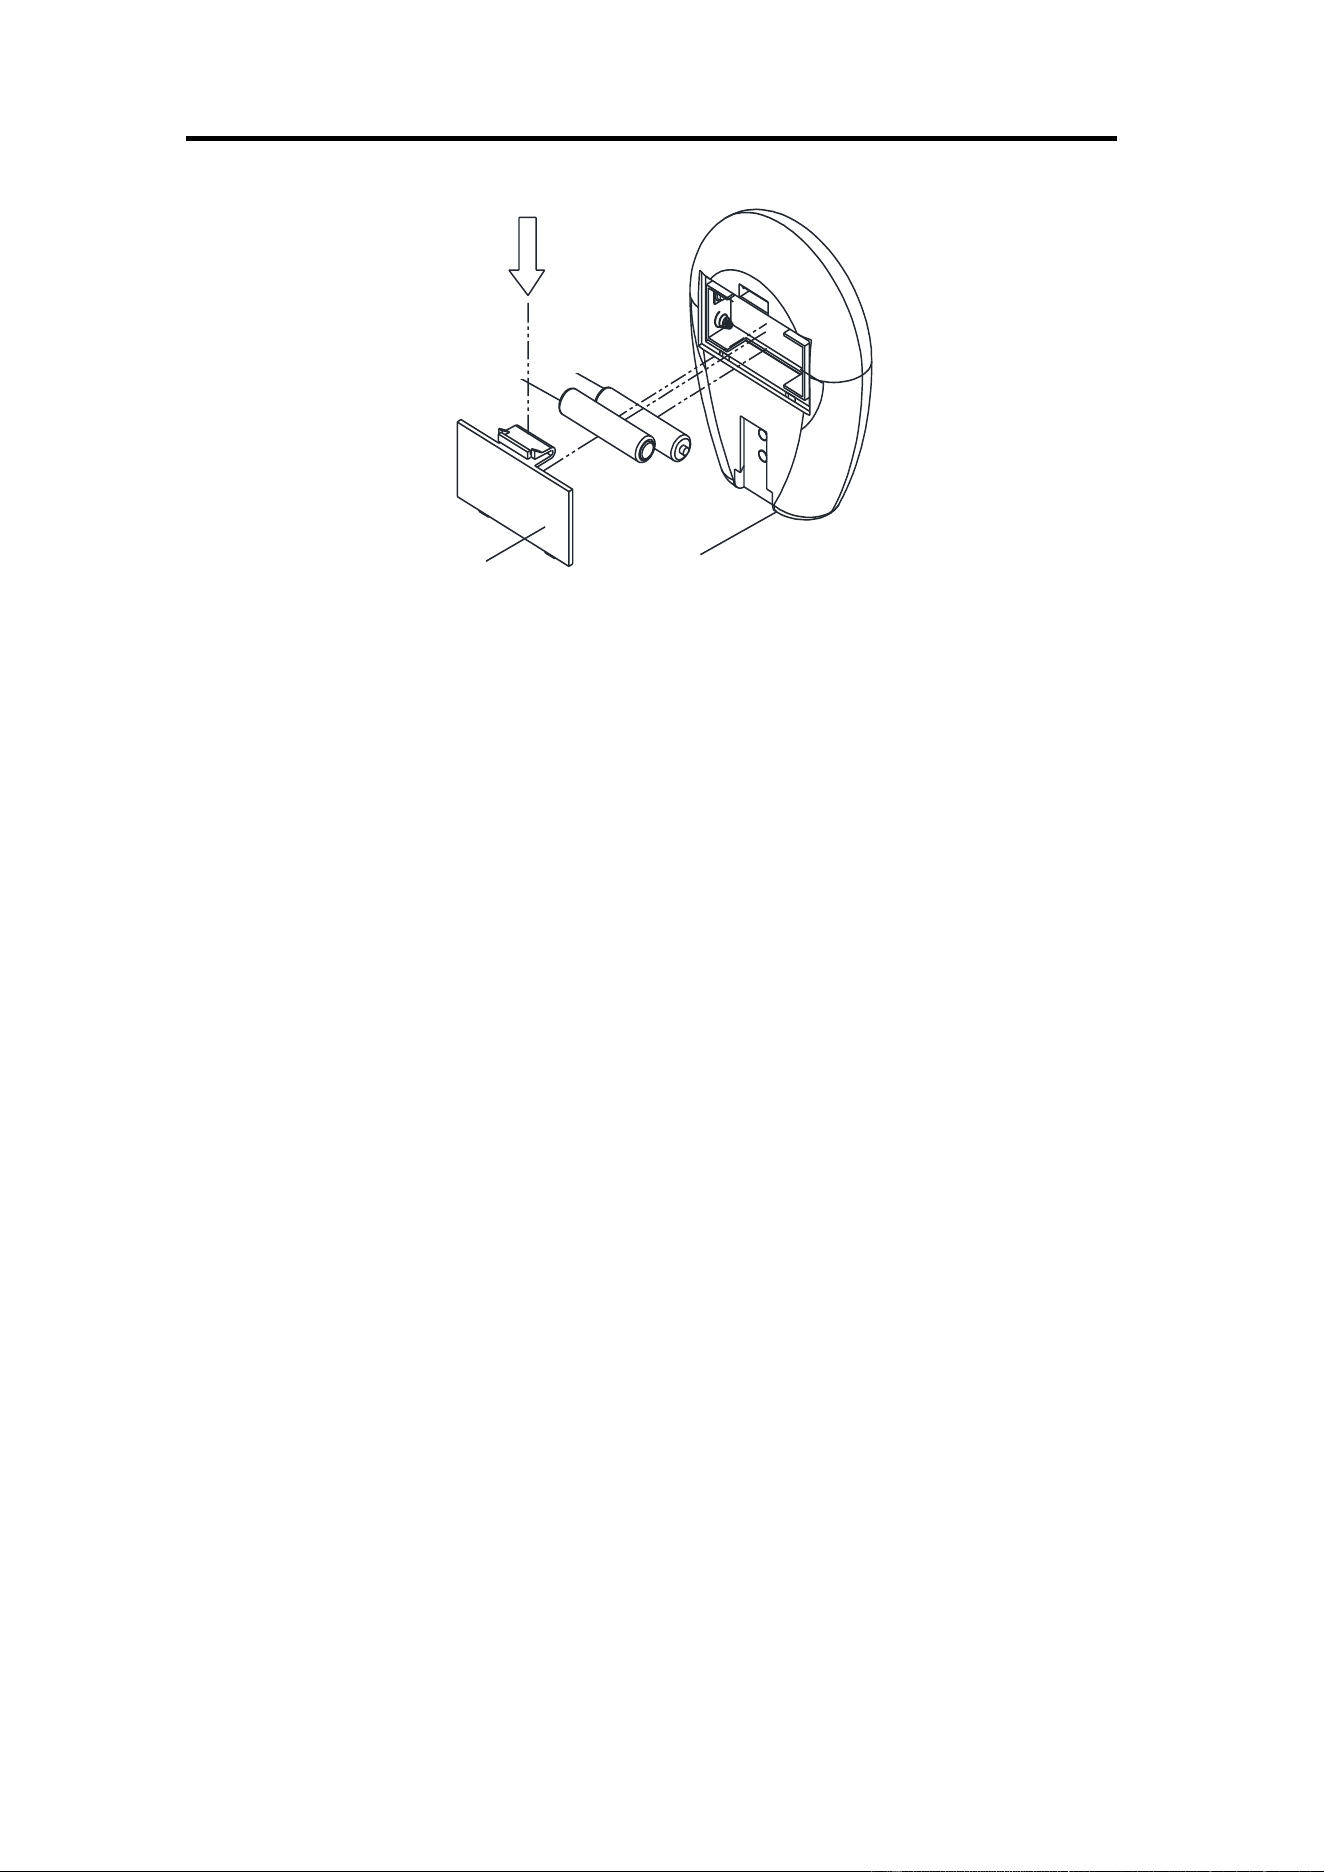
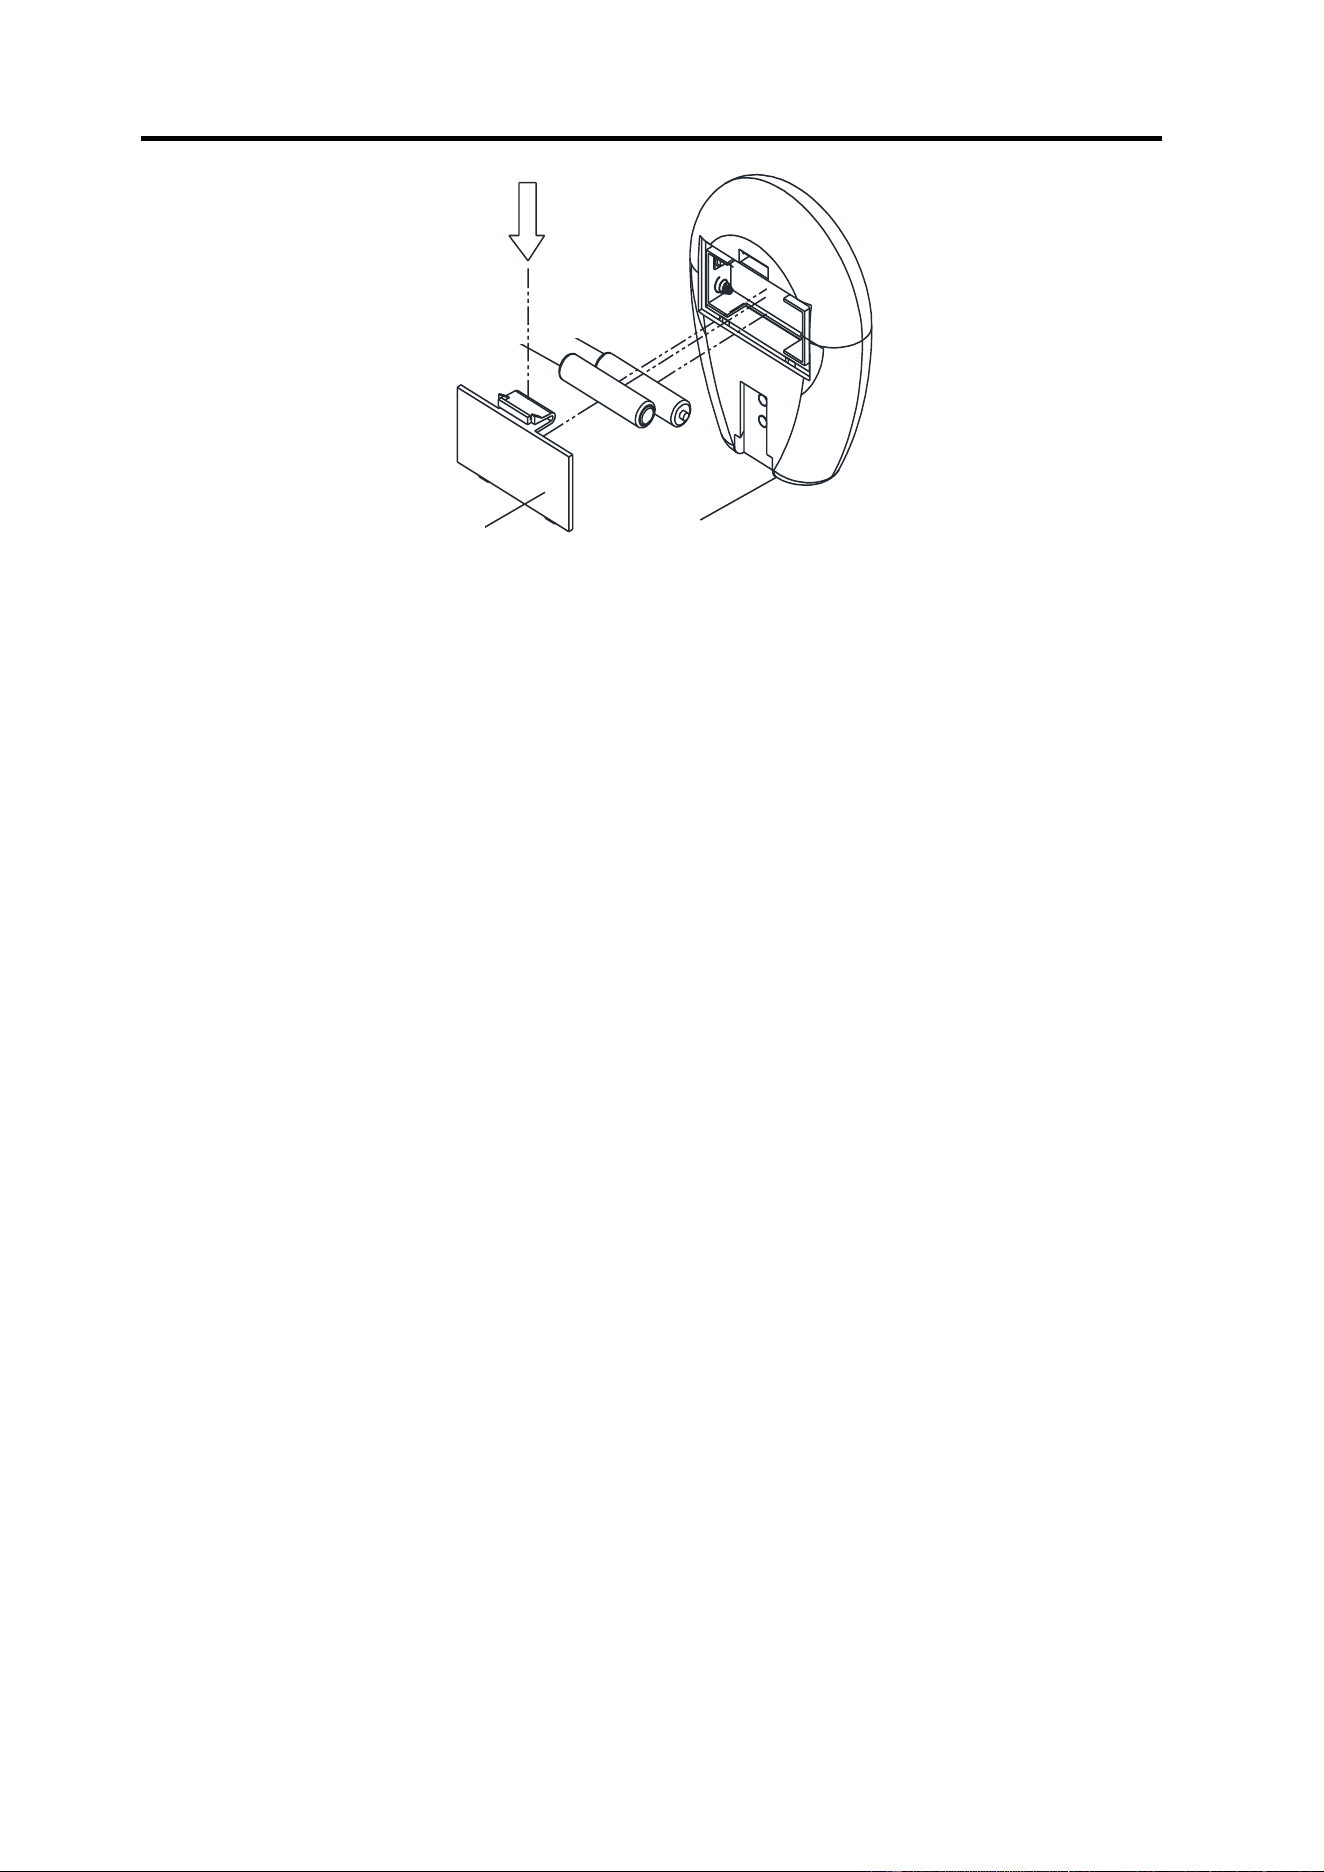
BATTERY INSTALLATION & REPLACEMENT
2
1
3
2
BATTERY INSTALLATION
1. Take out 2 AA batteries from computer box.
2. Press the buckle of battery cover on the back of the Computer (No. 9), then remove battery
cover.
3. Install 2 AA batteries into the battery case on the back of the Computer (No. 9). Pay attention to
the battery + and – ends before installing.
4. Press the buckle of battery cover, then put the battery cover back to the back of the Computer
(No. 9).
The installation is complete!
BATTERY REPLACEMENT
1. Press the buckle of battery cover on the back of the Computer (No. 9), then remove battery
cover.
2. Remove the 2 old AA batteries in the battery case and install 2 new AA batteries into the battery
case on the back of the Computer (No. 9). Pay attention to the battery + and – ends before
installing.
3. Press the buckle of battery cover, then put the battery cover back to the back of the Computer
(No. 9).
The replacement is complete!
NOTE: Always change both batteries at the same time. Do not mix battery types and do not mix old
and new batteries. Dispose batteries according to your state and regional guidelines.
Battery Cover
Battery
Battery
9

13
EXERCISE COMPUTER
SPECIFICATIONS:
TIME-------------------------------------------00:00-99:59 MIN:SEC
SPEED----------------------------------------0.0-999.9 MI(Mile)/H
DISTANCE-----------------------------------0.00-99.99 MI(Mile)
CALORIES-----------------------------------0.0-999.9 KCAL
FUNCTION KEY:
MODE: Press to select function (Scan, Time, Speed, Distance, Calories). Press and hold for 3
seconds to reset all values.
CLEAR: Press to reset value. This function is only available when the bike is stopped, and the
computer is not in SCAN mode.
OPERATION PROCEDURES:
AUTO ON/OFF: If the bike is put into motion or the MODE button is pressed, the computer will
activate and will remain active unless inactive for approximately 4 minutes. The computer power will
turn off automatically.
MODE: To select the LOCK MODE setting press the MODE button when the pointer is on the
function you wish to display, then remove your finger from the button. Once locked, only the selected
function will be displayed.
FUNCTIONS:
TIME: Counts the total time of an exercise from start to finish.
SPEED: Displays the current speed being obtained.
DISTANCE: Counts the total distance of an exercise from start to finish.
CALORIES: Counts the total number of calories burned during an exercise from start to finish. (The
data is a rough guide which can not be used in medical treatment.)
SCAN: Automatically displays functions in the following order shown: Time, Speed, Distance,
Calories (repeat).
BATTERY: This computer uses two AA batteries. If the display appears incorrectly or becomes
difficult to read, please install new batteries.
14
ADJUSTMENTS & USAGE GUIDE
74
ADJUSTING THE BALANCE
In order to achieve a smooth and comfortable ride, you must ensure that the
bike is stabled and secured. If you notice that the bike is unbalanced during
use, you should adjust the foot levelers located beneath the front and rear
stabilizers. To do so, simply rotate the Foot Leveler (No. 74) until the bike
becomes levelled with the floor surface. If required, repeat this process to
adjust the remaining foot levelers.
15
ADJUSTING THE TENSION & EMERGENCY STOP
Adjust the tension by rotating the Tension Control Knob (No. 15) clockwise
to increase the level of resistance. Rotate the Tension Control Knob (No. 15)
counter-clockwise to decrease the level of resistance. Push down on Tension
Control Knob (No. 15) to enforce the brake and stop the bike immediately.
ADJUSTING THE ANGLE OF THE SEAT
Use Spanner (No. 88) to unscrew the nut under the seat. Adjust the seat to
the desired angle and reinstall the nut. Check the nut periodically to ensure
that it is tight and secure. Use the Spanner (No. 88) to tighten when
necessary.
Note: You will need to tighten the nut on the opposite side at the same time.
The use of an additional wrench is required.
MOVING THE BIKE
To move the bike, first ensure that the handlebar is properly secured. If the
handlebar is loose, tighten the Adjustment Knob (No. 38) to secure it. Next,
stand at the front of the bike so that you’re directly in front of the handlebar.
Firmly grasp and hold each side of the handlebar, place one foot on the Front
Stabilizer (No. 73), and tilt the bike towards you until the transportation
wheels on the Front Stabilizer (No. 73) touch the ground. With the wheels on
the ground, you can transport the bike to the desired location with ease.
I
II
ADJUSTING THE HEIGHT
Loosen and pull out the [seat height] Adjustment Knob (No. 38) to adjust the
height of the seat. You may also slide the seat forwards or backwards by
loosening and pulling out the [seat] Adjustment Knob (No. 38) on the Seat
Slider (No. 36). You may adjust the height of the handlebar by using the
[handlebar] Adjustment Knob (No. 38). When making adjustments, you will
see a limit on the seat post, seat slider and handlebar post. DO NOT lift the
posts passed this mark. Always check the Adjustment Knobs (No. 38) to
ensure that they are fully secured when you finish making an adjustment.

15
MAINTENANCE INSTRUCTIONS
This is general information for daily, weekly and monthly maintenance to be performed on your bike.
DAILY MAINTENANCE
After each exercise session, wipe down all the
equipment: seat, frame, and handlebars. Pay
special attention to the seat post, handlebar
post, and belt/chain guard. Sweat is very
corrosive and may cause problems that require
parts replacement later.
1. Get on the bike and engage the drive train.
2. Pay attention to any vibrations felt through
the pedals. If you feel any vibrations, you
may need to tighten the pedals, bottom
bracket, or adjust the drive belt/chain
tension.
3. Use a wrench to tighten the pedals until
they are secure.
MONTHLY MAINTENANCE
1. Check if all hardware is secure, such as:
water bottle holder, flywheel nuts, belt/chain
guard bolts, brake caliper lock nuts, and
brake caliper tension rod nuts.
2. Inspect the brake tension rod for signs of
wear such as missing threads. Clean and
lubricate the brake tension rod.
3. Clean and lubricate the seat post, handlebar
post and seat slider. Remove any buildup of
foreign material.
WEEKLY MAINTENANCE
1. Inspect moving parts and tighten the
hardware.
2. Inspect pull pin frame fittings to make sure
the fittings are secure. Loose frame fittings
may strip out threads over time and cause
extensive damage.
3. Clean and lubricate pop pin assemblies.
Pull on the pin and spray a small amount of
lubricant onto the shaft.
4. Tighten the seat hardware to make sure the
seat is level and centered.
5. Brush and treat the resistance pads.
Remove any foreign material that may have
collected on the pads. Spray the pads with
silicone lubricant. This helps to reduce
noise from friction between the pads and
the flywheel.
6. Visually inspect the bottom bracket, toe
clips and toe straps. If any of them are loose
or disconnected, attach and tighten.
LEATHER BRAKE PAD CARE (If applicable)
1. Perform this maintenance when the brake
pad is first installed and for the life of the
brake pad. Following these simple
guidelines can increase the life of your
brake pads.
2. Some brake pad assemblies are
pre-lubricated. Squeeze the brake pad. If
lubricant is released, then the pad has been
pre-lubricated.
3. If the brake pad is dry, then coat the brake
pad with 3-n-1 oil. Brush the leather with a
clean, wire bristle brush, and then apply the
oil. The oil should be allowed to soak in to
the pad. Repeat 4-5 times until the pad is
saturated, but not dripping with oil. When
the pad is saturated, it will no longer absorb
oil.
4. Inspect the brake pad weekly and lubricate
if needed. The pad should not have a glazed
appearance. If the pad appears glazed, then
brush it with wire brush and apply lubricant
as needed. If any of the sponge padding is
showing through the leather pad, the brake
pad should be replaced.
Version: 4.3
16
INSTRUCCIONES DE ARMADO
Valoramos su experiencia con los productos de Sunny Health and Fitness. Para asistencia con
repuestos o solución de problemas, contáctenos en support@sunnyhealthfitness.com o al
1-877-90SUNNY (877-907-8669).
PASO 1:
Agarre el Poste de Asiento (n°. 37) del Estructura
Principal (n°. 85). Gire el Poste de Asiento (n°. 37)
a 180° como se muestra en la imagen de la
izquierda. Luego, vuelva insertar el Poste de
Asiento (n°. 37) en el manguito ubicado en la
Estructura Principal (n°. 85). Ajuste el Poste de
Asiento (n°. 37) a la posición deseada y apriete con
la Perilla de Ajuste (n°. 38).
PASO 2:
Fije los Estabilizadores Frontal y Trasero (n°. 73 &
n°. 84) al Estructura Principal (n°. 85) con 4
Tornillos (n°. 76) y 4 Arandelas (n°. 77). Apriete y
asegura con la Llave Allen (n°. 90).
#38 M16*1.5 1pc
85
38
37
37
38
85
#90
S6
#77 Φ16*Φ8*H1.5 4pcs
76
77
84
76
77
76
73
76
77
85
#76 M8*40*20*S6 4pcs
17
Valoramos su experiencia con los productos de Sunny Health and Fitness. Para asistencia con
repuestos o solución de problemas, contáctenos en support@sunnyhealthfitness.com o al
1-877-90SUNNY (877-907-8669).
PASO 3:
¡ADVERTENCIA! Lea las instrucciones
detenidamente, ya que un armado incorrecto puede
causar daños permanentes a su bicicleta.
Nota: Los Pedales (n°. 83L/R) están marcados “L” y
“R” para izquierda y derecha.
Retire las 2 Tuercas de Nylon (n°. 82L/R) ubicadas
en los Pedales (n°. 83L/R)
Gire la Perilla de Tensión (n°. 15) HACIA A LA
DERECHA tan fuerte como puede con su mano.
Alinee el Pedal Izquierdo (n°. 83L) con la Biela
Izquierda (n°. 45L) a 90°. Gire el perno del pedal en
el Pedal Izquierdo (n°. 83L) HACIA A LA
IZQUIERDA tan fuerte como puede con su mano.
Luego, use la Llave (n°. 88) para apretar y asegurar.
Gire la Tuerca de Nylon Izquierda (n°. 82L) HACIA
A LA DERECHA tan fuerte como pueda con su
mano. Use la Llave (n°. 88) para sostener el perno
del pedal en el Pedal Izquierdo (n°. 83L) y use la
Llave (n°. 68) para girar la Tuerca de Nylon
Izquierda (n°. 82L) HACIA A LA DERECHA al
mismo tiempo, hasta que esté apretada a la Biela
Izquierda (n°. 45L).
Alinee el Pedal Derecho (n°. 83R) con la Biela
Derecha (n°. 45R) a 90 °. Gire el perno del pedal en
el Pedal Derecho (n°. 83R) HACIA A LA DERECHA
tan fuerte como pueda con la mano. Luego, use la
Llave (n°. 88) para apretar y asegurar.
Gire la Tuerca de Nylon Derecha (n°. 82R) HACIA
A LA IZQUIERDA con la mano. Use la Llave (n°.
88) para sostener el perno del pedal en el Pedal
Derecho (n°. 83R) y use la Llave (n°. 68) para girar
la Tuerca de Nylon Derecha (n°. 82R) HACIA A LA
IZQUIERDA al mismo tiempo, hasta que está
apretado en la Biela Derecha (n°. 45R).
Retire 2 Tornillos (n°. 72) y 2 Arandelas (n°. 71) del
Estructura Principal (n°. 85) usando la Llave (n°.
88). Fije el Soporte de Botella (n°. 70) al
Estructura Principal (n°. 85) utilizando los 2
Tornillos (n°. 72) y las 2 Arandelas (n°. 71) que se
quitaron. Apriete y asegure con la Llave (n°. 88).
S15
S19
#68 1pc
#88 1pc
#82L/R 9/16*20*H8*S19 2pcs
#71 D5*Φ13*1 2pcs
#72 M5*16*Φ10 2pcs
15
85
70
71
72
71
83R
45R
82R
82L
45L
83L
45L
83L
45R
83R
45R
83R
82R
45L
83L
82L
S158888S15
6868
S19
S19
8888
S15 S15
18
Valoramos su experiencia con los productos de Sunny Health and Fitness. Para asistencia con
1-877-90SUNNY (877-907-8669).
PASO 4:
Afloje y retire la Perilla de Ajuste (n°. 38). Inserte el
Asiento Deslizante (n°. 36) en el Poste de
Asiento (n°. 37). Ajuste el Asiento Deslizante (n°.
36) a la posición deseada, vuelva a insertar y
apriete la Perilla de Ajuste (n°. 38) para asegurar
el poste en su lugar.
Asegure el Asiento (n°. 35) al Asiento Deslizante
(n°. 36) con la Llave (n°. 88).
NOTA: Antes de apretar completamente el asiento,
puede ajustar la parte delantera del asiento hacia
arriba o hacia abajo para satisfacer sus
necesidades.
PASO 5:
Afloje y retire la Perilla de Ajuste (n°. 38). Inserte el
Poste de Manubrio (n°. 10) en el manguito ubicado
en la parte delantera del Estructura Principal (n°.
85). Ajuste el Poste de Manubrio (n°. 10) a la
posición deseada y vuelva a insertar y apriete la
Perilla de Ajuste (n°. 38) para asegurar el poste en
su lugar.
Asegure el Manubrio (B) (n°. 8) al Poste de
Manubrio (n°. 10) con 2 Pernos (n°. 6) y 2 Tuercas
(n°. 11). Apriete y asegure con la Llave (n°. 68).
Retire el Tornillo (n°. 12) del Manubrio (B) (n°. 8)
con la Llave (n°. 88). Fije el Soporte de Tableta
(n°. 2) en el Manubrio (B) (n°. 8) con el Tornillo
(n°. 12) que se retiró. Apriete y asegure con la Llave
(n°. 88).
Fije la Computadora (n°. 9) al soporte ubicado en
el Poste de Manubrio (n°. 10). Conecte el cable de
enlace de la Computadora (n°. 9) al Cable del
Tronco (n°. 87).
¡El armado está completo!
38
36
35
#88
37
S 14
9
11
6
2
85
38
3
8
10
9
#68
#88
S17
21
87
87
# 1 1 M 1 0 * H 9 . 5 * S 1 7 2 p c s
# 6 M10*35*15*H6 2pcs
# 1 2 M 5 * 1 2 1 p c

19
INSTALACIÓN Y REEMPLAZO DE PILAS
2
1
3
2
INSTALACIÓN DE LAS PILAS
1. Saque 2 pilas AA de la caja de la computadora.
2. Presione la hebilla de la tapa de las pilas en la parte posterior de la Computadora (n°. 9), luego
retire la tapa de las pilas.
3. Instale 2 pilas AA en la caja de las pilas en la parte posterior de la Computadora (n°. 9). Preste
atención a las pilas + y - termina antes de instalar.
4. Presione la hebilla de la tapa de las pilas, luego vuelva a colocar la tapa de las pilas en la parte
posterior de la Computadora (n°. 9).
¡La instalación esta completa!
CAMBIO DE PILAS
1. Presione la hebilla de la tapa de las pilas en la parte posterior de la Computadora (n°. 9), luego
retire la tapa de las pilas.
2. Retire las 2 pilas AA viejas en la caja de las pilas e instale 2 pilas AA nuevas en la caja de las
pilas en la parte posterior de la Computadora (n°. 9). Preste atención a las pilas + y - termina
antes de instalar.
3. Presione la hebilla de la tapa de las pilas, luego vuelva a colocar la tapa de las pilas en la parte
posterior de la Computadora (n°. 9).
¡El cambio está completo!
NOTA: Cambie siempre las dos pilas al mismo tiempo. No mezcle tipos de pilas y no mezcle pilas
viejas y nuevas. Deseche las pilas de acuerdo con las regulaciones estatales y regionales.
Battery
9
Tapa de las Pilas
Pila
Pila

20
COMPUTADORA DE ENTRENAMIENTO
ESPECIFICACIONES:
TIME (TIEMPO) ----------------------------------------------- 00:00-99:59 MIN:SEC
SPEED (VELOCIDAD) -------------------------------------- 0.0-999.9 MI(Mile)/H
DISTANCE (DISTANCIA) ----------------------------------- 0.00-99.99 MI(Mile)
CALORIES (CALORIAS) ----------------------------------- 0.0-999.9 KCAL
TECLA DE FUNCIÓN:
MODE (MODA): Presione para seleccionar la función (Escaneo, Tiempo, Velocidad, Distancia,
Calorías). Mantenga presionado durante 3 segundos para restablecer todos
los valores.
CLEAR(CLARAR): Presione para restablecer el valor. Esta función solo está disponible cuando la
bicicleta está parada y la computadora no está en modo ESCANEAR.
PROCEDIMIENTOS DE OPERACION:
ENCENDIDO/APAGADO AUTOMÁTICO: Si la bicicleta se pone en movimiento o se presiona el
botón MODO, la computadora se activará y permanecerá activa a menos que esté inactiva durante
aproximadamente 4 minutos. La computadora se apagará automáticamente.
MODE (MODA): Para seleccionar la configuración de MODO DE BLOQUEO, presione el botón
MODA cuando el puntero esté en la función que desea mostrar, luego retire el dedo del botón. Una
vez bloqueado, solo se mostrará la función seleccionada.
FUNCIONES:
TIME (TIEMPO): Cuenta tiempo total de entrenamiento de inicio a final.
SPEED (VELOCIDAD): Muestra la velocidad actual que se está obteniendo.
DISTANCE (DISTANCIA): Cuenta la distancia total del entrenamiento de incico a final.
CALORIES (CALORIAS): Cuenta las calorías quemadas en total durante el entrenamiento de inicio
a final. (Los datos son una guía aproximada que no se puede utilizar en el tratamiento médico).
SCAN (ESCANEAR): Automáticamente muestra las funciones en el siguiente orden: Tiempo,
Velocidad, Distancia, Calorías (repetir).
BATTERY (PILAS): Esta computadora usa dos pilas AA. Si la pantalla aparece incorrectamente o
se vuelve difícil de leer, instale pilas nuevas.
21
GUÍA DE USO Y AJUSTES
74
AJUSTANDO LA BALANCIA
Para lograr una conducción suave y cómoda, debe asegurarse de que la
estabilidad de la bicicleta esté asegurada. Si nota que la bicicleta está
desequilibrada durante el uso, debe ajustar los niveladores de pie ubicados
debajo de los estabilizadores delantero y trasero. Para hacerlo, simplemente
gire el Nivelador de Pie (n°. 74) hasta que la se nivele con la superficie del
piso.
15
AJUSTANDO LA TENSIÓN Y PARADA DE EMERGENCIA
Ajuste la tensión girando la Perilla de Tensión (n°. 15) hacia a la derecha
para aumentar el nivel de resistencia. Gire la Perilla de Tensión (n°. 15)
hacia a la izquierda para bajar en nivel de resistencia. Empuje hacia abajo a
la Perilla de Tensión (n°. 15) para forzar el freno y detener la bicicleta
inmediatamente.
AJUSTE DEL ÁNGULO DEL ASIENTO
Use la Llave (n°. 88) para desenroscar la tuerca debajo del asiento. Ajuste el
asiento al ángulo deseado y vuelva a instalar la tuerca. Revise la tuerca
periódicamente para asegurarse de que esté apretada y segura. Use la Llave
(n°. 88) para apretar cuando sea necesario.
Nota: Debería apretar la tuerca en el lado opuesto al mismo tiempo. Esto se
requiere el uso de una llave adicional.
MOVIENDO LA BICICLETA
Para mover la Bicicleta, asegurase de que el manubrio este bien sujeto. Si el
manubrio esta floja, aprete la Perilla de Ajuste (n°. 38) para asegurarlo.
Luego, párate en la parte delantera de la bicicleta para que estés
directamente frente al manubrio. Sujete firmemente y sostenga cada lado del
manubrio, coloque un pie en el Estabilizador Frontal (n°. 73) e incline la
bicicleta hacia usted hasta que las ruedas de transporte en el Estabilizador
Frontal (n°. 73) toquen el suelo. Con las ruedas en el suelo, pueda
transportar la bicicleta a la ubicación deseada con facilidad.
I
II
AJUSTANDO EL ASIENTO
Afloje y extraiga la Perilla de Ajuste (n°. 38) para ajustar el asiento. También
puede deslizar el asiento hacia adelante o hacia atrás aflojando y tirando de
la Perilla de Ajuste (n°. 38) en el Asiento Deslizante (n°. 36). Puede ajustar
la altura del manubrio usando la Perilla de Ajuste (n°. 38). Al realizar ajustes,
verá un límite en el poste del asiento, el deslizador del asiento y el poste del
manubrio. NO levante el poste pasando de estas marcas. Siempre revise las
Perillas de Ajuste (n°. 38) para asegurarse de que estén completamente
asegurados cuando termine de hacer ajuste.

22
INSTRUCCIONES DE MANTENIMIENTO
Esta es información general para realizar el mantenimiento diario, semanal y mensual en su
bicicleta.
Version: 4.1
12
Versión 4.3
MANTENIMIENTO DIARIO
Después de cada sesión de ejercicio, limpie
todo el equipo: asiento, marco y manubrio.
Preste especial atención al poste del asiento,
al poste del manubrio y a la cubierta de la
correa/cadena. El sudor es muy corrosivo y
puede causar problemas que requieren
reemplazo de piezas más adelante.
1.
Súbase a la bicicleta y accione la
transmisión.
2.
Preste atención a cualquier vibración que
se siente a través de los pedales. Si
siente alguna vibración, es posible que
deba apretar los pedales, el soporte
inferior o ajustar la tensión de la
transmisión de cadena/correa.
3.
Use una llave para apretar los pedales
hasta que estén seguros.
MANTENIMIENTO MENSUAL
1.
Verifique que todas las herramientas estén
aseguradas: el soporte de botella, tuercas
del volante, pernos de protección de la
cadena o correa, las tuercas de seguridad de
la pinza de freno y tuercas de la perilla de
tensión de la pinza de freno.
2.
Inspeccione la perilla de tensión del freno en
busca de signos de desgaste, como roscas
faltantes. Limpie y lubrique la perilla de
tensión del freno.
3.
Limpie y lubrique el poste del asiento, el
poste del Manubrio y el deslizador del
asiento. Elimine cualquier acumulación de
material extraño.
MANTENIMIENTO SEMANAL
1.
Inspeccione las piezas móviles y apriete
con las herramientas.
2.
Inspeccione los accesorios de la
estructura de la clavija de tracción,
asegurándose de que los accesorios
estén ajustados. Accesorios flojos en la
estructura puede desprender de las
roscas con tiempo y causar daños
extensos.
3.
Limpie y lubrique los conjuntos de
pasadores. Tire del pasador y rocíe una
pequeña cantidad de lubricante en el eje.
4.
Ajuste las piezas metálicas del asiento,
asegurándose de que el asiento esté
nivelado y centrado.
5.
Cepille y trate las almohadillas de
resistencia. Retire cualquier material
extraño que pueda haber recogido en las
almohadillas. Rocíe las almohadillas con
lubricante de silicona. Esto ayuda a
reducir el ruido de la fricción entre las
almohadillas y el volante.
6.
Inspeccione visualmente el soporte
inferior, las punteras y las correas de los
pies. Si alguno de ellos está suelto o
desconectado, coloque y apriete.
CUIDADO DE LA ALMOHADILLA DE FRENO
DE CUERO (si corresponde)
1. Realice este mantenimiento cuando la pastilla
de freno se instale por primera vez y durante
toda la vida útil de la pastilla de freno.
Siguiendo estas sencillas instrucciones
puede aumentar la vida útil de sus pastillas
de freno.
2. Algunos conjuntos de pastillas de freno están
prelubricado. Aprieta la pastilla de freno. Si se
libera lubricante, entonces la almohadilla ha
sido prelubricada.
3. Si la pastilla de freno está seca, cubra la
pastilla de freno con aceite 3-n-1. Cepille el
cuero con un cepillo limpio de cerdas de
alambre y luego aplique el aceite. Se debe
permitir que el aceite penetre en la
almohadilla. Repita 4 a 5 veces hasta que la
almohadilla esté saturada, pero sin gotear
aceite. Cuando la almohadilla está saturada,
ya no absorberá el aceite.
4. Inspeccione la pastilla de freno
semanalmente y lubrique si es necesario. La
almohadilla no debe tener una apariencia
acristalada. Si la almohadilla aparece
acristalada, cepíllala con un cepillo de
alambre y aplica lubricante según sea
necesario. Si se observa algo del relleno de
esponja a través de la almohadilla de cuero,
se debe reemplazar la almohadilla de freno.
23
INSTRUCTIONS D’ASSEMBLAGE
Nous apprécions votre expérience d'utilisation des produits Sunny Health and Fitness. Pour obtenir de l'aide
concernant des pièces ou un dépannage, veuillez nous contacter à support@sunnyhealthfitness.com ou au
1- 877 - 90SUNNY (877-907-8669).
ÉTAPE 1:
Retirez la Tige de Siège (N° 37) du Cadre Principal
(N° 85). Tournez la Tige de Siège (N° 37) à 180 °
comme le montre l'image de gauche. Réinsérez
ensuite la Tige de Siège (N° 37) dans le manchon
situé sur le Cadre Principal (N° 85). Réglez la Tige
de Siège (N° 37) à la position souhaitée et serrez
avec le Bouton de Réglage (N° 38).
ÉTAPE 2:
Fixer les Stabilisateurs Avant et Arrière (N° 73 et
84) au Cadre Principal (N° 85) avec 4 Boulon (N°
76) et 4 Rondelles (N° 77). Bien serrer avec la Clé
Allen (N° 90).
#38 M16*1.5 1pc
85
38
37
37
38
85
#90
S6
#77 Φ16*Φ8*H1.5 4pcs
76
77
84
76
77
76
73
76
77
85
#76 M8*40*20*S6 4pcs
24
Nous apprécions votre expérience d'utilisation des produits Sunny Health and Fitness. Pour obtenir de l'aide
concernant des pièces ou un dépannage, veuillez nous contacter à support@sunnyhealthfitness.com ou au
1- 877 - 90SUNNY (877-907-8669).
ÉTAPE 3:
ATTENTION! Lire attentivement les instructions car
un assemblage incorrect peut entraîner des
dommages définitifs sur votre vélo.
Remarque: Les Pédales (N° 83L/R) sont marquées
"L" et "R" pour gauche et droite.
Retirer les 2 Écrous de Nylon (N° 82L/R) situés sur
les Pédales (N° 83L/R).
Tournez le bouton de Contrôleur de Tension (N°
15) dans le sens des aiguilles d'une montre aussi
fermement que possible avec votre main.
Alignez la Pédale Gauche (N° 83L) avec la
Capuchon de Manivelle Gauche (N° 45L) à 90 °.
Tournez le boulon de la pédale sur la Pédale
Gauche (N° 83L) dans le sens contraire des
aiguilles d'une montre aussi fermement que possible
avec votre main. Ensuite, utilisez la Clé Tricoise (N°
88) pour serrer et fixer.
Tournez l'Écrou de Nylon Gauche (N° 82L) dans le
sens des aiguilles d'une montre aussi fermement
que possible avec votre main. Utilisez la Clé
Tricoise (N° 88) pour maintenir le boulon de pédale
sur la Pédale Gauche (N° 83L) et utilisez la Clé
Tricoise (N° 68) pour tourner l'Écrou de Nylon
Gauche (N° 82L) dans le sens des aiguilles d'une
montre en même temps, jusqu'à ce qu'il soit serré
sur la Capuchon de Manivelle Gauche (N° 45L).
Alignez la Pédale Droite (N° 83R) avec la
Capuchon de Manivelle Droite (N° 45R) à 90 °.
Tournez le boulon de la pédale sur la Pédale Droite
(N° 83R) dans le sens des aiguilles d'une montre
aussi fermement que possible avec votre main.
Ensuite, utilisez la Clé Tricoise (N° 88) pour serrer
et fixer.
Tournez l'Écrou de Nylon Droite (N° 82R) dans le
sens contraire des aiguilles d'une montre aussi
fermement que possible avec votre main. Utilisez la
Clé Tricoise (N° 88) pour maintenir le boulon de
pédale sur la Pédale Droite (N° 83R) et utilisez la
Clé Tricoise (N° 68) pour tourner l'Écrou de Nylon
Droite (N° 82R) dans le sens contraire des aiguilles
d'une montre, jusqu'à ce qu'il est serré sur la
Capuchon de Manivelle Droite (N° 45R).
Retirer les 2 Vis (N° 72) et les 2 Rondelles (N° 71)
du Cadre Principal (N° 85) à l’aide de la Clé
Tricoise (N° 88). Fixer le Porte-bouteille (N° 70) au
Cadre Principal (N° 85) avec les 2 Vis (N° 72) et les
2 Rondelles (N° 71). Serrez et fixez avec la Clé
Tricoise (N° 88).
S15
S19
#68 1pc
#88 1pc
#82L/R 9/16*20*H8*S19 2pcs
#71 D5*Φ13*1 2pcs
#72 M5*16*Φ10 2pcs
15
85
70
71
72
71
83R
45R
82R
82L
45L
83L
45L
83L
45R
83R
45R
83R
82R
45L
83L
82L
S158888S15
6868
S19
S19
8888
S15 S15
25
Nous apprécions votre expérience d'utilisation des produits Sunny Health and Fitness. Pour obtenir de l'aide
concernant des pièces ou un dépannage, veuillez nous contacter à support@sunnyhealthfitness.com ou au
1- 877 - 90SUNNY (877-907-8669).
ÉTAPE 5:
Desserrer et retirer le Bouton de Réglage (N° 38)
[du guidon]. Insérer la Tige de Guidon (N° 10) dans
la gaine située à l’avant du Cadre Principal (N° 85).
Régler la Tige de Guidon (N° 10) à la position
souhaitée, réinsérer et serrer le Bouton de Réglage
(N° 38) pour immobiliser la tige.
Fixer le Guidon (B) (N° 8) à la Tige de Guidon (N°
10) avec 2 Boulons (N° 6) et 2 Écrous (N° 11). Bien
serrer avec la Clé Tricoise (N° 68).
Retirez la Vis (N° 12) du Guidon (B) (N° 8) avec la
Clé Tricoise (N° 88). Fixez le Support de Tablette
(N° 2) sur le Guidon (B) (N° 8) avec la Vis (N° 12)
qui a été retirée. Serrez et fixez avec la Clé Tricoise
(N° 88).
Fixer l’Ordinateur (N° 9) au support situé sur la
Tige de Guidon (N° 10). Connecter le câble de
liaison de l’Ordinateur (N° 9) au Câble de Liaison
(N° 87).
L
’
assemblage est terminé !
9
11
6
2
85
38
3
8
10
9
#68
#88
S17
21
87
87
# 1 1 M 1 0 * H 9 . 5 * S 1 7 2 p c s
# 6 M10*35*15*H6 2pcs
# 1 2 M 5 * 1 2 1 p c
ÉTAPE 4:
Desserrer et retirer le [du glissoir de siège] Bouton
de Réglage (N° 38). Insérer le Glissoir de Siège
(N° 36) dans la Tige de Siège (N° 37). Régler le
Glissoir de Siège (N° 36) à la position souhaitée,
réinsérer et serrer le Bouton de Réglage (N° 38)
pour immobiliser la tige.
Bien fixer la Siège (N° 35) au Glissoir de Siège (N°
36) avec la Clé Tricoise (N° 88).
REMARQUE: Avant de serrer complètement, ajuster
l’avant de la selle vers le haut ou le bas selon vos
besoins.
38
36
35
#88
37
S 14
26
INSTALLATION ET REMPLACEMENT DES PILES
2
1
3
2
INSTALLATION DE LA BATTERIE
1. Retirez 2 piles AA de la boîte de l'Ordinateur (N° 9).
2. Appuyez sur la boucle du couvercle de la batterie à l'arrière de l'Ordinateur (N° 9), puis retirez le
couvercle de la batterie.
3. Installez 2 piles AA dans le boîtier des piles à l'arrière de l'Ordinateur (N° 9). Faites attention aux
piles + et - avant de les installer.
4. Appuyez sur la boucle du couvercle de la batterie, puis remettez le couvercle de la batterie à
l'arrière de l'Ordinateur (N° 9).
L'installation est terminée!
REMPLACEMENT DES PILES
1. Appuyez sur la boucle du couvercle de la batterie à l'arrière de l'Ordinateur (N° 9), puis retirez le
couvercle de la batterie.
2. Retirez les 2 anciennes piles AA du boîtier de piles et installez 2 nouvelles piles AA dans le
boîtier des piles à l'arrière de l'Ordinateur (N° 9). Faites attention aux piles + et - avant de les
installer.
3. Appuyez sur la boucle du couvercle de la batterie, puis remettez le couvercle de la batterie à
l'arrière de l'Ordinateur (N° 9).
Le remplacement est terminé!
REMARQUE: changez toujours les deux piles en même temps. Ne mélangez pas les types de piles
et ne mélangez pas les anciennes et les nouvelles piles. Jetez les piles conformément à vos
directives nationales et régionales.
Couvercle de la Batterie
Piles
Piles
9

27
ORDINATEUR D’EXERCICE
SPÉCIFICATIONS:
TIME (DURÉE) --------------------------------- 00:00 à 99:59 MIN:SEC
SPEED (VITESSE) ---------------------------- 0,0 à 999,9 ML/H
DISTANCE--------------------------------------- 0,00 à 99,99 ML
CALORIES--------------------------------------- 0,0 à 999,9 KCAL
TOUCHE FONCTION:
MODE: Appuyer plusieurs fois sur MODE pour sélectionner la valeur d’affichage souhaitée (durée,
vitesse, distance, calories, balayage). Appuyez et maintenez pendant 3 secondes pour réinitialiser
toutes les valeurs.
CLEAR: Appuyez pour réinitialiser la valeur. Cette fonction n'est disponible que lorsque le vélo est
arrêté et que l'ordinateur n'est pas en mode SCAN.
MÉTHODES D’UTILISATION:
MARCHE / ARRÊT AUTO: Si le vélo est mis en mouvement ou si le bouton MODE est enfoncé,
l'ordinateur s'activera et restera actif à moins qu'il ne soit inactif pendant environ 4 minutes.
L'ordinateur s'éteint automatiquement.
MODE: Pour sélectionner le paramètre LOCK MODE, appuyez sur le bouton MODE lorsque le
pointeur se trouve sur la fonction que vous souhaitez afficher, puis retirez votre doigt du bouton.
Une fois verrouillée, seule la fonction sélectionnée sera affichée.
FONCTIONS:
TIME (DURÉE): Calcule la durée totale du début à la fin d’un exercice.
SPEED (VITESSE): Affiche la vitesse actuelle atteinte.
DISTANCE: Tient le compte de la distance parcourue du début à la fin d’un exercice.
CALORIES: Compte le total de calories brûlées du début à la fin d’une séance. (Les données sont
un guide approximatif qui ne peut pas être utilisé dans un traitement médical.)
SCAN (BALAYAGE): Affiche automatiquement les fonctions selon la séquence suivante : Durée,
Vitesse, Distance, Calories (à répétition).
Piles: Cet écran fonctionne avec deux piles AA. Si l’affichage n’apparaît pas correctement ou s’il
devient difficile à lire, essayer de remplacer les piles. Changer toujours les deux piles en même
temps. Ne pas mélanger les types de piles et ne pas mélanger les piles neuves et les anciennes.
Jeter les piles selon vos directives nationales et régionales.
28
RÉGLAGES ET GUIDE D’UTILISATION
74
➢ RÉGLAGE DE L’ÉQUILIBRE
Pour une séance fluide et confortable, le vélo doit être stable. Si le vélo est
instable pendant l’utilisation, il est possible de régler les pieds de nivellement
situés sous les stabilisateurs avant et arrière. Pour ce faire, il suffit de tourner
les Pieds de Nivellement (N° 74) jusqu’à ce que le vélo soit de niveau avec
le sol. Si nécessaire, répétez ce processus pour régler les niveleurs de pied
restants.
15
➢ RÉGLAGE DE LA TENSION ET ARRÊT D’URGENCE
Régler la tension en tournant le Contrôleur de Tension (N° 15) dans le sens
horaire pour augmenter le niveau de résistance. Tourner le bouton dans le
sens antihoraire pour diminuer le niveau de résistance. Enfoncer le
Contrôleur de Tension (N° 15) pour forcer le freinage et arrêter le vélo
immédiatement.
S14
➢ RÉGLAGE DE L’ANGLE DU SIÈGE
Utiliser la Clé Tricoise (N° 88) pour dévisser l’écrou sous la selle. Régler
l’angle de selle souhaité et réinstaller l’écrou. Vérifier l’écrou régulièrement
pour s’assurer qu’il est bien serré. Utiliser la Clé Tricoise (N° 88) pour
resserrer si nécessaire.
Remarque : Il faut serrer l’écrou de chaque côté en même temps. L’utilisation
d’une clé supplémentaire est nécessaire.
➢ DÉPLACER LE VÉLO
Pour déplacer le vélo, vérifier d’abord que le guidon est correctement fixé. Si
le guidon est lâche, resserrer le Bouton de Réglage (N° 38) pour
l’immobiliser. Ensuite, se tenir devant le vélo, directement en face du guidon.
Fermement saisir chaque côté du guidon, placer un pied sur le Stabilisateur
Avant (N° 73) et basculer le vélo vers soi jusqu’à ce que les roulettes de
transport du Stabilisateur Avant (N° 73) touchent le sol. Une fois les roulettes
au sol, déplacer le vélo jusqu’à l’emplacement souhaité.
I
II
➢ RÉGLAGE DE LA HAUTEUR
Desserrer et retirer le [hauteur du siège] Bouton de Réglage (N° 38) pour
régler la hauteur de la selle. Il est possible également de glisser le siège vers
l’avant ou vers l’arrière en desserrant et en tirant le Bouton de Réglage (N°
38) [du siège] sur le Glissoir de Siège (N° 36). De même, il est possible de
régler la hauteur du guidon en utilisant le Bouton de Réglage (N° 38) [du
guidon]. Lors des réglages, il est possible de voir un trait sur la tige de la selle,
sur le glissoir et sur la tige de guidon. NE PAS dépasser cette marque.
Toujours vérifier les Boutons de Réglage (N° 38) pour s’assurer qu’ils sont
en place et bien serrés à la fin d’un réglage.

29
INSTRUCTIONS D’ENTRETIEN
Il s’agit d’informations générales concernant l’entretien quotidien, hebdomadaire et mensuel à effectuer sur votre
vélo.
ENTRETIEN QUOTIDIEN
Après chaque séance d’exercice, essuyez tout
l’équipement: selle, cadre, guidon. Portez une attention
particulière à la tige de selle, à la tige de guidon et au
protège-courroie/chaîne. La transpiration est très
corrosive et peut entraîner des problèmes nécessitant
le remplacement des pièces plus tard.
1. Montez sur le vélo et engagez le train
d’entraînement.
2. Guettez toute vibration ressentie sur les pédales. Si
des vibrations se font sentir, il faut peut-être
resserrer les pédales, le support inférieur, ou régler
la tension de la chaîne.
3. Utilisez une clé pour serrer les pédales jusqu’à ce
qu’elles soient sécurisées.
ENTRETIEN MENSUEL
1. Vérifiez que toute la quincaillerie est bien serrée,
notamment: le porte-bouteille, les écrous du volant
d’inertie, les écrous du protège-courroie/chaîne, les
écrous autofreinés ainsi que les écrous de la tige de
tension des étriers de frein.
2. Inspectez la tige de tension de frein pour vérifier
tout signe d’usure tel que des filetages manquants.
Nettoyez et lubrifiez la tige de tension de frein.
3. Nettoyez et lubrifiez la tige de selle, la tige de
guidon et le glissoir de selle. Nettoyez toute matière
étrangère accumulée.
ENTRETIEN HEBDOMADAIRE
1. Inspectez les pièces mobiles et serrez la
quincaillerie.
2. Inspectez les raccords de cadre de la goupille pour
vérifier qu’ils sont bien serrés. Des raccords de
cadre desserrés risquent d’endommager le filetage
et de causer des dommages importants.
3. Nettoyez et lubrifiez les assemblages de bouton à
cliquet. Tirez sur le bouton et pulvérisez une petite
quantité de lubrifiant sur l’arbre.
4. Serrez la quincaillerie de la selle en vérifiant que
cette dernière est à niveau et centrée.
5. Brossez et traitez les patins de résistance. Nettoyez
toute matière étrangère accumulée sur les patins.
Pulvérisez les patins avec un lubrifiant au silicone.
Cela permet de réduire le bruit dû au frottement
entre les patins et le volant d’inertie.
6. Inspectez visuellement le support inférieur, les
cale-pieds et les courroies des cale-pieds. Si l’un
d’eux est desserré ou détaché, rattachez et serrez.
SOIN DU PATIN DE FREIN EN CUIR (s’il y a
lieu)
1. Effectuer cet entretien lors de la première
installation du patin de frein et durant toute sa durée
de vie. Suivre ces instructions simples peut
prolonger la durée de vie de vos patins de frein.
2. Certains ensembles de patins de frein sont déjà
lubrifiés. Appuyer sur le patin de frein. Si du
lubrifiant s’écoule, le patin a déjà été lubrifié.
3. Si le patin de frein est sec, l’enduire d’huile 3-en-1.
Brosser le cuir avec une brosse à poils métalliques
propre, puis appliquer l’huile. L’huile doit pénétrer
dans le patin. Répéter l’opération 4 à 5 fois jusqu’à
ce que le patin soit saturé, mais sans que l’huile ne
coule. Lorsque le patin est saturé, il n’absorbe plus
l’huile.
4. Inspecter le patin de frein une fois par semaine et le
lubrifier le cas échéant. Le patin ne doit pas avoir un
aspect lustré. Si le patin semble lustré, le brosser
avec une brosse métallique et appliquer du lubrifiant
le cas échéant. Si l’un des rembourrages en
mousse apparaît à travers le patin de frein en cuir,
celui-ci doit être remplacé.
Version: 4.3
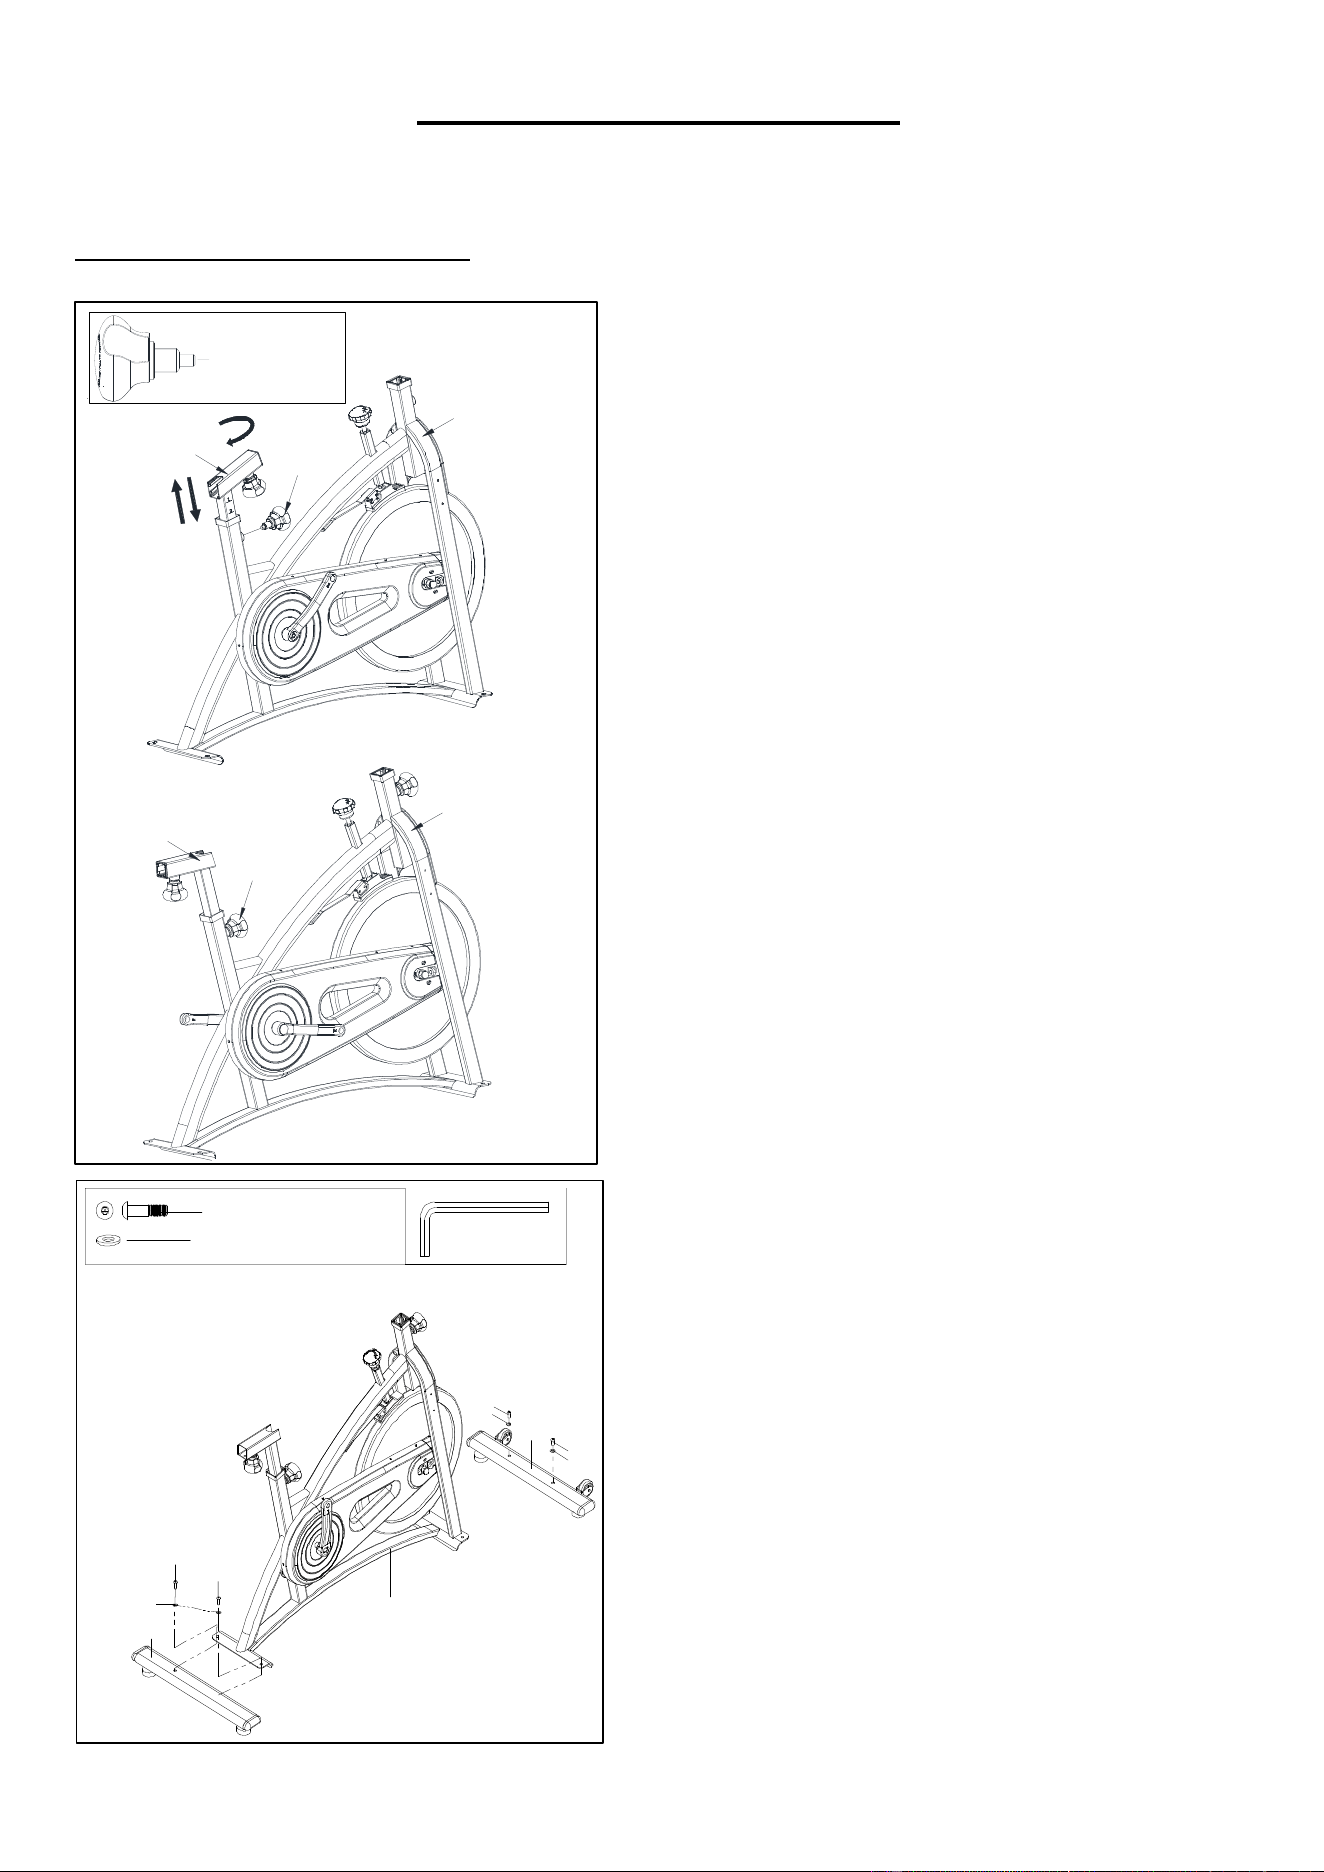
30
MONTAGEANLEITUNG
Wir schätzen Ihre Erfahrung im Umgang mit den Produkten von Sunny Health and Fitness. Für
Fragen zu Teilen oder Hilfe bei der Fehlerbehebung kontaktieren Sie uns bitte unter
SCHRITT 1:
Ziehen Sie die Sattelstütze (Nr. 37) aus dem
Hauptrahmen (Nr. 85). Drehen Sie die Sattelstütze
(Nr. 37) um 180°, wie auf dem linken Bild zu sehen
ist. Stecken Sie die Sattelstütze (Nr. 37) wieder in
die Einsteckhülse auf dem Hauptrahmen (Nr. 85)
ein. Stellen Sie die Sattelstütze (Nr. 37) in die
gewünschte Position und ziehen Sie den
Einstellknopf (Nr. 38) fest.
SCHRITT 2:
Befestigen Sie die Vorderen und Hinteren
Stabilisatoren (Nr. 73 bzw. Nr. 84) mit 4 Bolten (Nr.
76) und 4 Beilagscheiben (Nr. 77) am
Hauptrahmen (Nr. 85). Mit dem Inbusschlüssel
(Nr. 90) festdrehen und sichern.
#38 M16*1.5 1pc
85
38
37
37
38
85
#90
S6
#77 Φ16*Φ8*H1.5 4pcs
76
77
84
76
77
76
73
76
77
85
#76 M8*40*20*S6 4pcs
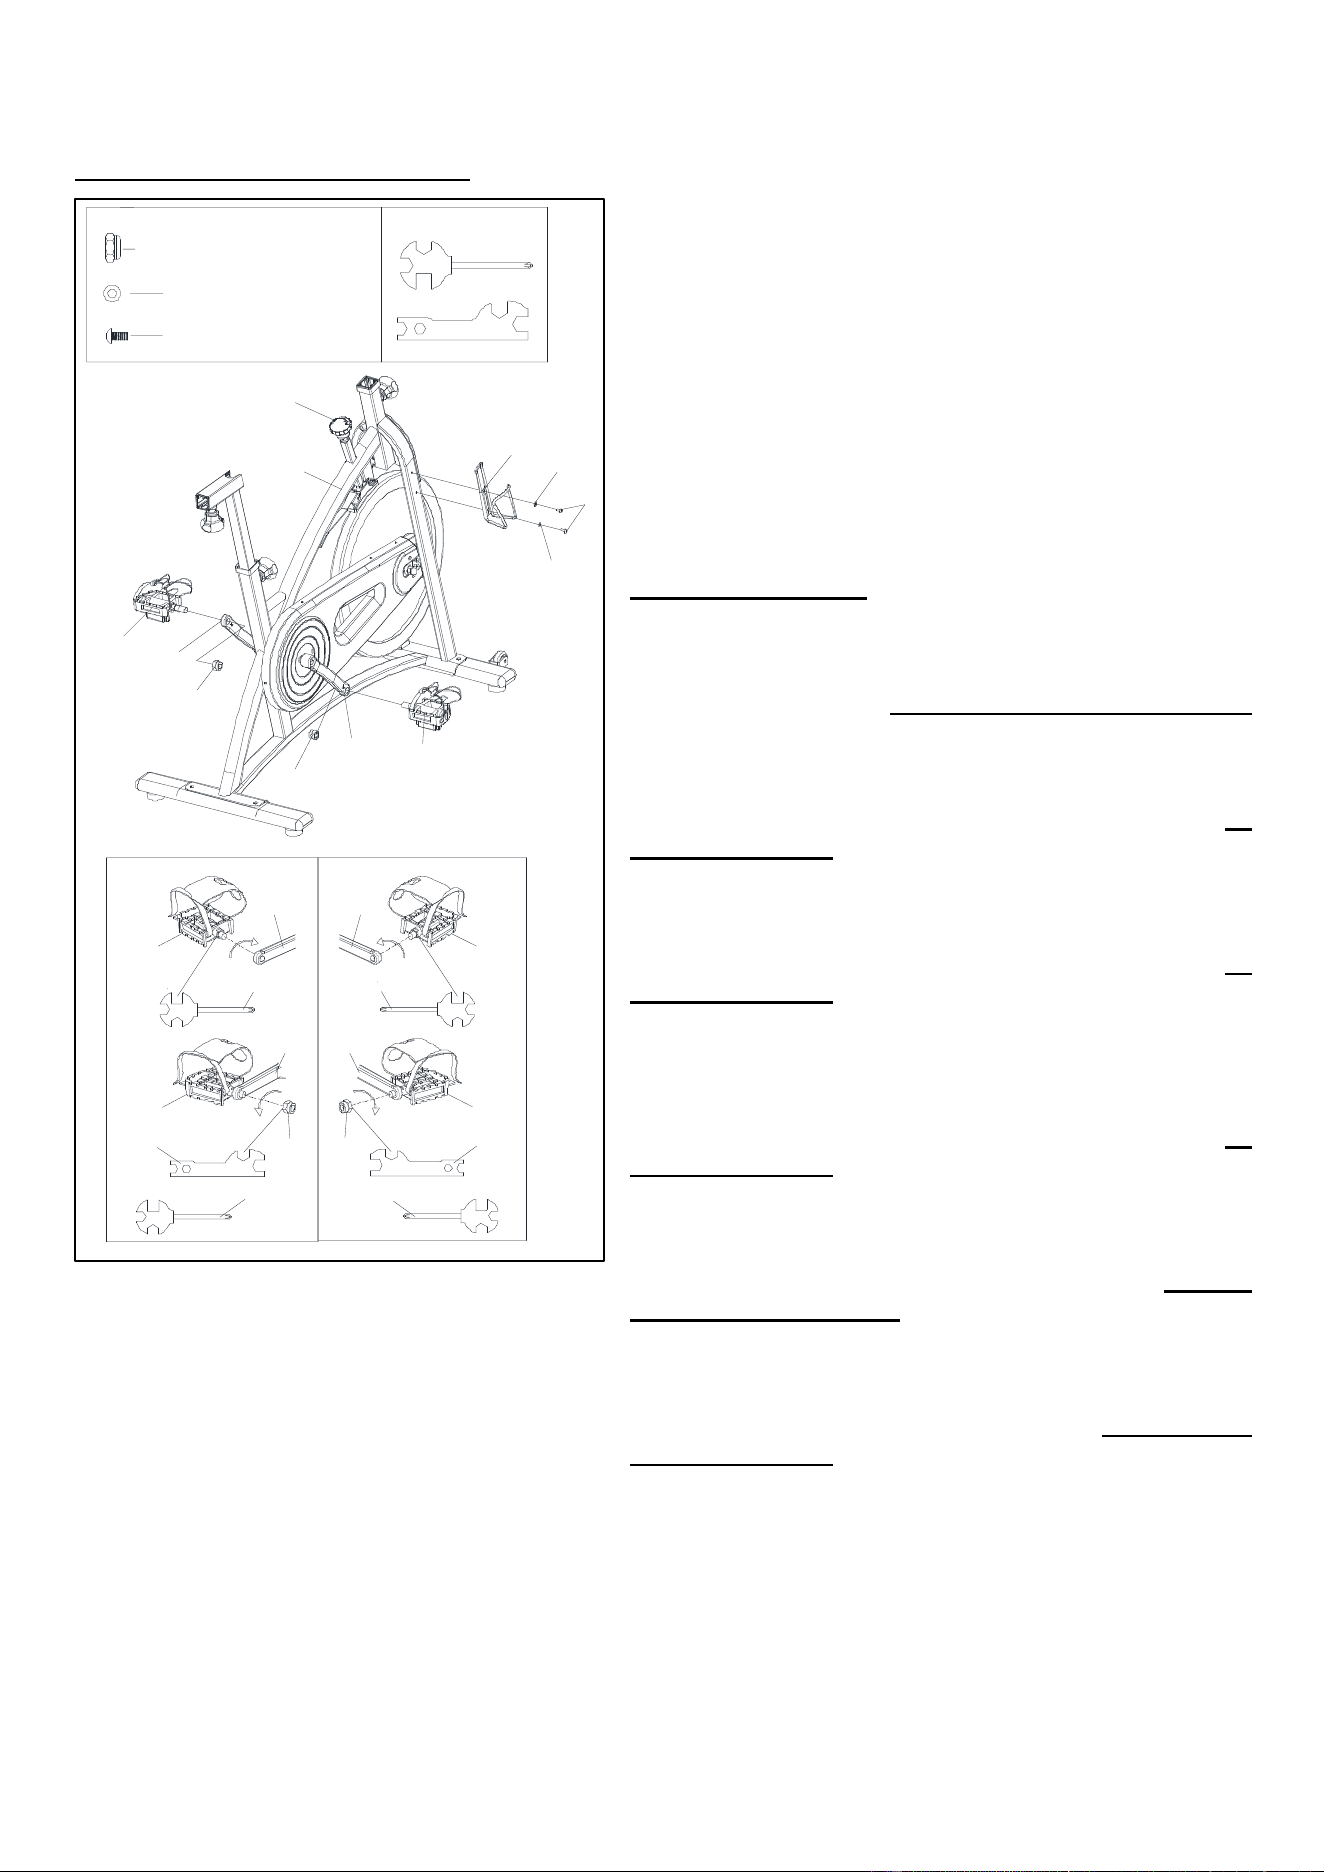
31
Wir schätzen Ihre Erfahrung im Umgang mit den Produkten von Sunny Health and Fitness. Für
Fragen zu Teilen oder Hilfe bei der Fehlerbehebung kontaktieren Sie uns bitte unter
SCHRITT 3:
WARNUNG! Lesen Sie die Anweisungen sorgfältig durch,
da eine unsachgemäße Montage dauerhafte Schäden am
Fahrrad verursachen kann.
Hinweis: Die Pedalen (Nr. 83L/R) sind mit „L“ und „R“ für
Links bzw. Rechts gekennzeichnet.
Entfernen Sie die 2 Nylonmuttern (Nr. 82L/R) an den
Pedalen (Nr. 83L/R).
Drehen Sie den Spannungssteuerungsknopf (Nr. 15)
IM UHRZEIGERSINN so fest wie möglich mit der Hand.
Richten Sie das Linke Pedal (Nr. 83L) um 90° zum Linke
Kurbel (Nr. 45L) aus. Drehen Sie die Pedalschraube am
Linke Pedal (Nr. 83L) GEGEN DEN UHRZEIGERSINN
so fest wie möglich mit der Hand. Anschließend mit dem
Schraubenschlüssel (Nr. 88) festdrehen und sichern.
Drehen Sie die Linke Nylonmutter (Nr. 82L) IM
UHRZEIGERSINN so fest wie möglich mit der Hand.
Halten Sie mit dem Schraubenschlüssel (Nr. 88) die
Pedalschraube am Linke Pedal (Nr. 83L) fest und
benutzen Sie den Schraubenschlüssel (Nr. 68), um
dabei die Linke Nylonmutter (Nr. 82L) IM
UHRZEIGERSINN zu drehen, bis sie am Linke Kurbel
(Nr. 45L) festgeschraubt ist.
Richten Sie das Rechte Pedal (Nr. 83R) um 90° zum
Rechte Kurbel (Nr. 45R) aus. Drehen Sie die
Pedalschraube am Rechte Pedal (Nr. 83R) IM
UHRZEIGERSINN so fest wie möglich mit der Hand.
Anschließend mit dem Schraubenschlüssel (Nr. 88)
festdrehen und sichern.
Drehen Sie die Rechte Nylonmutter (Nr. 82R) GEGEN
DEN UHRZEIGERSINN so fest wie möglich mit der
Hand. Halten Sie mit dem Schraubenschlüssel (Nr. 88)
die Pedalschraube am Rechte Pedal (Nr. 83R) fest und
benutzen Sie den Schraubenschlüssel (Nr. 68), um
dabei die Rechte Nylonmutter (Nr. 82R) GEGEN DEN
UHRZEIGERSINN zu drehen, bis sie am Rechte Kurbel
(Nr. 45R) festgeschraubt ist.
Mit dem Schraubenschlüssel (Nr. 88) entfernen Sie 2
Schrauben (Nr. 72) und 2 Beilagscheiben (Nr. 71) vom
Hauptrahmen (Nr. 85). Befestigen Sie dann den
Wasserflaschenhalter (Nr. 70) mit den vorher entfernten
2 Schrauben (Nr. 72) und 2 Beilagscheiben (Nr. 71) am
Hauptrahmen (Nr. 85). Mit dem Schraubenschlüssel
(Nr. 88) festdrehen und sichern.
S15
S19
#68 1pc
#88 1pc
#82L/R 9/16*20*H8*S19 2pcs
#71 D5*Φ13*1 2pcs
#72 M5*16*Φ10 2pcs
15
85
70
71
72
71
83R
45R
82R
82L
45L
83L
45L
83L
45R
83R
45R
83R
82R
45L
83L
82L
S158888S15
6868
S19
S19
8888
S15 S15
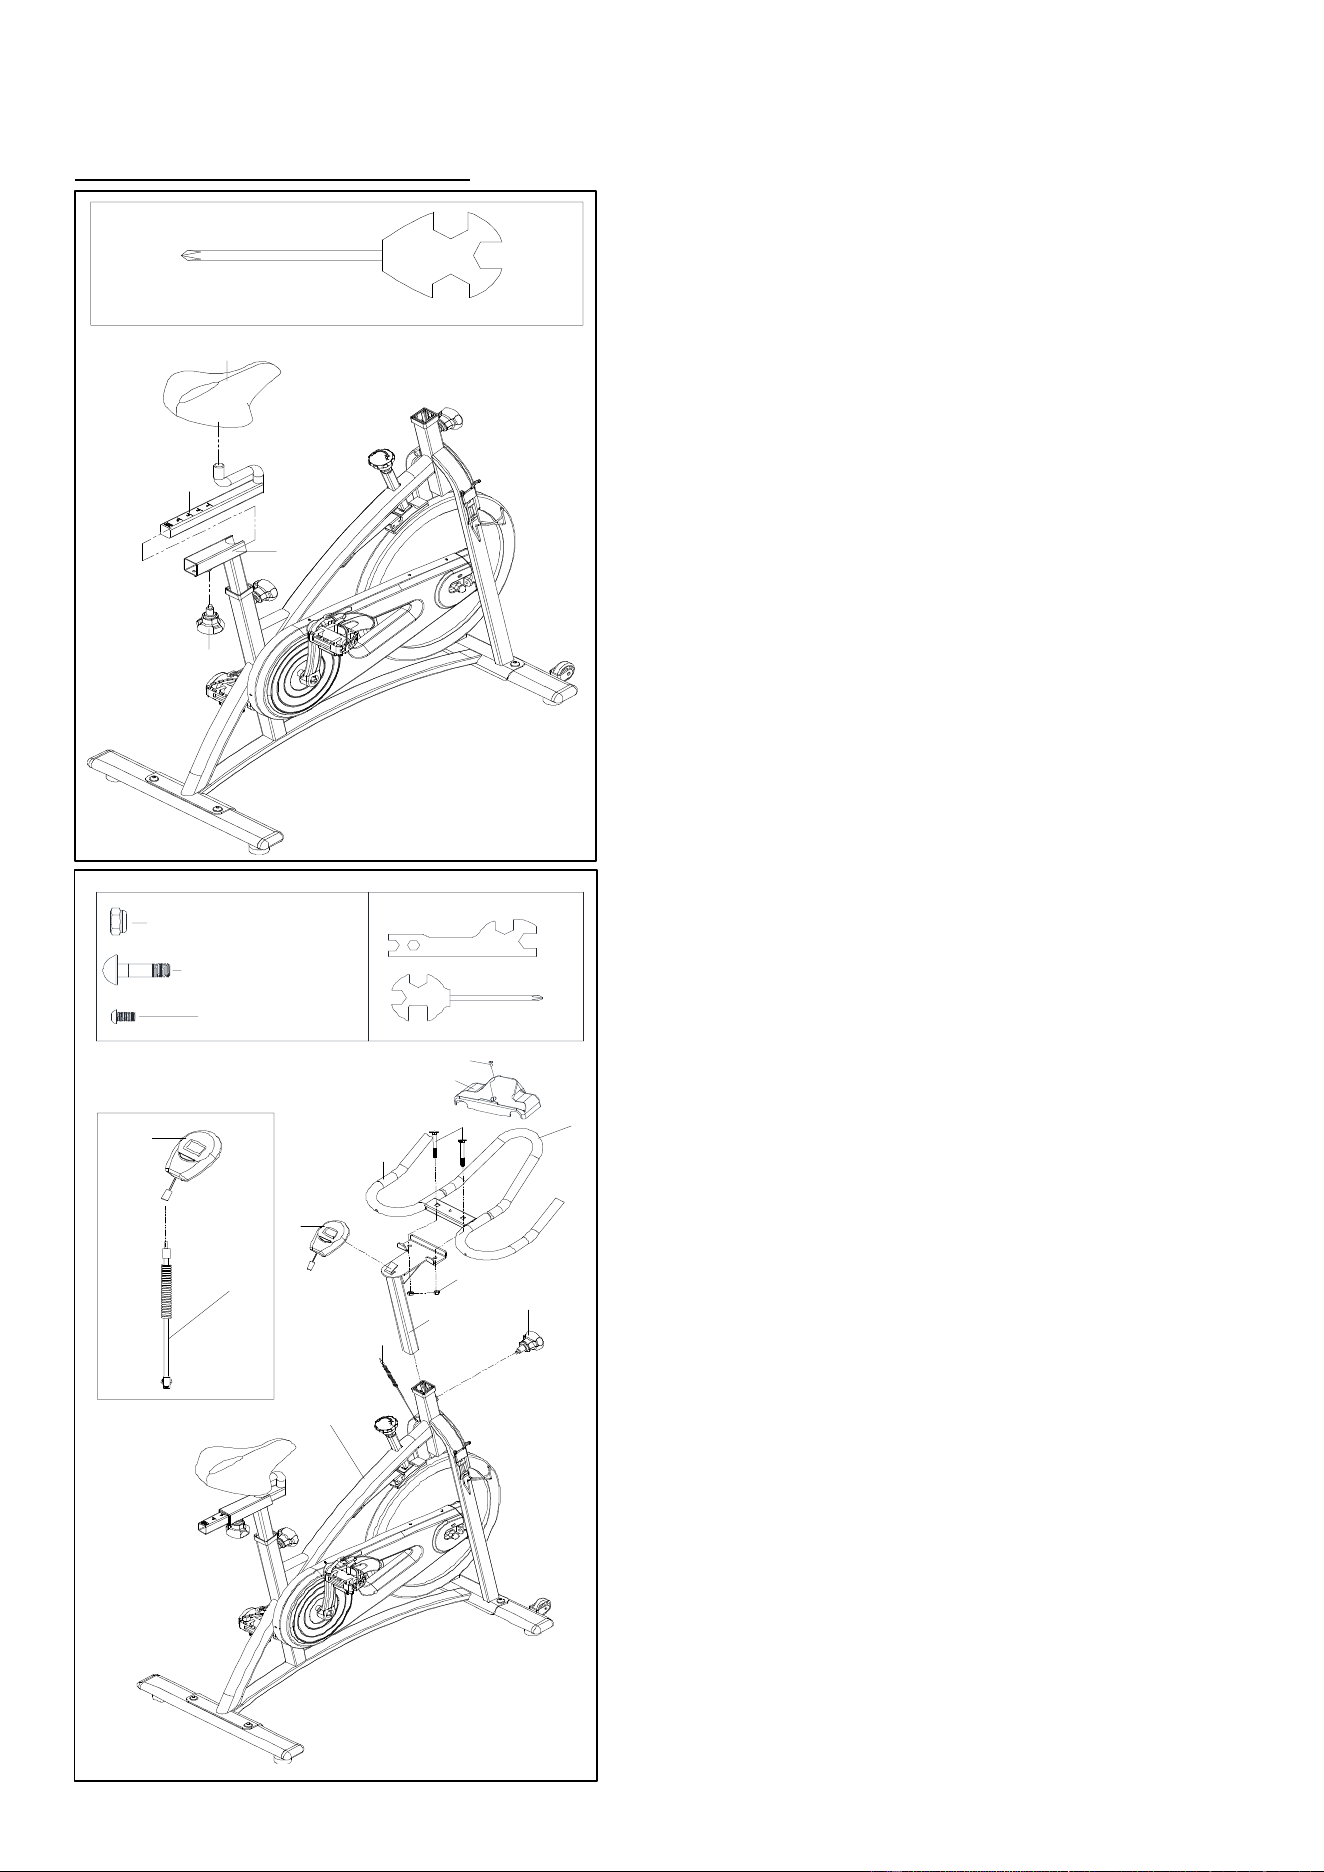
32
Wir schätzen Ihre Erfahrung im Umgang mit den Produkten von Sunny Health and Fitness. Für
Fragen zu Teilen oder Hilfe bei der Fehlerbehebung kontaktieren Sie uns bitte unter
SCHRITT 4:
Lösen und entfernen Sie den Einstellknopf (Nr. 38)
[des Sattelschlittens]. Stecken Sie den
Sattelschlitten (Nr. 36) in die Sattelstütze (Nr. 37).
Justieren Sie den Sattelschlitten (Nr. 36) in die
gewünschte Position. Setzen Sie den Einstellknopf
(Nr. 38) wieder ein und ziehen Sie ihn fest, um die
Stütze zu fixieren.
Mit Schraubenschlüssel (Nr. 88), befestigen Sie
den Sitz (Nr. 35) am Sattelschlitten (Nr. 36).
HINWEIS: Bevor Sie den Sitz vollständig festziehen,
können Sie die Vorderkante des Sitzes höher oder
niedriger einstellen, um Ihren Bedürfnissen gerecht
zu werden.
SCHRITT 5:
Lösen und entfernen Sie den Einstellknopf (Nr. 38)
[der Lenkstange]. Stecken Sie die Lenkerstütze
(Nr. 10) in die Einsteckhülse auf der Vorderseite des
Hauptrahmen (Nr. 85). Stellen Sie die
Lenkerstütze (Nr. 10) in die gewünschte Position,
setzen Sie den Einstellknopf (Nr. 38) wieder ein
und ziehen Sie ihn fest, um die Stütze zu fixieren.
Befestigen Sie die Griffstange (B) (Nr. 8) mit 2
Bolzen (Nr. 6) und 2 Schraubenmutter (Nr. 11) an
der Lenkerstütze (Nr. 10). Mit dem
Schraubenschlüssel (Nr. 68) festdrehen und
sichern.
Mit dem Schraubenschlüssel (Nr. 88), entfernen
Sie die Schraube (Nr. 12) von der Griffstange (B)
(Nr. 8). Mit der vorher entfernten Schraube (Nr. 12),
montieren Sie die Tablet-Halterung (Nr. 2) am
Griffstange (B) (Nr. 8). Mit dem
Schraubenschlüssel (Nr. 88) festdrehen und
sichern.
Montieren Sie den Computer (Nr. 9) auf die
Halterung an der Lenkerstütze (Nr. 10). Verbinden
Sie das Verbindungskabel des Computer (Nr. 9) mit
dem Stammkabel (Nr. 87).
Die Montage ist abgeschlossen!
9
11
6
2
85
38
3
8
10
9
#68
#88
S17
21
87
87
# 1 1 M 1 0 * H 9 . 5 * S 1 7 2 p c s
# 6 M10*35*15*H6 2pcs
# 1 2 M 5 * 1 2 1 p c
38
36
35
#88
37
S 14
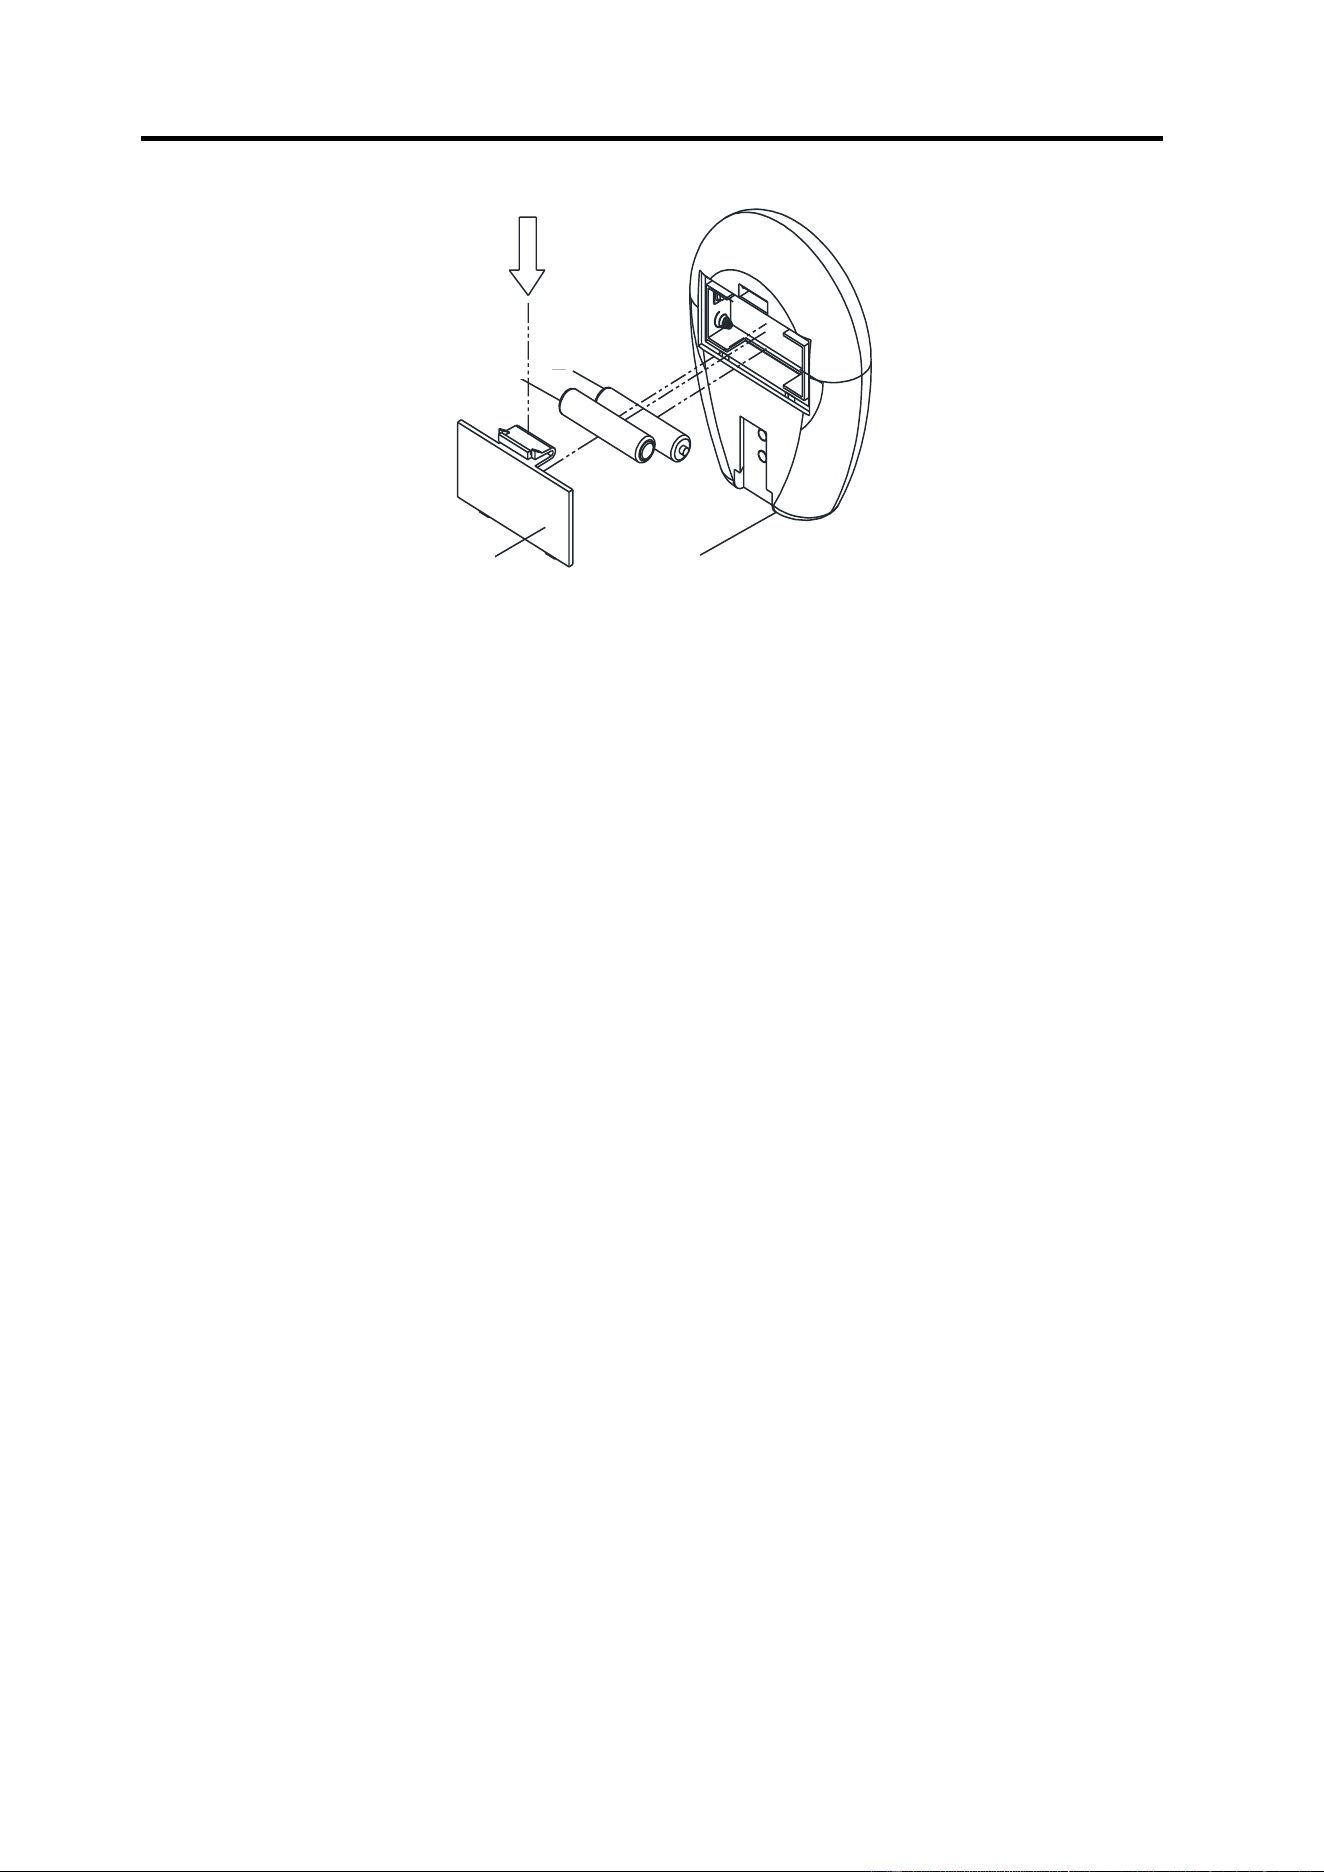
33
EINLEGEN UND AUSTAUSCHEN DER BATTERIE
2
1
3
2
EINLEGEN DER BATTERIEN
1. Nehmen Sie 2 AA-Batterien aus der Computerbox.
2. Betätigen Sie die Verschlusskappe der Batterieabdeckung auf der Rückseite des Computer (Nr.
9) und entfernen Sie dann die Batterieabdeckung.
3. Legen Sie 2 AA-Batterien in das Batteriefach auf der Rückseite des Computer (Nr. 9) ein.
Achten Sie vor dem Einsetzen der Batterie auf die Endungen + und –.
4. Drücken Sie die Verschlusskappe der Batterieabdeckung und setzen Sie die Batterieabdeckung
wieder auf die Rückseite des Computer (Nr. 9).
Das Einlegen der Batterien ist abgeschlossen!
AUSTAUSCHEN DER BATTERIEN
4. Drücken Sie die Verschlusskappe der Batterieabdeckung auf der Rückseite des Computer (Nr.
9) und entfernen Sie dann die Batterieabdeckung.
5. Entfernen Sie die 2 alten AA-Batterien im Batteriefach und legen Sie 2 neue AA-Batterien in das
Batteriefach auf der Rückseite des Computer (Nr. 9) ein. Achten Sie vor dem Einsetzen der
Batterie auf die Endungen + und –.
6. Drücken Sie die Verschlusskappe der Batterieabdeckung und setzen Sie die Batterieabdeckung
wieder auf die Rückseite des Computer (Nr. 9).
Das Austauschen der Batterien ist abgeschlossen!
HINWEIS: Wechseln Sie immer beide Batterien gleichzeitig. Mischen Sie weder die Batterietypen
noch alte und neue Batterien. Entsorgen Sie die Batterien gemäß den staatlichen und regionalen
Richtlinien.
Batterieabde
ckung
Batterie
Batterie
9

34
TRAININGSCOMPUTER
TECHNISCHE DATEN:
TIME (ZEIT)-------------------------------------------00:00-99:59 MIN:SEK
SPEED (GESCHWINDIGKEIT)------------------0.0-999.9 KM/H
DISTANCE (DISTANZ)-----------------------------0.00-99.99 KM
CALORIES (KALORIEN)--------------------------0.0-999.9 KCAL
FUNKTIONSTASTE:
MODE: Zur Auswahl der Funktion (Scan, Zeit, Geschwindigkeit, Distanz, Kalorien) drücken.
Diese Taste 3 Sekunden drücken, um alle Werte zurückzusetzen.
LÖSCHEN: Drücken, um den Wert zurückzusetzen. Diese Funktion ist nur verfügbar, wenn das
Fahrrad angehalten ist und der Computer sich nicht im SCAN-Modus befindet.
BEDIENUNGSANWEISUNGEN:
1. AUTO ON/OFF: Wenn das Fahrrad in Bewegung gesetzt oder die MODE-Taste gedrückt wird,
aktiviert sich der Computer und bleibt aktiv, sofern er nicht etwa 4 Minuten lang inaktiv ist. Der
Computer schaltet sich automatisch aus.
2. MODE: Um die LOCK-MODE Einstellung auszuwählen, drücken Sie die MODE-Taste; wenn
sich der Zeiger auf der Funktion befindet, die Sie anzeigen möchten, nehmen Sie Ihren Finger
von der Taste. Nach der Sperrung wird nur die ausgewählte Funktion angezeigt.
FUNKTIONEN:
TIME (ZEIT): Zählt die Gesamtzeit eines Trainings vom Anfang bis zum Ende.
SPEED (GESCHWINDIGKEIT): Zeigt die momentan erreichte Geschwindigkeit an.
DISTANCE (DISTANZ): Zählt die Gesamtdistanz eines Trainings vom Anfang bis zum Ende.
CALORIES (KALORIEN): Zählt die Gesamtzahl der während eines Trainings verbrauchten
Kalorien von Anfang bis Ende. (Die Daten sind ein grober Richtwert, der nicht in der
medizinischen Behandlung verwendet werden kann.)
SCAN: Zeigt automatisch Funktionen in der folgenden Reihenfolge an: Zeit, Geschwindigkeit,
Distanz, Kalorien (Wiederholung).
BATTERIE: Dieser Computer verwendet zwei AA-Batterien. Wenn die Anzeige falsch erscheint
oder schwer lesbar wird, legen Sie bitte neue Batterien ein.
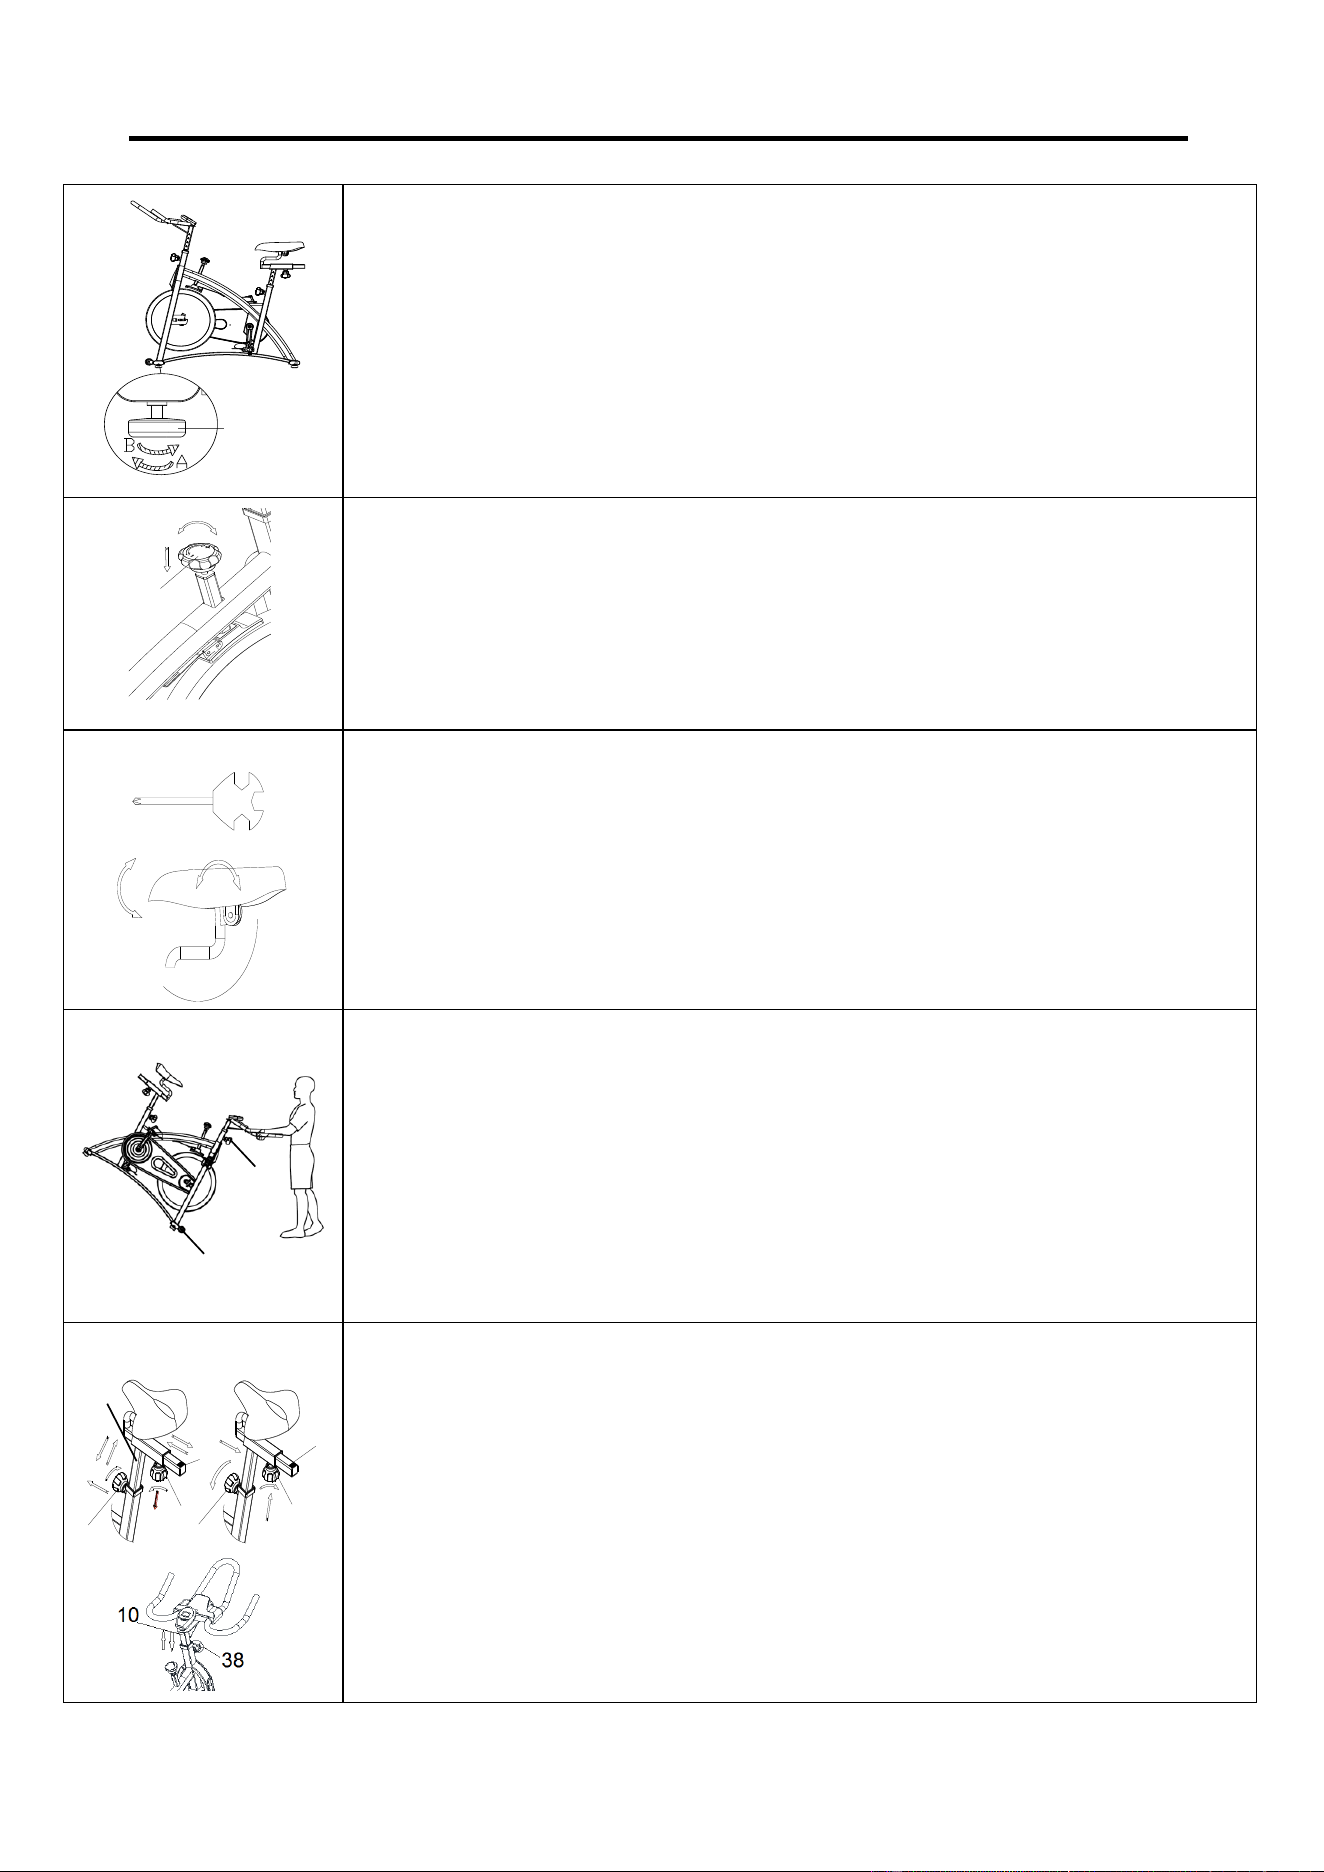
35
EINSTELLUNGEN UND GEBRAUCHSANWEISUNG
74
EINSTELLEN DER BALANCE
Um eine gleichmäßige und komfortable Bewegung zu erreichen, müssen Sie sicherstellen,
dass die Standsicherheit des Fahrrads gewährleistet ist. Wenn Sie feststellen, dass das
Fahrrad während des Gebrauchs nicht im Gleichgewicht ist, dann sollten Sie die
Fußnivellierer unterhalb der vorderen und hinteren Stabilisatoren einstellen. Dazu drehen
Sie einfach den Fußnivellierer (Nr. 74), bis das Fahrrad eben zur Bodenoberfläche ist. Bei
Bedarf wiederholen Sie diesen Vorgang, um die restlichen Fußhebel anzupassen.
15
EINSTELLEN DER SPANNUNG UND NOTBREMSUNG
Stellen Sie die Spannung ein, indem Sie den Spannungssteuerungsknopf (Nr. 15) im
Uhrzeigersinn drehen, um den Widerstand zu erhöhen. Drehen Sie den
Spannungssteuerungsknopf (Nr. 15) gegen den Uhrzeigersinn, um den
Widerstandsgrad zu reduzieren. Drücken Sie den Spannungssteuerungsknopf (Nr. 15)
nach unten, um den Bremsvorgang zu erzwingen und das Fahrrad sofort anzuhalten.
S14
EINSTELLEN DES SITZWINKELS
Verwenden Sie den Schraubenschlüssel (Nr. 88), um die Mutter unter dem Sitz zu lösen.
Richten Sie den Sitz in dem gewünschten Winkel aus und schrauben Sie die Mutter wieder
an. Überprüfen Sie die Mutter regelmäßig, um sicherzustellen, dass sie fest und gesichert
ist. Verwenden Sie den Schraubenschlüssel (Nr. 88), um ihn bei Bedarf festzuziehen.
Hinweis: Sie müssen die Mutter auf der gegenüberliegenden Seite dabei gleichzeitig
festziehen. Dazu ist ein zweiter Schraubenschlüssel erforderlich.
TRANSPORTIEREN DES FAHRRADS
Zum Transportieren des Fahrrads muss zunächst sichergestellt werden, dass die
Lenkstange ordnungsgemäß gesichert ist. Wenn die Lenkstange locker ist, ziehen Sie den
Einstellknopf (Nr. 38) fest, um sie zu sichern. Stellen Sie sich anschließend vor das
Fahrrad, sodass Sie sich direkt vor der Lenkstange befinden. Fassen und halten Sie beide
Seiten der Lenkstange fest, stellen Sie einen Fuß auf den Stabilisator Vorne (Nr. 73) und
neigen Sie das Fahrrad zu sich, bis die Transporträder des Stabilisator Vorne (Nr. 73) den
Boden berühren. Mit den Rädern auf dem Boden können Sie das Fahrrad problemlos an
den gewünschten Ort bringen.
I
II
38
38
38
38
36
36
EINSTELLEN DER HÖHE
Lösen und ziehen Sie den [Sitzhöhe] Einstellknopf (Nr. 38) heraus, um die Höhe des
Sitzes einzustellen. Sie können den Sitz auch nach vorne oder hinten schieben, indem Sie
den [Sitz] Einstellknopf (Nr. 38) am Sattelschlitten (Nr. 36) lösen und herausziehen. Die
Höhe der Lenkstange kann durch Drehen des [Lenkstangen] Einstellknopf (Nr. 38)
eingestellt werden. Beim Einstellen sieht man eine Begrenzung an der Sattelstütze, am
Sattelschlittens und an der Lenkerstütze. Die Stützen dürfen NICHT über diese
Markierungen hinausgehoben werden. Beim Abschluss dieser Einstellung ist es wichtig,
immer den Einstellknopf (Nr. 38) zu prüfen, dass er vollständig gesichert ist.
38
37
73

36
WARTUNG UND PFLEGE
Hier finden Sie allgemeine Informationen für die tägliche, wöchentliche und monatliche Wartung
Ihres Fahrrads.
Version 4.3
TÄGLICHE WARTUNG
Wischen Sie nach jeder Trainingseinheit alle Teile
des Gerätes ab: Sitz, Rahmen und Lenkstangen.
Achten Sie besonders auf die Sattelstütze, die
Lenkerstütze und den Riemen-/Kettenschutz.
Schweiß ist sehr korrosiv und kann zu Problemen
führen, die einen späteren Austausch von Teilen
erfordern.
1.
Steigen Sie auf das Fahrrad und aktivieren Sie
den Antriebsstrang.
2.
Achten Sie auf Vibrationen, die durch die Pedale
verursacht werden. Wenn Sie Vibrationen
spüren, müssen Sie möglicherweise die Pedale,
das Tretlager oder die
Antriebsriemen-/Kettenspannung nachziehen.
3.
Ziehen Sie die Pedale mit einem
Schraubenschlüssel fest, bis sie sicher sind.
MONATLICHE WARTUNG
1.
Überprüfen Sie, ob alle Hardwareteile sicher sind,
wie z.B.: Wasserflaschenhalter,
Schwungradmuttern,
Riemen-/Kettenschutzschrauben,
Bremssattel-Kontermuttern und
Bremssattel-Zugstangenmuttern.
2.
Überprüfen Sie die Bremszugstange auf
Verschleißerscheinungen wie z.B. fehlende
Gewinde. Reinigen und schmieren Sie die
Bremszugstange.
3.
Reinigen und schmieren Sie die Sattelstütze, die
Lenkerstütze und den Sattelschlitten. Entfernen Sie
eventuelle Ablagerungen von Fremdkörpern.
WÖCHENTLICHE WARTUNG
1.
Überprüfen Sie bewegliche Teile und ziehen Sie
die Hardware fest.
2.
Überprüfen Sie die Rahmenbeschläge der
Zugbolzen und vergewissern Sie sich, dass die
Beschläge fest sitzen. Lose Rahmenbeschläge
können im Laufe der Zeit die Gewinde
herauslösen und zu erheblichen Schäden
führen.
3.
Reinigen und schmieren Sie die
Pop-Pin-Einheiten. Ziehen Sie den Pin an und
sprühen Sie eine kleine Menge Schmiermittel
auf den Schaft.
4.
Ziehen Sie die Sitzbefestigungen fest und
vergewissern Sie sich, dass der Sitz gerade und
zentriert ist.
5.
Bürsten und behandeln Sie die
Widerstandspads. Entfernen Sie alle
Fremdkörper, die sich möglicherweise auf den
Pads angesammelt haben. Besprühen Sie die
Pads mit Silikon-Gleitmittel. Dadurch wird das
Reibungsgeräusch zwischen den Belägen und
dem Schwungrad reduziert.
6.
Kontrollieren Sie das Tretlager, die Pedalhaken
und die Fußhalteriemen mit
einer Sichtprüfung.
Wenn einer der Teile locker oder nicht richtig
befestigt ist, anbringen und festziehen.
PFLEGE DES LEDER-BREMSBELAGS
1.
Führen Sie diese Wartungsarbeiten bei der
Erstmontage des Bremsbelags und für die gesamte
Lebensdauer des Bremsbelags durch. Die
Einhaltung dieser einfachen Richtlinien verlängert
die Lebensdauer Ihrer Bremsbeläge.
2.
Einige Bremsbelageinheiten sind bereits
vorgeschmiert. Drücken Sie den Bremsbelag
zusammen. Wenn Schmiermittel freigesetzt wird,
wurde der Belag vorgeschmiert.
3.
Wenn der Bremsbelag trocken ist, dann
beschichten Sie ihn mit Schmieröl. Bürsten Sie das
Leder mit einer sauberen Drahtbürste und tragen
Sie dann das Öl auf. Das Öl sollte in das Pad
eindringen können. 4-5 Mal wiederholen, bis das
Pad gesättigt ist, aber nicht mit Öl tropft. Wenn das
Pad gesättigt ist, nimmt es kein Öl mehr auf.
4.
Überprüfen Sie den Bremsbelag wöchentlich und
schmieren Sie ihn bei Bedarf. Der Belag sollte kein
verschmiertes Aussehen haben. Wenn das Pad
schmierig erscheint, dann bürsten Sie es mit einer
Drahtbürste und tragen Sie bei Bedarf
Schmiermittel auf.
Wenn einer der
Schwammpolster durch das Lederpad sichtbar ist,
sollte der Bremsbelag ausgetauscht werden.

37