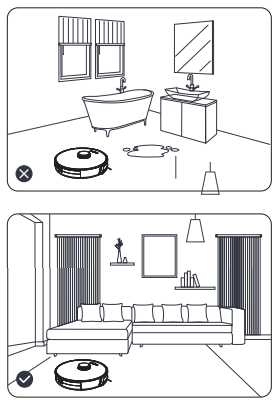
1. Before starting the vacuum cleaner, clean up wires and sundries scattered on the ground, and remove easy-to-fall, fragile, valuable and potentially dangerous items. Avoid being entangled, jammed, dragged, or knocked down by the main unit; otherwise, personal or property damage may be resulted.
2. Avoid using this product in the wading area; otherwise, the fan may be damaged, affecting the performance of the vacuum cleaner.
Preparations
Remove the protective strip
Before using the main unit, remove the protective strip from the main unit.
Charging the Main Unit
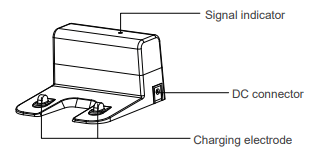
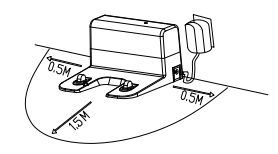
1. Place the docking station on the flat ground against the wall. Do not place any articles 0.5m to the left and right of the docking station and 1.5m in front of the docking station.
2. Connect the docking station to the power supply.
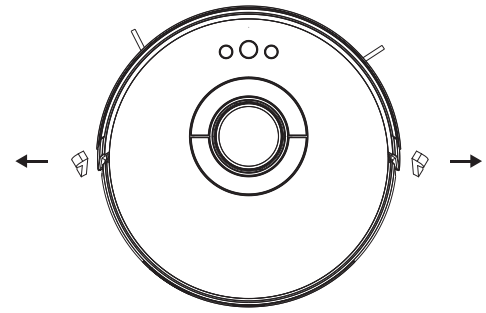
3. Install the left and right side brushes.
4. Place the main unit on the docking station to charge the main unit. During charging, the indicator blinks. When charging is completed, the indicator is steady on. It takes about 6.5 hours to fully charge the main unit.
During the cleaning process, the main unit automatically checks its power level. If the power is insufficient, the main unit activates the "Return to docking station" mode, and automatically returns to the docking station for charging. Alternatively, you can tap the "Return to docking station" button in the app to activate the "Return to docking station" mode of the main unit.
Note:
Do not use the docking station in a highly reflective environment such as the environment exposed to direct sunlight or with mirrors nearby.
To ensure the normal working time of the main unit, fully charge the main unit before use. The charging time is about 6.5 hours.
To ensure the safety of charging and prevent the damp cloth from damaging the floor, remove the water tank before charging the main unit.
Use Instructions
Power on and off the machine
Tap and hold the button to power on the machine. Then, the power indicator is on, and the vacuum cleaner enters the standby state. When the vacuum cleaner is in a static state, press and hold the button to power off the machine and stop the current cleaning task.
Tip: The vacuum cleaner in charging state cannot be powered off.
Start cleaning
Press the button to start cleaning. Then, the vacuum cleaner dynamically plans the cleaning route according to the map generated after scanning, and completes cleaning of different zones one by one. In each zone, the vacuum cleaner first sweeps the floor along the wall, and then moves in zigzag mode to clean the remaining part of the zone in an orderly and efficient manner.
Tips:
If the power is too low, the vacuum cleaner cannot start cleaning. Therefore, charge the vacuum cleaner before starting it.
Before cleaning, tidy up all kinds of wires on the ground (including the power cord of the docking station). Otherwise, the vacuum cleaner may drag the wires while cleaning, which may cause power failures of other electric appliance or damage to items or wires.
If the cleaning area is less than 2 square meters, the vacuum cleaner will clean the area twice by default.
If the power is insufficient in the cleaning process, the main unit will automatically return to the docking station for charging. After the power is sufficient, the main unit will automatically return to the interrupted point to continue cleaning (ensure that you have enabled the resumable cleaning function).
Pause cleaning
If you need to pause the robot vacuum, please press the button. You can press the button to continue cleaning, or press the button to return to the docking station and stop the current cleaning task.
Tip: In pause state, if the vacuum cleaner returns to the docking station for charging, the current cleaning task is stopped.
Enter the sleep mode
If no operation is performed in 10 minutes, the vacuum cleaner automatically enters the sleep mode, and the power indicator blinks every several seconds. In sleep mode, you can press any button to wake up the vacuum cleaner.
Tips:
When the vacuum cleaner is being charged at the docking station, it cannot enter the sleep mode.
If the sleep time exceeds 12 hours, the vacuum cleaner automatically powers off.
Charge the vacuum cleaner
Auto mode: After completing cleaning, the vacuum cleaner automatically returns to the docking station for charging.
Manual mode: In pause state, you can press the button to activate the "Return to docking station" mode.
When the vacuum cleaner is being charged, the power indicator blinks in breathing manner.
Tips: If the vacuum cleaner fails to find the docking station, it automatically returns to the starting point. In this case, you need to manually put the vacuum cleaner back to the docking station.
Faulty state
If the vacuum cleaner encounters a fault while working, the power indicator blinks quickly in red, and a voice prompt is generated. For details about troubleshooting method, see "Troubleshooting".
Tip:
In faulty state, if no operation is performed in 10 minutes, the vacuum cleaner automatically enters the sleep mode.
In faulty state, if the vacuum cleaner returns to the docking station for charging, the current cleaning task is stopped.
Reset the Wi-Fi settings
If your mobile phone fails to connect to the vacuum cleaner due to reasons such as change of router settings and password forgotten, re-pair the vacuum cleaner with the mobile phone according to the Wi-Fi connection instructions.
Tips: If the vacuum cleaner is in wait-to-connect state for more than 2 minutes, its Wi-Fi function is automatically disabled. To reconnect the vacuum cleaner to your mobile phone, reset the Wi-Fi settings.
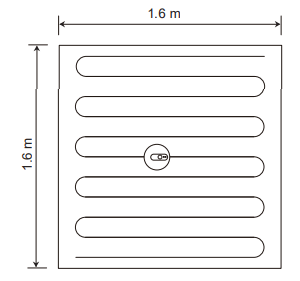
Pin and Go
You can use the mobile app to specify a target point on the map. The vacuum cleaner will automatically plan the route and move to the specified point. If you specify a target point in the app when the vacuum cleaner is in standby or pause state, the vacuum cleaner will clean the 1.6mx1.6m square zone centered on this point. After cleaning, the vacuum cleaner will automatically return to the starting point and stop working.
Tip: If you activate partial cleaning when the vacuum cleaner is in pause state, the current cleaning task will be stopped.
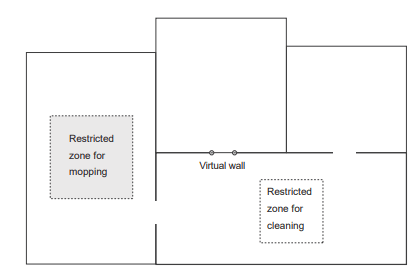
Set a restricted zone or virtual wall
You can use the mobile app to set a restricted zone or virtual wall. After the setting is completed, the vacuum cleaner will not enter the restricted zone or cross the virtual wall for cleaning.
Tips:
Before using this function, you need to enable the map save mode for the vacuum cleaner in the mobile app.
This function is only used to divide cleaning zones, but cannot be used to block dangerous zones.
If the vacuum cleaner is moved or there are significant changes in the home environment, the map may become invalid and the settings of the virtual wall or restricted zone may be lost.
More app functions
Real-time map update
Volume adjustment
Cleaning record viewing
Map management
Robot voice changing
Firmware update
Robot positioning
Robot status viewing
Tip: The functions and details of the app may change slightly due to continuous development and upgrade of the app. The specific functions and details of the app are subject to the actual version.
Selected zone cleaning
You can use the mobile app to select one or more zones for cleaning. The vacuum cleaner will clean one or more rooms based on the zone that you select on the app map.
Tips:
Before using this function, you need to enable the map save mode for the vacuum cleaner in the mobile app, and the vacuum cleaner has already generated a map for cleaning.
After cleaning starts, the main unit may move to a place beyond the selected zone. Make sure that you have cleared the obstacles on the ground around the selected zone, which cannot be used for safety isolation.
Configured zone cleaning
You can use the mobile app to configure a zone for cleaning. The vacuum cleaner will start cleaning based on the zone that you plan in the mobile app.
Tips: After cleaning starts, the main unit may move to a place beyond the configured zone. Make sure that you have cleared the obstacles on the ground around the configured zone, which cannot be used for safety isolation.
Cleaning mode
You can use the mobile app to select the Energy saving, Standard, and Strong mode. The Standard mode is selected by default.
DND mode
During the Do-Not-Disturb (DND) period, the vacuum cleaner will not automatically continue cleaning or play the voice prompt. The power indicator dims. You can use the mobile app to disable the DND mode, or change the DND time range.
Parts Maintenance
Regular maintenance
To achieve the best cleaning effect, clean and maintain the main unit regularly according to the table below. Determine the frequency of cleaning and maintenance according to your use habits.
Recommended cleaning and maintenance frequency:
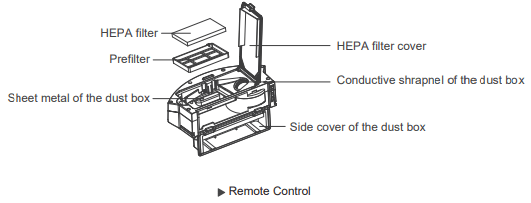
Dust Box
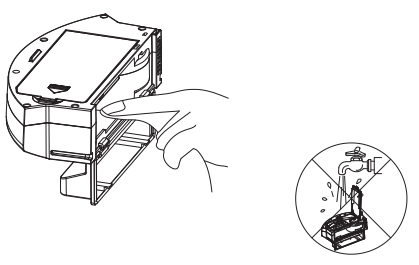
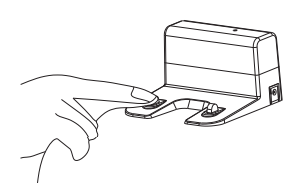
1. Press down the button on the dust box to remove the dust box.
2. Open the side cover of the dust box.
3. Dump the trash.
4. Open the HEPA filter cover.
5. Take out the HEPA filter and prefilter. Tap the HEPA filter to remove dust. Water washing is not recommended for the HEPA filter.
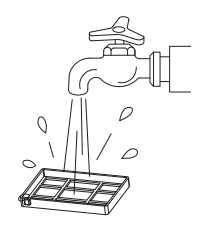
6. Wash the prefilter.
7. Wipe the dust box clean with a cloth. Do not wash the dust box with water.
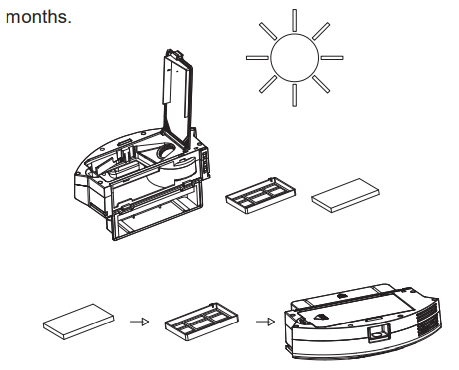
8. Dry the dust box and filter components, and keep them dry to ensure their service life.
Note: It is recommended that you wash the prefilter every 15 to 30 days. The maximum service life of the HEPA filter is 3 months.
A. Install the prefilter and HEPA filter back to the dust box.
Note:
Before installing filters, ensure that the prefilter and HEPA filter are dry.
Do not expose the prefilter and HEPA filter to the sunlight.
B. Close the cover of the dust box, and install the dust box on the main unit.
Note: Do not wash the dust box with water.
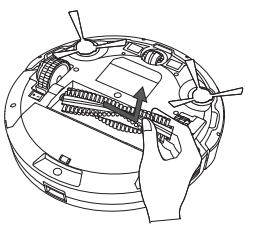
Roller Brush and Side Brush
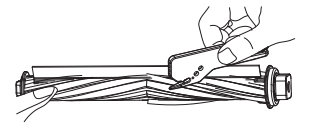
1. Clean the roller brush.
2. Open the roller brush cover assembly.
3. Take out the roller brush shaft.
4. Use a tool to clean the tangled hair.
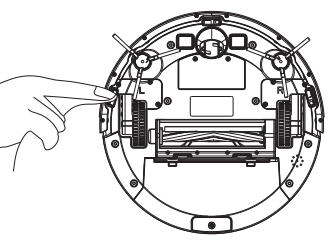
5. Clean the side brushes.
Charging electrode, anti-fall sensor, drive wheel and omnidirectional wheel
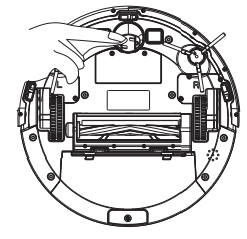
1. Clean the charging electrode.
2. Clean the drive wheel and omnidirectional wheel.
3. Clean the anti-fall sensor.
Troubleshooting
If the vacuum cleaner encounters a fault while working, the power indicator blinks quickly in red, and a voice prompt is generated. In this case, rectify the fault by referring to the table below.
Error Prompt
Solution
Error 1: Laser head is blocked or stuck, please check.
The laser ranging sensor is blocked or jammed by a foreign object. Remove the obstruction or foreign object. If the obstruction or foreign object cannot be removed, move the main unit to a new position and then start it.
Error 2: Collision sensor get stuck,please check the collision sensor
The bumper is stuck. Tap the bumper for several times to remove the foreign object. If there is no foreign object, move the main unit to a new position and then start it.
Error 3:Right wheel suspended, please remove the robot in a new place then start again
The wheel is suspended. Please move the main unit to a new position and then start it.
Error 4: Anti-fall sensor is blocked,please check and clean anti-fall sensor.
The main unit is suspended. Please move the main unit to a new position and then start it. This fault may occur when the cliff sensor is too dirty. Please wipe the cliff sensor clean.
Error 5: Side brush is entangled, please clean the side brush.
The side brushes may be entangled with foreign objects. Please disassemble and clean the side brushes.
Error 6:Right/left wheel is entangled, please clean the right/left wheel.
The wheel may be entangled with foreign objects. Please clean the wheel and start the main unit again.
Error 7: The robot is trapped, please remove the robot.
The main unit may be stuck. Please remove the obstacles around the main unit.
Error 8: Low battery, please charge.
The power is insufficient. Please charge the vacuum cleaner before using it.
Error 9:Charging problem. please check.
The battery temperature is too high or too low. Please wait and use the vacuum cleaner after the battery temperature becomes normal.
Error 10: Wall sensor is blocked, please check
The wall sensor is covered by dust. Please wipe the wall sensor.
Error 11: Uneven floor,please remove the robot in a new place then start again.
It is detected that the main unit is tilted upon startup. Please place the main unit on an even ground and restart it.
Error 12: Top cover of laser is blocked or stuck, please check.
The laser pressure sensor is pressed or stuck. Please move the vacuum cleaner to a new position and then restart it.
Failed to power on the machine
The battery power is insufficient. Please use the vacuum cleaner after charging it on the docking station.
The battery temperature is too high or too low. Please use the vacuum cleaner when the ambient temperature is 0°C to 40°C.
Failed to charge the machine
The docking station is not connected to the power supply. Please make sure that both ends of the docking station power cord are properly connected.
The docking station is not in proper contact with the main unit. Please clean the docking station shrapnel and the charging contact of the main unit.
Check whether the docking station indicator is on.
Slow charging
When used in a high or low temperature environment, the main unit will automatically decrease the charging speed to extend the battery life.
The charging contact area may be dirty. Please clean the area with a dry cloth.
Failed to return to the docking station
There are too many obstacles around the docking station. Please place the docking station in an open area.
The main unit is too far away from the docking station. Try to place the main unit near the docking station.
Abnormal behavior
The vacuum cleaner is powered off and then on again.
There is abnormal noise during cleaning.
The roller brush, side brushes, or main wheel may be entangled with foreign objects. Clean them after powering off the vacuum cleaner.
The omnidirectional wheel is covered by dust or is entangled during cleaning. It is recommended that you use a screwdriver to pull it out and rinse it.
The cleaning performance is degraded, or ash is dropped.
The dust box is full. Clean the dust box.
The filter is blocked. Clean the filter.
The roller brush is entangled with foreign objects. Clean the roller brush.
The Wi-Fi network cannot be connected.
The Wi-Fi function is not activated. Reset the Wi-Fi connection, and try again.
The Wi-Fi signal is not good. Ensure that the main unit is located in a place with good Wi-Fi signals.
The Wi-Fi connection is abnormal. Reset the Wi-Fi settings, download the mobile app of the latest version, and try to connect to the Wi-Fi network again.
The Wi-Fi network suddenly cannot be connected. The family router settings may be incorrect. In this case, contact the customer service for help.
Scheduled cleaning cannot be carried out.
The power is insufficient. Scheduled cleaning will be started only when the remaining power is more than 20%.
Is any power consumed if the vacuum cleaner always stays at the docking station?
The power consumption is extremely low when the vacuum cleaner always stays at the docking station. This helps to keep the battery in the best performance.
Is it necessary to charge the battery for 16 hours when the vacuum cleaner is used for the first three times?
The lithium battery does not have a memory effect. It can be used instantly after it is fully charged. There is no need to wait 16 hours.
The power is insufficient during cleaning. After the vacuum cleaner returns to the docking station for charging, it does not continue cleaning.
Check whether the main unit is in DND mode. The vacuum cleaner will not continue cleaning in DND mode.
The vacuum cleaner will not continue cleaning if the main unit is manually put back to the docking station.
The vacuum cleaner cannot return to the docking station after partial cleaning or after its position is moved.
The vacuum cleaner will re-generate a map after partial cleaning or after it is moved far away.
If the main unit is far away from the docking station, the main unit may fail to return to the docking station by itself. In this case, manually put the main unit back to the docking station.
The vacuum cleaner misses some areas when cleaning.
The wall sensor or cliff sensor may get dirty. It is recommended that you wipe the sensors using a soft dry cloth.
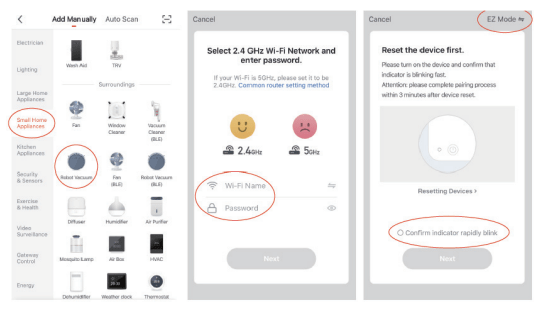
Installation
Download the Smart Life app, tap the plus (+) sign to add the home appliance, and select the 2.4 GHz Wi-Fi network. Enter the correct Wi-Fi name and password, and tap Next to connect the vacuum cleaner to the Wi-Fi network. You can configure the Wi-Fi network using either of the following methods:
1. Wi-Fi fast connection: Press and hold the Wi-Fi button on the machine for 3s. The machine beeps and enters the EZ mode, and the Wi-Fi indicator blinks quickly. Then, you can add the device and pair the device with the app.
When the app prompts that the connection is set up successfully, you can operate the machine in the app.
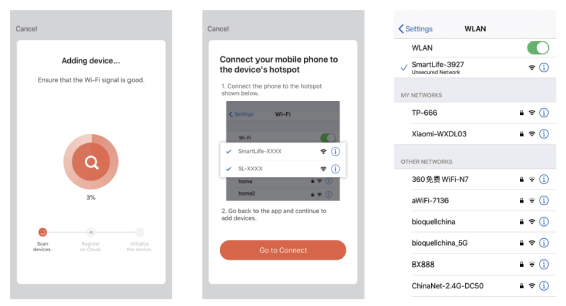
2. Hotspot pairing: Press and hold the Wi-Fi button on the machine for 6s. The machine beeps every 3s. After the machine beeps twice, it enters the AP mode, and the Wi-Fi indicator blinks slowly. Then, you can enter the correct Wi-Fi name and password, and tap Go to Connect. Select the SmartLife-XXXX hotspot without password. This hotspot is created after the machine is connected to your Wi-Fi network. After the machine is connected to the hotspot, return to the Smart Life app. The app automatically returns to the Connect your mobile phone to the device's hotspot screen. When the app prompts that the connection is set up successfully, you can operate the machine in the app.


 button to power on the machine. Then, the power indicator is on, and the vacuum cleaner enters the standby state. When the vacuum cleaner is in a static state, press and hold the
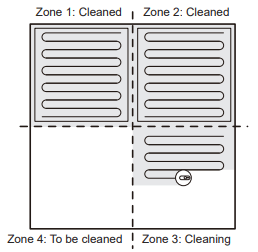
 button to return to the docking station and stop the current cleaning task.