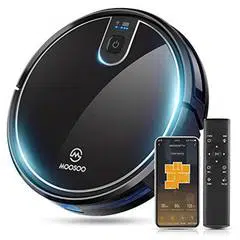
User Manual Vacuum Cleaner
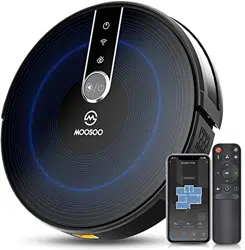
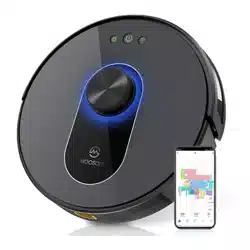
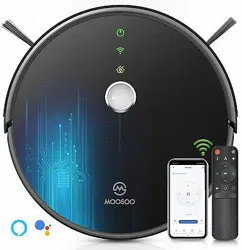
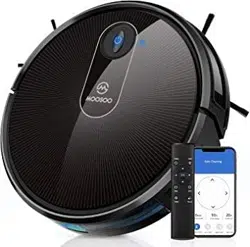
Overview
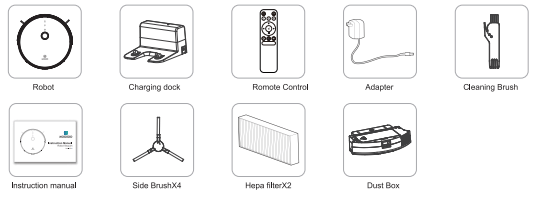
What's in the box
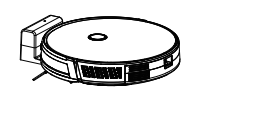
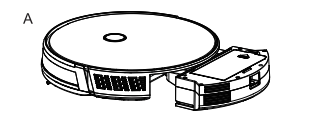
 Unit Name
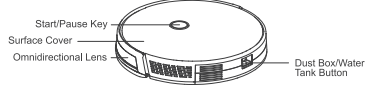
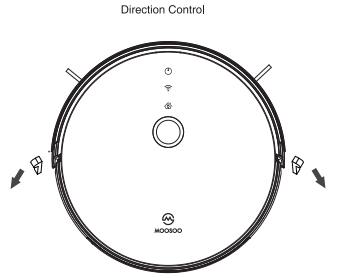
Top&Side
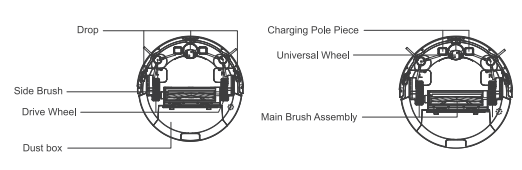
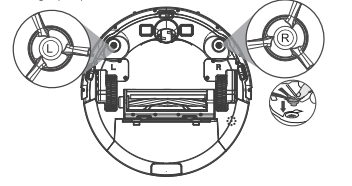
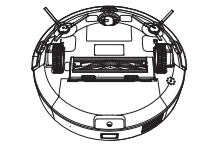
Bottom
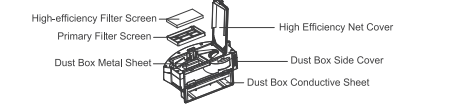
 Dust Box
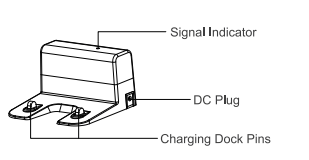
 Charging Dock
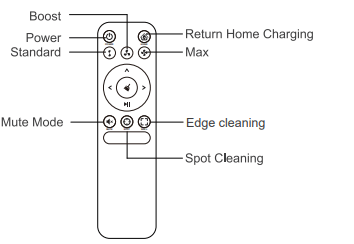
Remote Control
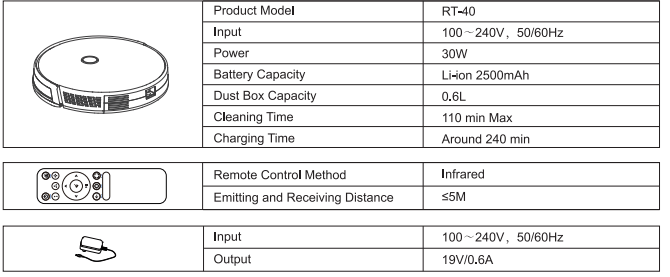
Parameter
There are no batteries in the remote control. It requires two AAA batteries which you can buy it on any store.
How to use
Preparation
Remove protection
Before using the robot, remove the protective strip on the Robot
Robot Charging
1. Placing and Charging: The charging dock is against the wall and placed on flat ground. Do not place objects within the range of 0.5m left, right and 1.5m ahead.
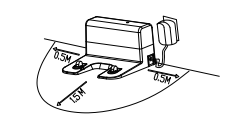
2. Plug the adapter into the corresponding outlet and connect the charging dock to it.
3. Installing side brushes according to the left and right(L/R).
4. Charging: Place the Robot on the charging seat for charging(During charging, the indicator light flashes, and when charging is over, the light is always on. The charging time is about 4 hours.)
During the cleaning process, the host can sense that its power is insufficient and automatically start the recharging mode to find the charging dock to charge.
You can also command the host to start the recharging mode through the "HOME" button  of the remote controller.
Charging attention:
1. The charging seat cannot be used in environments with strong reflection such as direct sunlight and nearby mirrors.
If there is any object with strong reflection, please cover the object 7 cm high from the bottom.
2. In order to ensure the normal working hours of the appliance, please fully charge before use. The charging time is about 4 hours.
3. Do not charge with the water tank units assembled so as to ensure the safety of charging and prevent wet rags from damaging the floor.
Start Cleaning
To meet liferent clearing requirements, this appliance has kinds of learning modes to choose from. You can start various cleaning modes through a Robot, remote control, or the app.
Auto Cleaning
Applicable scene: It is the most commonly used cleaning method that the main engine uses a bow-shaped path to plan and clean the whole house according to the actual environment.
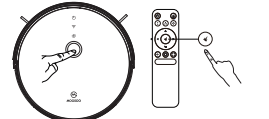
Setting method: In the shutdown state, long press the key on the main engine to switch it on. Short press the key to start automatic cleaning.
For using the remote control, press the button to switch the mode to auto cleaning at any circumstances.
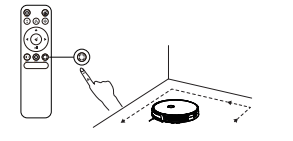
Spot Cleaning
Applicable scene: It is usually used for deaning one single room or a small area.
Tips: When it is only necessary to clean one single room, please close the door and the host will do centralized
Cleaning in the room if this room does not have a charging seat. The robot will return to the original point where it starts after cleaning.
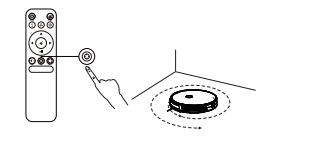
Edge Cleaning
Applicable scene: For indoor corner cleaning the robot cleans along the perimeter of fixed objects (such as walls), and returns to the charging seat after the edge cleaning is finished.
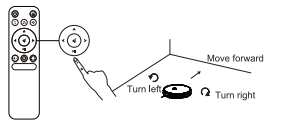
Manual Control
Applicable scene: Suitable for manual control cleaning.
Setting Method: Click on the position button of the remote controller to control the machine to move forward and make a turn by turning left and right.
Pause, wake up and shut down
Pause: During the operation of the robot, press the start/pause key or the pause button  on the remote control to pause the operation of the robot.
Wake up: If the robot stops working for more than ten minutes, it will automatically enter sleep mode (all the robot lights are off). You can wake up the robot by pressing the start key first. Then press the robot key or any keys on the remote control and app to restart your work.
*After the Robot finishes its work, it is not recommended to shut down it so as to keep it in a state of charge that starts working fast next time.
Vacuuming power setting
With three vacuuming power (Standard/Boost/Max) can be adjusted to meet different requirements. The standard suction mode can be used for cleaning wood floors and tile floors, boost mode for common household cleaning while the max mode can be used for deaning rugs.

Component maintenance
Dust Box
A. Press the dust box button to take out the dust box
B.. Open the dust box side cover
C. Dumping garbage
D. Open the high-efficiency net cover
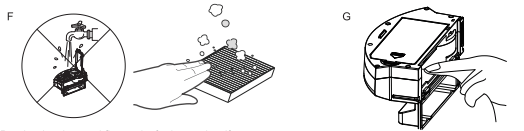
E. Open the high-efficiency screen cover and take out the high-efficiency filter screen and the primary filter screen. High-efficiency filter screen is not recommended to be water-washed. Please pat it gently to dump dust.
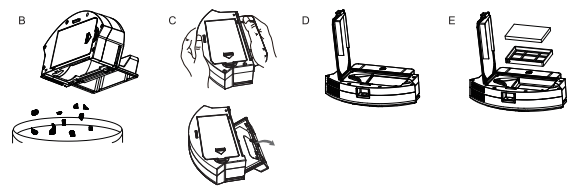
F. Rinse the primary filter screen
*Note: Do not wash the dust box with water or immerse the dust box in water.
G. Wipe the dust box with a damp cloth and do not flush or immerse the dust box.
H. Dry the dust box and filter units for its service life.
*Note: It is recommended to clean the primary filter screen with water 15-30 days after it is used. The maximum service life of the high-efficiency filter screen is 3 months.
I. Replace the primary and the high-efficiency filter screen into the dust box.
*Note:
1. Before installing the filter screen, please ensure that the high-efficiency and the primary filter screen are completely dry.
2. Do not expose the high-efficiency and primary filter screen to the sunlight.
J. Close the cover of dust box and replace the dust box to the robot.
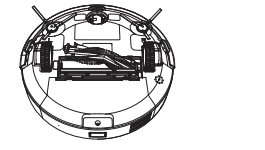
Main Brush and Side Brush
1. Open the main brush cover
2. Take out the main brush shaft
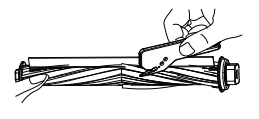
3. Cleaning tangled hair on the brush
Cleaning the main brush
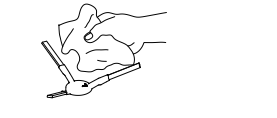
Cleaning the side brush
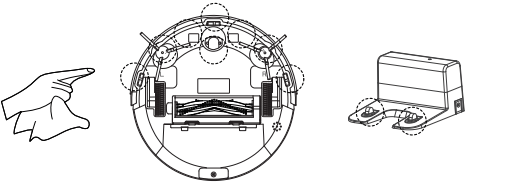
Charging Dock Pins, Drop Sensor, Drive Wheel and Swivel Wheel
Tip: The inter of the charging dock pins the drop sensor and the bumper all contain sensitive electronic compo-nents, please use dry rag when cleaning and do not use wet rag in case of causing short circuits or damage.
If you won't be using the appliance for a long time, please fully charge it before storing it. Turn off the robot and insist on supplying power to it every 3 months to prevent the battery from over discharge. If the battery is over-discharged or is not used for a long time. the appliance may not be able to be charged. Please contact with the customer service and do not disassemble it by yourself.
FAQ
Q: What should I do when it can not work on the carpet?
A: We don't suggest you make it clean the carpet. It's better for you to set the barrier around the carpet on the app.
Q: What if the strength of vacuuming is weak?
A: First of all. check whether the dust bin is full and the robot is fully charged. If it does, you can try to switch it to the higher mode. For litter that is difficult to collect, try to clean it with Spot Cleaning Mode.
Q: What if my charger has difficulties charging the robot?
A: Please check if the electrical sheet is connected to the charging stand or put it back manually.
Q: What if the robot can not find the charging stand?
A: The charging stand should be placed against the wall with at least 1-meter clearance on each side and 2 meters in front. Sometimes you can just put it back manually.
Q: What should I do if the side brush/main brush/wheel is stuck?
A: Check whether the side brush is trapped by wire and clean up the blockage.
Q: What should I do if WIFI connection fails?
A: Check whether the wireless network is working and reconnect following the WIFI Connection.
WiFi Connection
1. Please scan the QR code or search “Smart Life” and download App .
2. After the App is installed, please follow the App instructions to register the account and login.
3. Open the APP and click "add device! "/ "Small Home App" / "Robot Vacuum".
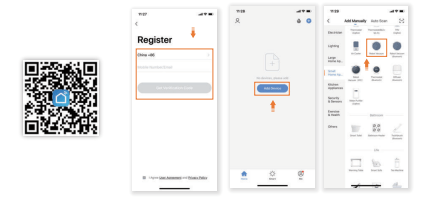
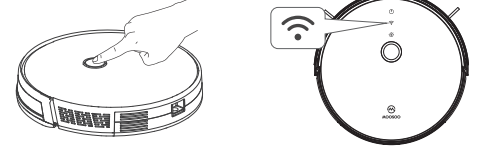
4. Please make sure that the product is on.
5. Double press  , and then
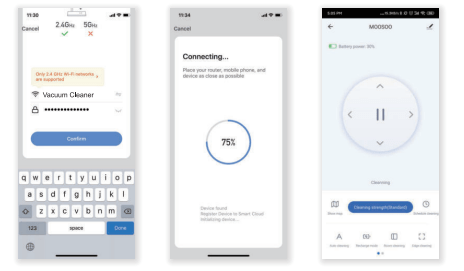
 flashes, click "Confirm indicator rapidly blink" on the APP. You can start to connect to Wifi.
6. Input the wifi account and password.(Only supports 2.4G wifi now, 5G wifi can not be connected.)
Safety Regulations
Before using this appliance please read the following safety instructions and flow all routine safety precautions.
Please read the instructions carefully and keep the instruction for further reference.
Any operation inconsistent with this instruction manual may cause damage to this appliance.
Note:
1. Only authorized technicians can disassemble this appliance. Users are not recommended to disassemble this appliance by themselves.
2. This appliance can only use the power adapter provided by the factory. Using other adapters may damage the appliance.
3. Please prevent wire, sockets or body parts from rolling into the appliance drive wheels.
4. Do not place this appliance near cigarette butts, Iighters, and other inflammable substances.
5. Please clean the appliance after switching off and unplugging the adapter
6. Do not bend wires excessively or place heavy objects and sharp objects on the appliance.
7. This appliance is a household appliance. Do not use it outdoors.
8. Do not sit on the appliance.
9. Do not use this appliance in a wet environment (e.g.bathroom)
10. Before using this appliance, please remove all vulnerable items (e.g.glasses. amps. etc.) on the ground as well as items (e.g.wires, paper sheets, curtains) that may entangle the side brushes and air suction passages.
11. Do not put this appliance in a place where it is easy to fall (e.g.0n desks and chairs).
12. Please carefully check whether the power adapter is connected to the socket before use, otherwise the battery may be damaged.
13. To avoid tripping, please inform other members in the house when this appliance starts working.
14. Please empty the dust cup before using this appliance when the dust cup is full.
16. The appliance is supposed to work at the room temperature from 32 to 104°F.
16. Do not use this appliance in high-temperature environment.
17. Please remove the battery from the machine before the appliance is scrapped.
18. Please make sure that this appliance is not powered on when removing the battery.
19. Please recycle the discarded batteries safely.
WARNING:
1. Use only the original rechargeable battery and charging seat specially equipped by the manufacturer. Non-rechargeable batteries are strictly prohibited. please refer to “appliance parameters" for battery specification information.
2. It is forbidden to use the appliance in environments with open flames or fragile objects.
3. It's forbidden to use the appliance in extremely hot (above 104°F) or extremely cold (below 32°F).
4. It is forbidden for human hair. clothes, fingers and other parts to approach the opening and operating parts of the appliance.
5. It is forbidden to use the appliance on wet or stagnant ground.
6. It is forbidden for the appliance to pick up any articles such as stones and waste paper that may clog the appliance.
7. It is forbidden for the appliance to pick up any inflammable substances. such as petrol. toner and toner for printers.
Do not use the appliance in clean areas with flammable items.
8: It is forbidden for the appliance to pick up any burning articles, such as cigarettes, matches, ashes, and other articles in case of causing fire.
9. It is forbidden to place articles at the suction opening. Do not use the appliance when the suction ports are blocked.
Clean up dust, cotton wool, hair, etc. at the suction opening to ensure smooth air circulation at the suction opening.
10. Use the power cord carefully to avoid damage. It is forbidden to use the power cord to drag or pull the appliance and the appliance charging seat. Is forbidden to use the power cord as a handle. It's forbidden to clamp the power cord in the crack of the door. It's forbidden to pull the power cord at sharp comers and comers. It is forbidden den for the appliance to run on the power cord while the power cord should be far away from the heat source.
11. Do not use a damaged charging seat.
12. Even if the appliance has been severely damaged. burning of the appliance is prohibited. which may lead to explosion of the battery of the appliance.
13. This appliance can be used by children aged from 8 years and above and persons with the reduced physical. sensory or mental capabilities or lack of experience and knowledge if they have been given supervision or instruction concerning use of the appliance in a safe way and understand the hazards involved. Children shall not play with the appliance. Cleaning and user maintenance shall not be made by children without supervision.
14. The adapter must be removed from the socket-outlet before cleaning or maintaining the appliance.
15. The appliance must be disconnected from the supply mains when removing the battery;