
J20C Robot cleaner user guide manual
MODEL: J20C
Email: [email protected] Telephone: 1-855-919-0908
Adress: 1601, Building 2, No. 1, Qingqing Road, Qinghu, Longhua District, Shenzhen, China

Directory
Safety Instructions···································02
Product configuration····························04
Product useage········································07
Product maintenance····························10
Use the Boundary Strip························12
Product specification ···························14
Safety Instructions
01 02
• To reduce the risk of damage, please keep in mind the following safety precautions when
resetting, using and maintaining the product:
• Please read all safety and operation instructions before using this product.
• Please preserve the instructions for future use.
• Please note all warnings in the instructions regarding the product, battery, charging dock.
• Follow all instructions and instructions.
• The external soft cable or cord of the power adapter is damaged and cannot be
replaced;If the cord or plug is damaged, the power adapter will be scrapped.
• This product can only use standard power adapters. The product should not be used with
other types of power adapters. Use of another power adapter will void the warranty
Warning: standard rechargeable battery only: maximum 48V,2600mAh lithium
battery, other types of batteries may explode and cause damage.Contact customer
service for proper battery replacement.
• Remove rechargeable batteries from products and accessories before long-term storage
or transportation.
• The battery must be removed from the product before it is scrapped.To remove the
battery from the product, use a screwdriver to unscrew the battery cover. Remove the
battery through a disconnected quick connector.
• Warning chemicals: if the battery leaks, keep the leaking liquid away from the skin or
eyes.If exposed, wash with plenty of water and seek medical advice.Please follow local laws
and regulations to remove and scrap product batteries.
• Warning of fire or explosion hazards: do not squeeze or remove batteries;Do not put
the battery in any heat source or direct sunlight.Don't burn out or short out the battery.Do
not allow the battery to be mechanically impacted.
• Liaise with your local waste management authority to follow the rules for battery
recycling and disposal in your area.
• This product is not a toy, do not sit or stand on the product, while the product is
working, please supervise the children and pets.
• For indoor use only.
• It is strictly prohibited to use non-rechargeable batteries, only the original rechargeable
batteries of this product could be used. If the battery is replaced, please purchase the OEM
battery from customer service.
• Use and store the product at room temperature.
• Do not spray or splash water on the product.
• Do not use any other power source cord.If you need to replace electrical wiring, please
contact customer service to ensure proper selection of dedicated power source lines
according to the national standard.
• Do not use this product to clean sharp objects, glass, or anything that is burning or
smoking.
• Do not immerse the battery in any liquid.
• Do not use this product to clean bleach, paint or other chemicals and anything wet.

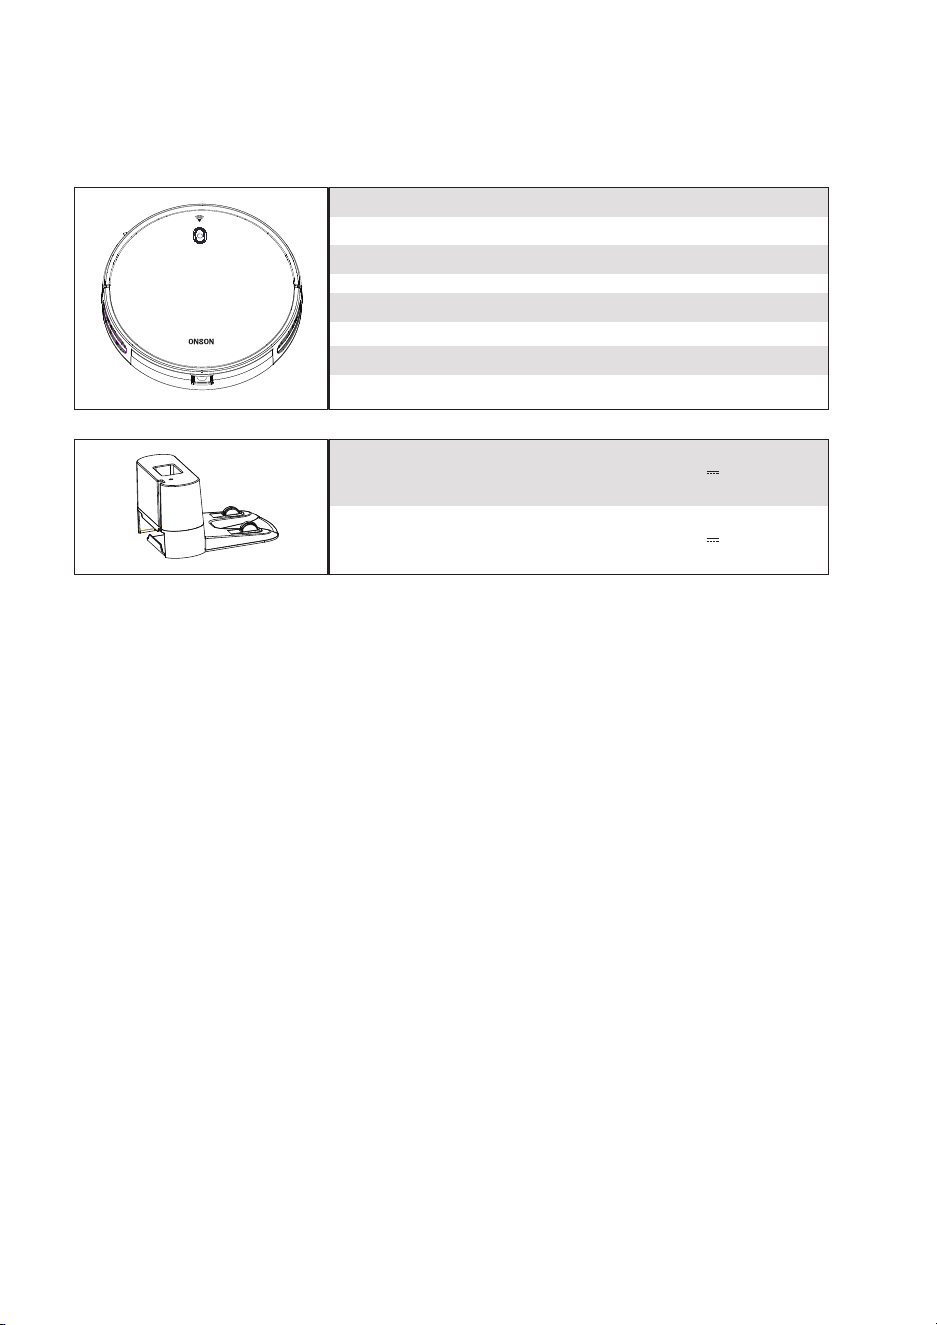
Components of the product
1.1 Robot cleaner
Right infrared receiver
sensor
Along wall in the right
direction infrared sensor
Along wall in the left
direction infrared sensor
Bumper
Mechanical collision
sensor
Start/ pause push button
Channel infrared collision sensor
03 04
Charging connection
electrode pole sheet
Downward view sensor
Driven wheel
Light stream luminous
flux sensor
Dust box
Side brush
Battery cover
Power source switch (On/Off)
Rolling brush
• Before using this product, please tidy up items such as clothes, pieces of paper, hanging
curtains or curtains, power source cords and any fragile items.If the product goes over a
wire and drags it, it may pull an object off a table or shelf.
• If there is such an environment as a balcony, a protective fence should be set on the
edge of the balcony to prevent products from entering the balcony and ensure safe work.
• Do not place anything on top of the product.
• Take caution when walking in the area where the product works so as not to step on it.
• Do not use the product on the floor with exposed sockets.
• Do not use the product on rough and uneven floors, which may damage the floor and
products, only on flat hard floors or carpets.
• This product will not scratch the floor when used on the floor.Nevertheless, it is still
recommended that trying it in a small area of the room to ensure that there are no
scratches before cleaning.
Related Information about rechargeable batteries
lithium battery
Lithium battery important note: lithium batteries and products containing lithium batteries
should comply with strict transport regulations.If the product (including batteries) needs to
be transported for maintenance, travel or any other reason, the following transportation
instructions must be followed:
• Remove the battery from the product.
• Place a piece of tape on the battery's charging poles.
• Re-place the taped battery in place and close the battery cover.
• Pack the product in original or suitable packaging when shipping.
• The product could be only transported by land, not by air.
Battery Storage
If the product is picked up from the charging dock for storage, remove the battery first.
Products and batteries should be stored in a cool, dry place.
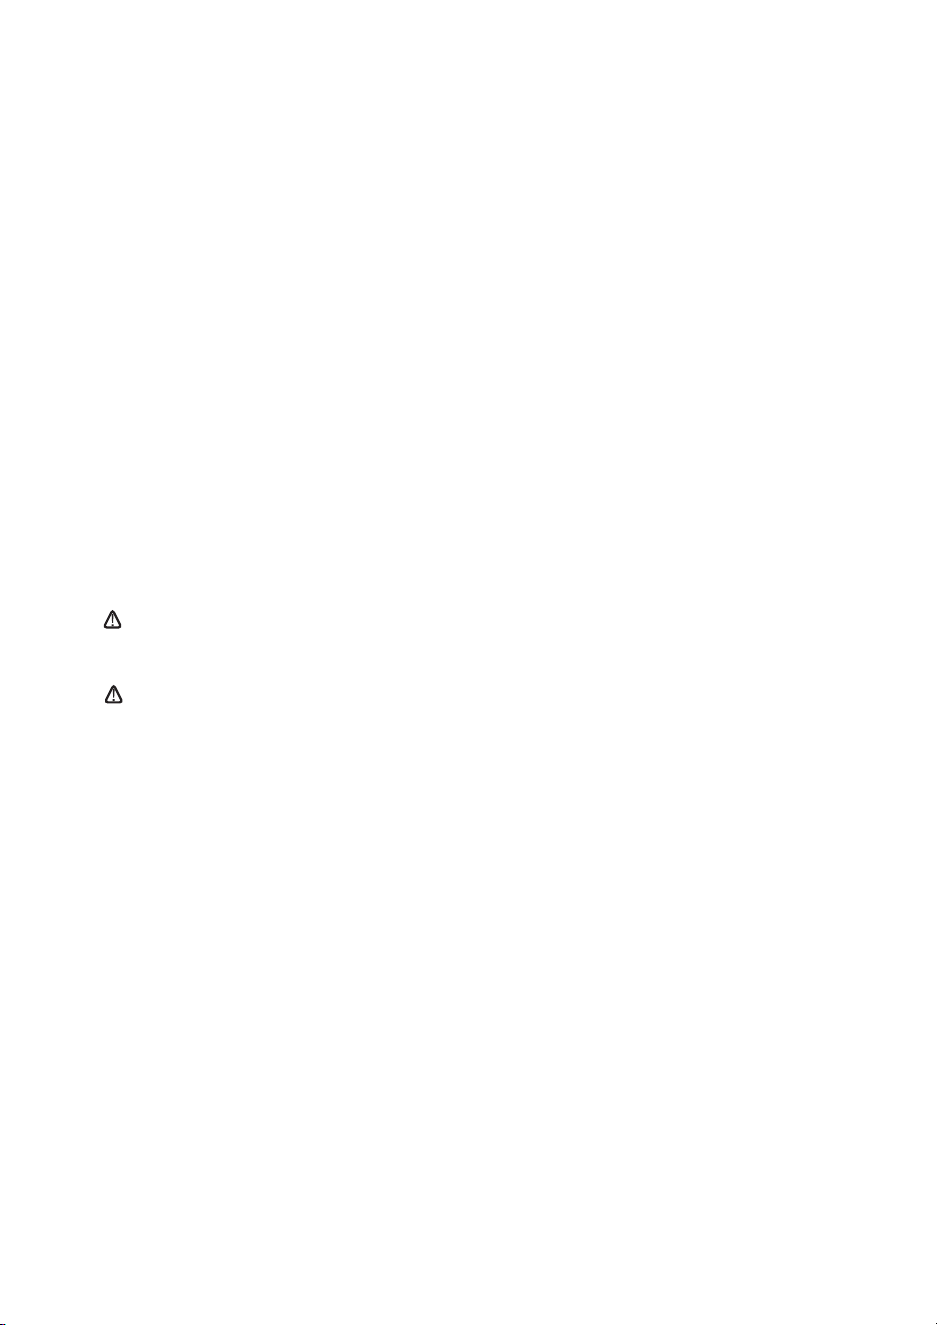
1.2 Other components of the product
Charging dock Adapter Remote control
Dust box
Cleaning brush
4xSide brush
Rolling brush Filter sponge and high
efficiency filter
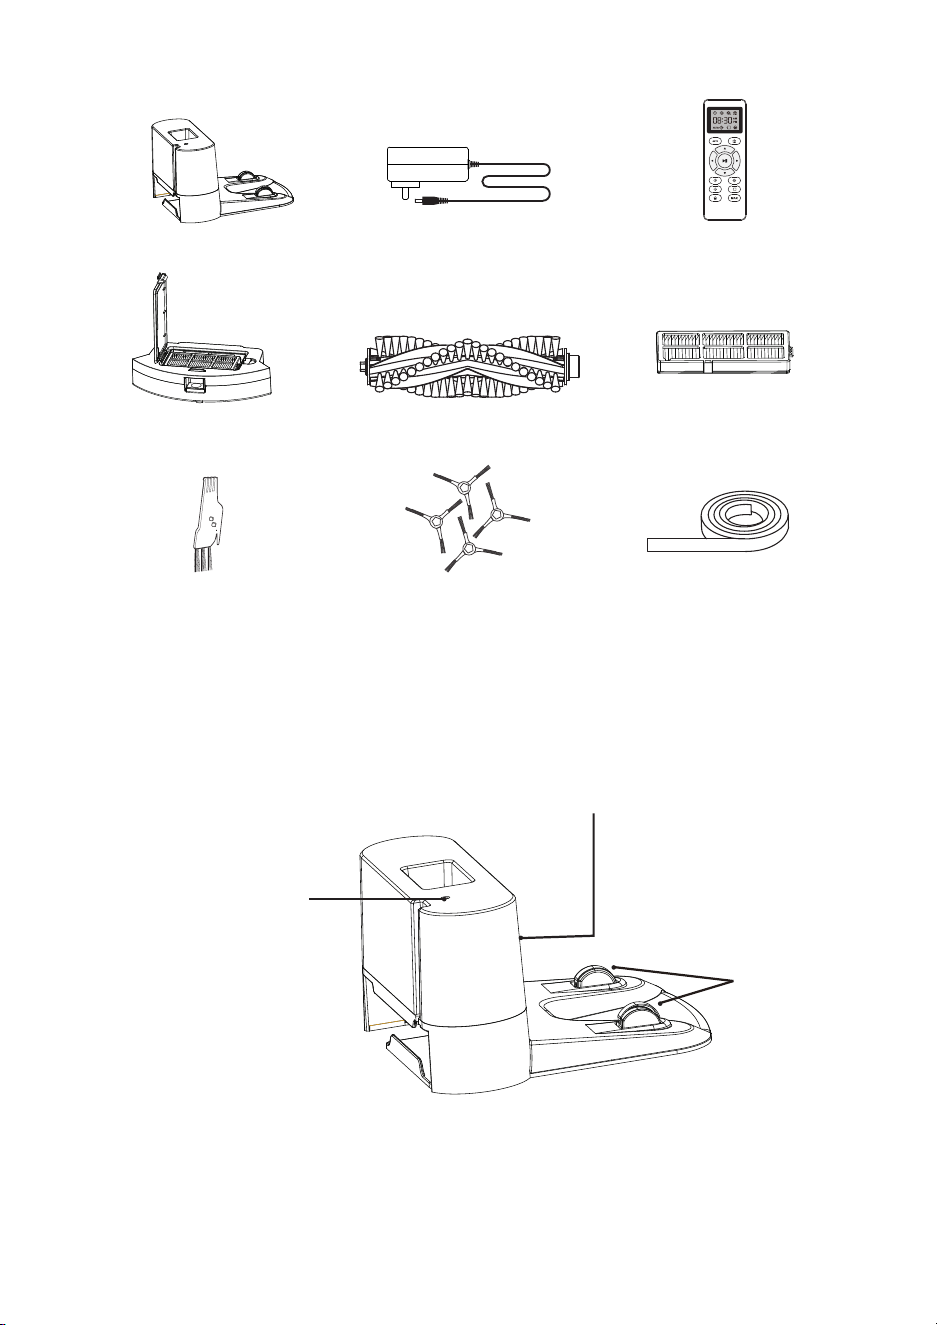
1.3 Charging dock
Charging indication
light
Connection electrode
pole
Signal emission zone
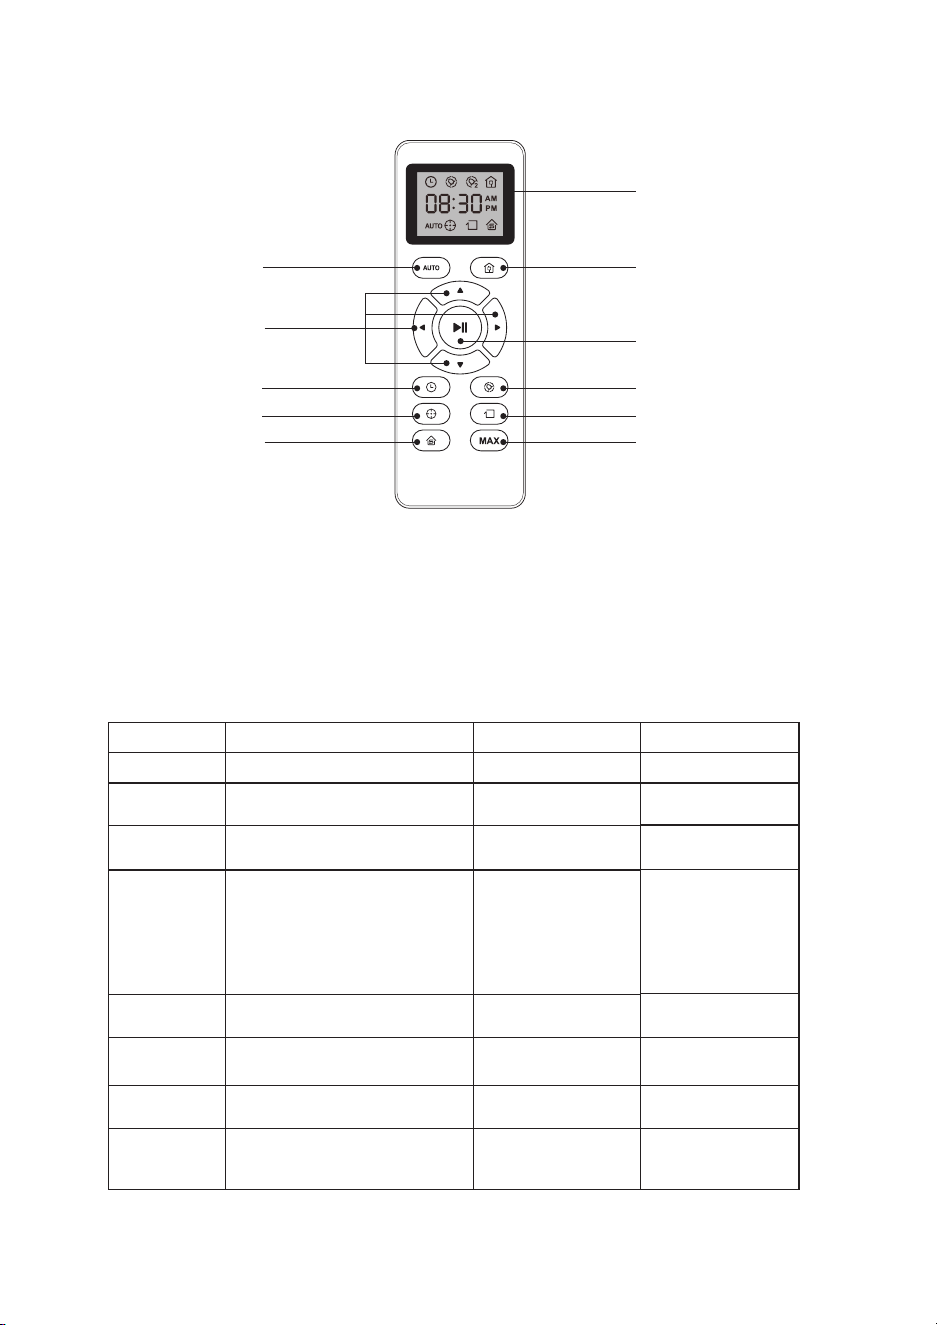
1.4 Remote control
Auto clean
Direction and
time setting
Clock setting
Fixed time point sweep
Random sweep
Module and time
indication screen
Recharging
Start/pause
Reservation to sweep
Sweeping along the side
Suction strength
adjusting level
1.5 Cleaner light indication method (including lamp indication time)
Warm tip: For the first time of use, please install a pair of AAA batteries before
using the remote . Ensure that the correct polarity of the battery is installed;
When the remote control is in use, please aim at the J��C sweeper.
The effective distance is � -�meter.
05 06
Operation indication light
Sleep mode No light indication Non light indication
WIFI indication lamp Remark
Standby mode Main push key blue lamp on
Link constant on/
disconnect flicker
Link constant on/
disconnect flicker
Link constant on/
disconnect flicker
Work mode
Main push key blue lamp
constant on
WIFI Standby mode
Recharging
mode
Low power recharging: the
purple light of the cleaner key is
always on.
Non-low power recharging: the
purple light of the cleaner is
always on
Link constant on/
disconnect flicker
Recharging
mode
Main key button red light
constant on or flicker
Link constant on/
disconnect flicker
Error mode
Purple breathe
WIFI Lamp quick
flicker
Distribution
network link
WIFI Lamp constant on
Distribution
network link
successful
Boundary Strips
6.6 ft/2 m Length (x2)
1.2 Other components of the product
Charging dock Adapter Remote control
Dust box
Cleaning brush
4xSide brush
Rolling brush Filter sponge and high
efficiency filter
1.3 Charging dock
Charging indication
light
Connection electrode
pole
Signal emission zone
1.4 Remote control
Auto clean
Direction and
time setting
Clock setting
Fixed time point sweep
Random sweep
Module and time
indication screen
Recharging
Start/pause
Reservation to sweep
Sweeping along the side
Suction strength
adjusting level
1.5 Cleaner light indication method (including lamp indication time)
Warm tip: For the first time of use, please install a pair of AAA batteries before
using the remote . Ensure that the correct polarity of the battery is installed;
When the remote control is in use, please aim at the J��C sweeper.
The effective distance is � -�meter.
05 06
Operation indication light
Sleep mode No light indication Non light indication
WIFI indication lamp Remark
Standby mode Main push key blue lamp on
Link constant on/
disconnect flicker
Link constant on/
disconnect flicker
Link constant on/
disconnect flicker
Work mode
Main push key blue lamp
constant on
WIFI Standby mode
Recharging
mode
Low power recharging: the
purple light of the cleaner key is
always on.
Non-low power recharging: the
purple light of the cleaner is
always on
Link constant on/
disconnect flicker
Recharging
mode
Main key button red light
constant on or flicker
Link constant on/
disconnect flicker
Error mode
Purple breathe
WIFI Lamp quick
flicker
Distribution
network link
WIFI Lamp constant on
Distribution
network link
successful
Boundary Strips
6.6 ft/2 m Length (x2)

Product useage
2.1Quick start
The location of the charging dock
1. Place the charging dock against the wall on a leveled flat ground.
3. Connect the adapter plug to a power socket at the charging dock and the other
end to a wall socket.
Install side brush, card slot into place
and hear a "click" to complete the i
nstallation.
Turn on the power on key at the bottom of
the main engine (1 means power on, 0 means
power off).
2. Make sure the charging dock is placed along the wall to avoid
any gaps.
Connect the charging dock to the cable storage box at the bottom of the
charging dock.
Warm tips: Uncollected cables may trap the cleaner that is
cleaning or recharging.
• Ensure 2m directly in front of the charging dock and 1m free
space on both sides.
Warm tip: make sure the charging dock is in the light on state when connected
to the power supply, otherwise the product could not be automatically recharged.
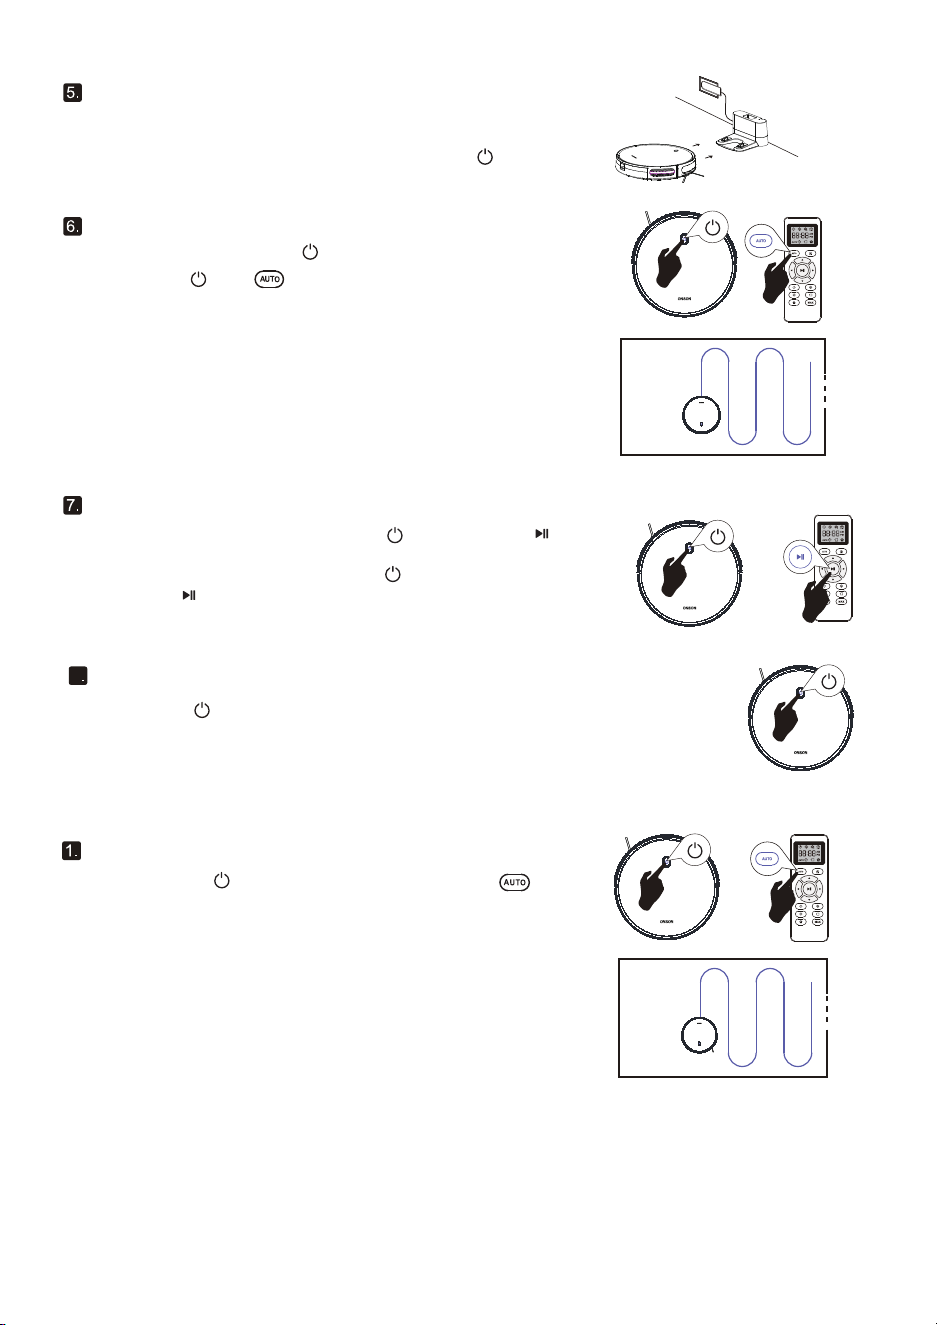
Activate product
Start cleaning
• Press once to wake up the cleaner.
Pause
Turn off
8
2.2 Automatic cleaning
Automatic cleaning
• Press again or the cleaner on the remote control starts cleaning
automatically.
• Please press the pause on the cleaner or remote control to
clean the cleaner.
• Long press until the lights on the cleaner go out.
• Turn off the power switch if not in use for a long time.
Cleaning mode
• If the battery is low before the cleaning is completed, the cleaner
will return to the charging dock for recharging.
• To continue cleaning, press the button on the cleaner remote
controller again.
• Press the start of automatic cleaning on the cleaner or
remote control.
Warm tip: During the recharging process, there may be a
phenomenon that the charging dock cannot be found. At
this time, the cleaner will flicker red light and "tick" four
times. Please put the cleaner into the charging dock
manually for charging.
07 08
If successful you will hear a series of tones. once the
Power button
illuminates robot is ready for use
Place robot onto the Charging Dock, making sure the metal charging contacts
on the Charging Dock match up with those underneath the Robot.
Product useage
2.1Quick start
The location of the charging dock
1. Place the charging dock against the wall on a leveled flat ground.
3. Connect the adapter plug to a power socket at the charging dock and the other
end to a wall socket.
Install side brush, card slot into place
and hear a "click" to complete the i
nstallation.
Turn on the power on key at the bottom of
the main engine (1 means power on, 0 means
power off).
2. Make sure the charging dock is placed along the wall to avoid
any gaps.
Connect the charging dock to the cable storage box at the bottom of the
charging dock.
Warm tips: Uncollected cables may trap the cleaner that is
cleaning or recharging.
• Ensure 2m directly in front of the charging dock and 1m free
space on both sides.
Warm tip: make sure the charging dock is in the light on state when connected
to the power supply, otherwise the product could not be automatically recharged.
Activate product
Start cleaning
• Press once to wake up the cleaner.
Pause
Turn off
8
2.2 Automatic cleaning
Automatic cleaning
• Press again or the cleaner on the remote control starts cleaning
automatically.
• Please press the pause on the cleaner or remote control to
clean the cleaner.
• Long press until the lights on the cleaner go out.
• Turn off the power switch if not in use for a long time.
Cleaning mode
• If the battery is low before the cleaning is completed, the cleaner
will return to the charging dock for recharging.
• To continue cleaning, press the button on the cleaner remote
controller again.
• Press the start of automatic cleaning on the cleaner or
remote control.
Warm tip: During the recharging process, there may be a
phenomenon that the charging dock cannot be found. At
this time, the cleaner will flicker red light and "tick" four
times. Please put the cleaner into the charging dock
manually for charging.
07 08
If successful you will hear a series of tones. once the
Power button
illuminates robot is ready for use
Place robot onto the Charging Dock, making sure the metal charging contacts
on the Charging Dock match up with those underneath the Robot.
2.3 Time and appointment are scheduled
The cleaning time can be set on the cleaning time of the cleaner. The appointment timing function can be
realized by the remote control. Before making the appointment, please make sure that the time of the
remote control is consistent with your local time.
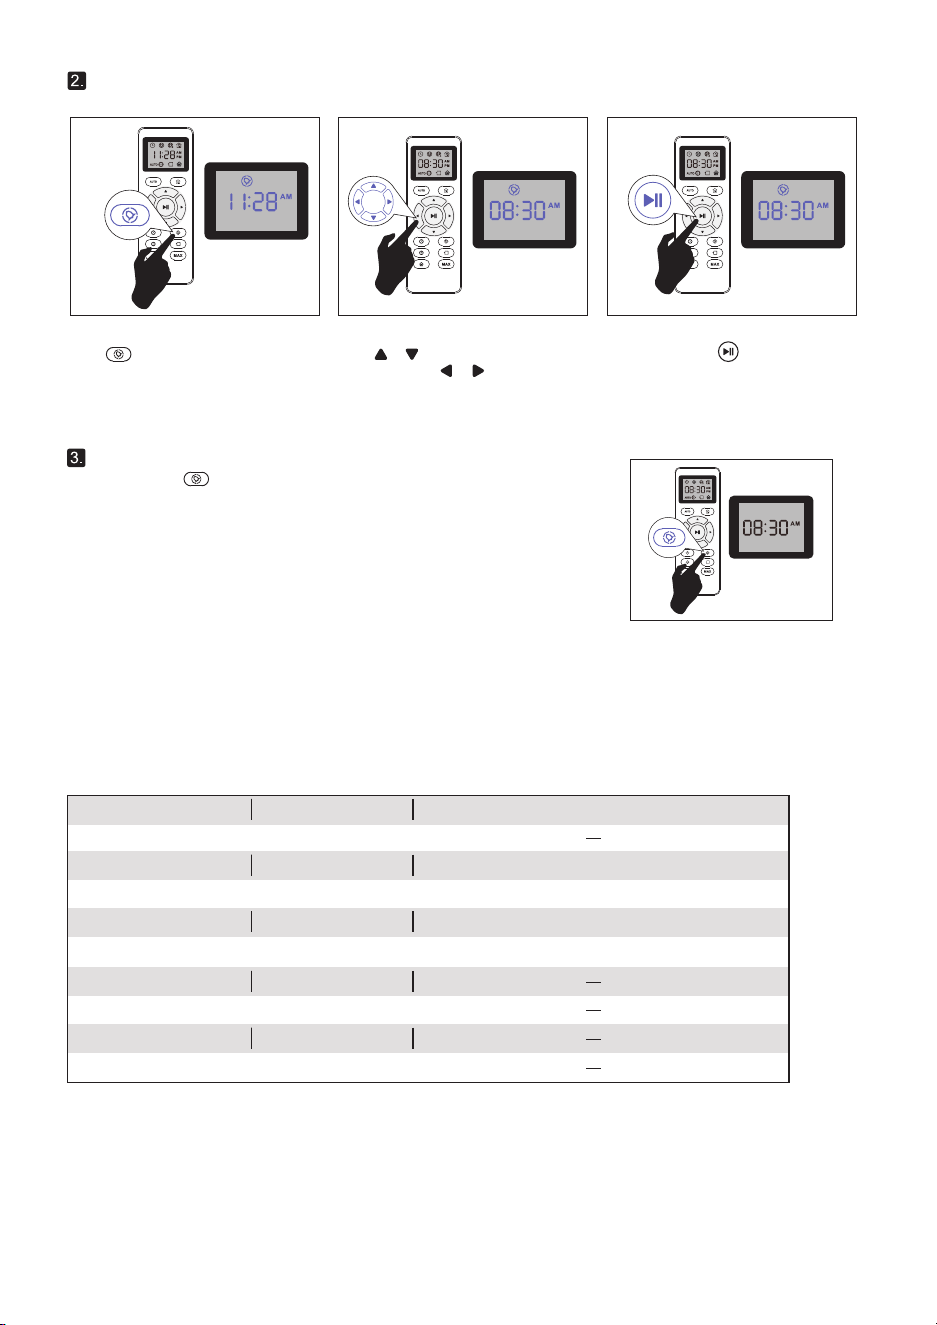
Set the remote control to display time
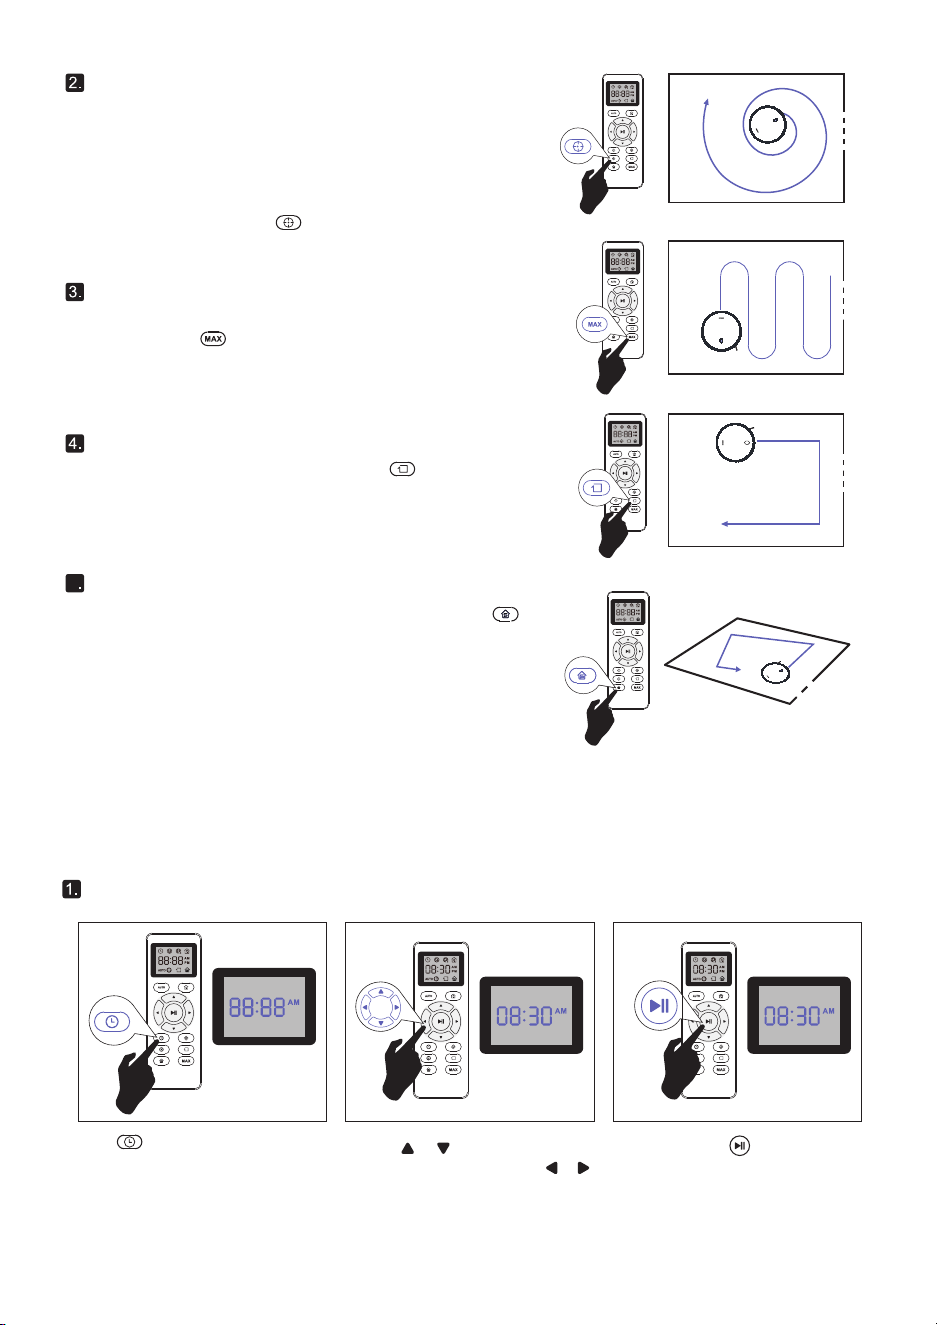
Fixed point cleaning
Border cleaning
Suction adjustment
Press on the remote controller.
The Settings on the Settings screen
start flashing.
Press the button on the remote controller and sweep along the
edges to make sure you sweep along the walls and legs of the
furniture.
5
Random sweep mode
When the machine is in random mode, press the button on the
remote control.
Fixed point sweep the fixed point sweep mode is selected. The
cleaner concentrates on sweeping the partially local area by
rotating outwardly in a spiral with a diameter of about 1m, and
then spirals inwards to the starting point.Under this mode, the
cleaner increases suction, giving you the best cleaning of the
desired location.Please put the cleaner in a dirty place and
press the remote control .
In operation mode, the suction can be adjusted by pressing the
remote control
Warm tip: when you set the clock or schedule, please make sure the �. remote control
is close to the cleaner.
。
In order to ensure the service life and the best cleaning performance for cleaning and
maintenance of the robot cleaner, please follow the following instructions in terms of
cleaner components cleaning and maintenance.
Product Maintenance
Recommended cleaning/replacement frequency: :
Dust box
Filter
Rolling brush
Cleaner component
Cleaning frequency Replacement frequency
After every time of use
Once weekly
Once weekly
Every 2 months
Every 6-12 months
Rolling brush guard bar
Side brush
Every 3-6 months (or if there is a lot of wear and tear)
Every 3-6 months (or if there is a lot of wear and tear)Once monthly
Sensor
Charging pole
Once monthly
Once monthly
Once monthly
Rolling Brush
Once every week
Every 6-12 months
Universal direction wheel
Oil grease treatment
Once monthly
Once monthly
09 10
Press or button to select the
desired figures. Press the or
button to select the minute or hour
section
And then press the button. the Robot
will "BEEP" when the clock setting completed.
Cancel the Cleaning Schedule
Press and hold button approximately 4 seconds on Remote Control, the Robot
will "BEEP" when the Cleaning Schedule process cancel completed.
Setting Cleaning Schedule
Press or button to select the desired
figures. Press the or button to select
the minute or hour section
And then press the button. the Robot
will "BEEP" when the Cleaning Schedule
setting completed.
Press button on Remote Control, and
then the hour section begins to Hash in the
Cleaning Schedule display setting window.
Note:When setting Cleaning Schedule,ensure the time on Remote Control iscorrect.
2.3 Time and appointment are scheduled
The cleaning time can be set on the cleaning time of the cleaner. The appointment timing function can be
realized by the remote control. Before making the appointment, please make sure that the time of the
remote control is consistent with your local time.
Set the remote control to display time
Fixed point cleaning
Border cleaning
Suction adjustment
Press on the remote controller.
The Settings on the Settings screen
start flashing.
Press the button on the remote controller and sweep along the
edges to make sure you sweep along the walls and legs of the
furniture.
5
Random sweep mode
When the machine is in random mode, press the button on the
remote control.
Fixed point sweep the fixed point sweep mode is selected. The
cleaner concentrates on sweeping the partially local area by
rotating outwardly in a spiral with a diameter of about 1m, and
then spirals inwards to the starting point.Under this mode, the
cleaner increases suction, giving you the best cleaning of the
desired location.Please put the cleaner in a dirty place and
press the remote control .
In operation mode, the suction can be adjusted by pressing the
remote control
Warm tip: when you set the clock or schedule, please make sure the �. remote control
is close to the cleaner.
。
In order to ensure the service life and the best cleaning performance for cleaning and
maintenance of the robot cleaner, please follow the following instructions in terms of
cleaner components cleaning and maintenance.
Product Maintenance
Recommended cleaning/replacement frequency: :
Dust box
Filter
Rolling brush
Cleaner component
Cleaning frequency Replacement frequency
After every time of use
Once weekly
Once weekly
Every 2 months
Every 6-12 months
Rolling brush guard bar
Side brush
Every 3-6 months (or if there is a lot of wear and tear)
Every 3-6 months (or if there is a lot of wear and tear)Once monthly
Sensor
Charging pole
Once monthly
Once monthly
Once monthly
Rolling Brush
Once every week
Every 6-12 months
Universal direction wheel
Oil grease treatment
Once monthly
Once monthly
09 10
Press or button to select the
desired figures. Press the or
button to select the minute or hour
section
And then press the button. the Robot
will "BEEP" when the clock setting completed.
Cancel the Cleaning Schedule
Press and hold button approximately 4 seconds on Remote Control, the Robot
will "BEEP" when the Cleaning Schedule process cancel completed.
Setting Cleaning Schedule
Press or button to select the desired
figures. Press the or button to select
the minute or hour section
And then press the button. the Robot
will "BEEP" when the Cleaning Schedule
setting completed.
Press button on Remote Control, and
then the hour section begins to Hash in the
Cleaning Schedule display setting window.
Note:When setting Cleaning Schedule,ensure the time on Remote Control iscorrect.
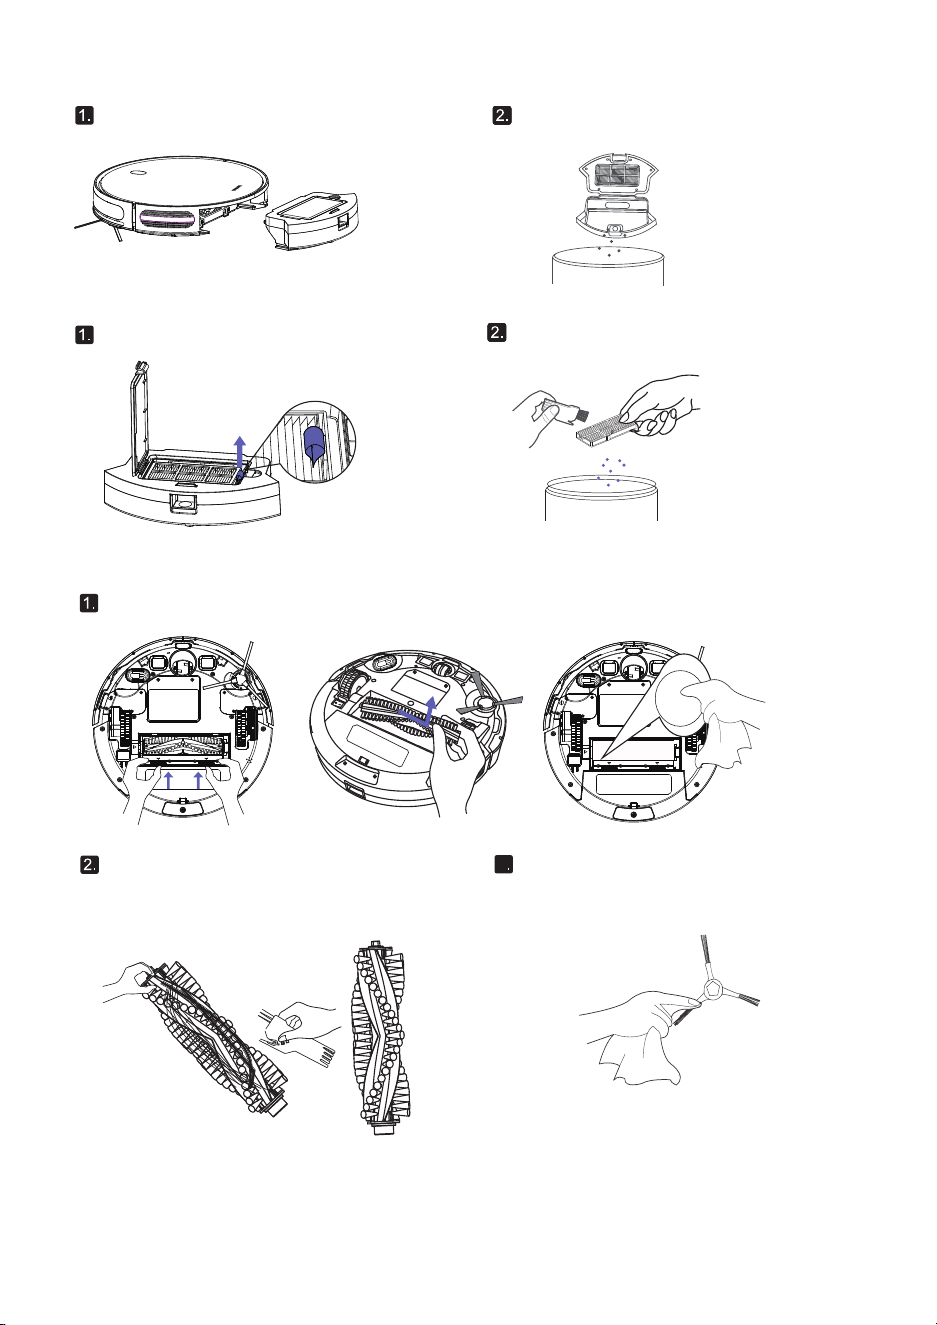
3.1 Empty dust box
3.2 Cleaning filter
2. Remove the cover of the dust box
and empty it.
Press the dust box Release button
to remove it.
Shake the garbage off the filter.Pull on the white label and remove the filter
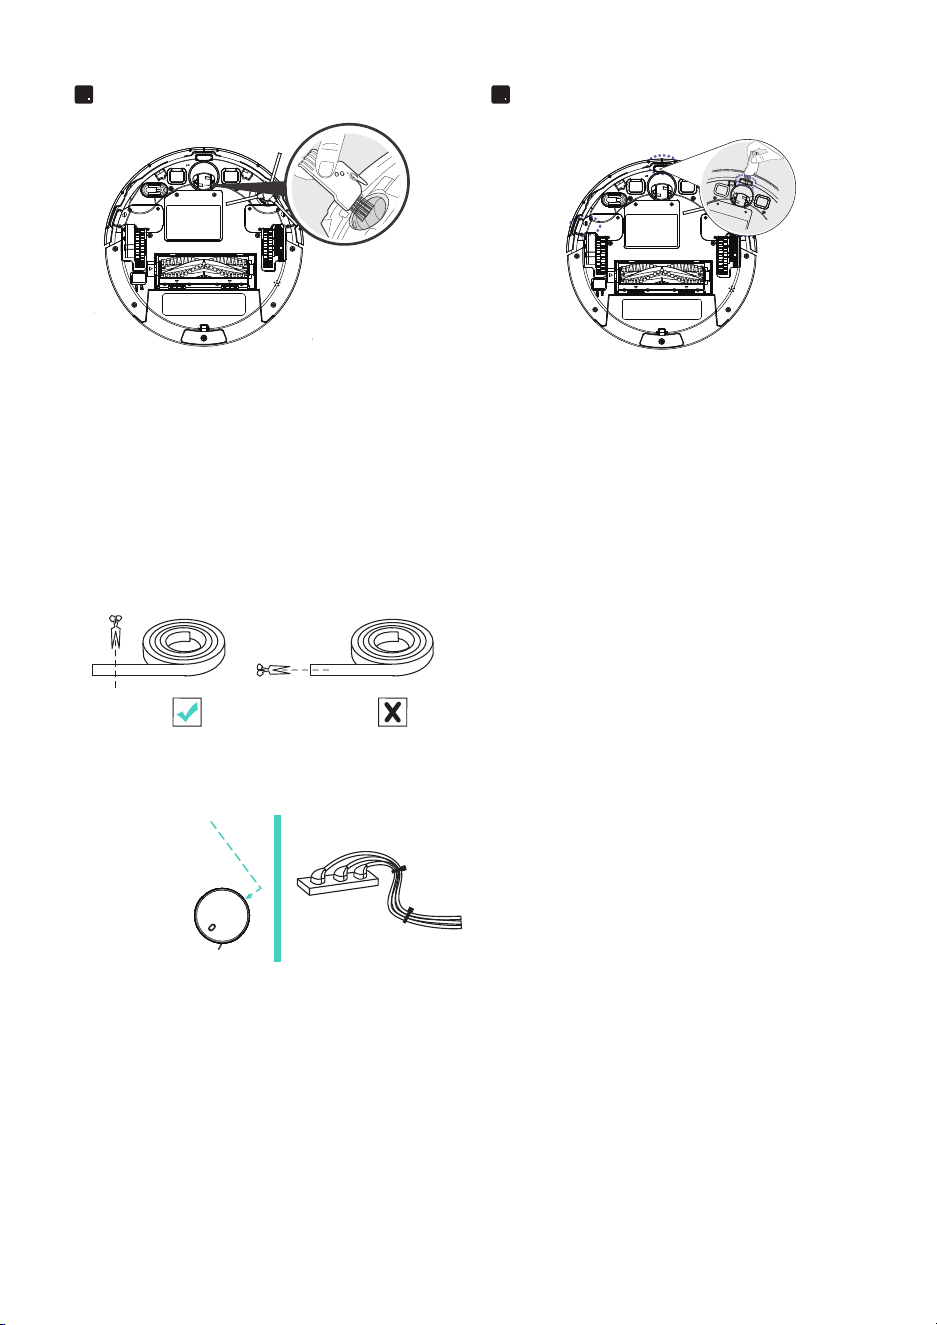
3.3 Cleaning brush, rolling brush, universal direction wheel and sensor
Remove the roller brush and clean the dust collection passage with a cloth.
Clean roller brush. Remove the hair from
the roller brush with the provided cleaning
tool knife.
Take the side brush. Clean the
side brush with a cloth brush.
3
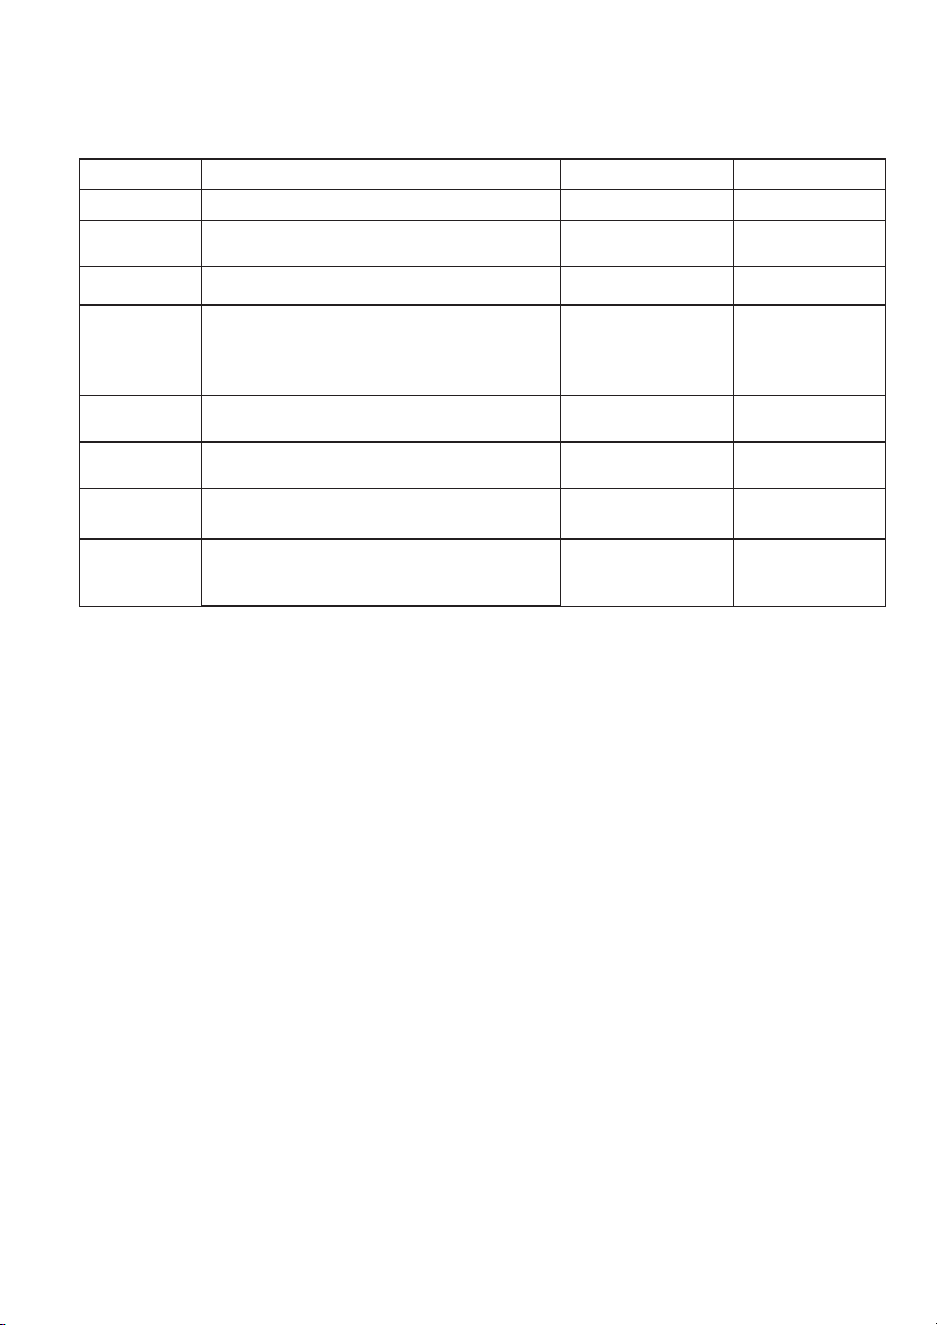
Use a cleaning brush to clean the universal
wheel.
4 5
Dust the sensor with a cleaning brush to
ensure optimum performance.
11 12
Note: please pay attention when cleaning the cleaner. If there is too much dust or oil on the optical
flow sensor sleeve, do not wipe it with your finger.
Use the Boundary Strip
With the Boundary Strip, you can keep RoboVac away from any area or item you do not want RoboVac
to clean. RoboVac will recognize the Boundary Strip and will not cross into the blocked-off area.
1. Identify the area or item you do not want RoboVac to get close to.
2. If necessary, use scissors to cut the Boundary Strip to a shorter length. Be sure to correctly
measure the length before cutting.
3. Apply the supplied strips of adhesive tape to lay the Boundary Strip flat on the floor. Make sure the
strip is placed FLAT on the floor or under an area rug.
3.1 Empty dust box
3.2 Cleaning filter
2. Remove the cover of the dust box
and empty it.
Press the dust box Release button
to remove it.
Shake the garbage off the filter.Pull on the white label and remove the filter
3.3 Cleaning brush, rolling brush, universal direction wheel and sensor
Remove the roller brush and clean the dust collection passage with a cloth.
Clean roller brush. Remove the hair from
the roller brush with the provided cleaning
tool knife.
Take the side brush. Clean the
side brush with a cloth brush.
3
Use a cleaning brush to clean the universal
wheel.
4 5
Dust the sensor with a cleaning brush to
ensure optimum performance.
11 12
Note: please pay attention when cleaning the cleaner. If there is too much dust or oil on the optical
flow sensor sleeve, do not wipe it with your finger.
Use the Boundary Strip
With the Boundary Strip, you can keep RoboVac away from any area or item you do not want RoboVac
to clean. RoboVac will recognize the Boundary Strip and will not cross into the blocked-off area.
1. Identify the area or item you do not want RoboVac to get close to.
2. If necessary, use scissors to cut the Boundary Strip to a shorter length. Be sure to correctly
measure the length before cutting.
3. Apply the supplied strips of adhesive tape to lay the Boundary Strip flat on the floor. Make sure the
strip is placed FLAT on the floor or under an area rug.
1413
4. lamp effect and alarm indication
Alarm Notice
When the cleaner fails, the red light of the cleaner AUTO button flashes or is
always on, and it will emit a "tick" with different length. Please refer to the
following table to inquire the cause of the failure:
Red lights blinking:
lamp effect indication
Operation indication light
Sleep mode No light indication Non light indication
WIFI indication lamp remark
Standby mode Main push key blue lamp on
Link constant on/
disconnect flicker
Link constant on/
disconnect flicker
Link constant on/
disconnect flicker
Work mode Main push key blue lamp constant on
WIFI Standby mode
Recharging
mode
Low power recharging: the purple light of
the cleaner key is always on.
Non-low power recharging: the purple light
of the cleaner is always on
Link constant on/
disconnect flicker
Recharging
mode
Purple breathe
Link constant on/
disconnect flicker
Error mode Main key button red light constant on or flicker
WIFI Lamp quick
flicker
Distribution
network link
WIFI Lamp constant
on
Distribution
network link
successful
6. Troubleshooting
In the process of using the product, if the following problems appear, you could
contrast and compare for the independent solution.
Warm Tips:
If the above method cannot solve the problem, please try the following operation:
1. Re-open the power switch on the bottom of the cleaner and restart the cleaner.
2. If the problem cannot be solved by restarting the cleaner, please send the
cleaner to the after-sales service center for repair.
No
01
1
02
2
03
3
04
4
Beeps Error Solution
Gyroscope error
Bumper error
Drop sensor error
Keep the robot at a stable place to
restart and do not move the machine
Check the bumper and remove any
object that could be blocking it
Check if the bumper dirty and clean sensor
Low power or charging error
Robot voltage is too low and needs
manually charging
Beeps and red light always on:
01
02
03
04
1
2
3
4
Beeps Error Solution
Driving wheel error
Side brushes error
Fan error
Roller brush error
Check if the drive wheel is blocked
Check if the side brush is blocked and
clean the side brush
Clean up the garbage and air ducts
channel
Check if the roller brush is entangled
and clean the roller brush

15 16
No. Malfunction Possible cause Solution
1
The cleaner
could not
recharge
There is insufficient contact
Make sure the charging
poles of the cleaner and
charging dock fully
connected.
The power supply of the charging dock
has been turned off, and the power
switch of the cleaner has been turned
on.It leads to power loss.
When the cleaner is not
performing work, it is
recommended that it will be
maintaining the charging
status, so as to better
proceed to the next work
task.
2
The cleaner
got into trouble
while working
The cleaner is tangled or obstructed
by the scattered wire on the ground,
the hanging curtain or the fringes
The cleaner will try various
ways to cast himself
From being trapped, if not,
manual assistance is
suggested.
3
If the cleaning
is not
completed, the
cleaner will
return to charge
When the cleaner is working, it can
sense the power shortage and return
to charge automatically.
Charge to the cleaner
For Wooden floor, ceramic tile and
other flat ground, the cleaner work
speed and time is different.
The working time of the
cleaner varies according to
the complexity of the room,
the volume of garbage and
the cleaning mode.
4
The cleaner
does not clean
automatically
as scheduled
The power switch of the cleaner is not
on. The cleaner cannot work by itself
in the closed state according to the
Open the clean power
source.
The cleaner battery power low
When the cleaner is standby,
it should be kept in the
charging state on the
charging stand to ensure
that it is fully charged at any
time.
The cleaner parts being obstructed
and tangled by garbage.
Turn off the power and
clean the dust box. Turn the
cleaner bottom up and
clean the parts separately.
5
Remote
controller
malfunction
Remoter battery power load
Replace the new battery
and install correctly
The power switch of the cleaner is not
on or the power of the cleaner is
insufficient.
Ensure that the power switch
of the cleaner is turned on
and sufficient power is
available to complete the
operation.
Remote control infrared transmitter or
cleaner receiver in dirty condition,
unable to transmit or receive signals.
Wipe the infrared transmitter
of the remote control and
the infrared receiver of the
cleaner with a clean cotton
cloth.
There is an infrared device disturbance
signal near the cleaner.
Avoid using remote controls
near other infrared devices.
Product specification
J20CProduct Type
Input
19 V 0.6 A
Working voltage
14.4 V
Rated power 28 W
Battery type
Dust box volume
0.5L
Max cleaning time 20 mins
Charging duration 300 - 360 mins
DC 14.4 V Li-ion 2600 mAh
Input 19 V 0.6 A
19 V 0.6 A
Output
This product can be connected to a mobile APP
for operation, please refer to the APP guide for details.