
Technical Support and E-Warranty Certificate www.vevor.com/support
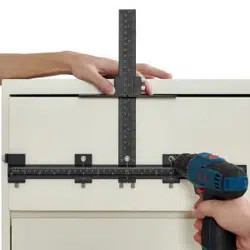
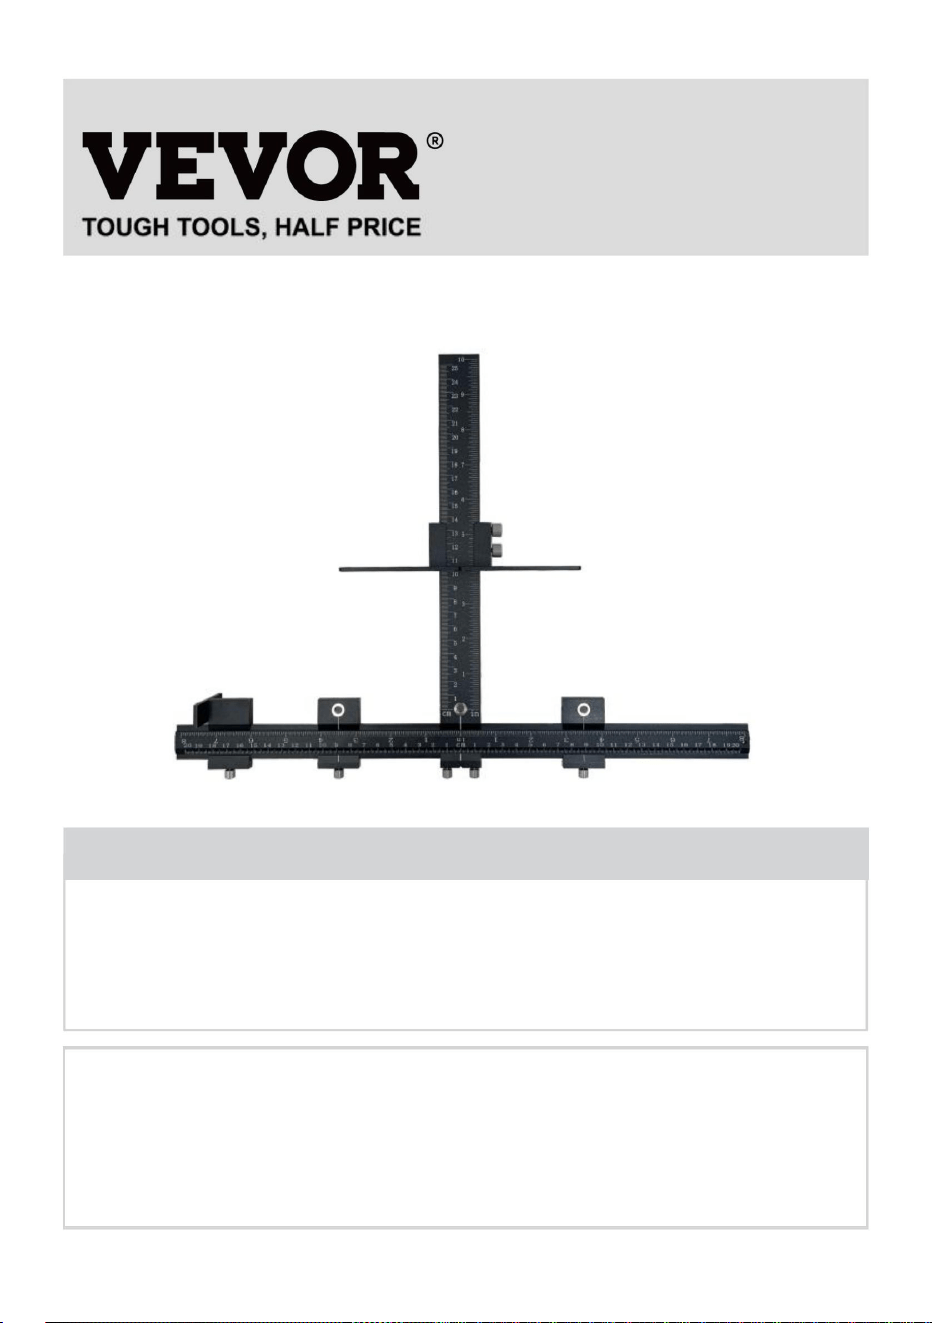
CABINET HARDWARE JIG
MODEL:
XRSS2305
We continue to be committed to provide you tools with competitive price.
"Save Half", "Half Price" or any other similar expressions used by us only represents an
estimate of savings you might benefit from buying certain tools with us compared to the major
top brands and does not necessarily mean to cover all categories of tools offered by us. You
are kindly reminded to verify carefully when you are placing an order with us if you are
actually saving half in comparison with the top major brands.
1
MODEL: XRSS2305
Have product questions? Need technical support? Please feel free to
contact us:
Technical Support and E-Warranty Certificate
www.vevor.com/support
NEED HELP? CONTACT US!
This is the original instruction, please read all manual instructions
carefully before operating. VEVOR reserves a clear interpretation of our
user manual. The appearance of the product shall be subject to the
product you received. Please forgive us that we won't inform you again if
there are any technology or software updates on our product.
CABINET HARDWARE JIG
2
SAFETY INSTRUCTIONS
1. This product contains small parts. If swallowed, it will pose a choking
hazard. Keep these small parts away from children !
2. Read, understand and follow your power tool manufacturer's instructions
for safety. Always wear safety glasses or eye shields before commencing power
tool operation. Always keep hands, face, hair, loose clothing, and body at a
safe distance from spindles and cutting tools. Always keep a firm grip on tool
handles when in operation. Always disconnect from the power source before
adjusting power tools.
MODEL AND PARAMETERS
Model
XRSS2305
Material
Aluminium Alloy
Longitudinal scale range
0-25cm/0-10inch
Horizontal scale range
0-20cm/0-8inch
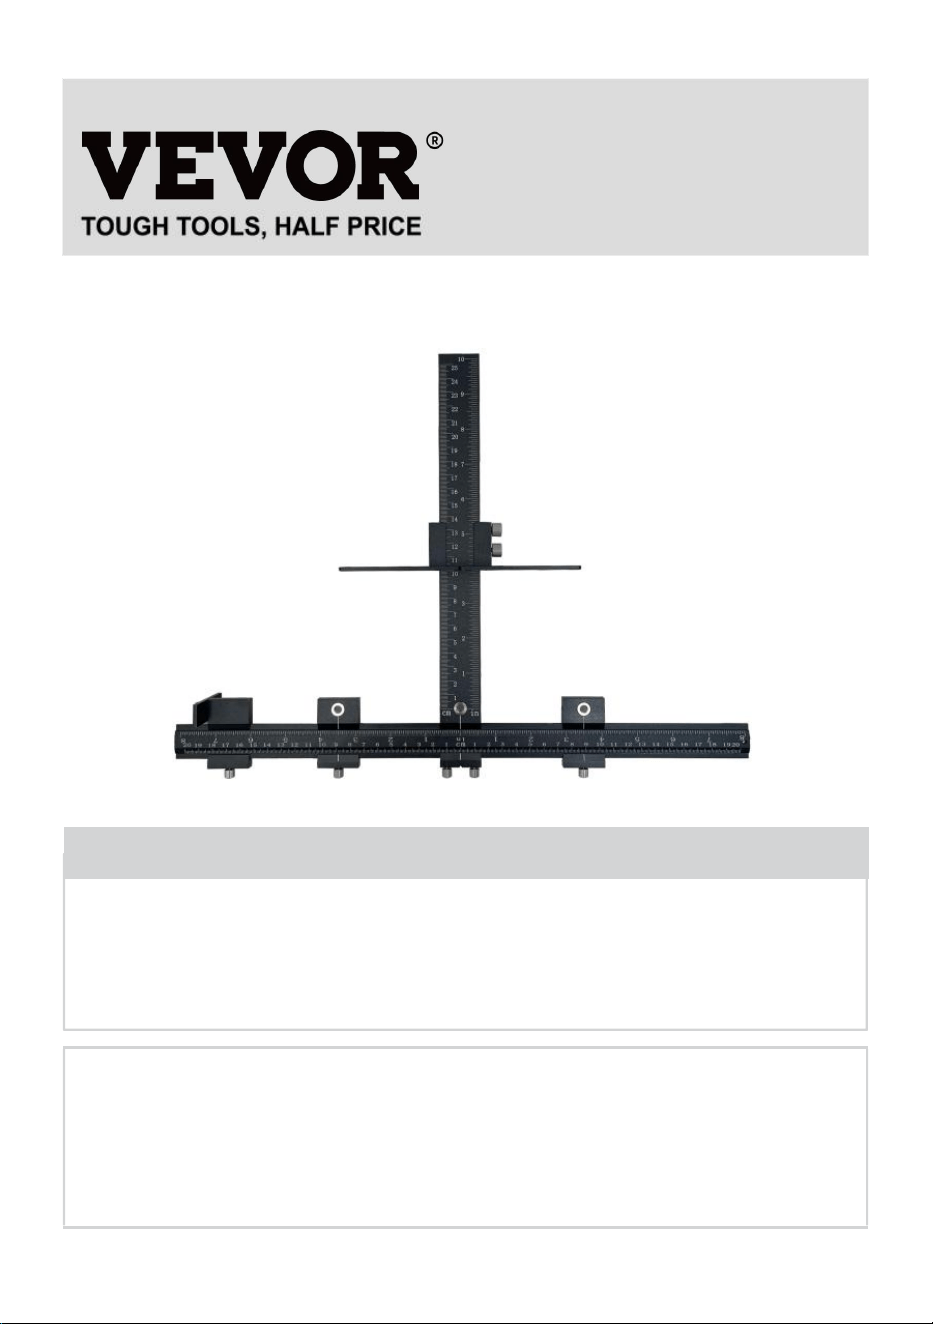
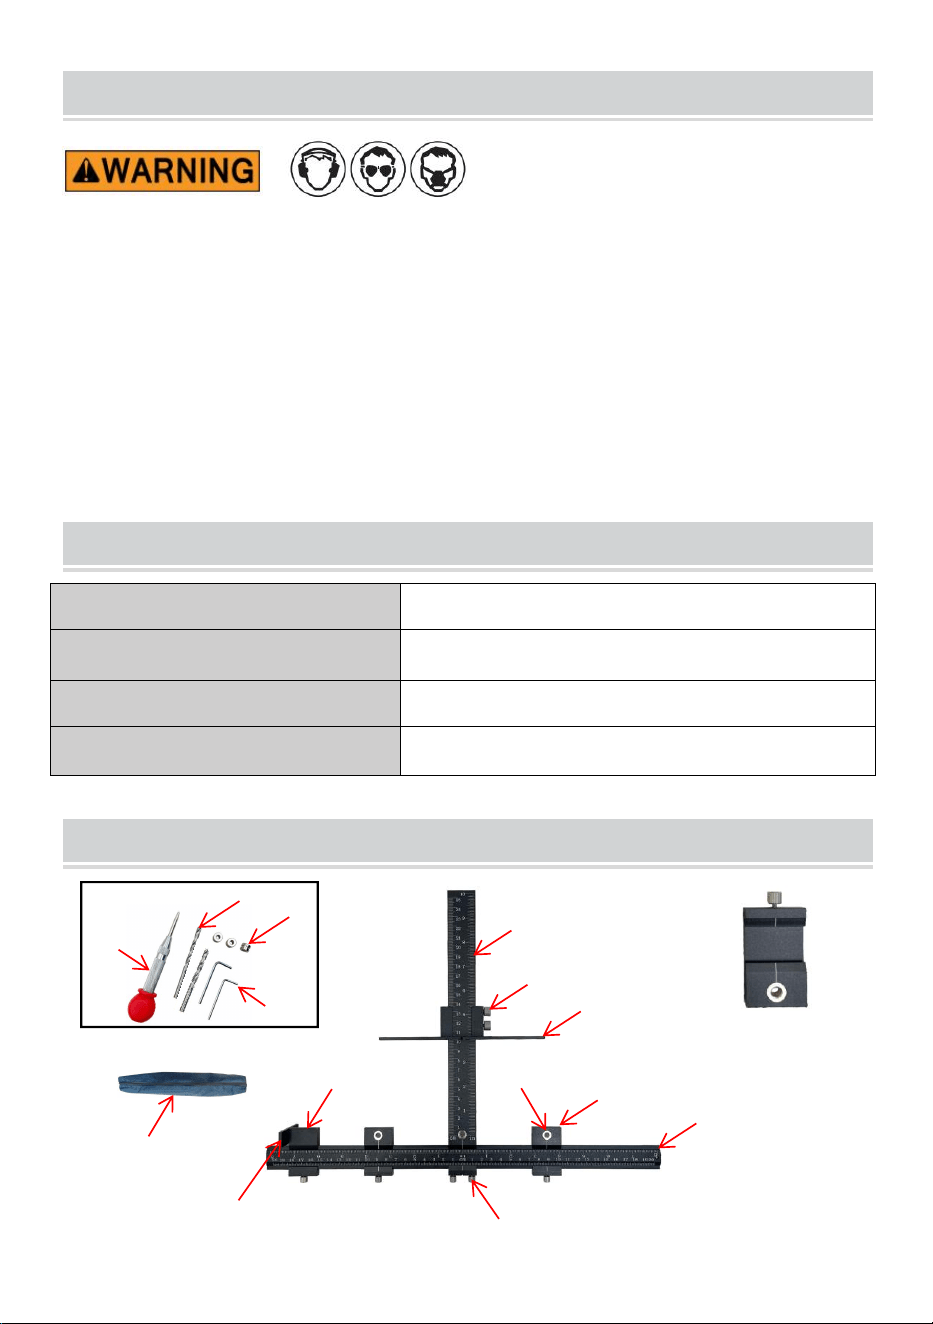
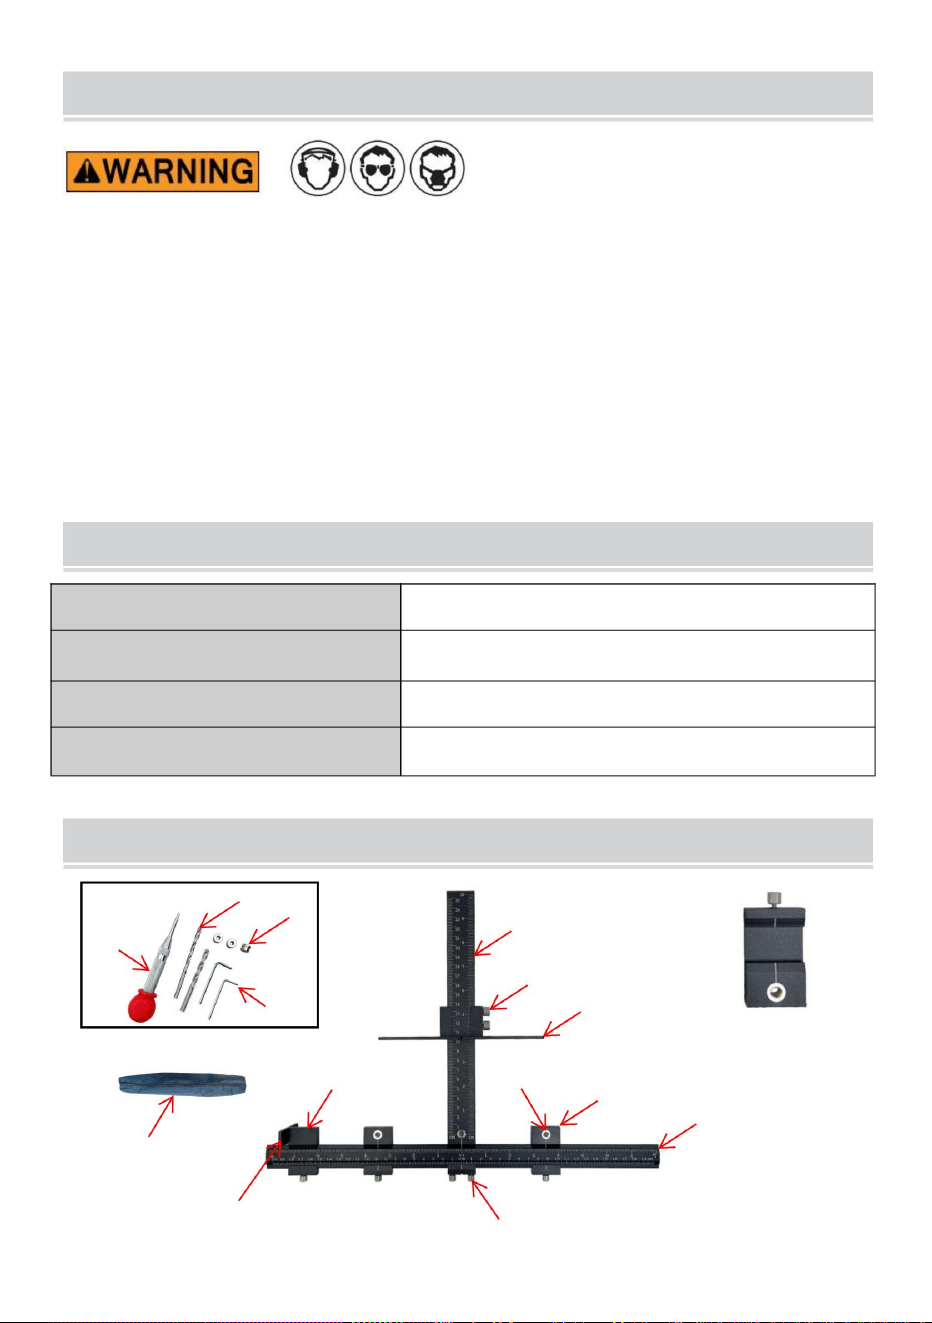
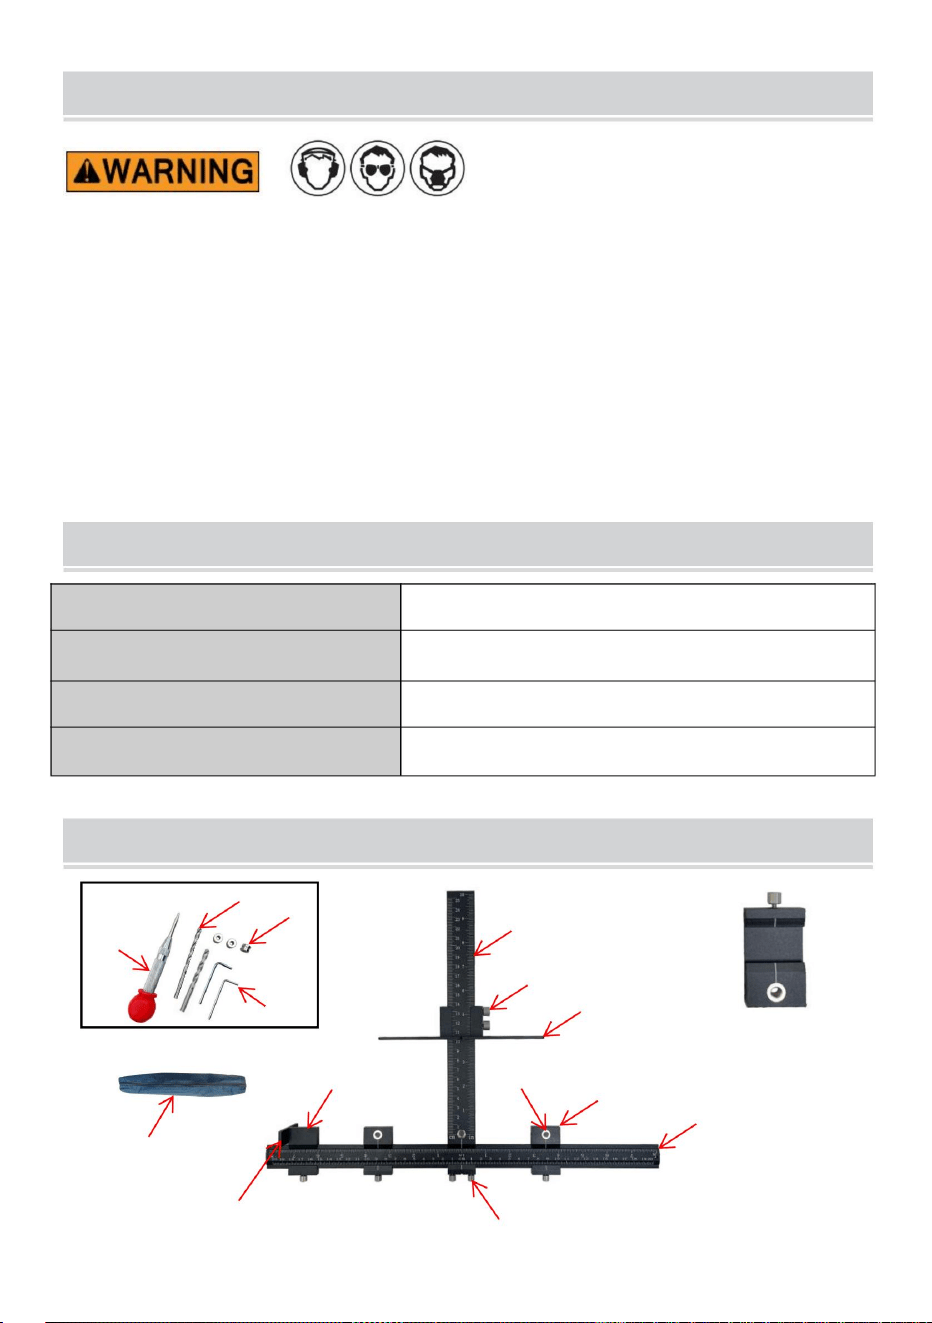
STRUCTURE DIAGRAM
AND
COMPONENTS
1
3
4
6
8
2
5
7
9
Multi-delivery x1
5
10
11
12
13

3
No.
Name
Qty
1
Main Ruler with Drill Guide
1
2
Hand Screw 1
6
3
Main Stop
1
4
Adjustable Drill Guide
3
5
Guide Sleeve(Φ4+Φ5)
6
6
Transverse Ruler
1
7
Hand Screw 2
2
8
End Stop
1
9
Bushing Holder/Slide
1
10
Wrench
2
11
Twist Bit(Φ4+Φ5)
2
12
Borehole Positioner
1
13
Storage Bag
1
14
User Manual
1
OPERATION
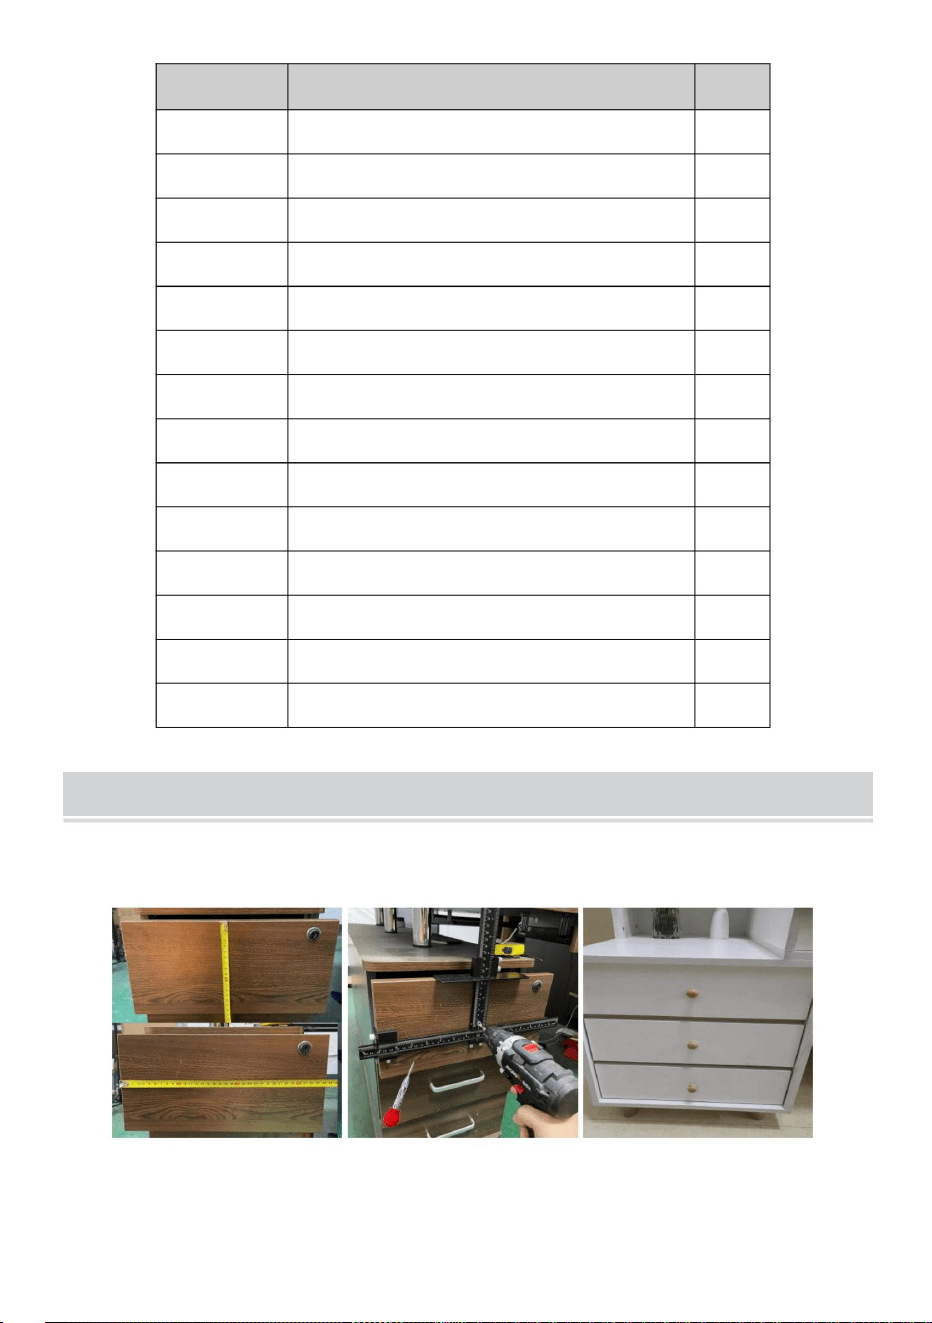
A: KNOB ON DRAWER FRONT(Center of width and height)
① ② ③
①Measure the width and height of the drawer .
②Set Large Stop at half of the drawer height, and set the sliding end stop at

4
half of the drawer width. Finally,drill holes .
(
NOTE: Using a center punch for positioning is more convenient .)
③Install the handle and you're done .
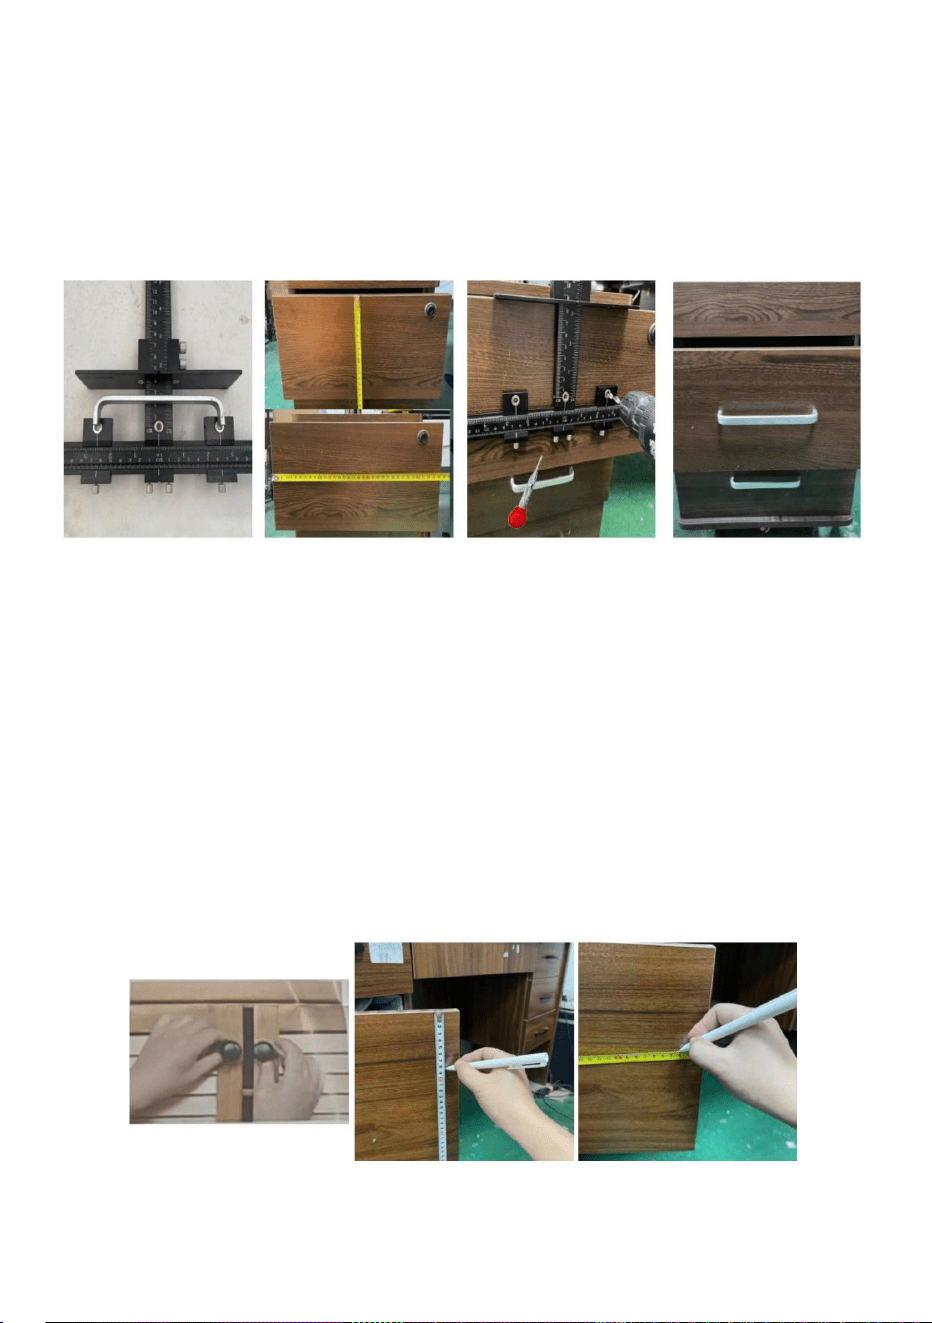
B: HANDLE ON DRAWER FRONT(Center of width and height)
① ② ③ ④
①:Measure hole centers of handles,adjust and tighten Sliding Drill Guides .
(Cover unused bushing with tape)
②:Measure the width and height of the drawer .
③:Set Large Stop at half of the drawer height, and set the sliding end stop at
half of the drawer width. Finally,drill holes .
(
NOTE: Using a center punch for positioning is more convenient .)
④:Install the handle, and you're done .
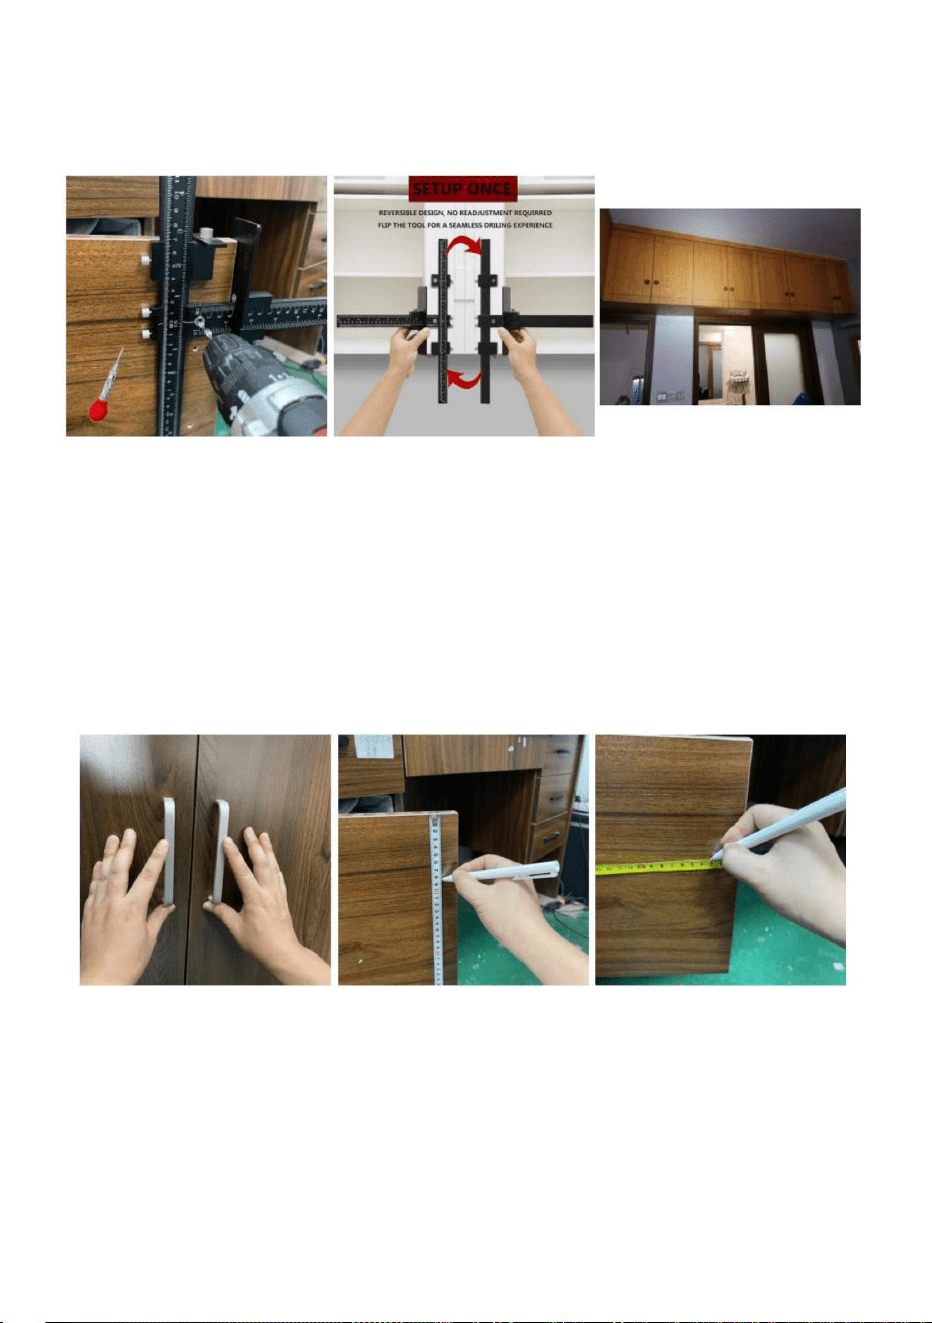
C: KNOB ON DOOR INSTALLATION (Off center of width and height)
① ② ③
①:Place the knob to find a position you like and mark it .

5
②:Measure from the top of the door to mark and set Sliding End Stop to the
measurement .
③:Measure from side of door to mark and set Large Stop to the measurement .
④ ⑤ ⑥
④:Place the tool as picture and drill hole through the drill bushing .
(
NOTE: Using a center punch for positioning is more convenient .)
⑤:The flipping tool punches a hole in the other cabinet door .
⑥: Install the handle, and you're done .
D:HANDLE ON DOOR INSTALLATION(Off center of width and height)
① ② ③
①:Place the handle to find position you like and mark the bottom hole
location .
②:Measure from the top of the door to mark and set Sliding End Stop to the
measurement .
③:Measure from the side of the door to mark and set Large Stop to the
measurement .

6
④ ⑤ ⑥
④:Place the tool as picture and drill hole through the drill bushing .
(
NOTE: Using a center punch for positioning is more convenient .)
⑤:The flipping tool punches a hole in the other cabinet door.
⑥: Install the handle, and you're done .
MAINTENANCE
1. After each use, please install it in time and keep it properly to avoid losing
parts .
2.Clean the surface after each use .

Address: Shuangchenglu 803nong11hao1602A-1609shi, baoshanqu, shanghai
200000 CN.
Imported to AUS: SIHAO PTY LTD, 1 ROKEVA STREETEASTWOOD NSW 2122
Australia
Imported to USA: Sanven Technology Ltd., Suite 250, 9166 Anaheim Place,
Rancho Cucamonga, CA 91730
REP
EC
E-CrossStu GmbH
Mainzer Landstr.69, 60329 Frankfurt am
Main.
REP
UK
YH CONSULTING LIMITED.
C/O YH Consulting Limited Office 147, Centurion
House, London Road, Staines-upon-Thames, Surrey,
TW18 4AX
TechnicalSupport and E-Warranty Certificate
www.vevor.com/support

MODELLO: XRSS2305
"Risparmia la metà", "Metà prezzo" o qualsiasi altra espressione simile da noi utilizzata rappresenta
solo una stima del risparmio che potresti ottenere acquistando determinati utensili con noi rispetto ai
principali marchi principali e non significa necessariamente coprire tutte le categorie di utensili da noi
offerti. Ti ricordiamo gentilmente di verificare attentamente quando effettui un ordine con noi se
stai effettivamente risparmiando la metà rispetto ai principali marchi principali.
Continuiamo a impegnarci per fornirvi strumenti a prezzi competitivi.
DIMA PER FERRAMENTA PER ARMADIETTI
Supporto tecnico e certificato di garanzia elettronica www.vevor.com/support
Machine Translated by Google

MODELLO: XRSS2305
HAI BISOGNO DI AIUTO? CONTATTACI!
1
Supporto tecnico e certificato di garanzia elettronica
www.vevor.com/support
Hai domande sui prodotti? Hai bisogno di supporto tecnico? Non esitare a contattarci:
Questa è l'istruzione originale, si prega di leggere attentamente tutte le istruzioni del
manuale prima di utilizzare. VEVOR si riserva una chiara interpretazione del nostro manuale
utente. L'aspetto del prodotto sarà soggetto al prodotto ricevuto. Vi preghiamo di
perdonarci se non vi informeremo di nuovo se ci sono aggiornamenti tecnologici o software sul
nostro prodotto.
DIMA PER FERRAMENTA PER ARMADIETTI
Machine Translated by Google
1
4
6
12
13
8
2
10
1. Questo prodotto contiene piccole parti. Se ingerito, potrebbe rappresentare un rischio
di soffocamento. Tenere queste piccole parti lontano dalla portata dei bambini!
3
7
2. Leggere, comprendere e seguire le istruzioni del produttore dell'utensile elettrico per
la sicurezza. Indossare sempre occhiali di sicurezza o protezioni per gli occhi prima di
iniziare a utilizzare l'utensile elettrico. Tenere sempre mani, viso, capelli, abiti larghi e
corpo a una distanza di sicurezza da mandrini e utensili da taglio. Mantenere sempre
una presa salda sulle impugnature dell'utensile durante il funzionamento. Scollegare
sempre dalla fonte di alimentazione prima di regolare gli utensili elettrici.
9
11
5
5
2
Consegna multipla x1
0-25 cm/0-10 pollici
0-20 cm/0-8 pollici
Intervallo di scala longitudinale
Materiale
Lega di alluminio
XRSS2305Modello
Gamma di scala orizzontale
MODELLO E PARAMETRI
ISTRUZIONI DI SICUREZZA
SCHEMA STRUTTURALE E COMPONENTI
Machine Translated by Google

OPERAZIONE
ÿ
ÿMisurare la larghezza e l'altezza del cassetto.
ÿImpostare il fermo grande a metà dell'altezza del cassetto e impostare il fermo scorrevole a
ÿÿ
A: MANOPOLA SUL FRONTALE DEL CASSETTO (centro della larghezza e dell'altezza)
Righello trasversale
Quantità
1
11
6
3
Fine fermata
2
12
Righello principale con guida per trapano
Chiave
13
4
9
Posizionatore di fori di trivellazione
Fermata principale
5
1
1
NO.
Manicotto di guida (ÿ4+ÿ5)
2
Manuale d'uso
6
Vite a mano 2
2
1
7
2
Nome
8
Supporto boccola/slitta
1
1
Vite a mano 1
Punta a torsione (ÿ4+ÿ5)
3
10
1
6
Guida di perforazione regolabile
Borsa portaoggetti
1
14
1
3
Machine Translated by Google

4
ÿ
ÿ ÿ
ÿ: Posiziona la manopola nella posizione che preferisci e contrassegnala.
ÿ
ÿ: Misurare i centri dei fori delle maniglie, regolare e stringere le guide di perforazione scorrevoli.
metà della larghezza del cassetto. Infine, praticare dei fori.
(Coprire la boccola non utilizzata con nastro adesivo)
ÿ
(NOTA: è più comodo utilizzare un punzone per il posizionamento.)
ÿ: Misurare la larghezza e l'altezza del cassetto. ÿ:
Impostare il fermo grande a metà dell'altezza del cassetto e impostare il fermo scorrevole a
metà della larghezza del cassetto. Infine, praticare dei fori.
ÿInstalla la maniglia e il gioco è fatto.
(NOTA: è più comodo utilizzare un punzone per il posizionamento.)
ÿ
ÿ: Installa la maniglia e il gioco è fatto.
ÿ
C: INSTALLAZIONE DELLA MANIGLIA SULLA PORTA (fuori centro rispetto a larghezza e altezza)
B: MANIGLIA SUL FRONTALE DEL CASSETTO (centro della larghezza e dell'altezza)
Machine Translated by Google

D: INSTALLAZIONE DELLA MANIGLIA SULLA PORTA (fuori centro rispetto a larghezza e altezza)
(NOTA: è più comodo utilizzare un punzone per il posizionamento.)
ÿ: Misurare dal lato della porta per contrassegnare e impostare il fermo grande su
misurazione .
ÿ: L'utensile di ribaltamento pratica un foro nell'altra anta
dell'armadio. ÿ: Installa la maniglia e il gioco è fatto.
ÿ: Misurare dalla parte superiore della porta per contrassegnare e impostare il finecorsa scorrevole su
ÿ
misurazione .
ÿÿ
ÿ: Posiziona la maniglia nella posizione che preferisci e segna il foro inferiore
ÿ: Misurare dal lato della porta al segno e impostare il fermo grande sulla misurazione.
ÿÿ ÿ
posizione .
ÿ: Misurare dalla parte superiore della porta per contrassegnare e impostare il finecorsa scorrevole su
ÿ: Posizionare l'utensile come in figura e praticare un foro attraverso la boccola del trapano.
misurazione .
5
Machine Translated by Google

MANUTENZIONE
1. Dopo ogni utilizzo, installarlo in tempo e conservarlo correttamente per evitare di perderlo
parti .
ÿ: L'utensile di ribaltamento pratica un foro nell'altra anta
dell'armadio. ÿ: Installa la maniglia e il gioco è fatto.
ÿ: Posizionare l'utensile come in figura e praticare un foro attraverso la boccola del trapano.
(NOTA: è più comodo utilizzare un punzone per il posizionamento.)
ÿ ÿ ÿ
2. Pulire la superficie dopo ogni utilizzo.
6
Machine Translated by Google

RAPPRESENTANZA DEL REGNO UNITO
Rappresentante della CE
Supporto tecnico e certificato di garanzia elettronica
Mainzer Landstr.69, 60329 Francoforte am
C/O YH Consulting Limited Ufficio 147, Centurion
Principale.
E-CrossStu GmbH
CONSULENZA YH LIMITATA.
Casa, London Road, Staines-upon-Thames, Surrey,
Modello TW18 4AX
Importato in AUS: SIHAO PTY LTD, 1 ROKEVA STREETEASTWOOD NSW 2122
Australia
200000 NC.
Indirizzo: Shuangchenglu 803nong11hao1602A-1609shi, baoshanqu, shanghai
www.vevor.com/support
Importato negli USA: Sanven Technology Ltd., Suite 250, 9166 Anaheim
Place, Rancho Cucamonga, CA 91730
Machine Translated by Google

MODEL: XRSS2305
„Oszczędź połowę”, „Połowa ceny” lub inne podobne wyrażenia używane przez nas stanowią
jedynie szacunkowe oszczędności, jakie możesz uzyskać, kupując u nas określone narzędzia w
porównaniu z głównymi markami i niekoniecznie oznaczają one objęcie wszystkich kategorii narzędzi
oferowanych przez nas. Uprzejmie przypominamy, aby dokładnie sprawdzić, czy składając u nas
zamówienie faktycznie oszczędzasz połowę w porównaniu z głównymi markami.
Nadal staramy się oferować Państwu narzędzia w konkurencyjnych cenach.
PRZYRZĄD DO MOCOWANIA OKUĆ MEBLOWYCH
Wsparcie techniczne i certyfikat gwarancji elektronicznej www.vevor.com/support
Machine Translated by Google
Wsparcie techniczne i certyfikat gwarancji elektronicznej
www.vevor.com/support
Masz pytania dotyczące produktu? Potrzebujesz wsparcia technicznego? Skontaktuj się z
nami:
To jest oryginalna instrukcja, przed użyciem należy uważnie przeczytać wszystkie
instrukcje. VEVOR zastrzega sobie jasną interpretację naszej instrukcji obsługi. Wygląd
produktu będzie zależał od produktu, który otrzymałeś. Prosimy o wybaczenie, że nie
poinformujemy Cię ponownie, jeśli w naszym produkcie pojawią się jakiekolwiek aktualizacje
technologiczne lub oprogramowania.
1
MODEL: XRSS2305
POTRZEBUJESZ POMOCY? SKONTAKTUJ SIĘ Z NAMI!
PRZYRZĄD DO MOCOWANIA OKUĆ MEBLOWYCH
Machine Translated by Google

0-25 cm/0-10 cali
0-20 cm/0-8 cali
Zakres skali wzdłużnej
XRSS2305
Stop aluminium
Tworzywo
Model
Zakres skali poziomej
2
Dostawa wielokrotna x1
1
4
6
12
13
8
2
10
1. Ten produkt zawiera małe części. W przypadku połknięcia istnieje ryzyko
zadławienia. Trzymaj te małe części z dala od dzieci!
3
7
2. Przeczytaj, zrozum i postępuj zgodnie z instrukcjami producenta elektronarzędzi
dotyczącymi bezpieczeństwa. Zawsze zakładaj okulary ochronne lub osłony oczu przed
rozpoczęciem korzystania z elektronarzędzia. Zawsze trzymaj ręce, twarz, włosy,
luźne ubranie i ciało w bezpiecznej odległości od wrzecion i narzędzi tnących. Zawsze
mocno trzymaj uchwyty narzędzi podczas pracy. Zawsze odłączaj od źródła zasilania
przed regulacją elektronarzędzi.
9
11
5
5
SCHEMAT STRUKTURY I SKŁADNIKI
INSTRUKCJE BEZPIECZEŃSTWA
MODEL I PARAMETRY
Machine Translated by Google

A: GAŁKA NA PRZODZIE SZUFLADY (środek szerokości i wysokości)
Zmierz szerokość i wysokość szuflady. Ustaw
duży ogranicznik na połowę wysokości szuflady, a ogranicznik końcowy przesuwny na
DZIAŁANIE
1
Ilość
1
11
6
3
Zatrzymanie końcowe
2
12
Linijka główna z prowadnicą wiertła
Klucz
13
4
9
Pozycjoner otworu wiertniczego
Główny przystanek
5
1
1
NIE.
Tuleja prowadząca (Φ4+Φ5)
2
Instrukcja obsługi
6
Śruba ręczna 2
2
1
7
2
Nazwa
8
Uchwyt tulei/suwak
1
1
Śruba ręczna 1
Bit skręcany (Φ4+Φ5)
3
10
1
6
Regulowany prowadnik wiertła
Torba do przechowywania
1
14
Linijka poprzeczna
3
Machine Translated by Google

C: INSTALACJA GAŁKI NA DRZWIACH (poza środkiem szerokości i wysokości)
B: UCHWYT NA PRZODZIE SZUFLADY (środek szerokości i wysokości)
: Umieść pokrętło w żądanej pozycji i zaznacz ją.
: Zmierz środki otworów uchwytów, wyreguluj i dokręć przesuwne prowadnice wiertarskie.
połowa szerokości szuflady. Na koniec wywierć otwory.
(Zakryj nieużywane tuleje taśmą)
UWAGA: Do pozycjonowania wygodniej jest używać punktaka.)
: Zmierz szerokość i wysokość szuflady. : Ustaw
duży ogranicznik na połowie wysokości szuflady, a ogranicznik końcowy przesuwny na
połowa szerokości szuflady. Na koniec wywierć otwory.
Zamontuj uchwyt i gotowe.
UWAGA: Do pozycjonowania wygodniej jest używać punktaka.)
: Zamontuj uchwyt i gotowe.
4
Machine Translated by Google

D:Montaż klamki na drzwiach (poza środkiem szerokości i wysokości)
UWAGA: Do pozycjonowania wygodniej jest używać punktaka.)
: Zmierz odległość od boku drzwi, aby zaznaczyć i ustawić duży ogranicznik
pomiar .
: Narzędzie do odwracania przebija otwór w drzwiach
drugiej szafki. : Zainstaluj uchwyt i gotowe.
: Zmierz odległość od górnej krawędzi drzwi, aby zaznaczyć i ustawić ogranicznik przesuwny
pomiar .
: Umieść uchwyt w żądanej pozycji i zaznacz dolny otwór
: Zmierz odległość od drzwi do oznaczenia i ustaw duży ogranicznik na tym punkcie pomiaru.
lokalizacja .
: Zmierz odległość od górnej krawędzi drzwi, aby zaznaczyć i ustawić ogranicznik przesuwny
: Umieść narzędzie tak jak na rysunku i wywierć otwór przez tuleję wiertarską.
pomiar .
5
Machine Translated by Google

KONSERWACJA
1. Po każdym użyciu należy go zainstalować na czas i prawidłowo przechowywać, aby uniknąć jego zgubienia.
części .
: Narzędzie do odwracania przebija otwór w drzwiach
drugiej szafki. : Zainstaluj uchwyt i gotowe.
2. Wyczyść powierzchnię po każdym użyciu.
UWAGA: Do pozycjonowania wygodniej jest używać punktaka.)
: Umieść narzędzie tak jak na rysunku i wywierć otwór przez tuleję wiertarską.
6
Machine Translated by Google

Przedstawiciel UE
REP WIELKIEJ BRYTANII
Certyfikat wsparcia technicznego i gwarancji elektronicznej
Główny.
C/O YH Consulting Limited Biuro 147, Centurion
Mainzer Landstr.69, 60329 Frankfurt am
E-CrossStu GmbH
YH CONSULTING LIMITED.
Dom, London Road, Staines-upon-Thames, Surrey,
TW18 4AX
Importowane do AUS: SIHAO PTY LTD, 1 ROKEVA STREETEASTWOOD NSW 2122
Australia
200000 CN.
Adres: Shuangchenglu 803nong11hao1602A-1609shi, baoshanqu, Szanghaj
www.vevor.com/support
Importowane do USA: Sanven Technology Ltd., Suite 250, 9166 Anaheim Place,
Rancho Cucamonga, CA 91730
Machine Translated by Google

MODELL: XRSS2305
SCHRANK-BESCHLÄGEVORRICHTUNG
Technischer Support und E-Garantie-Zertifikat www.vevor.com/support
„Sparen Sie die Hälfte“, „Halber Preis“ oder andere ähnliche Ausdrücke, die wir verwenden, stellen nur eine
Schätzung der Ersparnis dar, die Sie beim Kauf bestimmter Werkzeuge bei uns im Vergleich zu den großen
Topmarken erzielen können, und decken nicht unbedingt alle von uns angebotenen Werkzeugkategorien ab. Wir
möchten Sie freundlich daran erinnern, bei Ihrer Bestellung bei uns sorgfältig zu prüfen, ob Sie im Vergleich
zu den großen Topmarken tatsächlich die Hälfte sparen.
Wir sind weiterhin bestrebt, Ihnen Werkzeuge zu wettbewerbsfähigen Preisen anzubieten.
Machine Translated by Google

Dies ist die Originalanleitung. Bitte lesen Sie alle Anweisungen sorgfältig durch, bevor Sie
das Gerät in Betrieb nehmen. VEVOR behält sich eine klare Auslegung unserer Bedienungsanleitung
vor. Das Erscheinungsbild des Produkts richtet sich nach dem Produkt, das Sie erhalten
haben. Bitte verzeihen Sie uns, dass wir Sie nicht erneut informieren, wenn es Technologie- oder
Software-Updates für unser Produkt gibt.
Sie haben Fragen zu unseren Produkten? Sie benötigen technischen Support? Dann kontaktieren
Sie uns gerne:
Technischer Support und E-Garantie-Zertifikat
www.vevor.com/support
1
Brauchen Sie Hilfe? Kontaktieren Sie uns!
MODELL: XRSS2305
SCHRANK-BESCHLÄGEVORRICHTUNG
Machine Translated by Google

Längsskalenbereich
0–25 cm
0–20 cm
Horizontaler Skalierungsbereich
XRSS2305
Aluminiumlegierung
Material
Modell
10
2. Lesen, verstehen und befolgen Sie die Sicherheitshinweise Ihres Elektrowerkzeugherstellers.
Tragen Sie immer eine Schutzbrille oder einen Augenschutz, bevor Sie mit dem Betrieb des
Elektrowerkzeugs beginnen. Halten Sie Hände, Gesicht, Haare, lose Kleidung und Körper
immer in sicherem Abstand von Spindeln und Schneidwerkzeugen. Halten Sie die
Werkzeuggriffe während des Betriebs immer fest im Griff. Trennen Sie das Elektrowerkzeug
immer von der Stromquelle, bevor Sie Einstellungen vornehmen.
7
9
11
5
4
5
1
6
12
13
8
2
1. Dieses Produkt enthält Kleinteile. Bei Verschlucken besteht
Erstickungsgefahr. Halten Sie diese Kleinteile von Kindern fern!
3
MODELL UND PARAMETER
SICHERHEITSHINWEISE
STRUKTURDIAGRAMM UND KOMPONENTEN
Mehrfachlieferung x1
2
Machine Translated by Google
A: KNOPF AN DER SCHUBLADENVORDERSEITE (Mitte von Breite und Höhe)
BETRIEB
Hauptlineal mit Bohrführung
Schlüssel
4
9
1
11
13
6
3
Endanschlag
2
NEIN.
Führungshülse (ÿ4+ÿ5)
2
Bedienungsanleitung
6
12
Bohrlochpositionierer
Haupthaltestelle
5
1
Name
1
8
Buchsenhalter/-schieber
1
1
Handschraube 2
2
1
7
2
6
Einstellbare Bohrführung
Aufbewahrungstasche
1
14
Menge
1
Handschraube 1
Spiralbohrer (ÿ4+ÿ5)
3
Querlineal
10
1
3
ÿ
ÿMessen Sie die Breite und Höhe der Schublade.
ÿStellen Sie den großen Anschlag auf die Hälfte der Schubladenhöhe und den Gleitanschlag auf
ÿÿ
Machine Translated by Google

C: KNOPF-AN-TÜR-INSTALLATION (außerhalb der Breite und Höhe)
B: GRIFF AN DER SCHUBLADENVORDERSEITE (Mitte von Breite und Höhe)
Die Hälfte der Schubladenbreite. Zum Schluss Löcher bohren.
ÿInstallieren Sie den Griff und fertig.
(HINWEIS: Die Verwendung eines Körners zum Positionieren ist bequemer.)
ÿ: Installieren Sie den Griff, und fertig.
ÿ ÿ ÿ
ÿ ÿ ÿ:
Platzieren Sie den Knopf an der gewünschten Position und markieren Sie diese.
ÿ
Die Hälfte der Schubladenbreite. Zum Schluss Löcher bohren.
(Nicht verwendete Buchsen mit Klebeband abdecken)
ÿ: Lochmitten der Griffe messen, Gleitbohrführungen anpassen und festziehen.
(HINWEIS: Die Verwendung eines Körners zum Positionieren ist bequemer.)
ÿ:Messen Sie die Breite und Höhe der Schublade.
ÿ:Stellen Sie den großen Anschlag auf die Hälfte der Schubladenhöhe ein und den Gleitanschlag auf
ÿ
4
Machine Translated by Google

D: GRIFF AN DER TÜRINSTALLATION (außerhalb der Mitte von Breite und Höhe)
ÿ
ÿ: Platzieren Sie den Griff in der gewünschten Position und markieren Sie das untere Loch
ÿ: Messen Sie von der Seite der Tür bis zur Markierung und stellen Sie den großen Anschlag auf das Maß ein.
ÿ
Standort .
ÿ:Messen Sie von der Oberseite der Tür, um den Schiebe-Endanschlag zu markieren und auf die
ÿ ÿ
ÿ: Platzieren Sie das Werkzeug wie abgebildet und bohren Sie ein Loch durch die Bohrbuchse.
Messung .
(HINWEIS: Die Verwendung eines Körners zum Positionieren ist bequemer.)
ÿ:Messen Sie von der Seite der Tür, um den großen Anschlag zu markieren und auf den
Messung .
ÿ: Das Wendewerkzeug stanzt ein Loch in die andere
Schranktür. ÿ: Griff montieren, fertig.
ÿ:Messen Sie von der Oberseite der Tür, um den Schiebe-Endanschlag zu markieren und auf die
ÿ ÿ
Messung .
5
Machine Translated by Google

WARTUNG
ÿ: Das Wendewerkzeug stanzt ein Loch in die andere
Schranktür. ÿ: Griff montieren, fertig.
1. Installieren Sie es nach jedem Gebrauch rechtzeitig und bewahren Sie es ordnungsgemäß auf, um einen Verlust zu vermeiden
Teile.
2. Reinigen Sie die Oberfläche nach jedem Gebrauch.
ÿ: Platzieren Sie das Werkzeug wie abgebildet und bohren Sie ein Loch durch die Bohrbuchse.
(HINWEIS: Die Verwendung eines Körners zum Positionieren ist bequemer.)
ÿ ÿ ÿ
6
Machine Translated by Google

Vertreter der EG
UK REP
Hauptsächlich.
Haus, London Road, Staines-upon-Thames, Surrey,
Mainzer Landstr.69, 60329 Frankfurt am
E-CrossStu GmbH
C/O YH Consulting Limited Office 147, Centurion
TW18 4AX
YH CONSULTING LIMITED.
Nach AUS importiert: SIHAO PTY LTD, 1 ROKEVA STREETEASTWOOD NSW 2122
Australien
200000 CN.
Adresse: Shuangchenglu 803nong11hao1602A-1609shi, Baoshanqu, Shanghai
Importiert in die USA: Sanven Technology Ltd., Suite 250, 9166 Anaheim Place,
Rancho Cucamonga, CA 91730
www.vevor.com/support
Technischer Support und E-Garantie-Zertifikat
Machine Translated by Google

MODÈLE:XRSS2305
«Économisezlamoitié»,«Moitiéprix»outouteautreexpressionsimilaireutiliséeparnousnereprésente
qu'uneestimationdeséconomiesquevouspourriezréaliserenachetantcertainsoutilscheznousparrapport
auxgrandesmarquesetnecouvrepasnécessairementtouteslescatégoriesd'outilsquenousproposons.
Nousvousrappelonsdebienvouloirvérifiersoigneusementlorsquevouspassezunecommandechez
noussivouséconomisezréellementlamoitiéparrapportauxgrandesmarques.
Nouscontinuonsànousengageràvousfournirdesoutilsàdesprixcompétitifs.
GABARITDEQUINCAILLERIED'ARMOIRE
Assistancetechniqueetcertificatdegarantieélectroniquewww.vevor.com/support
Machine Translated by Google

Assistancetechniqueetcertificatdegarantieélectronique
www.vevor.com/support
Vousavezdesquestionssurlesproduits?Vousavezbesoind'uneassistancetechnique?N'hésitezpasà
nouscontacter:
Ils'agitdelanoticed'utilisationd'origine.Veuillezlireattentivementtouteslesinstructionsdu
manuelavantdel'utiliser.VEVORseréserveledroitd'interpréterclairementnotremanueld'utilisation.
L'apparenceduproduitdépendduproduitquevousavezreçu.Veuilleznousexcuser,nousnevous
informeronsplusencasdemiseàjourtechnologiqueoulogicielledenotreproduit.
MODÈLE:XRSS2305
BESOIND'AIDE?CONTACTEZNOUS!
GABARITDEQUINCAILLERIED'ARMOIRE
1
Machine Translated by Google

025cm/010pouces
Plaged'échellelongitudinale
Alliaged'aluminium
XRSS2305
020cm/08pouces
Matériel
Modèle
Plaged'échellehorizontale
2
Multilivraisonx1
5
12
13
1
6
10
7
1.Ceproduitcontientdepetitespièces.Encasd'ingestion,ilexisteunrisque
d'étouffement.Gardezcespetitespièceshorsdeportéedesenfants!
2
3
8
9
2.Lisez,comprenezetrespectezlesinstructionsdesécuritédufabricantdevotreoutilélectrique.
Porteztoujoursdeslunettesdesécuritéoudeslunettesdeprotectionavantdecommenceràutiliser
l'outilélectrique.Gardeztoujourslesmains,levisage,lescheveux,lesvêtementsamplesetle
corpsàunedistancesûredesbrochesetdesoutilsdecoupe.Mainteneztoujoursfermementles
poignéesdel'outilpendantsonfonctionnement.Débrancheztoujoursl'appareildelasource
d'alimentationavantderéglerl'outilélectrique.
5
4
11
SCHÉMADESTRUCTUREETCOMPOSANTS
CONSIGNESDESÉCURITÉ
MODÈLEETPARAMÈTRES
Machine Translated by Google

A:BOUTONSURLAFACEDUTIROIR(aucentredelalargeuretdelahauteur)
Mesurezlalargeuretlahauteurdutiroir.
Réglezlagrandebutéeàlamoitiédelahauteurdutiroiretréglezlabutéecoulissanteà
OPÉRATION
2
2
Visàmain2
1
7
2
Nom
1
Supportdedouille/glissière
8
1
Visàmain1
Embouttorsadé(Φ4+Φ5)
3
10
1
Guidedeperçageréglable
Sacderangement
6
1
14
1
Règletransversale
Quantité
1
11
3
Arrêtfinal
6
2
12
Règleprincipaleavecguidedeperçage
Clé
4
9
13
Arrêtprincipal
Positionneurdeforage
5
1
1
Non.
Manueld'utilisation
6
Manchondeguidage(Φ4+Φ5)
3
Machine Translated by Google

C:INSTALLATIONDUBOUTONSURLAPORTE(Décentréenlargeuretenhauteur)
B:POIGNÉESURLEDEVANTDUTIROIR(aucentredelalargeuretdelahauteur)
:Placezleboutonpourtrouverunepositionquevousaimezetmarquezla.
(REMARQUE:ilestpluspratiqued’utiliserunpoinçoncentralpourlepositionnement.)
:Mesurezlescentresdestrousdespoignées,ajustezetserrezlesguidesdeperçagecoulissants.
:Mesurezlalargeuretlahauteurdutiroir.:Réglez
lagrandebutéeàlamoitiédelahauteurdutiroiretréglezlabutéecoulissanteà
lamoitiédelalargeurdutiroir.Enfin,percezdestrous.
(Couvrirlabaguenonutiliséeavecdurubanadhésif)
(REMARQUE:ilestpluspratiqued’utiliserunpoinçoncentralpourlepositionnement.)
Installezlapoignéeetvousavezterminé.
lamoitiédelalargeurdutiroir.Enfin,percezdestrous.
:Installezlapoignéeetvousavezterminé.
4
Machine Translated by Google

D:INSTALLATIONDELAPOIGNÉESURLAPORTE(décentréeenlargeuretenhauteur)
:L'outilderetournementperceuntroudansl'autreportedel'armoire.
:Installezlapoignéeetvousavezterminé.
mesure.
(REMARQUE:ilestpluspratiqued’utiliserunpoinçoncentralpourlepositionnement.)
:Mesurezàpartirducôtédelaportepourmarqueretréglerlagrandebutéesur
mesure.
:Mesurezàpartirduhautdelaportepourmarqueretréglerlabutéecoulissantesurla
emplacement.
:Mesurezàpartirducôtédelaportejusqu'aurepèreetréglezlagrandebutéesurlamesure.
:Placezlapoignéepourtrouverlapositionsouhaitéeetmarquezletrouinférieur
:Placezl'outilcommesurl'imageetpercezuntrouàtraversladouilledeperçage.
mesure.
:Mesurezàpartirduhautdelaportepourmarqueretréglerlabutéecoulissantesurla
5
Machine Translated by Google

ENTRETIEN
(REMARQUE:ilestpluspratiqued’utiliserunpoinçoncentralpourlepositionnement.)
:L'outilderetournementperceuntroudansl'autreportedel'armoire.
:Installezlapoignéeetvousavezterminé.
1.Aprèschaqueutilisation,veuillezl'installeràtempsetleconservercorrectementpouréviterdeleperdre.
2.Nettoyezlasurfaceaprèschaqueutilisation.
:Placezl'outilcommesurl'imageetpercezuntrouàtraversladouilledeperçage.
pièces.
6
Machine Translated by Google

REPRÉSENTANTDUROYAUMEUNI
REPRÉSENTANTDELACE
Certificatdesupporttechniqueetdegarantieélectronique
MainzerLandstr.69,60329FrancfortsurleMain
YHCONSULTINGLIMITÉE.
Principal.
ECrossStuGmbH
Maison,LondonRoad,StainesuponThames,Surrey,
A/SYHConsultingLimitedBureau147,Centurion
TW184AX
200000CN.
ImportéenAustralie:SIHAOPTYLTD,1ROKEVASTREET,ESTWOODNSW2122
Adresse:Shuangchenglu803nong11hao1602A1609shi,baoshanqu,Shanghai
Australie
ImportéauxÉtatsUnis:SanvenTechnologyLtd.,Suite250,9166AnaheimPlace,
RanchoCucamonga,CA91730
www.vevor.com/support
Machine Translated by Google

MODEL: XRSS2305
"Save Half", "Half Price" of andere soortgelijke uitdrukkingen die wij gebruiken, geven alleen een schatting van de
besparingen die u kunt behalen door bepaalde gereedschappen bij ons te kopen in vergelijking met de grote topmerken
en betekent niet noodzakelijkerwijs dat alle categorieën gereedschappen die wij aanbieden, worden gedekt. Wij
herinneren u eraan om zorgvuldig te controleren of u daadwerkelijk de helft bespaart in vergelijking met de grote
topmerken wanneer u een bestelling bij ons plaatst.
Wij streven er voortdurend naar om u gereedschappen tegen concurrerende prijzen te leveren.
KASTBESLAGMACHINES
Technische ondersteuning en e-garantiecertificaat www.vevor.com/support
Machine Translated by Google

Technische ondersteuning en e-garantiecertificaat
www.vevor.com/support
Heeft u vragen over het product? Heeft u technische ondersteuning nodig? Neem dan gerust
contact met ons op:
Dit is de originele instructie, lees alle handleidingen zorgvuldig door voordat u het product
gebruikt. VEVOR behoudt zich een duidelijke interpretatie van onze gebruikershandleiding voor.
Het uiterlijk van het product is afhankelijk van het product dat u hebt ontvangen. Vergeef ons
dat we u niet opnieuw zullen informeren als er technologie- of software-updates voor ons product zijn.
MODEL: XRSS2305
HULP NODIG? NEEM CONTACT MET ONS OP!
KASTBESLAGMACHINES
1
Machine Translated by Google

0-25cm/0-10inch
Longitudinaal schaalbereik
Aluminiumlegering
XRSS2305
0-20cm/0-8inch
Materiaal
Model
Horizontaal schaalbereik
2
Meerdere leveringen x1
12
11
5
13
1
6
10
1. Dit product bevat kleine onderdelen. Als u het inslikt, kan het verstikkingsgevaar
opleveren. Houd deze kleine onderdelen buiten bereik van kinderen!
3
8
2
7
9
2. Lees, begrijp en volg de veiligheidsinstructies van de fabrikant van uw elektrisch
gereedschap. Draag altijd een veiligheidsbril of oogbescherming voordat u met het
elektrisch gereedschap aan de slag gaat. Houd uw handen, gezicht, haar, losse
kleding en lichaam altijd op een veilige afstand van spindels en snijgereedschappen.
Houd de handgrepen van het gereedschap altijd stevig vast tijdens het gebruik. Koppel
altijd los van de stroombron voordat u elektrisch gereedschap aanpast.
5
4
STRUCTUURDIAGRAM EN COMPONENTEN
VEILIGHEIDSINSTRUCTIES
MODEL EN PARAMETERS
Machine Translated by Google

A: KNOP OP LADEVOORKANT (midden van breedte en hoogte)
ÿ ÿÿ
ÿMeet de breedte en hoogte van de lade. ÿStel
de grote stop in op de helft van de hoogte van de lade en stel de schuifeindstop in op
WERKING
2
2
Handschroef 2
1
7
2
Naam
Bushouder/schuif
1
8
1
Handschroef 1
Twistbit (ÿ4+ÿ5)
3
10
1
Verstelbare boorgeleider
Opbergzak
6
1
14
1
Dwarsliniaal
Hoeveelheid
1
11
3
6
Einde stop
2
12
Hoofdliniaal met boorgeleider
Moersleutel
4
9
13
Hoofdhalte
Boorgatpositioneerder
5
1
1
Nee.
Gebruiksaanwijzing
Geleidingshuls (ÿ4+ÿ5)
6
3
Machine Translated by Google

C: INSTALLATIE VAN KNOP OP DEUR (Niet in het midden van de breedte en hoogte)
B: HANDGREEP OP DE VOORKANT VAN DE LADE (midden van de breedte en hoogte)
ÿ: Plaats de handgreep en je bent klaar.
ÿ
ÿ
ÿ: Plaats de knop in de gewenste positie en markeer deze.
ÿ
ÿ
(LET OP: Het is handiger om een centerpons te gebruiken voor het positioneren.)
ÿ: Meet de breedte en hoogte van de lade. ÿ: Stel
de grote stop in op de helft van de hoogte van de lade en stel de schuifeindstop in op
ÿ: Meet de gaten in de handgrepen, pas de geleiders voor de schuifboor aan en draai ze vast.
de helft van de ladebreedte. Boor ten slotte gaten.
(Bedek ongebruikte bussen met tape)
ÿ
(LET OP: Het is handiger om een centerpons te gebruiken voor het positioneren.)
de helft van de ladebreedte. Boor ten slotte gaten.
ÿInstalleer de handgreep en je bent klaar.
ÿÿ
4
Machine Translated by Google
D: INSTALLATIE HANDGREEP OP DEUR (Niet in het midden van de breedte en hoogte)
ÿ: Meet vanaf de bovenkant van de deur om de schuifeindstop te markeren en in te stellen op de
ÿ: Maak met het omdraaigereedschap een gat in de andere
kastdeur. ÿ: Plaats de handgreep en je bent klaar.
meting.
(LET OP: Het is handiger om een centerpons te gebruiken voor het positioneren.)
ÿ: Meet vanaf de zijkant van de deur om de grote stop te markeren en in te stellen op de
meting.
ÿÿ
ÿ: Meet vanaf de bovenkant van de deur om de schuifeindstop te markeren en in te stellen op de
ÿ
locatie.
ÿ
ÿ: Plaats de handgreep in de gewenste positie en markeer het onderste gat
ÿ: Meet vanaf de zijkant van de deur tot aan de markering en stel de grote stop in op de maat.
ÿ: Plaats het gereedschap zoals afgebeeld en boor een gat door de boorbus.
meting.
ÿ ÿ
5
Machine Translated by Google

ONDERHOUD
(LET OP: Het is handiger om een centerpons te gebruiken voor het positioneren.)
ÿ: Maak met het omdraaigereedschap een gat in de andere
kastdeur. ÿ: Plaats de handgreep en je bent klaar.
1. Installeer het na elk gebruik op tijd en bewaar het goed om verlies te voorkomen.
ÿ ÿ
onderdelen.
ÿ: Plaats het gereedschap zoals afgebeeld en boor een gat door de boorbus.
ÿ
2. Maak het oppervlak na elk gebruik schoon.
6
Machine Translated by Google

EC-REP
VK REP
Technische ondersteuning en e-garantiecertificaat
Voornaamst.
YH CONSULTING LIMITED.
Mainzer Landstr.69, 60329 Frankfurt am
E-CrossStu GmbH
Huis, London Road, Staines-upon-Thames, Surrey,
C/O YH Consulting Limited Kantoor 147, Centurion
TW18 4AX
200000 CN.
Geïmporteerd naar AUS: SIHAO PTY LTD, 1 ROKEVA STREETEASTWOOD NSW 2122
Adres: Shuangchenglu 803nong11hao1602A-1609shi, baoshanqu, shanghai
Australië
Geïmporteerd naar de VS: Sanven Technology Ltd., Suite 250, 9166 Anaheim Place,
Rancho Cucamonga, CA 91730
www.vevor.com/support
Machine Translated by Google

MODELL: XRSS2305
"Spara hälften", "halva priset" eller andra liknande uttryck som används av oss representerar
bara en uppskattning av besparingar du kan dra nytta av att köpa vissa verktyg hos oss jämfört med
de stora toppmärkena och betyder inte nödvändigtvis att täcka alla kategorier av verktyg som erbjuds
av oss. Du påminns vänligen om att noggrant kontrollera när du gör en beställning hos oss om
du faktiskt sparar hälften i jämförelse med de främsta stora varumärkena.
Vi fortsätter att vara engagerade i att ge dig verktyg till konkurrenskraftiga priser.
SKÅPBEVARA JIG
Teknisk support och e-garanticertifikat www.vevor.com/support
Machine Translated by Google

Teknisk support och e-garanticertifikat
www.vevor.com/support
Har du produktfrågor? Behöver du teknisk support? Kontakta oss gärna:
Detta är den ursprungliga instruktionen, läs alla instruktioner noggrant innan du
använder den. VEVOR reserverar sig för en tydlig tolkning av vår användarmanual. Utseendet
på produkten är beroende av den produkt du fått. Ursäkta oss att vi inte kommer att
informera dig igen om det finns någon teknik eller mjukvaruuppdateringar på vår produkt.
1
BEHÖVER HJÄLP? KONTAKTA OSS!
MODELL: XRSS2305
SKÅPBEVARA JIG
Machine Translated by Google

0-25 cm/0-10 tum
0-20 cm/0-8 tum
Längsgående skalområde
XRSS2305
Aluminiumlegering
Material
Modell
Horisontellt skalområde
2
Multileverans x1
1
4
6
12
13
8
2
10
1. Denna produkt innehåller små delar. Om den sväljs kommer den att
utgöra en kvävningsrisk. Håll dessa små delar borta från barn!
3
7
2. Läs, förstå och följ din elverktygstillverkares instruktioner för säkerheten.
Bär alltid skyddsglasögon eller ögonskydd innan du börjar använda elverktyget.
Håll alltid händer, ansikte, hår, lösa kläder och kropp på säkert avstånd från
spindlar och skärverktyg. Håll alltid ett stadigt grepp om verktygshandtagen
under drift. Koppla alltid från strömkällan innan du justerar elverktyg.
9
11
5
5
MODELL OCH PARAMETRAR
SÄKERHETSINSTRUKTIONER
STRUKTURDIAGRAM OCH KOMPONENTER
Machine Translated by Google

A: VRED PÅ LÅDAFRÄMME (mitten av bredd och höjd)
ÿ
ÿMät lådans bredd och höjd. ÿStäll in det
stora stoppet på halva lådans höjd och ställ in det skjutbara ändstoppet på
ÿÿ
DRIFT
1
Antal
1
11
6
3
Slut Stopp
2
12
Huvudlinjal med borrguide
Rycka
13
4
9
Borrhålspositionerare
Huvudstopp
5
1
1
Inga.
Styrhylsa (ÿ4+ÿ5)
2
Användarmanual
6
Handskruv 2
2
1
7
2
Namn
8
Bussningshållare/slid
1
1
Handskruv 1
Twist Bit (ÿ4+ÿ5)
3
10
1
6
Justerbar borrguide
Förvaringsväska
1
14
Tvärgående linjal
3
Machine Translated by Google
4
ÿ
ÿ ÿ
ÿ: Placera vredet för att hitta en position du gillar och markera den.
ÿ
ÿ: Mät hålens mittpunkter på handtagen, justera och dra åt glidande borrstyrningar.
hälften av lådbredden. Till sist, borra hål.
(Täck oanvänd bussning med tejp)
ÿ
ÿOBS: Det är bekvämare att använda en mittstans för positionering.)
ÿ: Mät lådans bredd och höjd. ÿ: Ställ in det
stora stoppet på halva lådans höjd och ställ in det skjutbara ändstoppet på
hälften av lådbredden. Till sist, borra hål.
ÿ Montera handtaget och du är klar.
ÿOBS: Det är bekvämare att använda en mittstans för positionering.)
ÿ
ÿ: Installera handtaget och du är klar.
ÿ
C: VRED PÅ DÖRRINSTALLATION (Från mitten av bredd och höjd)
B: HANDTAG PÅ LÅDAFRÄMME (mitten av bredd och höjd)
Machine Translated by Google

D:HANDTAG PÅ DÖRRINSTALLATION(Från mitten av bredd och höjd)
ÿOBS: Det är bekvämare att använda en mittstans för positionering.)
ÿ: Mät från sidan av dörren för att markera och ställa in Large Stop till
mätning.
ÿ: Det vändbara verktyget slår ett hål i den andra skåpdörren.
ÿ: Installera handtaget och du är klar.
ÿ: Mät från toppen av dörren för att markera och ställa in glidande ändstopp på
ÿ
mätning.
ÿÿ
ÿ: Placera handtaget för att hitta den position du vill ha och markera det nedre hålet
ÿ: Mät från sidan av dörren för att markera och ställ in Stort stopp på måttet.
ÿÿ ÿ
plats.
ÿ: Mät från toppen av dörren för att markera och ställa in glidande ändstopp på
ÿ: Placera verktyget som bild och borra hål genom borrbussningen.
mätning.
5
Machine Translated by Google

UNDERHÅLL
1. Efter varje användning, vänligen installera den i tid och förvara den ordentligt för att undvika att tappa
delar.
ÿ: Det vändbara verktyget slår ett hål i den andra skåpdörren.
ÿ: Installera handtaget och du är klar.
2. Rengör ytan efter varje användning.
ÿ ÿ
ÿOBS: Det är bekvämare att använda en mittstans för positionering.)
ÿ: Placera verktyget som bild och borra hål genom borrbussningen.
ÿ
6
Machine Translated by Google

UK REP
EC REP
Teknisk support och e-garanticertifikat
Main.
C/O YH Consulting Limited Office 147, Centurion
Mainzer Landstr.69, 60329 Frankfurt am
E-CrossStu GmbH
YH CONSULTING LIMITED.
House, London Road, Staines-upon-Thames, Surrey,
TW18 4AX
Importerad till AUS: SIHAO PTY LTD, 1 ROKEVA STREETEASTWOOD NSW 2122
Australien
200 000 CN.
Adress: Shuangchenglu 803nong11hao1602A-1609shi, baoshanqu, shanghai
www.vevor.com/support
Importerad till USA: Sanven Technology Ltd., Suite 250, 9166 Anaheim Place,
Rancho Cucamonga, CA 91730
Machine Translated by Google

MODELO:XRSS2305
"Ahorrelamitad","mitaddeprecio"ocualquierotraexpresiónsimilarqueutilicemossolorepresenta
unaestimacióndelahorroquepodríaobteneralcomprarciertasherramientasconnosotrosencomparación
conlasprincipalesmarcasynonecesariamentesignificaquecubratodaslascategoríasdeherramientas
queofrecemos.Lerecordamosque,alrealizarunpedidoconnosotros,verifiquecuidadosamentesi
realmenteestáahorrandolamitadencomparaciónconlasprincipalesmarcas.
Seguimoscomprometidosabrindarleherramientasaprecioscompetitivos.
PLANTILLAPARAHERRAJESDEGABINETES
Soportetécnicoycertificadodegarantíaelectrónicawww.vevor.com/support
Machine Translated by Google

Soportetécnicoycertificadodegarantíaelectrónica
www.vevor.com/support
¿Tienepreguntassobreelproducto?¿Necesitaasistenciatécnica?Nodudeenponerseencontacto
connosotros:
Estassonlasinstruccionesoriginales,leaatentamentetodaslasinstruccionesdelmanual
antesdeutilizarelproducto.VEVORsereservaunainterpretaciónclaradenuestromanualde
usuario.Laaparienciadelproductoestarásujetaalproductoquerecibió.Perdónenosporno
informarlenuevamentesihayactualizacionesdetecnologíaosoftwareennuestroproducto.
1
¿NECESITAAYUDA?¡CONTÁCTENOS!
MODELO:XRSS2305
PLANTILLAPARAHERRAJESDEGABINETES
Machine Translated by Google
025cm/010pulgadas
020cm/08pulgadas
Rangodeescalalongitudinal
Rangodeescalahorizontal
Material
Aleacióndealuminio
XRSS2305Modelo
2
Entregamúltiplex1
1
4
6
12
13
8
2
10
1.Esteproductocontienepiezaspequeñas.Siseingieren,puedenprovocarasfixia.
¡Mantengaestaspiezaspequeñasfueradelalcancedelosniños!
3
7
2.Lea,comprendaysigalasinstruccionesdeseguridaddelfabricantedesuherramientaeléctrica.
Utilicesiempregafasdeseguridadoprotectoresocularesantesdecomenzarautilizarlaherramienta
eléctrica.Mantengasiemprelasmanos,elrostro,elcabello,laropasueltayelcuerpoauna
distanciaseguradeloshusillosylasherramientasdecorte.Sujetesiempreconfirmezalosmangos
delaherramientacuandoestéenfuncionamiento.Desconectesiemprelaherramientadelafuente
dealimentaciónantesdeajustarla.
9
11
5
5
DIAGRAMADEESTRUCTURAYCOMPONENTES
INSTRUCCIONESDESEGURIDAD
MODELOYPARÁMETROS
Machine Translated by Google

OPERACIÓN
Midaelanchoylaalturadelcajón.Coloque
eltopegrandealamitaddelaalturadelcajónycoloqueeltopedeslizantealamitad.
A:PERILLAENELFRENTEDELCAJÓN(Centrodelanchoylaaltura)
Manguitoguía(Φ4+Φ5)
2
Tornillodemano2
2
1
7
Nombre
8
Soportedebuje/deslizador
1
1
Tornillodemano1
Brocagiratoria(Φ4+Φ5)
3
10
1
1
Reglatransversal
6
Guíadeperforaciónajustable
Bolsadealmacenamiento
Cantidad
1
14
6
3
Paradafinal
1
2
11
Reglaprincipalconguíadeperforación
Llaveinglesa
12
4
9
13
Posicionadordepozos
Paradaprincipal
5
1
1
2
Manualdeusuario
6
No.
3
Machine Translated by Google

C:INSTALACIÓNDELAPERILLAENLAPUERTA(Descentradaenelanchoylaaltura)
B:MANIJAENELFRENTEDELCAJÓN(Centrodelanchoylaaltura)
:Coloquelaperillaparaencontrarunaposiciónquelegusteymárquela.
:Midaloscentrosdelosorificiosdelosmangos,ajusteyaprietelasguíasdeperforacióndeslizantes.
Lamitaddelanchodelcajón.Porúltimo,taladrelosagujeros.
(Cubraelbujenoutilizadoconcinta)
NOTA:Esmásconvenienteutilizarunpunzóncentralparaposicionar).
:Midaelanchoylaalturadelcajón.:Coloque
eltopegrandealamitaddelaalturadelcajónycoloqueeltopedeslizantealamitad.
Lamitaddelanchodelcajón.Porúltimo,taladrelosagujeros.
Instalaelmangoylisto.
NOTA:Esmásconvenienteutilizarunpunzóncentralparaposicionar).
:Instalaelmangoylisto.
4
Machine Translated by Google

5
NOTA:Esmásconvenienteutilizarunpunzóncentralparaposicionar).
:Midadesdeelcostadodelapuertaparamarcarycolocareltopegrandeenel
Medición.
:Laherramientadevolteoperforaunagujeroenlaotrapuerta
delgabinete.:Instalelamanijaylisto.
:Midadesdelapartesuperiordelapuertaparamarcarycolocareltopefinaldeslizanteenla
Medición.
:Coloqueelmangoenlaposiciónquedeseeymarqueelorificioinferior
:Midadesdeelcostadodelapuertaparamarcaryajustareltopegrandealamedida.
ubicación.
:Midadesdelapartesuperiordelapuertaparamarcarycolocareltopefinaldeslizanteenla
:Coloquelaherramientacomosemuestraenlaimagenytaladreunorificioatravésdelbujedeperforación.
Medición.
D:INSTALACIÓNDELAMANIJAENLAPUERTA(fueradelcentrodelanchoylaaltura)
Machine Translated by Google

6
1.Despuésdecadauso,instáleloatiempoyguárdeloadecuadamenteparaevitarperderlo.
partes.
:Laherramientadevolteoperforaunagujeroenlaotrapuertadel
gabinete.:Instalelamanijaylisto.
2.Limpielasuperficiedespuésdecadauso.
:Coloquelaherramientacomosemuestraenlaimagenytaladreunorificioatravésdelbujedeperforación.
NOTA:Esmásconvenienteutilizarunpunzóncentralparaposicionar).
MANTENIMIENTO
Machine Translated by Google

MainzerLandstr.69,60329FráncfortdelMeno
C/OYHConsultingLimitedOficina147,Centurion
Principal.
ECrossStuGmbH
YHCONSULTINGLIMITADA.
Casa,LondonRoad,StainesuponThames,Surrey,
TW184AX
Soportetécnicoycertificadodegarantíaelectrónica
REPRESENTANTEDELREINOUNIDO
REPRESENTANTECE
ImportadoaAustralia:SIHAOPTYLTD,1ROKEVASTREETEASTWOODNSW2122
Australia
200000MN.
Dirección:Shuangchenglu803nong11hao1602A1609shi,baoshanqu,shanghai
www.vevor.com/support
ImportadoaEE.UU.:SanvenTechnologyLtd.,Suite250,9166AnaheimPlace,
RanchoCucamonga,CA91730
Machine Translated by Google
