

Technical Support and E-Warranty Certificate www.vevor.com/support
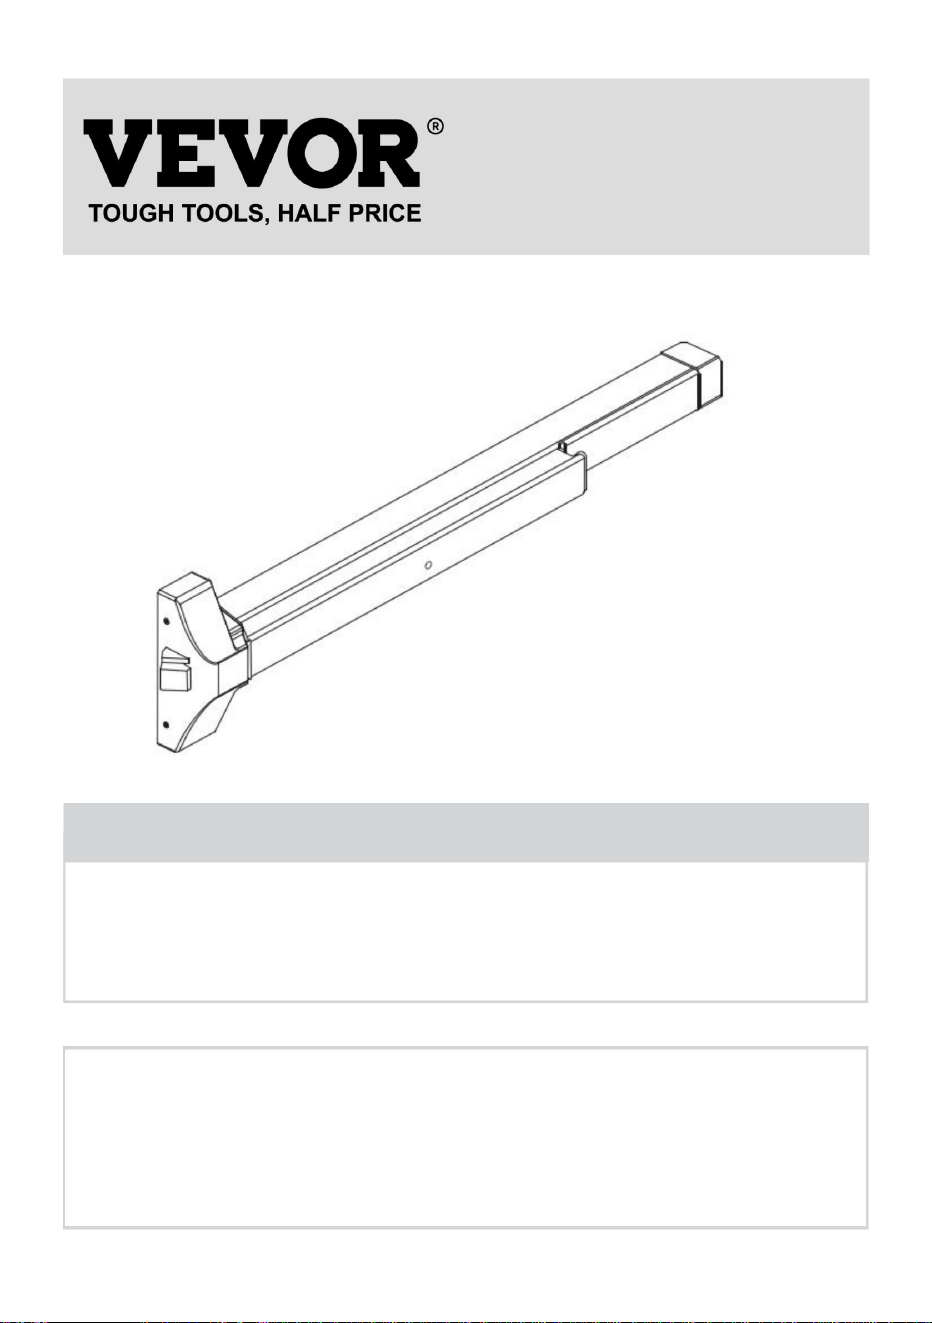
Panic Exit Device User Manual
MODEL: UL600S
We continue to be committed to provide you tools with competitive price.
"Save Half", "Half Price" or any other similar expressions used by us only represents an
estimate of savings you might benefit from buying certain tools with us compared to the major
top brands and does not necessarily mean to cover all categories of tools offered by us. You
are kindly reminded to verify carefully when you are placing an order with us if you are
actually saving half in comparison with the top major brands.

- 1 -
MODEL:UL600S
Have product questions? Need technical support? Please feel free to
contact us:
Technical Support and E-Warranty Certificate
www.vevor.com/support
NEED HELP? CONTACT US!
This is the original instruction, please read all manual instructions
carefully before operating. VEVOR reserves a clear interpretation of our
user manual. The appearance of the product shall be subject to the
product you received. Please forgive us that we won't inform you again if
there are any technology or software updates on our product.
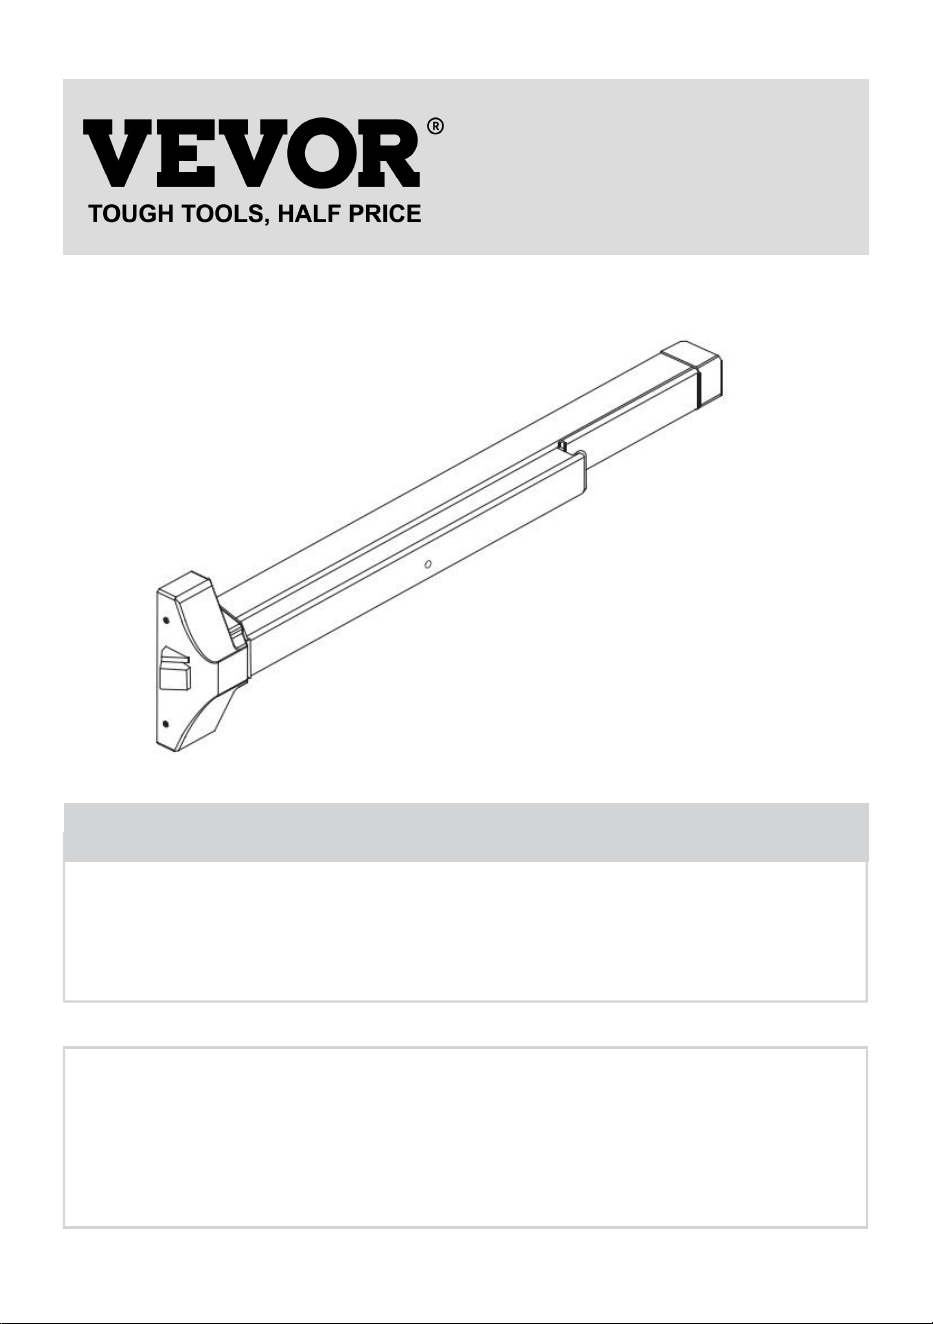
Panic Exit Device

- 2 -
1. Read carefully and understand all ASSEMBLY AND OPERATION
INSTRUCTIONS before operating.
2. Failure to follow the safety rules and other basic safety precautions may
result in serious personal injury.
GENERAL SAFETY RULES
1. To extend the life of this panic device, lock the latch in the retracted
position when the door is in continuous use.
2. To Lock
Hold the actuating bar down. Turn the dogging device counterclockwise
with a dogging wrench.
3. To Unlock
Hold the actuating bar down. Turn the dogging device clockwise with a
dogging wrench.
4. Assemble only according to these instructions. Improper assembly can
create hazards.
5. Keep assembly area clean and well lit.
6. Keep bystanders out of the area during assembly.
7. Do not assemble when tired or when under the influence of alcohol,
drugs or medication.
8. This product contains small parts. If swallowed, it will pose a choking
hazard. Keep these small parts away from children when assembling! This
is not a toy. Not for use by children.
SAVE THESE INSTRUCTIONS
- 3 -
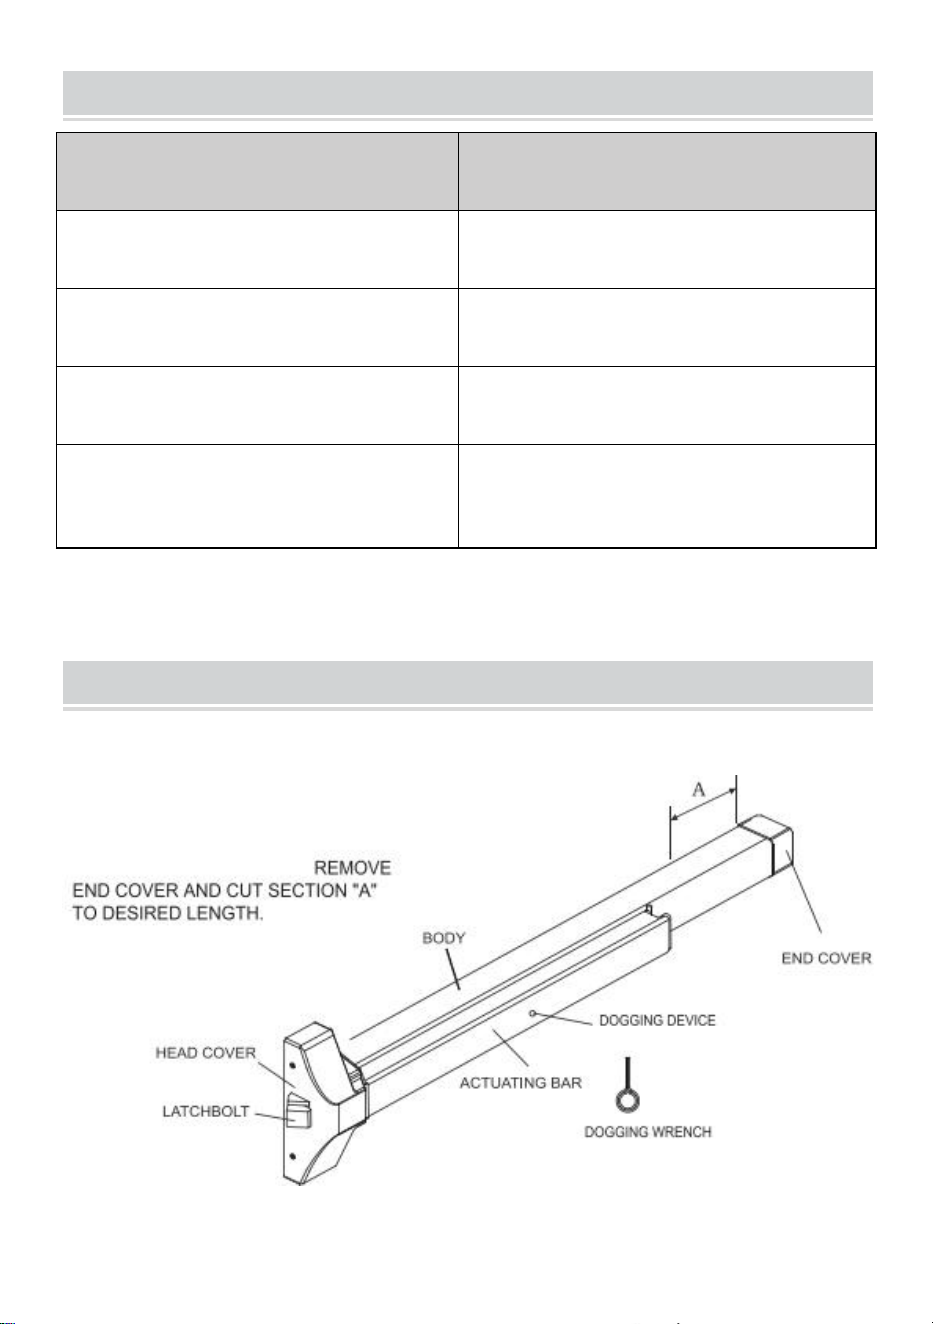
MODEL AND PARAMETERS
Model
UL600S
Product Spec
32”
Material
Stainless Steel 304
Suitable for Door
30"~36"
Suitable door thickness
1 37/64
″
~2 11/64
″
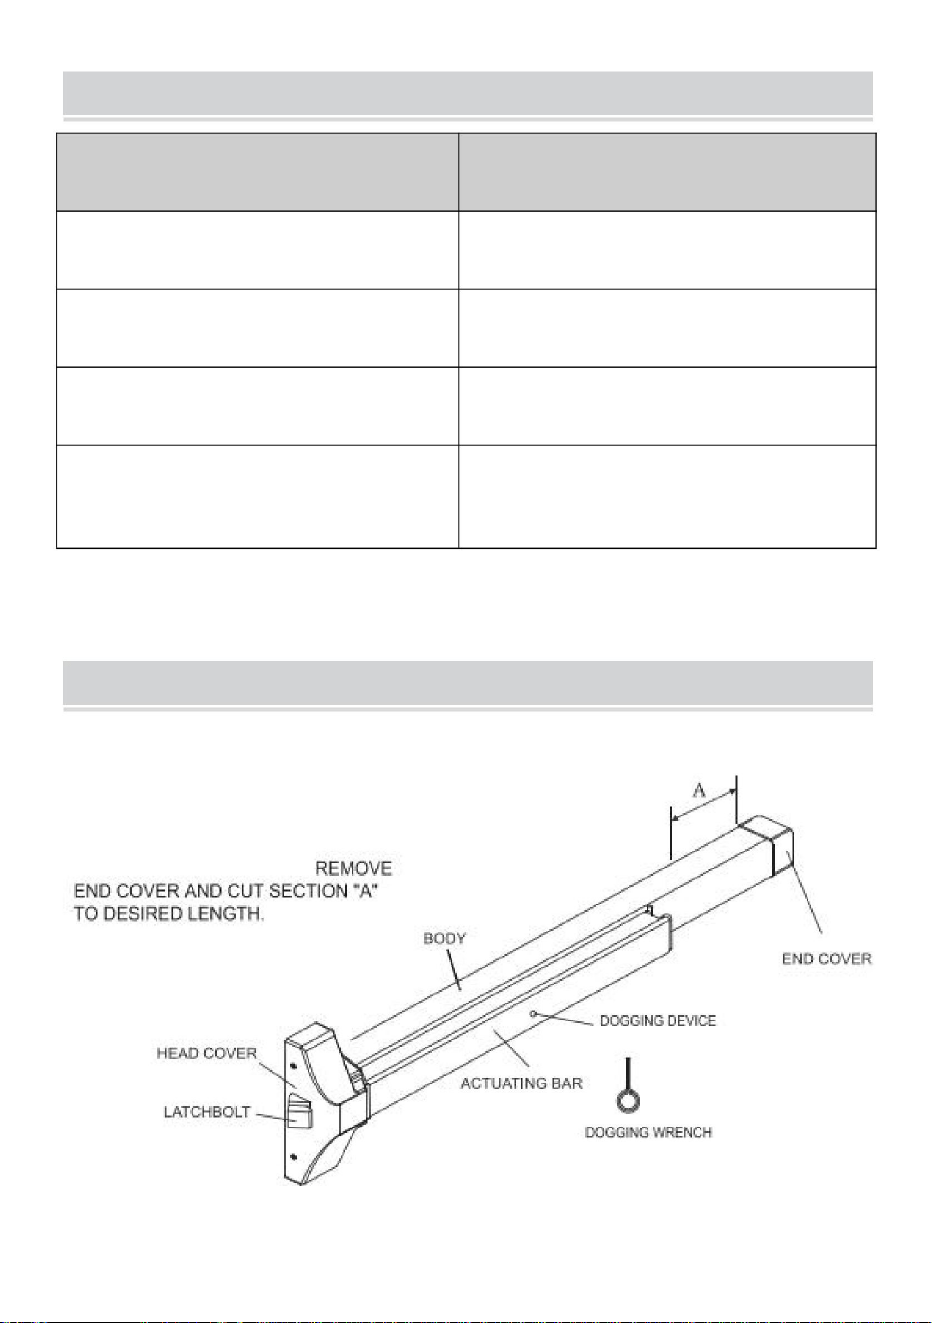
STRUCTURE DIAGRAM

- 4 -
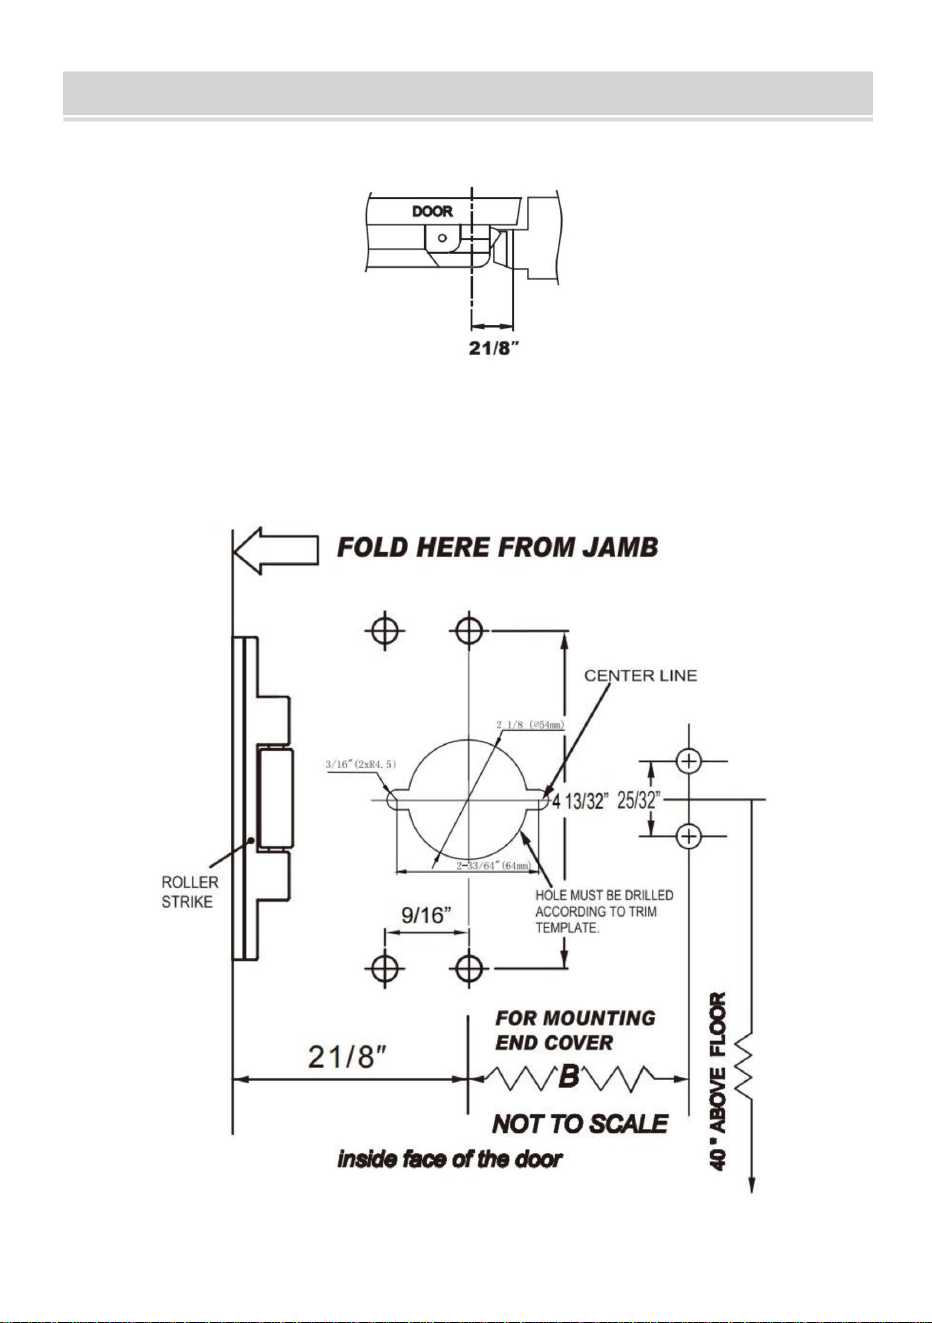
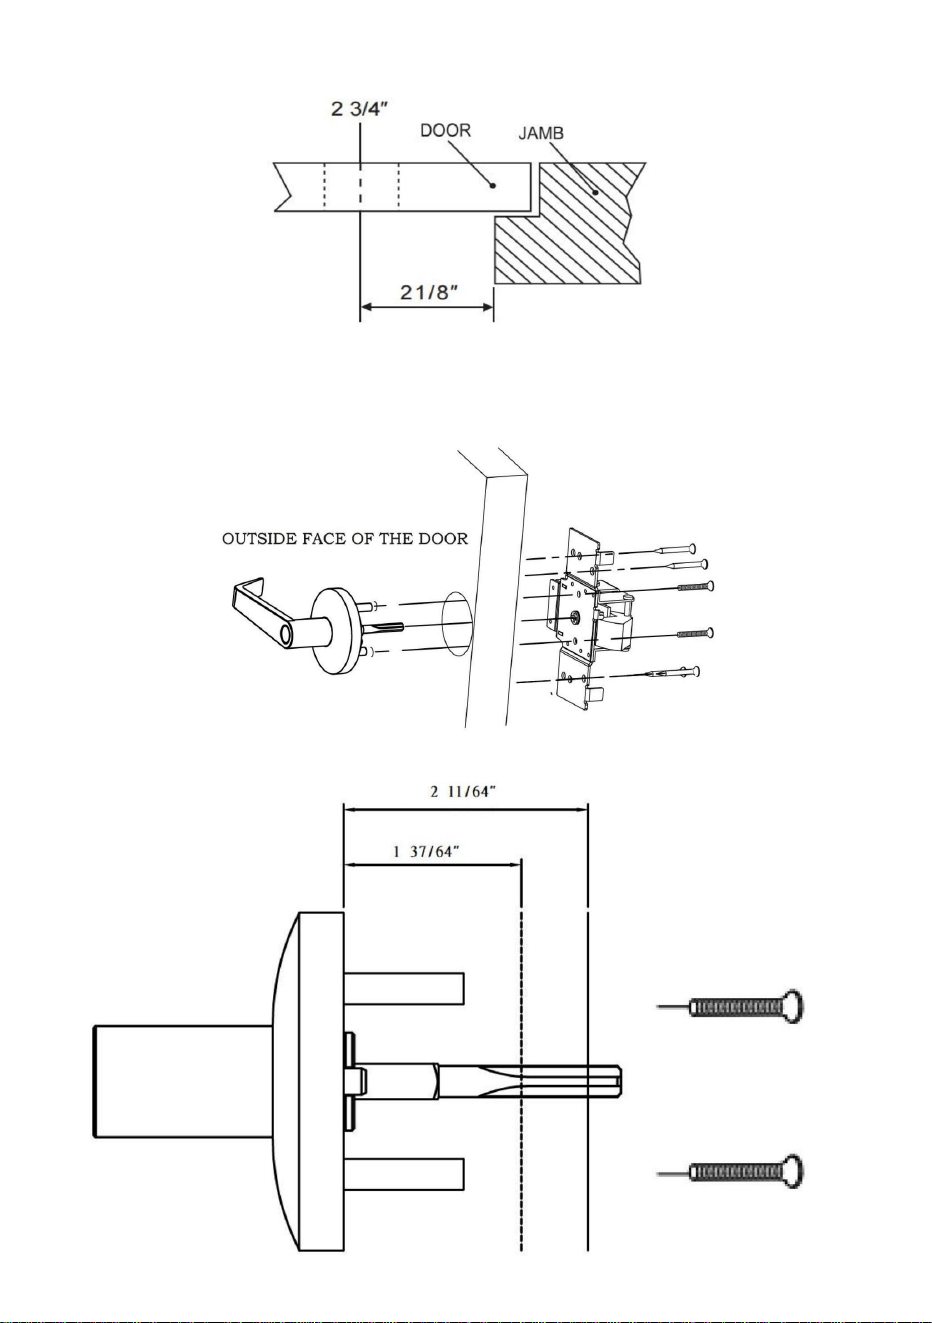
OPERATING INSTRUCTIONS
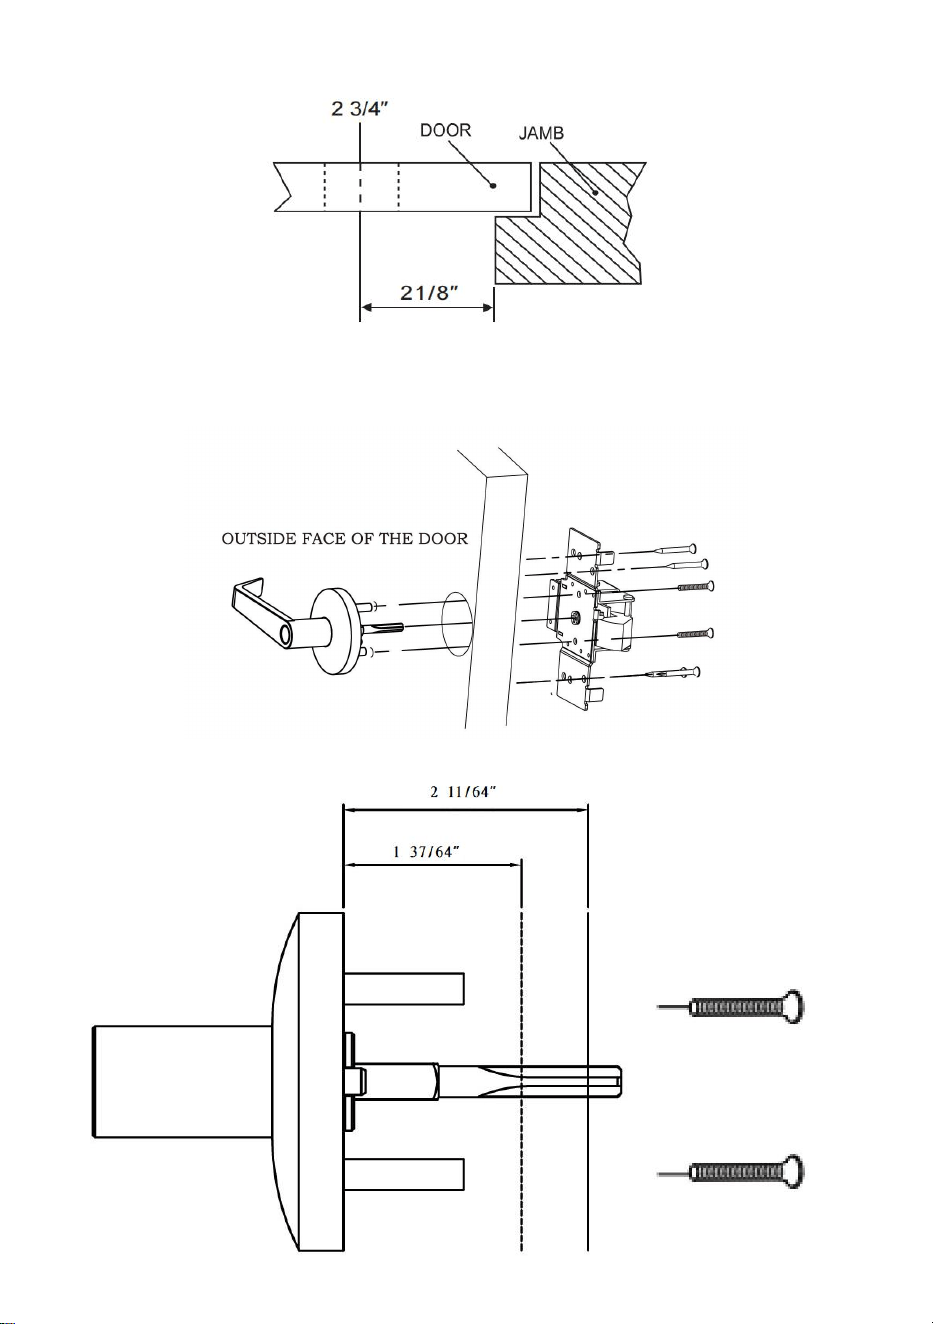
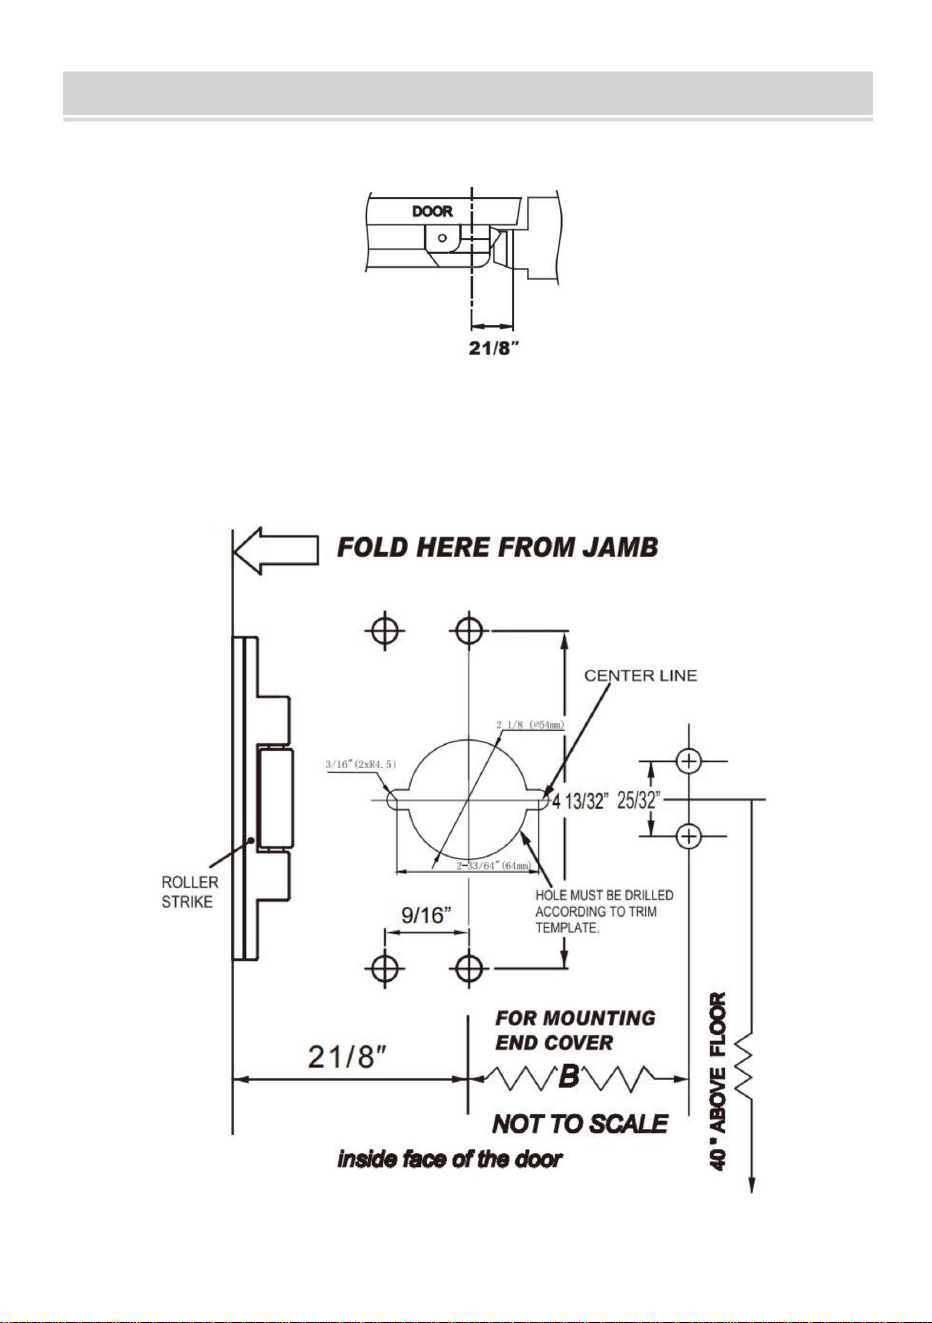
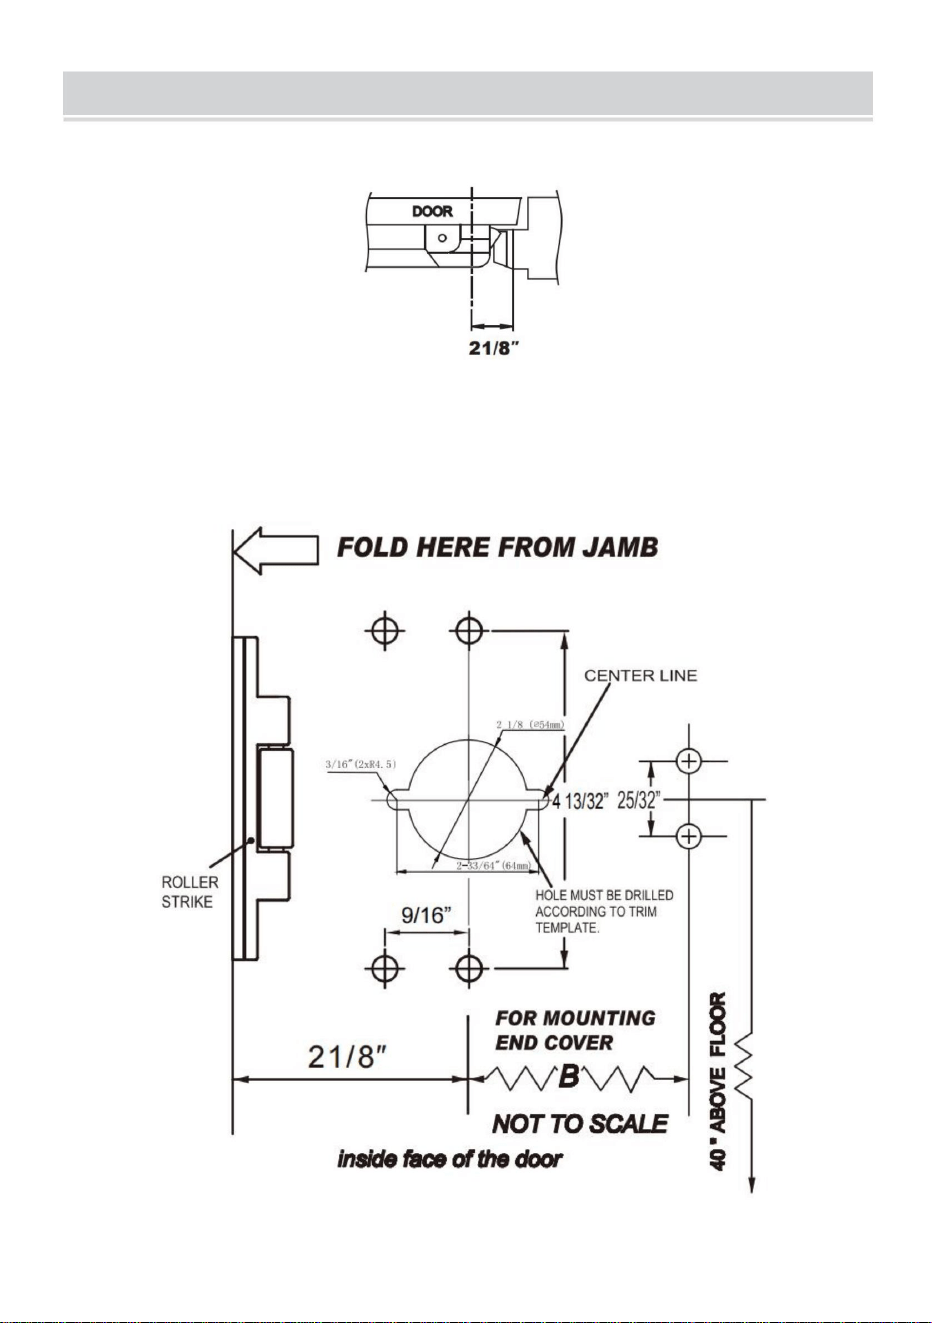
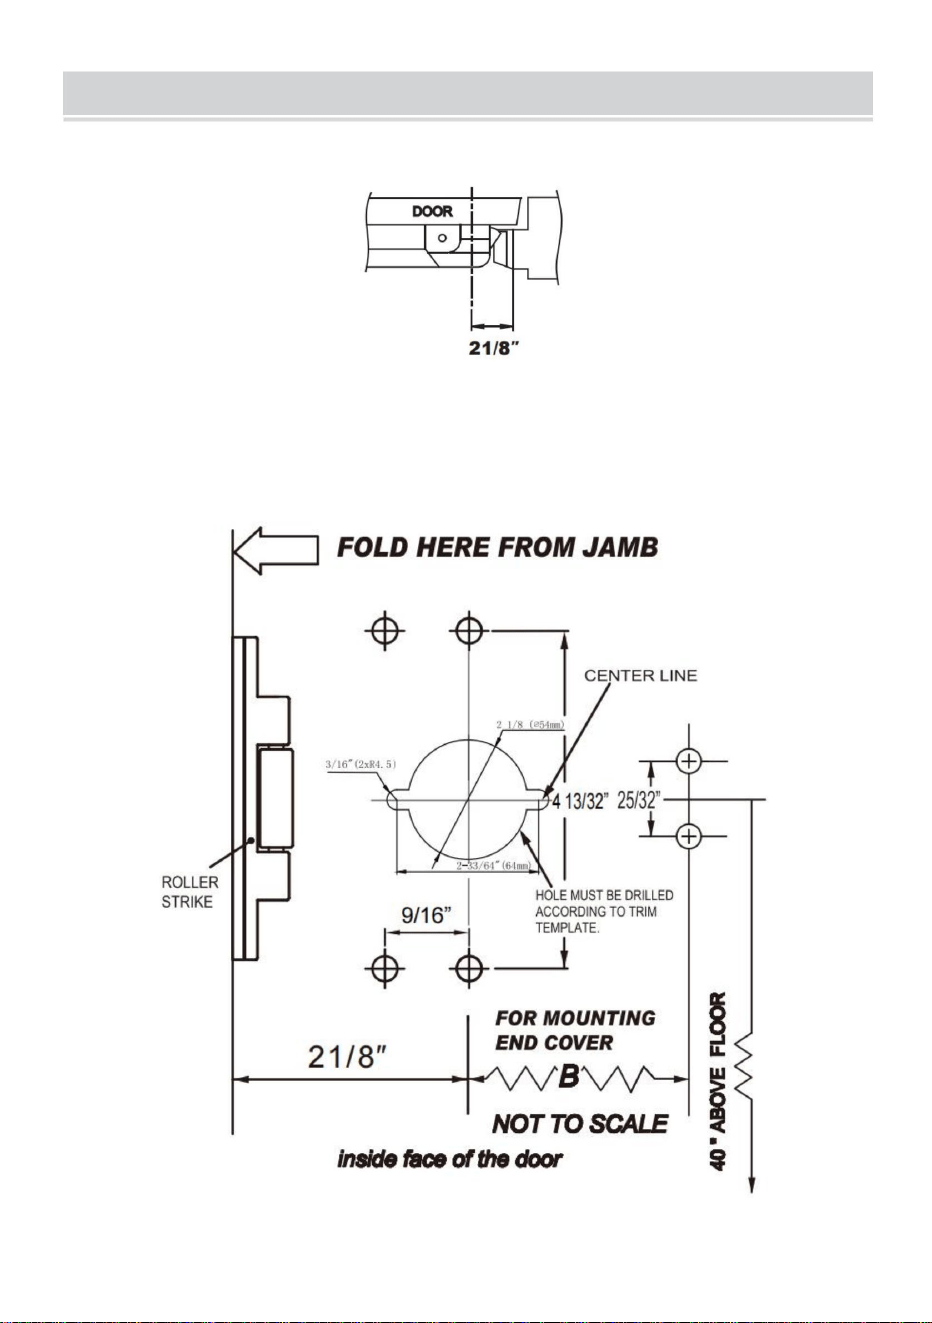
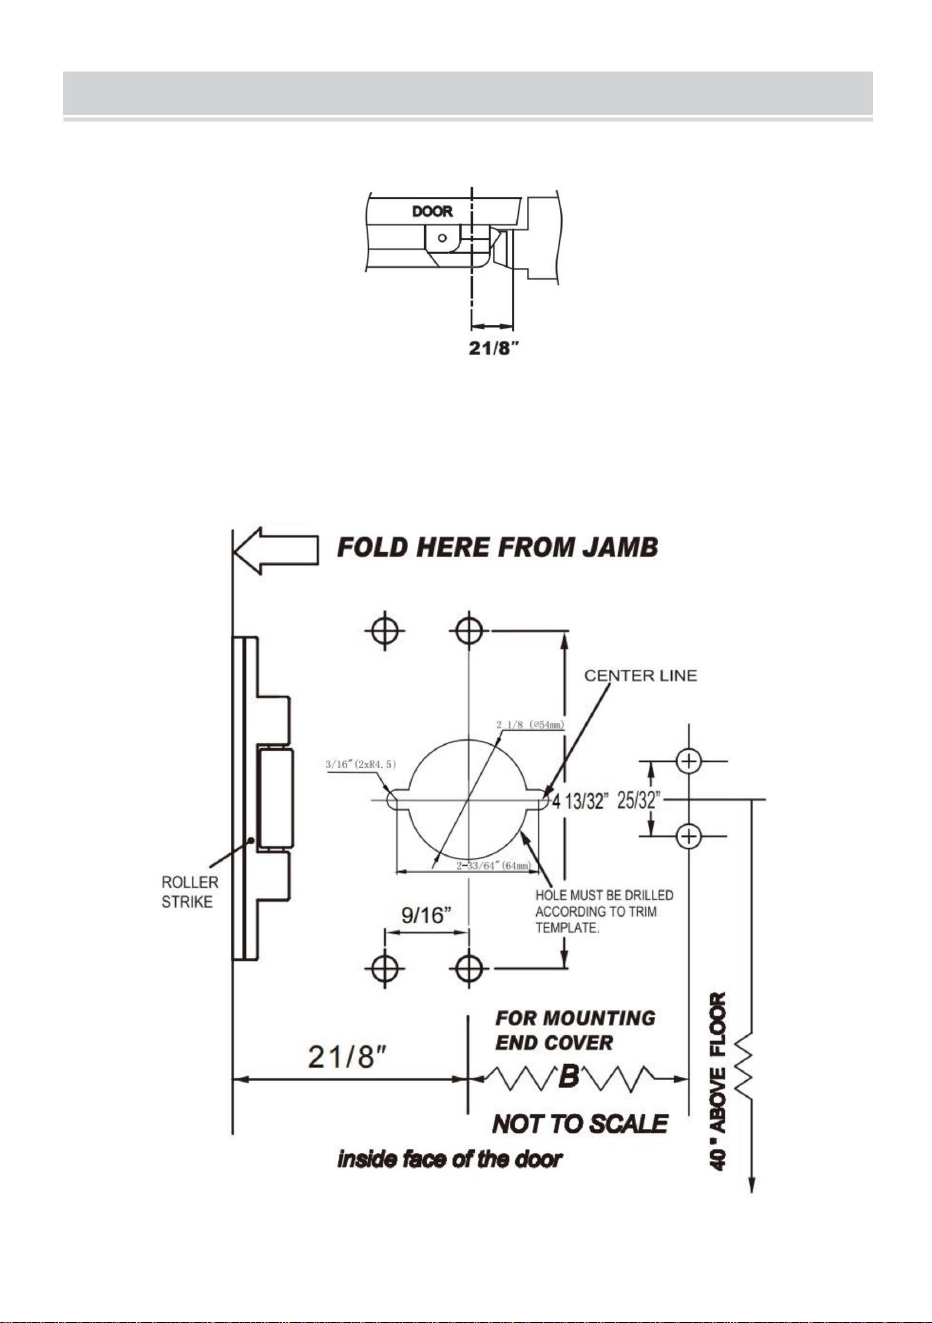
Step1:Installation distance determination.
Step2:Mark the corresponding holes on the door according to the dimensional
drawing.
Note:”B” length should be measured from the center of cylinder hole to the end of
the body.
- 5 -
Step3:Insert the lever trim into the hole on the door. Keep the lever trim
horizontal. Tighten the screws.
- 6 -
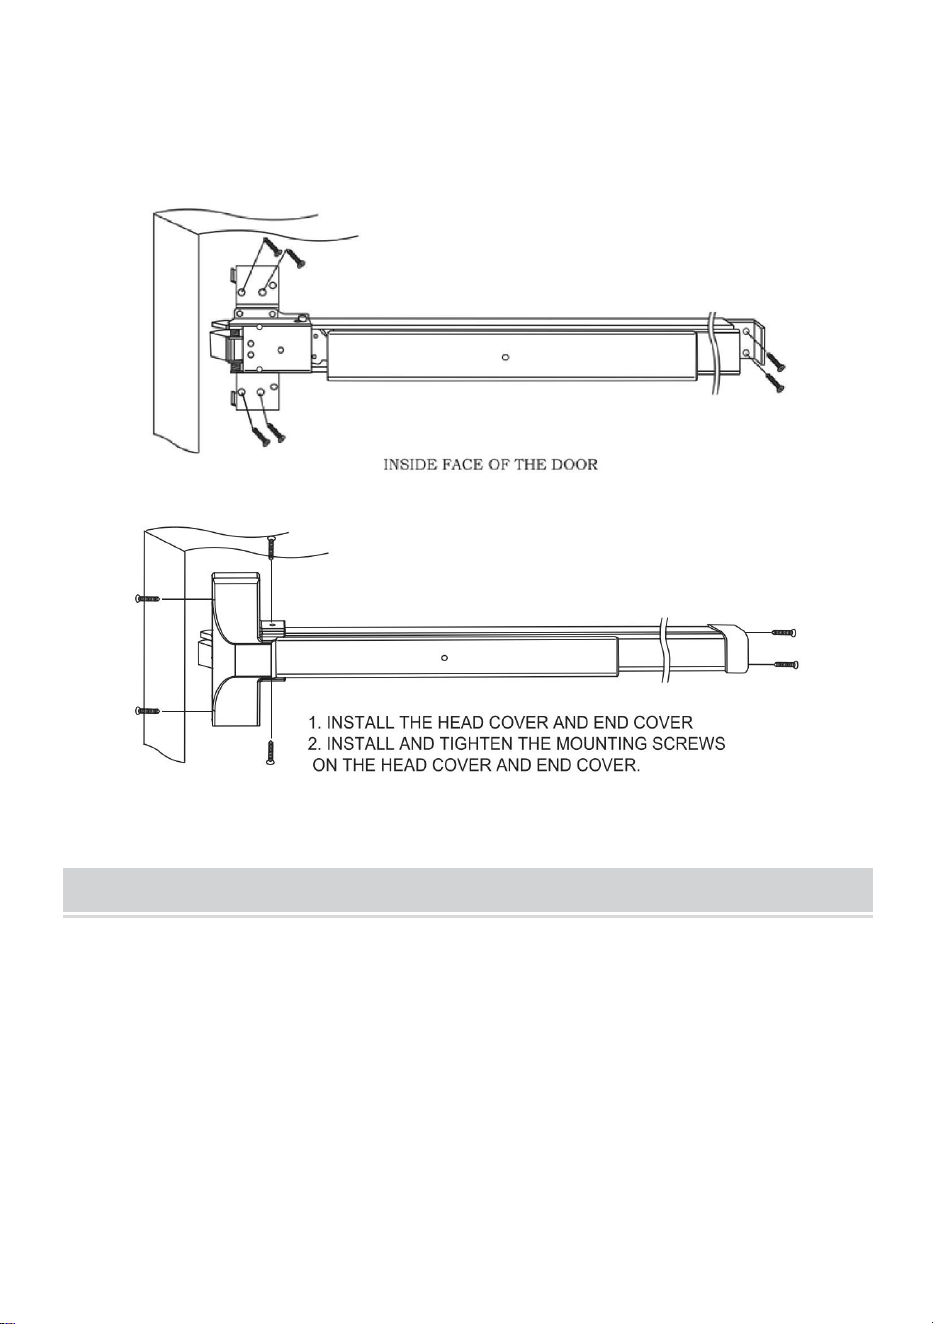
Step4:Remove the head cover and the screws on the end cover. Align the
screw holes with the holes on the door. Tighten the screws on the body and
the lining of end cover.
ROLLER STRIKE INSTALLATION
1.With the door in the closed position, mark the center line of latch bolt on
door JAMB.
2.Place roller strike on door JAMB. Align the center of the roller strike with
the latch bolt center line mark on the JAMB. Then align the outside edge of
the roller strike with the outside edge of the door JAMB.
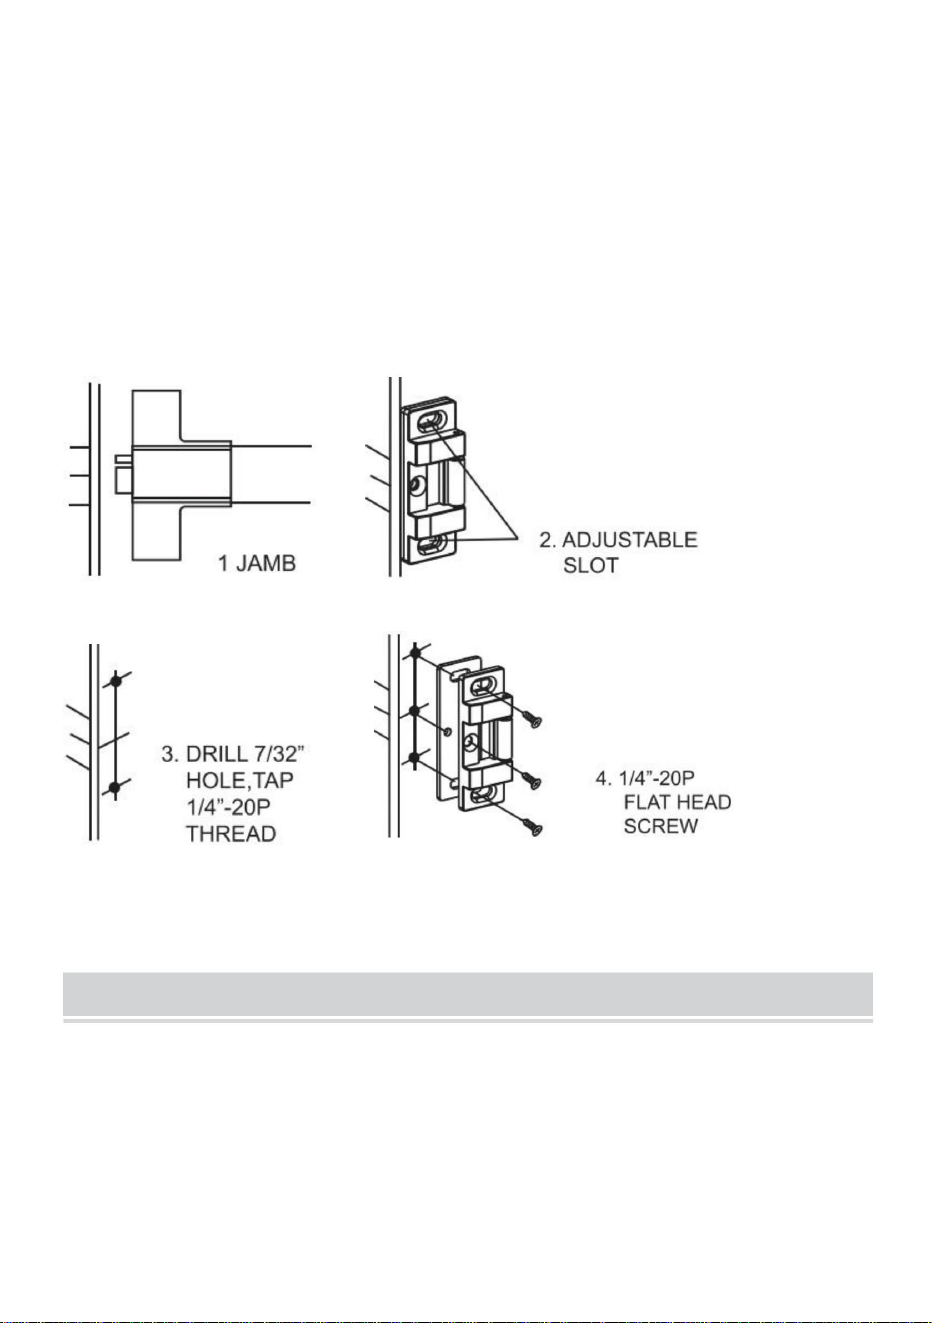
3.Mark the center of the 2 adjustable slotted holes and drill 7/32” pilot holes.
Tap pilot holes with 1/4”-20 threads and install machine screws. Or install
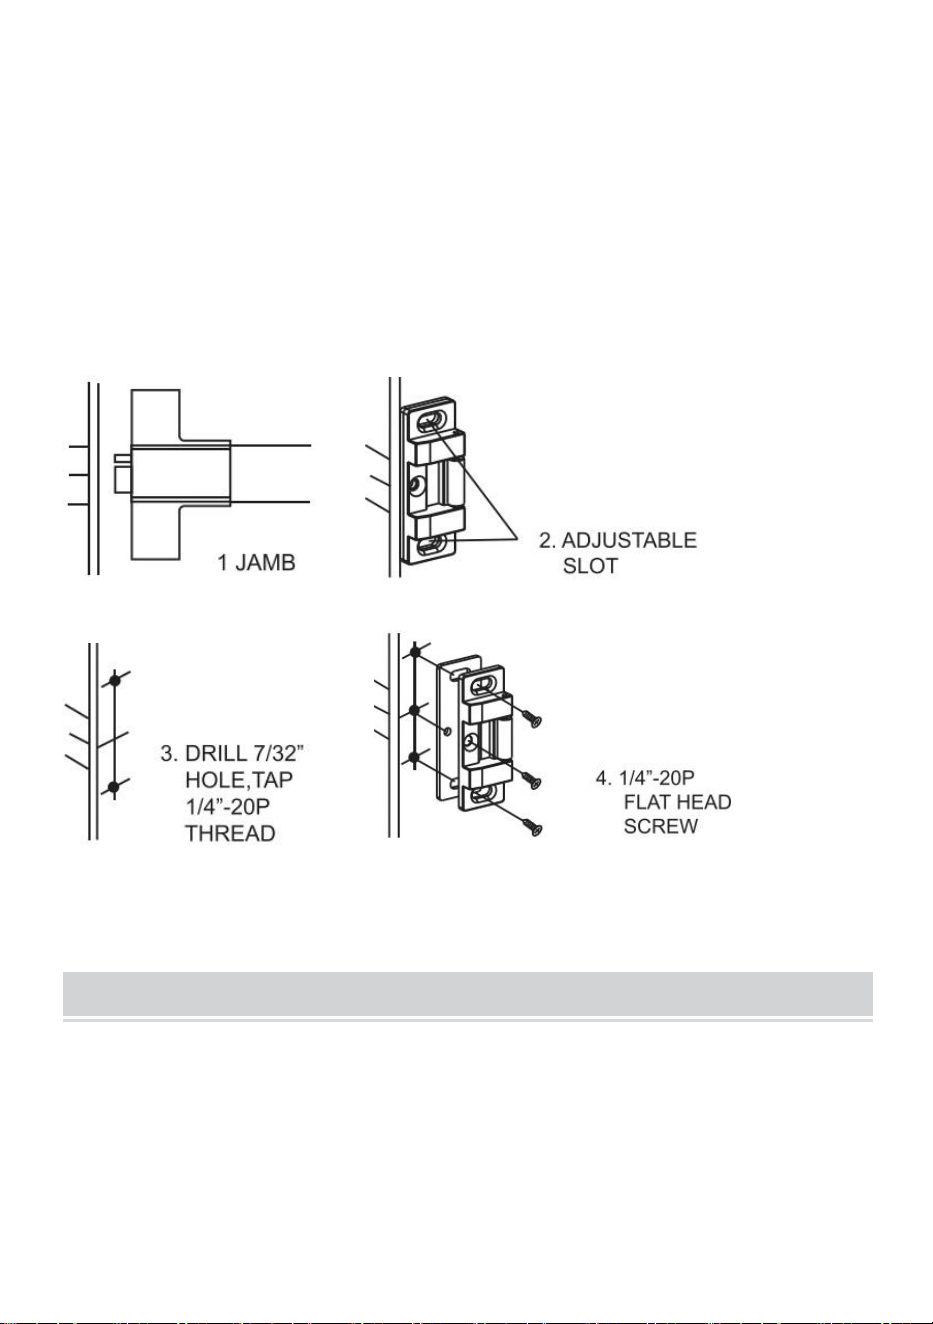
- 7 -
self-tapping machine screws or wood screws in pilot holes. Close the door
to check if the latch bolt extends properly. Adjust the roller strike if
necessary.
4.With roller strike in final position. Drill a 7 /32” pilot hole for the center
mounting hole.Tap the pilot hole with 1/4-20 threads and install machine
screws. Or install self -tapping machine screws or wood screws in pilot
holes.
MAINTENANCE
1. All maintenance, service, and repairs not discussed in the manual
should only be performed by qualified service technicians.
2. Check the product regularly to prevent screws from loosening and falling
off.
- 8 -
Manufacturer:
JIANGSU TONGGUAN INTELLIGENT TECHNOLOGYCO.,LTD
Address:
800 BIHUA ROAD, TONGZHOU DISTRICT,NANTONG,JIANGSU
PROVINCE,CHINA
Made in China


MODEL: UL600S
Instrukcja obsługi urządzenia antypanicznego
Wsparcie techniczne i certyfikat gwarancji elektronicznej www.vevor.com/support
„Oszczędź połowę”, „Połowa ceny” lub inne podobne wyrażenia używane przez nas stanowią
jedynie szacunkowe oszczędności, jakie możesz uzyskać, kupując u nas określone narzędzia w
porównaniu z głównymi markami i niekoniecznie oznaczają one objęcie wszystkich kategorii narzędzi
oferowanych przez nas. Uprzejmie przypominamy, aby dokładnie sprawdzić, czy składając u nas
zamówienie faktycznie oszczędzasz połowę w porównaniu z głównymi markami.
Nadal staramy się oferować Państwu narzędzia w konkurencyjnych cenach.
Machine Translated by Google

Machine Translated by Google

POTRZEBUJESZ POMOCY? SKONTAKTUJ SIĘ Z NAMI!
MODEL:UL600S
- 1 -
To jest oryginalna instrukcja, przed użyciem należy uważnie przeczytać wszystkie
instrukcje. VEVOR zastrzega sobie jasną interpretację naszej instrukcji obsługi. Wygląd produktu
będzie zależał od produktu, który otrzymałeś. Prosimy o wybaczenie, że nie poinformujemy
Cię ponownie, jeśli w naszym produkcie pojawią się jakiekolwiek aktualizacje technologiczne lub
oprogramowania.
Masz pytania dotyczące produktu? Potrzebujesz wsparcia technicznego? Skontaktuj się z
nami: Wsparcie
techniczne i certyfikat E-Gwarancji www.vevor.com/support
Urządzenie do wyjścia w panice
Machine Translated by Google

ZAPISZ TE INSTRUKCJE
- 2 -
OGÓLNE ZASADY BEZPIECZEŃSTWA
4. Montaż należy wykonywać wyłącznie zgodnie z niniejszą instrukcją. Nieprawidłowy montaż może
2. Aby zablokować
6. Podczas montażu nie dopuszczaj osób postronnych na teren montażu.
pozycja, gdy drzwi są w ciągłym użyciu.
5. Utrzymuj miejsce zgromadzenia w czystości i zapewnij dobre oświetlenie.
8. Ten produkt zawiera małe części. W przypadku połknięcia może dojść do zadławienia.
INSTRUKCJE przed użyciem.
3. Aby odblokować
zagrożenie. Trzymaj te małe części z dala od dzieci podczas montażu! To
Przytrzymaj drążek uruchamiający. Obróć urządzenie doggingowe przeciwnie do ruchu wskazówek zegara.
1. Przeczytaj uważnie i zrozum wszystkie instrukcje dotyczące montażu i użytkowania.
za pomocą klucza nasadowego.
7. Nie przychodź na spotkania, jeśli jesteś zmęczony lub pod wpływem alkoholu, narkotyków lub leków.
spowodować poważne obrażenia ciała.
klucz francuski.
Przytrzymaj drążek uruchamiający w dół. Obróć urządzenie dociskające zgodnie z ruchem wskazówek zegara za pomocą
2. Nieprzestrzeganie zasad bezpieczeństwa i innych podstawowych środków ostrożności może
1. Aby przedłużyć żywotność tego urządzenia antypanicznego, zablokuj zatrzask w pozycji schowanej.
stwarzać zagrożenia.
nie jest zabawką. Nie do użytku przez dzieci.
Machine Translated by Google

UL600S
Tworzywo
Specyfikacja produktu
- 3 -
Stal nierdzewna 304
Odpowiednia grubość drzwi
32”
Model
30"~36"
1 37/64″~2 11/64″
Nadaje się do drzwi
MODEL I PARAMETRY
SCHEMAT STRUKTURY
Machine Translated by Google
Krok 2: Zaznacz odpowiednie otwory na drzwiach zgodnie z rysunkiem wymiarowym.
Krok 1: Określenie odległości instalacyjnej.
Uwaga: Długość „B” należy mierzyć od środka otworu cylindra do końca korpusu.
INSTRUKCJA OBSŁUGI
- 4 -
Machine Translated by Google
- 5 -
Krok 3: Włóż listwę dźwigni do otworu w drzwiach. Trzymaj listwę dźwigni
poziomo. Dokręć śruby.
Machine Translated by Google

INSTALACJA ZACZEPU ROLKOWEGO
ościeżnica drzwi.
2. Umieść zaczep rolkowy na ościeżnicy drzwi. Wyrównaj środek zaczepu rolkowego z
linia środkowa rygla zatrzaskowego na OŚCIEŻNICY. Następnie wyrównaj zewnętrzną krawędź
zaczep rolkowy z zewnętrzną krawędzią ościeżnicy drzwi.
podszewka pokrywy końcowej.
1. Przy drzwiach w pozycji zamkniętej zaznacz linię środkową zasuwki na
otwory na śruby z otworami na drzwiach. Dokręć śruby na korpusie i
Krok 4: Zdejmij pokrywę głowicy i śruby na pokrywie końcowej. Wyrównaj
3. Zaznacz środek 2 regulowanych otworów szczelinowych i wywierć otwory pilotażowe o średnicy 7/32”.
Wywierć otwory pilotowe z gwintem 1/4”-20 i zamontuj śruby maszynowe. Lub zamontuj
- 6 -
Machine Translated by Google

KONSERWACJA
4. Z rolką uderzeniową w pozycji końcowej. Wywierć otwór pilotażowy 7 /32” dla otworu
montażowego na środku. Nagwintuj otwór pilotażowy gwintami 1/4-20 i zamontuj wkręty
maszynowe. Możesz też zainstalować wkręty maszynowe samogwintujące lub wkręty do drewna
w otworach pilotażowych.
1. Wszelkie prace konserwacyjne, serwisowe i naprawy nieopisane w instrukcji powinny być
wykonywane wyłącznie przez wykwalifikowanych techników serwisowych.
niezbędny.
wkręty samogwintujące lub wkręty do drewna w otworach pilotażowych. Zamknij drzwi, aby sprawdzić,
czy rygiel zatrzaskowy wysuwa się prawidłowo. Wyreguluj zaczep rolkowy, jeśli
2. Regularnie sprawdzaj produkt, aby zapobiec poluzowaniu się śrub i ich odpadnięciu.
- 7 -
Machine Translated by Google

Wyprodukowano w Chinach
PROWINCJA, CHINY
Producent:
JIANGSU TONGGUAN INTELLIGENT TECHNOLOGYCO.,LTD Adres:
800 BIHUA ROAD, DYSTRYKT TONGZHOU, NANTONG, JIANGSU
- 8 -
Machine Translated by Google

Machine Translated by Google


MODELLO: UL600S
Manuale d'uso del dispositivo di uscita antipanico
Supporto tecnico e certificato di garanzia elettronica www.vevor.com/support
"Risparmia la metà", "Metà prezzo" o qualsiasi altra espressione simile da noi utilizzata rappresenta
solo una stima del risparmio che potresti ottenere acquistando determinati utensili con noi rispetto ai
principali marchi principali e non significa necessariamente coprire tutte le categorie di utensili da noi
offerti. Ti ricordiamo gentilmente di verificare attentamente quando effettui un ordine con noi se
stai effettivamente risparmiando la metà rispetto ai principali marchi principali.
Continuiamo a impegnarci per fornirvi strumenti a prezzi competitivi.
Machine Translated by Google

Machine Translated by Google

Hai domande sul prodotto? Hai bisogno di supporto tecnico? Non esitare a contattarci:
Supporto
tecnico e certificato di garanzia elettronica www.vevor.com/
support
Questa è l'istruzione originale, si prega di leggere attentamente tutte le istruzioni del
manuale prima di utilizzare. VEVOR si riserva una chiara interpretazione del nostro manuale
utente. L'aspetto del prodotto sarà soggetto al prodotto ricevuto. Vi preghiamo di
perdonarci se non vi informeremo di nuovo se ci sono aggiornamenti tecnologici o software sul
nostro prodotto.
- 1 -
MODELLO:UL600S
HAI BISOGNO DI AIUTO? CONTATTACI!
Dispositivo di uscita antipanico
Machine Translated by Google

SALVA QUESTE ISTRUZIONI
- 2 -
NORME GENERALI DI SICUREZZA
2. Per bloccare
6. Tenere gli astanti fuori dall'area durante l'assemblea.
posizione quando la porta è in uso continuo.
5. Mantenere l'area di assemblaggio pulita e ben illuminata.
8. Questo prodotto contiene piccole parti. Se ingerito, può causare soffocamento.
ISTRUZIONI prima di operare.
Tenere premuta la barra di azionamento. Ruotare il dispositivo di bloccaggio in senso antiorario
3. Per sbloccare
7. Non riunirsi quando si è stanchi o sotto l'effetto di alcol, droghe o farmaci.
1. Leggere attentamente e comprendere tutte le istruzioni di MONTAGGIO E FUNZIONAMENTO
con una chiave inglese.
pericolo. Tenere queste piccole parti lontano dalla portata dei bambini durante il montaggio! Questo
causare gravi lesioni personali.
chiave inglese.
2. La mancata osservanza delle norme di sicurezza e di altre precauzioni di sicurezza di base può
Tenere premuta la barra di azionamento. Ruotare il dispositivo di bloccaggio in senso orario con un
non è un giocattolo. Non adatto all'uso da parte dei bambini.
1. Per prolungare la durata di questo dispositivo antipanico, bloccare il fermo in posizione retratta
creare pericoli.
4. Montare solo secondo queste istruzioni. Un montaggio improprio può
Machine Translated by Google

UL600S
- 3 -
Specifiche del prodotto
Materiale
Acciaio inossidabile 304
Spessore porta adatto
32"
Modello
30"~36"
Da 1 37/64ÿ a 2 11/64ÿ
Adatto per porta
SCHEMA DELLA STRUTTURA
MODELLO E PARAMETRI
Machine Translated by Google
Nota: la lunghezza "B" deve essere misurata dal centro del foro del cilindro all'estremità del corpo.
Fase 1: determinazione della distanza di installazione.
Fase 2: contrassegnare i fori corrispondenti sulla porta in base al disegno dimensionale.
ISTRUZIONI PER L'USO
- 4 -
Machine Translated by Google

- 5 -
Fase 3: Inserire la modanatura della leva nel foro sulla porta. Mantenere la modanatura
della leva orizzontale. Serrare le viti.
Machine Translated by Google

INSTALLAZIONE DEL RULLO DI COLPO
STIPITE della porta.
2. Posizionare il rullo di battuta sullo STIPITE della porta. Allineare il centro del rullo di battuta con
il segno della linea centrale del chiavistello sullo STIPITE. Quindi allineare il bordo esterno di
il rivestimento del coperchio terminale.
1. Con la porta in posizione chiusa, segnare la linea centrale del chiavistello su
fori per le viti con i fori sulla porta. Stringere le viti sul corpo e
Fase 4: rimuovere il coperchio della testa e le viti sul coperchio terminale. Allineare il
3.Segnare il centro dei 2 fori asolati regolabili e praticare dei fori pilota da 7/32".
il rullo sbatte con il bordo esterno dello STIPITE della porta.
Praticare dei fori pilota con filettature da 1/4”-20 e installare viti per macchine. Oppure installare
- 6 -
Machine Translated by Google
MANUTENZIONE
necessario.
1. Tutti gli interventi di manutenzione, assistenza e riparazione non trattati nel manuale devono
essere eseguiti esclusivamente da tecnici qualificati.
4. Con il rullo di battuta in posizione finale. Praticare un foro pilota da 7/32” per il foro di
montaggio centrale. Maschiare il foro pilota con filettature da 1/4-20 e installare viti per
macchine. Oppure installare viti per macchine autofilettanti o viti per legno nei fori pilota.
viti autofilettanti o viti per legno nei fori pilota. Chiudere la porta per verificare se il chiavistello
si estende correttamente. Regolare il rullo di riscontro se
2. Controllare regolarmente il prodotto per evitare che le viti si allentino e cadano.
- 7 -
Machine Translated by Google

Made in China
PROVINCIA,CINA
Produttore:
JIANGSU TONGGUAN INTELLIGENT TECHNOLOGYCO.,LTD Indirizzo:
800 BIHUA ROAD, DISTRETTO DI TONGZHOU, NANTONG, JIANGSU
- 8 -
Machine Translated by Google

Machine Translated by Google


MODELO:UL600S
"Ahorrelamitad","mitaddeprecio"ocualquierotraexpresiónsimilarqueutilicemossolorepresenta
unaestimacióndelahorroquepodríaobteneralcomprarciertasherramientasconnosotrosencomparación
conlasprincipalesmarcasynonecesariamentesignificaquecubratodaslascategoríasdeherramientas
queofrecemos.Lerecordamosque,alrealizarunpedidoconnosotros,verifiquecuidadosamentesi
realmenteestáahorrandolamitadencomparaciónconlasprincipalesmarcas.
Seguimoscomprometidosabrindarleherramientasaprecioscompetitivos.
Manualdeusuariodeldispositivodesalidadeemergencia
Soportetécnicoycertificadodegarantíaelectrónicawww.vevor.com/support
Machine Translated by Google

Machine Translated by Google

Estassonlasinstruccionesoriginales,leaatentamentetodaslasinstruccionesdel
manualantesdeutilizarelproducto.VEVORsereservaunainterpretaciónclaradenuestro
manualdeusuario.Laaparienciadelproductoestarásujetaalproductoquerecibió.
Perdónenospornoinformarlenuevamentesihayactualizacionesdetecnologíaosoftwareen
nuestroproducto.
¿Tienepreguntassobreelproducto?¿Necesitaasistenciatécnica?Nodudeenponerseen
contactocon
nosotros:Asistenciatécnicaycertificadodegarantíaelectrónica
www.vevor.com/support
¿NECESITAAYUDA?¡CONTÁCTENOS!
MODELO:UL600S
Dispositivodesalidadeemergencia
1
Machine Translated by Google

GUARDEESTASINSTRUCCIONES
NORMASGENERALESDESEGURIDAD
Mantengalabarradeaccionamientohaciaabajo.Gireeldispositivodebloqueoensentidoantihorario.
llavedeapriete.
7.Nosereúnacuandoestécansadoobajolainfluenciadelalcohol,drogasomedicamentos.
1.LeaatentamenteycomprendatodaslasinstruccionesdeMONTAJEYFUNCIONAMIENTO.
conunallaveinglesa.
8.Esteproductocontienepiezaspequeñas.Siseingieren,puedenprovocarasfixia.
INSTRUCCIONESantesdeoperar.
3.Paradesbloquear
Posicióncuandolapuertaestáenusocontinuo.
5.Mantengaeláreadereuniónlimpiaybieniluminada.
¡Peligro!Mantengaestaspiezaspequeñasfueradelalcancedelosniñosduranteelmontaje.
2.Parabloquear
6.Mantengaalostranseúntesfueradeláreaduranteelmontaje.
4.Realiceelmontajeúnicamentedeacuerdoconestasinstrucciones.Unmontajeincorrectopuede
1.Paraprolongarlavidaútildeestedispositivoantipánico,bloqueeelpestilloenlaposiciónretraída.
crearpeligros
2.Elincumplimientodelasnormasdeseguridadyotrasprecaucionesbásicasdeseguridadpuede
Mantengalabarradeaccionamientohaciaabajo.Gireeldispositivodebloqueoenelsentidodelasagujasdelrelojconun
Noesunjuguete.Noaptoparausoinfantil.
provocarlesionespersonalesgraves.
2
Machine Translated by Google

UL600S
Aceroinoxidable304
Adecuadoparapuerta
32”
Modelo
137/64″~211/64″
Grosordepuertaadecuado
30"~36"
DIAGRAMADEESTRUCTURA
MODELOYPARÁMETROS
Material
Especificacionesdelproducto
3
Machine Translated by Google

4
INSTRUCCIONESDEUSO
Paso2:Marquelosorificioscorrespondientesenlapuertadeacuerdoconeldibujodimensional.
Paso1:Determinacióndeladistanciadeinstalación.
Nota:Lalongitud“B”debemedirsedesdeelcentrodelorificiodelcilindrohastaelfinaldelcuerpo.
Machine Translated by Google

Paso3:Insertelamolduradelapalancaenelorificiodelapuerta.Mantengalamolduradelapalanca
enposiciónhorizontal.Aprietelostornillos.
5
Machine Translated by Google

6
puertaJAMB.
2.ColoqueelpestilloderodilloenlaJAMBAdelapuerta.Alineeelcentrodelpestilloderodillocon
lamarcadelalíneacentraldelpestilloenlaJAMB.Luegoalineeelbordeexteriorde
3.Marqueelcentrodelos2orificiosranuradosajustablesytaladreorificiospilotode7/32”.
Atornillelosorificiosdelostornillosconlosorificiosdelapuerta.Aprietelostornillosenelcuerpoy
1.Conlapuertaenposicióncerrada,marquelalíneacentraldelpestilloen
Elrevestimientodelatapadelextremo.
Paso4:Retirelatapadelcabezalylostornillosdelatapadelextremo.Alinee
Hagaagujerosguíaconroscasde1/4”20einstaletornillosparamáquina.Oinstale
ElrodillogolpeaconelbordeexteriordelapuertaJAMB.
INSTALACIÓNDECERRADURADERODILLOS
Machine Translated by Google

7
4.Conelpestilloderodilloenlaposiciónfinal,taladreunorificiopilotode7/32”paraelorificiode
montajecentral.Rosqueelorificiopilotoconroscasde1/420einstaletornillosparamáquina.O
instaletornillosparamáquinaautorroscantesotornillosparamaderaenlosorificiospiloto.
1.Todomantenimiento,servicioyreparaciónnodescritosenelmanualsólodebenserrealizadospor
técnicosdeserviciocalificados.
necesario.
Tornillosautorroscantesparamáquinaotornillosparamaderaenlosorificiosguía.Cierrelapuertapara
verificarsielpestilloseextiendecorrectamente.Ajusteelpestillodelrodillosiesnecesario.
2.Reviseelproductoperiódicamenteparaevitarquelostornillosseaflojenysecaigan.
MANTENIMIENTO
Machine Translated by Google

8
800BIHUAROAD,DISTRITODETONGZHOU,NANTONG,JIANGSU
Fabricante:
JIANGSUTONGGUANINTELLIGENTTECHNOLOGYCO.,LTDDirección:
PROVINCIA,CHINA
Hechoenchina
Machine Translated by Google

Machine Translated by Google


MODELL: UL600S
Panic Exit Device Användarmanual
Teknisk support och e-garanticertifikat www.vevor.com/support
"Spara hälften", "halva priset" eller andra liknande uttryck som används av oss representerar
bara en uppskattning av besparingar du kan dra nytta av att köpa vissa verktyg hos oss jämfört med
de stora toppmärkena och betyder inte nödvändigtvis att täcka alla kategorier av verktyg som erbjuds
av oss. Du påminns vänligen om att noggrant kontrollera när du gör en beställning hos oss om
du faktiskt sparar hälften i jämförelse med de främsta stora varumärkena.
Vi fortsätter att vara engagerade i att ge dig verktyg till konkurrenskraftiga priser.
Machine Translated by Google

Machine Translated by Google

Detta är den ursprungliga instruktionen, läs alla instruktioner noggrant innan du
använder den. VEVOR reserverar sig för en tydlig tolkning av vår användarmanual. Utseendet
på produkten är beroende av den produkt du fått. Ursäkta oss att vi inte kommer att
informera dig igen om det finns någon teknik eller mjukvaruuppdateringar på vår produkt.
Har du produktfrågor? Behöver du teknisk support? Kontakta oss gärna: Teknisk support och
e-
garanticertifikat www.vevor.com/support
- 1 -
BEHÖVER HJÄLP? KONTAKTA OSS!
MODELL: UL600S
Panic Exit Device
Machine Translated by Google

SPARA DESSA INSTRUKTIONER
- 2 -
ALLMÄNNA SÄKERHETSFÖRESKRIFTER
2. För att låsa
6. Håll åskådare borta från området under monteringen.
läge när dörren är i kontinuerlig användning.
5. Håll monteringsområdet rent och väl upplyst.
8. Denna produkt innehåller små delar. Om den sväljs kommer den att utgöra en kvävning
INSTRUKTIONER före användning.
Håll ned manöverstången. Vrid avkopplingsanordningen moturs
3. För att låsa upp
7. Sätt dig inte ihop när du är trött eller påverkad av alkohol, droger eller mediciner.
1. Läs noga och förstå all MONTERING OCH DRIFT
med en skiftnyckel.
fara. Håll dessa små delar borta från barn när du monterar dem! Detta
resultera i allvarliga personskador.
dogging skiftnyckel.
2. Underlåtenhet att följa säkerhetsreglerna och andra grundläggande säkerhetsåtgärder kan
Håll ned manöverstången. Vrid skjutanordningen medurs med a
är inte en leksak. Ej för användning av barn.
1. För att förlänga livslängden för denna panikanordning, lås spärren i den indragna
skapa faror.
4. Montera endast enligt dessa instruktioner. Felaktig montering kan
Machine Translated by Google

UL600S
Material
Produkt Spec
- 3 -
Rostfritt stål 304
Lämplig dörrtjocklek
32"
Modell
30"~36"
1 37/64"~2 11/64"
Lämplig för dörr
STRUKTURDIAGRAM
MODELL OCH PARAMETRAR
Machine Translated by Google
Obs: "B"-längden ska mätas från mitten av cylinderhålet till slutet av kroppen.
Steg 1: Bestämning av installationsavstånd.
Steg 2: Markera motsvarande hål på dörren enligt måttritningen.
DRIFTSINSTRUKTIONER
- 4 -
Machine Translated by Google

- 5 -
Steg 3: Sätt in spaken i hålet på dörren. Håll spakens trim horisontellt. Dra åt
skruvarna.
Machine Translated by Google

INSTALLATION AV ROLLER STRIKE
dörr JAMB.
2. Placera rullstöten på dörrens JAMB. Rikta in mitten av rullslaget med
spärrbultens mittlinjemärke på JAMB. Rikta sedan in ytterkanten av
3.Markera mitten av de 2 justerbara slitshålen och borra 7/32” pilothål.
ändskyddets foder.
1. Med dörren i stängt läge, markera mittlinjen för låsbulten
skruvhål med hålen på dörren. Dra åt skruvarna på kroppen och
Steg 4: Ta bort huvudskyddet och skruvarna på ändlocket. Rikta in
Knacka styrhål med 1/4”-20 gängor och installera maskinskruvar. Eller installera
rullslaget med ytterkanten av dörren JAMB.
- 6 -
Machine Translated by Google

UNDERHÅLL
nödvändig.
1. Allt underhåll, service och reparationer som inte diskuteras i manualen bör endast utföras av
kvalificerade servicetekniker.
4.Med rullstöt i slutläge. Borra ett 7/32” pilothål för mittmonteringshålet. Knacka på pilothålet
med 1/4-20 gängor och installera maskinskruvar. Eller installera självgängande maskinskruvar
eller träskruvar i pilothålen.
självgängande maskinskruvar eller träskruvar i styrhål. Stäng dörren för att kontrollera om
spärrkolven skjuter ut ordentligt. Justera rullstöten om
2. Kontrollera produkten regelbundet för att förhindra att skruvar lossnar och faller av.
- 7 -
Machine Translated by Google

Tillverkad i Kina
800 BIHUA ROAD, TONGZHOU DISTRICT, NANTONG, JIANGSU
Tillverkare:
JIANGSU TONGGUAN INTELLIGENT TECHNOLOGYCO.,LTD Adress:
PROVINS, KINA
- 8 -
Machine Translated by Google

Machine Translated by Google


MODEL: UL600S
"Save Half", "Half Price" of andere soortgelijke uitdrukkingen die wij gebruiken, geven alleen een schatting van de
besparingen die u kunt behalen door bepaalde gereedschappen bij ons te kopen in vergelijking met de grote topmerken
en betekent niet noodzakelijkerwijs dat alle categorieën gereedschappen die wij aanbieden, worden gedekt. Wij
herinneren u eraan om zorgvuldig te controleren of u daadwerkelijk de helft bespaart in vergelijking met de grote
topmerken wanneer u een bestelling bij ons plaatst.
Wij streven er voortdurend naar om u gereedschappen tegen concurrerende prijzen te leveren.
Gebruikershandleiding voor paniekuitgangsapparaat
Technische ondersteuning en e-garantiecertificaat www.vevor.com/support
Machine Translated by Google

Machine Translated by Google

Dit is de originele instructie, lees alle handleidingen zorgvuldig door voordat u het
product gebruikt. VEVOR behoudt zich een duidelijke interpretatie van onze gebruikershandleiding
voor. Het uiterlijk van het product is afhankelijk van het product dat u hebt ontvangen.
Vergeef ons dat we u niet opnieuw zullen informeren als er technologie- of software-updates
voor ons product zijn.
Heeft u vragen over het product? Heeft u technische ondersteuning nodig? Neem dan gerust
contact met
ons op: Technische ondersteuning en E-garantiecertificaat
www.vevor.com/support
- 1 -
HULP NODIG? NEEM CONTACT MET ONS OP!
MODEL:UL600S
Paniek-uitgangsapparaat
Machine Translated by Google

BEWAAR DEZE INSTRUCTIES
- 2 -
ALGEMENE VEILIGHEIDSREGELS
ernstig persoonlijk letsel tot gevolg hebben.
Houd de bedieningsstang naar beneden. Draai het dogging-apparaat tegen de klok in
1. Lees alle MONTAGE- EN BEDIENINGSINSTRUCTIES zorgvuldig door en begrijp ze.
sleutel voor het vastzetten.
met een borgmoersleutel.
7. Kom niet bijeen als u moe bent of onder invloed van alcohol, drugs of medicijnen.
GEBRUIKSAANWIJZING vóór gebruik.
3. Om te ontgrendelen
stand wanneer de deur continu in gebruik is.
5. Zorg ervoor dat de verzamelplaats schoon en goed verlicht is.
8. Dit product bevat kleine onderdelen. Als het wordt ingeslikt, kan dit verstikkingsgevaar opleveren.
gevaar. Houd deze kleine onderdelen uit de buurt van kinderen tijdens het monteren! Dit
6. Houd omstanders uit de buurt tijdens de montage.
2. Om te vergrendelen
4. Monteer alleen volgens deze instructies. Onjuiste montage kan
1. Om de levensduur van dit paniekapparaat te verlengen, vergrendelt u de grendel in de ingetrokken stand.
gevaren creëren.
Houd de bedieningsstang naar beneden. Draai het dogging-apparaat met de klok mee met een
2. Het niet naleven van de veiligheidsregels en andere elementaire veiligheidsmaatregelen kan
is geen speelgoed. Niet voor gebruik door kinderen.
Machine Translated by Google

UL600S
- 3 -
Productspecificatie
Materiaal
Roestvrij staal 304
Geschikt voor Deur
32”
Model
1 37/64ÿ~2 11/64ÿ
Geschikte deurdikte
30"~36"
STRUCTUURDIAGRAM
MODEL EN PARAMETERS
Machine Translated by Google
Stap 2: Markeer de overeenkomstige gaten op de deur volgens de maattekening.
Stap 1: Bepaling van de installatieafstand.
Let op: de lengte “B” moet worden gemeten vanaf het midden van het cilindergat tot aan het einde van
de behuizing.
GEBRUIKSAANWIJZING
- 4 -
Machine Translated by Google

- 5 -
Stap 3: Plaats de hendelbekleding in het gat op de deur. Houd de hendelbekleding
horizontaal. Draai de schroeven vast.
Machine Translated by Google

ROLLER STRIKE INSTALLATIE
deur JAMB.
2. Plaats de rolsluiting op de deurpost. Lijn het midden van de rolsluiting uit met
de middenlijnmarkering van de grendelbout op de JAMB. Lijn vervolgens de buitenrand van
de rolsluiting met de buitenrand van de deurpost.
de voering van het einddeksel.
1. Markeer, terwijl de deur gesloten is, de middellijn van de dagschoot op
schroefgaten met de gaten op de deur. Draai de schroeven op het lichaam vast en
Stap 4: Verwijder de kopkap en de schroeven op de eindkap. Lijn de
3. Markeer het midden van de 2 verstelbare sleufgaten en boor 7/32” geleidegaten.
Tap de geleidegaten met 1/4”-20 schroefdraad en installeer de machineschroeven. Of installeer
- 6 -
Machine Translated by Google

ONDERHOUD
4. Met de rolaanslag in de eindpositie. Boor een 7 /32” geleidegat voor het middelste
montagegat. Tap het geleidegat met 1/4-20 draden en installeer machineschroeven. Of
installeer zelftappende machineschroeven of houtschroeven in de geleidegaten.
1. Alle onderhouds-, service- en reparatiewerkzaamheden die niet in de handleiding worden
besproken, mogen uitsluitend worden uitgevoerd door gekwalificeerde servicetechnici.
nodig.
zelftappende machineschroeven of houtschroeven in geleidegaten. Sluit de deur om te
controleren of de dagschoot goed uitschuift. Stel de rolaanslag af als
2. Controleer het product regelmatig om te voorkomen dat de schroeven losraken en eraf
vallen.
- 7 -
Machine Translated by Google

Gemaakt in China
PROVINCIE,CHINA
Fabrikant:
JIANGSU TONGGUAN INTELLIGENT TECHNOLOGYCO.,LTD Adres:
800 BIHUA-WEG, TONGZHOU-DISTRICT, NANTONG, JIANGSU
- 8 -
Machine Translated by Google

Machine Translated by Google


MODELL: UL600S
Benutzerhandbuch für Paniktür-Geräte
Technischer Support und E-Garantie-Zertifikat www.vevor.com/support
„Sparen Sie die Hälfte“, „Halber Preis“ oder andere ähnliche Ausdrücke, die wir verwenden, stellen nur eine
Schätzung der Ersparnis dar, die Sie beim Kauf bestimmter Werkzeuge bei uns im Vergleich zu den großen
Topmarken erzielen können, und decken nicht unbedingt alle von uns angebotenen Werkzeugkategorien ab. Wir
möchten Sie freundlich daran erinnern, bei Ihrer Bestellung bei uns sorgfältig zu prüfen, ob Sie im Vergleich
zu den großen Topmarken tatsächlich die Hälfte sparen.
Wir sind weiterhin bestrebt, Ihnen Werkzeuge zu wettbewerbsfähigen Preisen anzubieten.
Machine Translated by Google

Machine Translated by Google
Dies ist die Originalanleitung. Bitte lesen Sie alle Anweisungen sorgfältig durch, bevor
Sie das Gerät in Betrieb nehmen. VEVOR behält sich eine klare Auslegung unserer
Bedienungsanleitung vor. Das Erscheinungsbild des Produkts richtet sich nach dem
Produkt, das Sie erhalten haben. Bitte verzeihen Sie uns, dass wir Sie nicht erneut informieren,
wenn es Technologie- oder Software-Updates für unser Produkt gibt.
Haben Sie Fragen zum Produkt? Benötigen Sie technischen Support? Bitte kontaktieren Sie
uns:
Technischer Support und E-Garantie-Zertifikat www.vevor.com/
support
- 1 -
Brauchen Sie Hilfe? Kontaktieren Sie uns!
MODELL:UL600S
Panik-Ausgangsvorrichtung
Machine Translated by Google

BEWAHREN SIE DIESE ANWEISUNGEN AUF
- 2 -
ALLGEMEINE SICHERHEITSREGELN
2. Sperren
6. Halten Sie während der Montage unbeteiligte Zuschauer vom Bereich fern.
Position, wenn die Tür im Dauerbetrieb ist.
5. Halten Sie den Versammlungsbereich sauber und gut beleuchtet.
8. Dieses Produkt enthält Kleinteile. Bei Verschlucken besteht Erstickungsgefahr.
VORBEREITUNG DER INBETRIEBNAHME DIE ANLEITUNG.
Halten Sie die Betätigungsstange gedrückt. Drehen Sie die Klemmvorrichtung gegen den Uhrzeigersinn
3. Zum Entsperren
7. Nicht montieren, wenn Sie müde sind oder unter dem Einfluss von Alkohol, Drogen oder Medikamenten
stehen.
1. Lesen Sie sorgfältig und verstehen Sie alle MONTAGE UND BETRIEB
mit einem Spannschlüssel.
Gefahr. Halten Sie diese Kleinteile beim Zusammenbau von Kindern fern! Diese
kann zu schweren Verletzungen führen.
Feststellschlüssel.
2. Die Nichtbeachtung der Sicherheitsregeln und anderer grundlegender Sicherheitsvorkehrungen kann
Halten Sie die Betätigungsstange gedrückt. Drehen Sie die Klemmvorrichtung mit einem
ist kein Spielzeug. Nicht für die Benutzung durch Kinder geeignet.
1. Um die Lebensdauer dieses Panikschlosses zu verlängern, verriegeln Sie den Riegel in der eingefahrenen
Gefahren schaffen.
4. Die Montage muss gemäß dieser Anleitung erfolgen. Eine unsachgemäße Montage kann
Machine Translated by Google
UL600S
Material
Produktspezifikation
- 3 -
32”
Passende Türstärke
Edelstahl 304
Modell
30 bis 36 Zoll
1 37/64ÿ~2 11/64ÿ
Geeignet für Tür
STRUKTURDIAGRAMM
MODELL UND PARAMETER
Machine Translated by Google
Schritt 2: Markieren Sie die entsprechenden Löcher an der Tür gemäß der Maßzeichnung.
Schritt 1: Bestimmung des Installationsabstands.
Hinweis: Die Länge „B“ sollte von der Mitte des Zylinderlochs bis zum Ende des Körpers
gemessen werden.
BEDIENUNGSANLEITUNG
- 4 -
Machine Translated by Google

- 5 -
Schritt 3: Setzen Sie die Hebelverkleidung in das Loch an der Tür ein. Halten Sie die Hebelverkleidung
waagerecht. Ziehen Sie die Schrauben fest.
Machine Translated by Google

ROLLER STRIKE-INSTALLATION
TÜRPFOSTEN.
2.Platzieren Sie den Rollanschlag am Türpfosten. Richten Sie die Mitte des Rollanschlags mit
die Mittellinie des Riegelbolzens auf dem Pfosten. Richten Sie dann die Außenkante des
Schraubenlöcher mit den Löchern in der Tür. Ziehen Sie die Schrauben am Korpus fest und
1.Markieren Sie bei geschlossener Tür die Mittellinie des Riegels auf
die Auskleidung der Endabdeckung.
Schritt 4: Entfernen Sie die Kopfabdeckung und die Schrauben an der Endabdeckung. Richten Sie die
3. Markieren Sie die Mitte der beiden verstellbaren Langlöcher und bohren Sie 7/32-Zoll-Pilotlöcher.
die Rolle mit der Außenkante des Türpfostens anschlagen.
Bohren Sie vorgebohrte Löcher mit 1/4”-20 Gewinde und montieren Sie Maschinenschrauben. Oder montieren Sie
- 6 -
Machine Translated by Google

WARTUNG
4. Mit der Rolle in die Endposition schlagen. Bohren Sie ein 7/32-Zoll-Pilotloch für das mittlere
Montageloch. Gewindeschneiden Sie das Pilotloch mit 1/4-20-Gewinden und installieren Sie
Maschinenschrauben. Oder installieren Sie selbstschneidende Maschinenschrauben oder
Holzschrauben in den Pilotlöchern.
1. Alle Wartungs-, Service- und Reparaturarbeiten, die nicht im Handbuch beschrieben sind, dürfen nur
von qualifizierten Servicetechnikern durchgeführt werden.
notwendig.
selbstschneidende Maschinenschrauben oder Holzschrauben in die Führungslöcher. Schließen Sie die
Tür, um zu prüfen, ob der Riegel richtig ausfährt. Passen Sie den Rollenanschlag an, wenn
2. Überprüfen Sie das Produkt regelmäßig, um zu verhindern, dass sich Schrauben lösen und abfallen.
- 7 -
Machine Translated by Google
In China hergestellt
800 BIHUA ROAD, BEZIRK TONGZHOU, NANTONG, JIANGSU
Hersteller:
JIANGSU TONGGUAN INTELLIGENT TECHNOLOGYCO.,LTD Adresse:
PROVINZ, CHINA
- 8 -
Machine Translated by Google

Machine Translated by Google


MODÈLE:UL600S
«Économisezlamoitié»,«Moitiéprix»outouteautreexpressionsimilaireutiliséeparnousnereprésente
qu'uneestimationdeséconomiesquevouspourriezréaliserenachetantcertainsoutilscheznousparrapport
auxgrandesmarquesetnecouvrepasnécessairementtouteslescatégoriesd'outilsquenousproposons.
Nousvousrappelonsdebienvouloirvérifiersoigneusementlorsquevouspassezunecommandechez
noussivouséconomisezréellementlamoitiéparrapportauxgrandesmarques.
Nouscontinuonsànousengageràvousfournirdesoutilsàdesprixcompétitifs.
Manueld'utilisationdudispositifantipanique
Assistancetechniqueetcertificatdegarantieélectroniquewww.vevor.com/support
Machine Translated by Google

Machine Translated by Google

Vousavezdesquestionssurnosproduits?Vousavezbesoind'assistancetechnique?
N'hésitezpas
ànouscontacter:Assistancetechniqueetcertificatdegarantie
électroniquewww.vevor.com/support
Ils'agitdelanoticed'utilisationd'origine.Veuillezlireattentivementtoutesles
instructionsdumanuelavantdel'utiliser.VEVORseréserveledroitd'interpréterclairement
notremanueld'utilisation.L'apparenceduproduitdépendduproduitquevousavez
reçu.Veuilleznousexcuser,nousnevousinformeronsplusencasdemiseàjourtechnologique
oulogicielledenotreproduit.
BESOIND'AIDE?CONTACTEZNOUS!
MODÈLE:UL600S
Dispositifdesortiedepanique
1
Machine Translated by Google

CONSERVEZCESINSTRUCTIONS
RÈGLESGÉNÉRALESDESÉCURITÉ
Maintenezlabarred'actionnementverslebas.Tournezledispositifdeblocagedanslesensinversedesaiguillesd'unemontre.
cléàmolette.
7.Nemontezpaslorsquevousêtesfatiguéousousl’influencedel’alcool,dedroguesoudemédicaments.
1.Lisezattentivementetcompreneztouteslesinstructionsd'ASSEMBLAGEETD'UTILISATION
avecunecléàmolette.
8.Ceproduitcontientdepetitespièces.Encasd'ingestion,ilpeutyavoirunrisqued'étouffement.
INSTRUCTIONSavantl'utilisation.
3.Pourdéverrouiller
positionlorsquelaporteestenutilisationcontinue.
5.Gardezlazonedemontagepropreetbienéclairée.
danger.Gardezcespetitespièceshorsdeportéedesenfantslorsdel'assemblage!
2.Pourverrouiller
6.Gardezlesspectateurshorsdelazonependantlemontage.
4.Assemblezuniquementseloncesinstructions.Unassemblageincorrectpeut
1.Pourprolongerladuréedeviedecedispositifantipanique,verrouillezleloquetenpositionrétractée.
créerdesdangers.
2.Lenonrespectdesrèglesdesécuritéetdesautresprécautionsdesécuritédebasepeut
Maintenezlabarred'actionnementverslebas.Tournezledispositifdeblocagedanslesensdesaiguillesd'unemontreavecun
Cen'estpasunjouet.Nedoitpasêtreutilisépardesenfants.
entraînerdesblessurescorporellesgraves.
2
Machine Translated by Google

Acierinoxydable304
Convientpourlaporte
32”
Modèle
137/64″~211/64″
Épaisseurdeporteadaptée
30"~36"
UL600S
SCHÉMADESTRUCTURE
MODÈLEETPARAMÈTRES
Matériel
Spécificationsduproduit
3
Machine Translated by Google
Remarque:lalongueur«B»doitêtremesuréeducentredutrouducylindrejusqu'àl'extrémité
ducorps.
Étape1:Déterminationdeladistanced’installation.
Étape2:Marquezlestrouscorrespondantssurlaporteselonledessindimensionnel.
MODED'EMPLOI
4
Machine Translated by Google

5
Étape3:Insérezlagarnituredulevierdansletroudelaporte.Maintenezlagarniture
dulevieràl'horizontale.Serrezlesvis.
Machine Translated by Google
INSTALLATIONDELAGACHEÀROULEAU
MONTANTDEPORTE.
2.PlacezlagâcheàgaletsurleMONTANTdelaporte.Alignezlecentredelagâcheàgaletavec
lamarquedelalignecentraledupêneduloquetsurleJAMB.Alignezensuitelebordextérieurde
ladoublureducouvercled'extrémité.
1.Aveclaporteenpositionfermée,marquezlalignecentraledupênedormantsur
trousdevisaveclestrousdelaporte.Serrezlesvissurlecorpset
Étape4:Retirezlecouvercledelatêteetlesvisducouvercled'extrémité.Alignezle
Percezdesavanttrousavecdesfiletages1/4"20etinstallezdesvisàmétaux.Ouinstallez
3.Marquezlecentredes2trousoblongsréglablesetpercezdestrouspilotesde7/32po.
lagâcheàgaletaveclebordextérieurduJAMBAGEdelaporte.
6
Machine Translated by Google

ENTRETIEN
4.Aveclagâcheàgaletenpositionfinale.Percezuntroupilotede7/32popourletroude
montagecentral.Taraudezletroupiloteavecdesfiletages1/420etinstallezdesvisà
métaux.Ouinstallezdesvisàmétauxautotaraudeusesoudesvisàboisdanslestrous
pilotes.
1.Touslestravauxd'entretien,deréparationetdemaintenancenondécritsdanslemanuel
doiventêtreeffectuésuniquementpardestechniciensdemaintenancequalifiés.
nécessaire.
visautotaraudeusesouvisàboisdanslesavanttrous.Fermezlaportepourvérifiersilepêne
dormants'étendcorrectement.Réglezlagâcheàgaletsi
2.Vérifiezrégulièrementleproduitpouréviterquelesvisnesedesserrentetnetombent.
7
Machine Translated by Google

FabriquéenChine
PROVINCE,CHINE
Fabricant:
JIANGSUTONGGUANINTELLIGENTTECHNOLOGYCO.,LTDAdresse:
800ROUTEBIHUA,DISTRICTDETONGZHOU,NANTONG,JIANGSU
8
Machine Translated by Google

Machine Translated by Google

