
Technical Support and E-Warranty Certificate www.vevor.com/support
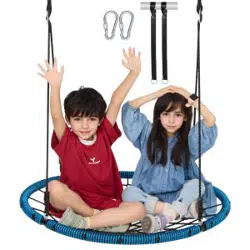
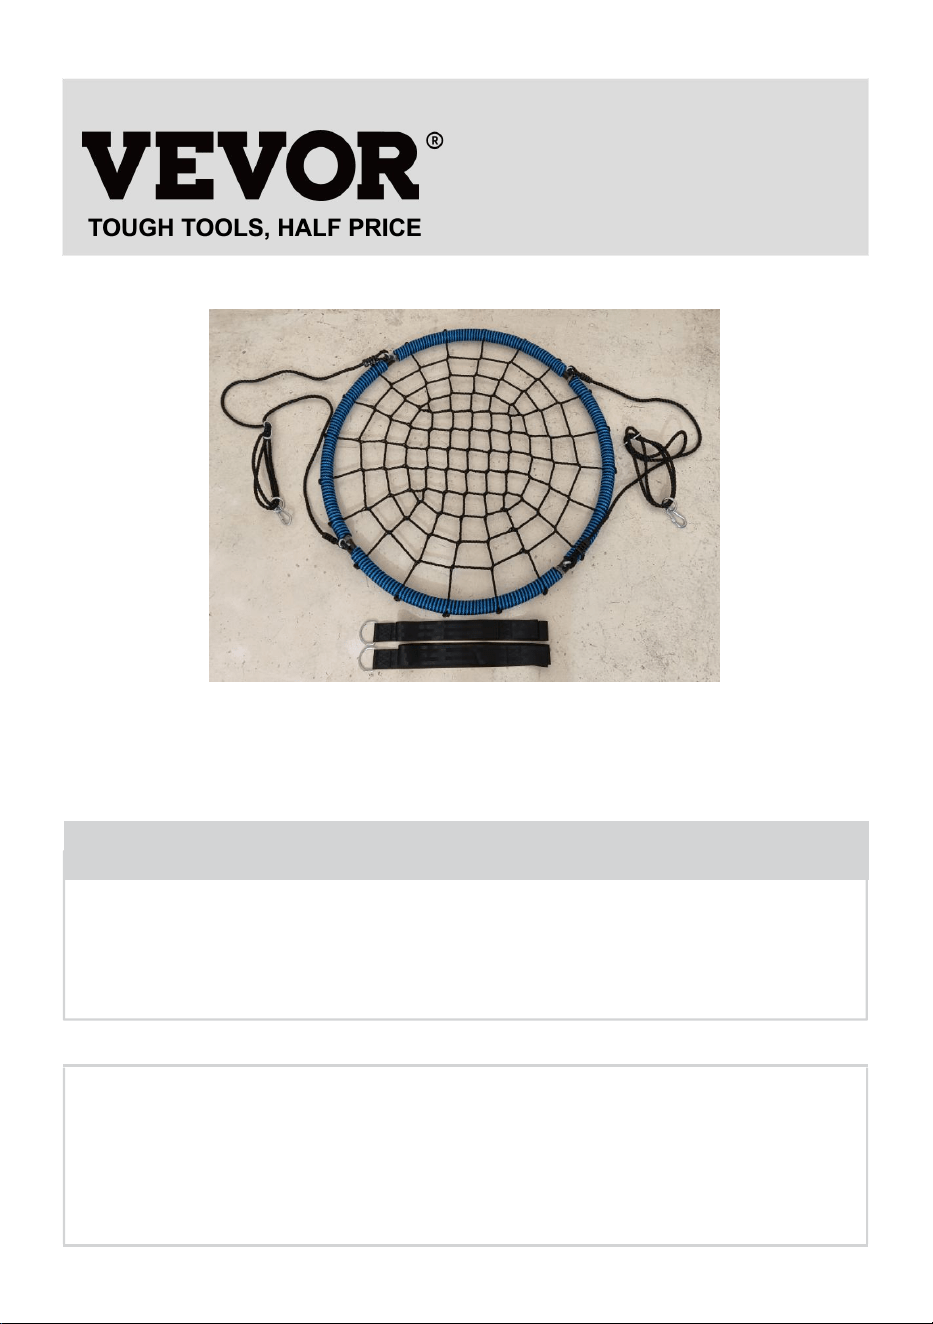
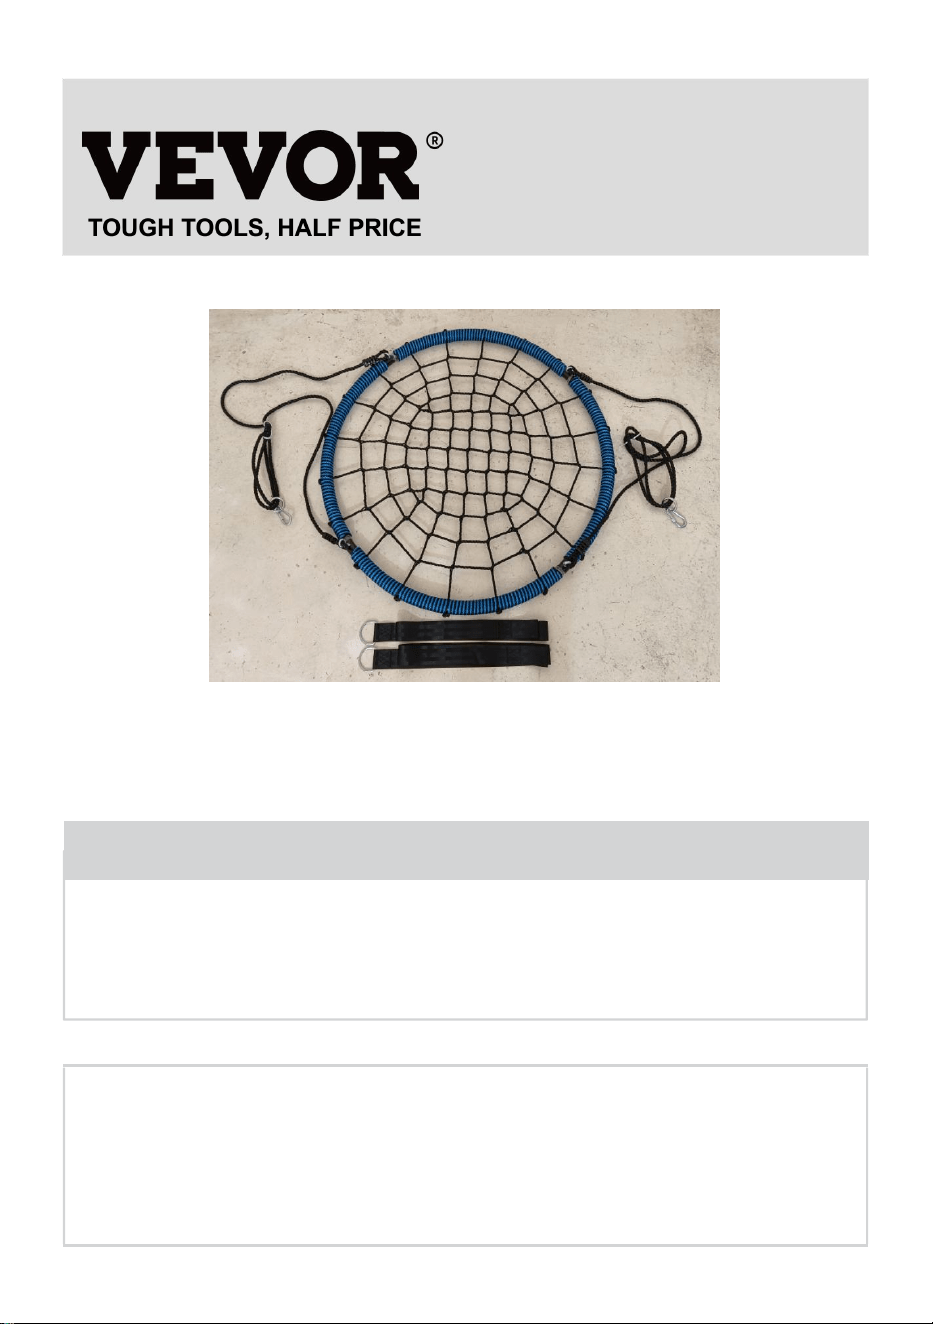
Multi-person Swing Seat
We continue to be committed to provide you tools with competitive price.
"Save Half", "Half Price" or any other similar expressions used by us only represents an
estimate of savings you might benefit from buying certain tools with us compared to the major
top brands and does not necessarily mean to cover all categories of tools offered by us. You
are kindly reminded to verify carefully when you are placing an order with us if you are
actually saving half in comparison with the top major brands.
1
MODEL: YXS-BN01
Have product questions? Need technical support? Please feel free to
contact us:
Technical Support and E-Warranty Certificate
www.vevor.com/support
NEED HELP? CONTACT US!
This is the original instruction, please read all manual instructions
carefully before operating. VEVOR reserves a clear interpretation of our
user manual. The appearance of the product shall be subject to the
product you received. Please forgive us that we won't inform you again if
there are any technology or software updates on our product.
Multi-person Swing
Seat

2
INSTRUCTIONS
Thank you very much for choosing this Multi-person Swing Seat.
- Please read all of the instructions before using it. The information will help you
achieve the best possible results.
The products carried in this catalog may be different in color than the actual item.
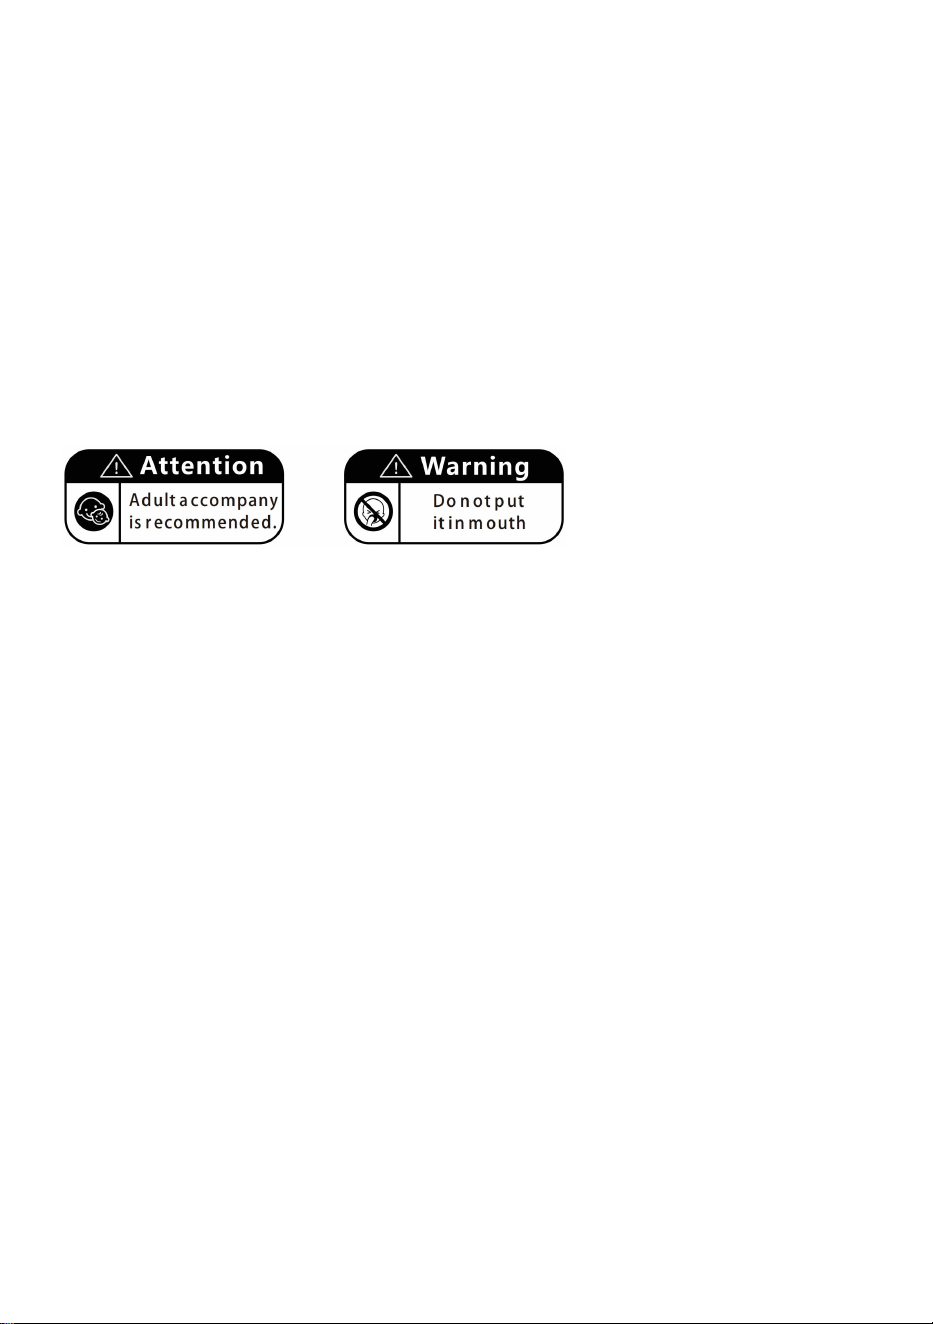
IMPORTANT SAFETY INSTRUCTIONS
MAXIMUM WEIGHT SHOULD NOT EXCEED 750 lbs(340kg)
SAFE PLAY AREA
Read all instructions before using this product.
Intended solely for family and domestic use, not for a commercial playground or
daycare.
Ideally, the swing body should be hung over grass, sand, wood chips, or other soft
surfaces.
Distance from the ground should not exceed 40cm; the maximum fall height
should not be more than 46cm. Two S hooks are attached to the rope to allow for
adjustment of the rope length.
Please be sure to examine the ropes regularly to check for wear.
If the color of the rope has become pale, frays easily, or gives off a powdery
material when rubbed between the fingers, we recommend you replace the rope.
Equipment should be hung in such a way that a distance of at least 2m is clear on
either side.
Can be hung on an A -frame or swing set or on a tree limb of a diameter of at least
25cm.
Ensuring Safety of the Swing
It is important for adults to instruct children to:
- Dress appropriately while using the swing (avoid ponchos, scarves, and other
loose -fitting clothing that is potentially hazardous)
3
-Sit in the center of the swing with full weight on the seat if swinging alone
- Do not lean heavily on the sides of the tent
- Never lean on the gate of the tent
It is important for adults to instruct children NOT to
-Walk close to, in front of, behind, or between moving items
-Twist ropes or loop them over the top support bar since such action may reduce
the strength of the rope
-Climb on the swing when it is wet.
-Attach additional items to the swing that might cause a strangulation hazard.
SAVE THESE INSTRUCTIONS
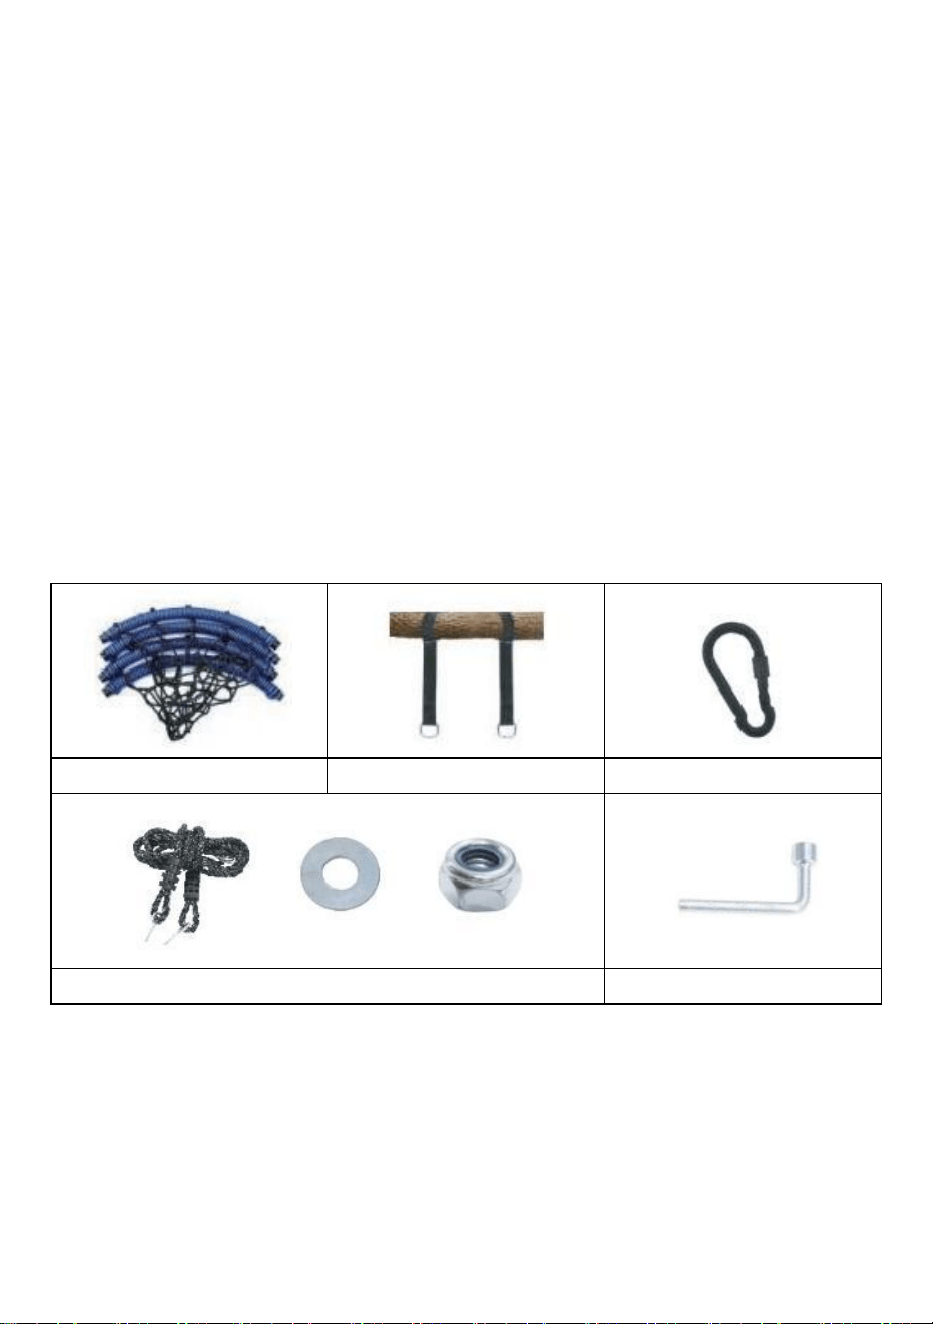
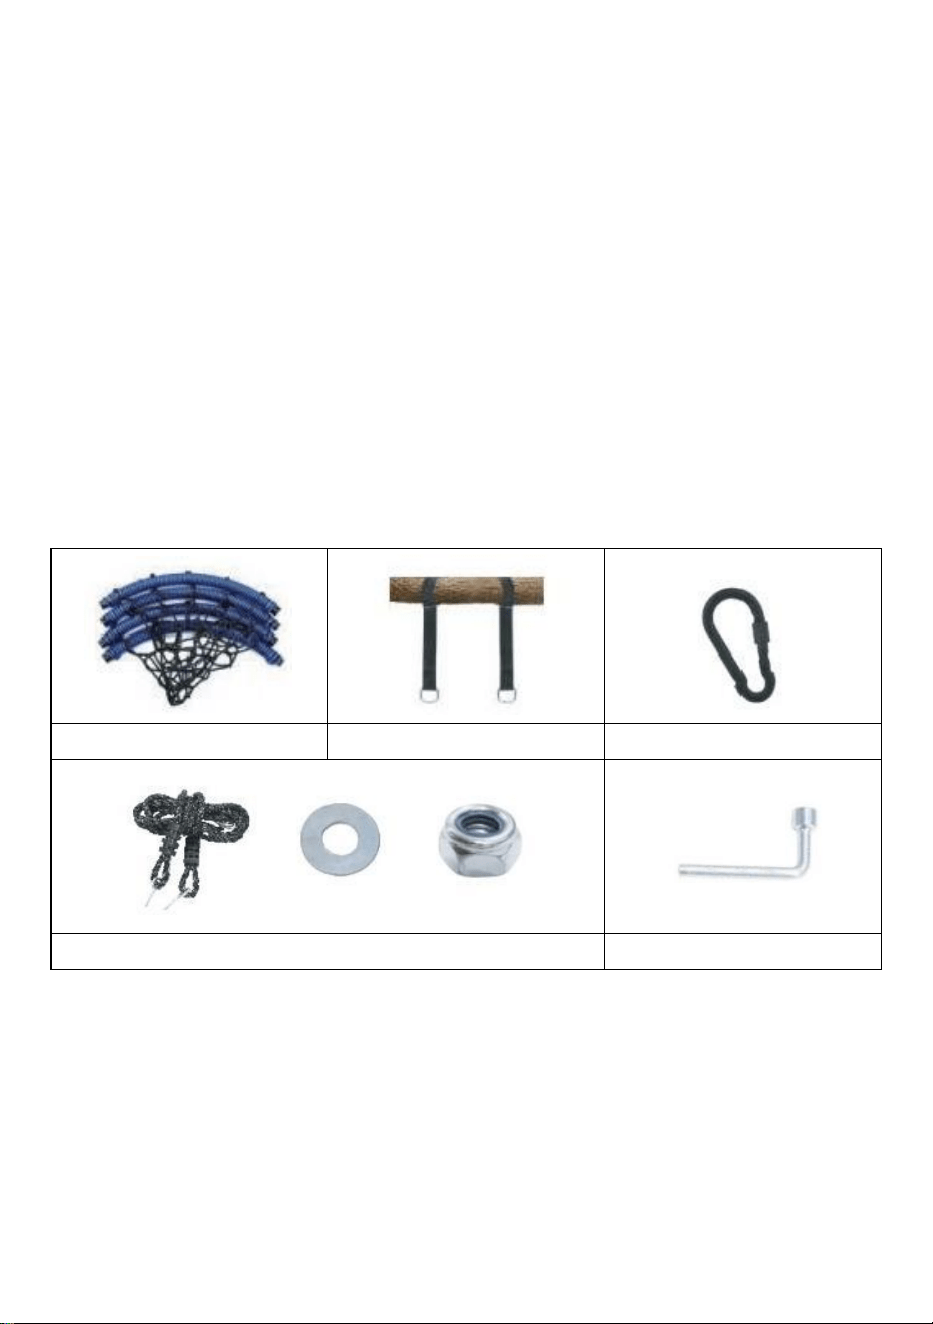
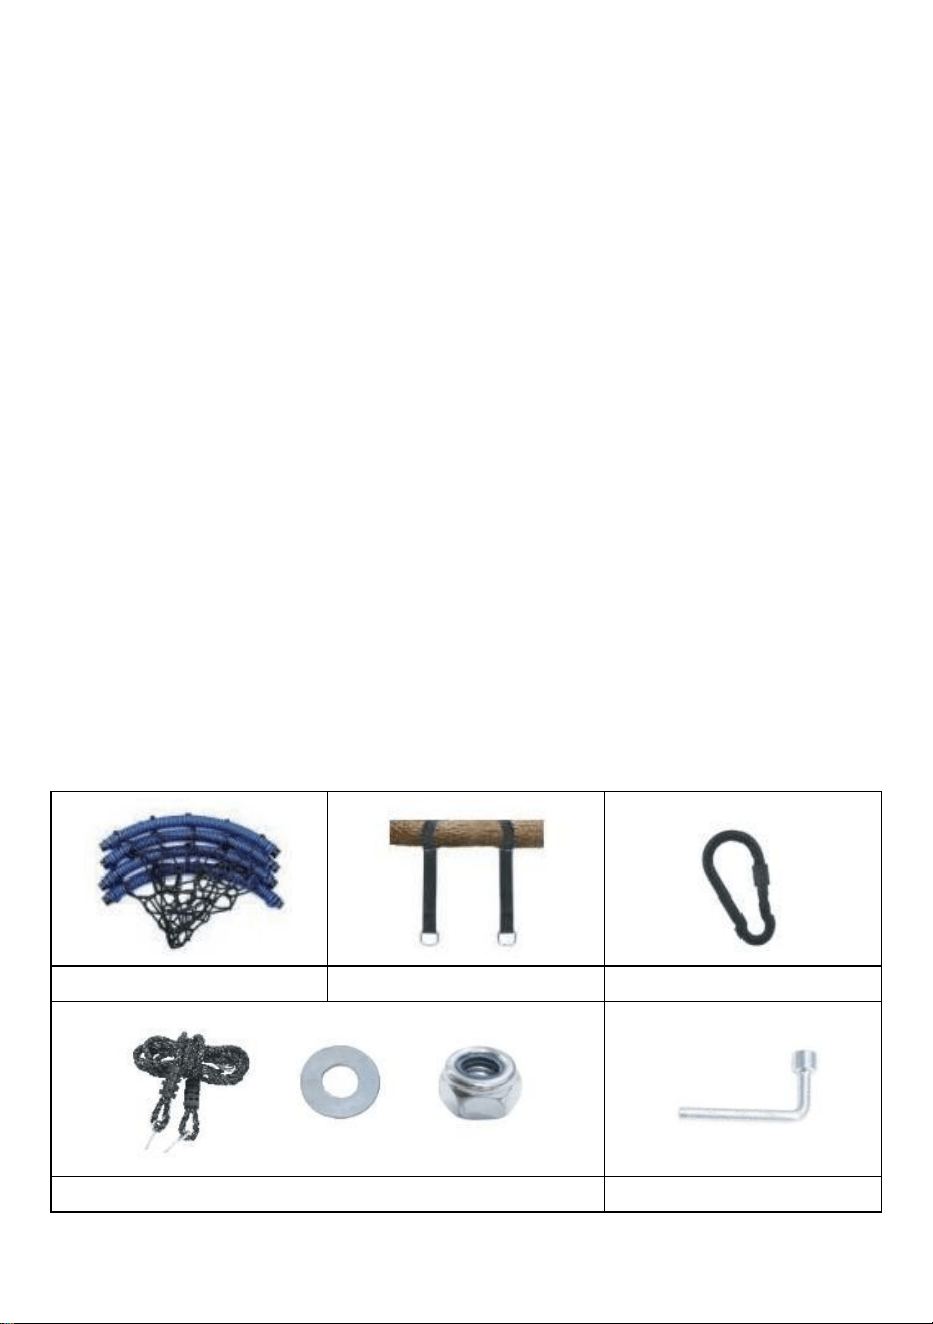
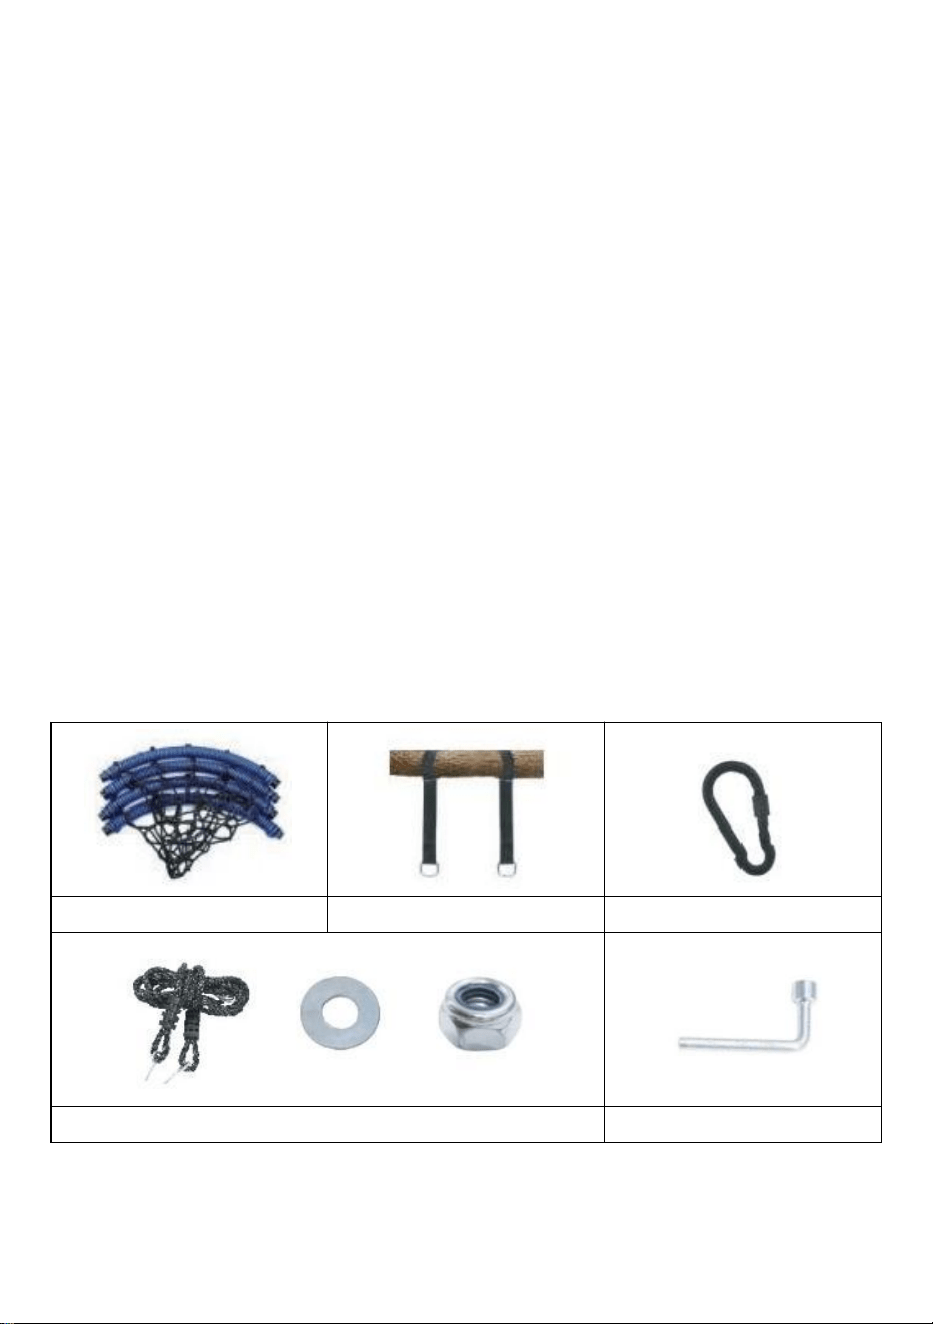
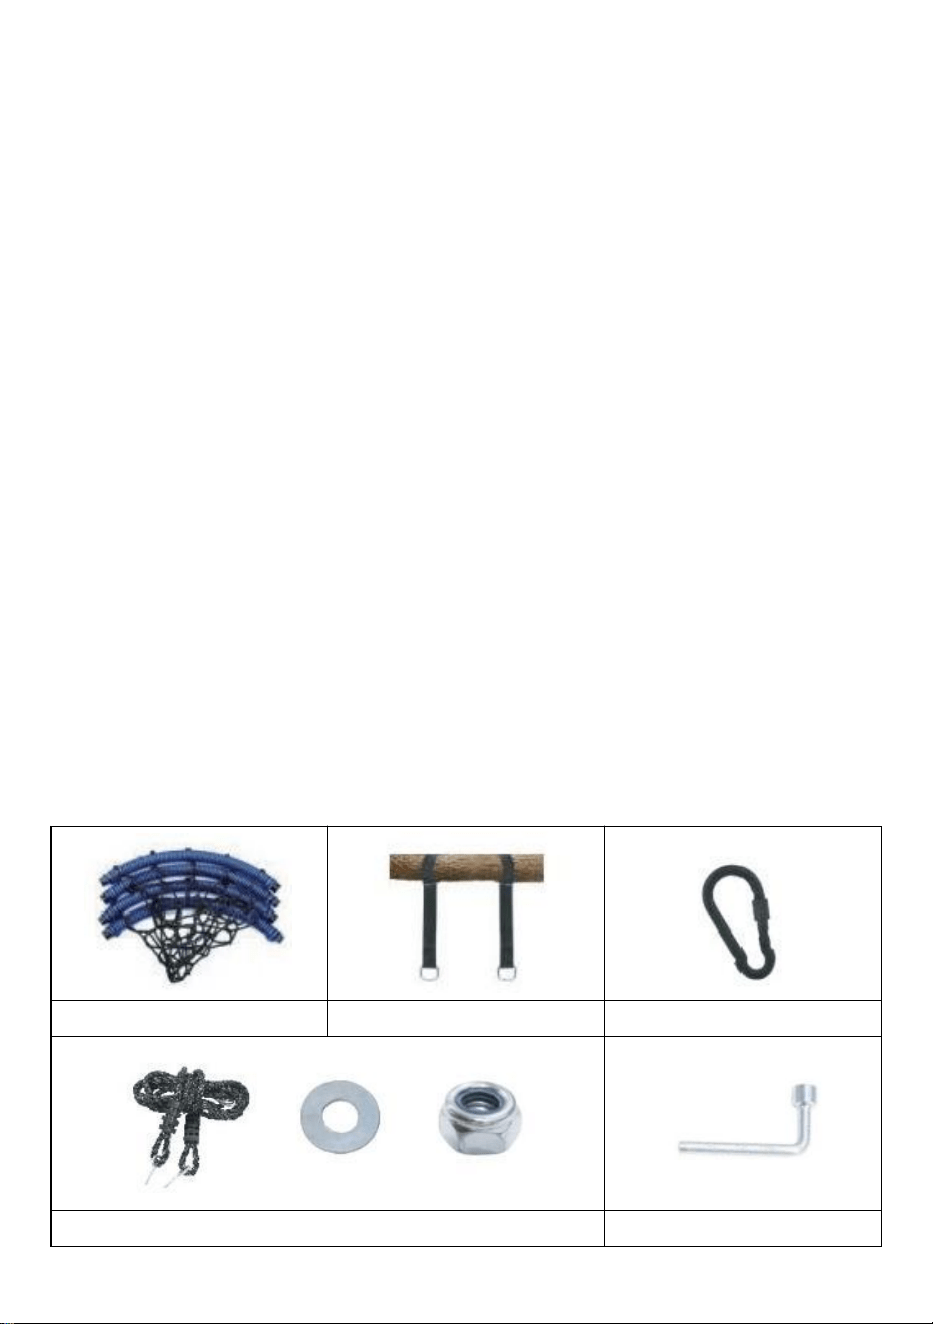
Assembly and Use
Swing seal
Tree strap
Carabiner × 2
Suspension Rope X 2,Screw and SpacerX 4
Spanner
Tips:This is the general user manual of swing, the actual color refers to the item
you purchased.
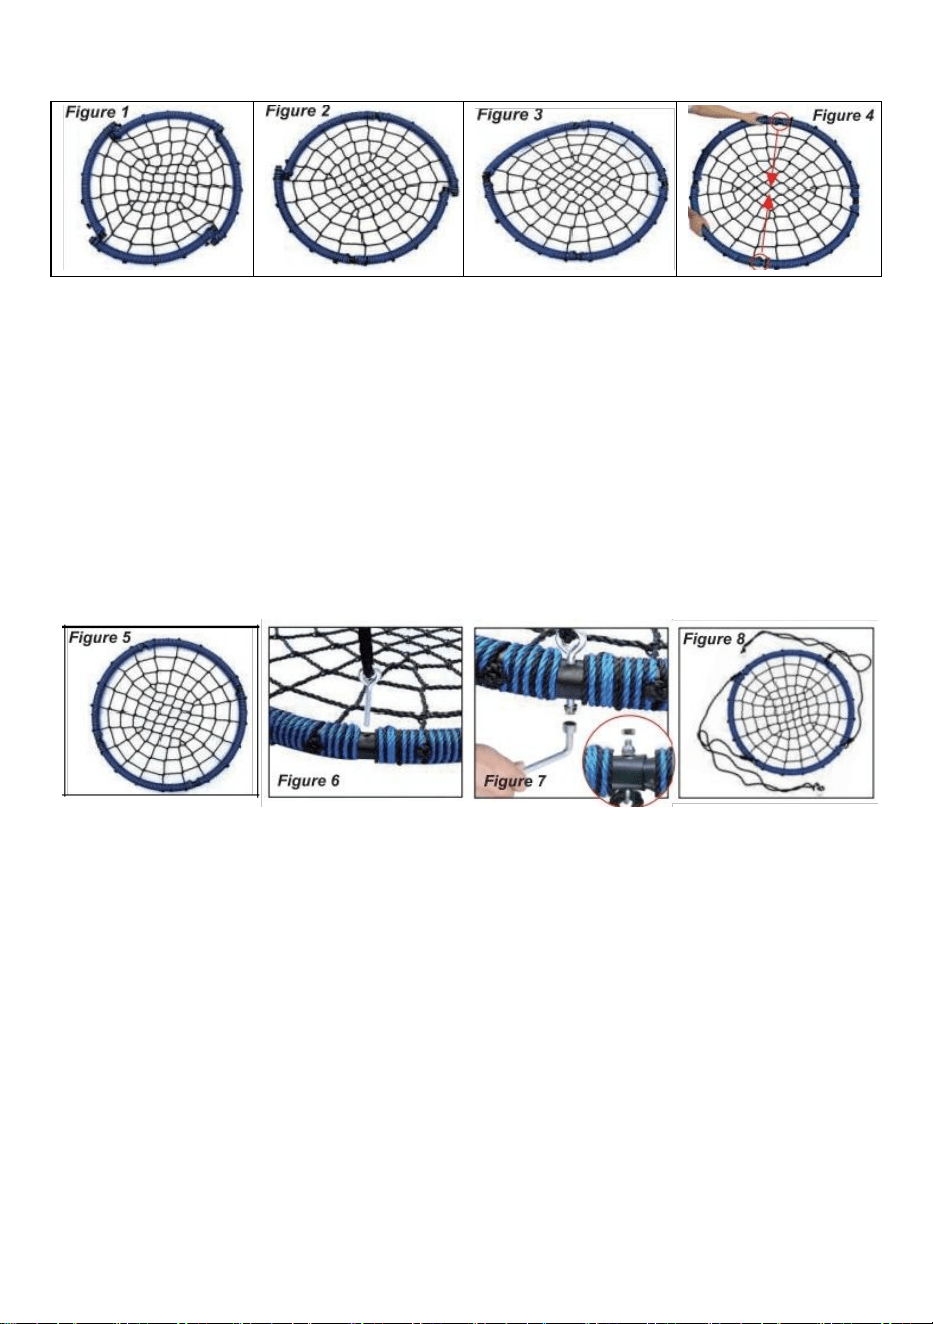
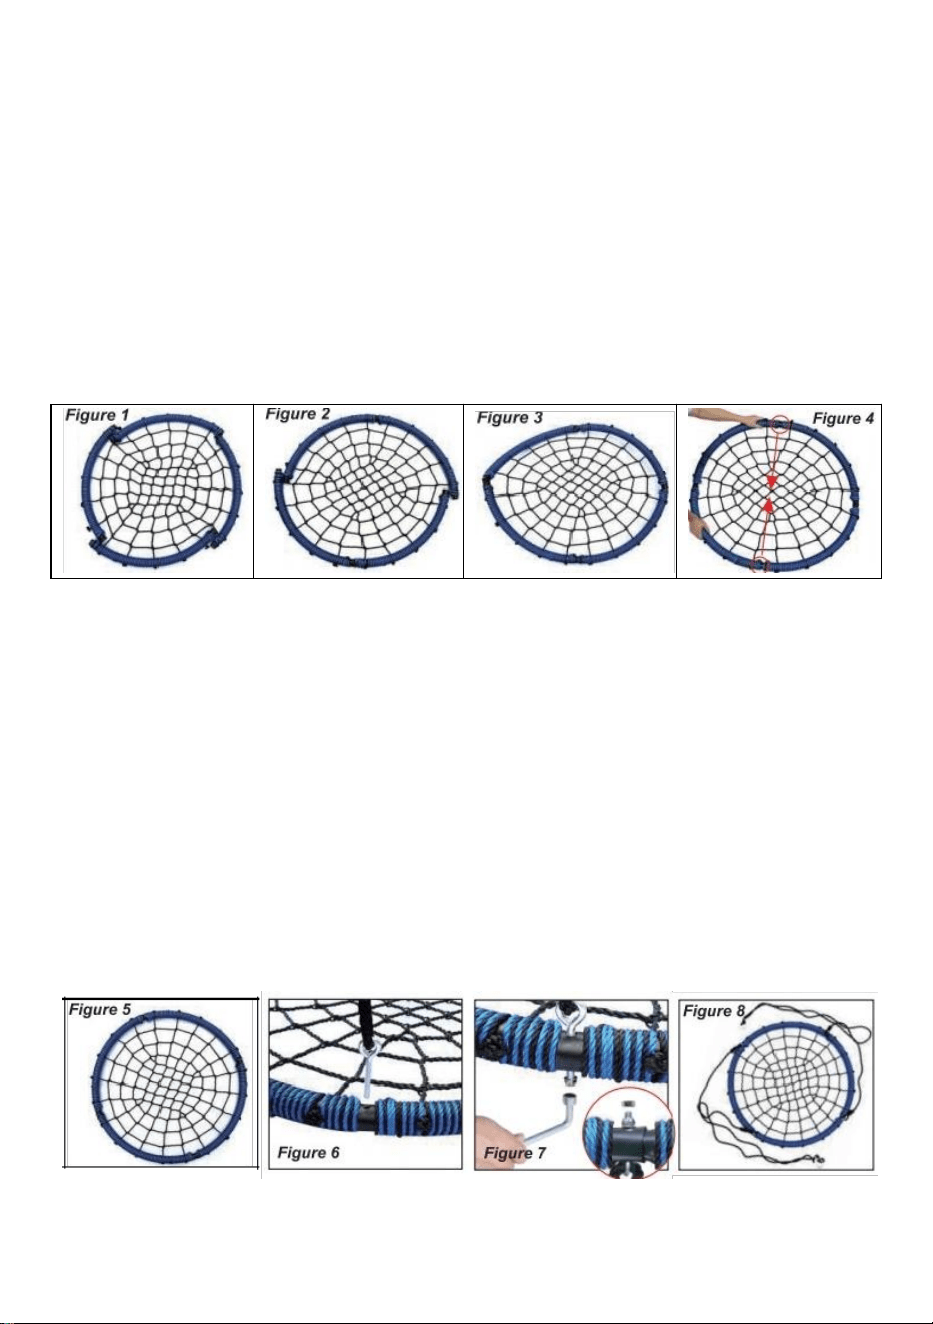
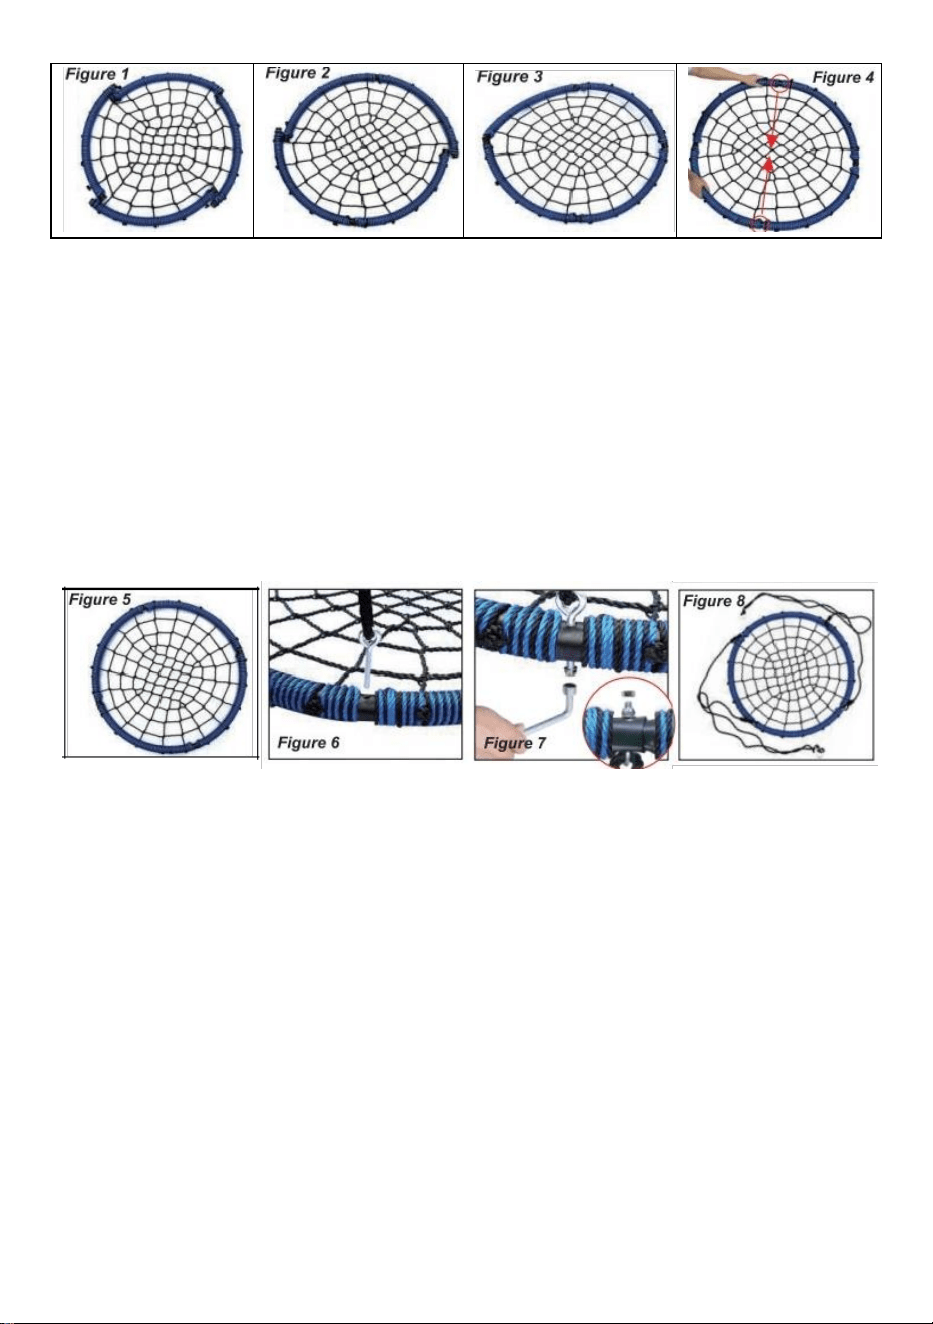
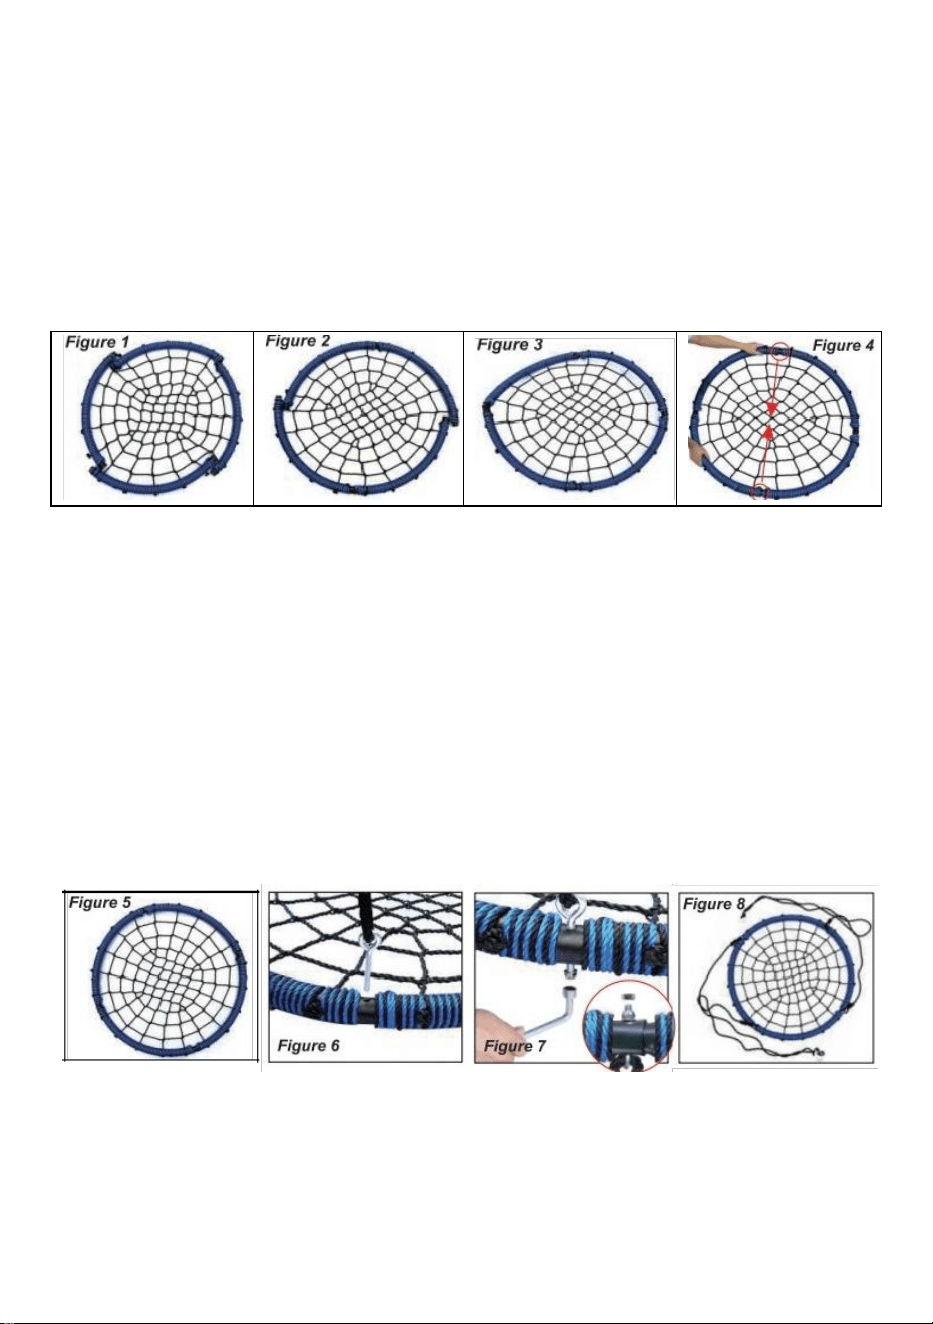
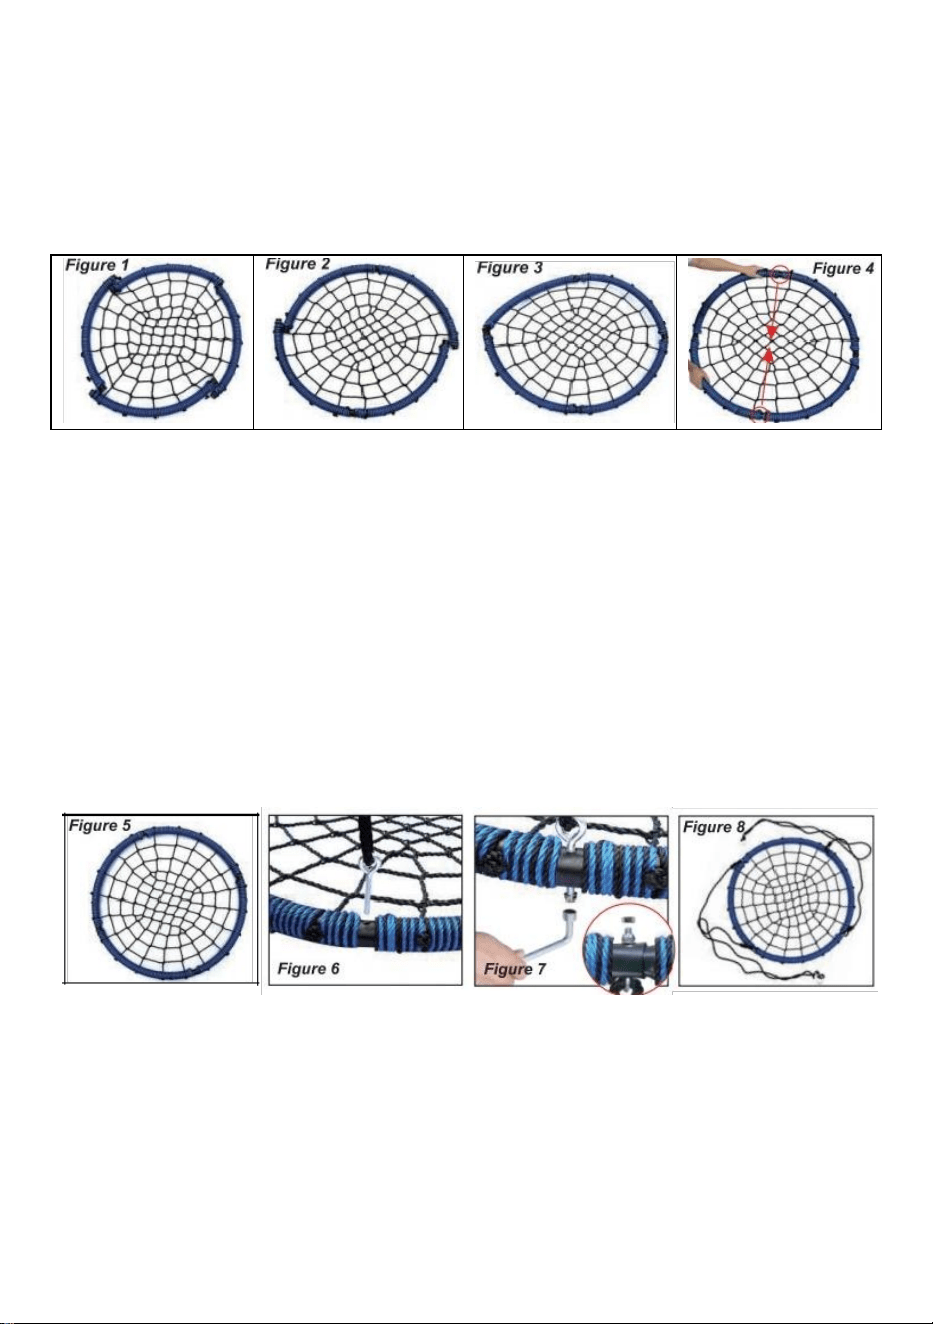
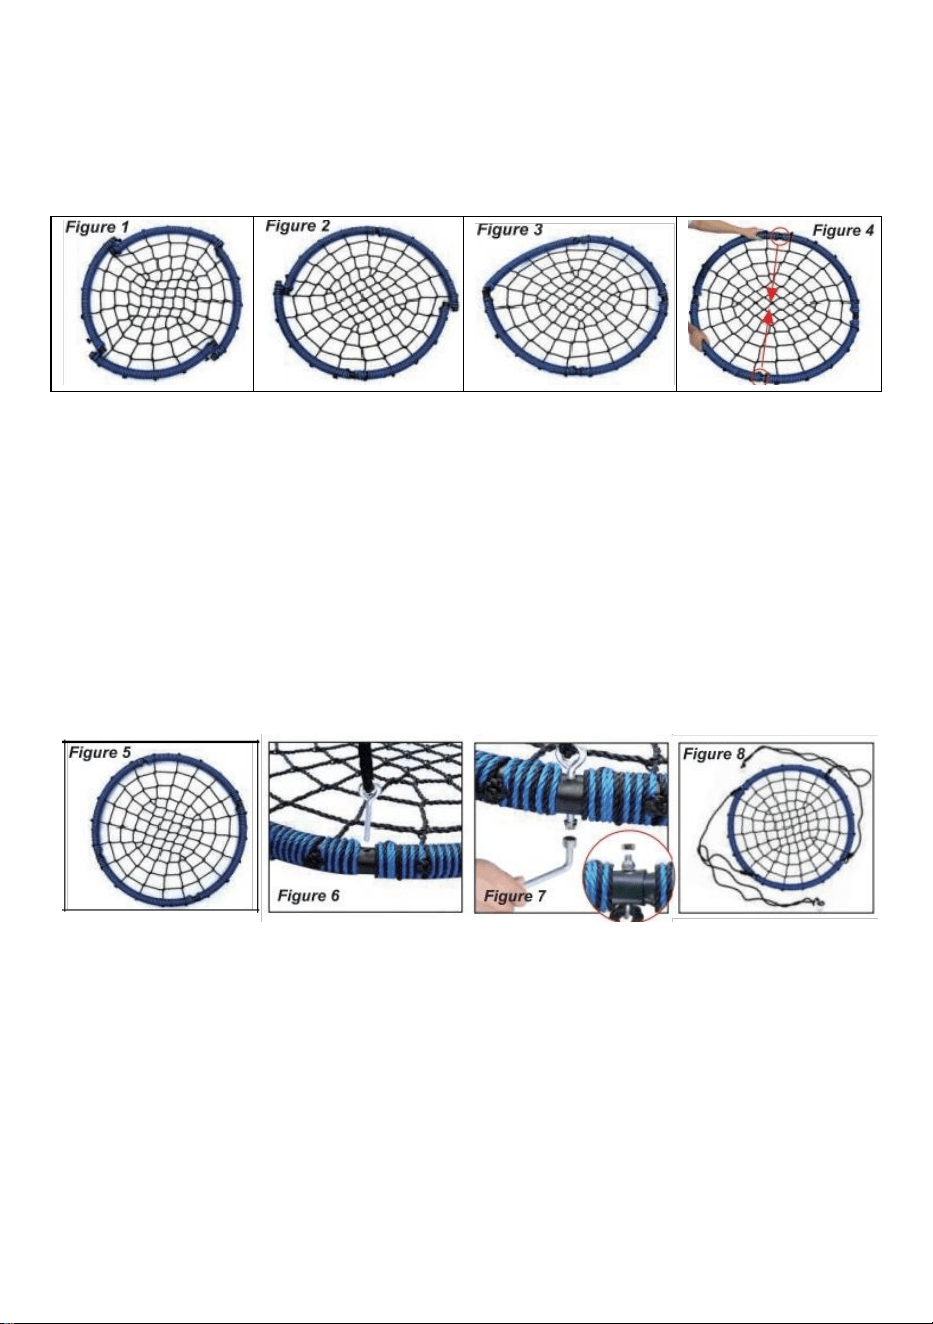
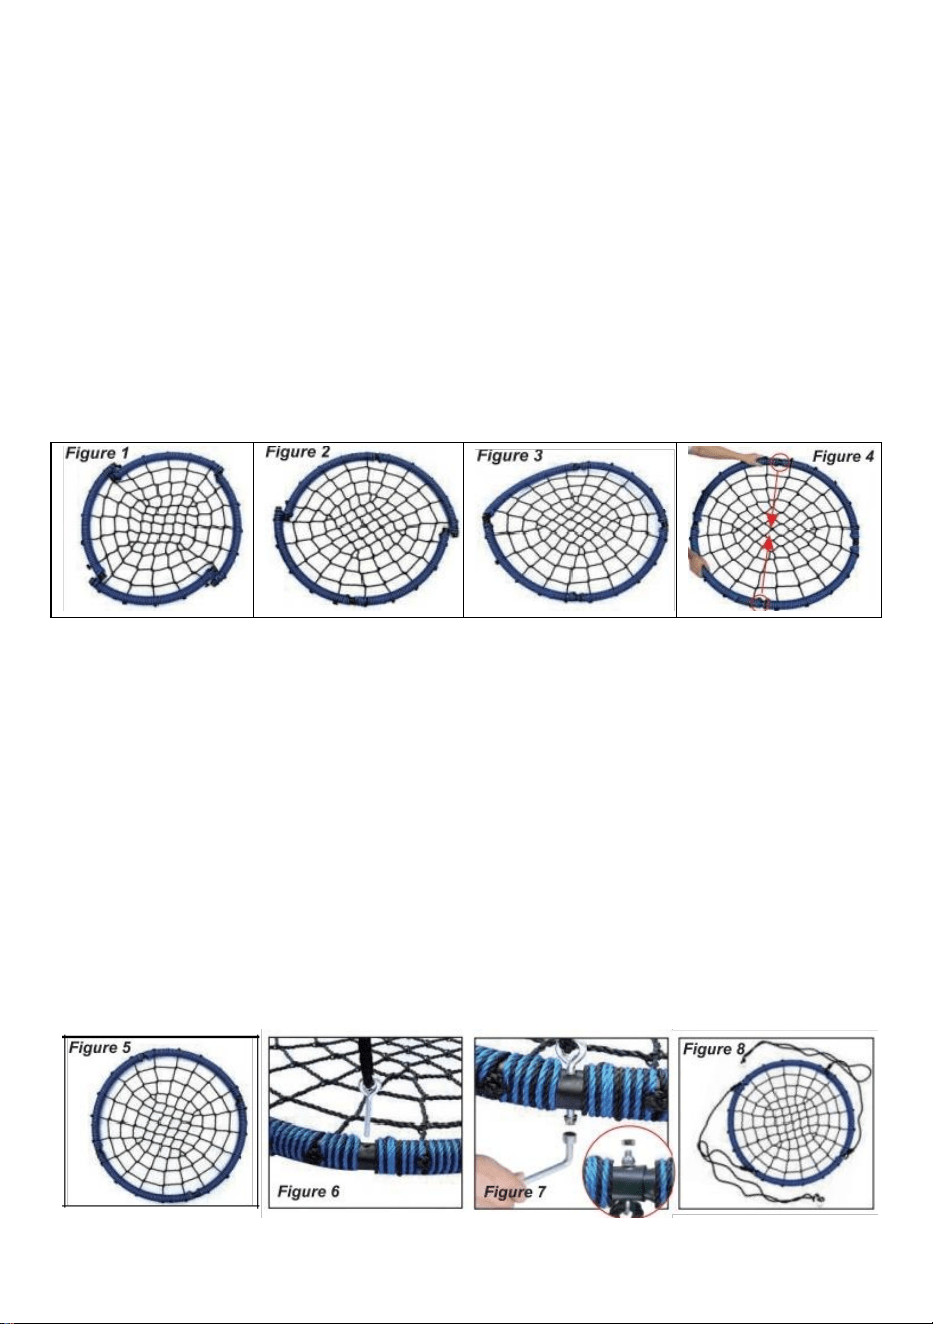
Figure 1:Put the Swing seat on the ground and keep four tubes flat.
Figure 2:Joint two random tubes.
Joint other two tubes then we get two semi-circle tubes.
4
Figure 3:Hold the two semi-circles and align both joints.
Figure 4 &Figure5:Push two semi-circle tubes until it is even.
Figure 6:Make sure two holes are overlapped then insert the bolt into the hole at
the joint.
Figure 7:Put the washer and nut onto the bolt, and tighten with a wrench until 3-4
threads of bolts are exposed, then put the nut cap onto the bolt and tighten it.
Please make sure all the screws are tightened for your safety. (You need an
open-end wrench to fasten nut and nut cap.)
Figure 8:Assembly complete.
MAINTENANCE
1.Always pay attention to the following points if the swing was not in use for a
longer period (Especially at the beginning of a new season!).
2.Lubricate all metal parts. Check all the caps on screws and sharp edges and
replace them, if required. Check the swing seats, chains, ropes and other
accessories for any signs of wear.
3.Check the ropes and rings constantly for decay, wear and tear resistance.
The best way to check this is to turn the ropes till their inside becomes visible!
Check the knots regularly for tightness.

5
Examine the wood regularly for decay and cracks.
4.Also check if wood shavings are sticking out from the swing board. These
should be abraded in order to avoid injuries. Do not expose the swing to the
weather during longer periods of rain and sun.
Manufacturer: NingBo YongXu Industrial Products Manufacturing
Co.,Ltd
Address: 13-1 Haikou Village,Xidian town,Ninghai county,Ningbo
city, ZhejingProvince, China
Imported to AUS: SIHAO PTY LTD. 1 ROKEVA
STREETEASTWOOD NSW 2122 Australia
Imported to USA: Sanven Technology Ltd. Suite 250, 9166
Anaheim Place, Rancho Cucamonga, CA 91730
REP
EC
E-CrossStu GmbH
Mainzer Landstr.69, 60329
Frankfurt am Main.
REP
UK
YH CONSULTING LIMITED.
C/O YH Consulting Limited Office 147,
Centurion House, London Road,
Staines-upon-Thames, Surrey, TW18 4AX

1


4
We continue to be committed to provide you tools with competitive price.
"Save Half", "Half Price" or any other similar expressions used by us only represents an
estimate of savings you might benefit from buying certain tools with us compared to the major
top brands and does not necessarily mean to cover all categories of tools offered by us. You
are kindly reminded to verify carefully when you are placing an order with us if you are
actually saving half in comparison with the top major brands.

1
MODÈLE : YXS-BN01
Have product questions? Need technical support? Please feel free to
contact us:
Technical Support and E-Warranty Certificate
www.vevor.com/support
NEED HELP? CONTACT US!
This is the original instruction, please read all manual instructions
carefully before operating. VEVOR reserves a clear interpretation of our
user manual. The appearance of the product shall be subject to the
product you received. Please forgive us that we won't inform you again if
there are any technology or software updates on our product.
Multi-person Swing
Seat

2
INSTRUCTIONS
Merci beaucoup d'avoir choisi cette balançoire multi-personnes .
- Veuillez lire toutes les instructions avant de l'utiliser. Ces informations vous
aideront à obtenir les meilleurs résultats possibles.
Les produits présentés dans ce catalogue peuvent avoir une couleur différente de
celle de l'article réel.
CONSIGNES DE SÉCURITÉ IMPORTANTES
LE POIDS MAXIMUM NE DOIT PAS DÉPASSER 7 5 0 livres ( 340 kg)
ZONE DE JEU SÉCURISÉE
Lisez toutes les instructions avant d’utiliser ce produit.
Destiné uniquement à un usage familial et domestique, pas à une aire de jeux
commerciale ou à une garderie .
Idéalement, le corps de la balançoire doit être suspendu au-dessus de l'herbe , du
sable , des copeaux de bois ou d'autres surfaces molles .
La distance par rapport au sol ne doit pas dépasser 40 cm ; la hauteur de chute
maximale ne doit pas dépasser 46 cm . Deux crochets en S sont fixés à la corde
pour permettre
réglage de la longueur de la corde .
Assurez-vous d'examiner régulièrement les cordes pour vérifier leur usure.
Si la couleur de la corde est devenue pâle , s'effiloche facilement ou dégage une
odeur poudreuse
matériau lorsqu'il est frotté entre les doigts , nous vous recommandons de
remplacer la corde .
L'équipement doit être suspendu de manière à ce qu'une distance d'au moins 2 m
soit libre de chaque côté .
Peut être accroché sur un portique ou une balançoire ou sur une branche d'arbre
d'un diamètre d'au moins 25 cm .

3
Assurer la sécurité de la balançoire
Il est important que les adultes apprennent aux enfants à :
- Habillez-vous de manière appropriée lorsque vous utilisez la balançoire (évitez
les ponchos , les écharpes et autres vêtements amples potentiellement
dangereux)
-Asseyez-vous au centre de la balançoire avec tout votre poids sur le siège si vous
vous balancez seul
- Ne vous appuyez pas lourdement sur les côtés de la tente
- Ne vous appuyez jamais sur la porte de la tente
Il est important que les adultes apprennent aux enfants à NE PAS
-Marchez à proximité , devant, derrière ou entre des objets en mouvement
-Tordez les cordes ou enroulez-les autour de la barre de support supérieure, car
une telle action peut réduire la résistance de la corde
-Monter sur la balançoire quand elle est mouillée .
-Fixez des objets supplémentaires à la balançoire qui pourraient entraîner un
risque d’étranglement.
CONSERVEZ CES INSTRUCTIONS
Montage et utilisation
Joint pivotant
Sangle d'arbre
Mousqueton × 2
Suspension Corde X 2, Vis et EspaceurX 4
Clé à molette
4
Conseils : Ceci est le manuel d'utilisation général du swing, la couleur réelle
fait référence à l'article que vous avez acheté.
Figure 1 : Placez le siège de la balançoire sur le sol et maintenez les quatre
tubes à plat.
Figure 2 : Assemblez deux tubes aléatoires.
Rassemblez les deux autres tubes et nous obtenons ainsi deux tubes en
demi-cercle.
Figure 3 : Tenez les deux demi-cercles et alignez les deux articulations.
Figure 4 et Figure 5 : Pousser deux demi-cercles tubes jusqu'à ce que ce soit
même.
Figure 6 : Assurez-vous que les deux trous se chevauchent, puis insérez le boulon
dans le trou au niveau du joint.
Chiffre 7 : Placez la rondelle et l'écrou sur le boulon, et serrez avec une clé jusqu'à
ce que 3-4 filets de boulons soient exposés, Ensuite, placez le capuchon de
l'écrou sur le boulon et serrez-le . Assurez-vous que tous les les vis sont serrées
pour votre sécurité. (Vous avez besoin d'une clé plate pour fixer l'écrou et le
capuchon de l'écrou.)
Chiffre 8 : Assemblage terminé.

5
ENTRETIEN
1. Faites toujours attention aux points suivants si la balançoire n'a pas été
utilisée pendant une période prolongée (surtout au début d'une nouvelle
saison !).
2. Lubrifiez toutes les pièces métalliques. Vérifiez tous les capuchons sur les
vis et les bords tranchants et remplacez-les, si nécessaire. Vérifiez les sièges
pivotants, chaînes, cordes et autres accessoires pour détecter tout signe
d'usure.
3. Vérifiez constamment que les cordes et les anneaux ne sont pas
endommagés, résistance à l'usure. La meilleure façon de vérifier cela est de
tourner les cordes jusqu’à ce que leur intérieur devienne visible ! Vérifiez
régulièrement la solidité des nœuds.
Examinez régulièrement le bois pour détecter toute trace de pourriture ou de
fissures.
4. Vérifiez également si des copeaux de bois dépassent de la planche
pivotante. Ceux-ci devraient être abrasés afin d'éviter les blessures. N'exposez
pas la balançoire aux intempéries pendant les périodes prolongées de pluie et
de soleil.
Fabricant : NingBo YongXu Industrial Products Manufacturing Co.,
Ltd
Adresse: 13-1 Village de Haikou, ville de Xidian, comté de Ninghai,
ville de Ningbo, province de Zhejing, Chine
Importé en Australie : SIHAO PTY LTD. 1 ROKEVA
STREETEASTWOOD NSW 2122 Australie
Importé aux États-Unis : Sanven Technology Ltd. Suite 250, 9166
Anaheim Place, Rancho Cucamonga, CA 91730
REP
EC
E-CrossStu GmbH
Mainzer Landstr.69, 60329
Frankfurt am Main.

6
REP
UK
YH CONSULTING LIMITED.
C/O YH Consulting Limited Office 147,
Centurion House, London Road,
Staines-upon-Thames, Surrey, TW18 4AX

1


4
We continue to be committed to provide you tools with competitive price.
"Save Half", "Half Price" or any other similar expressions used by us only represents an
estimate of savings you might benefit from buying certain tools with us compared to the major
top brands and does not necessarily mean to cover all categories of tools offered by us. You
are kindly reminded to verify carefully when you are placing an order with us if you are
actually saving half in comparison with the top major brands.
1
MODEL: YXS-BN01
Have product questions? Need technical support? Please feel free to
contact us:
Technical Support and E-Warranty Certificate
www.vevor.com/support
NEED HELP? CONTACT US!
This is the original instruction, please read all manual instructions
carefully before operating. VEVOR reserves a clear interpretation of our
user manual. The appearance of the product shall be subject to the
product you received. Please forgive us that we won't inform you again if
there are any technology or software updates on our product.
Multi-person Swing
Seat

2
INSTRUCTIES
Hartelijk dank dat u voor deze Multi-persoons Schommelstoel hebt gekozen .
- Lees alle instructies voordat u het gebruikt. De informatie zal u helpen om de
best mogelijke resultaten te behalen.
De producten in deze catalogus kunnen qua kleur afwijken van het daadwerkelijke
artikel.
BELANGRIJKE VEILIGHEIDSINSTRUCTIES
HET MAXIMALE GEWICHT MAG NIET OVERSCHRIJDEN 7 5 0 pond ( 340
kg)
VEILIGE SPEELPLEK
Lees alle instructies voordat u dit product gebruikt.
Alleen bedoeld voor gezins- en huishoudelijk gebruik, niet voor een commerciële
speeltuin of kinderdagverblijf .
Idealiter hangt de schommel boven gras , zand , houtsnippers of andere zachte
oppervlakken .
De afstand vanaf de grond mag niet meer dan 40 cm bedragen; de maximale
valhoogte mag niet meer dan 46 cm bedragen . Er zijn twee S-haken aan het touw
bevestigd om
aanpassing van de touwlengte .
Controleer de touwen regelmatig op slijtage.
Als de kleur van het touw bleek is geworden , gemakkelijk rafelt of een
poederachtige gloed afgeeft
materiaal wanneer u het tussen uw vingers wrijft , raden wij u aan het touw te
vervangen .
Apparatuur dient zodanig te worden opgehangen dat er aan beide kanten
minimaal 2 meter vrije ruimte is .
Kan opgehangen worden aan een A-frame, schommel of aan een boomtak met

3
een diameter van minimaal 25 cm .
Zorgen voor de veiligheid van de schommel
Het is belangrijk dat volwassenen kinderen leren om:
- Draag gepaste kleding tijdens het gebruik van de schommel (vermijd poncho's ,
sjaals en andere loszittende kleding die potentieel gevaarlijk is)
- Ga in het midden van de schommel zitten met je volledige gewicht op de stoel als
je alleen schommelt
- Leun niet te hard op de zijkanten van de tent
- Leun nooit tegen de poort van de tent
Het is belangrijk dat volwassenen kinderen leren om NIET
- Loop dichtbij , voor, achter of tussen bewegende voorwerpen
- Draai touwen of lus ze over de bovenste steunbalk, omdat dit de sterkte van het
touw kan verminderen
-Klim op de schommel als het nat is .
-Bevestig extra voorwerpen aan de schommel die wurgingsgevaar kunnen
opleveren.
BEWAAR DEZE INSTRUCTIES
Montage en gebruik
Draaibare afdichting
Boomband
Karabijnhaak × 2
Oponthoud Touw X 2,Schroef En AfstandhouderX 4
Moersleutel

4
Tips:Dit is de algemene gebruikershandleiding van de schommel, De
werkelijke kleur heeft betrekking op het artikel dat u hebt gekocht.
Afbeelding 1: Plaats de schommelstoel op de grond en houd de vier buizen
plat.
Figuur 2: Twee willekeurige buizen met elkaar verbinden.
Voeg de andere twee buizen samen, dan krijgen we twee halfronde buizen.
Afbeelding 3: Houd de twee halve cirkels vast en lijn beide gewrichten uit.
Figuur 4 &Figuur 5:Druk twee halve cirkels buizen totdat het is zelfs.
Afbeelding 6: Zorg ervoor dat de twee gaten elkaar overlappen en steek
vervolgens de bout in het gat bij de verbinding.
Figuur 7: Plaats de ring en de moer op de bout, en draai vast met een sleutel
totdat 3-4 draden van de bouten zichtbaar zijn, plaats dan de moerdop op de bout
en draai deze vast . Zorg ervoor dat alle schroeven worden voor uw veiligheid
aangedraaid. (Om de moer en de moerdop vast te draaien, hebt u een
steeksleutel nodig.)
Figuur 8:Montage voltooid.
ONDERHOUD

5
1. Let altijd op de volgende punten als de schommel voor een langere periode
niet gebruikt is (vooral aan het begin van een nieuw seizoen!).
2. Smeer alle metalen onderdelen. Controleer alle doppen op schroeven en
scherpe randen en vervang ze, indien nodig. Controleer de schommelzitjes,
kettingen, touwen en andere accessoires op tekenen van slijtage.
3. Controleer de touwen en ringen voortdurend op verval,
Slijtagebestendigheid. De beste manier om dit te controleren is door de touwen
te draaien totdat de binnenkant zichtbaar wordt! Controleer regelmatig of de
knopen nog goed vastzitten.
Controleer het hout regelmatig op rotting en scheuren.
4. Controleer ook of er houtsnippers uit het schommelplankje steken. Deze
moeten worden afgeschuurd in om verwondingen te voorkomen. Stel de
schommel niet bloot aan weersinvloeden tijdens langdurige regen- en
zonperioden.
Fabrikant: NingBo YongXu Industrial Products Manufacturing
Co.,Ltd
Adres: 13-1 Haikou Village, Xidian-stad, Ninghai-provincie,
Ningbo-stad, provincie Zhejing, China
Geïmporteerd naar AUS: SIHAO PTY LTD. 1 ROKEVA
STREETEASTWOOD NSW 2122 Australië
Geïmporteerd naar de VS: Sanven Technology Ltd. Suite 250,
9166 Anaheim Place, Rancho Cucamonga, CA 91730
REP
EC
E-CrossStu GmbH
Mainzer Landstr.69, 60329
Frankfurt am Main.
REP
UK
YH CONSULTING LIMITED.
C/O YH Consulting Limited Office 147,
Centurion House, London Road,
Staines-upon-Thames, Surrey, TW18 4AX

6

1


3
Teknisk support och e-garanticertifikat www.vevor.com/support
Gungstol för flera personer
We continue to be committed to provide you tools with competitive price.
"Save Half", "Half Price" or any other similar expressions used by us only represents an
estimate of savings you might benefit from buying certain tools with us compared to the major
top brands and does not necessarily mean to cover all categories of tools offered by us. You
are kindly reminded to verify carefully when you are placing an order with us if you are
actually saving half in comparison with the top major brands.

1
MODELL: YXS-BN01
Have product questions? Need technical support? Please feel free to
contact us:
Technical Support and E-Warranty Certificate
www.vevor.com/support
NEED HELP? CONTACT US!
This is the original instruction, please read all manual instructions
carefully before operating. VEVOR reserves a clear interpretation of our
user manual. The appearance of the product shall be subject to the
product you received. Please forgive us that we won't inform you again if
there are any technology or software updates on our product.
Multi-person Swing
Seat
2
INSTRUKTIONER
Tack så mycket för att du valde denna Swing Seat för flera personer .
- Läs alla instruktioner innan du använder den. Informationen hjälper dig att uppnå
bästa möjliga resultat.
Produkterna i denna katalog kan ha en annan färg än den faktiska varan.
VIKTIGA SÄKERHETSINSTRUKTIONER
MAXIMALVIKT BÖR INTE ÖVERstiga 7 5 0 lbs ( 340 kg)
SÄKERT LEKOMRÅDE
Läs alla instruktioner innan du använder denna produkt.
Avsedd endast för familje- och hushållsbruk, inte för en kommersiell lekplats eller
dagis .
Helst bör gungkroppen hängas över gräs , sand , träflis eller andra mjuka ytor .
Avståndet från marken bör inte överstiga 40 cm; den maximala fallhöjden bör inte
vara mer än 46 cm . Två S-krokar är fästa i repet för att möjliggöra
justering av replängden .
Se till att undersöka repen regelbundet för att kontrollera om de är slitna.
Om färgen på repet har blivit blek , fransar det lätt eller ger ifrån sig en pudrig
gnuggas mellan fingrarna rekommenderar vi att du byter ut repet .
Utrustning bör hängas på ett sådant sätt att ett avstånd på minst 2 m är fritt på
båda sidor .
Kan hängas på en A-ram eller gungställning eller på en trädgren med en diameter
på minst 25 cm .
Säkerställa gungans säkerhet
Det är viktigt för vuxna att instruera barn att:
- Klä dig lämpligt när du använder gungan (undvik ponchos , halsdukar och andra
löst sittande kläder som är potentiellt farliga)
-Sitt i mitten av gungan med full vikt på sätet om du svänger ensam
3
inte hårt mot tältets sidor
dig aldrig mot tältporten
Det är viktigt för vuxna att instruera barn att INTE göra det
-Gå nära , framför, bakom eller mellan rörliga föremål
- Vrid rep eller ögla dem över den övre stödstången eftersom en sådan åtgärd kan
minska repets styrka
-Klättra på gungan när den är blöt .
- Fäst ytterligare föremål på gungan som kan orsaka strypningsrisk.
SPARA DESSA INSTRUKTIONER
Montering och användning
Svängtätning
Trädband
Karbinhake × 2
Suspension Rep X 2, Skruv och SpacerX 4
Nyckel
Tips: Detta är den allmänna användarmanualen för swing, den faktiska färgen
hänvisar till varan du köpte.
Figur 1:Sätt Swing-sätet på marken och håll fyra rör platta.
Figur 2: Sammanfoga två slumpmässiga rör.
Förena två andra rör så får vi två halvcirkelrör.
Figur 3: Håll i de två halvcirklarna och rikta in båda lederna.
4
Figur 4 &Figur 5: Tryck två halvcirklar rör tills det är även.
Figur 6: Se till att två hål överlappar varandra och sätt sedan in bulten i hålet vid
skarven.
Figur 7: Sätt brickan och muttern på bulten, och dra åt med en skiftnyckel tills 3-4
trådar av bultar är exponerade, sätt sedan mutterlocket på bulten och dra åt den .
Se till att alla skruvarna dras åt för din säkerhet. (Du behöver en skiftnyckel för att
fästa mutter och mutterlock.)
Figur 8: Montering klar.
UNDERHÅLL
1. Var alltid uppmärksam på följande punkter om gungan inte har använts
under en längre period (speciellt i början av en ny säsong!).
2. Smörj alla metalldelar. Kontrollera alla lock på skruvar och vassa kanter och
sätt tillbaka dem, om det behövs. Kontrollera gungstolarna, kedjor, rep och
andra tillbehör för eventuella tecken på slitage.
3. Kontrollera repen och ringarna ständigt för förfall, slitstyrka. Det bästa sättet
att kontrollera detta är att vända repen tills deras insida blir synlig! Kontrollera
regelbundet att knutarna är täta.
Undersök träet regelbundet för röta och sprickor.
5
4. Kontrollera även om träspån sticker ut från svängbrädan. Dessa ska slipas
in för att undvika skador. Utsätt inte gungan för väder och vind under längre
perioder med regn och sol.
Tillverkare: NingBo YongXu Industrial Products Manufacturing
Co.,Ltd
Adress: 13-1 Haikou Village, Xidian stad, Ninghai län, Ningbo stad,
Zhejingprovinsen, Kina
Importerad till AUS: SIHAO PTY LTD. 1 ROKEVA
STREETEASTWOOD NSW 2122 Australien
Importerad till USA: Sanven Technology Ltd. Suite 250, 9166
Anaheim Place, Rancho Cucamonga, CA 91730
REP
EC
E-CrossStu GmbH
Mainzer Landstr.69, 60329
Frankfurt am Main.
REP
UK
YH CONSULTING LIMITED.
C/O YH Consulting Limited Office 147,
Centurion House, London Road,
Staines-upon-Thames, Surrey, TW18 4AX

1


4
We continue to be committed to provide you tools with competitive price.
"Save Half", "Half Price" or any other similar expressions used by us only represents an
estimate of savings you might benefit from buying certain tools with us compared to the major
top brands and does not necessarily mean to cover all categories of tools offered by us. You
are kindly reminded to verify carefully when you are placing an order with us if you are
actually saving half in comparison with the top major brands.

1
MODELO: YXS-BN01
Have product questions? Need technical support? Please feel free to
contact us:
Technical Support and E-Warranty Certificate
www.vevor.com/support
NEED HELP? CONTACT US!
This is the original instruction, please read all manual instructions
carefully before operating. VEVOR reserves a clear interpretation of our
user manual. The appearance of the product shall be subject to the
product you received. Please forgive us that we won't inform you again if
there are any technology or software updates on our product.
Multi-person Swing
Seat

2
INSTRUCCIONES
Muchas gracias por elegir este columpio para varias personas .
- Lea todas las instrucciones antes de usarlo. La información le ayudará a lograr
los mejores resultados posibles.
Los productos mostrados en este catálogo pueden ser de color diferente al
artículo real.
INSTRUCCIONES DE SEGURIDAD IMPORTANTES
EL PESO MÁXIMO NO DEBE EXCEDER 7 5 0 libras ( 340 kg)
ZONA DE JUEGOS SEGURA
Lea todas las instrucciones antes de usar este producto.
Destinado únicamente para uso familiar y doméstico, no para parque infantil o
guardería comercial .
Lo ideal es que el cuerpo del columpio quede colgado sobre césped , arena ,
virutas de madera u otras superficies blandas .
La distancia desde el suelo no debe superar los 40 cm; la altura máxima de caída
no debe ser superior a los 46 cm . Se fijan dos ganchos en forma de S a la cuerda
para permitir
ajuste de la longitud de la cuerda .
Asegúrese de examinar las cuerdas periódicamente para verificar si hay
desgaste.
Si el color de la cuerda se ha vuelto pálido , se deshilacha fácilmente o desprende
una textura polvorienta,
material al frotarse entre los dedos , le recomendamos que reemplace la cuerda .
El equipo debe colgarse de tal manera que haya una distancia libre de al menos 2
m a cada lado .
Se puede colgar en un marco en forma de A, en un columpio o en la rama de un
árbol con un diámetro de al menos 25 cm .
3
Garantizar la seguridad del columpio
Es importante que los adultos enseñen a los niños a:
- Vístase apropiadamente mientras utiliza el columpio (evite ponchos , bufandas y
otras prendas holgadas que sean potencialmente peligrosas)
-Siéntese en el centro del columpio con todo el peso sobre el asiento si se
balancea solo.
- No se apoye demasiado en los lados de la tienda.
- Nunca te apoyes en la puerta de la tienda.
Es importante que los adultos enseñen a los niños a NO
-Camine cerca , delante, detrás o entre elementos en movimiento.
- Gire las cuerdas o páselas por la barra de soporte superior, ya que dicha acción
puede reducir la resistencia de la cuerda.
-Subir al columpio cuando esté mojado .
-No coloque elementos adicionales en el columpio que puedan provocar peligro
de estrangulamiento.
GUARDE ESTAS INSTRUCCIONES
Montaje y uso
Sello oscilante
Correa para árbol
Mosquetón × 2
Suspensión Soga incógnita 2,Tornillo y Espaciador X 4
Llave
4
Consejos: Este es el manual de usuario general del columpio, El color real se
refiere al artículo comprado.
Figura 1: Coloque el asiento del columpio en el suelo y mantenga los cuatro
tubos planos.
Figura 2: Unir dos tubos al azar.
Juntamos otros dos tubos y obtenemos dos tubos semicirculares.
Figura 3: Sostenga los dos semicírculos y alinee ambas articulaciones.
Figura 4 y Figura 5: Empujar dos semicírculos tubos hasta que lo sea incluso.
Figura 6: Asegúrese de que los dos orificios estén superpuestos y luego inserte el
perno en el orificio en la unión.
Cifra 7: Coloque la arandela y la tuerca en el perno, y apriete con una llave hasta
que queden expuestas 3-4 roscas de los tornillos, Luego coloque la tapa de la
tuerca en el perno y apriétela . Asegúrese de que todos los tornillos estén bien
apretados. Los tornillos están bien apretados para su seguridad. (Necesita una
llave de boca abierta para fijar la tuerca y la tapa de la tuerca).
Cifra 8:Montaje completo.
MANTENIMIENTO
1. Preste siempre atención a los siguientes puntos si el columpio no va a

5
utilizarse durante un periodo prolongado (¡especialmente al comienzo de una
nueva temporada!).
2. Lubrique todas las partes metálicas. Revise todas las tapas de los tornillos y
los bordes afilados y reemplácelos. si es necesario. Revise los asientos del
columpio, cadenas, Cuerdas y otros accesorios para detectar posibles signos
de desgaste.
3. Revise constantemente las cuerdas y los anillos para detectar posibles
desgastes. Resistencia al desgaste. ¡La mejor manera de comprobarlo es girar
las cuerdas hasta que su interior quede visible! Revise periódicamente los
nudos para comprobar que estén bien apretados.
Examine periódicamente la madera para detectar posibles descomposición o
grietas.
4. Compruebe también si sobresalen virutas de madera de la tabla del
columpio. Estos deben desgastarse. Para evitar lesiones. No exponga el
columpio a la intemperie durante períodos prolongados de lluvia y sol.
Fabricante: NingBo YongXu Industrial Products Manufacturing Co.,
Ltd.
DIRECCIÓN: 13-1 Haikou Village, ciudad de Xidian, condado de
Ninghai, ciudad de Ningbo, provincia de Zhejing, China
Importado a AUS: SIHAO PTY LTD. 1 ROKEVA
STREETEASTWOOD NSW 2122 Australia
Importado a EE. UU.: Sanven Technology Ltd. Suite 250, 9166
Anaheim Place, Rancho Cucamonga, CA 91730
REP
EC
E-CrossStu GmbH
Mainzer Landstr.69, 60329
Frankfurt am Main.
REP
UK
YH CONSULTING LIMITED.
C/O YH Consulting Limited Office 147,
Centurion House, London Road,
Staines-upon-Thames, Surrey, TW18 4AX

6

1


3
Supporto tecnico e certificato di garanzia elettronica www.vevor.com/support
Sedile altalena multi-persona
We continue to be committed to provide you tools with competitive price.
"Save Half", "Half Price" or any other similar expressions used by us only represents an
estimate of savings you might benefit from buying certain tools with us compared to the major
top brands and does not necessarily mean to cover all categories of tools offered by us. You
are kindly reminded to verify carefully when you are placing an order with us if you are
actually saving half in comparison with the top major brands.

1
MODELLO: YXS-BN01
Have product questions? Need technical support? Please feel free to
contact us:
Technical Support and E-Warranty Certificate
www.vevor.com/support
NEED HELP? CONTACT US!
This is the original instruction, please read all manual instructions
carefully before operating. VEVOR reserves a clear interpretation of our
user manual. The appearance of the product shall be subject to the
product you received. Please forgive us that we won't inform you again if
there are any technology or software updates on our product.
Multi-person Swing
Seat

2
ISTRUZIONI
Grazie mille per aver scelto questo seggiolino altalena multi-persona .
- Si prega di leggere tutte le istruzioni prima di utilizzarlo. Le informazioni ti
aiuteranno a ottenere i migliori risultati possibili.
I prodotti rappresentati in questo catalogo potrebbero avere un colore diverso
rispetto all'articolo reale.
IMPORTANTI ISTRUZIONI DI SICUREZZA
IL PESO MASSIMO NON DEVE SUPERARE 7 5 0 libbre ( 340kg)
AREA GIOCO SICURA
Leggere tutte le istruzioni prima di utilizzare questo prodotto.
Destinato esclusivamente all'uso familiare e domestico, non per parchi giochi
commerciali o asili nido .
L'ideale sarebbe appendere l'altalena su erba , sabbia , trucioli di legno o altre
superfici morbide .
La distanza dal suolo non deve superare i 40 cm; l'altezza massima di caduta non
deve essere superiore a 46 cm . Due ganci a S sono fissati alla corda per
consentire
regolazione della lunghezza della corda .
Assicuratevi di controllare regolarmente le corde per verificarne l'usura.
Se il colore della corda è diventato pallido , si sfilaccia facilmente o emana una
polvere
materiale quando strofinato tra le dita , si consiglia di sostituire la corda .
L'attrezzatura deve essere appesa in modo tale che vi sia una distanza libera di
almeno 2 m da entrambi i lati .
Può essere appeso a una struttura a forma di A, a un'altalena o a un ramo di un
albero con un diametro di almeno 25 cm .
Garantire la sicurezza dell'altalena

3
È importante che gli adulti insegnino ai bambini a:
- Indossare indumenti adeguati durante l'uso dell'altalena (evitare poncho , sciarpe
e altri indumenti larghi che potrebbero essere pericolosi)
-Se ti dondoli da solo, siediti al centro dell'altalena con tutto il peso sul sedile.
- Non appoggiarsi pesantemente ai lati della tenda
- Non appoggiarsi mai al cancello della tenda
È importante che gli adulti insegnino ai bambini a NON
-Camminare vicino , davanti, dietro o tra oggetti in movimento
- Attorcigliare le corde o avvolgerle sulla barra di supporto superiore poiché tale
azione potrebbe ridurre la resistenza della corda
- Salire sull'altalena quando è bagnata .
- Non fissare all'altalena oggetti aggiuntivi che potrebbero rappresentare un rischio
di strangolamento.
SALVA QUESTE ISTRUZIONI
Montaggio e utilizzo
Guarnizione oscillante
Cinghia per albero
Moschettone × 2
Sospensione Corda X 2, Vite E DistanziatoreX 4
Chiave inglese
Suggerimenti: questo è il manuale utente generale dello swing, il colore
effettivo si riferisce all'articolo acquistato.
4
Figura 1: Posizionare il sedile dell'altalena a terra e tenere i quattro tubi in
piano.
Figura 2: Giunzione di due tubi casuali.
Unendo altri due tubi otteniamo due tubi semicircolari.
Figura 3: Tenere i due semicerchi e allineare entrambi i giunti.
Figura 4 e Figura 5: Spingere due semicerchi tubi finché non è Anche.
Figura 6: Assicurarsi che due fori siano sovrapposti, quindi inserire il bullone nel
foro nel giunto.
Figura 7: Mettere la rondella e il dado sul bullone, e stringere con una chiave fino a
quando non sono esposti 3-4 filettature dei bulloni, quindi mettere il tappo del dado
sul bullone e stringerlo . Si prega di assicurarsi che tutti i le viti sono serrate per la
vostra sicurezza. (Per stringere il dado e il cappuccio del dado è necessaria una
chiave inglese.)
Figura 8: Montaggio completato.
MANUTENZIONE
1. Prestare sempre attenzione ai seguenti punti se l'altalena non viene
utilizzata per un lungo periodo (soprattutto all'inizio di una nuova stagione!).
2. Lubrificare tutte le parti metalliche. Controllare tutti i tappi delle viti e gli
5
spigoli vivi e sostituirli, se necessario. Controllare i sedili dell'altalena, catene,
corde e altri accessori per eventuali segni di usura.
3. Controllare costantemente le corde e gli anelli per eventuali segni di
deterioramento, resistenza all'usura. Il modo migliore per verificarlo è girare le
corde finché non ne diventa visibile l'interno! Controllare regolarmente che i
nodi siano ben stretti.
Esaminare regolarmente il legno per verificare che non vi siano segni di
deterioramento o crepe.
4. Controllare anche che non fuoriescano trucioli di legno dall'altalena. Questi
dovrebbero essere abrasi in per evitare lesioni. Non esporre l'altalena alle
intemperie durante lunghi periodi di pioggia e sole.
Produttore: NingBo YongXu Industrial Products Manufacturing
Co.,Ltd
Indirizzo: 13-1 Villaggio di Haikou, città di Xidian, contea di Ninghai,
città di Ningbo, provincia di Zhejing, Cina
Importato in AUS: SIHAO PTY LTD. 1 ROKEVA
STREETEASTWOOD NSW 2122 Australia
Importato negli USA: Sanven Technology Ltd. Suite 250, 9166
Anaheim Place, Rancho Cucamonga, CA 91730
REP
EC
E-CrossStu GmbH
Mainzer Landstr.69, 60329
Frankfurt am Main.
REP
UK
YH CONSULTING LIMITED.
C/O YH Consulting Limited Office 147,
Centurion House, London Road,
Staines-upon-Thames, Surrey, TW18 4AX

1


3
Wsparcie techniczne i certyfikat gwarancji elektronicznej www.vevor.com/support
Wieloosobowe siedzisko huśtawki
We continue to be committed to provide you tools with competitive price.
"Save Half", "Half Price" or any other similar expressions used by us only represents an
estimate of savings you might benefit from buying certain tools with us compared to the major
top brands and does not necessarily mean to cover all categories of tools offered by us. You
are kindly reminded to verify carefully when you are placing an order with us if you are
actually saving half in comparison with the top major brands.

1
MODEL: YXS-BN01
Have product questions? Need technical support? Please feel free to
contact us:
Technical Support and E-Warranty Certificate
www.vevor.com/support
NEED HELP? CONTACT US!
This is the original instruction, please read all manual instructions
carefully before operating. VEVOR reserves a clear interpretation of our
user manual. The appearance of the product shall be subject to the
product you received. Please forgive us that we won't inform you again if
there are any technology or software updates on our product.
Multi-person Swing
Seat

2
INSTRUKCJE
Dziękujemy bardzo za wybranie tej huśtawki wieloosobowej .
- Przed użyciem przeczytaj wszystkie instrukcje. Informacje te pomogą Ci
osiągnąć najlepsze możliwe rezultaty.
Produkty prezentowane w tym katalogu mogą różnić się kolorem od rzeczywistego
produktu.
WAŻNE INSTRUKCJE BEZPIECZEŃSTWA
MAKSYMALNA WAGA NIE POWINNA PRZEKRACZAĆ 7 5 0 funty ( 340 kg)
BEZPIECZNY PLAC ZABAW
Przed użyciem produktu należy przeczytać wszystkie instrukcje .
Przeznaczony wyłącznie do użytku rodzinnego i domowego, nie nadaje się na
komercyjne place zabaw lub do żłobków .
Najlepiej, aby huśtawka była zawieszona nad trawą , piaskiem , wiórami
drzewnymi lub inną miękką powierzchnią .
Odległość od podłoża nie powinna przekraczać 40 cm; maksymalna wysokość
upadku nie powinna przekraczać 46 cm . Do liny przymocowane są dwa haki S,
aby umożliwić
regulacja długości liny .
Należy regularnie sprawdzać stan lin pod kątem zużycia.
Jeśli kolor liny stał się blady , łatwo się strzępi lub wydziela pudrowy odcień,
Jeśli materiał zacznie się rozmazywać między palcami , zalecamy wymianę liny .
Sprzęt należy zawiesić w taki sposób, aby po każdej stronie pozostała wolna
przestrzeń wynosząca co najmniej 2 m .
Można zawiesić na ramie w kształcie litery A, huśtawce lub na gałęzi drzewa o
średnicy co najmniej 25 cm .
Zapewnienie bezpieczeństwa huśtawki
Ważne jest, aby dorośli instruowali dzieci, aby:
3
- Ubierz się odpowiednio podczas korzystania z huśtawki (unikaj poncz , szalików i
innych luźnych ubrań, które mogą stwarzać zagrożenie)
-Jeśli huśtasz się sam, usiądź w środkowej części huśtawki, przenosząc cały
ciężar ciała na siedzisko.
- Nie opieraj się mocno o boki namiotu .
- Nigdy nie opieraj się o bramkę namiotu .
Ważne jest, aby dorośli pouczali dzieci, aby NIE
- Chodź blisko , przed, za lub między ruchomymi przedmiotami
- Skręć liny lub przeciągnij je przez górny drążek podtrzymujący, ponieważ takie
działanie może zmniejszyć wytrzymałość liny.
- Wchodź na huśtawkę, kiedy jest mokro .
- Nie należy mocować do huśtawki dodatkowych przedmiotów, które mogą
stwarzać ryzyko uduszenia.
ZAPISZ TE INSTRUKCJE
Montaż i użytkowanie
Uszczelka wahadłowa
Pasek na drzewo
Karabinek × 2
Zawieszenie Lina X 2, Śruba I SpacerX 4
Klucz do nakrętek
Wskazówki: To jest ogólna instrukcja obsługi swingu, Faktyczny kolor odnosi
się do zakupionego przedmiotu.
4
Rysunek 1: Połóż siedzisko huśtawki na ziemi i ułóż cztery rurki płasko.
Rysunek 2:Połącz dwie losowe rurki.
Połącz pozostałe dwie rurki i otrzymasz dwie półkoliste rurki.
Rycina 3: Trzymając dwa półkola, wyrównaj oba stawy.
Rysunek 4 i Rysunek 5: Pchanie dwa półkola rurki dopóki to nie będzie nawet.
Rysunek 6: Upewnij się, że dwa otwory na siebie zachodzą, a następnie włóż
śrubę do otworu w miejscu połączenia.
Postać 7: Załóż podkładkę i nakrętkę na śrubę, i dokręć kluczem, aż będą
widoczne 3-4 gwinty śrub, następnie nałóż nakrętkę na śrubę i dokręć ją . Upewnij
się, że wszystkie Śruby są dokręcone dla Twojego bezpieczeństwa. (Do
dokręcenia nakrętki i zaślepki potrzebny jest klucz płaski.)
Postać 8: Montaż ukończony.
KONSERWACJA
1. Jeśli huśtawka nie była używana przez dłuższy czas (szczególnie na
początku nowego sezonu!), zawsze zwróć uwagę na następujące kwestie.
2. Nasmaruj wszystkie części metalowe. Sprawdź wszystkie zaślepki na
śrubach i ostre krawędzie i wymień je, jeśli wymagane. Sprawdź siedziska
huśtawki, więzy, Sprawdź liny i inne akcesoria pod kątem śladów zużycia.

5
3. Sprawdzaj stale liny i pierścienie pod kątem uszkodzeń, odporność na
zużycie i rozdarcie. Najlepszym sposobem sprawdzenia tego jest obrócenie lin,
aż ich wnętrze stanie się widoczne! Regularnie sprawdzaj, czy węzły są dobrze
zaciśnięte.
Regularnie sprawdzaj drewno pod kątem obecności próchnicy i pęknięć.
4. Sprawdź również, czy z deski huśtawki nie wystają wióry. Należy je zetrzeć
aby uniknąć obrażeń. Nie należy wystawiać huśtawki na długotrwałe działanie
deszczu i słońca.
Producent: NingBo YongXu Industrial Products Manufacturing
Co.,Ltd
Adres: 13-1 Wieś Haikou, miasto Xidian, hrabstwo Ninghai, miasto
Ningbo, prowincja Zhejing, Chiny
Importowane do AUS: SIHAO PTY LTD. 1 ROKEVA
STREETEASTWOOD NSW 2122 Australia
Importowane do USA: Sanven Technology Ltd. Suite 250, 9166
Anaheim Place, Rancho Cucamonga, CA 91730
REP
EC
E-CrossStu GmbH
Mainzer Landstr.69, 60329
Frankfurt am Main.
REP
UK
YH CONSULTING LIMITED.
C/O YH Consulting Limited Office 147,
Centurion House, London Road,
Staines-upon-Thames, Surrey, TW18 4AX

1


3
Technischer Support und E-Garantie-Zertifikat www.vevor.com/support
Mehrpersonen-Schaukelsitz
We continue to be committed to provide you tools with competitive price.
"Save Half", "Half Price" or any other similar expressions used by us only represents an
estimate of savings you might benefit from buying certain tools with us compared to the major
top brands and does not necessarily mean to cover all categories of tools offered by us. You
are kindly reminded to verify carefully when you are placing an order with us if you are
actually saving half in comparison with the top major brands.

1
MODELL: YXS-BN01
Have product questions? Need technical support? Please feel free to
contact us:
Technical Support and E-Warranty Certificate
www.vevor.com/support
NEED HELP? CONTACT US!
This is the original instruction, please read all manual instructions
carefully before operating. VEVOR reserves a clear interpretation of our
user manual. The appearance of the product shall be subject to the
product you received. Please forgive us that we won't inform you again if
there are any technology or software updates on our product.
Multi-person Swing
Seat
2
ANWEISUNGEN
Vielen Dank, dass Sie sich für diesen Mehrpersonen-Schaukelsitz entschieden
haben .
- Bitte lesen Sie vor der Anwendung alle Anweisungen sorgfältig durch. Die
Informationen helfen Ihnen, die bestmöglichen Ergebnisse zu erzielen.
Die Farbe der in diesem Katalog aufgeführten Produkte kann vom tatsächlichen
Artikel abweichen.
WICHTIGE SICHERHEITSHINWEISE
Das maximale Gewicht sollte 7,5 0 nicht überschreiten . Pfund ( 340 kg)
SICHERER SPIELBEREICH
Lesen Sie alle Anweisungen , bevor Sie dieses Produkt verwenden.
Ausschließlich für den Familien- und Hausgebrauch bestimmt, nicht für einen
kommerziellen Spielplatz oder eine Kindertagesstätte .
Idealerweise sollte der Schaukelkörper über Gras , Sand , Holzspäne oder andere
weiche Oberflächen gehängt werden .
Der Abstand zum Boden sollte 40 cm nicht überschreiten; die maximale Fallhöhe
sollte 46 cm nicht überschreiten . Am Seil sind zwei S-Haken angebracht, die
Einstellung der Seillänge .
Bitte überprüfen Sie die Seile regelmäßig auf Verschleiß.
Wenn die Farbe des Seils blass geworden ist , leicht ausfranst oder einen
pulverartigen Geruch abgibt
Material beim Reiben zwischen den Fingern , empfehlen wir Ihnen, das Seil
auszutauschen .
Die Geräte sollten so aufgehängt werden, dass auf beiden Seiten ein Abstand von
mindestens 2 m besteht .
Kann an einem A-Rahmen oder einer Schaukel oder an einem Ast mit einem
Durchmesser von mindestens 25 cm aufgehängt werden .
3
Gewährleistung der Sicherheit der Schaukel
Es ist wichtig, dass Erwachsene ihren Kindern Folgendes beibringen:
- Ziehen Sie sich beim Schaukeln angemessen an (vermeiden Sie Ponchos ,
Schals und andere weite Kleidungsstücke, die eine Gefahr darstellen können).
- Setzen Sie sich in die Mitte der Schaukel und verlagern Sie Ihr gesamtes
Gewicht auf den Sitz, wenn Sie alleine schaukeln.
- Lehnen Sie sich nicht schwer an die Seiten des Zeltes
- Lehnen Sie sich niemals an das Zelttor
Es ist wichtig, dass Erwachsene Kinder anweisen, NICHT
- Gehen Sie in der Nähe von , vor, hinter oder zwischen beweglichen
Gegenständen.
- Verdrehen Sie Seile oder legen Sie sie über die obere Stützstange, da dies die
Festigkeit des Seils verringern kann.
- Steigen Sie auf die Schaukel, wenn es nass ist .
- Befestigen Sie zusätzliche Gegenstände an der Schaukel, die eine
Strangulationsgefahr darstellen können.
BEWAHREN SIE DIESE ANWEISUNGEN AUF
Montage und Verwendung
Schwingdichtung
Baumgurt
Karabiner × 2
Suspension Seil X 2, Schraube Und SpacerX 4
Schlüssel
4
Tipps:Dies ist die allgemeine Bedienungsanleitung von Swing, die tatsächliche
Farbe bezieht sich auf den von Ihnen gekauften Artikel.
Abbildung 1: Stellen Sie den Schaukelsitz auf den Boden und halten Sie die
vier Rohre flach.
Abbildung 2: Verbinden Sie zwei beliebige Rohre.
Verbinden Sie die anderen beiden Rohre, und Sie erhalten zwei halbrunde
Rohre.
Abbildung 3: Halten Sie die beiden Halbkreise und richten Sie beide Gelenke
aus.
Abbildung 4 und Abbildung 5: Drücken zwei Halbkreise Rohre bis es ist sogar.
Abbildung 6: Stellen Sie sicher, dass sich zwei Löcher überlappen, und stecken
Sie dann die Schraube in das Loch an der Verbindung.
Figur 7:Setzen Sie die Unterlegscheibe und die Mutter auf die Schraube. und mit
einem Schraubenschlüssel festziehen, bis 3-4 Gewindegänge der Schrauben
freiliegen, Setzen Sie dann die Mutternkappe auf die Schraube und ziehen Sie sie
fest . Bitte stellen Sie sicher, dass alle Die Schrauben sind zu Ihrer Sicherheit
festgezogen. (Zum Festziehen der Mutter und der Mutternkappe benötigen Sie
einen Gabelschlüssel.)
Figur 8: Montage abgeschlossen.

5
WARTUNG
1. Beachten Sie unbedingt die folgenden Punkte, wenn die Schaukel längere
Zeit nicht benutzt wurde (insbesondere zu Beginn einer neuen Saison!).
2. Alle Metallteile schmieren. Überprüfen Sie alle Kappen auf Schrauben und
scharfen Kanten und ersetzen Sie sie. falls erforderlich. Überprüfen Sie die
Schaukelsitze, Ketten, Seile und sonstiges Zubehör auf eventuelle
Abnutzungserscheinungen.
3. Überprüfen Sie die Seile und Ringe ständig auf Verschleiß,
Verschleißfestigkeit. Am besten prüfen Sie dies, indem Sie die Seile so lange
drehen, bis die Innenseite sichtbar wird! Kontrollieren Sie die Knoten
regelmäßig auf festen Sitz.
Untersuchen Sie das Holz regelmäßig auf Fäule und Risse.
4. Kontrollieren Sie außerdem, ob Holzspäne aus dem Schaukelbrett
herausragen. Diese sollten abgerieben werden in um Verletzungen zu
vermeiden. Setzen Sie die Schaukel nicht der Witterung bei längerem Regen
und Sonneneinstrahlung aus.
Hersteller: NingBo YongXu Industrial Products Manufacturing Co.,
Ltd.
Adresse: 13-1 Dorf Haikou, Stadt Xidian, Kreis Ninghai, Stadt
Ningbo, Provinz Zhejing, China
Nach AUS importiert: SIHAO PTY LTD. 1 ROKEVA
STREETEASTWOOD NSW 2122 Australien
Importiert in die USA: Sanven Technology Ltd. Suite 250, 9166
Anaheim Place, Rancho Cucamonga, CA 91730
REP
EC
E-CrossStu GmbH
Mainzer Landstr.69, 60329
Frankfurt am Main.

6
REP
UK
YH CONSULTING LIMITED.
C/O YH Consulting Limited Office 147,
Centurion House, London Road,
Staines-upon-Thames, Surrey, TW18 4AX


