THIS INSTRUCTION BOOKLET CONTAINS IMPORTANT SAFETY INFORMATION. PLEASE READ AND KEEP FOR FUTURE REFERENCE.
EN DE FR ES IT PL
USER'S MANUAL/HANDBUCH
/MANUEL DE L'UTILISATEUR/MANUAL DEL USUARIO
/MANUALE UTENTE/INSTRUKCJA OBSŁUGI
TP10009
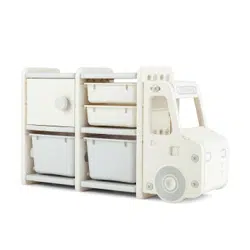
Kids' Toy Storage Organizer / Kinderzimmerregal /
Étagère de Rangement pour Enfant / Estante de Almacenamiento /
Scaffale Portaoggetti / Mebel do przechowywania dla dzieci
EN
DE
FR
ES
IT
PL
With your inspiring rating, COSTWAY will be more consistent to offer you EASY
SHOPPING EXPERIENCE, GOOD PRODUCTS and EFFICIENT SERVICE!
Mit Ihrer inspirierenden Bewertung wird COSTWAY konsistenter sein, um Ihnen EIN
SCHÖNES EINKAUFSERLEBNIS, GUTE PRODUKTE und EFFIZIENTEN SERVICE zu
bieten!
Avec votre évaluation inspirante, COSTWAY continuera à fournir une EXPÉRIENCE
D’ACHAT PRATIQUE, des PRODUITS DE QUALITÉ et un SERVICE EFFICACE !
Con su calificación inspiradora, COSTWAY será más consistente para ofrecerle
EXPERIENCIA DE COMPRA FÁCIL, BUENOS PRODUCTOS y SERVICIO EFICIENTE.
Con la tua valutazione incoraggiante, COSTWAY sarà più coerente per offrirti
ESPERIENZA DI ACQUISTO FACILE, BUONI PRODOTTI e SERVIZIO EFFICIENTE!
Dzięki twojej opinii COSTWAY będzie mógł oferować jeszcze WYGODNIEJSZE
ZAKUPY, LEPSZE PRODUKTY i SPRAWNIEJSZĄ OBSŁUGĘ KLIENTA.
US office: Fontana UK office: Ipswich AU office: Truganina
DE office: FDS GmbH, Neuer Höltigbaum 36, 22143 Hamburg, Deutschland
FR office: Saint Vigor d'Ymonville
PL office: Gdańsk
EN
Before You Start
General Warnings:
Danger! Keep all small parts and packaging materials for this product away from
babies and children, otherwise they may pose a choking hazard.
The product must be installed and used under the supervision of an adult.
Read through each step carefully and follow the proper order.
Remove all Packaging, separate and count all parts and hardware before
installation.
Please ensure that all parts are correctly installed, incorrect installation can lead to
a danger.
We recommend that, where possible, all items are assembled near the area in
which they will be placed in use, to avoid moving the product unnecessarily once
assembled.
Ensure a secure surface during installation, and place the product always on a flat,
steady and stable surface.
Please read all instructions carefully and keep it for future reference.
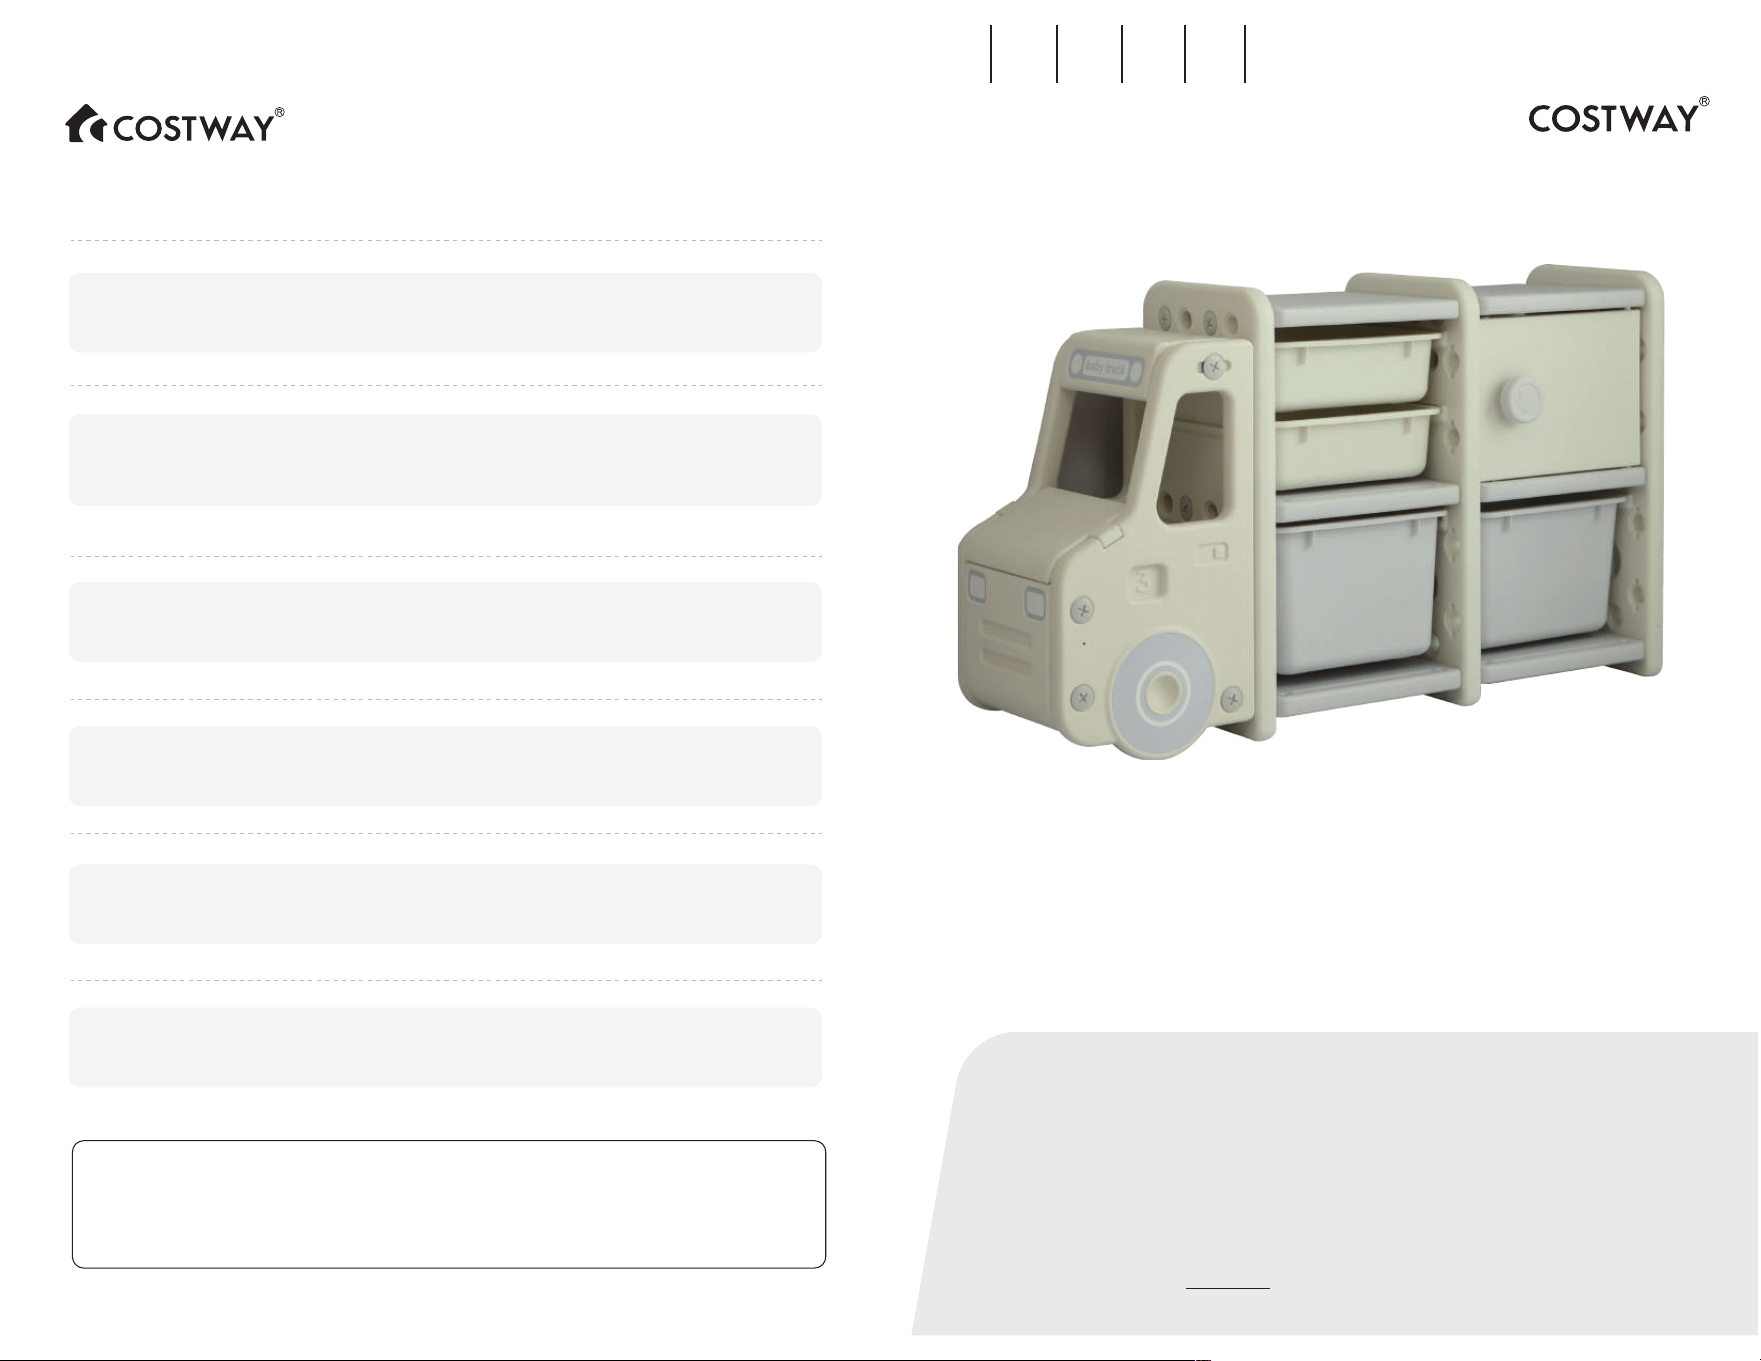
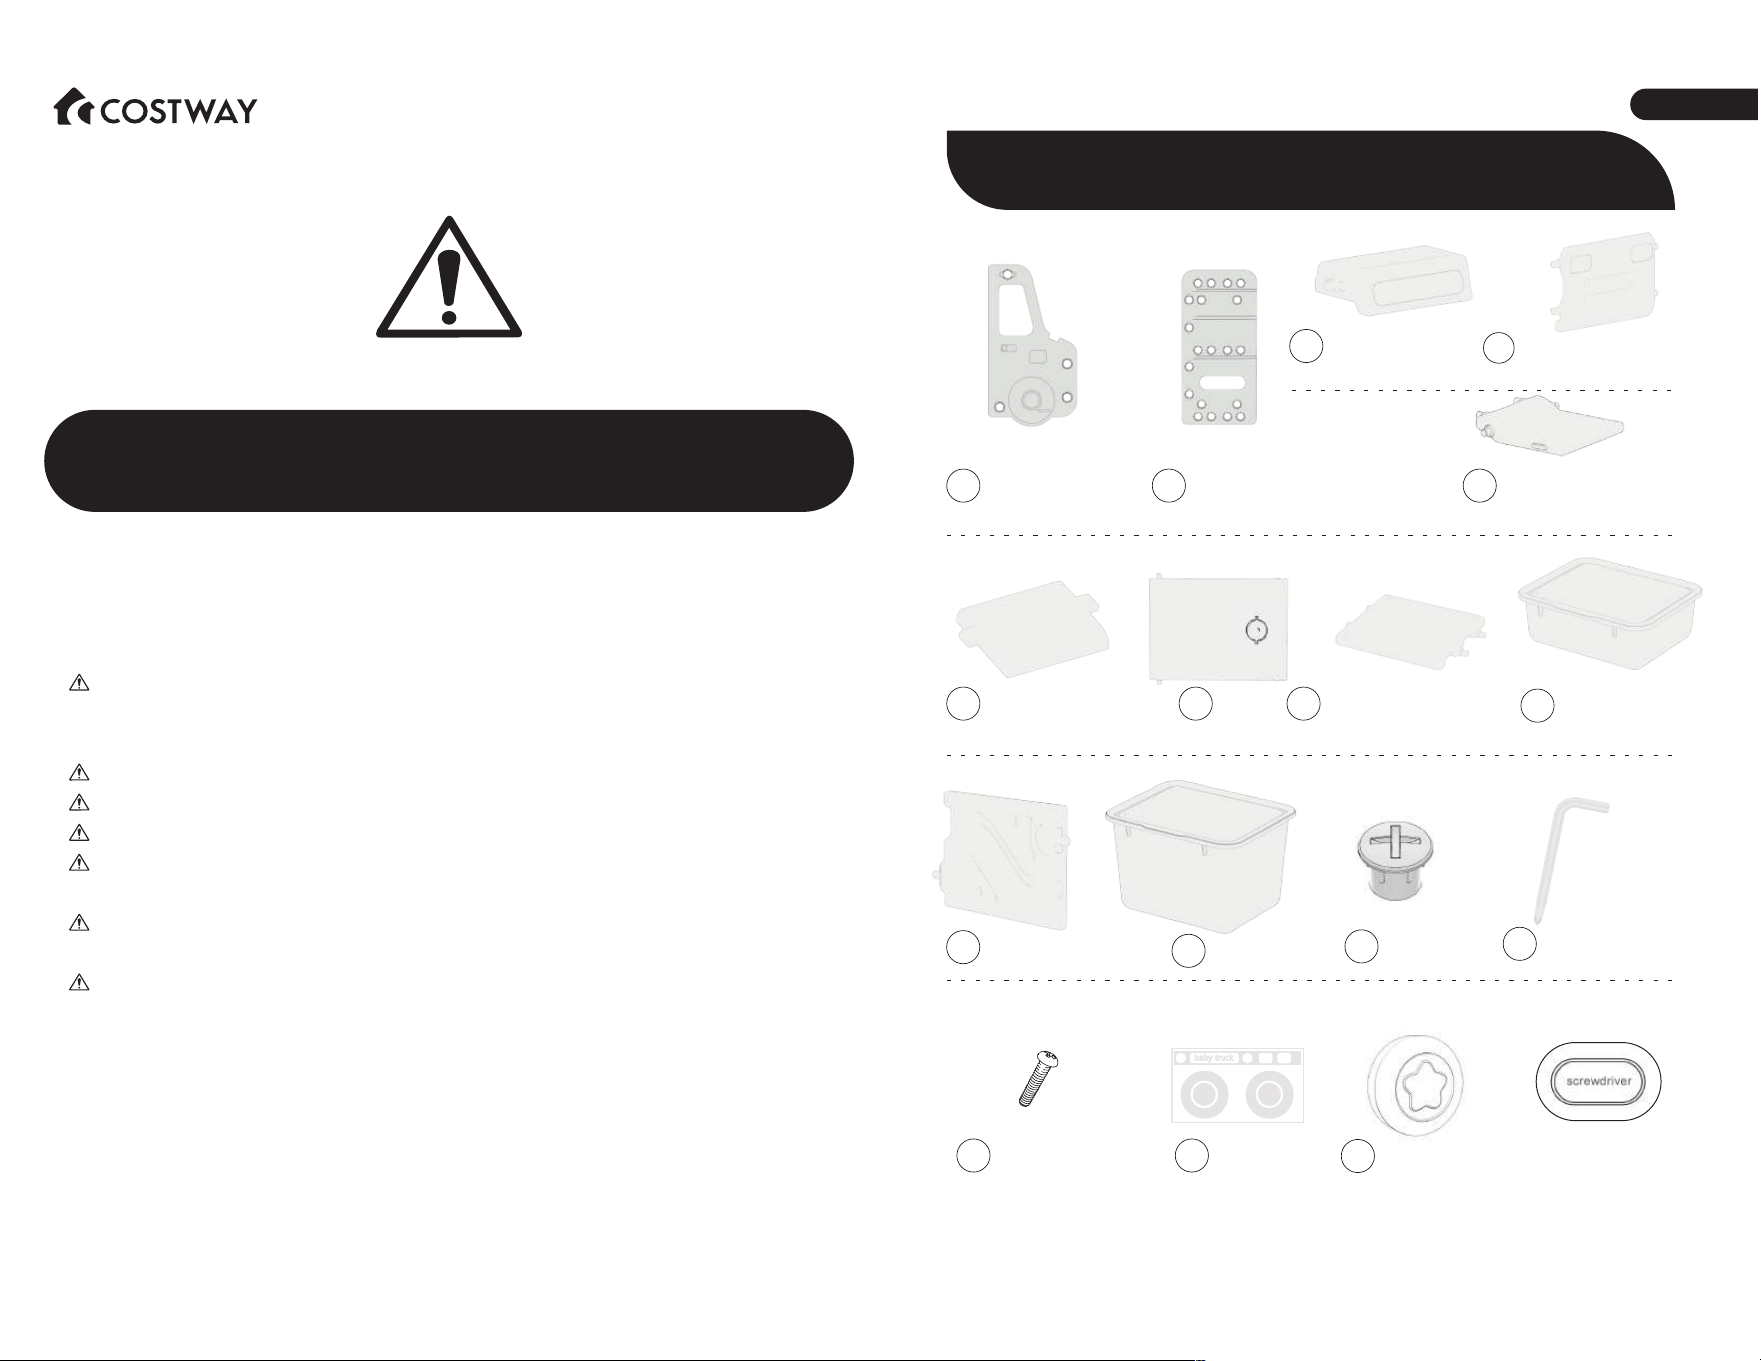
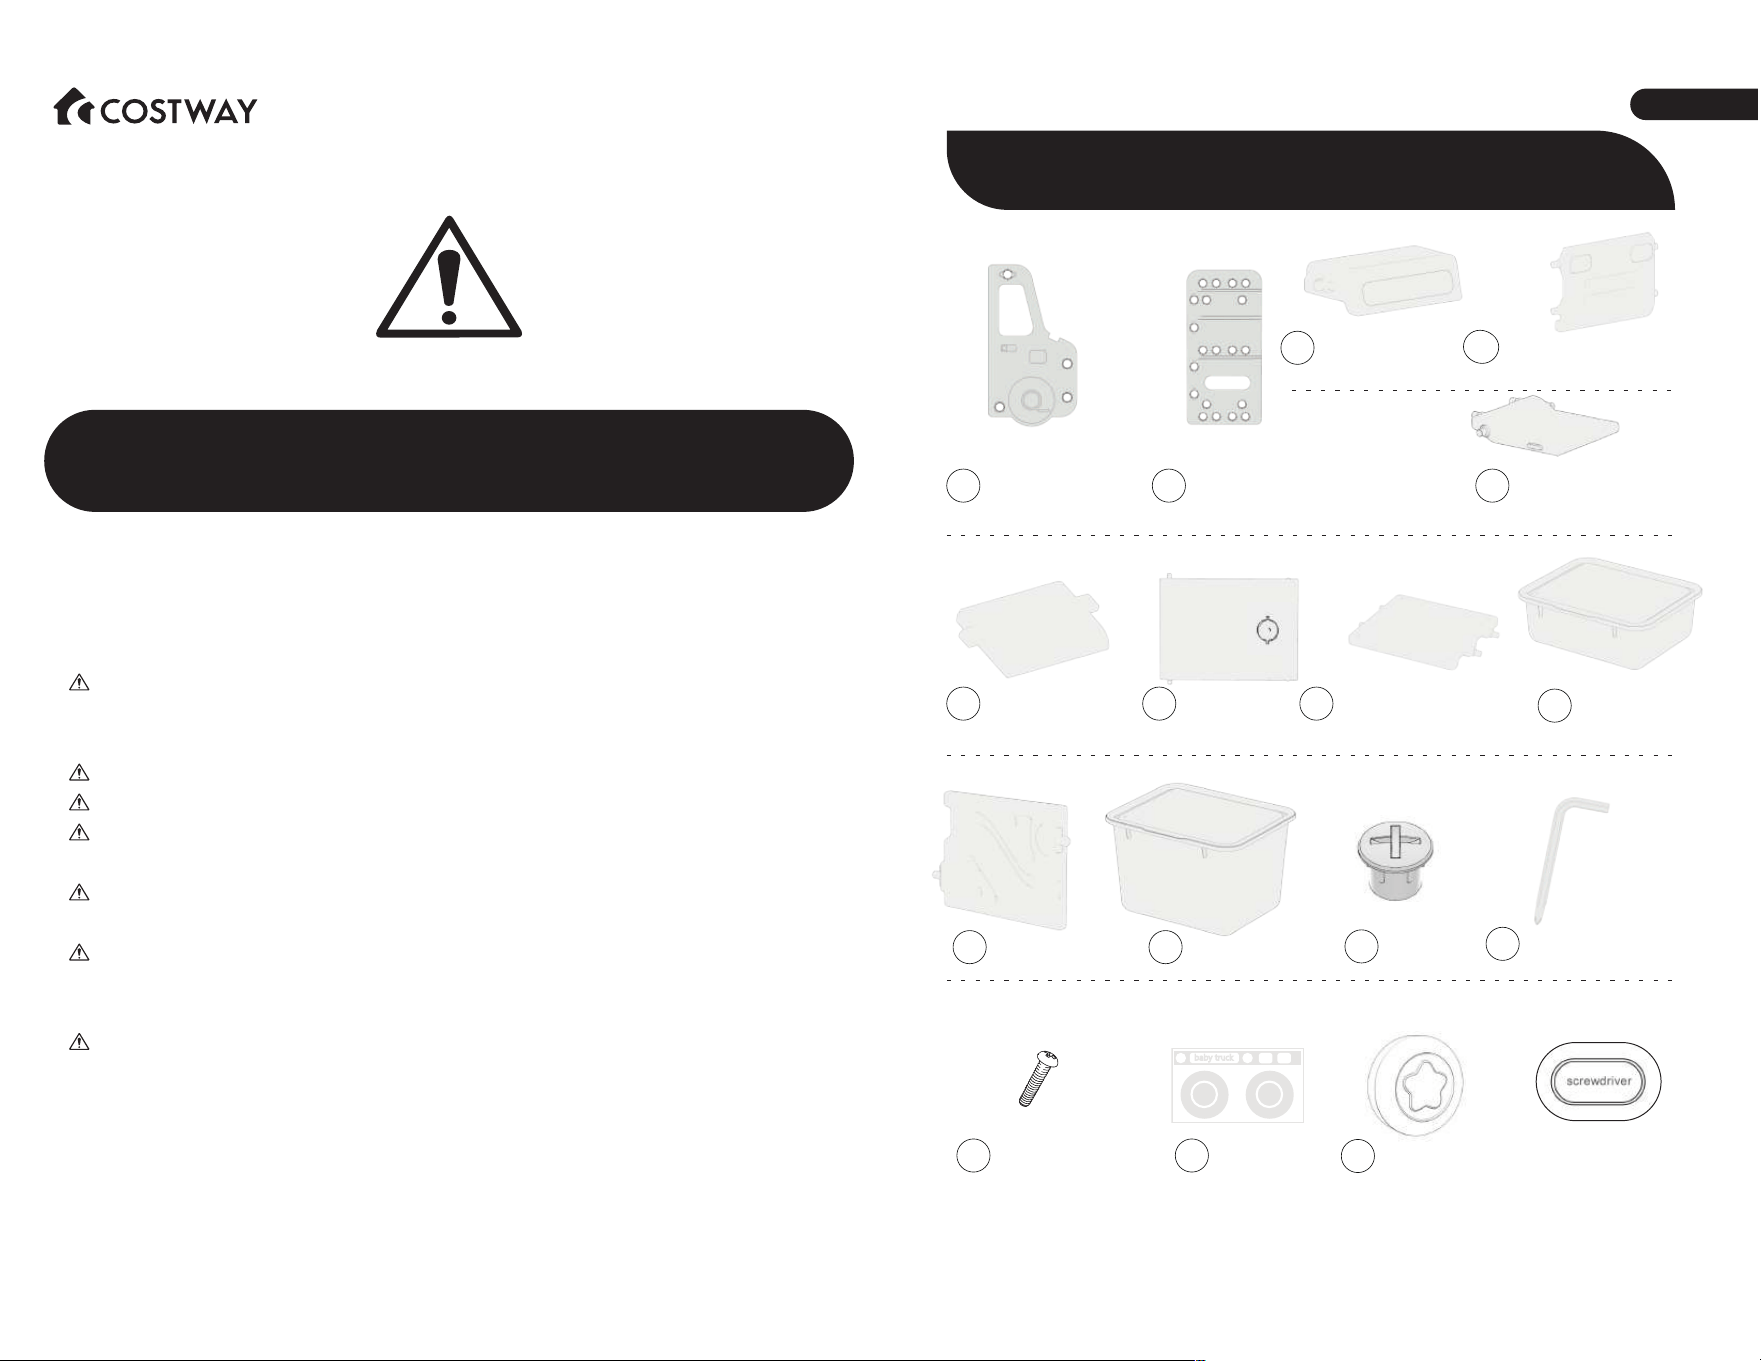
Package List
15
16
14
13
12
11
10
9
8
7
6
5
3
4
2
1
Car Side Panel
Organizer Side Panel Car Bottom Panel
Car Top Panel
Car Front
Cover
Car Front Panel
Door
Horizontal Board
Small Bin
Back Panel
Large Bin
Nut
Allen Key
4*30mm Screw
Sticker Door Handle Screwdriver
02 03

EN
Part List
Name
Quantity
Car Side Panel �
Organizer Side Panel �
Car Top Panel �
Car Bottom Panel �
Car Front Panel �
Car Front Cover
Door �
Horizontal Board �
Back Panel �
Small Bin �
Large Bin �
Door Handle
4*30mm Screw �
Nut �
Screwdriver
2
3
1
1
1
1
1
6
1
2
2
1
1
38
1
Installation
1
14
7
16
13
1
4
5
6
3
12
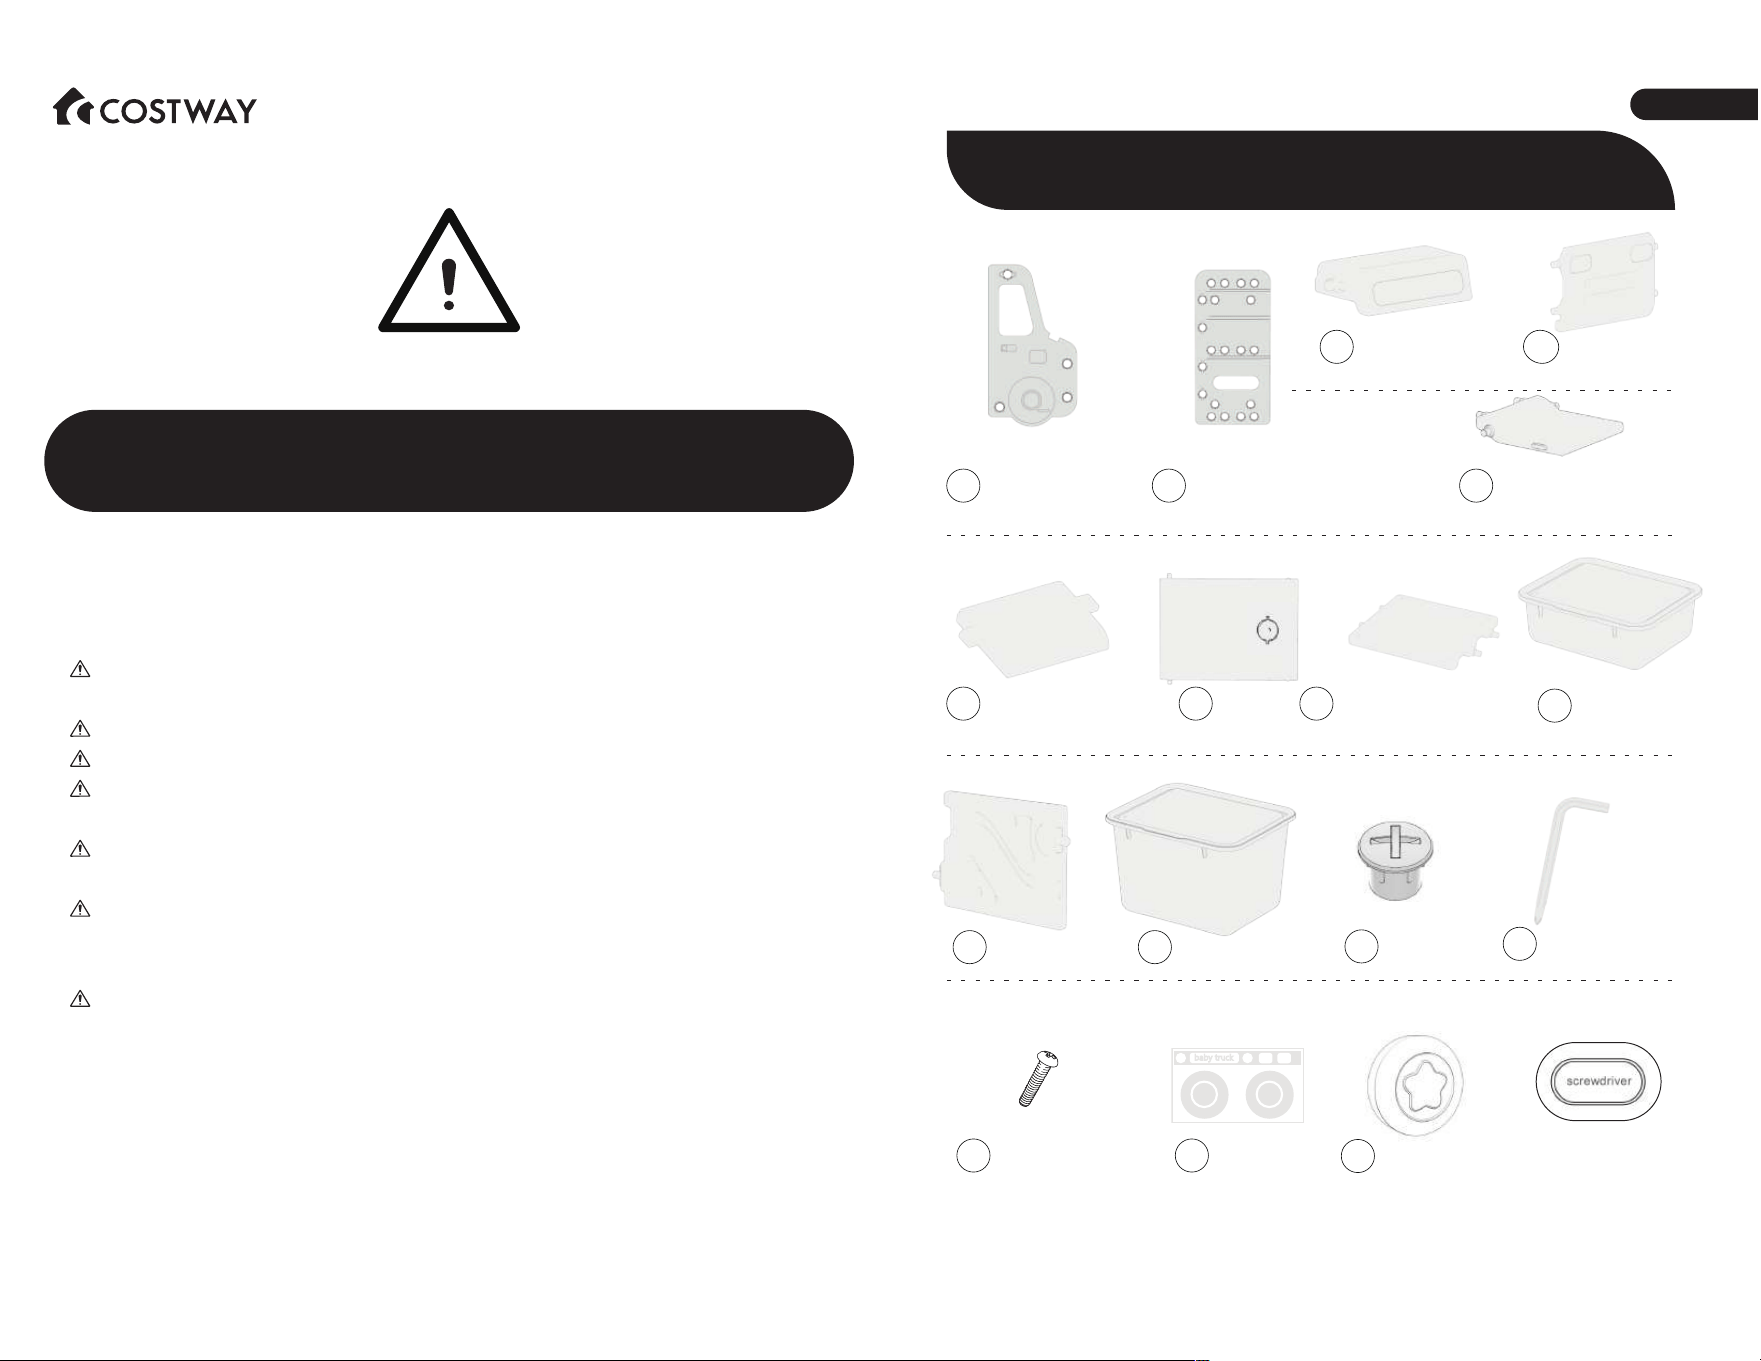
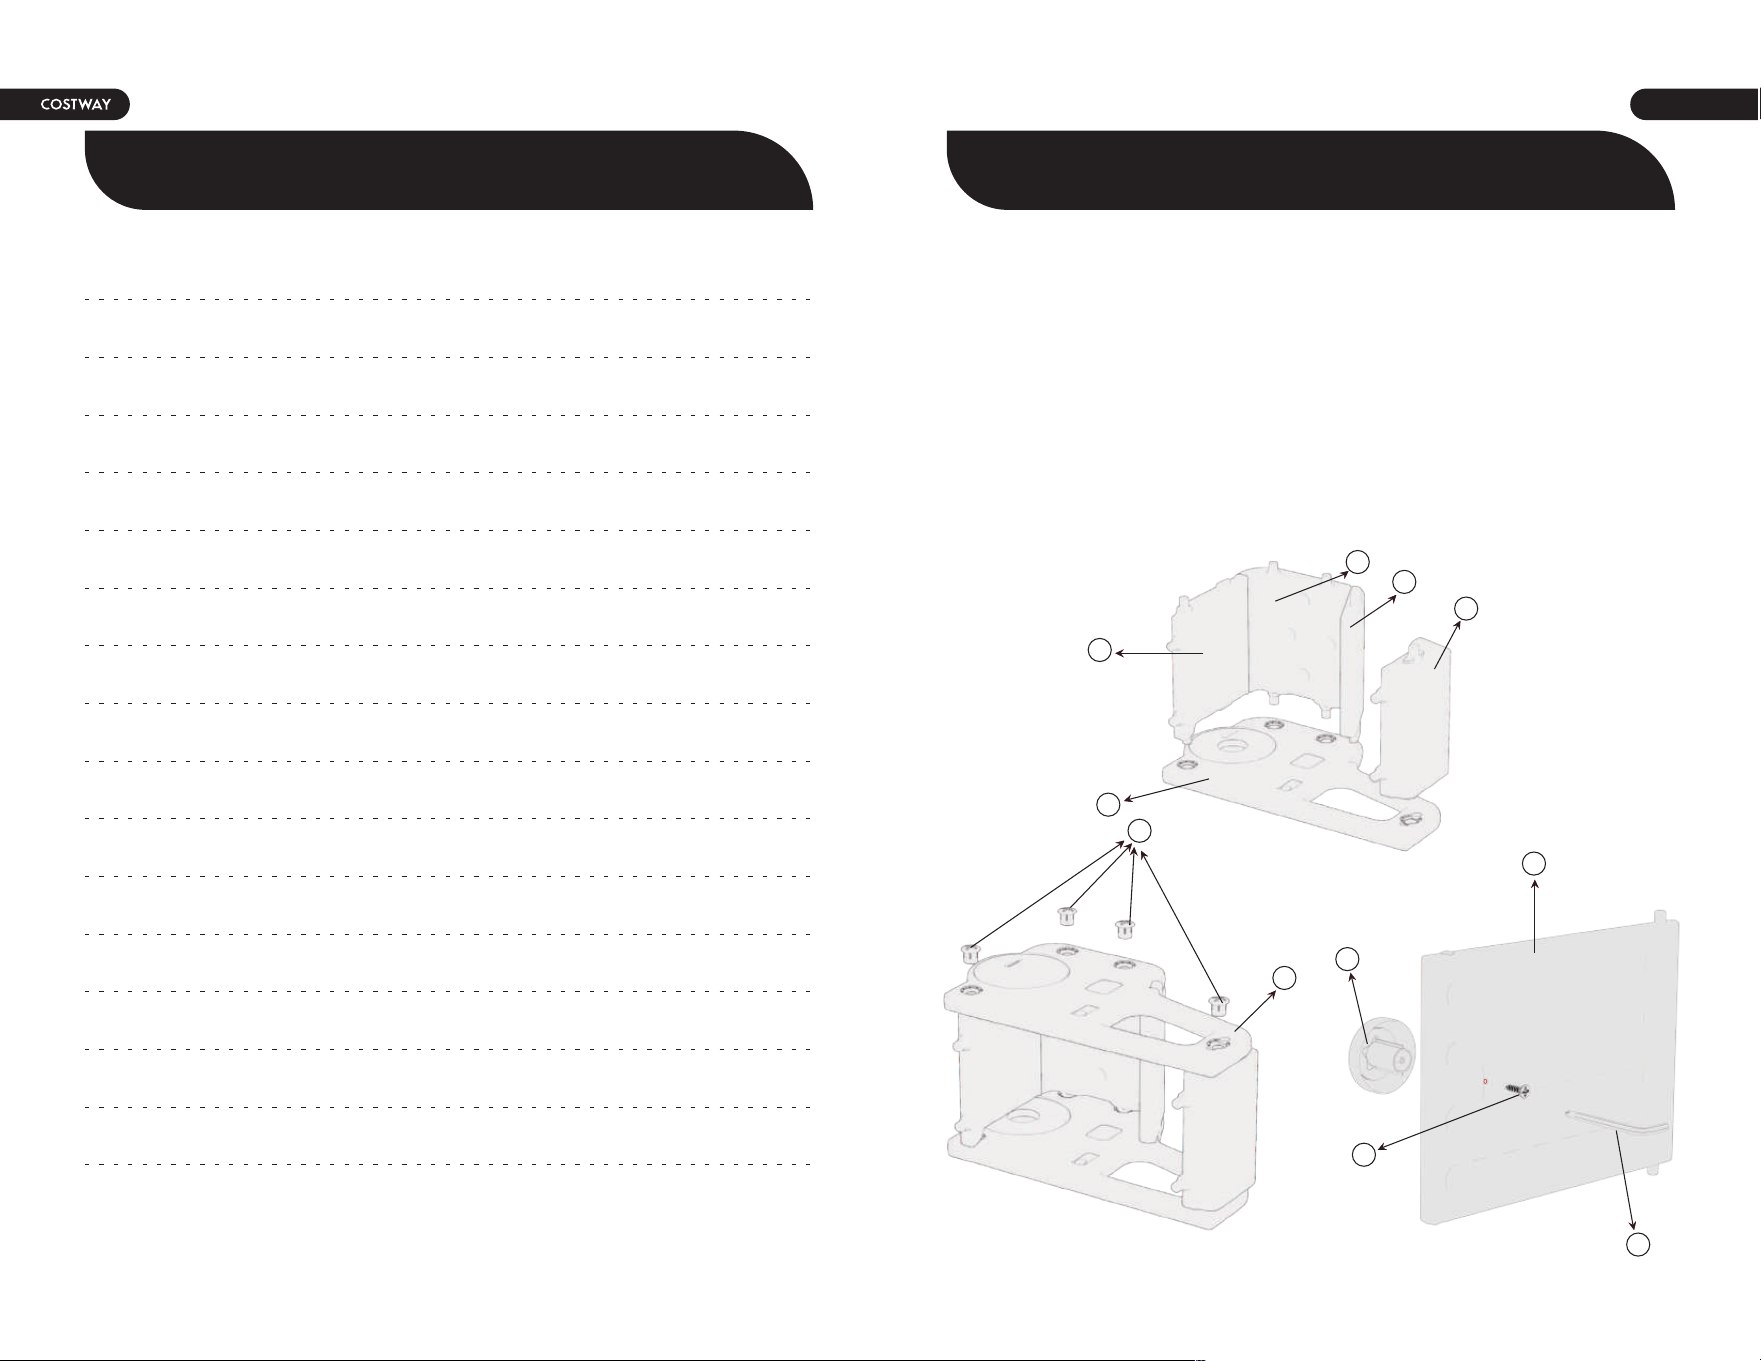
A. Car Decor Installation
1.As shown in figure 1, put the car side panel upward on a flat surface,
and align the car top panel, front cover, front panel, bottom panel with
the corresponding holes of the car side panel and fix them.
Notice: (Do not mix the car left panel and car right panel. The counterbore
side should face outside.)
2.As shown in figure 2, align the car top panel, front cover, front panel
and bottom panel with the holes of the another car side panel and tighten
them with nuts.
3.Turn the whole car part over and tighten with the nuts.
4.Install the door handle to the door with a 4*30mm screw and Allen Key.
figure 1
figure 2
04 05

EN
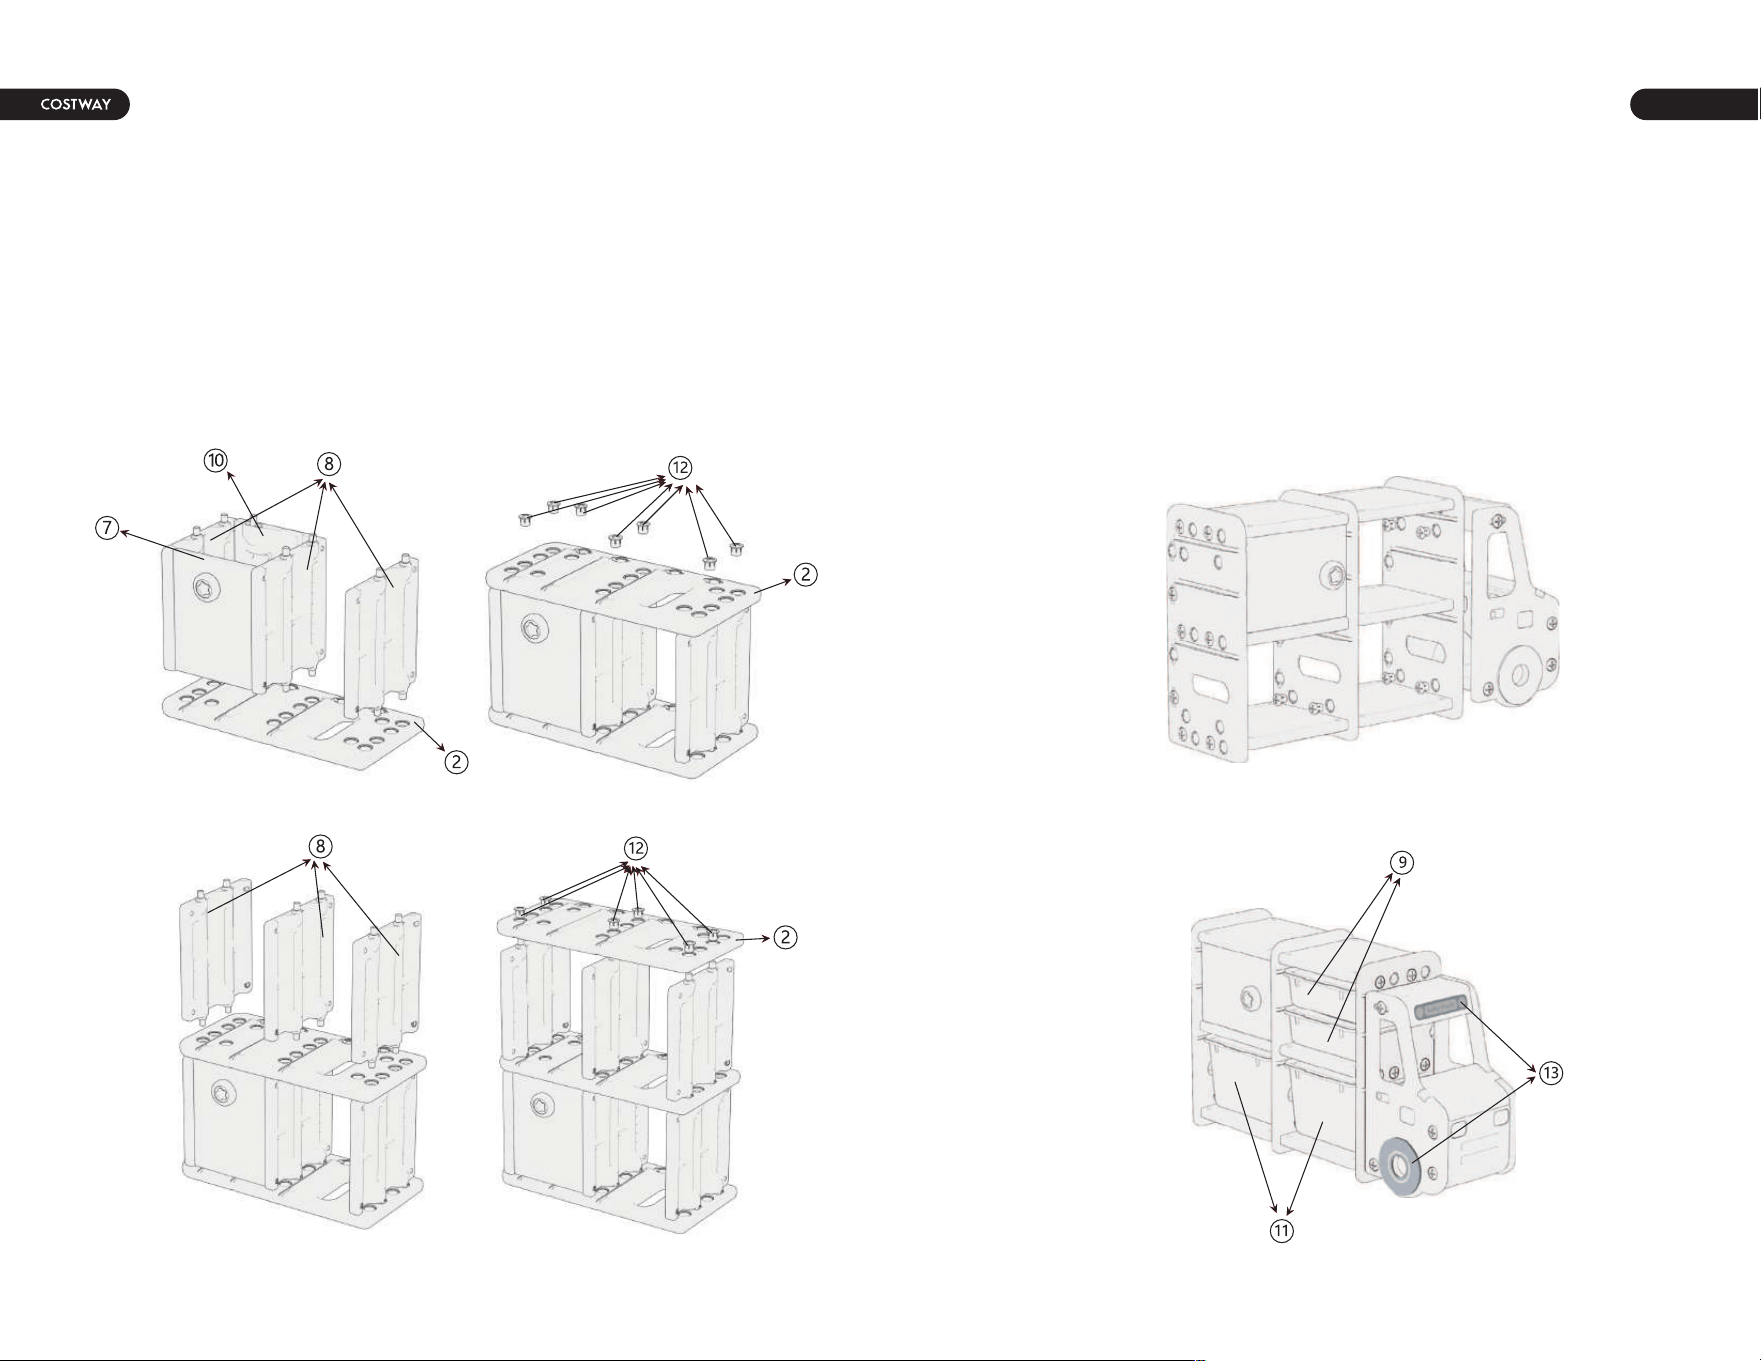
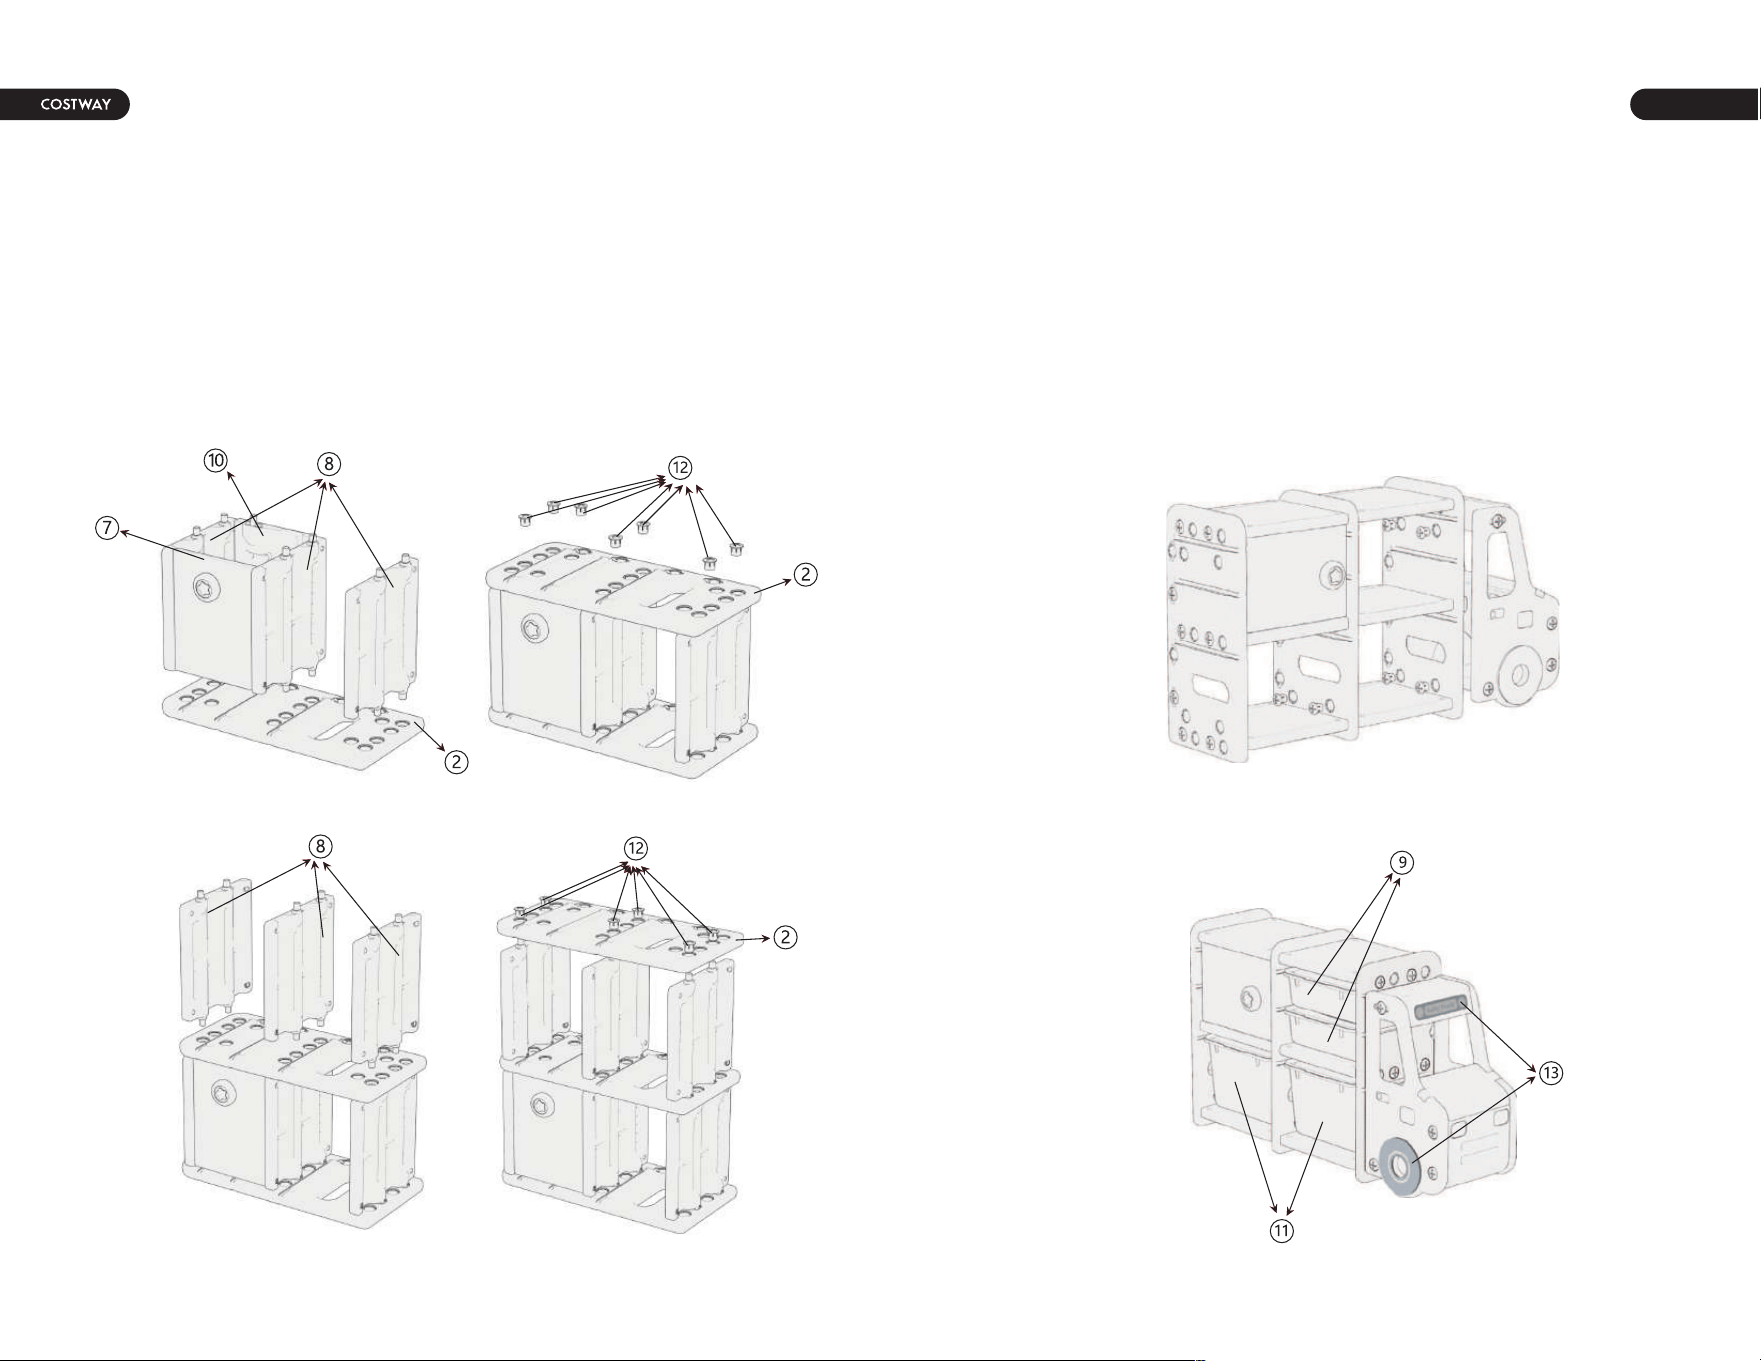
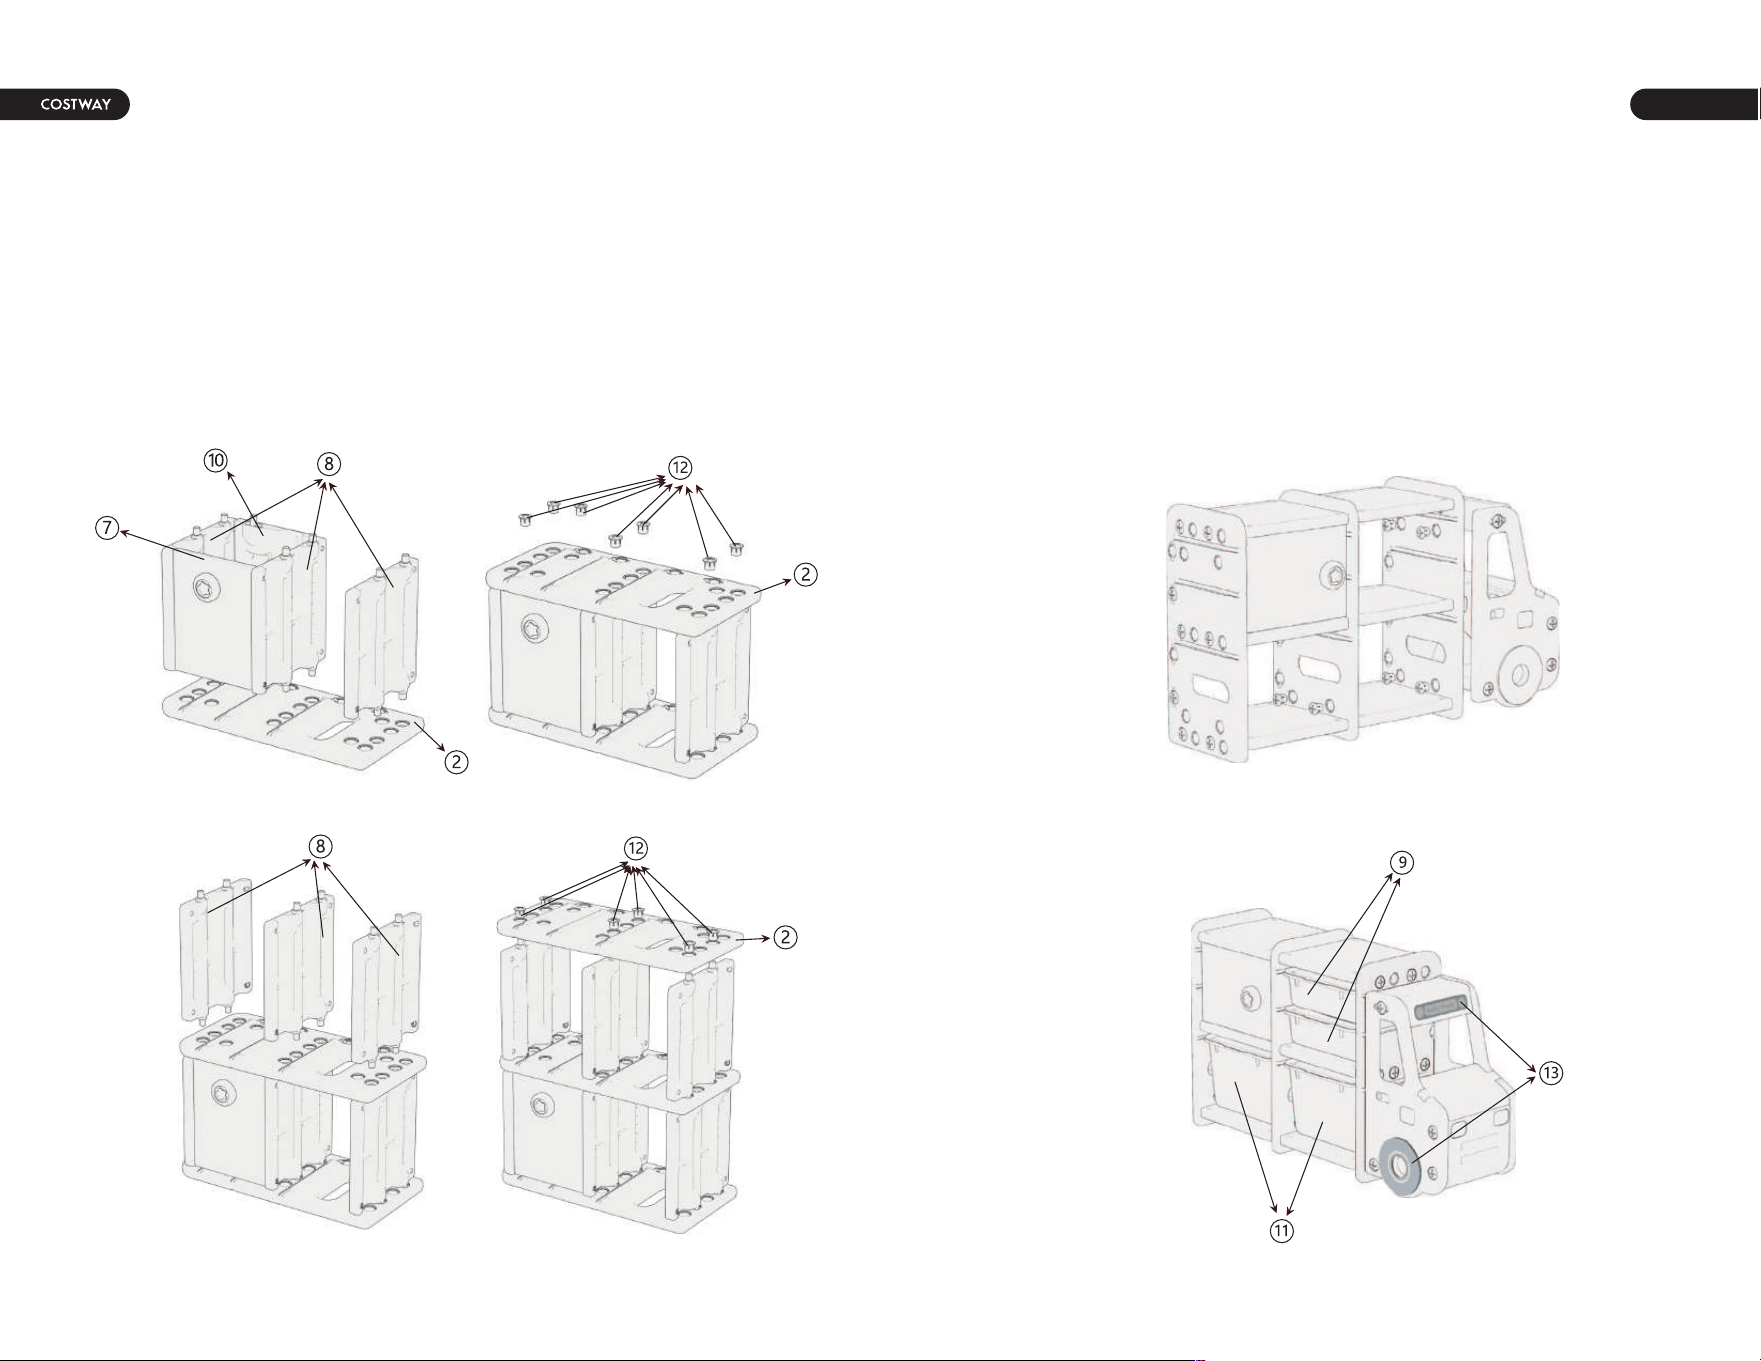
B. Storage Organizer Installation
1.As shown in figure 3, put the organizer side panel on a flat surface and
assemble the storage part together. Then align the storage part assembly
with the holes of the organizer side panel.
2.As shown in figure 4, align the another side panel with the above
assembly part, tighten them with nuts.
3.As shown in figure 5, insert the horizontal boards into the holes of the
above assembly part. Open the door and tighten them with nuts.
4.As shown in figure 6, align the third side panel with the above assembly
part, tighten them with nuts.
5.As shown in figure 7, align the car decor assembly with the organizer
assembly and tighten them with nuts.
6.As shown in figure 8, put in the small and large storage bins. Attach the
stickers onto the corresponding place of the car decor part.
7.Before use, be sure all parts are correctly installed and all nuts and
screw are tighten.
figure 3 figure 4
figure 5 figure 6
figure 7
figure 8
06 07

DE
Bevor Sie beginnen
Hinweis zur Montage
Achtung! Halten Sie alle kleinteile und Verpackungsmaterialien fern von Babys und
Kindern, ansonsten besteht Erstickungsgefahr.
Der Artikel muss unter der Aufsicht eines Erwachsenen montiert und benutzt
werden.
Lesen Sie jeden Schritt sorgfältig durch und befolgen Sie die richtige Reihenfolge.
Entfernen Sie alle Verpackungen, Überprüfen Sie, ob alle Teile und Zubehörteile
vorhanden sind.
Bitte stellen Sie sicher, dass alle Teile richtig montiert sind, eine falsche Montage
kann zu einer Gefahr führen.
Wir empfehlen, alle Teile möglichst in der Nähe des Aufstellungsortes zu
montieren, um unnötige Bewegungen nach der Montage zu vermeiden.
Achten Sie bei der Montage auf einen sicheren Untergrund und stellen Sie den
Artikel immer auf eine ebene, feste und stabile Fläche.
Bitte sorgfältig lesen und zum späteren Nachschlagen aufbewahren.
Paketliste
15
16
14
13
12
11
10
9
8
7
6
5
3
4
2
1
LKW-Seitliche
Platte
Regal Seitliche Platte LKW-Bodenplatte
LKW- Obere
Platte
LKW-
Frontabdeckung
LKW-Frontplatte
Tür
Horizontale Platte
Kleiner Kasten
Rückenplatte
Großer Kasten
Mutter
Inbusschlüssel
4*30mm
Schraube
Aufkleber Türgriff Schraubenzieher
08 09

Teileliste
Name
Menge
LKW-Seitliche Platte
Regal Seitliche Platte
Schrank Obere Platte
LKW-Bodenplatte
LKW-Frontplatte
LKW-Frontabdeckung
Tür
Horizontale Platte
Rückenplatte
Kleiner Kasten
Großer Kasten
Türgriff
4*30mm Schraube
Mutter
Inbusschlüssel
2
3
1
1
1
1
1
6
1
2
2
1
1
38
1
Montage
1
14
7
16
13
1
4
5
6
3
12
A. Montage des Deko-LKWs
1. Legen Sie, wie in Abbildung 1 dargestellt, die Lkw-Seitenplatte mit der
Oberseite nach oben auf eine ebene Fläche und richten Sie die obere
Platte, die Frontabdeckung, die Frontplatte und die Bodenplatte des Lkw
an den entsprechenden Löchern der Lkw-Seitenplatte aus und befestigen
Sie die Platten.
Hinweis: (Mischen Sie nicht die linke und die rechte Platte des LKWs. Die
Seite mit der Senkung muss nach außen zeigen).
2. Richten Sie die obere Platte, die vordere Abdeckung, die vordere Platte
und die untere Platte wie in Abbildung 2 gezeigt an den Löchern der
anderen LKW-Seitenplatte aus und ziehen Sie die Platten mit Muttern fest.
3. Drehen Sie das gesamte Lkw-Teil um und ziehen Sie es mit den
Muttern fest.
4. Montieren Sie den Türgriff mit einer 4*30mm Schraube und einem
Inbusschlüssel an der Tür.
DE
Abbildung 1
Abbildung 2
10 11
B. Montage des Regals
1. Legen Sie die Seitenplatte des Regals wie in Abbildung 3 gezeigt auf
eine ebene Fläche und bauen Sie das Ablageteil zusammen. Richten Sie
dann das Ablageteil an den Löchern der Seitenplatte des Regals aus.
2. Richten Sie, wie in Abbildung 4 gezeigt, eine weitere Platte mit dem
obigen Montageteil aus und ziehen Sie sie mit Muttern fest.
3. Wie in Abbildung 5 gezeigt, setzen Sie die horizontalen Bretter in die
Löcher des obigen Montageteils ein. Öffnen Sie die Tür und ziehen Sie sie
mit den Muttern fest.
4. Richten Sie die dritte Platte, wie in Abbildung 6 gezeigt, mit dem obigen
Montageteil aus und ziehen Sie sie mit den Muttern fest.
5. Richten Sie, wie in Abbildung 7 dargestellt, den Dekorwagen mit der
Regalbaugruppe aus und ziehen Sie sie mit den Muttern fest.
6. Setzen Sie, wie in Abbildung 8 gezeigt, die kleinen und großen
Ablagefächer ein. Bringen Sie die Aufkleber an der entsprechenden Stelle
des Dekorwagenteils an.
7. Vergewissern Sie sich vor dem Gebrauch, dass alle Teile korrekt
montiert und alle Muttern und Schrauben festgezogen sind.
DE
Abbildung 3 Abbildung 4
Abbildung 5 Abbildung 6
Abbildung 7
Abbildung 8
12 13

Avant de Commencer
Avertissements Généraux :
Danger ! Éloignez toutes les petites pièces et le matériel d’emballage des bébés et
des enfants pour éviter un risque d’étouffement.
Le produit doit être installé et utilisé sous la surveillance d’un adulte.
Lisez attentivement chaque étape et suivez le bon ordre.
Retirez tous les emballages, séparez et comptez toutes les pièces et le matériel
avant l’installation.
Assurez-vous que toutes les pièces soient correctement installées. Une installation
incorrecte peut entraîner un danger.
Assurez une surface sûre pendant l’assemblage et placez le produit toujours sur
une surface plane et stable.
Veuillez lire attentivement toutes les instructions et les conserver pour la référence
ultérieure.
FR
Liste de Colis
15
16
14
13
12
11
10
9
8
7
6
5
3
4
2
1
Panneau Latéral
de Voiture
Panneau Latéral de
l'Organisateur
Panneau Inférieur
de la Voiture
Panneau Supérieur
de la Voiture
Couverture Avant
de Voiture
Panneau Avant de
Voiture
Panneau
de Porte
Planche Horizontale
Petit Bac
Panneau
Arrière
Grand Bac
Écrou
Clé Allen
4*30mm Vis
Autocollant Poignée de Porte Tournevis
14 15
Liste des Pièces
Nom
Quantité
Panneau Latéral de Voiture
Panneau Latéral de l'Organisateur
Panneau Supérieur de Voiture
Panneau Inférieur de Voiture
Panneau Avant de Voiture
Couverture Avant de Voiture
Porte
Planche Horizontale
Panneau Arrière
Petit Bac
Grand Bac
Poignée de Porte
4*30mm Vis
Écrou
Tournevis
2
3
1
1
1
1
1
6
1
2
2
1
1
38
1
Installation
1
14
7
16
13
1
4
5
6
3
12
A. Installation de Décoration de Voiture
1. Comme le montre la figure 1, placez le panneau latéral de la voiture
vers le haut sur une surface plane et alignez le panneau supérieur de la
voiture, le capot avant, le panneau avant et le panneau inférieur avec les
trous correspondants du panneau latéral de la voiture et fixez-les.
Remarque : (Ne mélangez pas le panneau gauche de la voiture et le
panneau droit de la voiture. Le côté du contre-alésage doit faire face à
l'extérieur.)
2. Comme le montre la figure 2, alignez le panneau supérieur de la
voiture, le capot avant, le panneau avant et le panneau inférieur avec les
trous de l'autre panneau latéral de la voiture et serrez-les avec des
écrous.
3. Retournez toute la pièce de la voiture et serrez avec les écrous.
4. Installez la poignée de porte sur la porte avec une vis 4*30mm et une
clé Allen.
FR
figure 1
figure 2
16 17
B. Installation de l'Organisateur de Stockage
1. Comme le montre la figure 3, placez le panneau latéral de
l'organisateur sur une surface plane et assemblez la partie de stockage
ensemble. Alignez ensuite l'ensemble de la pièce de rangement avec les
trous du panneau latéral de l'organisateur.
2. Comme indiqué sur la figure 4, alignez l'autre panneau latéral avec la
pièce d'assemblage ci-dessus, serrez-les avec des écrous.
3. Comme le montre la figure 5, insérez les planches horizontales dans les
trous de la pièce d'assemblage ci-dessus. Ouvrez la porte et serrez-les
avec des écrous.
4. Comme indiqué sur la figure 6, alignez le troisième panneau latéral
avec la pièce d'assemblage ci-dessus, serrez-les avec des écrous.
5. Comme le montre la figure 7, alignez l'ensemble de décoration de
voiture avec l'ensemble organisateur et serrez-les avec des écrous.
6. Comme le montre la figure 8, placez les petits et les grands bacs de
rangement. Collez les autocollants à l'endroit correspondant de la pièce de
décoration de voiture.
7. Avant utilisation, assurez-vous que toutes les pièces sont correctement
installées et que tous les écrous et vis sont serrés.
FR
figure 3 figure 4
figure 5 figure 6
figure 7
figure 8
18 19

Antes de Empezar
Advertencias Generales:
¡Peligro! Mantenga todas las piezas pequeñas y los materiales de embalaje de este
producto fuera del alcance de los bebés y los niños, ya que, de lo contrario, pueden
suponer un peligro de asfixia.
El producto debe instalarse y usarse bajo la supervisión de un adulto.
Lea cada paso cuidadosamente y siga el orden correcto.
Retire todo el embalaje, separe y cuente todas las piezas y los accesorios antes de
la instalación.
Asegúrese de que todas las piezas estén instaladas correctamente, una instalación
incorrecta puede provocar un peligro.
Asegure una superficie segura durante el montaje, y coloque el producto siempre
sobre una superficie plana, firme y estable.
Lea todas las instrucciones detenidamente y guárdelas para futuras referencias.
ES
Lista de Embalaje
15
16
14
13
12
11
10
9
8
7
6
5
2
1
Panel lateral
de coche
Panel lateral de estante
3
Panel superior
de coche
4
Panel inferior
de coche
Panel frontal
de coche
Cubierta frontal
de coche
Puerta de
estante
Panel horizontal
de estante
Caja pequeña
Panel trasero
de estante
Caja grande
Tuerca en
cruz
Llave Allen
Tornillo 4*30mm
Pegatina Manija Destornillador
20 21

Lista de Piezas
Nombre
Cantidad
Panel lateral de coche
Panel lateral de estante
Panel superior de coche
Panel inferior de coche
Panel frontal de coche
Cubierta frontal de coche
Puerta de estante
Panel horizontal de estante
Panel trasero de estante
Caja pequeña
Caja grande
Manija
Tornillo 4*30 mm
Tuerca en cruz
Destornillador
2
3
1
1
1
1
1
6
1
2
2
1
1
38
1
Instrucciones de Montaje
1
14
7
16
13
1
4
5
6
3
12
A. Montaje del Cabezal de Coche
1. Como se muestra en la Fig.1, ponga el panel lateral de coche en una
superficie plana con el lado interior hacia arriba, y alinee el panel superior,
la cubierta frontal, el panel frontal, el panel inferior de coche con los
agujeros correspondientes del panel lateral de coche y fíjelos
(Aviso: No mezcle los paneles laterales izquierdo y derecho del coche. El
lado de los agujeros debe mirar hacia afuera).
2. Como se muestra en la Fig.2, alinee el panel superior, la cubierta
frontal, el panel frontal y el panel inferior de coche con los agujeros
correspondientes del otro panel lateral de coche y apriételos con tuercas.
3. Dé la vuelta a todo el conjunto y apriete con las tuercas.
4. Monte la manija de puerta en la puerta con el tornillo 4*30mm y la
llave Allen.
ES
Fig.1
Fig.2
22 23
B. Montaje del Estante
1. Como se muestra en la Fig.3, coloque el panel lateral de estante en una
superficie plana y ensamble el compartimiento de almacenamiento
utilizando los paneles (7, 8, 10), luego coloque todo el conjunto del
compartimento de almacenamiento en los agujeros correspondientes del
panel lateral de estante.
2. Como se muestra en la Fig.4, alinee el panel lateral de estante en el
otro lado con el conjunto montado anterior, y luego apriételos con
tuercas.
3. Como se muestra en la Fig.5, inserte los paneles horizontales de
estante en los agujeros del compartimento montado en el paso anterior,
abra la puerta y apriete con tuercas.
4. Como se muestra en la Fig.6, alinee el tercer panel lateral de estante
con las piezas que sobresalen de los paneles horizontales y apriete con
tuercas.
C. Montaje de Combinación
5. Como se muestra en la Fig.7, alinee el conjunto del cabezal de coche
con el conjunto del estante y apriételos con tuercas.
6. Finalmente, como se muestra en la Fig.8, introduzca la caja pequeña y
la caja grande en el estante de almacenamiento a lo largo de la corredera.
Pegue la pegatina en la posición correspondiente de la parte delantera del
coche.
7. Antes de utilizarlo, asegúrese de que todas las piezas están
correctamente instaladas y que todas las tuercas y el tornillo están
apretados bien.
ES
Fig.3 Fig.4
Fig.5 Fig.6
Fig.7
Fig.8
24 25
Prima di iniziare
Avvertenza�
Pericolo! Tenere tutte le piccole parti e i materiali di imballaggio di questo prodotto
lontano da neonati e bambini, altrimenti potrebbero rappresentare un rischio di
soffocamento.
Il prodotto deve essere installato e utilizzato sotto la supervisione di un adulto.
Leggere attentamente ogni passo e seguire l'ordine corretto.
Rimuovere tutti gli imballaggi, separare e contare tutte le parti e tutti gli accessori.
Si prega di assicurarsi che tutte le parti siano installate correttamente,
un'installazione errata può portare a un pericolo.
Si consiglia, ove possibile, di montare tutti gli articoli vicino alla zona in cui verranno
posti in uso, per evitare di spostare inutilmente il prodotto una volta assemblato.
Garantire una superficie sicura durante il montaggio e posizionare il prodotto sempre
su una superficie piana, stabile.
Si prega di leggere attentamente tutte le istruzioni e conservarle per riferimento futuro.
IT
Lista delle Parti
15
16
14
13
12
11
10
9
8
7
6
5
4
3
2
1
Pannello laterale
dell'auto
Pannello laterale di
stoccaggio
Tetto dell'auto
Pannello inferiore
dell'auto
Pannello anteriore
dell'auto
Coperchio anteriore
dell'auto
Porta
Ripiano portaoggetti
Scatola piccola
Pannello posteriore
di stoccaggio
Scatola
grande
Dado a
croce
Chiave a
brugola
4*30mm Vite
Adesivo Maniglia Cacciavite
26 27

Lista degli Accessori
Nome
Qtà.
Pannello laterale dell'auto
Pannello laterale di stoccaggio
Tetto dell'auto
Pannello inferiore dell'auto
Pannello anteriore dell'auto
Coperchio anteriore dell'auto
Porta
Ripiano portaoggetti
Pannello posteriore di stoccaggio
Scatola piccola
Scatola grande
Maniglia
4*30mm Vite
Dado a croce
Cacciavite
2
3
1
1
1
1
1
6
1
2
2
1
1
38
1
Istruzioni di Montaggio
1
14
7
16
13
1
4
5
6
3
12
A. Installazione del corpo anteriore dell'auto
1. Come mostrato nella Fig.1, mettere il pannello laterale dell'auto a terra
con il lato interno rivolto verso l'alto, e inserire il tetto dell'auto, il
coperchio anteriore, il pannello anteriore e inferiore uno per uno nei fori
corrispondenti del pannello laterale dell'auto.
(Suggerimenti: Non mischiare i pannelli laterali destro e sinistro, e i fori
dei piani sono rivolti verso l'esterno).
2. Come mostrato nella Fig.2, allineare i rigonfiamenti del tetto dell'auto,
del coperchio anteriore, del pannello anteriore e inferiore nei fori del
pannello laterale dell'auto, e stringere le viti dopo il collegamento.
3. Girare l'intero gruppo, ripetere il passo precedente e stringere le viti.
4. Installare la maniglia della porta sulla porta con una vite 4*30mm e
una chiave a brugola.
IT
Fig.1
Fig.2
28 29

B. Montaggio del ripiano di stoccaggio
1. Come mostrato nella Fig.3, mettere il pannello laterale di stoccaggio in
piano, assemblare il vano portaoggetti utilizzando i pannelli (N.7,8,10), e
poi mettere l'intero vano portaoggetti nel foro corrispondente del pannello
laterale di stoccaggio.
2. Come mostrato nella Fig.4, allineare il pannello laterale di stoccaggio
sull'altro lato, e stringere le viti e le viti sul retro.
3. Come mostrato nella Fig.5, inserire il pannello di stoccaggio nel foro del
vano portaoggetti assemblato nel passo precedente, aprire la porta e
stringere le viti in basso per fissarlo.
4. Come mostrato nella Fig.6, allineare il terzo pannello laterale di
stoccaggio alla posizione sporgente del pannello orizzontale e stringere le
viti.
C. Montaggio delll'armadio di stoccaggio
5. Come mostrato nella Fig.7, allineare il corpo anteriore dell'auto
assemblato con l'armadio di stoccaggio e stringere le viti per fissarlo.
6. Infine, spingere la scatola piccola e la scatola grande nell'armadio lungo
la guida. Attaccare l'adesivo alla posizione corrispondente sulla parte
anteriore dell'auto.
7. Si prega di controllare prima dell'uso per assicurarsi che tutte le parti
siano installate al loro posto, e di stringere completamente le viti e i dadi.
IT
Fig.3 Fig.4
Fig.5 Fig.6
Fig.7
Fig.8
30 31
Zanim Zaczniesz
Ogólne ostrzeżenia:
Niebezpieczeństwo! Wszystkie małe części i materiały opakowaniowe należy
przechowywać z dala od niemowląt i dzieci, w przeciwnym razie mogą stwarzać ryzyko
zadławienia.
Produkt musi być zainstalowany i używany pod nadzorem osoby dorosłej.
Przeczytaj uważnie każdy krok i postępuj we właściwej kolejności.
Usuń opakowanie i upewnij się, że zestaw zawiera wszystkie części i elementy
montażowe.
Upewnij się, że wszystkie części są zainstalowane poprawnie - nieprawidłowa
instalacja może prowadzić do wypadków.
Zalecamy, aby w miarę możliwości wszystkie elementy były montowane w pobliżu
miejsca, w którym będą używane, aby uniknąć niepotrzebnego przenoszenia produktu
po złożeniu.
Zapewnij bezpieczną przestrzeń roboczą podczas montażu i upewnij się, że produkt
znajduje się na płaskiej i stabilnej powierzchni.
Przeczytaj uważnie wszystkie instrukcje i zachowaj je na przyszłość.
PL
Lista części w zestawie
15
16
14
13
12
11
10
9
8
7
6
5
2
1
Panel boczny
samochodu
Panel boczny organizera
3
Górny panel
samochodu
4
Dolny panel
samochodu
Przednia pokrywa
samochodu
Panel przedni
samochodu
Panel drzwi
Deska pozioma
Mały pojemnik
Panel tylny
Duży pojemnik
Nakrętka
Klucz imbusowy
Śruba 4*30mm
Naklejka Klamka drzwi Śrubokręt
32 33

Lista części
Nazwa
Ilość
Panel boczny samochodu
Panel boczny organizera
Górny panel samochodu
Dolny panel samochodu
Panel przedni samochodu
Przednia pokrywa samochodu
Drzwi
Deska pozioma
Panel tylny
Mały pojemnik
Duży pojemnik
Klamka drzwi
Śruba 4*30mm
Nakrętka
Śrubokręt
2
3
1
1
1
1
1
6
1
2
2
1
1
38
1
Montaż
1
14
7
16
13
1
4
5
6
3
12
A. Instalacja samochodu
1. Jak pokazano na rysunku 1, umieść panel boczny samochodu na
płaskiej powierzchni i wyrównaj górny panel samochodu, przednią
pokrywę, przedni panel i dolny panel z odpowiednimi otworami w bocznym
panelu z samochodu i zabezpiecz je.
Uwaga: (Nie mieszaj lewego panelu samochodu z prawym ). Strona z
wgłębieniem powinna być skierowana na zewnątrz.)
2. Jak pokazano na rysunku 2, wyrównaj górny panel samochodu,
przednią maskę, przedni panel i dolny panel z otworami w drugim panelu
bocznym samochodu i dokręć je nakrętkami.
3. Odwróć całą część samochodu i dokręć nakrętkami.
4. Zamontuj klamkę na drzwiach za pomocą śruby 4*30mm i klucza
imbusowego.
PL
rysunku 1
rysunku 2
34 35

B. Instalacja Organizera (do Przechowywania)
1. Jak pokazano na rysunku 3, umieść boczny panel organizera na płaskiej
powierzchni i zmontuj razem części. Następnie wyrównaj cały element z
otworami w bocznym panelu organizera.
2. Jak pokazano na rysunku 4, wyrównaj drugi panel boczny z częścią
montażową powyżej, dokręć je nakrętkami.
3. Jak pokazano na rysunku 5, włóż deski poziome do otworów w części
montażowej powyżej. Otwórz drzwi i dokręć je nakrętkami.
4. Jak pokazano na rysunku 6, wyrównaj trzeci panel boczny z częścią
montażową powyżej, dokręć je nakrętkami.
5. Jak pokazano na rysunku 7, dopasuj zespół elementów samochodu do
zespołu organizera i dokręć je nakrętkami.
6. Jak pokazano na rysunku 8, umieść małe i duże pojemniki . Przyklej
naklejki w odpowiednich miejscach na samochodzie.
7. Przed użyciem upewnij się, że wszystkie części są prawidłowo
zamontowane, a wszystkie nakrętki i śruby są dokręcone.
PL
rysunku 3 rysunku 4 rysunku 7
rysunku 8
rysunku 5 rysunku 6
36 37
