
BA8086US
THIS INSTRUCTION BOOKLET CONTAINS IMPORTANT SAFETY INFORMATION. PLEASE READ AND KEEP FOR FUTURE REFERENCE.
USA office: Fontana GBR office: Ipswich AUS office: Truganina
If you're having difficulty, our friendly
customer team is always here to help.
AUS:cs.au@costway.com
GBR:cs.uk@costway.com
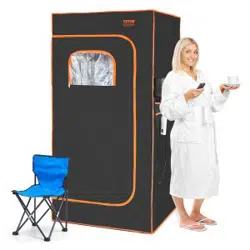
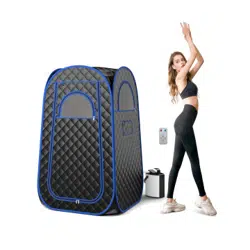
Portable Steam Sauna Spa
Before You Start
Please read all instructions carefully.
Retain instructions for future reference.
Separate and count all parts and hardware.
Read through each step carefully and follow the proper order.
We recommend that, where possible, all items are assembled near to the
area in which they will be placed in use, to avoid moving the product
unnecessarily once assembled.
Always place the product on a flat, steady and stable surface.
Keep all small parts and packaging materials for this product away from
babies and children as they potentially pose a serious choking hazard.
Portable Steam Sauna Spa
02 03
Before You Start
Safety Instructions
Please read all instructions carefully.
Retain instructions for future reference.
Separate and count all parts and hardware.
Read through each step carefully and follow the proper order.
We recommend that, where possible, all items are assembled near to the
area in which they will be placed in use, to avoid moving the product
unnecessarily once assembled.
Always place the product on a flat, steady and stable surface.
Keep all small parts and packaging materials for this product away from
babies and children as they potentially pose a serious choking hazard.
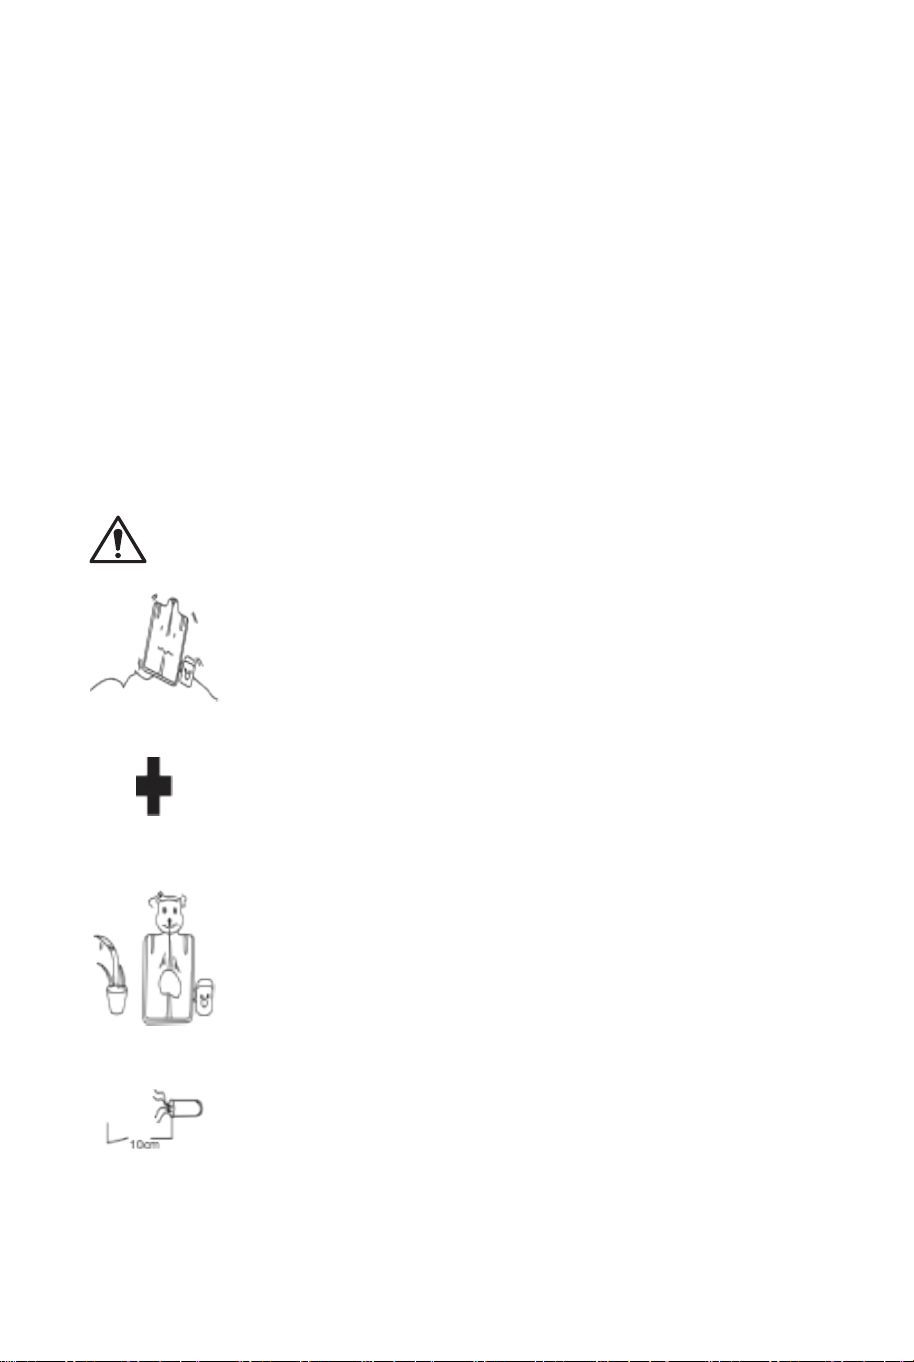
Please keep the product in balance when using it. To prevent
fire hazards, do not place the steamer near flammable
materials .
Pregnant women and people having high blood pressure and
heart disease should not use this product. Please wait at least
30 minutes after eating before using this product. Do not use
this product in times of great hunger for your safety.
Don’t put animals or plants in the sauna room.
When using the product, stay at least 10 cm (4 inches) away
from the steam outlet. Don't touch the steam outlet with bare
hands.
Do not use the product in a humid environment or immerse
it in water.
The water filled in the steamer should not reach over the
max water line in case of malfunction.
Users should drink 200-300 ml of water or tea before using
the product. Please prepare a towel for wiping sweat. Take
a break after a certain period of use. Don’t use the product
consecutively over 20 minutes at one time.
The elders should be accompanied by their families when
using the product.
The steamer will power off automatically when the water
inside dries up. It will restart 20 minutes later. If it doesn’t
restart, please contact the supplier. Never turn on the
steamer without water added.
Don’t forget to disconnect the power after use and wipe it
clean with a damp cloth after 15 minutes of cooling down.
Don’t clean the product with water directly.
The sauna room and steamer must be placed on a flat
surface. Do not open the lid immediately if the steamer is
working. Disconnect the power and let it thoroughly cool
down first.
04 05
Before You Start
Safety Instructions
Please read all instructions carefully.
Retain instructions for future reference.
Separate and count all parts and hardware.
Read through each step carefully and follow the proper order.
We recommend that, where possible, all items are assembled near to the
area in which they will be placed in use, to avoid moving the product
unnecessarily once assembled.
Always place the product on a flat, steady and stable surface.
Keep all small parts and packaging materials for this product away from
babies and children as they potentially pose a serious choking hazard.
Please keep the product in balance when using it. To prevent
fire hazards, do not place the steamer near flammable
materials .
Pregnant women and people having high blood pressure and
heart disease should not use this product. Please wait at least
30 minutes after eating before using this product. Do not use
this product in times of great hunger for your safety.
Don’t put animals or plants in the sauna room.
When using the product, stay at least 10 cm (4 inches) away
from the steam outlet. Don't touch the steam outlet with bare
hands.
Do not use the product in a humid environment or immerse
it in water.
The water filled in the steamer should not reach over the
max water line in case of malfunction.
Users should drink 200-300 ml of water or tea before using
the product. Please prepare a towel for wiping sweat. Take
a break after a certain period of use. Don’t use the product
consecutively over 20 minutes at one time.
The elders should be accompanied by their families when
using the product.
The steamer will power off automatically when the water
inside dries up. It will restart 20 minutes later. If it doesn’t
restart, please contact the supplier. Never turn on the
steamer without water added.
Don’t forget to disconnect the power after use and wipe it
clean with a damp cloth after 15 minutes of cooling down.
Don’t clean the product with water directly.
The sauna room and steamer must be placed on a flat
surface. Do not open the lid immediately if the steamer is
working. Disconnect the power and let it thoroughly cool
down first.
04 05
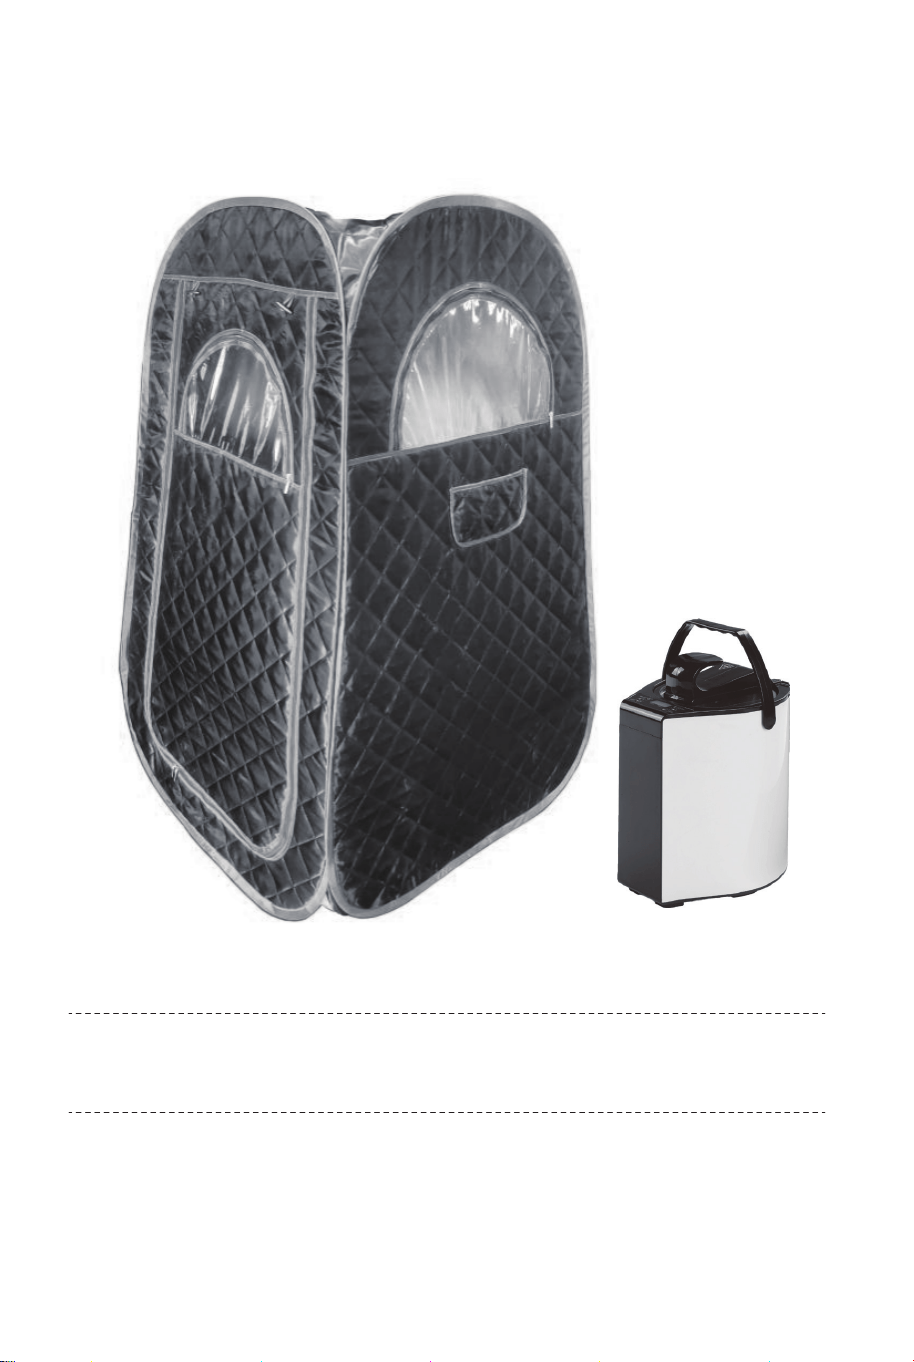
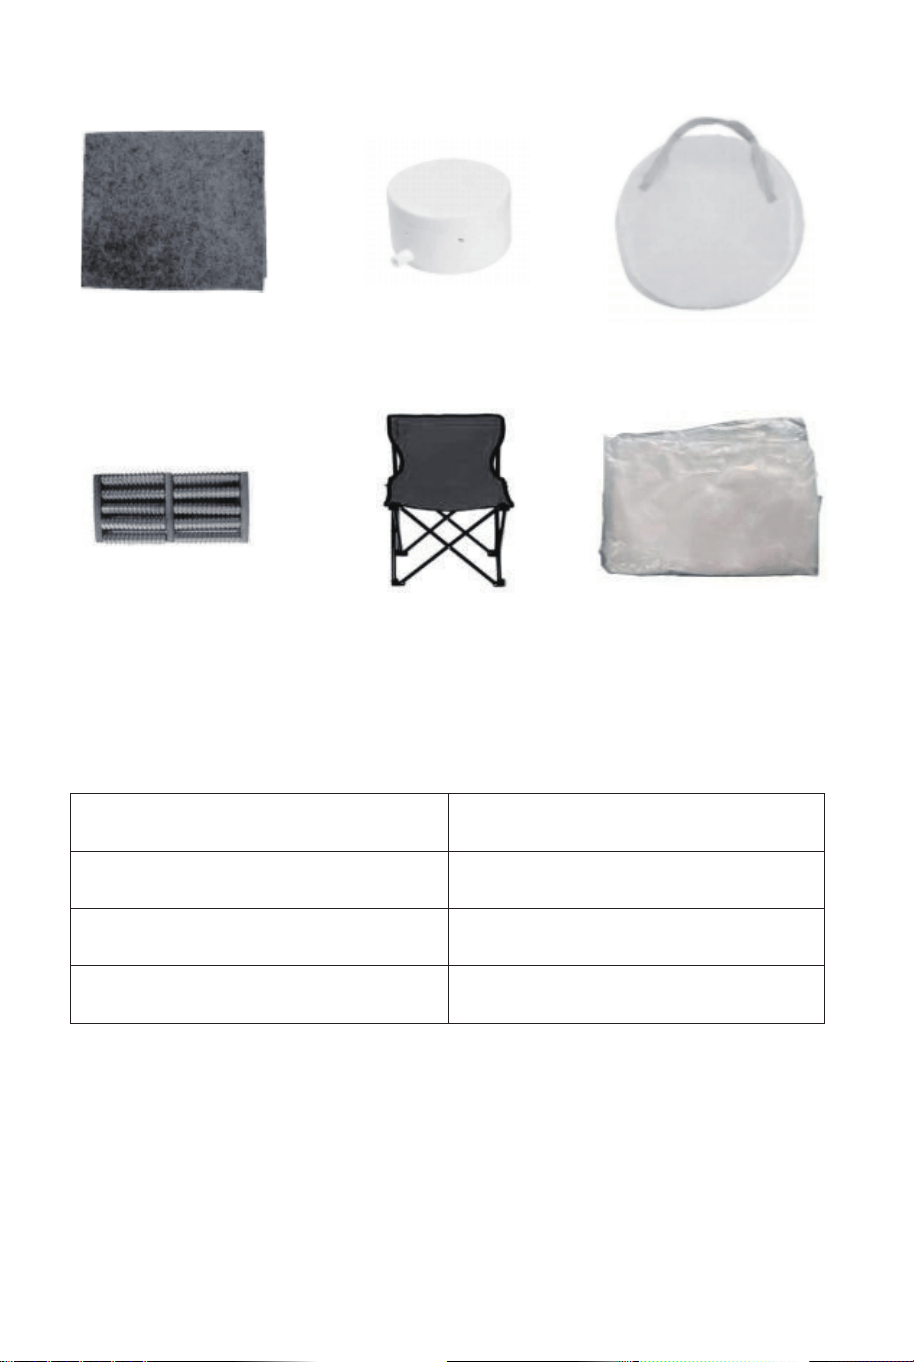
Package Contents
Specifications
Sauna Tent Cover × 1 Steamer × 1 Steam Tube × 2
Overall Dimensions(L×W×H)
Material
Rated Voltage of Steamer
Power of Steamer
35” × 35” × 58.7”
Satin Cover & Iron Frame
110V / 60HZ
800W
Mat × 1 Steam Box × 1 Carrying Bag × 1
Wooden Foot
Massage × 1
Chair × 1 Plastic bag × 1
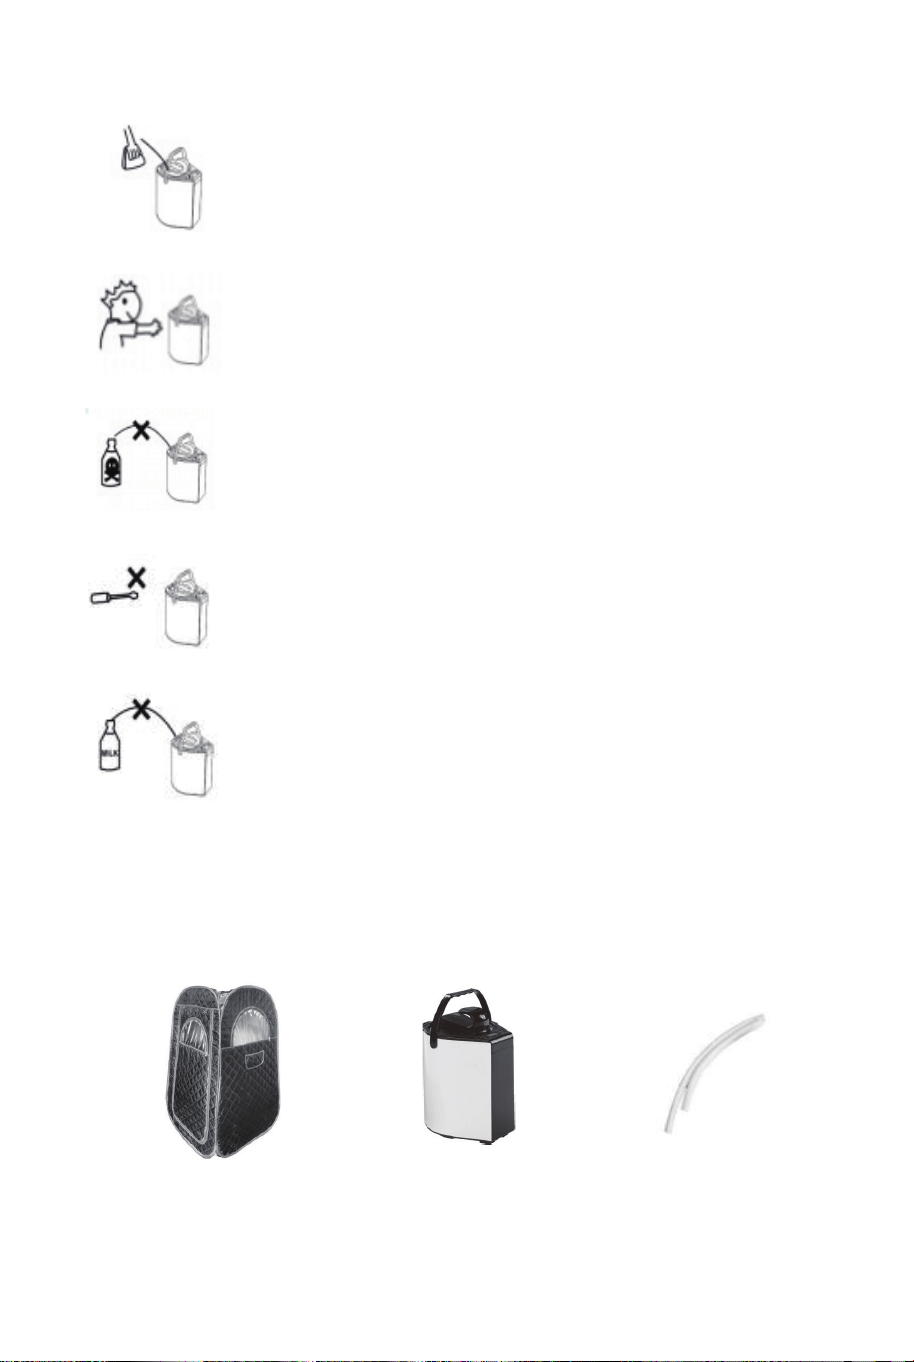
Always keep the product clean and in good condition as it
would make its service life longer.
Please keep this product out of reach of children.
Flammable, toxic, corrosive, or other harmful liquids must
not be put into the steamer as they might cause bodily
injuries or property damage.
The steamer should be only used in the sauna room. It
should not be used for other heating purposes. Don’t repair
or modify the product by yourself.
Milk should not be put into the steamer. If you want to use
herbs or flowers, remember to use a gauze bag to wrap
them in advance.
06 07
Package Contents
Specifications
Sauna Tent Cover × 1 Steamer × 1 Steam Tube × 2
Overall Dimensions(L×W×H)
Material
Rated Voltage of Steamer
Power of Steamer
35” × 35” × 58.7”
Satin Cover & Iron Frame
110V / 60HZ
800W
Mat × 1 Steam Box × 1 Carrying Bag × 1
Wooden Foot
Massage × 1
Chair × 1 Plastic bag × 1
Always keep the product clean and in good condition as it
would make its service life longer.
Please keep this product out of reach of children.
Flammable, toxic, corrosive, or other harmful liquids must
not be put into the steamer as they might cause bodily
injuries or property damage.
The steamer should be only used in the sauna room. It
should not be used for other heating purposes. Don’t repair
or modify the product by yourself.
Milk should not be put into the steamer. If you want to use
herbs or flowers, remember to use a gauze bag to wrap
them in advance.
06 07
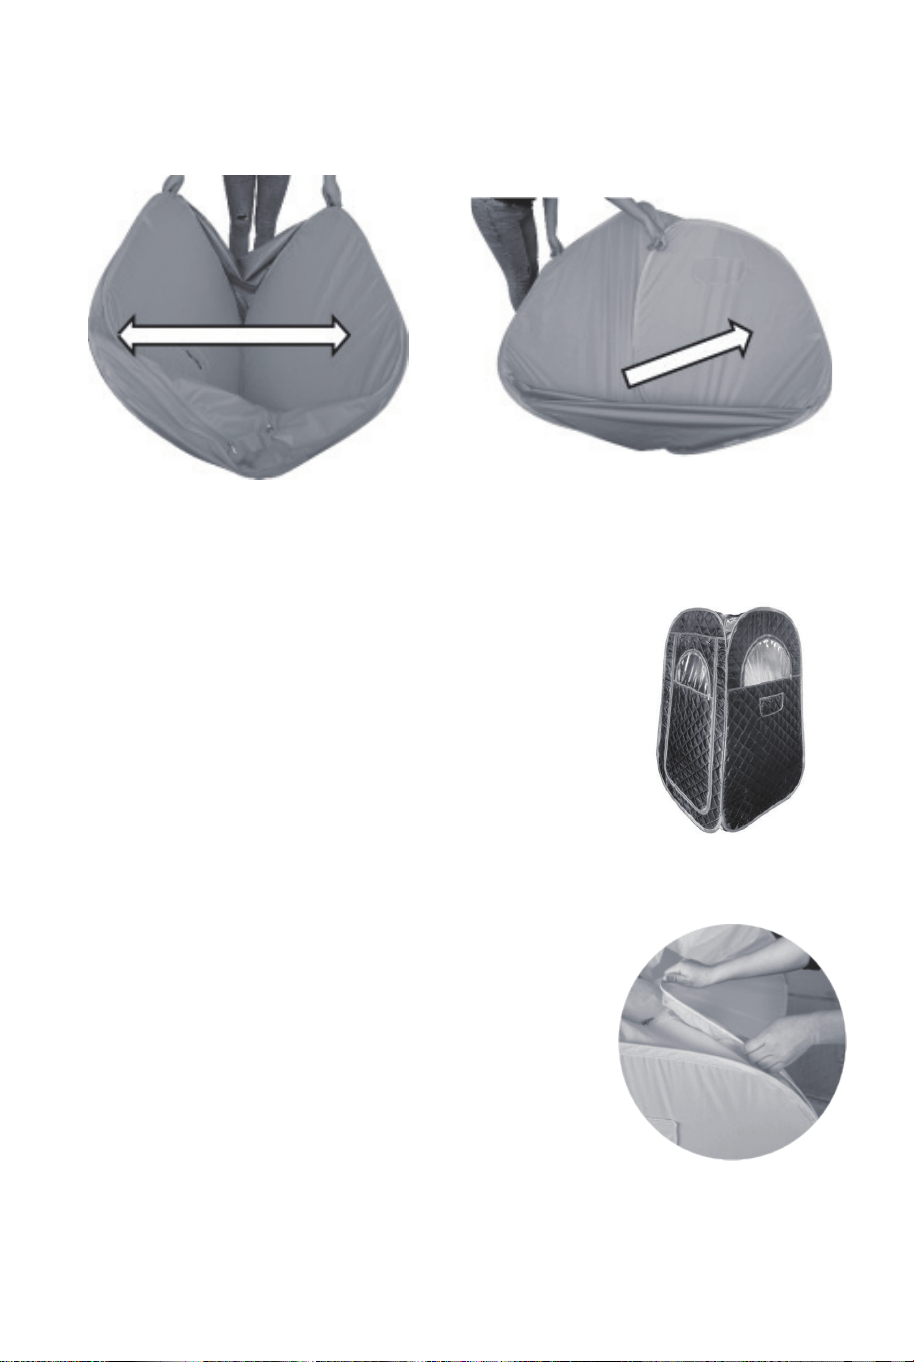
Fig 1 Fig 2
Fig 3
Fig 4
1. Take out the sauna tent cover from the
carrying bag and unfold it from the center as
shown in Fig 1.
2. Hold the inner frame and pull out diagonally
as shown in Fig 2.
3. The sauna tent cover will look like Fig 3 after
it is fully unfolded.
Note:
If the frame of the sauna tent cover is out of
shape, please twist it
forward and backward repeatedly to readjust it
as shown in Fig 4.
Use one of the steam tubes to connect the steam box and outlet port on the
inner side of the sauna tent cover as shown in Fig 5. Ensure that the steam
tube is well connected with the two parts.
Note: Make sure that the steam box is placed flat with its cover on the top
and that there are no objects within 4 inches of all sides.
Set-Up Instructions
Fig 5
B
08 09
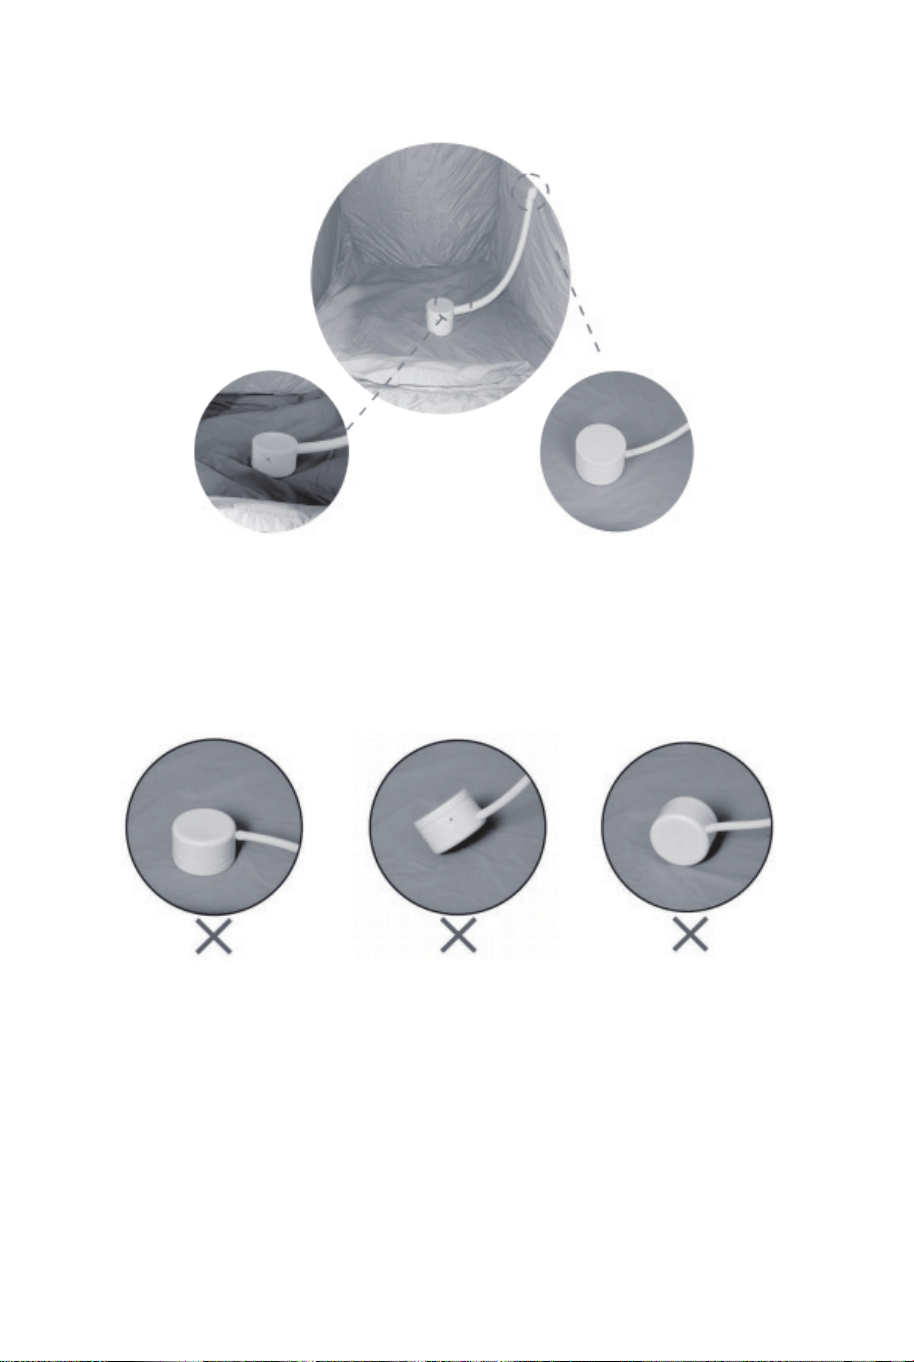

Use one of the steam tubes to connect the steamer and the inlet hole on the
outer side of the sauna tent cover as shown in Fig 6.
Ensure that the steam tube is well connected with the two parts. If the tubes
fall off or loosen during usage, please turn off the power and let them
thoroughly cool down first before reconnection.
a).Switch Button (ON/OFF Button)
Press this button to switch between standby and operating status.
b).Timing Button (TIMER Button)
Press this button to shorten and prolong timer. 9-level timing settings:
(15, 20, 30, 40, 50, 60, 70, 80, and 90 min). Suggested time is 20-30
minutes.
c).Temperature Button (TEMP Button)
Press this button to increase temp. There are 9 grades. Suggested
temperature grade is 6-8.
d).Fogging Button
Photocatalyst fogging function makes steam have better wettability and
skin-friendly properties. At the same time, the steamer has a certain
bactericidal affect.
NOTE:
1.Do not operate without water in the steamer when the power is on.
2.Pay attention to the battery(not included). If there is not enough battery left
of the remote controller, please open the cover of the battery behind the
controller and install a new one, then close the cover again.
1. Zip up the cover and add water to the steamer until the water reaches to
the M water line. This amount of water could last about 1 hour. If you like,
you can add some herb or flowers in the steamer or the steam box.
Remember to use a gauze bag to wrap them in advance.
2. Connect the steamer or the sauna room with shorter steamer hose
(Please keep the air in good conditions).
3. Make sure the lid is closed on the steamer and connected to the power.
Before connection, please note that the voltage on the power plug is
consistent with the voltage on the nameplate, and then press the power
button "ON /OFF".
4. Press the button on the steamer or use the remote to turn it on and adjust
the time to 90 minutes and temperature to P9. Let it preheat for about 10-15
minutes first. When the steam is ready in the tent, we will start the sauna.
Caution:
When you are using the product,
please make sure all of the steam
tubes are not bent as shown in the
picture since it would block the flow
of steam.
As a result, the steam tubes may
pop off and the hot steam may stray
out, causing scalding and other
bodily injuries. Make sure the steam
tubes are placed straight. If you find
they are bent, turn off the power and
let them thoroughly cool down first
before you adjust their positions.
Button Instruction
Steamer Operation Instructions
Fig 6
A
10 11

5. Before you get into the sauna room, adjust the temperature back to P6
first. Since the P6 is suitable for most people. You can turn it up if you think it
is not hot enough.
6. For time setting, press the "TIMER" button. There are 9 grades of time
from 15 minutes to 90 minutes. The recommended time is 20-30 minutes
(press the up button for 15-80 minutes. For 90 minutes, the user has to
press the button down).
7. For the temperature setting, press the “TEMP” button. There are 9
adjustable temperature grades. The recommended temperature is 6-8
grades depending on comfort level.
Press the up button to increase the temperature level from low to high
(1-2-3-4-5-6-7-8-9), which can be adjusted in a cycle. Press the downward
button, the temperature level decreases from high to low
(9-8-7-6-5-4-3-2-1), which can be adjusted in a cycle.
There is a "FOGGING" button. When pressed, the water vapor becomes
smoother and more pleasing to the skin.
NOTE:
1. After use, please disconnect the power and let the product cool
down completely before disassembling (If you reuse it, let the product cool
down for 30 minutes before starting).
2. After sauna, relax your body and let your body temperature return to
normal before taking a bath.
3. It is forbidden to pour water into the steam box. Because it will cause the
vapor diffusion to be blocked.
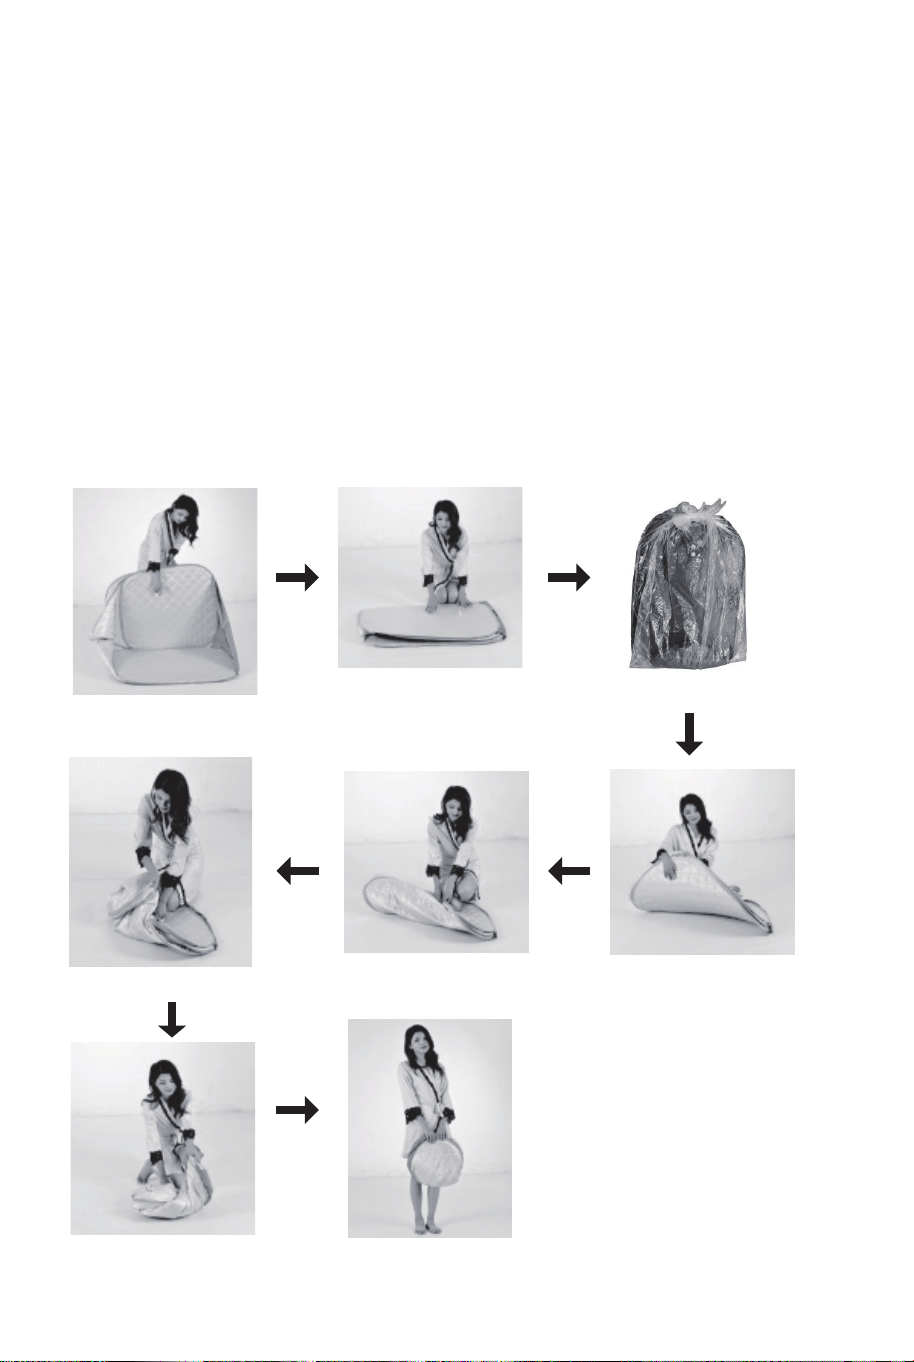
First way:
1. Lay down the sauna tent cover with the inlet hole facing you. Press down
the frame on the opposite side as shown in Fig 7.
2. Fold the sauna tent cover into half as shown in Fig 8.
3. Put the sauna tent cover into the plastic bag,then tie the plastic bag tightly
as shown in Fig 9.
Second way:
1. Lay down the sauna tent cover with the inlet hole facing you. Press down
the frame on the opposite side as shown in Fig 7.
2. Fold the sauna tent cover into half as shown in Fig 8.
3. Hold the top left corner and fold it toward the right side of the inlet hole as
shown in Fig 10.
4. With your right hand holding the top left corner in place, use your left
hand to fold the top right corner toward the outlet hole as shown in Fig 11.
5. Fold the button left corner over the top right corner as shown in Fig 11.
6. Press down the folded sauna tent cover as shown in Fig 13.
7. Put the folded sauna tent cover back to the carrying bag as shown in Fig
14.
*In order to keep the shape of the sauna tent cover, recommend using the
first way. If you’re skilled in taking down the sauna tent cover as the second
way’s shown, you can use the second way.
Sauna Tent Cover Take-Down Instructions
Fig 7
Fig 8
Fig 9
Fig 12
Fig 11 Fig 10
Fig 13 Fig 14
12 13
5. Before you get into the sauna room, adjust the temperature back to P6
first. Since the P6 is suitable for most people. You can turn it up if you think it
is not hot enough.
6. For time setting, press the "TIMER" button. There are 9 grades of time
from 15 minutes to 90 minutes. The recommended time is 20-30 minutes
(press the up button for 15-80 minutes. For 90 minutes, the user has to
press the button down).
7. For the temperature setting, press the “TEMP” button. There are 9
adjustable temperature grades. The recommended temperature is 6-8
grades depending on comfort level.
Press the up button to increase the temperature level from low to high
(1-2-3-4-5-6-7-8-9), which can be adjusted in a cycle. Press the downward
button, the temperature level decreases from high to low
(9-8-7-6-5-4-3-2-1), which can be adjusted in a cycle.
There is a "FOGGING" button. When pressed, the water vapor becomes
smoother and more pleasing to the skin.
NOTE:
1. After use, please disconnect the power and let the product cool
down completely before disassembling (If you reuse it, let the product cool
down for 30 minutes before starting).
2. After sauna, relax your body and let your body temperature return to
normal before taking a bath.
3. It is forbidden to pour water into the steam box. Because it will cause the
vapor diffusion to be blocked.
First way:
1. Lay down the sauna tent cover with the inlet hole facing you. Press down
the frame on the opposite side as shown in Fig 7.
2. Fold the sauna tent cover into half as shown in Fig 8.
3. Put the sauna tent cover into the plastic bag,then tie the plastic bag tightly
as shown in Fig 9.
Second way:
1. Lay down the sauna tent cover with the inlet hole facing you. Press down
the frame on the opposite side as shown in Fig 7.
2. Fold the sauna tent cover into half as shown in Fig 8.
3. Hold the top left corner and fold it toward the right side of the inlet hole as
shown in Fig 10.
4. With your right hand holding the top left corner in place, use your left
hand to fold the top right corner toward the outlet hole as shown in Fig 11.
5. Fold the button left corner over the top right corner as shown in Fig 11.
6. Press down the folded sauna tent cover as shown in Fig 13.
7. Put the folded sauna tent cover back to the carrying bag as shown in Fig
14.
*In order to keep the shape of the sauna tent cover, recommend using the
first way. If you’re skilled in taking down the sauna tent cover as the second
way’s shown, you can use the second way.
Sauna Tent Cover Take-Down Instructions
Fig 7
Fig 8
Fig 9
Fig 12
Fig 11 Fig 10
Fig 13 Fig 14
12 13
In case a return is required, the item must be returned in original
box. Without this your return will not be accepted.
DO NOT discard the box / original packaging.
Take a photo of the box markings.
Take a photo of the damaged part (if applicable).
Send us an email with the images requested.
A photo of the markings (text) on the side of the box is required in
case a part is needed for replacement. This helps our staff identify
your product number to ensure you receive the correct parts.
A photo of the damage is always required to file a claim and get
your replacement or refund processed quickly. Please make sure
you have the box even if it is damaged.
Email us directly from marketplace where your item was purchased
with the attached images and a description of your claim.
Return / Damage Claim Instructions
14

BA8086US
THIS INSTRUCTION BOOKLET CONTAINS IMPORTANT SAFETY INFORMATION. PLEASE READ AND KEEP FOR FUTURE REFERENCE.
USA office: Fontana GBR office: Ipswich AUS office: Truganina
If you're having difficulty, our friendly
customer team is always here to help.
AUS:cs.au@costway.com
GBR:cs.uk@costway.com
Portable Steam Sauna Spa