Before You Start
Assembled only by adults
Remove all packaging, separate and count all parts and hardware.
Read through each step carefully and follow the proper order.
We recommend that, where possible, all items are assembled near the area in which
they will be placed in use, to avoid moving the product unnecessarily once assembled.
Ensure a secure surface during installation, and place the product always on a flat,
steady and stable surface.
Caution: Children should use this product under the parental supervision.
Danger: Keep all small parts and packaging materials for this product away from babies
and children, otherwise they may pose a choking hazard.
Danger: Lack of attachment may cause a risk of tipping.
WARNING:
CHOKING HAZARD
-Small parts.
Not for children under 3 years.
0-3
Please read all instructions carefully and keep it for future reference.
02
EN
Warning for Assembly
General Security Warning
Avant de Commencer
Construction seulement par des adultes
Retirez tous les emballages, séparez et comptez toutes les pièces et le matériel.
Lisez attentivement chaque étape et suivez l’ordre correct.
Nous recommandons que, dans la mesure du possible, tous les articles soient
assemblés à proximité de la zone dans laquelle ils seront utilisés, afin d’éviter de
déplacer inutilement le produit une fois assemblé.
Assurez-vous que la surface soit solide pendant la construction et placez toujours le
produit sur une surface plane et stable.
Attention : Les enfants doivent utiliser ce produit sous la surveillance de leurs parents.
Danger : Gardez toutes les petites pièces et les matériaux d’emballage de ce produit hors
de la portée des bébés et des enfants pour éviter un risque d’étouffement.
Danger : Le manque de la fixation pourrait entraîner un risque de basculement.
Veuillez lire attentivement toutes les instructions et les conserver pour la référence ultérieure.
0-3
AVERTISSEMENT :
RISQUE D’ÉTOUFFEMENT
– Les petites pièces.
Ne convient pas aux enfants de
moins de 3 ans.
FR
Avertissement pour l’Assemblage
Avertissement de Sécurité Générale
02 03
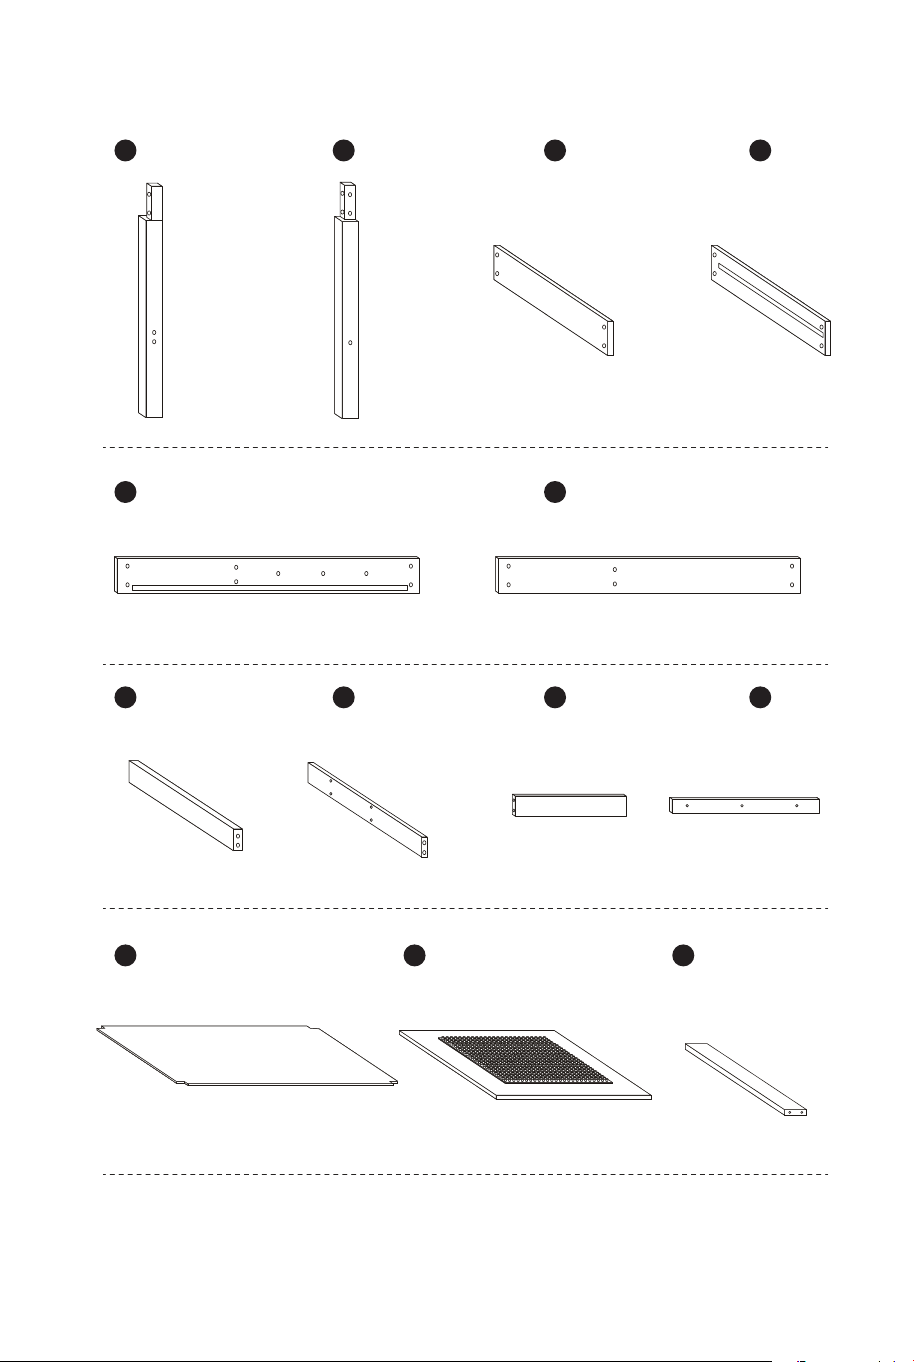
1 x2 2 x2 3 x1
5 x1 6 x1
4 x1
7 x2 8 x1 9 x2
11 x1 12 x1 13 x1
10 x2
A x4 B x4
D x8 E x16
C x16
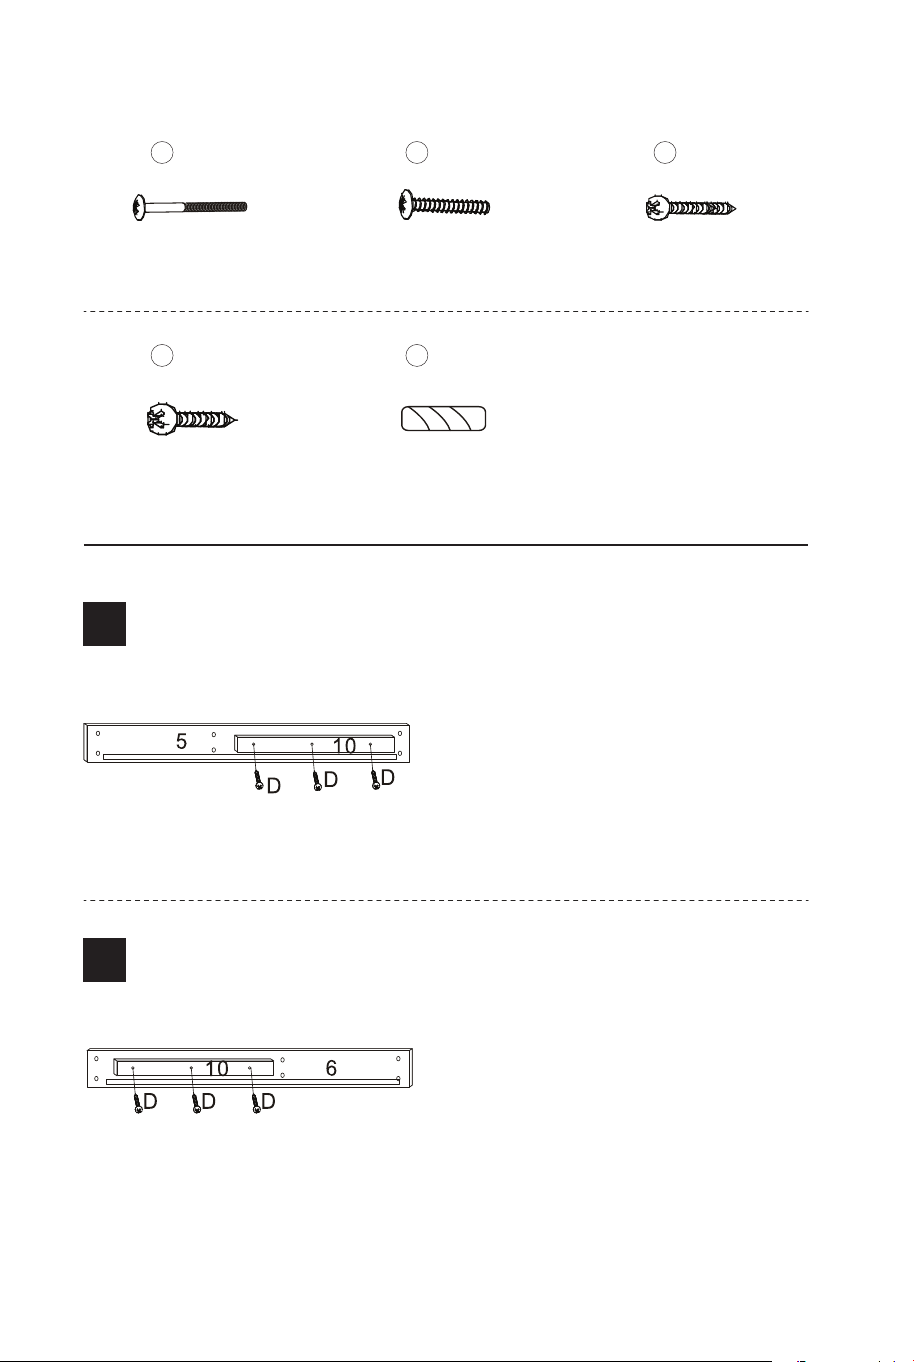
1
EN: Use screws (D) to lock the
No.10 panel to the No.5 panel.
FR: Utilisez les vis (D) pour
verrouiller le panneau n° 10 au
panneau n° 5.
2
EN: Use screws (D) to lock the
No.10 panel to the No.6 panel.
FR: Utilisez les vis (D) pour
verrouiller le panneau n° 10 au
panneau n° 6.
5x50mm
4x20mm 5x30mm
5x40mm 4x25mm
04 05
1 x2 2 x2 3 x1
5 x1 6 x1
4 x1
7 x2 8 x1 9 x2
11 x1 12 x1 13 x1
10 x2
A x4 B x4
D x8 E x16
C x16
1
EN: Use screws (D) to lock the
No.10 panel to the No.5 panel.
FR: Utilisez les vis (D) pour
verrouiller le panneau n° 10 au
panneau n° 5.
2
EN: Use screws (D) to lock the
No.10 panel to the No.6 panel.
FR: Utilisez les vis (D) pour
verrouiller le panneau n° 10 au
panneau n° 6.
5x50mm
4x20mm 5x30mm
5x40mm 4x25mm
04 05
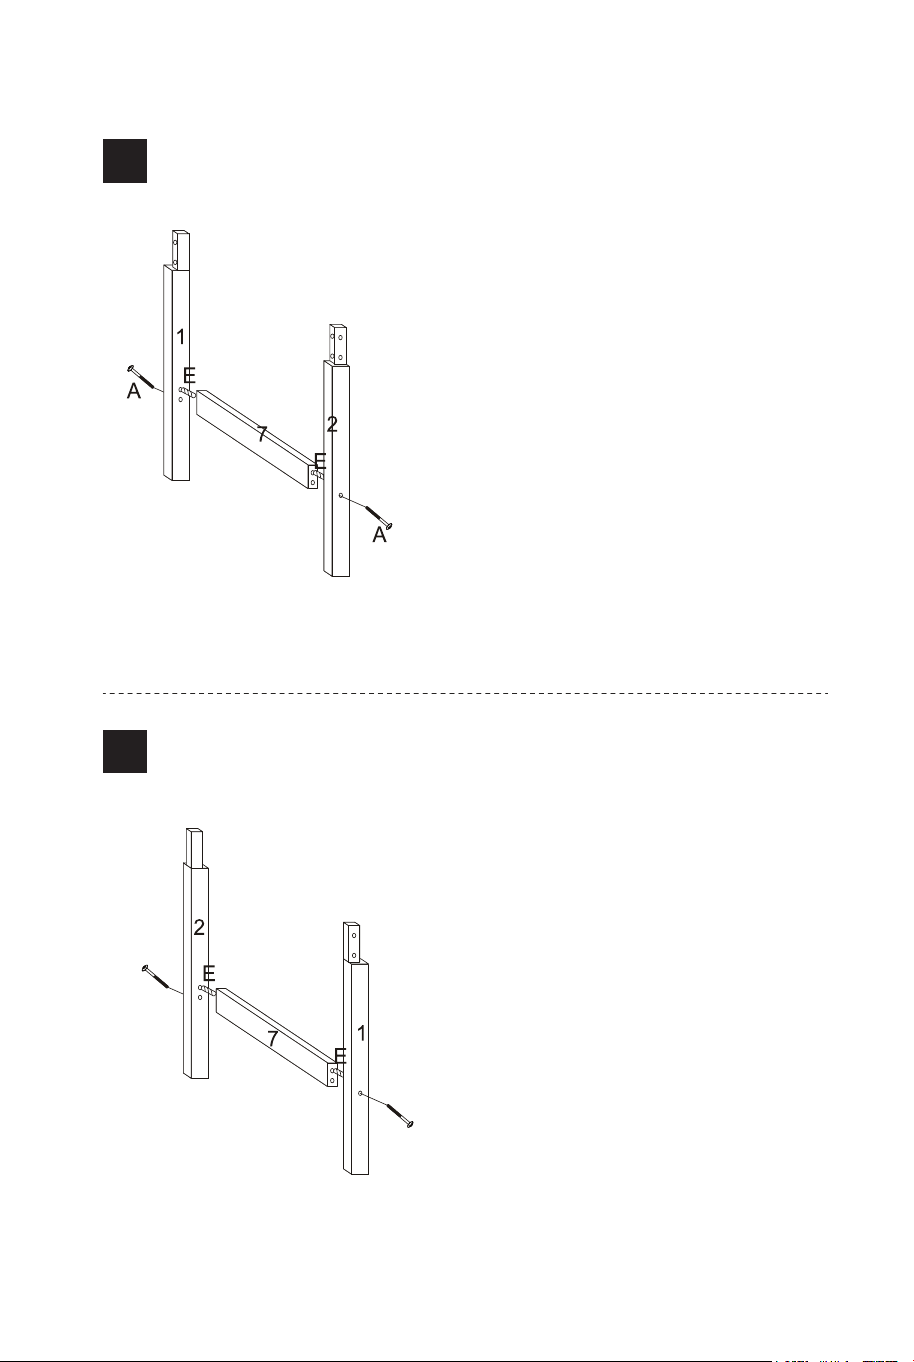
3
EN: Insert wooden dowels (E) into
both sides of the No.7 panel, and
connect it to the No.1 and No.2
panel, then use screws (A) to lock
it on. The left part assembly of the
table is completed.
FR: Insérez des chevilles en bois
(E) dans les deux côtés du
panneau n° 7, et reliez-le aux
panneaux n° 1 et n° 2, puis utilisez
les vis (A) pour le verrouiller.
L'assemblage de la partie gauche
de la table est terminé.
4
EN: Insert wooden dowels (E) into
both sides of the No.7 panel, and
connect it to the No.1 and No.2
panel, then use screws (A) to lock
it on. The right part assembly of
the table is completed.
FR: Insérez des chevilles en bois
(E) dans les deux côtés du
panneau n° 7 et reliez-le aux
panneaux n° 1 et n° 2, puis utilisez
des vis (A) pour le verrouiller.
L'assemblage de la partie droite de
la table est terminé.
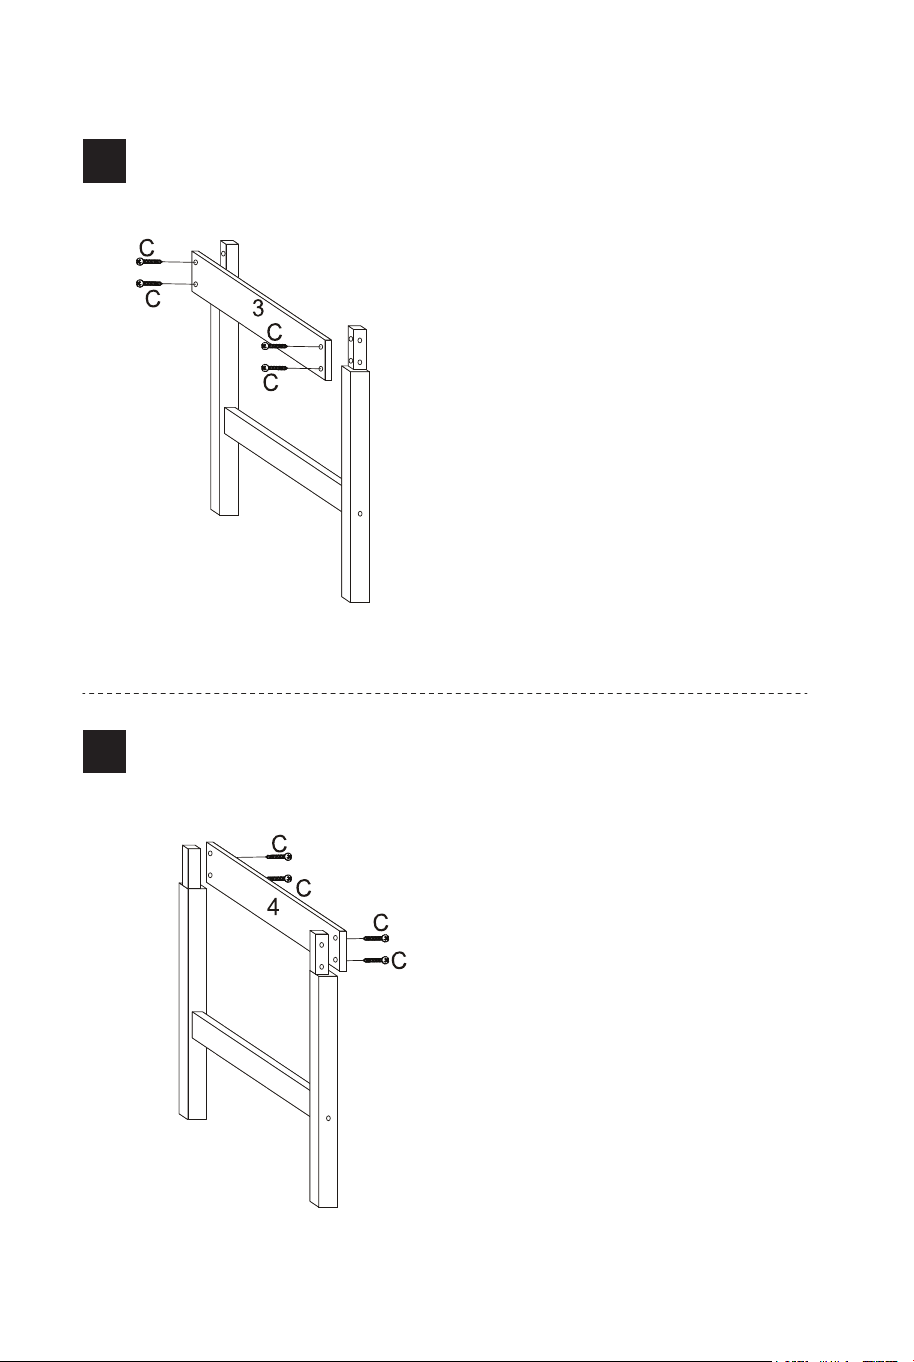
5
EN: Use screws (C) to lock the
No.3 panel to the No.1 and No.2
panel.
FR: Utilisez des vis (C) pour
verrouiller le panneau n° 3 sur les
panneaux n° 1 et n° 2.
6
EN: Use screws (C) to lock the
No.4 panel to the No.1 and No.2
panel.
FR: Utilisez des vis (C) pour
verrouiller le panneau n° 4 sur les
panneaux n° 1 et n° 2.
06 07
3
EN: Insert wooden dowels (E) into
both sides of the No.7 panel, and
connect it to the No.1 and No.2
panel, then use screws (A) to lock
it on. The left part assembly of the
table is completed.
FR: Insérez des chevilles en bois
(E) dans les deux côtés du
panneau n° 7, et reliez-le aux
panneaux n° 1 et n° 2, puis utilisez
les vis (A) pour le verrouiller.
L'assemblage de la partie gauche
de la table est terminé.
4
EN: Insert wooden dowels (E) into
both sides of the No.7 panel, and
connect it to the No.1 and No.2
panel, then use screws (A) to lock
it on. The right part assembly of
the table is completed.
FR: Insérez des chevilles en bois
(E) dans les deux côtés du
panneau n° 7 et reliez-le aux
panneaux n° 1 et n° 2, puis utilisez
des vis (A) pour le verrouiller.
L'assemblage de la partie droite de
la table est terminé.
5
EN: Use screws (C) to lock the
No.3 panel to the No.1 and No.2
panel.
FR: Utilisez des vis (C) pour
verrouiller le panneau n° 3 sur les
panneaux n° 1 et n° 2.
6
EN: Use screws (C) to lock the
No.4 panel to the No.1 and No.2
panel.
FR: Utilisez des vis (C) pour
verrouiller le panneau n° 4 sur les
panneaux n° 1 et n° 2.
06 07
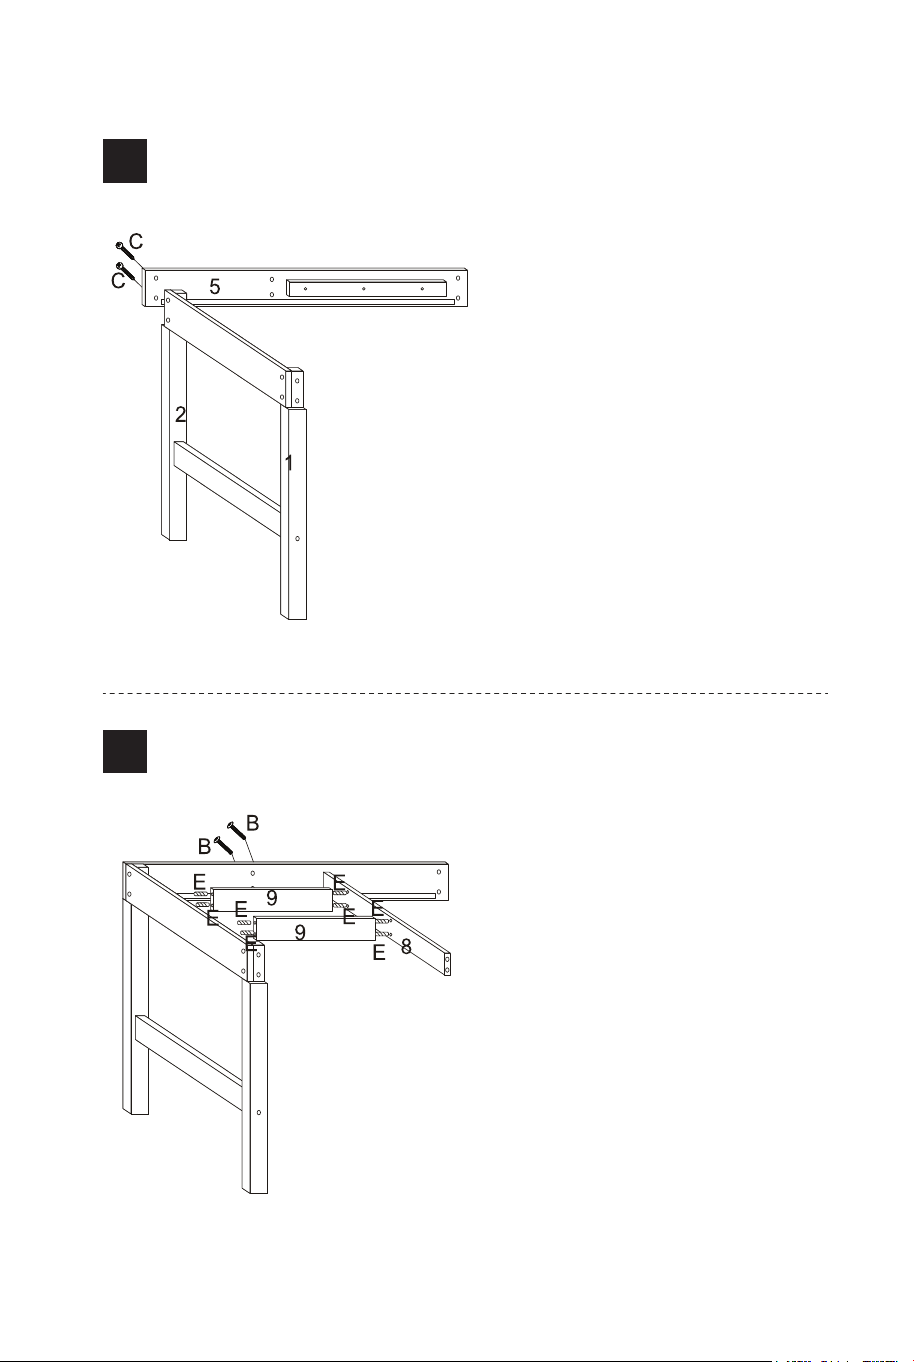
7
EN: Use screws (C) to lock the
No.5 panel to the No.2 panel.
FR: Utilisez des vis (C) pour
verrouiller le panneau n° 5 sur le
panneau n° 2.
8
EN: Insert wooden dowels (E)
into both sides of the No.9 panel,
and connect it to the No.8 and
No.3 panel, then use screws (B)
to lock the No.8 panel to the No.5
panel.
FR: Insérez des chevilles en bois
(E) des deux côtés du panneau
n° 9, et reliez-le aux panneaux n°
8 et n° 3, puis utilisez les vis (B)
pour verrouiller le panneau n° 8
au panneau n° 5.
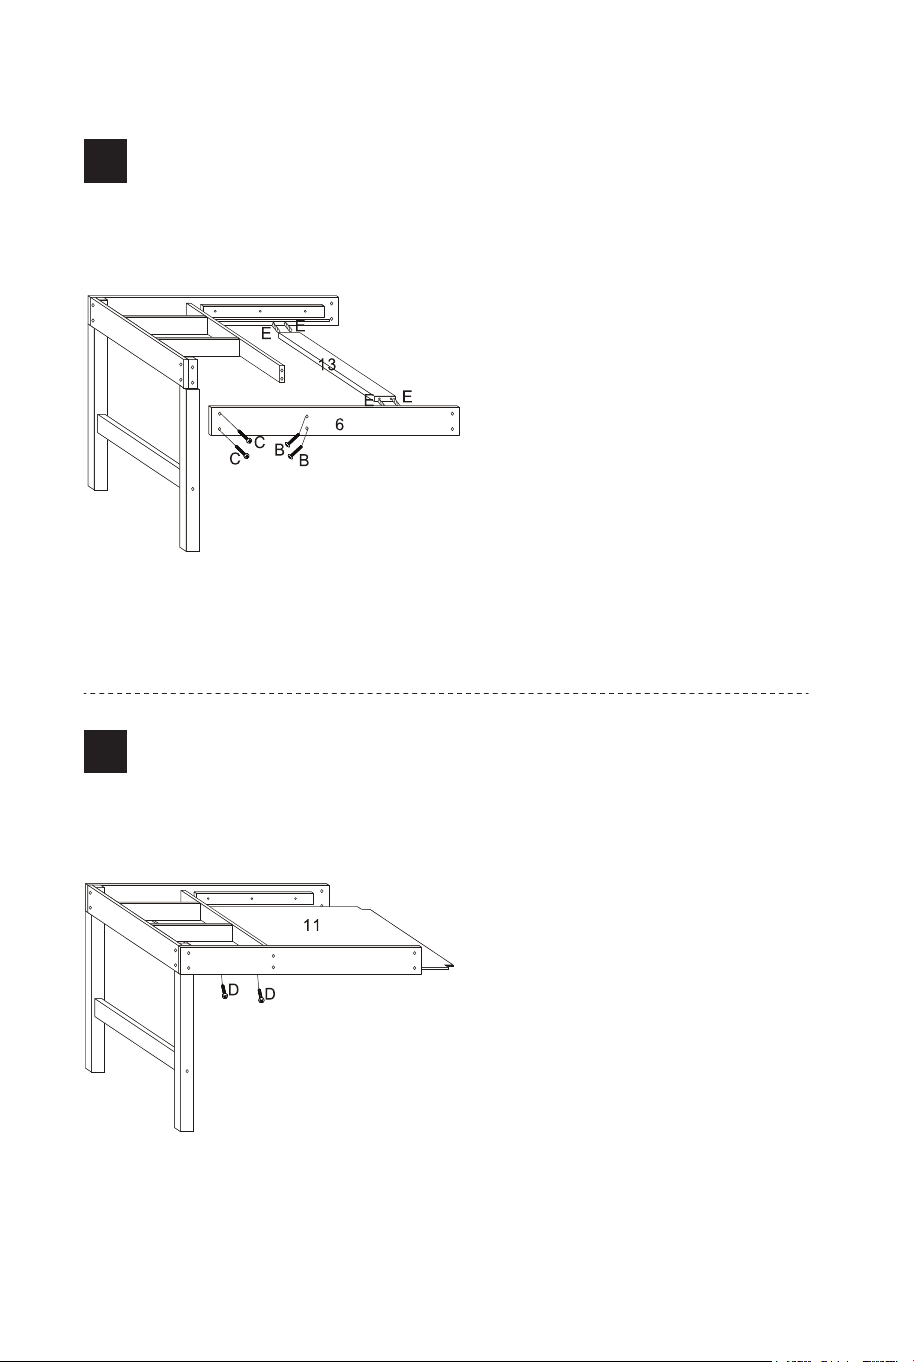
9
EN: Insert wooden dowels (E)
into both sides of the No.13
panel, and connect it to the No.6
and No.5 panel, then use screws
(C and B) to lock the No.6 panel
to the No.1 and No.8 panel.
FR: Insérez des chevilles en bois
(E) des deux côtés du panneau
n° 13 et connectez-les aux
panneaux n° 6 et n° 5, puis
utilisez des vis (C et B) pour
verrouiller le panneau n° 6 aux
panneaux n° 1 et n° 8.
10
EN: Insert the No.11 panel
between in the No.5 and No.6
panel. Use screws (D) to lock the
No.11 panel to the No.8 panel.
FR: Insérez le panneau n° 11
entre les panneaux n° 5 et n° 6.
Utilisez des vis (D) pour
verrouiller le panneau n° 11 sur le
panneau n° 8.
08 09
7
EN: Use screws (C) to lock the
No.5 panel to the No.2 panel.
FR: Utilisez des vis (C) pour
verrouiller le panneau n° 5 sur le
panneau n° 2.
8
EN: Insert wooden dowels (E)
into both sides of the No.9 panel,
and connect it to the No.8 and
No.3 panel, then use screws (B)
to lock the No.8 panel to the No.5
panel.
FR: Insérez des chevilles en bois
(E) des deux côtés du panneau
n° 9, et reliez-le aux panneaux n°
8 et n° 3, puis utilisez les vis (B)
pour verrouiller le panneau n° 8
au panneau n° 5.
9
EN: Insert wooden dowels (E)
into both sides of the No.13
panel, and connect it to the No.6
and No.5 panel, then use screws
(C and B) to lock the No.6 panel
to the No.1 and No.8 panel.
FR: Insérez des chevilles en bois
(E) des deux côtés du panneau
n° 13 et connectez-les aux
panneaux n° 6 et n° 5, puis
utilisez des vis (C et B) pour
verrouiller le panneau n° 6 aux
panneaux n° 1 et n° 8.
10
EN: Insert the No.11 panel
between in the No.5 and No.6
panel. Use screws (D) to lock the
No.11 panel to the No.8 panel.
FR: Insérez le panneau n° 11
entre les panneaux n° 5 et n° 6.
Utilisez des vis (D) pour
verrouiller le panneau n° 11 sur le
panneau n° 8.
08 09

Instructions De Retour / Réclamation De Dommages
Dans le cas où un retour est requis, l'article doit être retourné dans sa boîte
d'origine. Sans cela, votre retour ne sera pas accepté.
NE PAS jeter la boîte/l'emballage d'origine.
Prenez une photo des marquages de la boîte.
Prenez une photo des dommages (le cas échéant).
Envoyez-nous un e-mail avec les images demandées.
Une photo des marquages (texte) sur le côté de la boîte est requise au cas où une
pièce serait nécessaire pour le remplacement. Cela aide notre personnel à
identifier votre numéro de produit pour s'assurer que vous recevez les bonnes
pièces.
Une photo des dommages est toujours requise pour déposer une réclamation et
obtenir rapidement votre remplacement ou votre remboursement. Assurez-vous
d'avoir la boîte même si elle est endommagée.
Envoyez-nous un e-mail directement depuis le marché où votre article a été
acheté avec les images ci-jointes et une description de votre réclamation.
FR
In case a return is required, the item must be returned in original box. Without this
your return will not be accepted.
DO NOT discard the box / original packaging.
Take a photo of the box markings.
Take a photo of the damaged part (if applicable).
Send us an email with the images requested.
A photo of the markings (text) on the side of the box is required in case a part is
needed for replacement. This helps our staff identify your product number to
ensure you receive the correct parts.
A photo of the damage is always required to file a claim and get your replacement
or refund processed quickly. Please make sure you have the box even if it is
damaged.
Email us directly from marketplace where your item was purchased with the
attached images and a description of your claim.
EN
Return / Damage Claim Instructions
11
EN: Use screws (C) to lock the
right part to the table.
FR: Utilisez les vis (C) pour
verrouiller la partie droite sur la
table.
12
EN: Put the No.12 panel in the
table. The table assembly is
completed.
FR: Placez le panneau n° 12
dans la table. L'assemblage de la
table est terminé.
10 11