
Please give us a chance to make it right and do better !
Contact our friendly customer service department for help first.
Replacements for missing or damaged parts will be shipped ASAP !
Contact Us !
Do NOT return this item.
US:cs.us@costway.com
UK:cs.uk@costway.com
US office: Fontana UK office: Ipswich AU office: Truganina

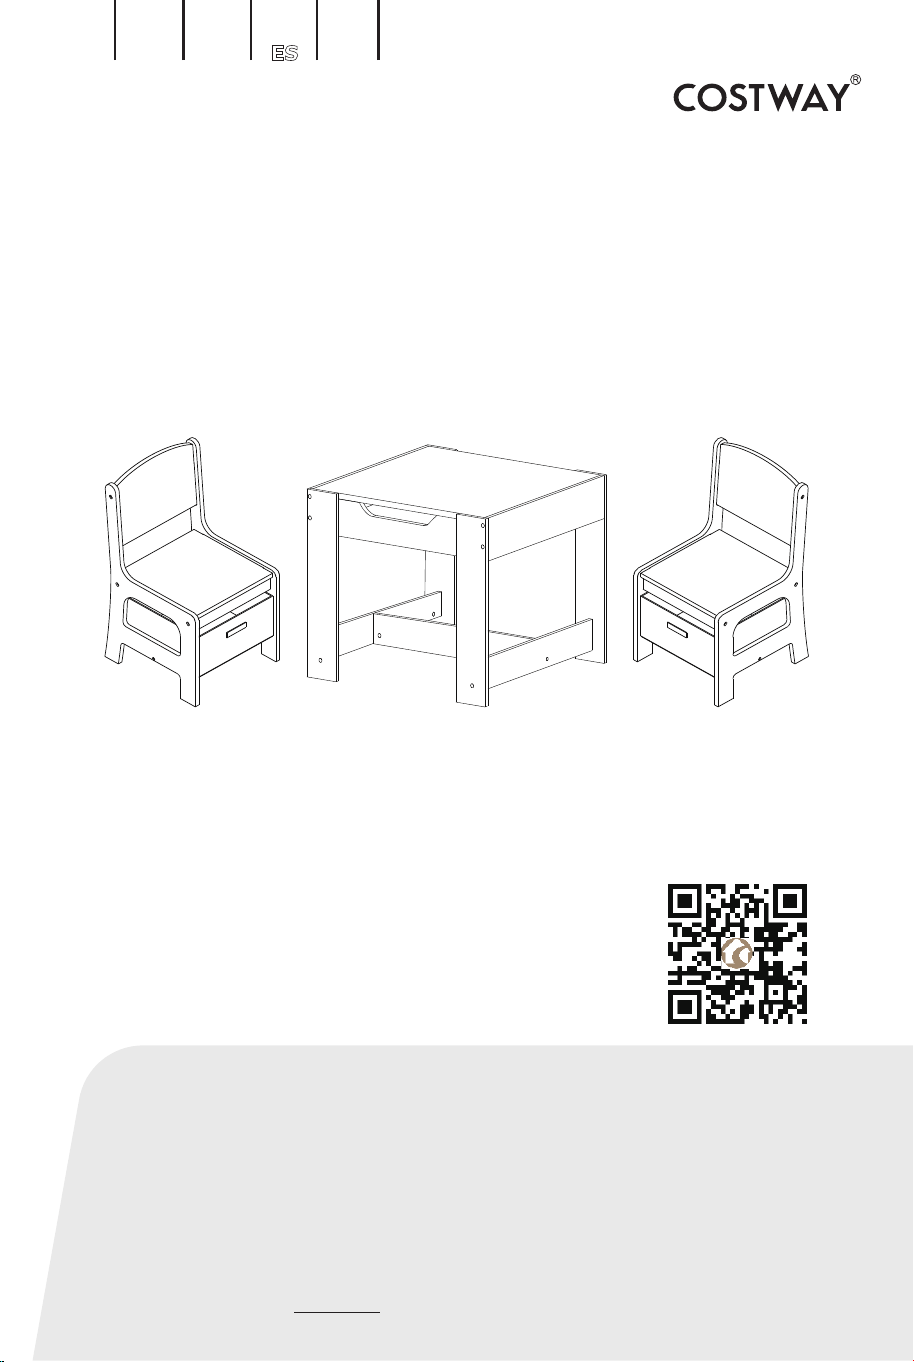
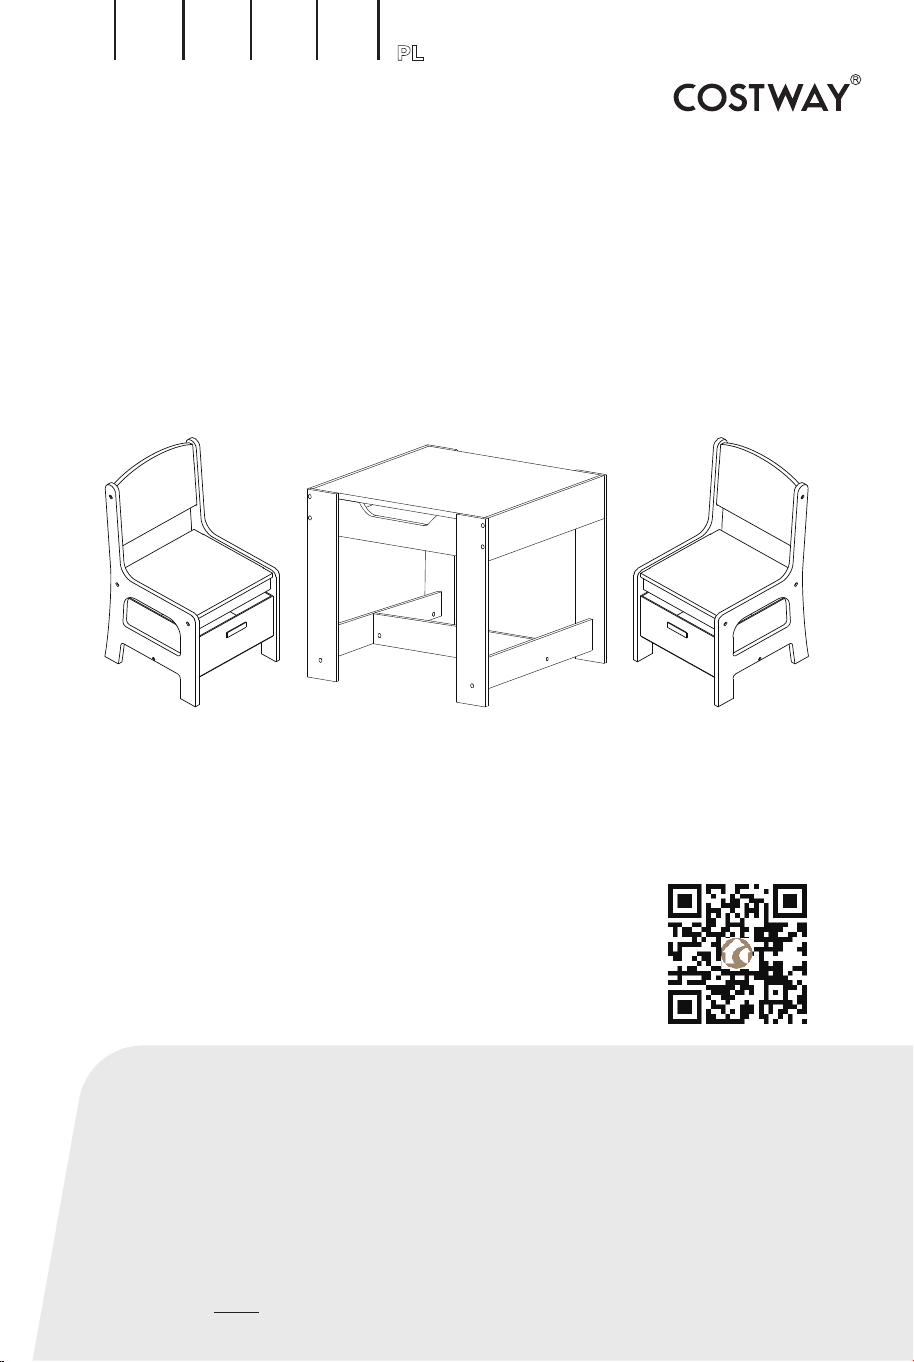
Kids Table and Chair Set
BB5584
USER’S MANUAL
THIS INSTRUCTION BOOKLET CONTAINS IMPORTANT SAFETY INFORMATION. PLEASE READ AND KEEP FOR FUTURE REFERENCE.
EN DE FR ES IT PL
Scan QR code for
assembly instructions.
02
Before You Start
Warning for Assembly
Assembled only by adults
Remove all Packaging, separate and count all parts and hardware.
Read through each step carefully and follow the proper order.
We recommend that, where possible, all items are assembled near the area in
which they will be placed in use, to avoid moving the product unnecessarily once
assembled.
Ensure a secure surface during installation, and place the product always on a flat,
steady and stable surface.
General Security Warning
Caution: The Product is not suitable for the children under 3 years
Danger: Keep all small parts and packaging materials for this product away from babies
and children, otherwise they may pose a choking hazard.
Danger: Lack of attachment may cause a risk of tipping.
WARNING:
CHOKING HAZARD-Small parts.
Not for children under 3 years.
0-3
Please read all instructions carefully and keep it for future reference.

03
3
x1
6
x2
9
x2
12
x2
15
x2
1
x2
7
x2
10
x2
13
x2
2
x2
5
x2
8
x1
11
x2
14
x4
4
x1
16
x2
17
x2
C
x26
A
x4
B
x4
6×35mm
6x40mm
D x26
EN
F x22
E x4
6×16mm
6×25mm
G x12
H x6
5×25mm
4×25mm
04
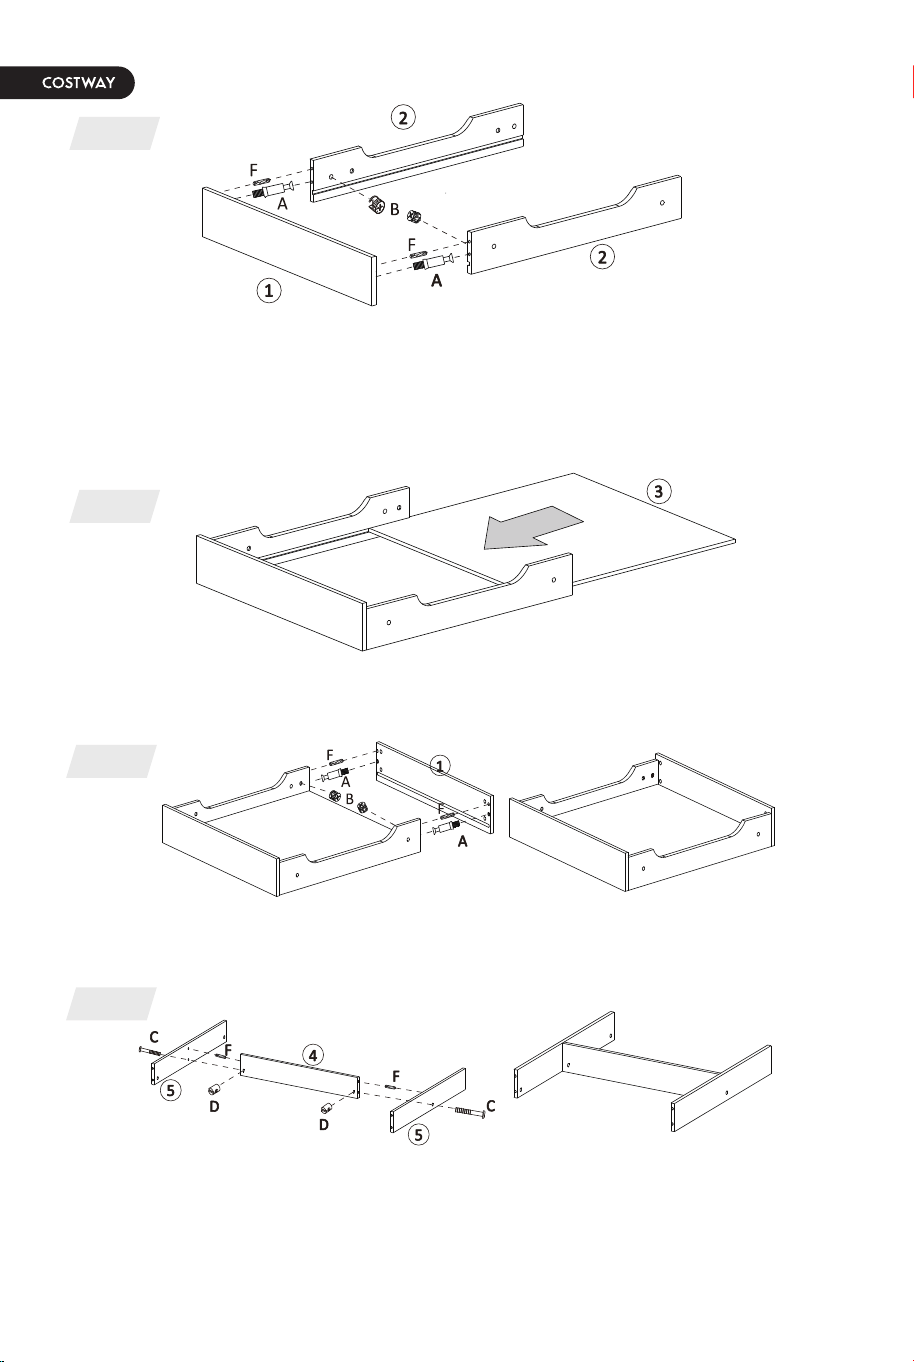
Insert the cam lock (B) into the panel No. 2 by aligning the arrow on the cam lock
toward the cam bolt, then turn the cam lock (B) right 180° to lock the cam bolt (A).
For the upper holes, connect the panel (1) and (2)
along the dotted line using wood
plugs (F), and for the lower holes, connect with cam bolt (A).
Slide in the No.3 panel along the side groove.
1
2
Insert the cam lock (B) into the panel No. 2, then turn the cam lock as in step 1.
3
Insert the nut (D) into the No.4 panel and keep the groove flat. For the upper
holes of No.4 panel, connect with wood plugs(F), and for the lower holes, connect
with screws(C).
4

05
EN
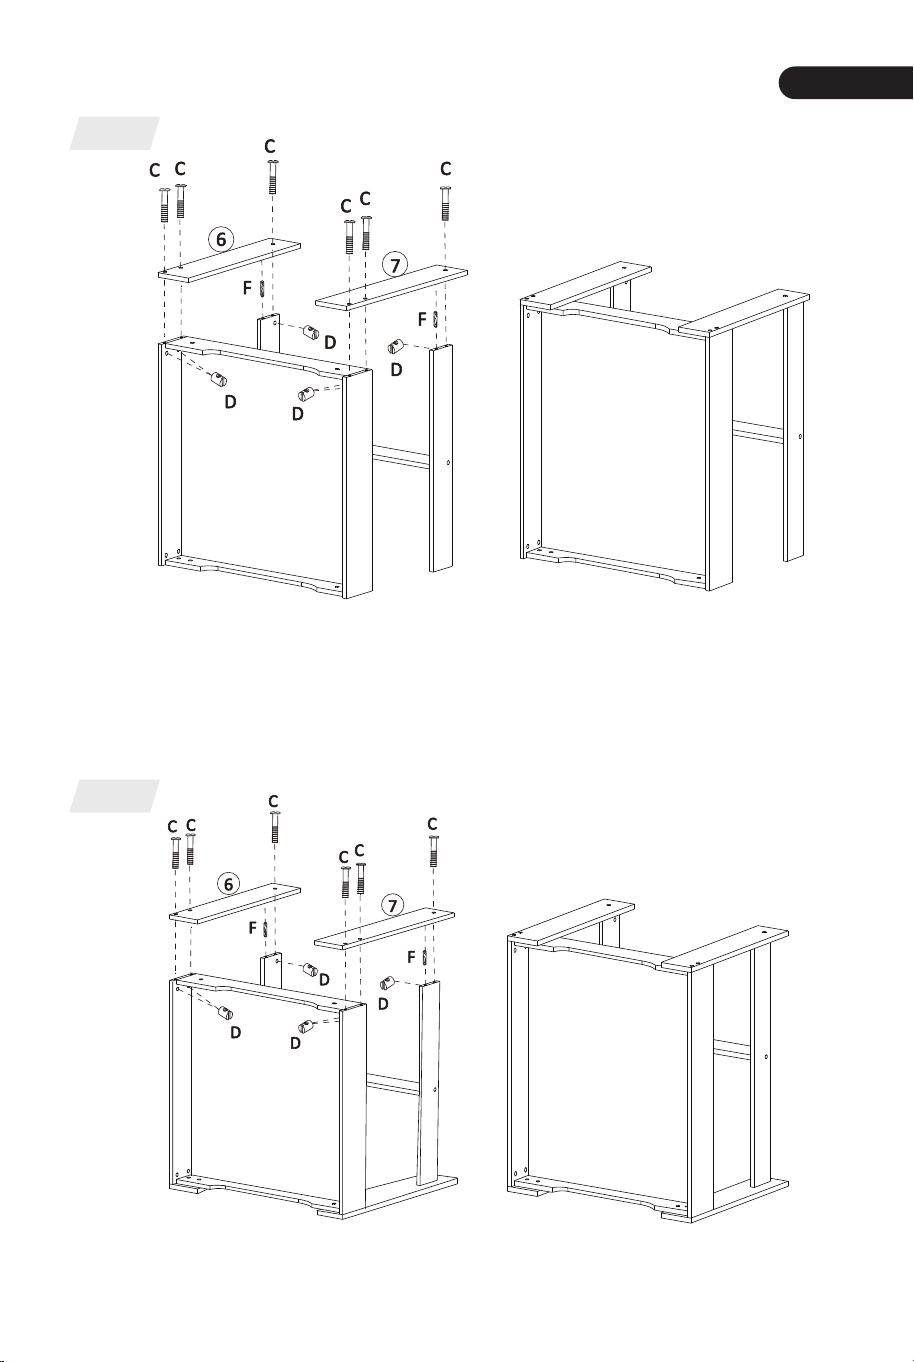
Lay down the table. For the holes of the No.5 panel, connect with wood plugs (F)
and screws (C). For other panels, all inside parts of the panels are inserted by the
nut (D) and all outside parts of the panels are screwed by screws (C).
5
Same as step 5.
6

06
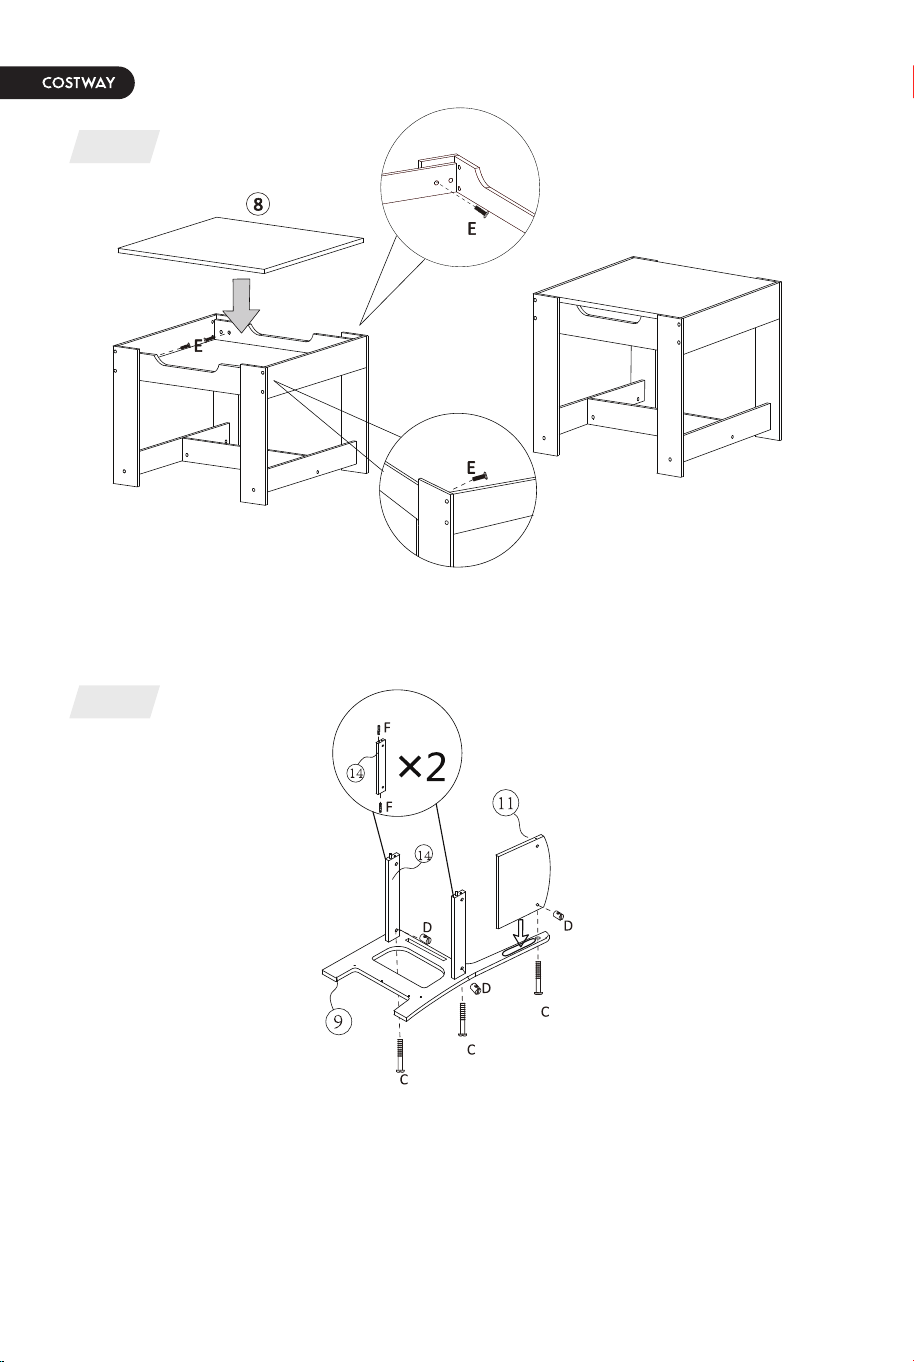
Fix the No.14 part to the No.9 part with wood plugs(F), then put nuts(D) into the
No.14 part holes, use screws(C) to lock it, then put the nut(D) into the No.11
part, and then insert the No.11 part into the slot of No.9 part and lock it with the
screw(C).
Twist the screws(E) into the No.2 panel.
7
8

07
EN
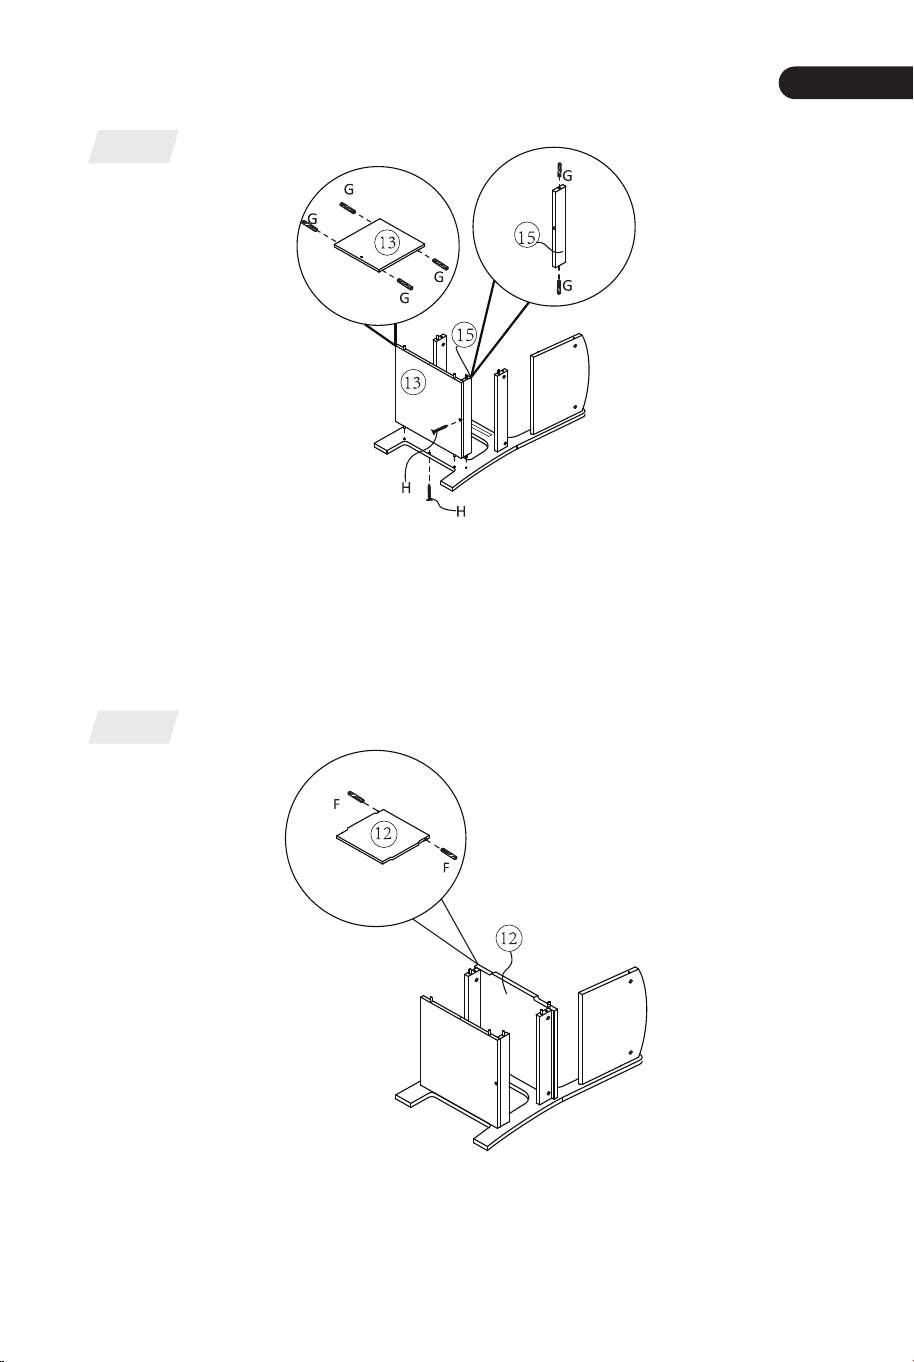
Put the wood plugs(G) into the No.13 part and use screws(H) to fix it to the No.9
part, then insert the wood plug(G) into the No.15 part, and use screws(H) to fix
it to the No.13 part.
Connect the No.12 seat panel and the No.9 side panel together with wood
plugs(F).
9
10
08
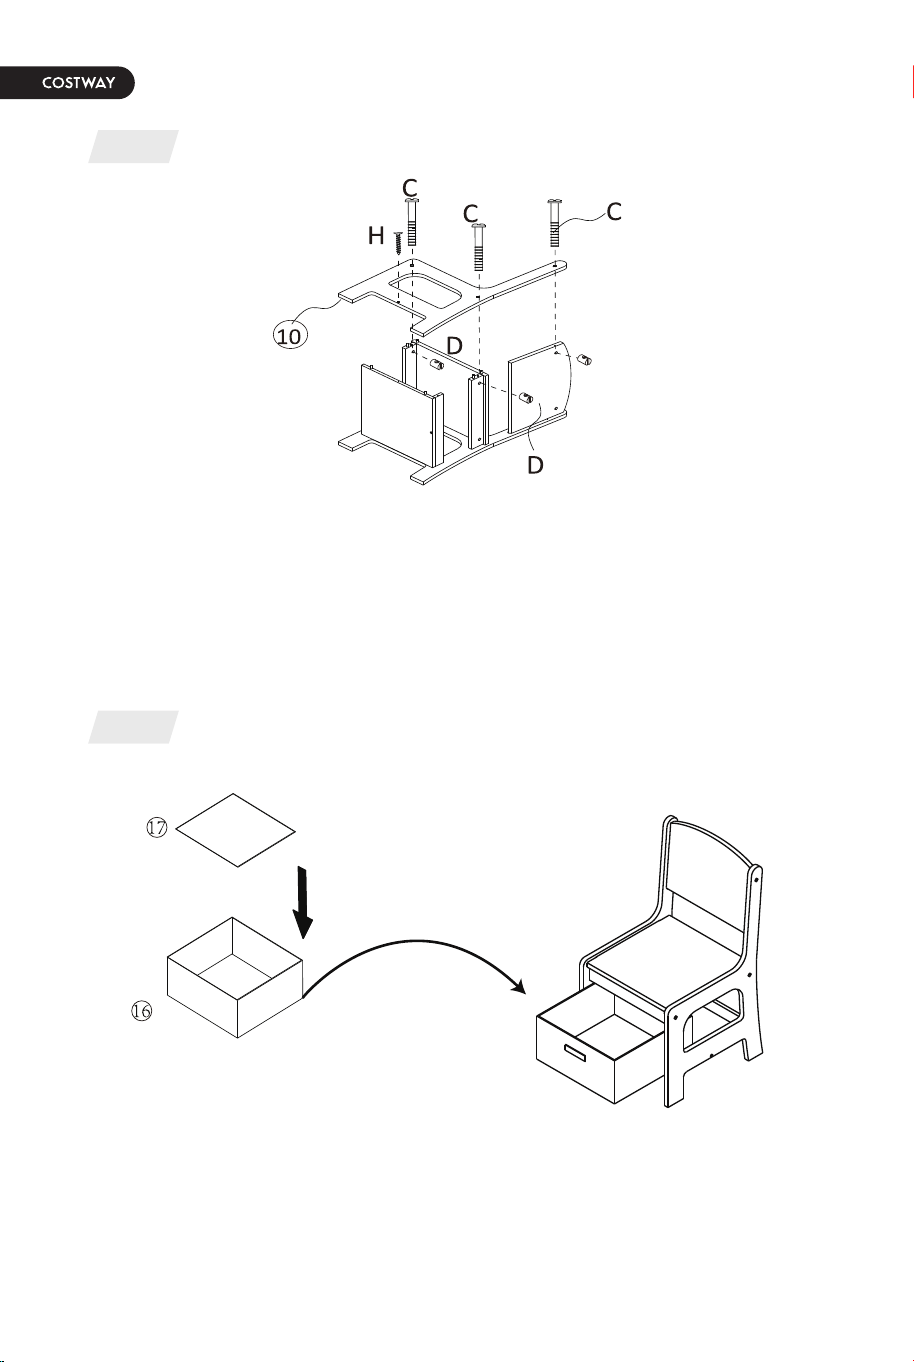
Insert the nuts (D) into the holes of the chair back and slat. Connect the No.10
panel with screws(H and C).
Put the fabric bin under the chair.
11
12

Bitte wenden Sie sich bei weiteren Fragen an unseren Kundenservice
Ersatzteile können so schnell wie möglich geliefert werden.
Deutsches Büro: FDS GmbH, Neuer Höltigbaum 36, 22143 Hamburg, Deutschland
Kontaktieren Sie uns !
Schicken Sie diesen Artikel NICHT zurück,
bitte wenden Sie sich an unseren Kundenservice.

Kindersitzgruppe
BB5584
HANDBUCH
DIESE ANLEITUNG ENTHÄLT WICHTIGE SICHERHEITSINFORMATIONEN. BITTE SORGFÄLTIG LESEN UND ZUM SPÄTEREN NACHSCHLAGEN AUFBEWAHREN.
EN DE FR ES IT PL
02
Bevor Sie beginnen
Hinweis zur Montage
Montage nur durch Erwachsene
Entfernen Sie alle Verpackungen, Überprüfen Sie, ob alle Teile und Zubehörteile
vorhanden sind.
Lesen Sie jeden Montageschritt sorgfältig durch und folgen Sie den Anleitungen.
Wir empfehlen, alle Teile möglichst in der Nähe des Aufstellungsortes zu
montieren, um unnötige Bewegungen nach der Montage zu vermeiden.
Achten Sie bei der Montage auf einen sicheren Untergrund und stellen Sie den
Artikel immer auf eine ebene, feste und stabile Fläche.
Allgemeine Sicherheitswarnung
Warnung: Der Artikel ist nicht für Kinder unter 3 Jahren geeignet.
Warnung: Halten Sie alle Kleinteile und Verpackungsmaterialien, die verschluckt
werden können, von Babys und Kindern fern.
Warnung: Unsachgemäße Montage kann zu Kippgefahr führen.
Bitte sorgfältig lesen und zum späteren Nachschlagen aufbewahren.
0-3
ACHTUNG:
Nicht für Kinder unter 36 Monaten
geeignet. Enthält Kleinteile, die verschluckt
werden können.
( Erstickungsgefahr!)

03
3
x1
6
x2
9
x2
12
x2
15
x2
1
x2
7
x2
10
x2
13
x2
2
x2
5
x2
8
x1
11
x2
14
x4
4
x1
16
x2
17
x2
C
x26
A
x4
B
x4
D x26
DE
F x22
E x4
6×16mm
6×25mm
G x12
H x6
5×25mm
4×25mm
6×35mm
6x40mm

04
Schieben Sie die Platte Nr. 3 entlang der seitlichen Nut ein.
1
2
Den Nockenbolzen (B) in die Platte Nr. 2 einführen, dann den Nockenbolzen wie in
Schritt 1 drehen.
3
Setzen Sie die Mutter (D) in die Platte Nr. 4 ein und halten Sie die Rille flach. Die
oberen Löcher der Platte Nr. 4 werden mit Holzdübeln (F) und die unteren Löcher
mit Schrauben (C) befestigt.
4
Setzen Sie das Nockenschloss (B) in die Platte Nr. 2 ein und richten Sie den Pfeil auf
dem Nockenschloss auf den Nockenbolzen aus, dann drehen Sie das Nockenschloss
(B) um 180° nach rechts, um den Nockenbolzen (A) zu verriegeln. Bei den oberen
Löchern die Platten (1) und (2) entlang der gestrichelten Linie mit Holzdübeln (F)
und bei den unteren Löchern mit dem Nockenbolzen (A) verbinden.

05
DE
Legen Sie den Tisch hin. Die Löcher der Platte Nr. 5 werden mit Holzdübeln (F)
und Schrauben (C) befestigt. Bei den anderen Platten werden alle inneren Teile
der Platten mit der Mutter (D) und alle äußeren Teile der Platten mit den
Schrauben (C) befestigt.
5
Wie bei Schritt 5.
6
06
Befestigen Sie das Teil Nr. 14 an dem Teil Nr. 9 mit Holzdübeln (F), setzen Sie
dann Muttern (D) in die Löcher des Teils Nr. 14, verwenden Sie Schrauben (C),
um es zu sichern, setzen Sie dann die Mutter (D) in das Teil Nr. 11, und setzen
Sie dann das Teil Nr. 11 in den Schlitz des Teils Nr. 9 und sichern Sie es mit der
Schraube (C).
Drehen Sie die Schrauben (E) in die Platte Nr. 2 ein.
7
8

07
DE
Setzen Sie die Holzdübel (G) in das Teil Nr. 13 ein und befestigen Sie es mit den
Schrauben (H) am Teil Nr. 9, dann setzen Sie den Holzdübel (G) in das Teil Nr.
15 ein und befestigen Sie es mit den Schrauben (H) am Teil Nr. 13.
Verbinden Sie die Sitzplatte Nr. 12 und die Seitenplatte Nr. 9 mit den Holzdübeln
(F) miteinander.
9
10

08
Stecken Sie die Muttern (D) in die Löcher der Stuhllehne und des Lattenrostes.
Verbinden Sie die Platte Nr. 10 mit den Schrauben (H und C).
Stellen Sie den Stoffbehälter unter den Stuhl.
11
12
VEUILLEZ NOUS DONNER L’OCCASION DE L’AMÉLIORER !
Contactez notre service à la clientèle pour obtenir de l’aide.
Les remplacements de pièces manquantes ou endommagées seront
expédiés dès que possible !
Contactez-nous !
Ne retournez pas cet article.
FR : [email protected]
Contactez notre service à la clientèle pour obtenir de l’aide.
FR office: Saint Vigor d'Ymonville

Table et 2 Chaises pour Enfant
BB5584
MANUEL DE L’UTILISATEUR
CE MANUEL CONTIENT DES INFORMATIONS IMPORTANTES SUR LA SÉCURITÉ. VEUILLEZ LE LIRE ET LE CONSERVER POUR TOUTE RÉFÉRENCE FUTURE.
EN DE FR ES IT PL
02
Avant de Commencer
Avertissement pour l’Assemblage
Construction seulement par des adultes
Retirez tous les emballages, séparez et comptez toutes les pièces et le matériel.
Lisez attentivement chaque étape et suivez l’ordre correct.
Nous recommandons que, dans la mesure du possible, tous les articles soient
assemblés à proximité de la zone dans laquelle ils seront utilisés, afin d’éviter de
déplacer inutilement le produit une fois assemblé.
Assurez-vous que la surface soit solide pendant la construction et placez toujours le
produit sur une surface plane et stable.
Avertissement de Sécurité Générale
Attention : Le produit ne convient pas aux enfants de moins de 3 ans.
Danger : Gardez toutes les petites pièces et les matériaux d’emballage de ce produit
hors de la portée des bébés et des enfants pour éviter un risque d’étouffement.
Danger : Le manque de la fixation pourrait entraîner un risque de basculement.
Veuillez lire attentivement toutes les instructions et les conserver pour la référence
ultérieure.
0-3
AVERTISSEMENT:
RISQUE D’ÉTOUFFEMENT
– Les petites pièces.Ne convient pas
aux enfants de moins de 3 ans.

03
3
x1
6
x2
9
x2
12
x2
15
x2
1
x2
7
x2
10
x2
13
x2
2
x2
5
x2
8
x1
11
x2
14
x4
4
x1
16
x2
17
x2
C
x26
A
x4
B
x4
D x26
FR
F x22
E x4
6×16mm
6×25mm
G x12
H x6
5×25mm
4×25mm
6×35mm
6x40mm

04
Insérez les verrous à came (B) dans les plaques (N°2) de sorte que la flèche sur le
verrou à came (B) soit orientée vers le trou de boulon à came (A), puis tournez les
verrous à came (B) à droite 180° pour bloquer les boulons à came (A). Pour les
trous supérieurs, connectez les plaques (1) et (2) suivant la ligne en pointillé à l’aide
des chevilles en bois (F), et pour les trous inférieurs, connectez avec des boulons à
came (A).
Glissez la plaque (N°3) le long de la rainure latérale.
1
2
Insérez les verrous à came (B) dans les plaques (N°2), puis tournez les verrous à came
(B) comme dans l’étape 1.
3
Insérez les écrous (D) dans la plaque (N°4) et maintenez la rainure à plat. Pour
les trous supérieurs de la plaque (N°4), connectez les plaques (4) et (5) à l’aide
des chevilles en bois (F), et pour les trous inférieurs, connectez avec des vis (C).
4

05
FR
Posez la table. Pour les trous de plaque (N°5), connectez avec des chevilles en
bois (F) et des vis (C). Pour les autres plaques, insérez les écrous (D) dans les
parties intérieures des plaques, vissez les vis (C) par les parties extérieures des
plaques.
5
C’est pareil à l’étape 5.
6

06
Connectez la plaque (N°14) au cadre (N°9) à l’aide des chevilles en bois (F),
placez les écrous (D) dans les trous de la plaque (N°14), et serrez à l’aide des
vis (C). Placez les écrous (D) dans les trous de la plaque (N°11), insérez la
plaque (N°11) dans la fente de cadre (N°9), et serrez à l’aide des vis (C).
Vissez les vis (E) dans les plaques (N°2).
7
8
07
FR
Insérez des chevilles en bois (G) dans la plaque (N°13), connectez la plaque (N°
13) au cadre (N°9) à l’aide des vis (H), insérez des chevilles en bois (G) dans la
plaque (N°15), et connectez la plaque (N°15) à la plaque (N°13) à l’aide des vis
(H).
Connectez la plaque de siège (N°12) et le cadre (N°9) à l’aide des chevilles en bois
(F).
9
10

08
Insérez les écrous (D) dans les trous du dossier et de la latte de chaise.
Connectez le cadre (N°10) avec les vis (H et C).
Mettez le tiroir sous la chaise.
11
12

¡Por favor dénos una oportunidad para hacerlo bien y hacerlo mejor!
Primero póngase en contacto con nuestro amable departamento de
servicio al cliente para obtener ayuda. ¡Los reemplazos de piezas
faltantes o dañadas se enviarán lo antes posible!
¡Contáctenos!
NO devuelva este artículo.
ES : [email protected]
Primero póngase en contacto con nuestro amable departamento
de servicio al cliente para obtener ayuda.
Juego de Mesa y Sillas para Niños
BB5584
MANUAL DEL USUARIO
ESTE MANUAL DE INSTRUCCIONES CONTIENE IMPORTANTES INFORMACIONES DE SEGURIDAD, POR FAVOR, LÉALO Y GUÁRDELO PARA FUTURAS CONSULTAS.
EN DE FR ES IT PL

02
Antes de Empezar
Advertencia para el Montaje
El producto solo puede ser ensamblado por adultos.
Retire todo el embalaje, separe y cuente todas las piezas y los accesorios.
Lea detenidamente cada paso y siga el orden correcto.
Recomendamos que, siempre que sea posible, todos los elementos se monten cerca
de la zona en la que se van a utilizar, para evitar mover el producto innecesariamente
una vez montado.
Asegure una superficie segura durante el montaje, y coloque el producto siempre
sobre una superficie plana, firme y estable.
Advertencia de Seguridad General
Precaución: El producto no es adecuado para los niños menores de 3 años.
Peligro: Mantenga todas las piezas pequeñas y los materiales de empaque de este
producto fuera del alcance de los bebés y los niños, ya que, de lo contrario, pueden
suponer un peligro de asfixia.
Peligro: La falta de fijación puede provocar un riesgo de vuelco.
Lea atentamente todas las instrucciones y consérvelas para futuras consultas.
0-3
ADVERTENCIA:
PELIGRO DE ASFIXIA
- Piezas pequeñas.
No es adecuado para los niños menores de 3 años.

03
3
x1
6
x2
9
x2
12
x2
15
x2
1
x2
7
x2
10
x2
13
x2
2
x2
5
x2
8
x1
11
x2
14
x4
4
x1
16
x2
17
x2
C
x26
A
x4
B
x4
D x26
ES
F x22
E x4
6×16mm
6×25mm
G x12
H x6
5×25mm
4×25mm
6×35mm
6x40mm

04
Inserte los bloqueos de leva (B) en los paneles (2) alineando la flecha del bloqueo de
leva hacia el perno de leva (A), luego gire los bloqueos de leva (B) a la derecha 180°
para bloquear los pernos de leva (A). Para los orificios superiores, conecte los
paneles (1) y (2) a lo largo de la línea de puntos utilizando las espigas de madera
(F), y para los orificios inferiores, conecte con los pernos de leva (A).
Deslice el panel (3) a lo largo de las ranuras laterales.
1
2
Inserte los bloqueos de leva (B) en los paneles (2), luego gire los bloqueos de leva como
en el Paso 1.
3
Inserte las tuercas (D) en el panel (4) y mantenga la ranura plana. Para los
orificios superiores del panel (4), conecte con las espigas de madera (F), y para
los orificios inferiores, conecte con los tornillos (C).
4
05
ES
Ponga la mesa. Para los orificios de los paneles (5), conecte con las espigas de
madera (F) y los tornillos (C). Para otros paneles, todas las partes internas de los
paneles se insertan con las tuercas (D) y todas las partes externas de los paneles
se atornillan con los tornillos (C).
5
Igual que el Paso 5.
6

06
Fije las piezas (14) a la pieza (9) con las espigas de madera (F), luego coloque
las tuercas (D) en los orificios de las piezas (14), use los tornillos (C) para
bloquearlas, luego coloque la tuerca (D) en la pieza (11) e inserte la pieza (11)
en la ranura de la pieza (9), y fíjela con el tornillo (C).
Atornille los tornillos (E) en los paneles (2).
7
8

07
ES
Inserte las espigas de madera (G) en la pieza (13) y use los tornillos (H) para
fijar la pieza (13) a la pieza (9), luego inserte las espigas de madera (G) en la
pieza (15) y use los tornillos (H) para fijar la pieza (15) a la pieza (13).
Conecte el panel de asiento (12) y el panel lateral (9) juntos con las espigas de
madera (F).
9
10

08
Inserte las tuercas (D) en los orificios del respaldo y de la tablilla de la silla.
Conecte el panel (10) con los tornillos (H y C).
Coloque la caja de tela debajo de la silla.
11
12

Vi preghiamo di darci la possibilità di fare bene e fare di meglio!
Si prega di contattare prima il nostro servizio clienti per assistenza.
Le parti di ricambio per le parti mancanti o danneggiate verranno spedite al più presto!
Contattaci !
NON restituire questo articolo.
Si prega di contattare prima il nostro servizio clienti per assistenza.

Tavolo e Sedie per Bambini
BB5584
MANUALE UTENTE
QUESTO MANUALE DI ISTRUZIONI CONTIENE IMPORTANTI INFORMAZIONI SULLA SICUREZZA. SI PREGA DI LEGGERE E CONSERVARE PER RIFERIMENTO FUTURO.
EN DE FR ES IT PL
02
Prima di iniziare
Avvertenza per il montaggio
Questo prodotto è montato dagli adulti.
Rimuovere tutti gli imballaggi, separare e contare tutte le parti e tutti gli accessori.
Leggere attentamente ogni passo e seguire l'ordine corretto.
Si consiglia, ove possibile, di montare tutti gli articoli vicino alla zona in cui
verranno posti in uso, per evitare di spostare inutilmente il prodotto una volta
assemblato.
Garantire una superficie sicura durante il montaggio e posizionare il prodotto
sempre su una superficie piana, stabile.
Si prega di leggere attentamente tutte le istruzioni e conservarle per riferimento futuro.
Avvertenza di sicurezza generale
Attenzione: Il prodotto non è adatto ai bambini sotto i 3 anni.
Pericolo: Tenere tutte le piccole parti e i materiali di imballaggio di questo prodotto
lontano da neonati e bambini, altrimenti potrebbero rappresentare un rischio di
soffocamento.
Pericolo: La mancanza di accessorio può causare un rischio di ribaltamento.
0-3
AVVERTENZA:
RISCHIO DI SOFFOCAMENTO
- Piccole parti.
Non per i bambini sotto i 3 anni.

03
3
x1
6
x2
9
x2
12
x2
15
x2
1
x2
7
x2
10
x2
13
x2
2
x2
5
x2
8
x1
11
x2
14
x4
4
x1
16
x2
17
x2
C
x26
A
x4
B
x4
D x26
IT
F x22
E x4
6×16mm
6×25mm
G x12
H x6
5×25mm
4×25mm
6×35mm
6x40mm

04
Inserire l’eccentrico (B) nel pannello N.2 allineando la freccia sull’eccentrico verso il
bullone a camma, poi ruotare l’eccentrico (B) a destra di 180° per bloccare il bullone
a camma (A). Per i fori superiori, collegare il pannello (1) e (2) lungo la linea
tratteggiata usando i tasselli di legno (F), e per i fori inferiori, collegare con il bullone
a camma (A).
Far scorrere il pannello N.3 lungo la fessura laterale.
1
2
Inserire l’eccentrico (B) nel pannello N.2, poi girare l’eccentrico come al passo 1.
3
Inserire il dado (D) nel pannello N.4 e mantenere la fessura piatta. Per i fori
superiori del pannello N.4, collegare con i tasselli di legno (F), e per i fori
inferiori, collegare con le viti (C).
4

05
IT
Posizionare il tavolo come mostrato nell'immagine. Per i fori del pannello N.5
collegare con i tasselli di legno (F) e le viti (C). Per gli altri pannelli, tutte le parti
interne dei pannelli sono inserite dal dado (D) e tutte le parti esterne dei pannelli
avvitate dalle viti (C).
5
Uguale al passo 5.
6

06
Fissare la parte N.14 alla parte N.9 con tasselli di legno (F), poi mettere i dadi
(D) nei fori della parte N.14, usare le viti (C) per bloccarla, poi mettere il dado
(D) nella parte N.11, e poi inserire la parte N.11 nella fessura della parte N.9 e
bloccarla con la vite (C).
Avvitare le viti (E) nel pannello N.2.
7
8

07
IT
Mettere i tasselli di legno (G) nella parte N.13 e usare le viti (H) per fissarla alla
parte N.9, poi inserire i tasselli in legno (G) nella parte N.15 e utilizzare le viti (H)
per fissarlo alla parte N.13.
Collegare il pannello della sedia N.12 e il pannello laterale N.9 insieme con i
tasselli in legno (F).
9
10

08
Inserire i dadi (D) nei fori dello schienale e della doga della sedia. Collegare il
pannello N.10 con le viti (H e C).
Mettere il cassetto sotto la sedia.
11
12

W razie problemów skontaktuj się z nami!
Jeśli potrzebujesz pomocy, skontaktuj się z naszym przyjaznym działem obsługi klienta.
Wymiana uszkodzonych lub brakujących części zostanie przeprowadzona
tak szybko, jak to możliwe!
Nie zwracaj tego produktu.
Skontaktuj się z naszym działem obsługi klienta, aby uzyskać
pomoc.
Skontaktuj się z nami !
PL office: Gdańsk
Zestaw stołu i krzeseł dla dzieci
BB5584
INSTRUKCJA OBSŁUGI
NINIEJSZA INSTRUKCJA ZAWIERA ISTOTNE INFORMACJE DOTYCZĄCE BEZPIECZEŃSTWA. PROSIMY O ZAPOZNANIE SIĘ Z NIĄ I ZACHOWANIE JEJ DO WGLĄDU W PRZYSZŁOŚCI.
EN DE FR ES IT PL
02
Zanim Zaczniesz
Ostrzeżenie
Montażem powinny zająć się wyłącznie osoby dorosłe
Usuń opakowanie i upewnij się, że zestaw zawiera wszystkie części i elementy
montażowe.
Przeczytaj uważnie każdy krok i postępuj we właściwej kolejności.
Zalecamy, aby w miarę możliwości wszystkie elementy były montowane w pobliżu
miejsca, w którym będą używane, aby uniknąć niepotrzebnego przenoszenia produktu
po złożeniu.
Zapewnij bezpieczną powierzchnię podczas montażu i zawsze umieszczaj produkt
na płaskiej i stabilnej powierzchni.
Ogólne ostrzeżenia dotyczące bezpieczeństwa
Uwaga: Produkt nie jest odpowiedni dla dzieci poniżej 3 lat
Niebezpieczeństwo: Trzymaj wszystkie małe części i materiały opakowaniowe dla tego
produktu z dala od niemowląt i dzieci, w przeciwnym razie mogą stwarzać ryzyko
zadławienia.
Niebezpieczeństwo: Brak mocowania może spowodować ryzyko przewrócenia.
UWAGA:
RYZYKO ZADŁAWIENIA
- Produkt zawiera małe elementy. Nieodpowiednie
dla dzieci poniżej 3 roku życia.
0-3
Przeczytaj uważnie wszystkie instrukcje i zachowaj je na przyszłość.

03
3
x1
6
x2
9
x2
12
x2
15
x2
1
x2
7
x2
10
x2
13
x2
2
x2
5
x2
8
x1
11
x2
14
x4
4
x1
16
x2
17
x2
C
x26
A
x4
B
x4
D x26
PL
F x22
E x4
6×16mm
6×25mm
G x12
H x6
5×25mm
4×25mm
6×35mm
6x40mm

04
Włóż zamek krzywkowy (B)do elementu numer 2 kierując strzałkę na zamku
krzywkowym w stronę dziury na śrube (A), następnie przekręć zamek krzywkowy
(B)w prawo o 180° aby zamknąć śrubę krzywkową (A). Należy połaczyć elementy
(1) i (2) tak jak wskazują to przerywane linie na ilustracji: górne dziurki za pomocą
drewnianych kołków (F), dolne dziurki zą pomoca śrub krzywkowych (A).
Włóż do konstrukcji element numer 3.
1
2
Włóż zamek krzywkowy (B)do elementu numer 2 i przekręć tak jak zostało to opisane w
kroku 1.
3
Włóż nakrętkę (D) do elementu numer 4 i zadbaj aby nie wystawała. Do górnych
dziurek elementu numer 4 wsadź drewniane kołki (F) a do dolnych śruby (C) i
zamocuj na nich elementy numer 5.
4

05
PL
Połóż stół. Otwory w panelu nr 5 połącz za pomocą kołków do drewna (F) i śrub
(C). W przypadku innych paneli, wszystkie wewnętrzne części paneli zamocuj za
pomocą nakrętki (D), a wszystkie zewnętrzne części paneli za pomocą śrub (C).
5
Tak samo jak w kroku 5.
6

06
Krok 8: Połącz część nr 14 z częścią nr 9 za pomocą drewnianych kołków (F),
umieść nakrętki (D) w otworach w części nr 14 i dokręć za pomocą śrub (C).
Umieść nakrętki (D) w otworach części nr 11, włóż część nr 11 do szczeliny
części nr 9 i dokręć śrubami (C).
Przykręć śruby (E) do elementu numer 2.
7
8

07
PL
Krok 9: Włóż drewniane kołki (G) do części nr 13, połącz część nr 13 z częścią nr
9 za pomocą śrub (H), włóż drewniane kołki (G) do część nr 15 i połącz część nr
15 z częścią nr 13 za pomocą śrub (H).
Połącz siedzisko nr 12 i płytę boczną nr 9 za pomocą drewnianych kołków (F).
9
10

08
Włóż nakrętki (D) do dziurek w oparciu i siedzisku krzesła. Połącz element 10
śrubami (H oraz C).
Włóż kubełek z materiału pod krzesełko.
11
12