EN DE FR ES IT PL
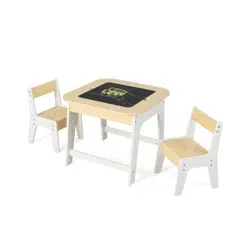
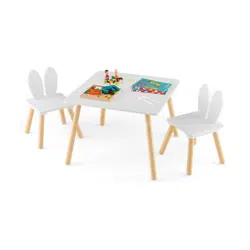
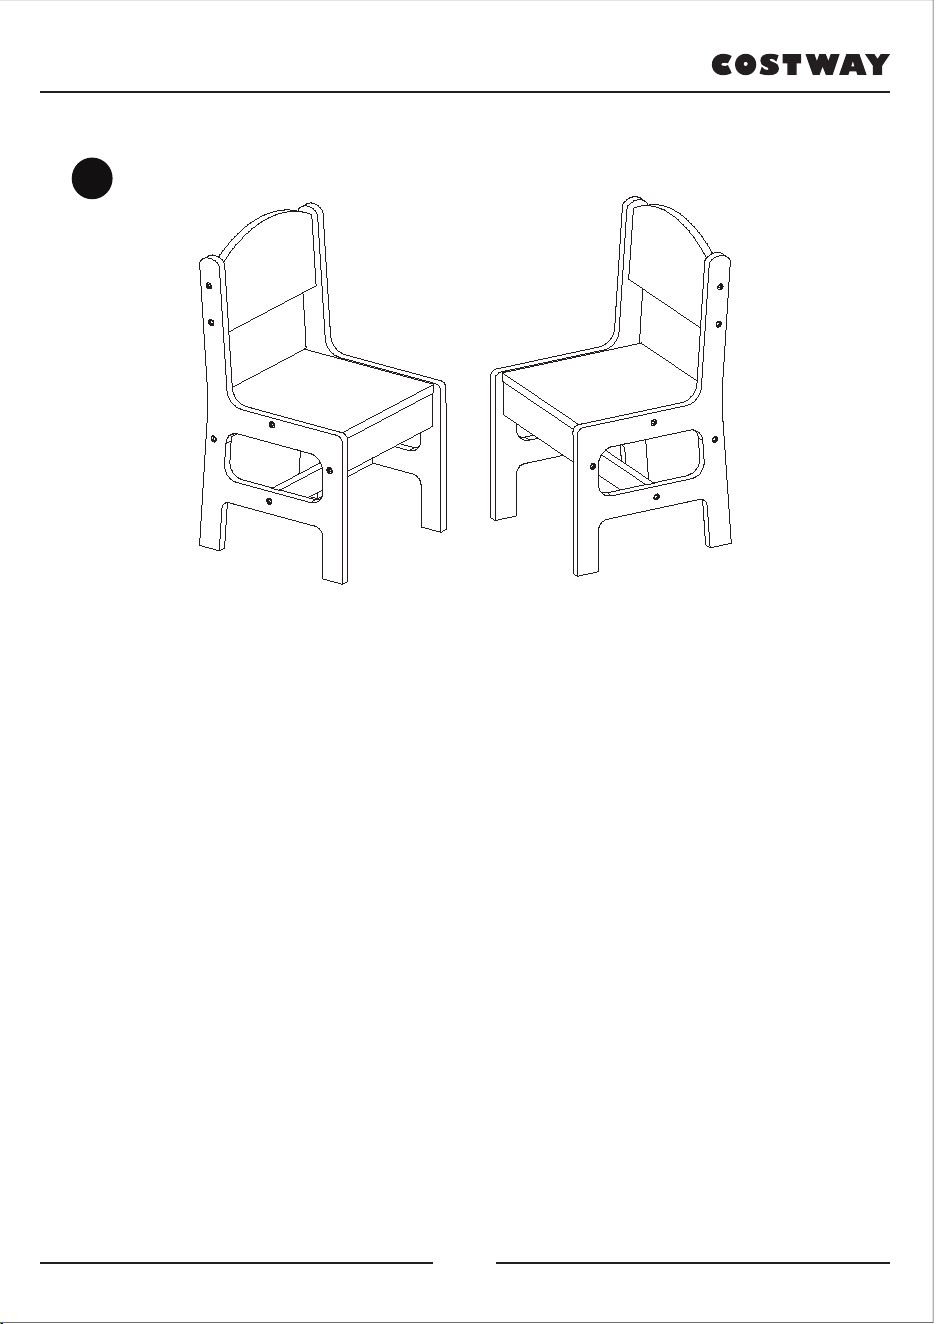
Children’s Table & Chair Set
BB5695 / BB5700
THIS INSTRUCTION BOOKLET CONTAINS IMPORTANT SAFETY INFORMATION. PLEASE READ AND KEEP FOR FUTURE REFERENCE.
Follow Costway
Please give us a chance to make it right and do better!
Contact our friendly customer service department for help first.
Replacements for missing or damaged parts will be shipped ASAP!
USER’S MANUAL
EN DE FR ES IT PL
Children’s Table & Chair Set
BB5695 / BB5700
THIS INSTRUCTION BOOKLET CONTAINS IMPORTANT SAFETY INFORMATION. PLEASE READ AND KEEP FOR FUTURE REFERENCE.
Follow Costway
Please give us a chance to make it right and do better!
Contact our friendly customer service department for help first.
Replacements for missing or damaged parts will be shipped ASAP!
USER’S MANUAL
Table et Chaise pour Enfant
BB5695 / BB5700
CE MANUEL D’INSTRUCTIONS CONTIENT DES INFORMATIONS IMPORTANTES SUR LA SÉCURITÉ. VEUILLEZ LIRE ET CONSERVER POUR LA RÉFÉRENCE FUTURE.
MANUEL DE L’UTILISATEUR
VEUILLEZ NOUS DONNER UNE
OCCASION DE L’AMELIORER ET FAIRE MIEUX!
Contactez d’abord notre service à la clientèle amical pour l’aide.
Les replacements pour les pièces manquantes ou endommagées
seront envoyés le plus vite possible!
Suivez Costway
EN DE FR ES IT PL
Bitte geben Sie uns eine Chance,
es zu korrigieren und besser zu machen!
Wenden Sie sich zunächst an unseren freundlichen Kundendienst.
Ersatz für fehlende oder beschädigte Teile wird so schnell wie
möglich versendet!
DAS HANDBUCH ENTHÄLT WICHTIGE SICHERHEITSHINWEISE. BITTE LESEN UND BEWAHREN SIE FÜR DIE ZUKÜNFTIGE VERWENDUNG AUF.
EN DE FR ES IT PL
Folgen Costway
HANDBUCH
Kindersitzgruppe
BB5695 / BB5700
MANUAL DEL USUARIO
ESTE MANUAL DE INSTRUCCIONES CONTIENE IMPORTANTES INFORMACIONES DE SEGURIDAD, POR FAVOR LO LEA Y GUARDE PARA REFERENCIAS FUTURAS.
¡Por favor dénos la oportunidad de hacerlo bien y mejorar!
Primero póngase en contacto con nuestro amable departamento de
servicio al cliente para obtener ayuda. ¡Los reemplazos de piezas
faltas o dañadas se enviarán lo antes posible!
Siga Costway
Mesa y Sillas para Niños
BB5695 / BB5700
EN DE FR ES IT PL
Seguire Costway
Vi preghiamo di darci la possibilità di fare bene e fare di meglio!
Per prima cosa contatta il nostro servizio di assistenza clienti.
Sostituzioni per parti mancanti o danneggiate saranno spedite al
più presto!
MANUALE UTENTE
QUESTO MANUALE DI ISTRUZIONI CONTIENE IMPORTANTI INFORMAZIONI SULLA SICUREZZA. SI PREGA DI LEGGERE E CONSERVARE PER RIFERIMENTO FUTURO.
Tavolo e Sedie per Bambini
BB5695 / BB5700
EN DE FR ES IT PL
NINIEJSZA INSTRUKCJA ZAWIERA
ISTOTNE
INFORMACJE DOTYCZĄCE BEZPIECZEŃSTWA. PROSIMY O ZAPOZNANIE SIĘ Z NIĄ I ZACHOWANIE JEJ DO WGLĄDU W PRZYSZŁOŚCI.
Śledź Costway
W razie kłopotów skontaktuj się z nami!
Jeśli potrzebujesz pomocy skontaktuj się z naszym przyjaznym
działem obsługi klienta.
Ewentualne braki elementów zostaną uzupełnione najszybciej jak to
możliwe!
EN DE FR ES IT PL
INSTRUKCJA OBSŁUGI
Stół z krzesłami - zestaw dla dzieci
BB5695 / BB5700
02 03
Bitte lesen Sie alle Anweisungen sorgfältig durch und Bewahren Sie die Anweisungen zur
zukünftigen Verwendung auf.
Allgemeine Warnhinweise:
Achtung! Halten Sie alle kleinteile und Verpackungsmaterialien fern von Babys und Kindern,
ansonsten besteht Erstickungsgefahr.
Das Produkt muss unter Aufsicht eines Erwachsenen installiert und verwendet werden.
Lesen Sie jeden Schritt sorgfältig durch und befolgen Sie die richtige Reihenfolge.
Entfernen Sie alle Verpackungen, separieren und zählen Sie alle Teile und Hardware vor der
Montage oder Verwendung.
Bitte beachten Sie darauf, alle Teile richtig anzubringen, eine falsche Montage kann zu einer
Gefährdung führen.
Wir empfehlen, wenn möglich, alle Artikel in der Nähe des Einsatzortes zu montieren, um eine
unnötige Bewegung der Artikel zu vermeiden.
Achten Sie auf einen sicheren Untergrund während des Aufbaus stellen, und stellen Sie das
Produkt immer auf eine glatte, flache und stabile Oberfläche.
Kontak�eren Sie uns!
Senden Sie diesen Artikel NICHT zurück.
Wenden Sie sich zunächst an unseren freundlichen Kundendienst.
Vor dem Beginnen
Please read all instructions carefully and keep it for future reference.
General Warnings:
Danger! Keep all small parts and packaging materials for this product away from babies and
children, otherwise they may pose a choking hazard.
The product must be installed and used under the supervision of an adult.
Read through each step carefully and follow the proper order.
Remove all Packaging, separate and count all parts and hardware before Installation.
Please ensure that all parts are correctly installed, incorrect Installation can lead to a Danger.
We recommend that, where possible, all items are assembled near to the area in which
they will be placed in use, to avoid moving the product unnecessarily once assembled.
Ensure a secure surface during construction, and place the product always on a flat, steady
and stable surface.
04 05
Veuillez lire attentivement toutes les instructions et les conserver pour la référence ultérieure.
Avertissements Généraux :
Danger ! Éloignez toutes les petites pièces et le matériel d’emballage des bébés et des
enfants pour éviter un risque d’étouffement.
Le produit doit être installé et utilisé sous la surveillance d’un adulte.
Lisez attentivement chaque étape et suivez le bon ordre.
Retirez tous les emballages, séparez et comptez toutes les pièces et le matériel avant
l’installation.
Assurez-vous que toutes les pièces sont correctement installées. Une installation incorrecte
peut entraîner un danger.
Assurez une surface sûre pendant l’assemblage et placez le produit toujours sur une surface
plane et stable.
Lea todas las instrucciones detenidamente y guárdelas para futuras referencias.
Advertencias Generales:
¡Peligro! Mantenga todas las piezas pequeñas y materiales de embalaje de este producto
fuera del alcance de bebés y niños, de lo contrario, pueden presentar un peligro de asfixia.
El producto debe instalarse y usarse bajo la supervisión de un adulto.
Lea cada paso cuidadosamente y siga el orden correcto.
Retire todo el embalaje, separe y cuente todas las piezas y los accesorios antes de la
instalación.
Asegúrese de que todas las piezas estén instaladas correctamente, la instalación incorrecta
puede provocar un peligro.
Asegúrese de de esté en una superficie segura durante la construcción y coloque el producto
siempre sobre una superficie plana y estable.
ES
¡Contáctenos!
NO devuelva este artículo.
Primero póngase en contacto con nuestro amable departamento de servicio al cliente para
obtener ayuda.
06 07
Conta�aci!
NON restituire questo articolo.
Per prima cosa contatta il nostro servizio di assistenza clienti.
Prima di iniziare
Si prega di leggere attentamente tutte le istruzioni e conservarle per riferimenti futuri.
Avvertenze Generali:
Pericolo! Tenere tutte le parti piccole e i materiali di imballaggio per questo prodotto
lontano da neonati e bambini, altrimenti potrebbero rappresentare un rischio di
soffocamento.
Il prodotto deve essere installato e utilizzato sotto la supervisione di un adulto.
Leggere attentamente ogni passo e seguire l'ordine corretto.
Rimuovere tutti gli imballaggi, separare e contare tutte le parti e l'hardware prima
dell'installazione.
Assicurarsi che tutte le parti siano installate correttamente, un'installazione errata può
comportare un pericolo.
Assicurare una superficie sicura durante la costruzione e posizionare il prodotto sempre
su una superficie piana, stabile e solida.
E-mail
IT: cs.it@costway.com
Przeczytaj uważnie wszystkie instrukcje i zachowaj je na przyszłość.
Ogólne ostrzeżenia:
Niebezpieczeństwo! Wszystkie małe części i materiały opakowaniowe należy przechowywać z
dala od niemowląt i dzieci, w przeciwnym razie mogą stwarzać ryzyko zadławienia.
Produkt musi być zainstalowany i używany pod nadzorem osoby dorosłej.
Przeczytaj uważnie każdy krok i postępuj we właściwej kolejności.
Usuń opakowanie i upewnij się, że zestaw zawiera wszystkie części i elementy montażowe.
Upewnij się, że wszystkie części są zainstalowane poprawnie - nieprawidłowa instalacja może
prowadzić do wypadków.
Zalecamy, aby w miarę możliwości wszystkie elementy były montowane w pobliżu miejsca, w
którym będą używane, aby uniknąć niepotrzebnego przenoszenia produktu po złożeniu.
Zapewnij bezpieczną przestrzeń roboczą podczas montażu i upewnij się, że produkt znajduje
się na płaskiej i stabilnej powierzchni.
Skontaktuj się z nami!
Nie zwracaj tego produktu.
Jeśli potrzebujesz pomocy, skontaktuj się z naszym przyjaznym działem obsługi klienta.
Zanim Zaczniesz
E-mail
PL: sklep@costway.com
08 09
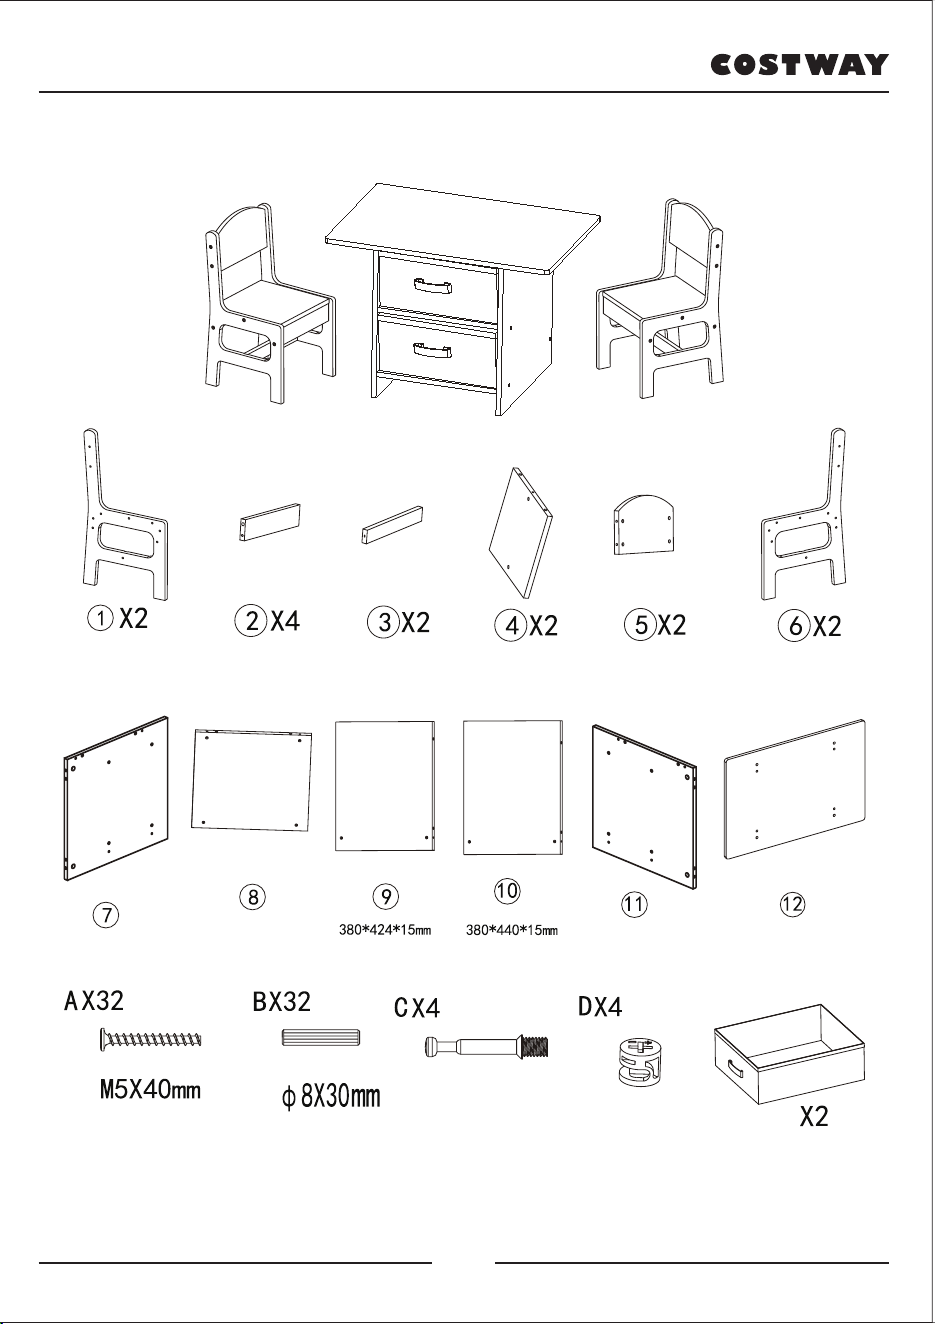
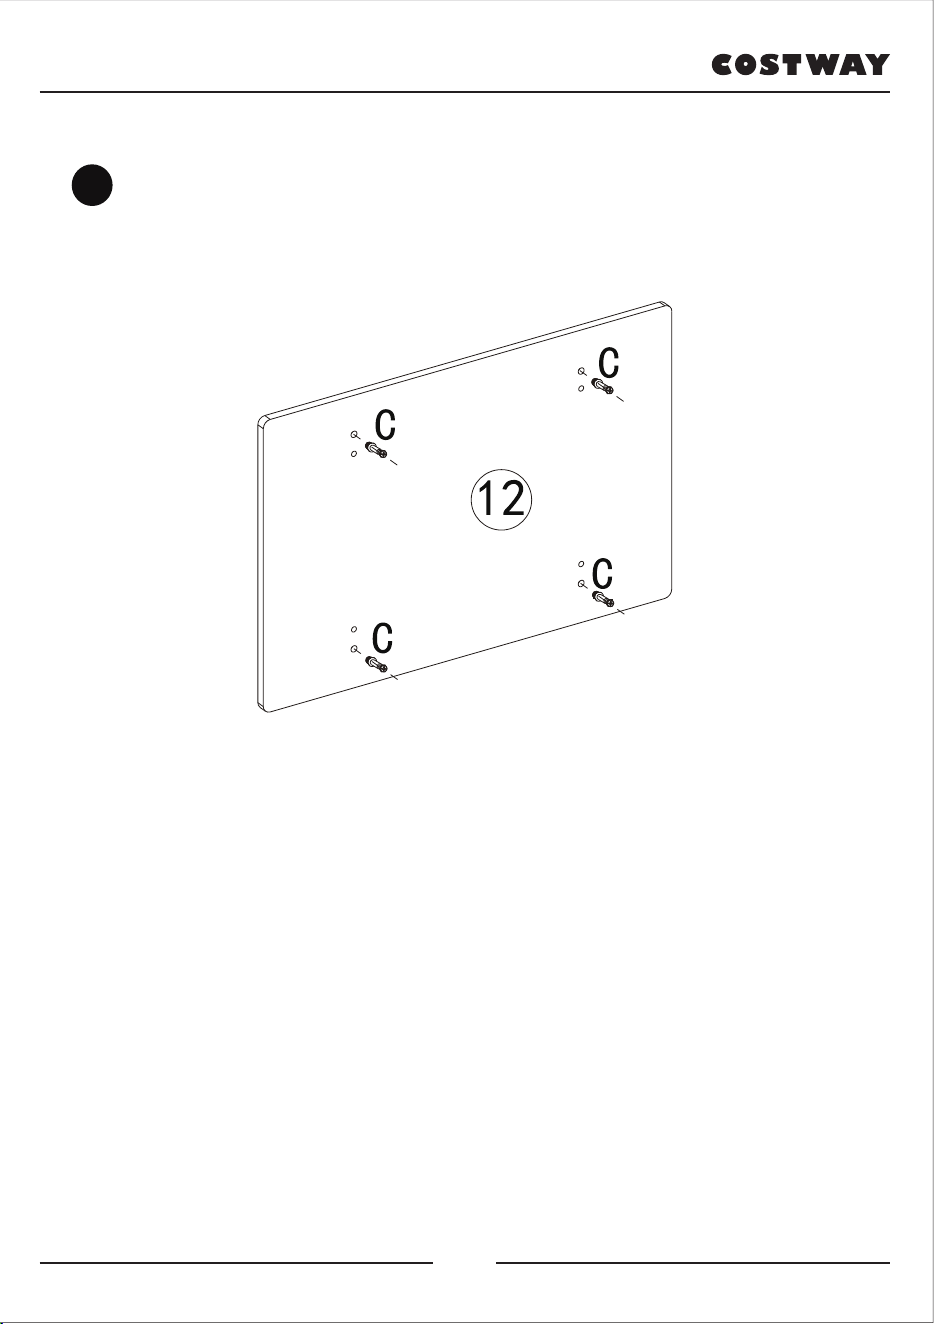
EN: Install 4 x Cam Bolt(C) into Panel (12).
DE: Installieren Sie 4 x Nockenschraube (C) in Platte (12).
FR: Insérez quatre boulons à came (C) dans le panneau (12).
ES: Instale 4 pernos de leva (C) en el panel (12).
IT: Installare 4 bulloni a camma (C) nel pannello (12).
PL: Zainstaluj cztery śruby krzywkowe (C) w panelu (12).
1
10 11
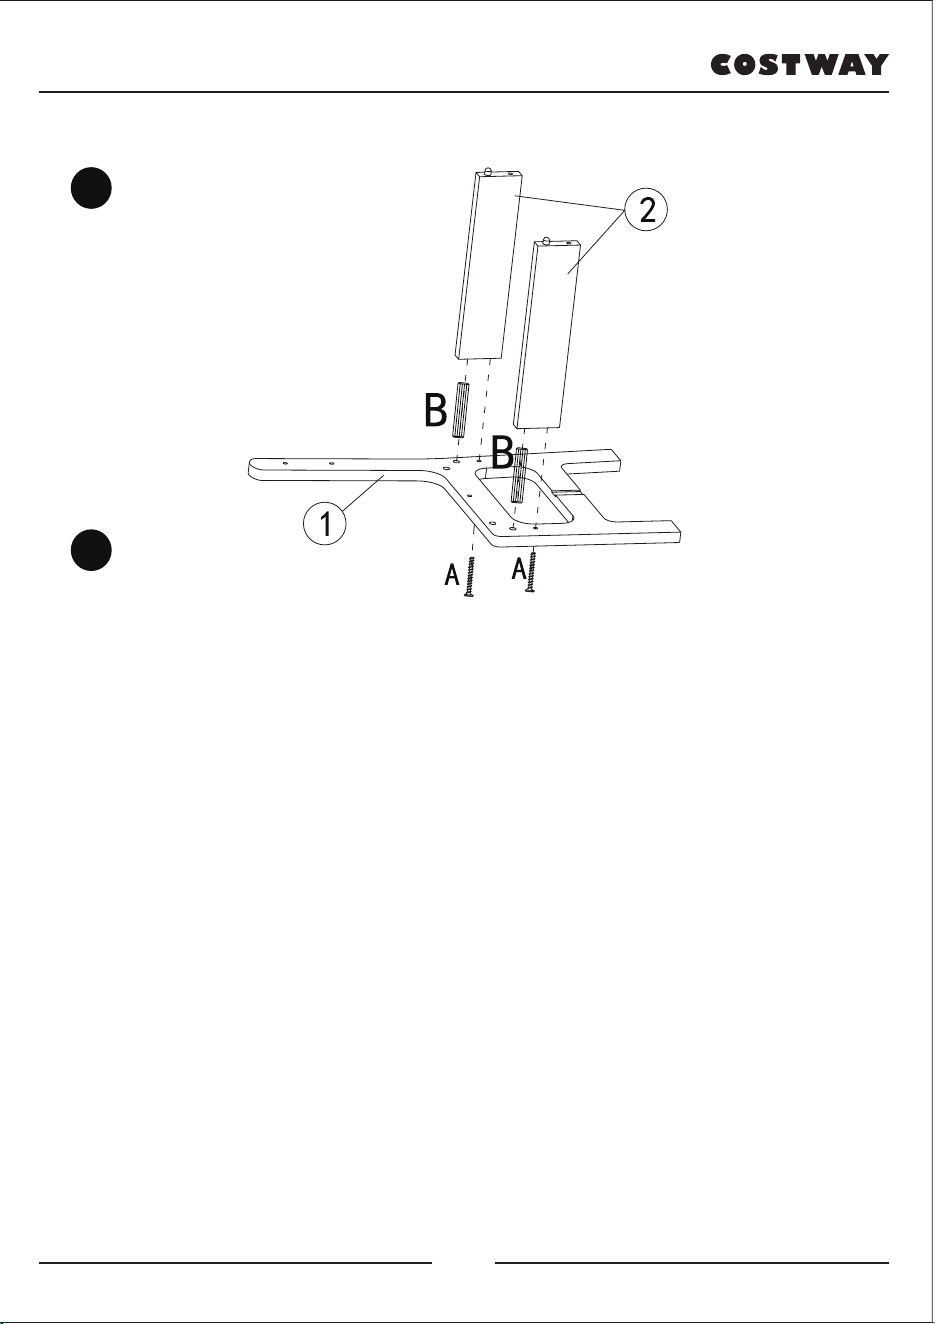
EN: Put Panel (1) down on a flat surface, insert 2 x Part(B) into the hole of
the Board(2) separately, connect Board(2) assembly to the Panel(1) and then
fix them with 2 x Screws(A).
DE: Legen Sie die Platte (1) auf eine ebene Fläche, führen Sie 2 x Teil (B)
separat in das Loch der Platte (2) ein, verbinden Sie die Platte (2) mit der
Platte (1) und befestigen Sie sie mit 2 x Schrauben (A).
FR: Posez le panneau (1) sur une surface plane, insérez deux chevilles (B)
dans le trou de panneau (2), connectez les panneaux (2) au panneau (1) et
fixez-les avec deux vis (A).
ES: Coloque el panel (1) sobre una superficie plana, inserte 2 piezas (B) en el
orificio del panel (2) por separado, conecte el conjunto del panel (2) al panel
(1) y luego fíjelos con 2 tornillos (A).
IT: Posizionare il pannello (1) su una superficie piana, inserire le parti (B)
nel foro del pannello (2) separatamente, collegare il pannello (2) al pannello
(1) e quindi fissarli con le viti (A).
PL: Połóż panel (1) na płaskiej powierzchni, włóż dwie części (B) do otworu
w płycie (2), połącz płytę (2) z panelem (1), a następnie zamocuj je za
pomocą dwóch wkrętów (A).
2
3
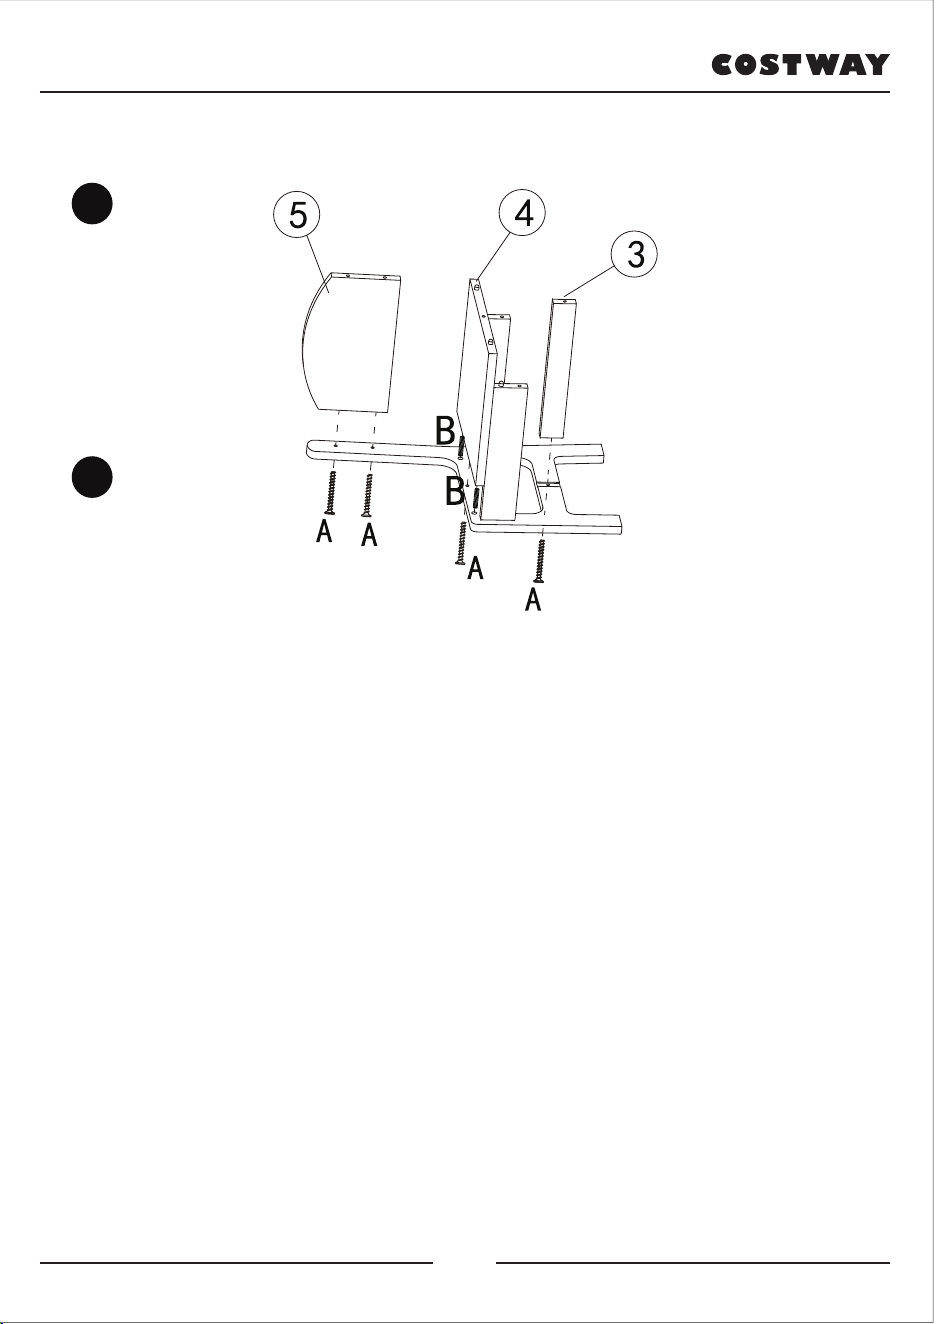
EN: Insert 2 x Part(B) into the holes of the Panel(4). Fix the Panel(3) (4) (5)
to the Panel(1) with 4 x Screws(A) as shown in the figure.
DE: Führen Sie 2 x Teil (B) in die Löcher der Platte (4) ein. Befestigen Sie
die Platte (3) (4) (5) mit 4 x Schrauben (A) an der Platte (1), wie in der
Abbildung gezeigt.
FR: Insérez deux chevilles (B) dans les trous du panneau (4). Fixez les
panneaux (3) (4) (5) au panneau (1) avec 4 vis (A) comme indiqué sur la
figure.
ES: Inserte 2 piezas (B) en los orificios del panel (4). Fije los paneles (3), (4)
y (5) al panel (1) con 4 tornillos (A) como se muestra en la figura.
IT: Inserire le parti (B) nei fori del pannello (4). Fissare il pannello (3) (4) (5)
al pannello (1) con 4 viti (A) come mostrato in figura.
PL: Włóż dwie części (B) do otworów w panelu (4). Przymocuj panele (3)
(4) (5) do panelu (1) za pomocą czterech wkrętów (A), jak pokazano na
rysunku.
3
4
12 13
EN: Put Panel (1) down on a flat surface, insert 2 x Part(B) into the hole of
the Board(2) separately, connect Board(2) assembly to the Panel(1) and then
fix them with 2 x Screws(A).
DE: Legen Sie die Platte (1) auf eine ebene Fläche, führen Sie 2 x Teil (B)
separat in das Loch der Platte (2) ein, verbinden Sie die Platte (2) mit der
Platte (1) und befestigen Sie sie mit 2 x Schrauben (A).
FR: Posez le panneau (1) sur une surface plane, insérez deux chevilles (B)
dans le trou de panneau (2), connectez les panneaux (2) au panneau (1) et
fixez-les avec deux vis (A).
ES: Coloque el panel (1) sobre una superficie plana, inserte 2 piezas (B) en el
orificio del panel (2) por separado, conecte el conjunto del panel (2) al panel
(1) y luego fíjelos con 2 tornillos (A).
IT: Posizionare il pannello (1) su una superficie piana, inserire le parti (B)
nel foro del pannello (2) separatamente, collegare il pannello (2) al pannello
(1) e quindi fissarli con le viti (A).
PL: Połóż panel (1) na płaskiej powierzchni, włóż dwie części (B) do otworu
w płycie (2), połącz płytę (2) z panelem (1), a następnie zamocuj je za
pomocą dwóch wkrętów (A).
2
3
EN: Insert 2 x Part(B) into the holes of the Panel(4). Fix the Panel(3) (4) (5)
to the Panel(1) with 4 x Screws(A) as shown in the figure.
DE: Führen Sie 2 x Teil (B) in die Löcher der Platte (4) ein. Befestigen Sie
die Platte (3) (4) (5) mit 4 x Schrauben (A) an der Platte (1), wie in der
Abbildung gezeigt.
FR: Insérez deux chevilles (B) dans les trous du panneau (4). Fixez les
panneaux (3) (4) (5) au panneau (1) avec 4 vis (A) comme indiqué sur la
figure.
ES: Inserte 2 piezas (B) en los orificios del panel (4). Fije los paneles (3), (4)
y (5) al panel (1) con 4 tornillos (A) como se muestra en la figura.
IT: Inserire le parti (B) nei fori del pannello (4). Fissare il pannello (3) (4) (5)
al pannello (1) con 4 viti (A) come mostrato in figura.
PL: Włóż dwie części (B) do otworów w panelu (4). Przymocuj panele (3)
(4) (5) do panelu (1) za pomocą czterech wkrętów (A), jak pokazano na
rysunku.
3
4
12 13
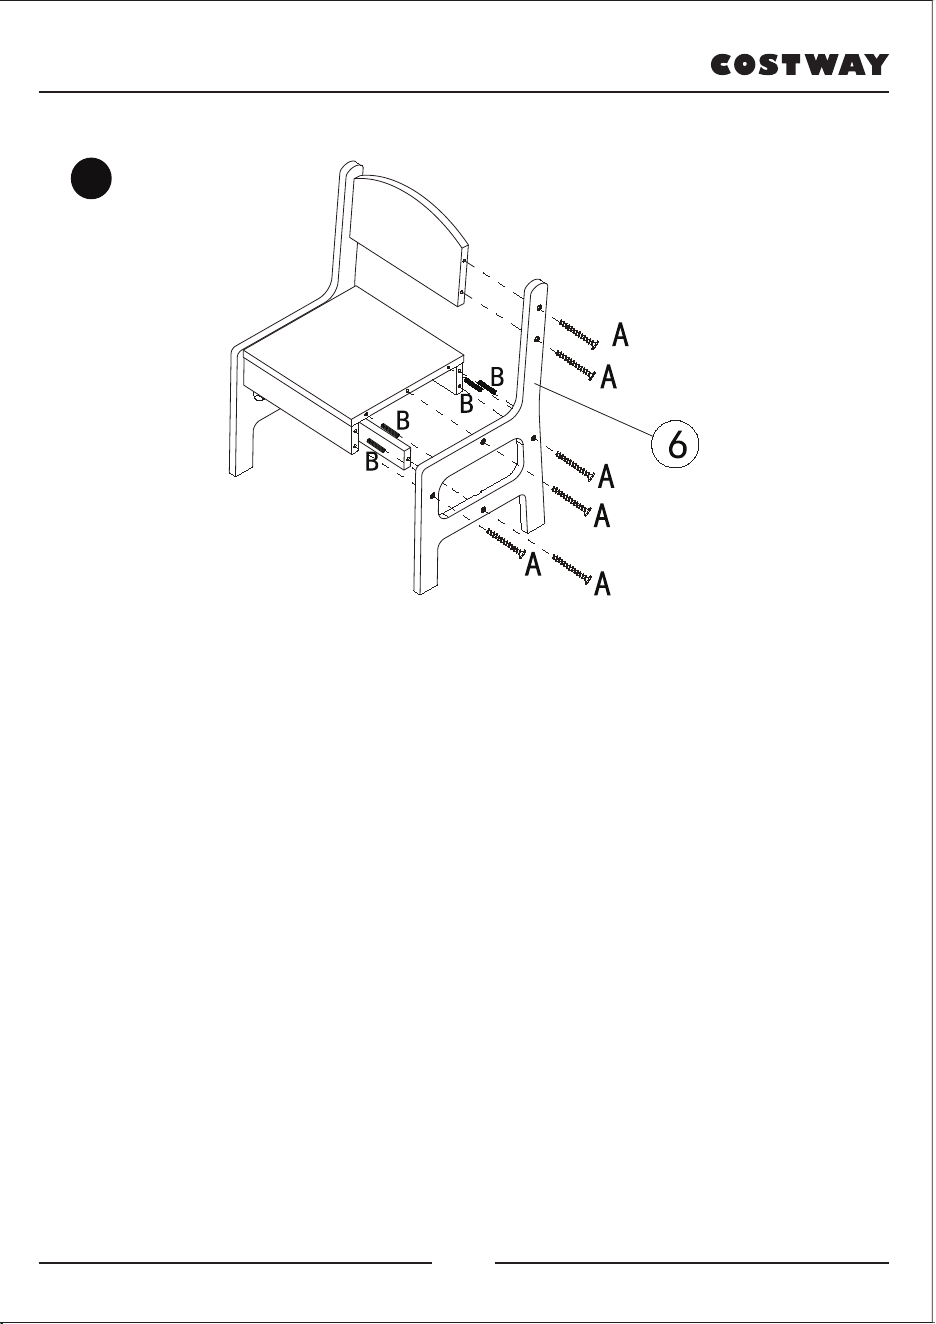
EN: Insert 4 x Part(B) into the corresponding position of the Panel(2) (3) (4),
connect Panel(6) to the Panel(2) (3) (4) and then fix them with 6 x Screws
(A).
DE: Setzen Sie 4 x Teil (B) in die entsprechende Position der Platte (2) (3)
(4) ein, verbinden Sie die Platte (6) mit der Platte (2) (3) (4) und befestigen
Sie sie dann mit 6 x Schrauben (A).
FR: Insérez quatre chevilles (B) dans la position correspondante des
panneaux (2) (3) (4), connectez le panneau (6) aux panneaux (2) (3) (4), puis
fixez-les avec 6 vis (A).
ES: Inserte 4 piezas (B) en la posición correspondiente de los paneles (2), (3)
y (4), conecte el panel (6) a los paneles (2), (3) y (4) y luego fíjelos con 6
tornillos(A).
IT: Inserire le parti (B) nella posizione corrispondente del pannello (2) (3)
(4), collegare il pannello (6) al pannello (2) (3) (4) e quindi fissarli con le viti
(A).
PL: Włóż cztery części (B) w odpowiednie miejsce panelu (2) (3) (4),
podłącz panel (6) do panelu (2) (3) (4), a następnie zamocuj za pomocą
sześciu wkrętów (A).
EN: Repeat the above steps and install another chair.
DE: Wiederholen Sie die obigen Schritte und installieren Sie einen weiteren
Stuhl.
FR: Répétez les étapes ci-dessus et assemblez une autre chaise.
ES: Repita los pasos anteriores e instale la otra silla.
IT: Ripetere i passi precedenti e installare un'altra sedia.
PL: Powtórz powyższe kroki i zmontuj kolejne krzesło.
4 5
14 15
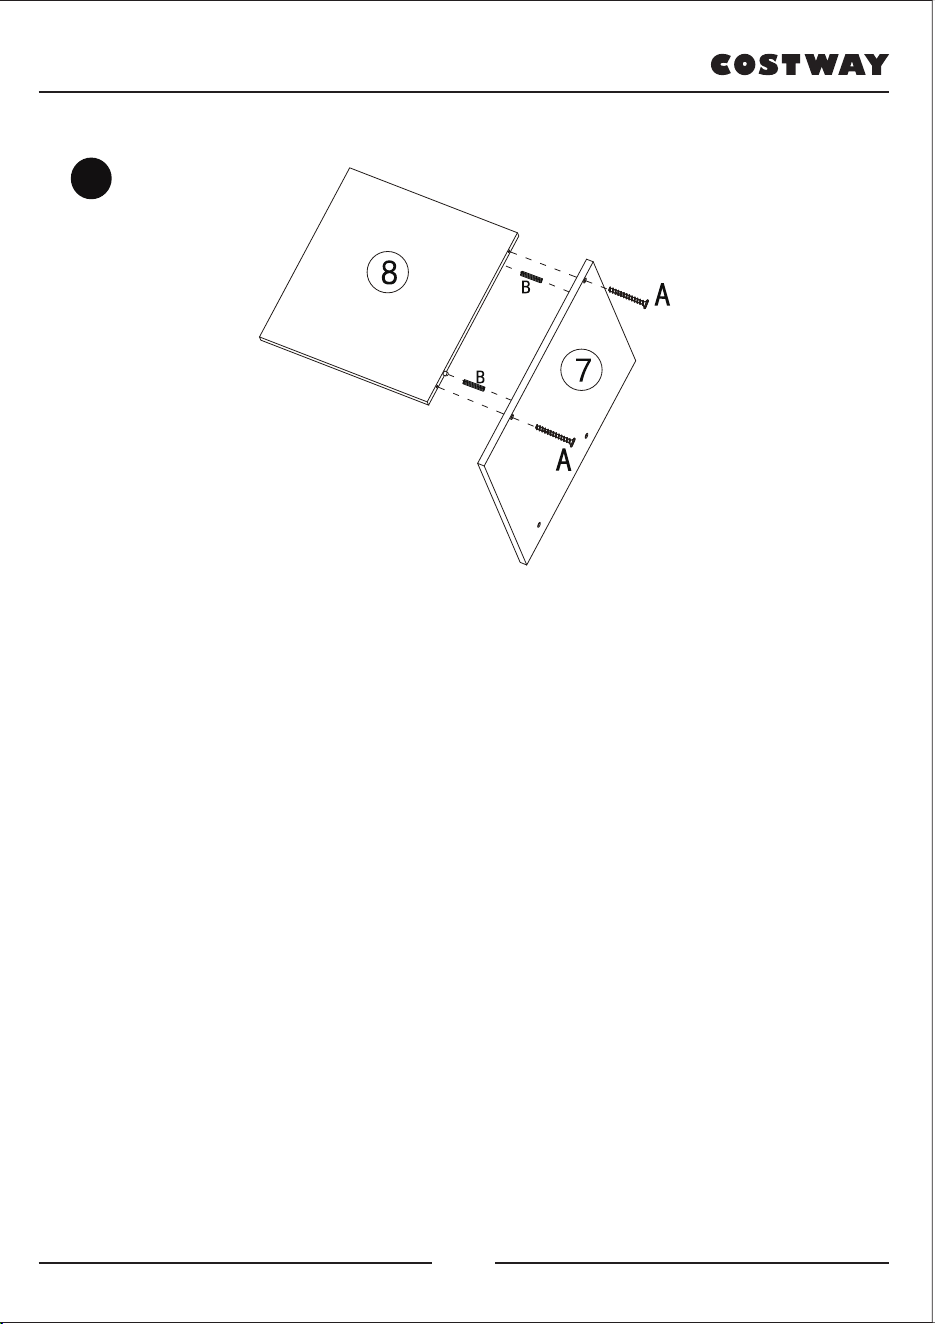
EN: Insert 2x Part(B) into the holes of Panel(8), connect Panel(8) to the
Panel(7) and then fix them with 2 x Screws(A).
DE: Führen Sie 2x Teil (B) in die Löcher der Platte (8) ein, verbinden Sie die
Platte (8) mit der Platte (7) und befestigen Sie sie dann mit 2 x Schrauben
(A).
FR: Insérez deux chevilles (B) dans les trous du panneau (8), connectez le
panneau (8) au panneau (7), puis fixez-les avec 2 vis (A).
ES: Inserte 2 piezas (B) en los orificios del panel (8), conecte el panel (8) al
panel (7) y luego fíjelos con 2 tornillos (A).
IT: Inserire le parti (B) nei fori del pannello (8), collegare il pannello (8) al
pannello (7) e quindi fissarli con le viti (A).
PL: Włóż dwie części (B) do otworów w panelu (8), połącz panel (8) z
panelem (7), a następnie zamocuj za pomocą dwóch wkrętów (A).
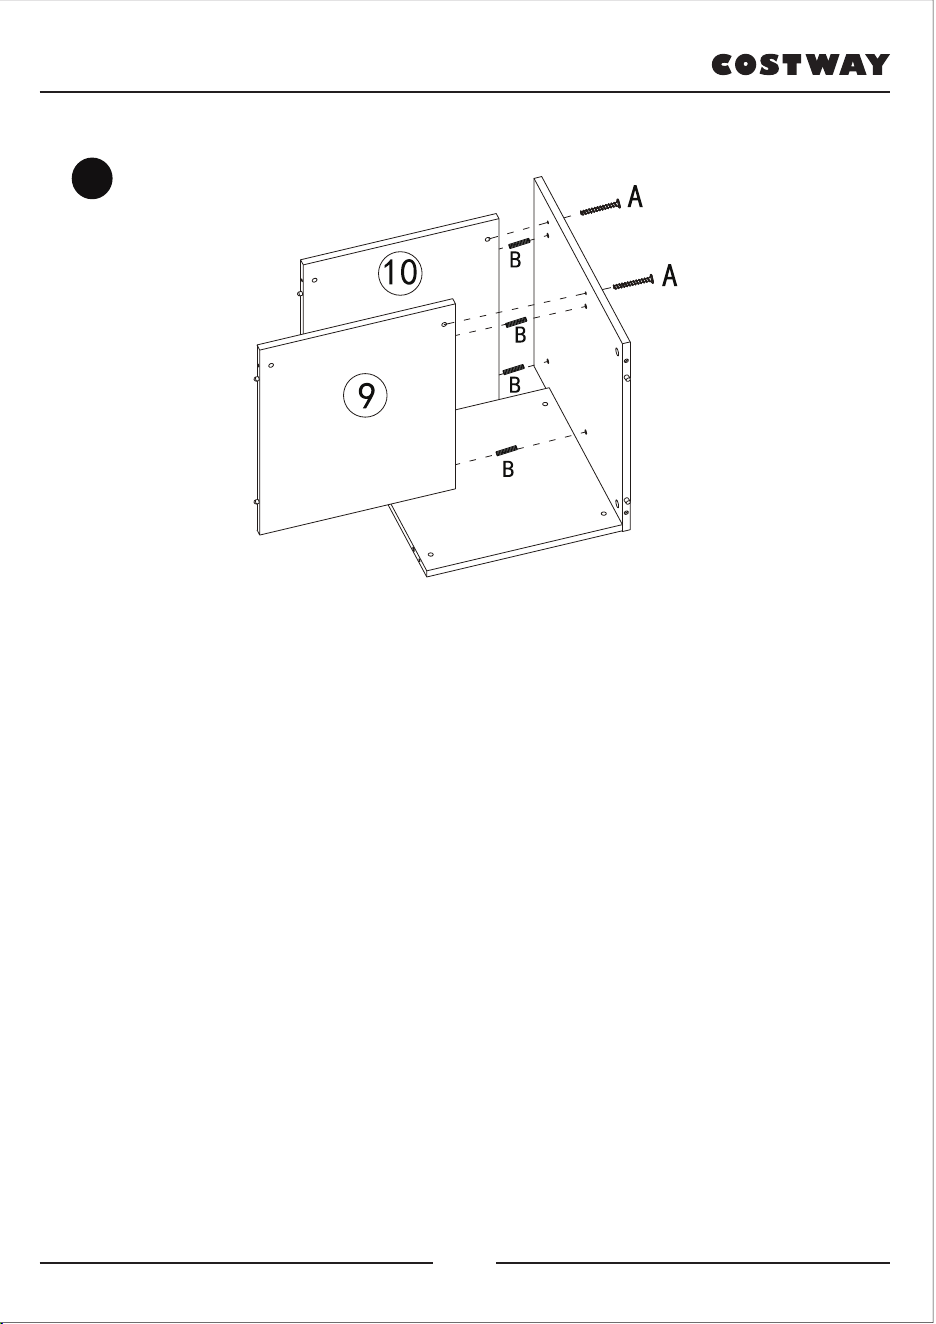
EN: Lay the Panel(7)&(8) assembly down, inset the 4 x Part(B) the holes of
the Panel (7). Connect the Panel (9) and the Panel (10) to the Panel (7) in
parallel, and fix them with 2 x Screws (A).
DE: Legen Sie die Baugruppe Platte (7) und (8) hin und setzen Sie das 4 x
Teil (B) in die Löcher der Platte (7) ein. Verbinden Sie die Platte (9) und die
Platte (10) parallel mit der Platte (7) und befestigen Sie sie mit 2 x Schrauben
(A).
FR: Posez l’ensemble des panneaux (7 et 8), insérez quatre chevilles (B) dans
les trous du panneau (7). Connectez le panneau (9) et le panneau (10) au
panneau (7), et fixez-les avec 2 vis (A).
ES: Coloque el conjunto de los paneles (7) y (8) sobre una superficie plana,
inserte las 4 piezas (B) en los orificios del panel (7). Conecte el panel (9) y el
panel (10) al panel (7) en paralelo, y fíjelos con 2 tornillos (A).
IT: Posare i pannelli (7) e (8), inserire le parti (B) nei fori del pannello (7).
Collegare il pannello (9) e il pannello (10) al pannello (7) in parallelo e
fissarli con le viti (A).
PL: Połóż panele (7) i (8) na dole, włóż cztery części (B) otwory w panelu
(7). Połącz panel (9) i panel (10) z panelem (7) równolegle i zamocuj je za
pomocą dwóch wkrętów (A).
6 7
16 17
EN: Insert 2x Part(B) into the holes of Panel(8), connect Panel(8) to the
Panel(7) and then fix them with 2 x Screws(A).
DE: Führen Sie 2x Teil (B) in die Löcher der Platte (8) ein, verbinden Sie die
Platte (8) mit der Platte (7) und befestigen Sie sie dann mit 2 x Schrauben
(A).
FR: Insérez deux chevilles (B) dans les trous du panneau (8), connectez le
panneau (8) au panneau (7), puis fixez-les avec 2 vis (A).
ES: Inserte 2 piezas (B) en los orificios del panel (8), conecte el panel (8) al
panel (7) y luego fíjelos con 2 tornillos (A).
IT: Inserire le parti (B) nei fori del pannello (8), collegare il pannello (8) al
pannello (7) e quindi fissarli con le viti (A).
PL: Włóż dwie części (B) do otworów w panelu (8), połącz panel (8) z
panelem (7), a następnie zamocuj za pomocą dwóch wkrętów (A).
EN: Lay the Panel(7)&(8) assembly down, inset the 4 x Part(B) the holes of
the Panel (7). Connect the Panel (9) and the Panel (10) to the Panel (7) in
parallel, and fix them with 2 x Screws (A).
DE: Legen Sie die Baugruppe Platte (7) und (8) hin und setzen Sie das 4 x
Teil (B) in die Löcher der Platte (7) ein. Verbinden Sie die Platte (9) und die
Platte (10) parallel mit der Platte (7) und befestigen Sie sie mit 2 x Schrauben
(A).
FR: Posez l’ensemble des panneaux (7 et 8), insérez quatre chevilles (B) dans
les trous du panneau (7). Connectez le panneau (9) et le panneau (10) au
panneau (7), et fixez-les avec 2 vis (A).
ES: Coloque el conjunto de los paneles (7) y (8) sobre una superficie plana,
inserte las 4 piezas (B) en los orificios del panel (7). Conecte el panel (9) y el
panel (10) al panel (7) en paralelo, y fíjelos con 2 tornillos (A).
IT: Posare i pannelli (7) e (8), inserire le parti (B) nei fori del pannello (7).
Collegare il pannello (9) e il pannello (10) al pannello (7) in parallelo e
fissarli con le viti (A).
PL: Połóż panele (7) i (8) na dole, włóż cztery części (B) otwory w panelu
(7). Połącz panel (9) i panel (10) z panelem (7) równolegle i zamocuj je za
pomocą dwóch wkrętów (A).
6 7
16 17
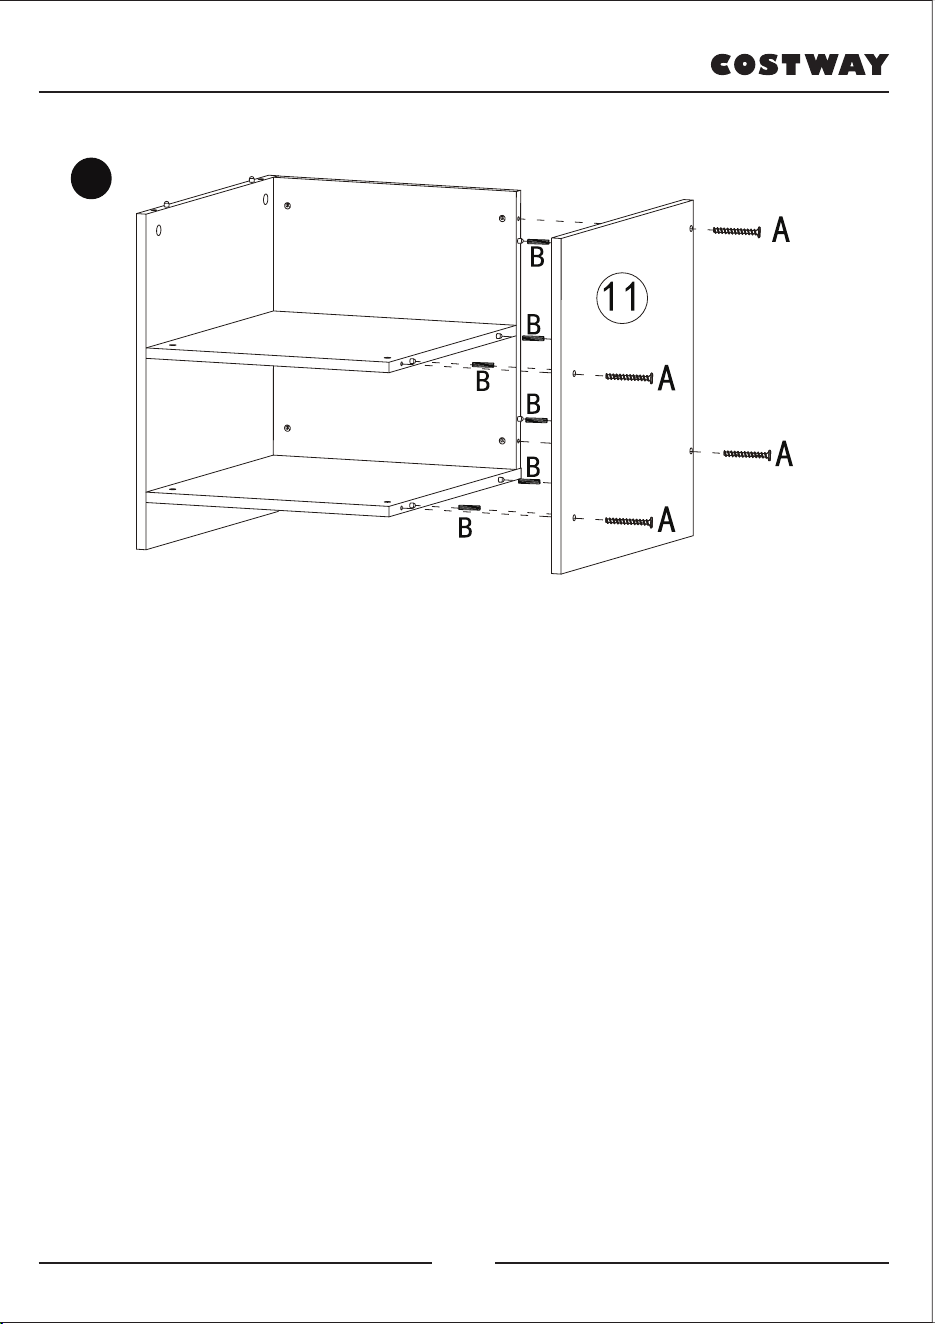
EN: Turn the above part to upright position and insert 6 x Part(B) into the
holes of Panel(8)(9)(10). Connect the Panel(11) to the Panel(8)(9)(10) and fix
them with 4 x Screws(A).
DE: Drehen Sie das obige Teil in die aufrechte Position und führen Sie 6 x
Teil (B) in die Löcher der Platte (8) (9) (10) ein. Verbinden Sie die Platte (11)
mit der Platte (8) (9) (10) und befestigen Sie sie mit 4 x Schrauben (A).
FR: Tournez la partie ci-dessus en position verticale et insérez 6 chevilles (B)
dans les trous des panneaux (8, 9 et 10). Connectez le panneau (11) aux
panneaux (8, 9 et 10) et fixez-les avec 4 vis (A).
ES: Gire la parte anterior a la posición vertical e inserte 6 piezas (B) en los
orificios de los paneles (8), (9) y (10). Conecte el panel (11) a los paneles (8),
(9) y (10) y fíjelos con 4 tornillos (A).
IT: Ruotare la parte sopra in posizione verticale e inserire le parti (B) nei fori
del pannello (8) (9) (10). Collegare il pannello (11) al pannello (8) (9) (10) e
fissarli con le viti (A).
PL: Obróć powyższą część do pozycji pionowej i włóż sześć części (B) do
otworów w panelu (8) (9) (10). Połącz panel (11) z panelem (8) (9) (10) i
zamocuj je za pomocą czterech wkrętów (A).
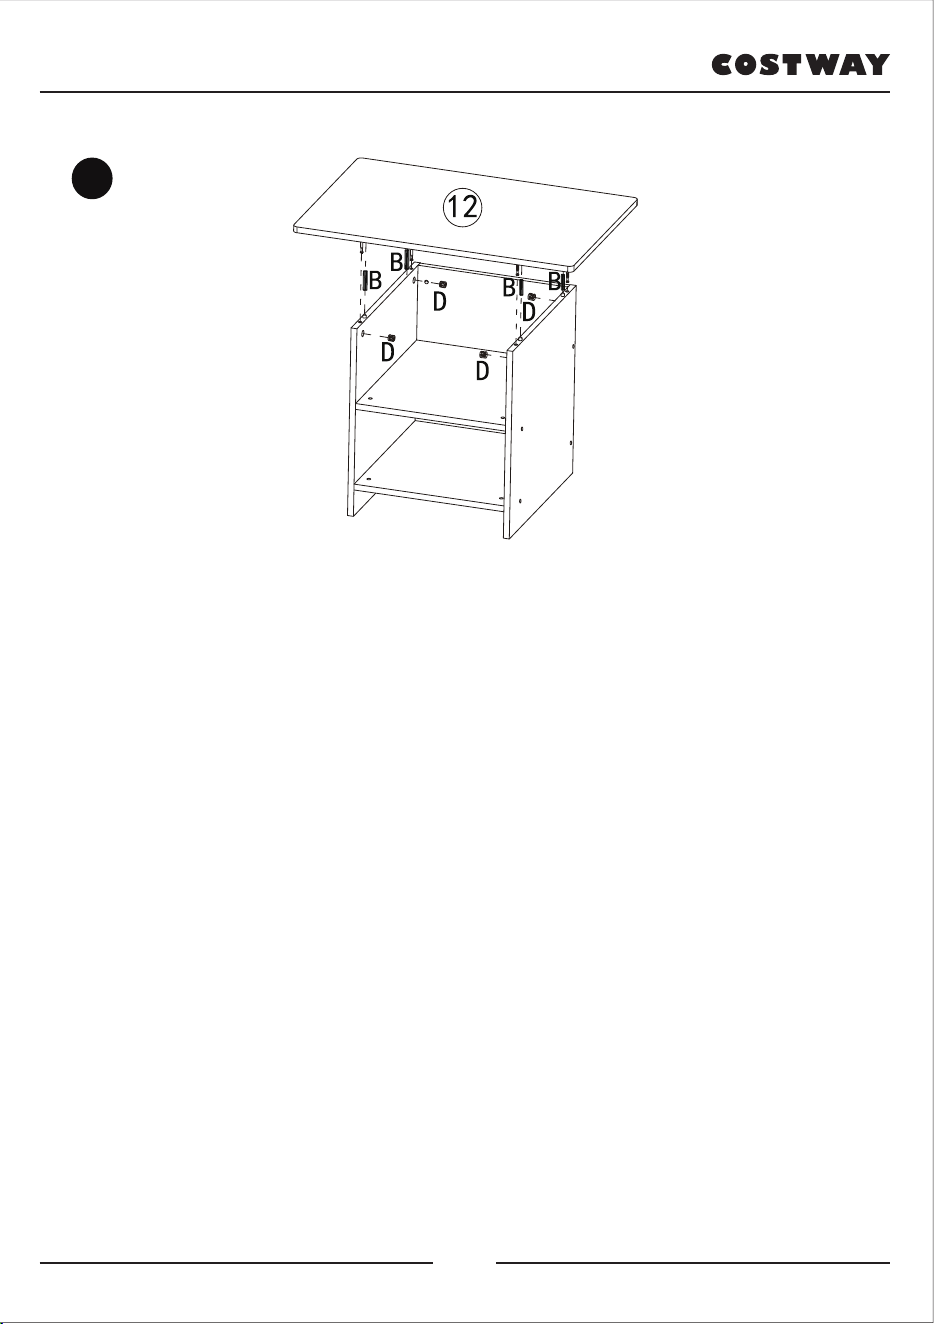
EN: Insert 4 x Nuts(D) into the corresponding holes of Panel(7) &Panel(11). Insert 4 x Part
(B) into the corresponding holes of Panel(7) &Panel(11). Align the Panel (12) downward,
and use a screwdriver to turn each Cam Lock (D) 90 degrees to lock the Panel (12).
DE: Setzen Sie 4 x Muttern (D) in die entsprechenden Löcher von Platte (7) und Platte (11)
ein. Führen Sie 4 x Teil (B) in die entsprechenden Löcher von Platte (7) und Platte (11) ein.
Richten Sie die Platte (12) nach unten aus und drehen Sie jede Nockenverriegelung (D) mit
einem Schraubendreher um 90 Grad, um die Platte (12) zu verriegeln.
FR: Insérez 4 serrures à came (D) dans les trous correspondants du panneau (7) et du
panneau (11). Insérez 4 chevilles (B) dans les trous correspondants du panneau (7) et du
panneau (11). Mettez le panneau (12) vers le bas et utilisez un tournevis pour tourner
chaque serrure à came (D) de 90 degrés afin de fixer le panneau (12).
ES: Inserte 4 tuercas (D) en los orificios correspondientes del panel (7) y del panel (11).
Inserte 4 piezas (B) en los orificios correspondientes del panel (7) y del panel (11). Alinee el
panel (12) hacia abajo, y utilice un destornillador para girar cada bloqueo de leva (D) 90
grados para bloquear el panel (12).
IT: Inserire i dadi (D) nei fori corrispondenti del pannello (7) e del pannello (11). Inserire le
parti (B) nei fori corrispondenti del pannello (7) e del pannello (11). Allineare il pannello
(12) verso il basso e utilizzare un cacciavite per ruotare ciascun dado (D) di 90 gradi per
bloccare il pannello (12).
PL: Włóż cztery nakrętki (D) do odpowiednich otworów w panelu (7) i panelu (11). Włóż
cztery części (B) do odpowiednich otworów w panelu (7) i panelu (11). Ustaw panel (12)
w dół i za pomocą śrubokręta przekręć każdą śrubę krzywkową o 90 stopni, aby
zablokować panel (12).
8 9
18 19
EN: Turn the above part to upright position and insert 6 x Part(B) into the
holes of Panel(8)(9)(10). Connect the Panel(11) to the Panel(8)(9)(10) and fix
them with 4 x Screws(A).
DE: Drehen Sie das obige Teil in die aufrechte Position und führen Sie 6 x
Teil (B) in die Löcher der Platte (8) (9) (10) ein. Verbinden Sie die Platte (11)
mit der Platte (8) (9) (10) und befestigen Sie sie mit 4 x Schrauben (A).
FR: Tournez la partie ci-dessus en position verticale et insérez 6 chevilles (B)
dans les trous des panneaux (8, 9 et 10). Connectez le panneau (11) aux
panneaux (8, 9 et 10) et fixez-les avec 4 vis (A).
ES: Gire la parte anterior a la posición vertical e inserte 6 piezas (B) en los
orificios de los paneles (8), (9) y (10). Conecte el panel (11) a los paneles (8),
(9) y (10) y fíjelos con 4 tornillos (A).
IT: Ruotare la parte sopra in posizione verticale e inserire le parti (B) nei fori
del pannello (8) (9) (10). Collegare il pannello (11) al pannello (8) (9) (10) e
fissarli con le viti (A).
PL: Obróć powyższą część do pozycji pionowej i włóż sześć części (B) do
otworów w panelu (8) (9) (10). Połącz panel (11) z panelem (8) (9) (10) i
zamocuj je za pomocą czterech wkrętów (A).
EN: Insert 4 x Nuts(D) into the corresponding holes of Panel(7) &Panel(11). Insert 4 x Part
(B) into the corresponding holes of Panel(7) &Panel(11). Align the Panel (12) downward,
and use a screwdriver to turn each Cam Lock (D) 90 degrees to lock the Panel (12).
DE: Setzen Sie 4 x Muttern (D) in die entsprechenden Löcher von Platte (7) und Platte (11)
ein. Führen Sie 4 x Teil (B) in die entsprechenden Löcher von Platte (7) und Platte (11) ein.
Richten Sie die Platte (12) nach unten aus und drehen Sie jede Nockenverriegelung (D) mit
einem Schraubendreher um 90 Grad, um die Platte (12) zu verriegeln.
FR: Insérez 4 serrures à came (D) dans les trous correspondants du panneau (7) et du
panneau (11). Insérez 4 chevilles (B) dans les trous correspondants du panneau (7) et du
panneau (11). Mettez le panneau (12) vers le bas et utilisez un tournevis pour tourner
chaque serrure à came (D) de 90 degrés afin de fixer le panneau (12).
ES: Inserte 4 tuercas (D) en los orificios correspondientes del panel (7) y del panel (11).
Inserte 4 piezas (B) en los orificios correspondientes del panel (7) y del panel (11). Alinee el
panel (12) hacia abajo, y utilice un destornillador para girar cada bloqueo de leva (D) 90
grados para bloquear el panel (12).
IT: Inserire i dadi (D) nei fori corrispondenti del pannello (7) e del pannello (11). Inserire le
parti (B) nei fori corrispondenti del pannello (7) e del pannello (11). Allineare il pannello
(12) verso il basso e utilizzare un cacciavite per ruotare ciascun dado (D) di 90 gradi per
bloccare il pannello (12).
PL: Włóż cztery nakrętki (D) do odpowiednich otworów w panelu (7) i panelu (11). Włóż
cztery części (B) do odpowiednich otworów w panelu (7) i panelu (11). Ustaw panel (12)
w dół i za pomocą śrubokręta przekręć każdą śrubę krzywkową o 90 stopni, aby
zablokować panel (12).
8 9
18 19
Welcome to visit our website and purchase our quality products!
We would like to extend our hear�elt thanks to
all of our customers for taking �me to assemble
this product and giving us valuable feedbacks.
With your inspiring rating, COSTWAY will be more consistent to offer you
EASY SHOPPING EXPERIENCE, GOOD PRODUCTS and EFFICIENT SERVICE!
US office: Fontana, California
UK office: Ipswich
Reward Points
Exclusive Customer Service
Personalized Recommenda�ons
Permanent Shopping Cart
Order History
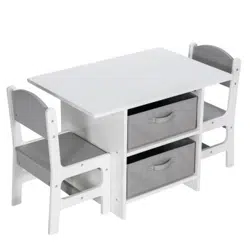
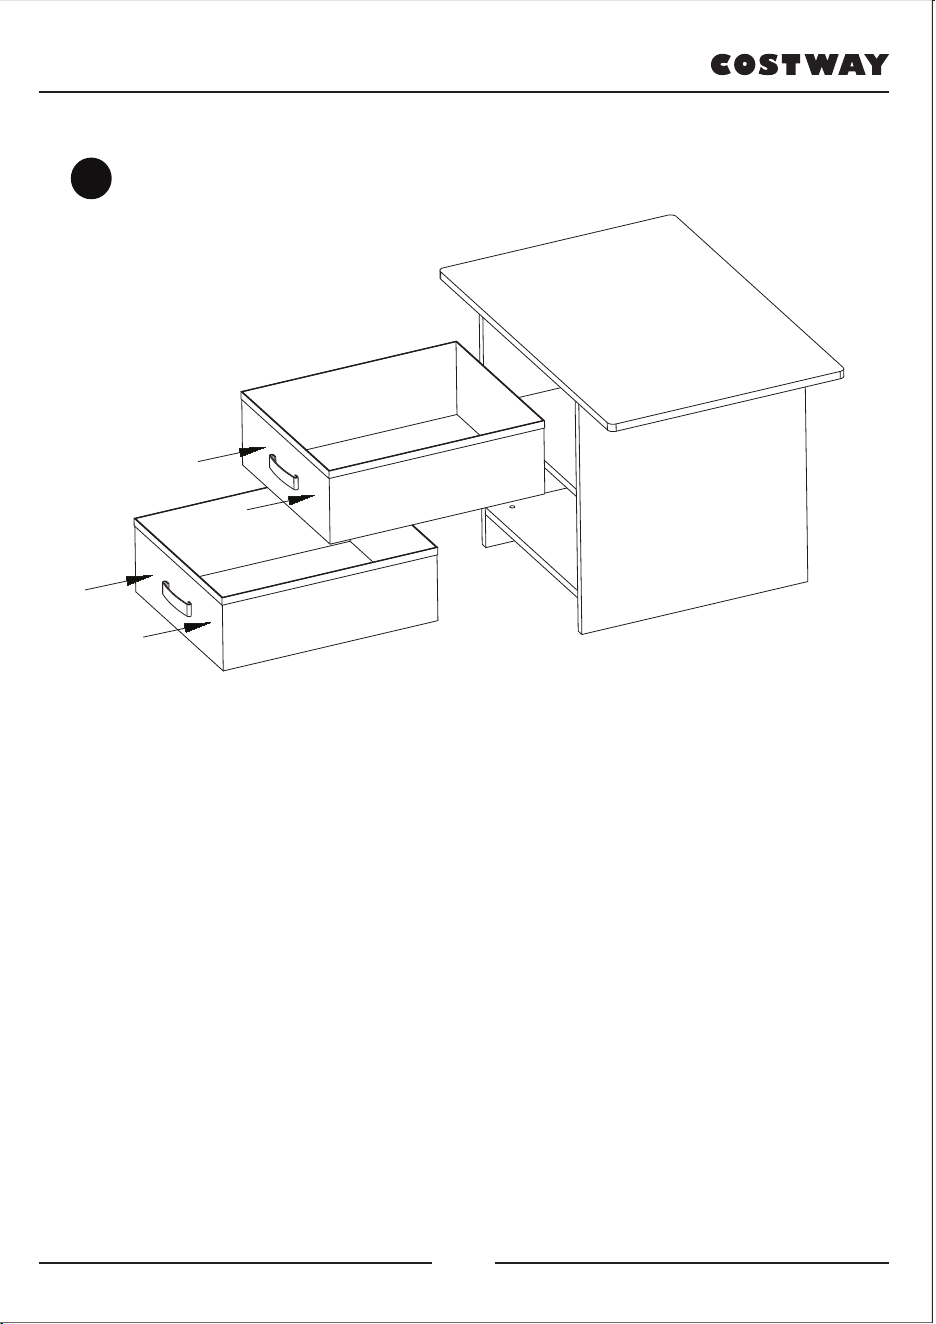
EN: Place 2 x Fabric Drawers on the shelf of the table and the installation is
complete.
DE: Stellen Sie 2 x Stoffschubladen auf das Regal des Tisches und die
Installation ist abgeschlossen.
FR: Placez 2 tiroirs en tissu sur la tablette de la table et l’assemblage est
terminé.
ES: Coloque 2 cajones de tela en el estante de la mesa y la instalación está
completa.
IT: Posizionare 2 cassetti in tessuto sul ripiano del tavolo e l'installazione è
completa.
PL: Umieść dwie szuflady w półkach stołu. Instalacja jest zakończona.
10
20 21
Welcome to visit our website and purchase our quality products!
We would like to extend our hear�elt thanks to
all of our customers for taking �me to assemble
this product and giving us valuable feedbacks.
With your inspiring rating, COSTWAY will be more consistent to offer you
EASY SHOPPING EXPERIENCE, GOOD PRODUCTS and EFFICIENT SERVICE!
US office: Fontana, California
UK office: Ipswich
Reward Points
Exclusive Customer Service
Personalized Recommenda�ons
Permanent Shopping Cart
Order History
EN: Place 2 x Fabric Drawers on the shelf of the table and the installation is
complete.
DE: Stellen Sie 2 x Stoffschubladen auf das Regal des Tisches und die
Installation ist abgeschlossen.
FR: Placez 2 tiroirs en tissu sur la tablette de la table et l’assemblage est
terminé.
ES: Coloque 2 cajones de tela en el estante de la mesa y la instalación está
completa.
IT: Posizionare 2 cassetti in tessuto sul ripiano del tavolo e l'installazione è
completa.
PL: Umieść dwie szuflady w półkach stołu. Instalacja jest zakończona.
10
20 21
VIELEN
DAN K
Ihre Vorschläge und Kommentare für COSTWAY sind wirklich wich�g für uns!
Wir möchten uns bei allen Kunden herzlich bedanken,
dass sie sich die Zeit genommen haben, dieses Produkt
zusammenzubauen und uns wertvolle Bewertung
zukommen zu lassen.
Mit Ihrer inspirierenden Bewertung wird COSTWAY konsistenter sein, um Ihnen
EIN SCHÖNES EINKAUFSERLEBNIS, GUTE PRODUKTE und EFFIZIENTEN SERVICE zu bieten!
DE office:FDS GmbH,Neuer Höltigbaum 36,22143 Hamburg,Deutschland
Belohnungspunkte
Exklusiver Kundendienst
Personalisierte Empfehlungen
Permanenter Einkaufswagen
Bestellverlauf
5 Sterne Bewertung
Bienvenue pour visiter notre site et acheter nos produits de qualité!
Nous tenons à vous présenter nos remerciements
sincères à tous nos clients qui prennent beaucoup
de temps pour assembler ce produit et nous donner
des commentaires précieux.
Avec votre évaluation inspirante, COSTWAY sera plus professionnel pour vous offrir une
BONNE EXPÉRIENCE D’ACHATS, de BONS PRODUITS et un SERCIVE EFFICACE !
FR office : 26 RUE DU VERTUQUET, 59960 NEUVILLE EN FERRAIN, FRANCE
Points de Récompense
Service à la Clientèle Exclusif
Recommanda�ons Personnalisées
Panier Permanent
Historique des Commandes
merci
22 23
¡Bienvenido a visitar nuestro si�o web y comprar nuestros
productos de alta calidad!
Nos gustaría expresar nuestro más sincero
agradecimiento a todos nuestros clientes por tomarse
el �empo de ensamblar este producto y brindarnos
valiosos comentarios.
¡Con su calificación inspiradora, COSTWAY será más consistente para ofrecerle EXPERIENCIA
DE COMPRA CONVENIENTE, BUENOS PRODUCTOS y SERVICIO EFICIENTE!
EE.UU.: Fontana, California
Reino Unido: Ipswich
Puntos de recompensa
Servicio al cliente exclusivo
Recomendaciones personalizadas
Carrito de compras permanente
Historial de pedidos
Gracias
Benvenu� a visitare il nostro sito Web e acquistare i nostri
prodo� di qualità!
Ringraziamo sinceramente tu� i nostri clien� per
aver dedicato del tempo per assemblare questo
prodo�o e fornirci preziosi feedback.
Con il tuo commento stimolante, COSTWAY continuerà a offrirti FACILITÀ DI ACQUISTO FACILE,
PRODOTTI BUONI e SERVIZIO EFFICIENTE!
US ufficio: Fontana, California
UK ufficio: Ipswich
Pun� del premio
Servizio dei clien� esclusivo
Raccomandazioni personalizzate
Carrello permanente
Storia degli ordini
Grazie
24 25
Zapraszamy do odwiedzenia naszej strony internetowej!
Dziękujemy za dokonanie zakupu w naszym
sklepie i zapraszamy do odwiedzenia go w
przyszłości!
Twoja ocena nas inspiruje! Dzięki niej COSTWAY będzie dążył do zaoferowania ci WYDAJNEJ
OBSŁUGI, DOBRYCH PRODUKTÓW I BEZPROBLEMOWYCH ZAKUPÓW!
PL office: Gdańsk
punkty lojalnościowe
doskonała obsługa klienta
personalizowane rekomendacje
karta stałego klienta
historia zamówień
Pięciogwiazdkowa Ocena
26