

User Manual
Cordless Garden Shears
JYGS03

2
CONTENTS
1. INTRODUCTION
2. TECHNICAL DATA, PACKING LIST
3. FUNCTION AND GENERAL CHARACTERISTICS
4. TOOL FIGURE
5. INSTRUCTIONS FOR SAFETY OPERATION
6. OPERATION
7. CLEANING AND MAINTENANCE
8. TROUBLESHOOTING
9. WARRANTY
Save the instrucation

The purpose of these operating instructions is to familiarise yourself with the tool.This
manual is intended to familiarise yourself with the Cordless Lawn Shears (hereinafter
referred to as the tool) and its correct operation. These operating instructions contain
information that promotes.These operating instructions contain information that pro-
motes the long-term, safe use of the tool.
The manufacturer reserves the right to make modifications to the operating instruc-
tions in order to improve the tool.
The changes will be published in a new edition of the operating manual .
Before using the tool, you must carefully read these operating instructions must be
carefully read before the tool is operated.
By operating the tool, the purchaser declares that he has read and understood of this
manual and accepts liability for the consequences of non-observance of the provisions
in this manual: safety operation, storage and disposal of the tool.
3
1. INTRODUCTION
Save the instrucation
2.1 TECHNICAL SPECIFICATIONS
Battery voltage
Battery capacity
No-load Speed
Handle Swivel angle
Cutting length
Cutting width
3.6 V
2000 mAh
1200 RPM
0º - 40º / 60º
116 mm
82 mm
2.2 Packing List
Garden shears
Shrub cutter blade
Grass cutter blade
Charging cable
User manual
x 1
x 1
x 1
x 1
x 1

Cordless garden shears are a multifunctional tool, used for lawn finishing and shrub
care.
The tool is designed for short-term work in domestic environments, in areas with mod-
erate climate, with a typical temperature from -10˚C to +40˚C, relative humidity of no
more than 80% and no direct exposure to of atmospheric precipitation and excessive air
dustiness.
This safety data sheet contains the most complete information and requirements,
necessary and sufficient for the safe, efficient and reliable operation of the tool.
Due to the continuous improvement of the product design the manufacturer reserves
the right to make minor modifications to the design modifications which are not described
in this safety data sheet and which do not affect the tool's effective and safe operation.
Read this safety data sheet carefully. The information you have learned will enable
you to learn how to commission the tool correctly and avoid avoid errors and hazards.
The product may only be operated by persons of legal age;
have the skills and/or knowledge of how to operate and operate the tool; are in a
sober state; not under the influence of medication
They are sober, not under the influence of any medication that can cause drowsiness
and/or impair concentration, under the influence of drugs that cause drowsiness and/or
impaired ability to concentrate; not affected by any of the following. Any of these condi-
tions and are not affected by medication causing drowsiness and/or reduced concentra-
tion to work with the tool.
3. PURPOSE AND GENERAL CHARACTERISTICS
4
Save the instrucation
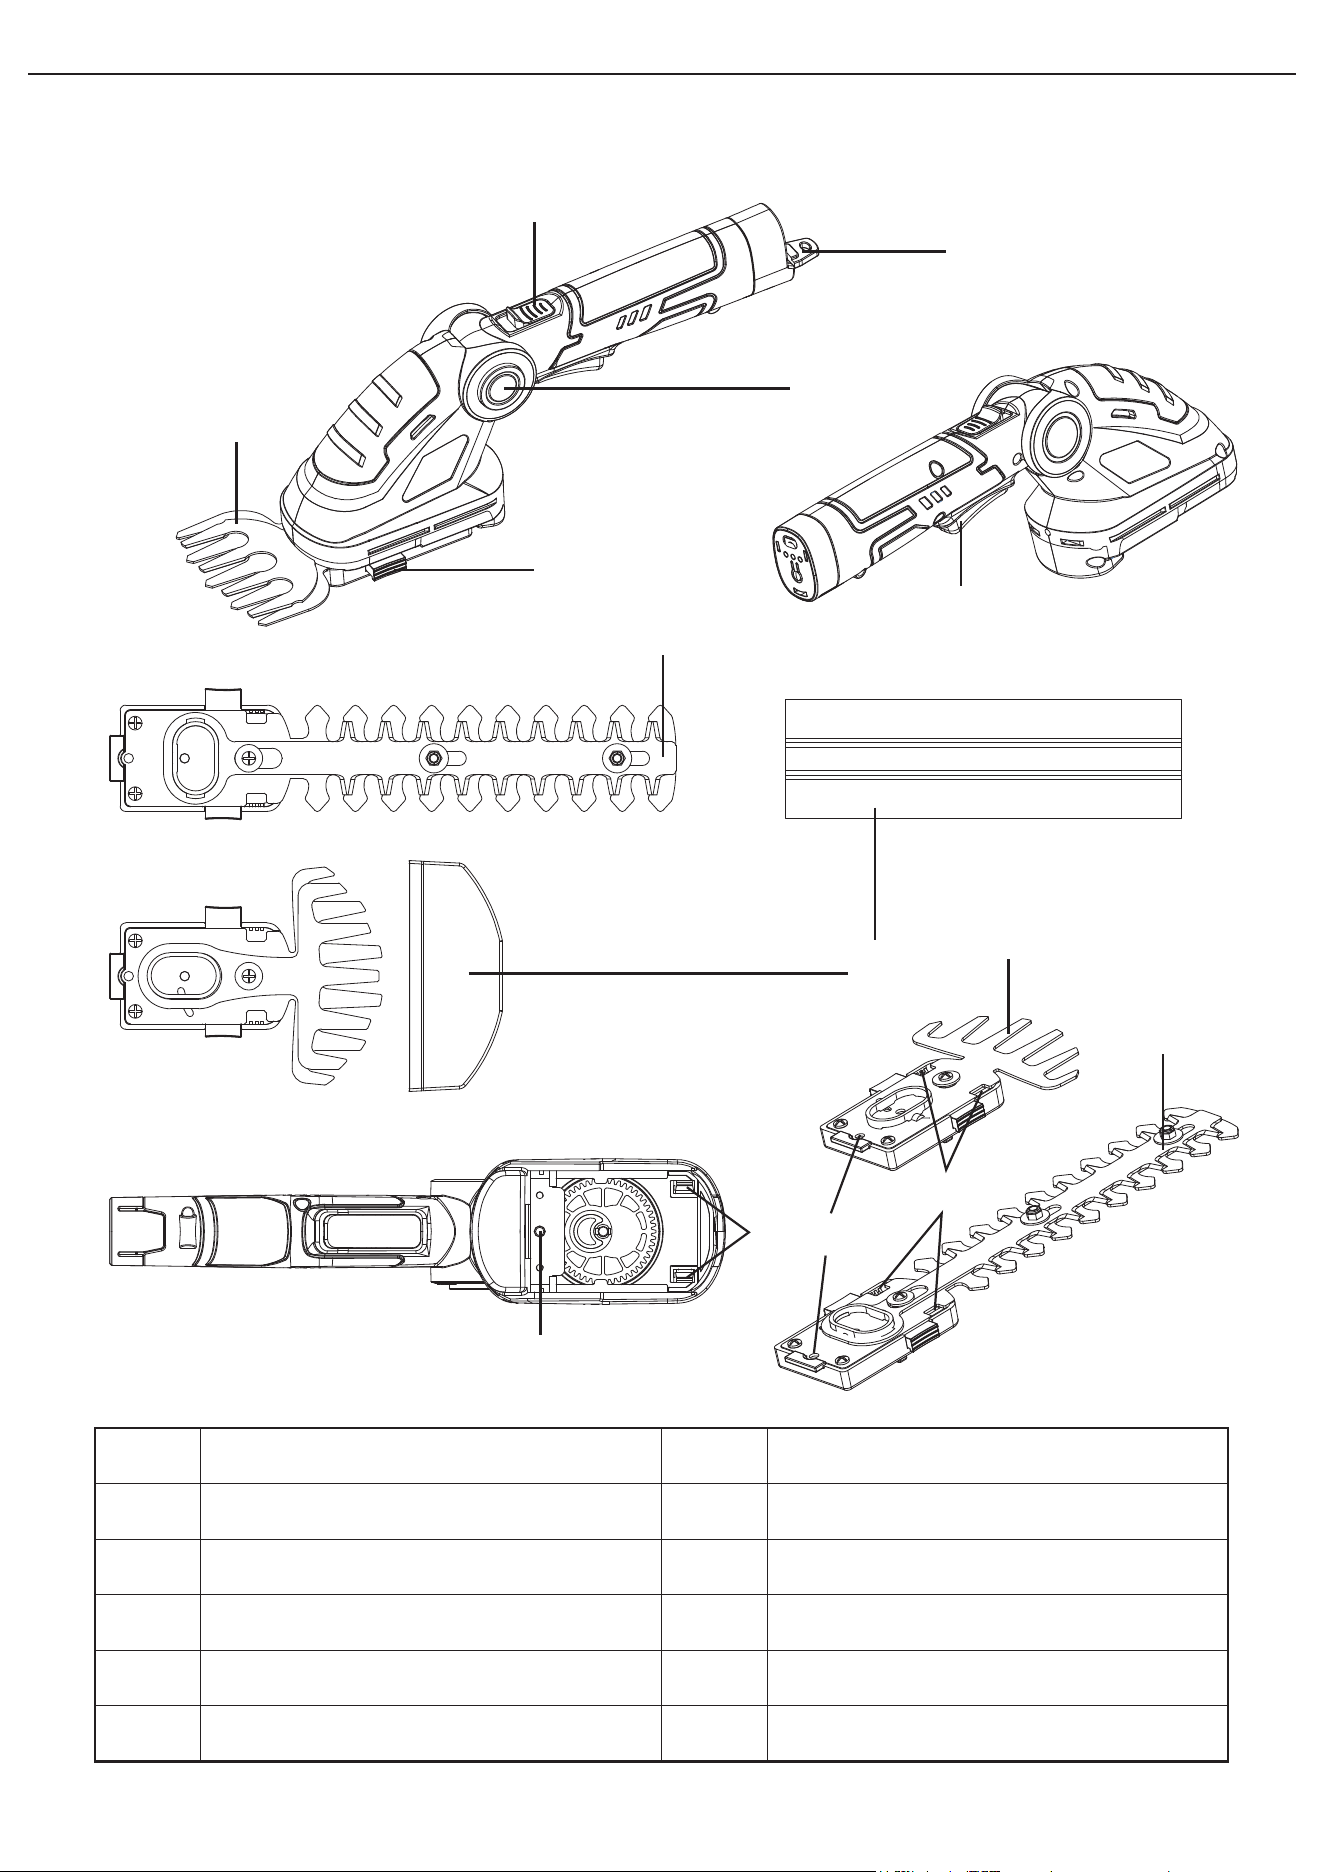
4. TOOL FIGURE
3
4
2
7
8
1
5
Save the instrucation
1
2
3
4
5
6
7
8
9
10
11
12
Grass cutter blade
Handle angle adjustment button
Safety switch
Safety key
Clip for brade
Insert slot of blade
Blade release mechanism
Shrub cutter blade
Blade guard
Fixing post for blade
Fixing hole on the blade
Trigger
9
12
1
10
115
6
8

This tool belongs to the category of hand-held power tools. Before use, please famil-
iarize yourself with and strictly follow the safety instructions below.
Use the tool only for its intended purpose as specified in the operating manual.
Perform necessary maintenance in a timely manner. Any alteration or modification of
the tool is prohibited, as it could cause damage and/or personal injury.
5. INSTRUCTIONS FOR SAFETY OPERATION
Each time before using the tool, it must be inspected visually to make sure it is intact
and undamaged, and all components of the tool should be inspected once before use to
make sure that it is intact and not damaged.
Checking the tool
Make sure the workplace is safe: it must be clean and well clean and well-lit.
Poor lighting and cluttering of the workplace can lead to accidents.
Workplace safety
Wear protective headgear when operating the tool.
Use respiratory protection when working with dust-forming materials.
Always wear safety glasses.
Do not wear clothing that is too wide when operating the tool.
Wear long pants to protect your legs.
Wear protective headphones.
Wear non-slip, durable work gloves.
Workwear
* Keep your hands away from the moving parts of the machine.
* Do not allow any part of the body to fall into the moving parts of the tool during opera-
tion.
* Do not leave the hand-held power tool unattended while the machine is operating.
* Do not operate the tool while under the influence of alcohol or medication, which can
affect your reaction time.
* Do not operate the tool when you are tired or unable to control the work process.
* Be attentive throughout the entire work period.
* Do not use caustic chemicals or liquids to clean tools.
* Do not apply unnecessary force to the tool. The right tool for the job tool will allow you
to do a better and safer job with the productivity tool is designed to do the job better and
safer.
* Do not use a tool with a faulty switch. Any tool that has a a defective switch is danger-
Use and care
6
Save the instrucation
Do not operate the tool if it is not working properly! The tool must be disconnected
from the power supply before making any adjustments, maintenance, or when storing the
tool.
Warning!
ous and must be repaired.
* Always disconnect the tool from the power source before making adjustments, changing
accessories, or storing the tool from the mains supply before making any adjustments,
changing accessories, or storing it to prevent the risk of the tool accidentally being switched
back on of the tool being switched on again.
* Use the tool, accessories, attachments and attachments in tool and accessories and
attachments in accordance with these instructions and for the purpose for which the tool is
intended, taking into account the the conditions and type of work to be performed. Use of
the power tool for purposes other than those for which it is intended. Use of the power tool
for purposes other than those for which it is intended could result in a hazardous situation.

* The charger plug must match the mains socket. Never modify the plug in any way when
using a tool.
* Do not use adapters when using a grounded tool. Sockets and plugs that have not been
unmodified, reduce the risk of electric shock.
* Avoid body contact with grounded surfaces such as pipes, radiators, radiators, and
refrigerators. There is an increased risk of electric shock when you come in contact with
grounded grounded objects increase the risk of electric shock.
* Do not expose the tool to rain or moisture. Exposure of the tool to water of the tool
increases the risk of electric shock.
* Handle the power cord carefully. Never use the power cord power cord for carrying,
moving or unplugging. Locate cord away from heat, oil, sharp edges and moving parts.
Damaged or entangled power cords increase the risk of electric shock. electric shock.
* When using the tool outdoors, use an extension cord, suitable for the purpose. Use of
an appropriate cord reduces the risk of electric shock.
* If the tool has to be operated in a wet area, use a power line power supply line that is
protected by a ground fault interrupter (RCD). (Ground Fault Circuit Interrupter). (Ground
Fault Interrupter). Its use will reduce the risk of electric shock. Use and care of bat-
tery-powered tools.
* Charge the battery only with the charger specified by the manufacturer. A charger that
is suitable for one type of battery pack may cause fire when used with a different battery
pack.
* Use the tool only with the specified battery packs. Use of other battery packs may
result in injury or fire.
* When the battery pack not in use, keep it away from metal objects, such as paper clips,
coins, keys, nails, screws, or other or other small metal objects that can cause a short
circuit between the battery pack terminals and the battery pack. The battery pack termi-
nals. Short-circuiting the battery pack terminals could cause burns or fire.
* Fluid may leak from the battery pack if mishandled. Avoid contact with it. In case of con-
tact with skin, flush the contact area with copious. In the event of contact on the skin,
flush the point of contact with copious amounts of water. In the event of contact with
eyes, consult a physician. The fluid from the of the battery pack may cause irritation or
burns.
Electrical Safety
* Keep your hands away from the moving parts of the machine.
* Do not allow any part of the body to fall into the moving parts of the tool during opera-
tion.
* Do not leave the hand-held power tool unattended while the machine is operating.
* Do not operate the tool while under the influence of alcohol or medication, which can
affect your reaction time.
* Do not operate the tool when you are tired or unable to control the work process.
* Be attentive throughout the entire work period.
* Do not use caustic chemicals or liquids to clean tools.
* Do not apply unnecessary force to the tool. The right tool for the job tool will allow you
to do a better and safer job with the productivity tool is designed to do the job better and
safer.
* Do not use a tool with a faulty switch. Any tool that has a a defective switch is danger-
7
Save the instrucation
* The tool should only be serviced by a qualified by a qualified repair person and only with
identical replacement parts. This will ensure the safety of the power tool.
ous and must be repaired.
* Always disconnect the tool from the power source before making adjustments, changing
accessories, or storing the tool from the mains supply before making any adjustments,
changing accessories, or storing it to prevent the risk of the tool accidentally being switched
back on of the tool being switched on again.
* Use the tool, accessories, attachments and attachments in tool and accessories and
attachments in accordance with these instructions and for the purpose for which the tool is
intended, taking into account the the conditions and type of work to be performed. Use of
the power tool for purposes other than those for which it is intended. Use of the power tool
for purposes other than those for which it is intended could result in a hazardous situation.

* The charger plug must match the mains socket. Never modify the plug in any way when
using a tool.
* Do not use adapters when using a grounded tool. Sockets and plugs that have not been
unmodified, reduce the risk of electric shock.
* Avoid body contact with grounded surfaces such as pipes, radiators, radiators, and
refrigerators. There is an increased risk of electric shock when you come in contact with
grounded grounded objects increase the risk of electric shock.
* Do not expose the tool to rain or moisture. Exposure of the tool to water of the tool
increases the risk of electric shock.
* Handle the power cord carefully. Never use the power cord power cord for carrying,
moving or unplugging. Locate cord away from heat, oil, sharp edges and moving parts.
Damaged or entangled power cords increase the risk of electric shock. electric shock.
* When using the tool outdoors, use an extension cord, suitable for the purpose. Use of
an appropriate cord reduces the risk of electric shock.
* If the tool has to be operated in a wet area, use a power line power supply line that is
protected by a ground fault interrupter (RCD). (Ground Fault Circuit Interrupter). (Ground
Fault Interrupter). Its use will reduce the risk of electric shock. Use and care of bat-
tery-powered tools.
* Charge the battery only with the charger specified by the manufacturer. A charger that
is suitable for one type of battery pack may cause fire when used with a different battery
pack.
* Use the tool only with the specified battery packs. Use of other battery packs may
result in injury or fire.
* When the battery pack not in use, keep it away from metal objects, such as paper clips,
coins, keys, nails, screws, or other or other small metal objects that can cause a short
circuit between the battery pack terminals and the battery pack. The battery pack termi-
nals. Short-circuiting the battery pack terminals could cause burns or fire.
* Fluid may leak from the battery pack if mishandled. Avoid contact with it. In case of con-
tact with skin, flush the contact area with copious. In the event of contact on the skin,
flush the point of contact with copious amounts of water. In the event of contact with
eyes, consult a physician. The fluid from the of the battery pack may cause irritation or
burns.
* Keep the battery pack at a safe distance from the heat source.
* Do not leave the battery pack exposed to high temperatures for a long period of time.
* Do not leave the battery pack exposed to high temperatures (in direct sunlight, near
heaters, or where the temperature exceeds 45°C) for a long time, in direct sunlight, near
heaters or in places where the temperature exceeds 45°C). The maximum temperature
allowed for the battery pack of the battery pack is 40°C. Heating the battery pack poses
a risk of fire or explosion.
* Do not expose the battery pack to water or rain. Short-circuiting the battery pack's con-
tacts to each other can cause high currents, overheating, possible burns, and even rup-
ture of the battery pack. The battery pack may over-current, overheat, burns, or even
rupture.
* Do not drop or bump the battery pack. Do not use the battery pack if The battery pack
has been dropped or subjected to shock.
* Charge the battery pack before it is completely discharged. In the event of power loss
while operating the tool, stop operation and recharge the battery pack.
* Never recharge a fully charged battery pack. Overcharging shortens the life of the pack.
* Do not store the battery pack (battery) in a discharged state. Charge immediately after
discharging. The battery pack should be stored at 50% capacity and take it out and
charge it every 1 to 2 months.
* Store the tool and battery pack separately.
* Before using the battery pack, read this manual and the warning labels on the battery
charger, battery pack, and tool that is powered by the battery pack.
* Do not charge unsealed battery packs.
* The battery charger unit must be connected to the mains with a voltage corresponding
to the voltage specified in the technical data. An incorrect voltage undervoltage may
cause overloading of the tool.
* Do not charge the battery pack in an explosive atmosphere, in the presence of flamma-
ble liquids, gases, or dust, or near flammable materials. Heating the battery pack while
charging creates the risk of fire. charging creates the risk of fire.
* When charging the battery pack, make sure it is in a well-ventilated. Make sure it is in
a well-ventilated area when charging the battery pack. The battery pack may become hot
while charging.
* Avoid overcharging the battery pack. Battery pack charging time is limited and should
not exceed. Time for charging the battery pack is limited and should not exceed 30 min-
utes when fully charged.
Battery Pack (if applicable)
8
Save the instrucation
Do not leave the battery pack and chargers unattended while charging.
Caution!
* The tool should only be serviced by a qualified by a qualified repair person and only with
identical replacement parts. This will ensure the safety of the power tool.

Failure to observe the safety precautions or to use the tool correctly can result
in serious injury. This tool can cause serious personal injury and create the risk
of fire or explosion.
* Read the instructions carefully. Familiarize yourself with the proper use of the tool.
* Use the tool only in daylight or good artificial light.
* Inspect the cutting area and remove any debris that may be stuck in the reel. Also
remove any objects that the tool might catch during cutting.
* Keep children away. Spectators should be at a safe distance from the of the work area,
at least 15 meters away.
* Keep hands and feet away from the cutting part of the tool while it is use.
* Warning. The cutting elements continue to rotate for several seconds after the motor
has been turned off. Wait until the cutting elements come to a complete stop.
Safety precautions when using the tool
Before performing any work on the tool, always make sure that the tool is turned off
and the power cord is unplugged.
6. OPERATION
Please make sure that the tool is delivered with all the parts as specified in the pack-
ing list.
Carefully open the packaging and remove the equipment.
Remove the packaging material and any packing and/or shipping brackets (if any).
- Check that all components are in place.
- Inspect the equipment and accessories for shipping damage.
- If possible, please keep the packaging until the end of the warranty period.
- Remove the packaging material and any packing and/or shipping brackets.
6.1 Kit Elements
The tool should be stored indoors or in other naturally ventilated areas where tem-
perature and humidity fluctuations are noticeably less than utdoors in moderate or cold
climates. Temperatures not exceeding +40°C and not lower than -50°C, and a relative
humidity of not more than 80% at +25°С, which corresponds to storage condition 5 of
State Standard 15150-89.
Note:
9
Save the instrucation
The equipment and packaging material are not toys. Do not allow children play with
plastic bags, foil or small parts. There is a danger of of swallowing or suffocation!
WARNING!

The tool can be used to trim small hedges and shrubs.
Hold the tool slightly tilted in relation to the hedge you want to cut.
First cut the sides from the bottom up, then cut the top.
Watch out for foreign objects in or on the hedge which could damage the blades.
6.3.2 Trimming hedges
* As a general rule, hedges which lose their leaves in the autumn should be trimmed in
June and October.
* Hedges which do not lose their leaves should be cut in April and August.
When is the best time to trim hedges?
Insert the safety key (Fig.1/Item 4) to the tool.
Timely recharging of the battery will help it last a
long time.
Recharging is always necessary when you notice
a decrease in performance of the tool.The LED is
red while charging.The LED becames green after
fully charged.
Never allow the battery to be completely dis-
charged. This will cause the battery pack will
become defective.
6.2 Before you start working
The area to be worked on must first be cleared of stones and other solid objects. The
safety device prevents the tool from starting up unintentionally tool. Engage the safety
catch by pushing it forward and simultaneously pressing the on/off button at the same
time. To turn the tool on, release the on/off button.
6.3 Operation
* Allow the mower to glide over the ground. Best results can be achieved when the lawn
is dry.
* When you notice a drop in mowing performance, charge the tool immediately so that
the battery is not completely discharged.
6.3.1 Cutting the grass
10
Save the instrucation
Warning! Risk of injury!
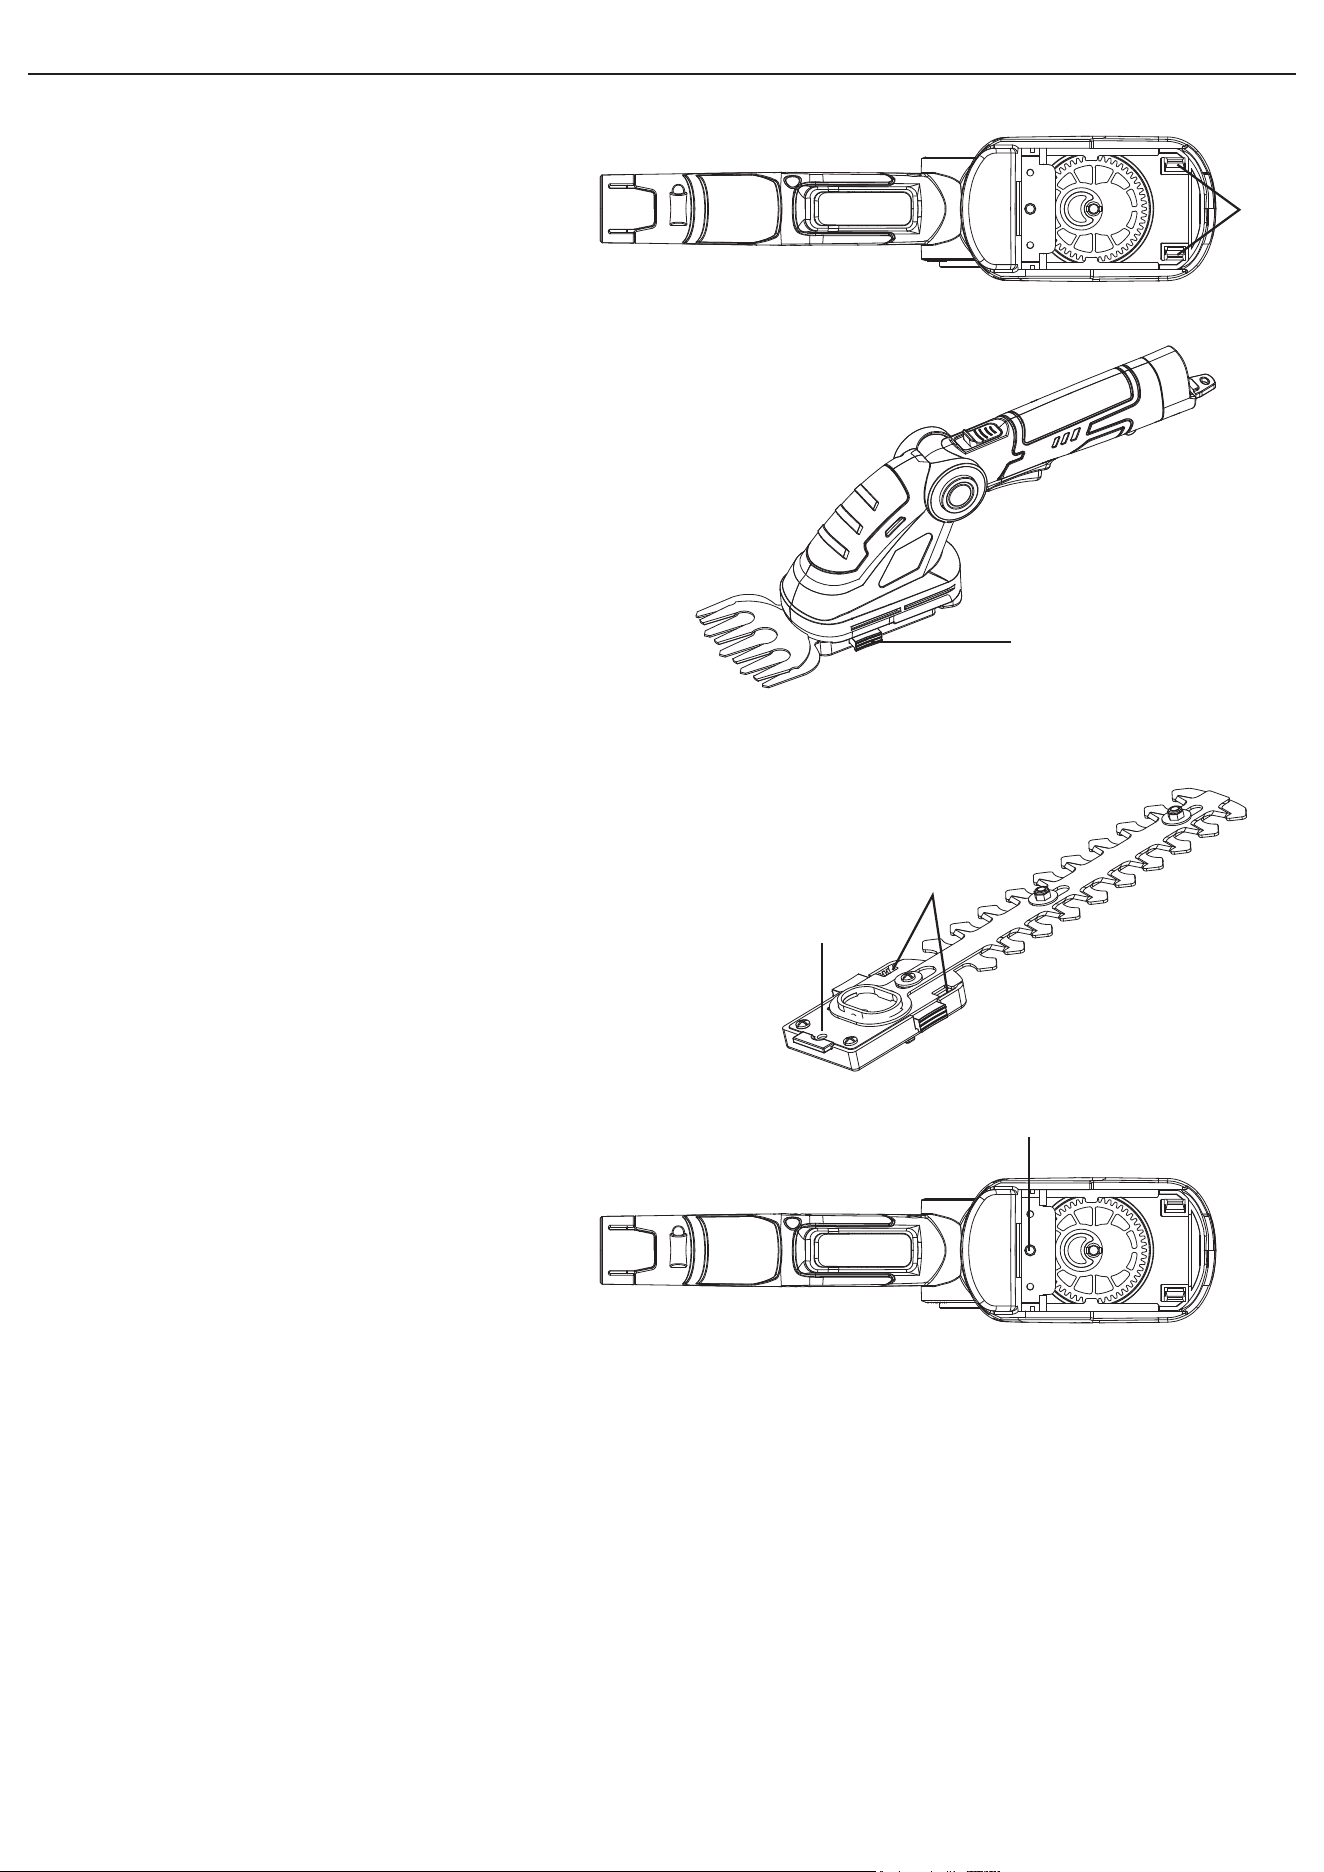
6.3.3 Changing the blades
To remove the blade, press the release mechanism (Fig.1/Item 7) and take out the
blade .
4
Fig.1
7
Once you have removed the
grass cutter blade, you will be able
to see two clips for blade (Fig.3/Item
5) at the bottom of the product.
Press the blade release mecha-
nism (Fig.3/Item 7).
Then pick up the shrub cutter
blades, (there will be two insert slots
(Fig. 4/Item 6) at the two sides of the
shrub cutter blades.
Insert shrub cutter blade into
machine with the fixing post
(Fig.5/Item 10) against the fixing
hole on the blade (Fig.4/Item 11),
then press the blade into the clips
for blade (Fig.3/Item 5).
Finally, lose the release
mechanism (Fig.3/Item 7), the
the blade change finished.
Save the instrucation
To remove the blade, press the release mechanism (Fig.1/Item 7) and take out the
blade .
Fig.2
Fig.3
Fig.4
Fig.5
7
Once you have removed the
grass cutter blade, you will be able
to see two clips for blade (Fig.3/Item
5) at the bottom of the product.
5
Press the blade release mecha-
nism (Fig.3/Item 7).
Then pick up the shrub cutter
blades, (there will be two insert slots
(Fig. 4/Item 6) at the two sides of the
shrub cutter blades.
6
Insert shrub cutter blade into
machine with the fixing post
(Fig.5/Item 10) against the fixing
hole on the blade (Fig.4/Item 11),
then press the blade into the clips
for blade (Fig.3/Item 5).
11
10
Finally, lose the release
mechanism (Fig.3/Item 7), the
the blade change finished.

* As a general rule, hedges which lose their leaves in the autumn should be trimmed in
June and October.
* Hedges which do not lose their leaves should be cut in April and August.
7. Cleaning and maintenance
8. TROUBLESHOOTING
11
Save the instrucation
Never clean the tool under running water and particularly never with high pressure -
because of the potential danger to persons and property. Keep your cordless grass
cutter and hedge trimmer in a dry and frost-proof place. Choose a place that children are
unable to enter.
Caution!
7.1 Cleaning
• Keep all safety devices, air vents and the motor housing free of dirt and dust as far as
possible. Wipe the equipment with a clean cloth or blow it with compressed air at low
pressure.
• We recommend that you clean the device immediately each time you have finished
using it.
• Clean the equipment regularly with a moist cloth and some soft soap. Do not use clean-
ing agents or solvents; these could attack the plastic parts of the equipment. En-sure that
no water can seep into the device.
• A few drops of oil (e.g. sewing machine oil) will improve the cutting performance of the
blades, but never apply any grease to the blades.
• To ensure constant exact cutting it is also important to remove grass remnants and dirt
from between the upper and lower blade.
7.2 Maintenance
• To achieve good results you should keep the blades sharp at all times. In particular we
re-commend that you immediately level off any jags or ridges caused by stones or the
like.
The tool should be thoroughly cleaned both before and after use.
• There are no parts inside the equipment which require additional maintenance.
Fault cause
Possible faults Simultaneous burning of armature and stator
Armature combustion with melting of insulating bushings.
Stator combustion with simultaneous melting Armature insulating bushings
Operation with motor overload.
Possible faults

The warranty period for the tool is 12 months from the purchase date. If the tool has
been used commercially (professional), the warranty period is 1 month from the pur-
chase date.
9. WARRANTY
12
Save the instrucation
Possible faults and troubleshooting methods
Failure Probable
The engine does not turn on
Increased brush arcing
on the collector
Increased vibration, noise
The appearance of smoke
and smell of burning
insulation
Engine overheating
The engine does not reaches
full speed and does not
operate at full power
Faulty rotor or stator
windings
Motor Cooling windows
are dirty
Electric motor is overloaded
Rotor defective
Low power supply
Winding is burned out or
there is a break in the
winding
Check the battery
Contact a specialised
service center for repair
Clean the cooling windows
of motor
Release the load and allow the
tool to run for 2 to 3 minutes
Contact a specialised
service center for repair
Contact a specialist
center for repair
Contact a professional
service center for repair
Secure the working
tool correctly
Contact a specialist
center for repair
Cause
No voltage/the battery
is discharged
Brushes are worn out
The manifold is dirty
Rotor windings are
defective
The tool is not properly
secured
Bearing faulty
Rotor or gear teeth wear
Switch defective
Brushes are worn out
Check the battery is
charged
Contact a specialised
service center for repair
Corrective action
