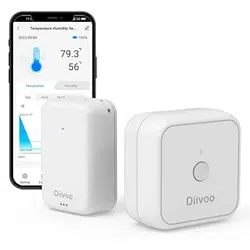

Thermo-Hygrometer with WiFi Hub
User Manual
Model: ITH-02/WG02
01 02 03 04 05 06 07 08 09 10 11 12 13 14
15 16 17 18 19 20 21 22 23 24 25 26 27
28 29 30 31 32 33 34 35 36 37 38 39 40
41 42 43 44 45 46 47 48 49 50 51 52 53
54 55 56 57 58 59 60 61 62 63 64 65 66

English
Deutsch
Francais
ltaliano
Espahol
01
15
28
41
54
Contents
1
01 02 03 04 05 06 07 08 09 10 11 12 13 14
15 16 17 18 19 20 21 22 23 24 25 26 27
28 29 30 31 32 33 34 35 36 37 38 39 40
41 42 43 44 45 46 47 48 49 50 51 52 53
54 55 56 57 58 59 60 61 62 63 64 65 66

Temperature Range -20~60℃(-4~140℉)
Model ITH-02
Humidity Range 0~100%RH
Battery Model CR2450/3V
Battery Life About 6 Months
Response Time Every 6 seconds
Temp ±0.2℃/Humidity ±1.8%RHAccuracy
APP
Smart Life
Model WG02
WiFi Band
2.4GHz only
Protocol
IEEE 802.11b/g/n & Bluetooth
WiFi Hub Input
100V~250V~50/60Hz
Working Humidity
10%-90% RH (no condensation)
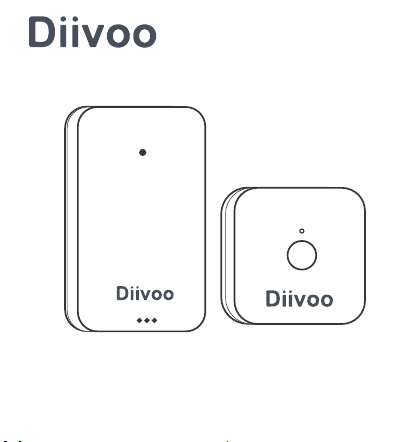
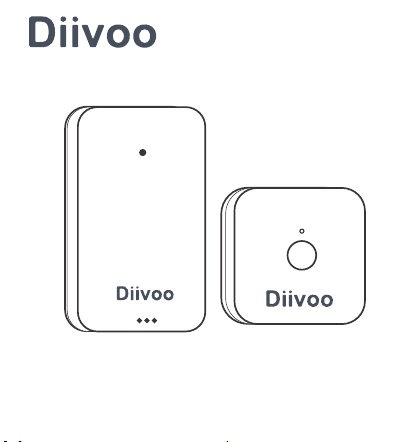
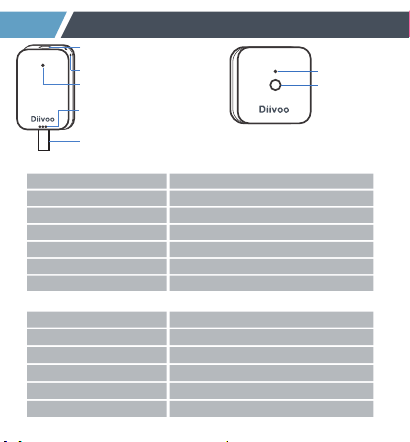
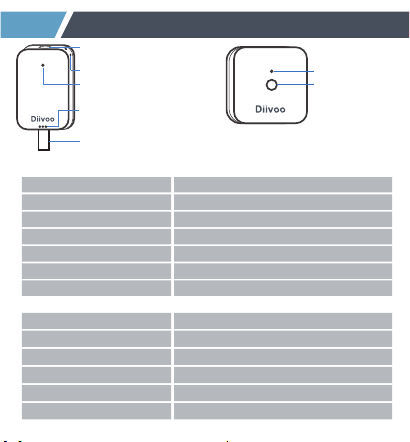
Thermo-Hygrometer
Lanyard Hole
Temp and Humidity
Sensor Hole
Indicator Light
Network Switch
PULL OFF
Pull out the insulating piece to
power up the thermo-hygrometer
2
Product Appearance
LED-Light
Control Button
WiFi Hub
01 02 03 04 05 06 07 08 09 10 11 12 13 14
15 16 17 18 19 20 21 22 23 24 25 26 27
28 29 30 31 32 33 34 35 36 37 38 39 40
41 42 43 44 45 46 47 48 49 50 51 52 53
54 55 56 57 58 59 60 61 62 63 64 65 66
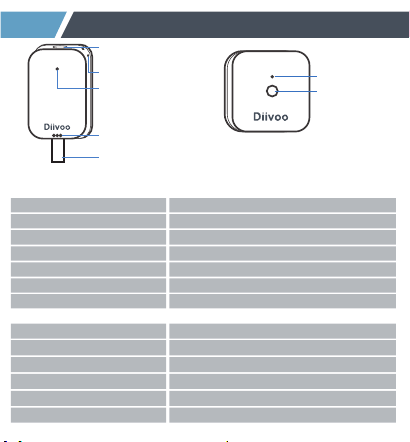
Control Button
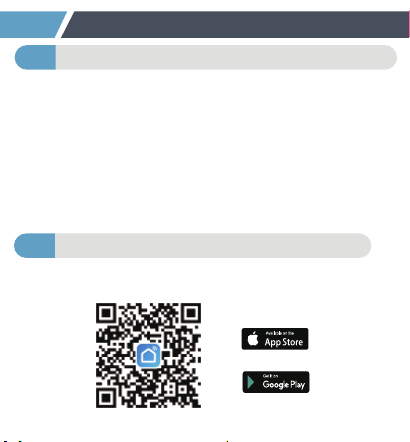
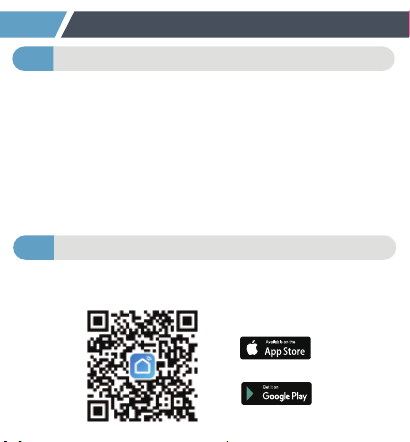
Scan the QR code and download and install the free
Android or IOS app.
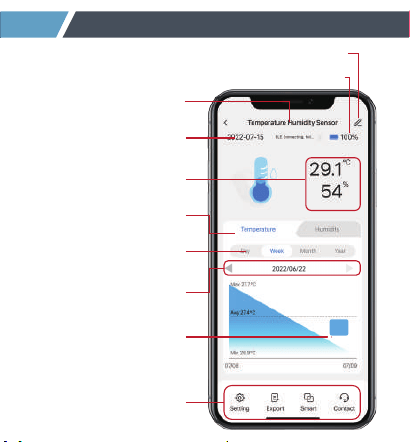
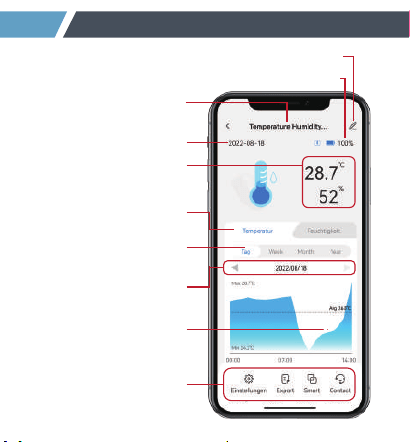
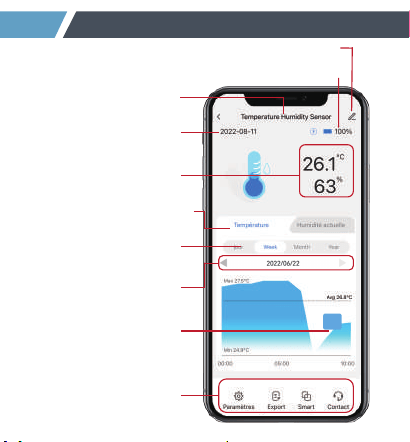
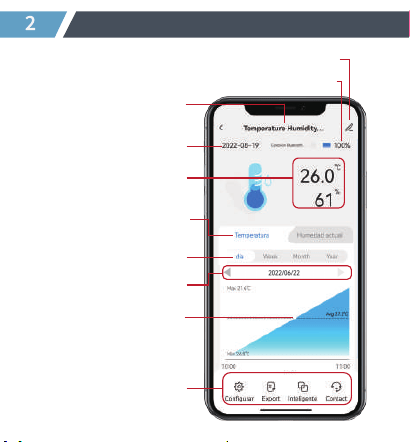
Product Name
Current Date
Temp and Humidity
Curve Selection
Time Selection
Menu Bar
Edit Device Name
Power Display
Current
Temp and Humidity
Cycle Selection
Fixed-Point Data
13:00
27.3℃
3
Meet the Diivoo App Home Screen
01 02 03 04 05 06 07 08 09 10 11 12 13 14
15 16 17 18 19 20 21 22 23 24 25 26 27
28 29 30 31 32 33 34 35 36 37 38 39 40
41 42 43 44 45 46 47 48 49 50 51 52 53
54 55 56 57 58 59 60 61 62 63 64 65 66
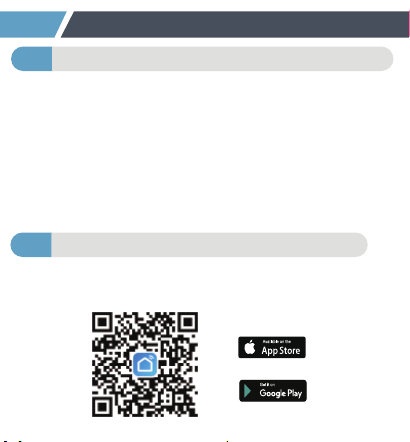
Scan the QR code and download and install the free
Android or IOS app.
Download the Smart Life App2
Power the WiFi Hub & Thermo-Hygrometer1
Step 1: Plug the Wi-Fi Hub into an indoor outlet.
Step 2: Pull out the insulating piece to power up
the thermo-hygrometer.
Note: (The distance between the Wi-Fi Hub and the
thermo-hygrometer should not exceed 49.2/15m).
Please do not place the sensors where your
Bluetooth signal will be obstructed.
4
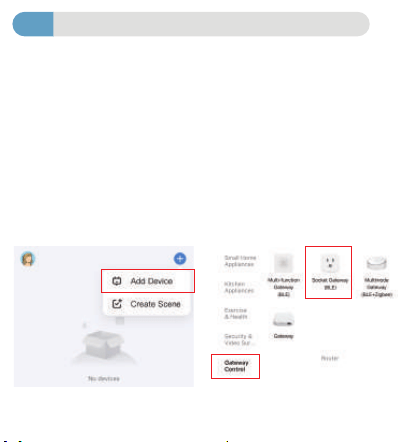
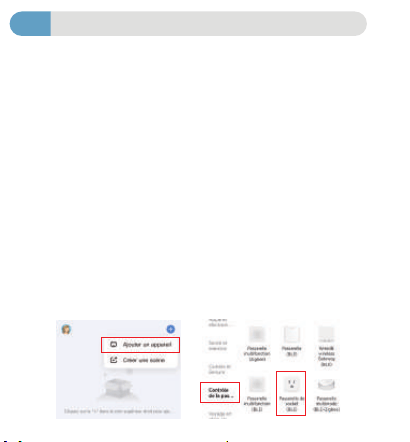
lnitial Smart Life App Setup
Step 1: Turn on the phone's bluetooth and WiFi.
Step 2: Long-press the button on the WiFi hub for
5-10s until the green lights flash to keep in pairing
mode.
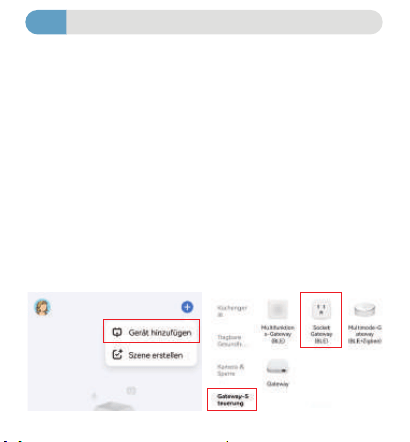
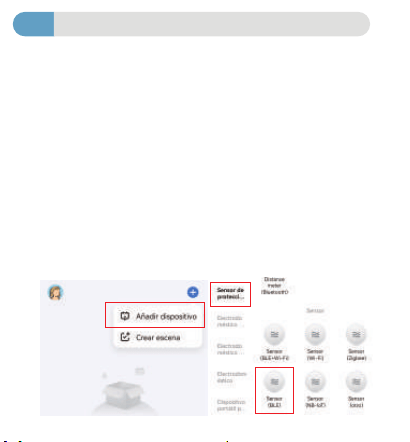
Step 3: Click "Add device" or top right "+", select "
Gateway control">"Socket Gateway (BLE)"> to add
the WiFi Hub in app.
Step 4: Waiting for connecting to be 100% completed.
01 02 03 04 05 06 07 08 09 10 11 12 13 14
15 16 17 18 19 20 21 22 23 24 25 26 27
28 29 30 31 32 33 34 35 36 37 38 39 40
41 42 43 44 45 46 47 48 49 50 51 52 53
54 55 56 57 58 59 60 61 62 63 64 65 66
Step 1: Plug the Wi-Fi Hub into an indoor outlet.
Step 2: Pull out the insulating piece to power up
the thermo-hygrometer.
Note: (The distance between the Wi-Fi Hub and the
thermo-hygrometer should not exceed 49.2/15m).
Please do not place the sensors where your
Bluetooth signal will be obstructed.
Pair the WiFi Hub
3
Step 1: Turn on the phone's bluetooth and WiFi.
Step 2: Long-press the button on the WiFi hub for
5-10s until the green lights flash to keep in pairing
mode.
Step 3: Click "Add device" or top right "+", select "
Gateway control">"Socket Gateway (BLE)"> to add
the WiFi Hub in app.
Step 4:
Waiting for connecting to be 100% completed.
Note: (Only Support 2.4Ghz WiFi)
01 02 03 04 05 06 07 08 09 10 11 12 13 14
15 16 17 18 19 20 21 22 23 24 25 26 27
28 29 30 31 32 33 34 35 36 37 38 39 40
41 42 43 44 45 46 47 48 49 50 51 52 53
54 55 56 57 58 59 60 61 62 63 64 65 66
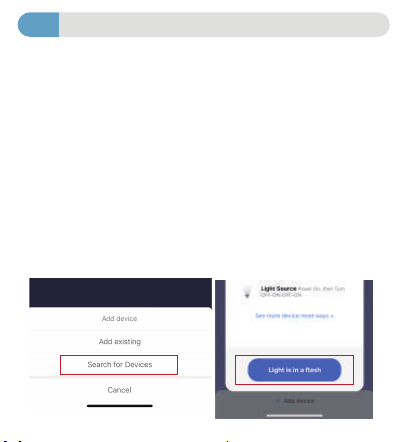
Pairing thermo-hygrometer with WiFi Hub
4
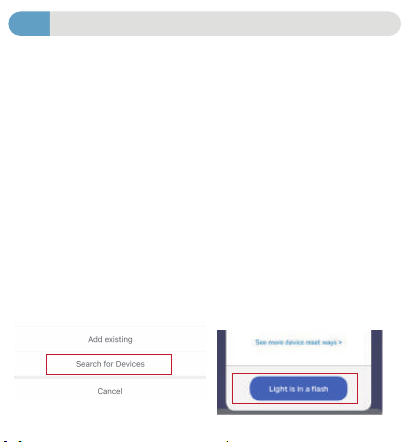
Connection Method
Step1: Aer the gateway getting connected, click
the gateway icon into Gateway page to add a
sensor.
Step2: Long-press sensor the "Network Switch" for
5-10s until the green lights flash to keep the
thermo-hygrometer in pairing mode.
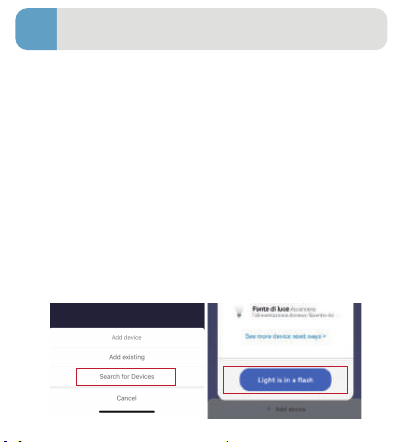
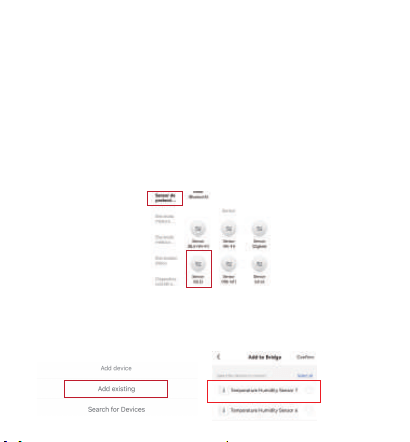
Step3: Click "Add device" to add the sensors in
Gateway, then select "Search for Devices".
Step4: Click on the "Light is in a flash" to connect
the th sensor and confirm.
①
Step 1: Turn on the phone's bluetooth and WiFi.
Step 2: Long-press the button on the WiFi hub for
5-10s until the green lights flash to keep in pairing
mode.
Step 3: Click "Add device" or top right "+", select "
Gateway control">"Socket Gateway (BLE)"> to add
the WiFi Hub in app.
Step 4: Waiting for connecting to be 100% completed.
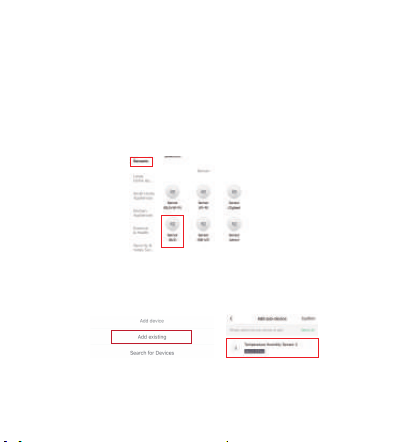
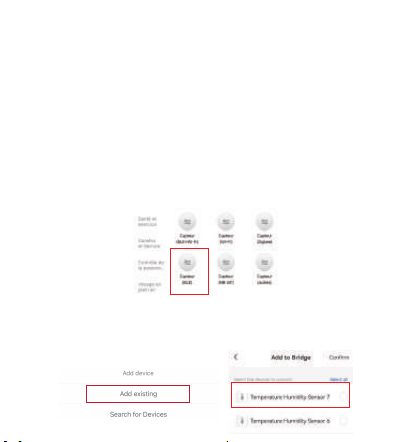
Connection Method
Step1: Aer the gateway getting connected, then
add a sensor to the APP.
Step2: Long-press sensor the "Network Switch" for
5-10s until the green lights flash to keep the
thermo-hygrometerin pairing mode.
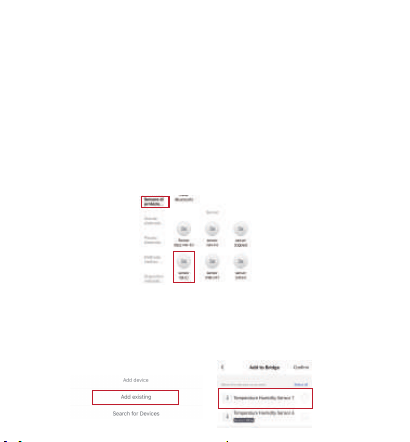
Step3: Click upper right corner "+", select "Sensors"
> "Sensor(BLE) to add the thermo-hygrometer.
Step4: Click the Gateway icon, tap "Add device" and
select >"Add existing" >" add the already connected
thermo-hygrometer in Gateway.
Note: Make sure Bluetooth and WiFi on your phone
is turned on during paring. Please check the above
steps and try again if paring fails.
Verbindungsmethode
Schritt 1: Nachdem das Gateway verbunden wurde,
fügen Sie der APP einen Sensor hinzu.
Schritt 2: Halten Sie den Sensor “Netzwerkschalter”
5–10 Sekunden lang gedrückt, bis die grünen
Lichter blinken, um das Thermo-Hygrometer im
Kopplungsmodus zu halten.
Schritt 3: Klicken Sie auf das „+“ in der oberen
rechten Ecke, wählen Sie “Sicherheitssensor” >
“Sensor (BLE)”, um das Thermo-Hygrometer
hinzuzufügen.
Schritt 4: Klicken Sie auf das Gateway-Symbol,
tippen Sie auf “Add device” und wählen Sie > “Add
existing” >“, um das bereits verbundene
Thermo-Hygrometer im Gateway hinzuzufügen.
01 02 03 04 05 06 07 08 09 10 11 12 13 14
15 16 17 18 19 20 21 22 23 24 25 26 27
28 29 30 31 32 33 34 35 36 37 38 39 40
41 42 43 44 45 46 47 48 49 50 51 52 53
54 55 56 57 58 59 60 61 62 63 64 65 66
Connection Method
Step1: Aer the gateway getting connected, click
the gateway icon into Gateway page to add a
sensor.
Step2: Long-press sensor the "Network Switch" for
5-10s until the green lights flash to keep the
thermo-hygrometer in pairing mode.
Step3: Click "Add device" to add the sensors in
Gateway, then select "Search for Devices".
Step4: Click on the "Light is in a flash" to connect
the th sensor and confirm.
Connection Method
Step1: Aer the gateway getting connected, then
add a sensor to the APP.
Step2: Long-press sensor the "Network Switch" for
5-10s until the green lights flash to keep the
thermo-hygrometerin pairing mode.
Step3: Click upper right corner "+", select "Sensors"
> "Sensor(BLE) to add the thermo-hygrometer.
Step4: Click the Gateway icon, tap "Add device" and
select >"Add existing" >" add the already connected
thermo-hygrometer in Gateway.
Note: Make sure Bluetooth and WiFi on your phone
is turned on during paring. Please check the above
steps and try again if paring fails.
②
Verbindungsmethode
Schritt 1: Nachdem das Gateway verbunden wurde,
fügen Sie der APP einen Sensor hinzu.
Schritt 2: Halten Sie den Sensor “Netzwerkschalter”
5–10 Sekunden lang gedrückt, bis die grünen
Lichter blinken, um das Thermo-Hygrometer im
Kopplungsmodus zu halten.
Schritt 3: Klicken Sie auf das „+“ in der oberen
rechten Ecke, wählen Sie “Sicherheitssensor” >
“Sensor (BLE)”, um das Thermo-Hygrometer
hinzuzufügen.
Schritt 4: Klicken Sie auf das Gateway-Symbol,
tippen Sie auf “Add device” und wählen Sie > “Add
existing” >“, um das bereits verbundene
Thermo-Hygrometer im Gateway hinzuzufügen.
Hinweis: Stellen Sie sicher, dass Bluetooth und
WLAN auf Ihrem Telefon während des Pairings
eingeschaltet sind. Bitte überprüfen Sie die obigen
Schritte und versuchen Sie es erneut, wenn das
Pairing fehlschlägt.
01 02 03 04 05 06 07 08 09 10 11 12 13 14
15 16 17 18 19 20 21 22 23 24 25 26 27
28 29 30 31 32 33 34 35 36 37 38 39 40
41 42 43 44 45 46 47 48 49 50 51 52 53
54 55 56 57 58 59 60 61 62 63 64 65 66

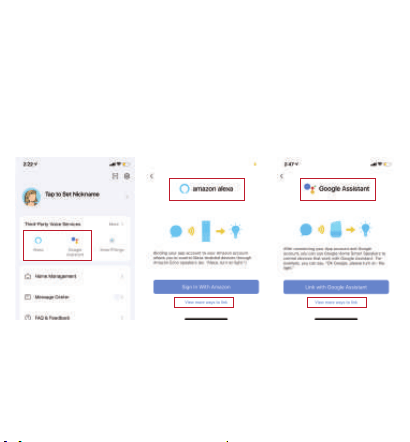
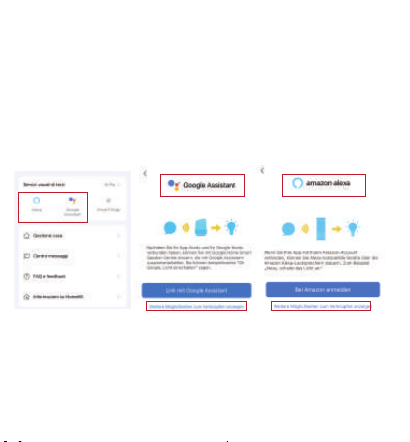
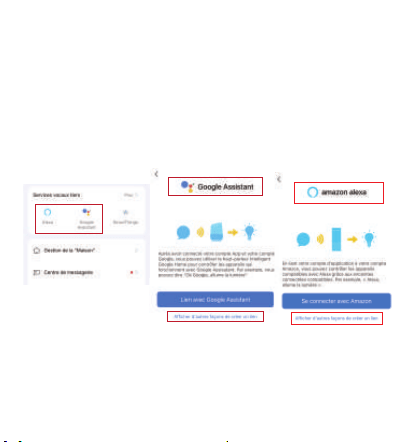
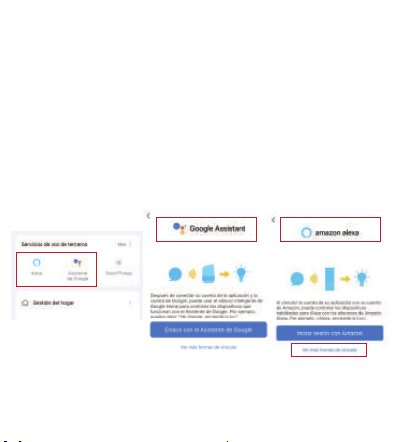
Amazon Alexa and Google Assistant
Sensors with wifi hub can be used with Alexa and
Google Assistant. You can find the instructions
via the below steps:
1. Click the "Me" --- "Alexa icon and Google
Assistant" --- "View more ways to link" ---
"Instructions", same way as Google Assistant.
a. If you works with Google Assistant, please
follow with the below command.
①OK Google, what humidity does <device name>
show?
②OK Google, what is the<device name>
temperature?
③Ok Google, what percentage charge does my
<device> have
Connection Method
Step1: Aer the gateway getting connected, then
add a sensor to the APP.
Step2: Long-press sensor the "Network Switch" for
5-10s until the green lights flash to keep the
thermo-hygrometerin pairing mode.
Step3: Click upper right corner "+", select "Sensors"
> "Sensor(BLE) to add the thermo-hygrometer.
Step4: Click the Gateway icon, tap "Add device" and
select >"Add existing" >" add the already connected
thermo-hygrometer in Gateway.
Note: Make sure Bluetooth and WiFi on your phone
is turned on during paring. Please check the above
steps and try again if paring fails.
5
Hinweis: Stellen Sie sicher, dass Bluetooth und
WLAN auf Ihrem Telefon während des Pairings
eingeschaltet sind. Bitte überprüfen Sie die obigen
Schritte und versuchen Sie es erneut, wenn das
Pairing fehlschlägt.
01 02 03 04 05 06 07 08 09 10 11 12 13 14
15 16 17 18 19 20 21 22 23 24 25 26 27
28 29 30 31 32 33 34 35 36 37 38 39 40
41 42 43 44 45 46 47 48 49 50 51 52 53
54 55 56 57 58 59 60 61 62 63 64 65 66
Q2.The Reasons for Failed Connection
A1. Check if:
a. The device should be placed within the coverage
of the router signal. Make sure the distance between
the device and the router is lessthan 15m/49.2.
b. Please confirm that the device is in connecting
mode.(The indicator light of EZ mode flashes every
0.5 seconds.)
c. Please confirm that the WiFi network is 2.4Ghz, not
5Ghz.
d. Please check whether the battery is running low.
e. Please check whether the device is added in
gateway.
Q1: Why do you need to enable location permission?
A3: If you don't enable the location permission on
your phone, the functions of Intelligent Linkage
can not work.
b. If you works with Amazon Alexa, please follow
with the below command.
①Alexa,what's the<device name>battery?
②Alexa, what is the<device name> humidity?
③Alexa, what is the temperature of <device
name>?
01 02 03 04 05 06 07 08 09 10 11 12 13 14
15 16 17 18 19 20 21 22 23 24 25 26 27
28 29 30 31 32 33 34 35 36 37 38 39 40
41 42 43 44 45 46 47 48 49 50 51 52 53
54 55 56 57 58 59 60 61 62 63 64 65 66

Q2.The Reasons for Failed Connection
Q3: Why the temperature and humidity values do
not change?
A1. Check if:
a. The device should be placed within the coverage
of the router signal. Make sure the distance between
the device and the router is lessthan 15m/49.2.
b. Please confirm that the device is in connecting
mode.(The indicator light of EZ mode flashes every
0.5 seconds.)
c. Please confirm that the WiFi network is 2.4Ghz, not
5Ghz.
d. Please check whether the battery is running low.
e. Please check whether the device is added in
gateway.
A2: Check if
a. Please check whether the device is online.
b. Please check whether the battery is running low.
c. There is no change in ambient temperature.
d. Make sure the distance between the device and
the phone is less than 15m/49.2.
Q1: Why do you need to enable location permission?
A3: If you don't enable the location permission on
your phone, the functions of Intelligent Linkage
can not work.
6
FQA
Q3: Warum ändern sich die Temperatur- und
Feuchtigkeitswerte nicht?
01 02 03 04 05 06 07 08 09 10 11 12 13 14
15 16 17 18 19 20 21 22 23 24 25 26 27
28 29 30 31 32 33 34 35 36 37 38 39 40
41 42 43 44 45 46 47 48 49 50 51 52 53
54 55 56 57 58 59 60 61 62 63 64 65 66

Q3: Why the temperature and humidity values do
not change?
A1. Check if:
a. The device should be placed within the coverage
of the router signal. Make sure the distance between
the device and the router is lessthan 15m/49.2.
b. Please confirm that the device is in connecting
mode.(The indicator light of EZ mode flashes every
0.5 seconds.)
c. Please confirm that the WiFi network is 2.4Ghz, not
5Ghz.
d. Please check whether the battery is running low.
e. Please check whether the device is added in
gateway.
A2: Check if
a. Please check whether the device is online.
b. Please check whether the battery is running low.
c. There is no change in ambient temperature.
d. Make sure the distance between the device and
the phone is less than 15m/49.2.
Q1: Why do you need to enable location permission?
7
Warm Tips
2
1
The sensor should work in an environment
with a temperature ranging from -20~60℃
(-4~140℉) and humidity ranging from
0-100%RH.
Do not immerse the sensor in water and put it
in the refrigerator. The refrigerator or freezer
will block the signal.
3
The best range between the thermo-hygrome-
ter and wifi hub is within 49.2/15m in the
open area.
Der Sensor erkennt die Lutemperatur und
Lufeuchtigkeit durch die Löcher vorne und
unten, bitte decken Sie die Löcher nicht ab.
Bitte stellen Sie sicher, dass sich der WLAN-Hub
so nah wie möglich am Router befindet.
Bitte stellen Sie sicher, dass das Signal nicht
durch mehr Wände, Schmutz oder dicke
Stahlbarrieren läu.
Bitte tauschen Sie die Batterien aus, wenn die
Anzeige für niedrigen Batteriestand auf dem
Display erscheint.
01 02 03 04 05 06 07 08 09 10 11 12 13 14
15 16 17 18 19 20 21 22 23 24 25 26 27
28 29 30 31 32 33 34 35 36 37 38 39 40
41 42 43 44 45 46 47 48 49 50 51 52 53
54 55 56 57 58 59 60 61 62 63 64 65 66
4
5
6
7
The sensor detects the air temperature and
humidity through the holes in the front and at
the bottom, please don't cover the holes.
Please make sure the wifi hub is as close as
possible to the router.
Please make sure the signal avoid to travels
through more walls, dirt, or thick steel barriers.
Please replace batteries when the low battery
indicator appears on the display.
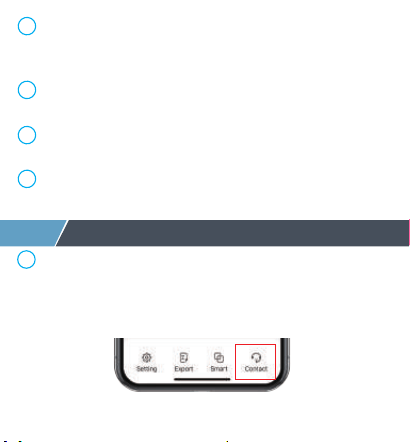
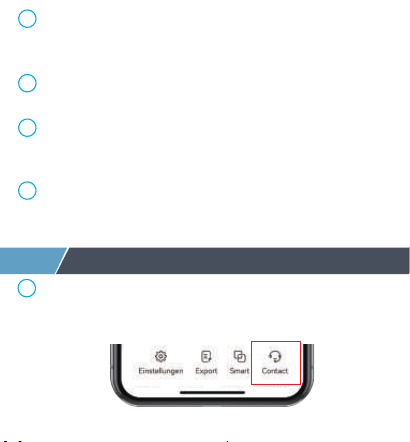
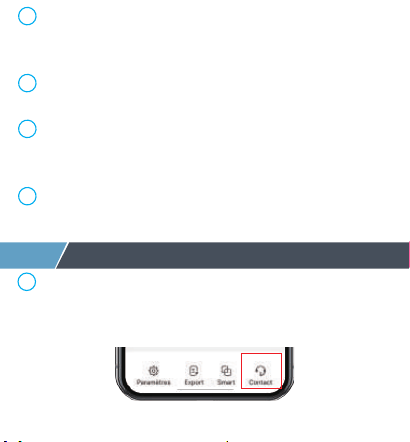
If you have any questions about the product,
please click "Contact" on the app page to
contact us.
8
Aer-Sales Service
1
01 02 03 04 05 06 07 08 09 10 11 12 13 14
15 16 17 18 19 20 21 22 23 24 25 26 27
28 29 30 31 32 33 34 35 36 37 38 39 40
41 42 43 44 45 46 47 48 49 50 51 52 53
54 55 56 57 58 59 60 61 62 63 64 65 66

The sensor detects the air temperature and
humidity through the holes in the front and at
the bottom, please don't cover the holes.
Please make sure the wifi hub is as close as
possible to the router.
Please make sure the signal avoid to travels
through more walls, dirt, or thick steel barriers.
Please replace batteries when the low battery
indicator appears on the display.
The thermo-hygrometer have 1 year warranty
since the day of purchase.
If you have any questions, please feel free to
contact via [email protected]om. We will
follow up and respond within 24 hours.
Problems occur due to its use for other purposes,or
improper use or use of components not supplied
by Diivoo.
Damages caused by improper use,for example,
incorrect battery installation,artificial damage,etc.
The following conditions are not included:
3
2
Company: E-CrossStu GmbH
Address: Mainzer Landstr.69,60329 Frankfurt am Main
Company Name: YH Consulting Limited
Address: C/O YH Consulting Limited Office
147, Centurion House, London Road,
Staines-upon-Thames, Surrey, TW18 4AX
01 02 03 04 05 06 07 08 09 10 11 12 13 14
15 16 17 18 19 20 21 22 23 24 25 26 27
28 29 30 31 32 33 34 35 36 37 38 39 40
41 42 43 44 45 46 47 48 49 50 51 52 53
54 55 56 57 58 59 60 61 62 63 64 65 66
Thermo-Hygrometer mit WiFi-Hub
Benutzerhandbuch
Modell: ITH-02/WG02
01 02 03 04 05 06 07 08 09 10 11 12 13 14
15 16 17 18 19 20 21 22 23 24 25 26 27
28 29 30 31 32 33 34 35 36 37 38 39 40
41 42 43 44 45 46 47 48 49 50 51 52 53
54 55 56 57 58 59 60 61 62 63 64 65 66
1
Aussehen des Produkts
Thermo-Hygrometer
Temperaturbereich -20~60℃(-4~140℉)
Modell ITH-02
Feuchtigkeitsbereich 0~100 % relative Lufeuchtigkeit
Batteriemodell CR2450/3V
Lebensdauer der Batterie Ungefähr 6 Monate
Reaktionszeit Alle 6 Sekunden
Temperatur ± 0,2 ℃ /Lufeuchtigkeit ± 1,8 % relative Lufeuchtigkeit
Genauigkeit
Lanyard-Loch
Temp and Humidity
Sensor Hole
Kontrollleuchte
Netzwerkschalter
PULL OFF
Ziehen Sie das Isolierstück heraus,
um das Thermo-Hygrometer einzuschalten
LED-Licht
Steuertaste
WiFi Hub
APP
Smart Life
Modell WG02
WiFi Band
Nur 2,4 GHz
Protokoll
IEEE 802.11b/g/n & Bluetooth
WLAN-Hub-Eingang
100V~250V~50/60Hz
Arbeitsfeuchtigkeit
10 %–90 % relative Lufeuchtigkeit (keine Kondensation)
01 02 03 04 05 06 07 08 09 10 11 12 13 14
15
16 17 18 19 20 21 22 23 24 25 26 27
28 29 30 31 32 33 34 35 36 37 38 39 40
41 42 43 44 45 46 47 48 49 50 51 52 53
54 55 56 57 58 59 60 61 62 63 64 65 66
2
Steuertaste
Produktname
Aktuelles Datum
Auswahl der Temperatur-
und Feuchtigkeitskurve
Zeitauswahl
Menüleiste
Gerätenamen bearbeiten
Leistungsanzeige
Aktuelle Temperatur
und Lufeuchtigkeit
Zyklusauswahl
Festkommadaten
Lernen Sie den Startbildschirm der Diivoo-App kennen
01 02 03 04 05 06 07 08 09 10 11 12 13 14
15 16
17 18 19 20 21 22 23 24 25 26 27
28 29 30 31 32 33 34 35 36 37 38 39 40
41 42 43 44 45 46 47 48 49 50 51 52 53
54 55 56 57 58 59 60 61 62 63 64 65 66
3
Ersteinrichtung der Smart Life App
Lernen Sie den Startbildschirm der Diivoo-App kennen
Scannen Sie den QR-Code und laden Sie die
kostenlose Android- oder IOS-App herunter und
installieren Sie sie.
Laden Sie die Smart Life-App herunter2
Versorgen Sie den WLAN-Hub und
das Thermo-Hygrometer mit Strom
1
Schritt 1: Schließen Sie den WLAN-Hub an eine
Steckdose im Innenbereich an.
Schritt 2: Ziehen Sie das Isolierstück heraus, um
das Thermo-Hygrometer einzuschalten.
Hinweis: (Der Abstand zwischen dem Wi-Fi-Hub
und dem Thermo-Hygrometer sollte 15 m nicht
überschreiten). Bitte platzieren Sie die Sensoren
nicht dort, wo Ihr Bluetooth-Signal behindert wird.
01 02 03 04 05 06 07 08 09 10 11 12 13 14
15 16 17
18 19 20 21 22 23 24 25 26 27
28 29 30 31 32 33 34 35 36 37 38 39 40
41 42 43 44 45 46 47 48 49 50 51 52 53
54 55 56 57 58 59 60 61 62 63 64 65 66
Schritt 1: Schließen Sie den WLAN-Hub an eine
Steckdose im Innenbereich an.
Schritt 2: Ziehen Sie das Isolierstück heraus, um
das Thermo-Hygrometer einzuschalten.
Hinweis: (Der Abstand zwischen dem Wi-Fi-Hub
und dem Thermo-Hygrometer sollte 15 m nicht
überschreiten). Bitte platzieren Sie die Sensoren
nicht dort, wo Ihr Bluetooth-Signal behindert wird.
Koppeln Sie den WLAN-Hub
3
Schritt 1: Schalten Sie Bluetooth und WLAN des
Telefons ein.
Schritt 2: Halten Sie die Taste am WLAN-Hub 5-10
Sekunden lang gedrückt, bis die grünen Lichter
blinken, um im Kopplungsmodus zu bleiben.
Schritt 3: Klicken Sie auf “Gerät hinzufügen” oder
oben rechts auf “+”, wählen Sie “Gateway-Steuer-
ung”> “Socket Gateway (BLE)”>, um den WLAN-Hub
in der App hinzuzufügen.
Schritt 4: Warten, bis die Verbindung zu 100 %
abgeschlossen ist.
Hinweis: (Unterstützt nur 2,4-GHz-WLAN)
01 02 03 04 05 06 07 08 09 10 11 12 13 14
15 16 17 18
19 20 21 22 23 24 25 26 27
28 29 30 31 32 33 34 35 36 37 38 39 40
41 42 43 44 45 46 47 48 49 50 51 52 53
54 55 56 57 58 59 60 61 62 63 64 65 66
Schritt 1: Schalten Sie Bluetooth und WLAN des
Telefons ein.
Schritt 2: Halten Sie die Taste am WLAN-Hub 5-10
Sekunden lang gedrückt, bis die grünen Lichter
blinken, um im Kopplungsmodus zu bleiben.
Schritt 3: Klicken Sie auf “Gerät hinzufügen” oder
oben rechts auf “+”, wählen Sie “Gateway-Steuer-
ung”> “Socket Gateway (BLE)”>, um den WLAN-Hub
in der App hinzuzufügen.
Schritt 4: Warten, bis die Verbindung zu 100 %
abgeschlossen ist.
Kopplung des Thermo-Hygrometers
mit dem WiFi-Hub
4
Verbindungsmethode
Schritt 1: Nachdem das Gateway verbunden
wurde, klicken Sie auf das Gateway-Symbol auf
der Gateway-Seite, um einen Sensor hinzuzufügen.
Schritt 2: Halten Sie den “Netzwerkschalter” 5-10
Sekunden lang gedrückt, bis die grünen Lichter
blinken, um das Thermo-Hygrometer im
Kopplungsmodus zu halten.
Schritt 3: Klicken Sie auf “Gerät hinzufügen”, um
die Sensoren im Gateway hinzuzufügen, und
wählen Sie dann “Search for Devices”.
Schritt 4: Klicken Sie auf "Light is in a flash", um
den Sensor zu verbinden und zu bestätigen.
①
Méthode de connexion
Étape 1: Une fois la passerelle connectée, ajoutez un
capteur à l'application.
Étape 2: appuyez longuement sur le capteur «
Commutateur de réseau » pendant 5 à 10 secondes
jusqu'à ce que les voyants verts clignotent pour
maintenir le thermo-hygromètre en mode
d'appairage.
Étape 3: cliquez sur le coin supérieur droit "+",
“sélectionnez Capteurs" > "Capteur (BLE)” pour
ajouter le thermo-hygromètre.
Étape 4: Cliquez sur l'icône de la passerelle, appuyez
sur "Add device" et sélectionnez >"Add existing" >"
ajoutez le thermo-hygromètre déjà connecté dans la
passerelle.
01 02 03 04 05 06 07 08 09 10 11 12 13 14
15 16 17 18 19
20 21 22 23 24 25 26 27
28 29 30 31 32 33 34 35 36 37 38 39 40
41 42 43 44 45 46 47 48 49 50 51 52 53
54 55 56 57 58 59 60 61 62 63 64 65 66
Verbindungsmethode
Schritt 1: Nachdem das Gateway verbunden
wurde, klicken Sie auf das Gateway-Symbol auf
der Gateway-Seite, um einen Sensor hinzuzufügen.
Schritt 2: Halten Sie den “Netzwerkschalter” 5-10
Sekunden lang gedrückt, bis die grünen Lichter
blinken, um das Thermo-Hygrometer im
Kopplungsmodus zu halten.
Schritt 3: Klicken Sie auf “Gerät hinzufügen”, um
die Sensoren im Gateway hinzuzufügen, und
wählen Sie dann “Search for Devices”.
Schritt 4: Klicken Sie auf "Light is in a flash", um
den Sensor zu verbinden und zu bestätigen.
Verbindungsmethode
Schritt 1: Nachdem das Gateway verbunden wurde,
fügen Sie der APP einen Sensor hinzu.
Schritt 2: Halten Sie den Sensor “Netzwerkschalter”
5–10 Sekunden lang gedrückt, bis die grünen
Lichter blinken, um das Thermo-Hygrometer im
Kopplungsmodus zu halten.
Schritt 3: Klicken Sie auf das „+“ in der oberen
rechten Ecke, wählen Sie “Sicherheitssensor” >
“Sensor (BLE)”, um das Thermo-Hygrometer
hinzuzufügen.
Schritt 4: Klicken Sie auf das Gateway-Symbol,
tippen Sie auf “Add device” und wählen Sie > “Add
existing” >“, um das bereits verbundene
Thermo-Hygrometer im Gateway hinzuzufügen.
②
Méthode de connexion
Étape 1: Une fois la passerelle connectée, ajoutez un
capteur à l'application.
Étape 2: appuyez longuement sur le capteur «
Commutateur de réseau » pendant 5 à 10 secondes
jusqu'à ce que les voyants verts clignotent pour
maintenir le thermo-hygromètre en mode
d'appairage.
Étape 3: cliquez sur le coin supérieur droit "+",
“sélectionnez Capteurs" > "Capteur (BLE)” pour
ajouter le thermo-hygromètre.
Étape 4: Cliquez sur l'icône de la passerelle, appuyez
sur "Add device" et sélectionnez >"Add existing" >"
ajoutez le thermo-hygromètre déjà connecté dans la
passerelle.
Remarque: Assurez-vous que le Bluetooth et le Wi-Fi
de votre téléphone sont activés pendant l'associa-
tion. Veuillez vérifier les étapes ci-dessus et réessayer
si l'appariement échoue.
01 02 03 04 05 06 07 08 09 10 11 12 13 14
15 16 17 18 19 20
21 22 23 24 25 26 27
28 29 30 31 32 33 34 35 36 37 38 39 40
41 42 43 44 45 46 47 48 49 50 51 52 53
54 55 56 57 58 59 60 61 62 63 64 65 66

Verbindungsmethode
Schritt 1: Nachdem das Gateway verbunden wurde,
fügen Sie der APP einen Sensor hinzu.
Schritt 2: Halten Sie den Sensor “Netzwerkschalter”
5–10 Sekunden lang gedrückt, bis die grünen
Lichter blinken, um das Thermo-Hygrometer im
Kopplungsmodus zu halten.
Schritt 3: Klicken Sie auf das „+“ in der oberen
rechten Ecke, wählen Sie “Sicherheitssensor” >
“Sensor (BLE)”, um das Thermo-Hygrometer
hinzuzufügen.
Schritt 4: Klicken Sie auf das Gateway-Symbol,
tippen Sie auf “Add device” und wählen Sie > “Add
existing” >“, um das bereits verbundene
Thermo-Hygrometer im Gateway hinzuzufügen.
4
Amazon Alexa und Google Assistant
Hinweis: Stellen Sie sicher, dass Bluetooth und
WLAN auf Ihrem Telefon während des Pairings
eingeschaltet sind. Bitte überprüfen Sie die obigen
Schritte und versuchen Sie es erneut, wenn das
Pairing fehlschlägt.
Sensoren mit WLAN-Hub können mit Alexa und
Google Assistant verwendet werden. Sie finden
die Anweisungen über die folgenden Schritte:1.
Klicken Sie auf "Profil" --- "Alexa-Symbol und
Google Assistant" --- "Weitere Möglichkeiten zum
Verknüpfen anzeigen" --- "Anleitungen", genauso
wie bei Google Assistant.
a. Wenn Sie mit Google Assistant arbeiten, folgen
Sie bitte dem folgenden Befehl.
①Ok Google, welche Lufeuchtigkeit zeigt
<Gerätename> an?
②OK Google, wie ist die Temperatur von
<Gerätename>?
③Ok Google, wie viel Prozent Strom hat mein
Gerät?
Méthode de connexion
Étape 1: Une fois la passerelle connectée, ajoutez un
capteur à l'application.
Étape 2: appuyez longuement sur le capteur «
Commutateur de réseau » pendant 5 à 10 secondes
jusqu'à ce que les voyants verts clignotent pour
maintenir le thermo-hygromètre en mode
d'appairage.
Étape 3: cliquez sur le coin supérieur droit "+",
“sélectionnez Capteurs" > "Capteur (BLE)” pour
ajouter le thermo-hygromètre.
Étape 4: Cliquez sur l'icône de la passerelle, appuyez
sur "Add device" et sélectionnez >"Add existing" >"
ajoutez le thermo-hygromètre déjà connecté dans la
passerelle.
Remarque: Assurez-vous que le Bluetooth et le Wi-Fi
de votre téléphone sont activés pendant l'associa-
tion. Veuillez vérifier les étapes ci-dessus et réessayer
si l'appariement échoue.
01 02 03 04 05 06 07 08 09 10 11 12 13 14
15 16 17 18 19 20 21
22 23 24 25 26 27
28 29 30 31 32 33 34 35 36 37 38 39 40
41 42 43 44 45 46 47 48 49 50 51 52 53
54 55 56 57 58 59 60 61 62 63 64 65 66
Hinweis: Stellen Sie sicher, dass Bluetooth und
WLAN auf Ihrem Telefon während des Pairings
eingeschaltet sind. Bitte überprüfen Sie die obigen
Schritte und versuchen Sie es erneut, wenn das
Pairing fehlschlägt.
Sensoren mit WLAN-Hub können mit Alexa und
Google Assistant verwendet werden. Sie finden
die Anweisungen über die folgenden Schritte:1.
Klicken Sie auf "Profil" --- "Alexa-Symbol und
Google Assistant" --- "Weitere Möglichkeiten zum
Verknüpfen anzeigen" --- "Anleitungen", genauso
wie bei Google Assistant.
a. Wenn Sie mit Google Assistant arbeiten, folgen
Sie bitte dem folgenden Befehl.
①Ok Google, welche Lufeuchtigkeit zeigt
<Gerätename> an?
②OK Google, wie ist die Temperatur von
<Gerätename>?
③Ok Google, wie viel Prozent Strom hat mein
Gerät?
b. Wenn Sie mit Amazon Alexa arbeiten, folgen Sie
bitte dem folgenden Befehl.
①Alexa, was ist die <Gerätename>Batterie?
②Alexa, wie ist die <Gerätename> Lufeuchtigkeit?
③Alexa, wie ist die Temperatur von
<Gerätename>?name>?
Q1: Warum müssen Sie die Standortberechtigung
aktivieren?
A1: Wenn Sie die Standortberechtigung auf Ihrem
Telefon nicht aktivieren, können die Funktionen
von Intelligent Linkage nicht funktionieren.
Q2.Die Gründe für eine fehlgeschlagene Verbindung
A2. Überprüfen Sie, ob:
a. Das Gerät sollte innerhalb der Reichweite des
Routersignals platziert werden. Stellen Sie sicher,
dass der Abstand zwischen dem Gerät und dem
Router weniger als 15 m beträgt.
b. Bitte bestätigen Sie, dass sich das Gerät im
Verbindungsmodus befindet. (Die Anzeigeleuchte
des EZ-Modus blinkt alle 0,5 Sekunden.)
c. Bitte bestätigen Sie, dass das WLAN-Netzwerk 2,4
GHz und nicht 5 GHz ist.
d. Bitte überprüfen Sie, ob die Batterie schwach ist.
e. Bitte überprüfen Sie, ob das Gerät im Gateway
hinzugefügt wurde.
Remarque: Assurez-vous que le Bluetooth et le Wi-Fi
de votre téléphone sont activés pendant l'associa-
tion. Veuillez vérifier les étapes ci-dessus et réessayer
si l'appariement échoue.
01 02 03 04 05 06 07 08 09 10 11 12 13 14
15 16 17 18 19 20 21 22
23 24 25 26 27
28 29 30 31 32 33 34 35 36 37 38 39 40
41 42 43 44 45 46 47 48 49 50 51 52 53
54 55 56 57 58 59 60 61 62 63 64 65 66

b. Wenn Sie mit Amazon Alexa arbeiten, folgen Sie
bitte dem folgenden Befehl.
①Alexa, was ist die <Gerätename>Batterie?
②Alexa, wie ist die <Gerätename> Lufeuchtigkeit?
③Alexa, wie ist die Temperatur von
<Gerätename>?name>?
5
FQA
Q1: Warum müssen Sie die Standortberechtigung
aktivieren?
A1: Wenn Sie die Standortberechtigung auf Ihrem
Telefon nicht aktivieren, können die Funktionen
von Intelligent Linkage nicht funktionieren.
Q2.Die Gründe für eine fehlgeschlagene Verbindung
A2. Überprüfen Sie, ob:
a. Das Gerät sollte innerhalb der Reichweite des
Routersignals platziert werden. Stellen Sie sicher,
dass der Abstand zwischen dem Gerät und dem
Router weniger als 15 m beträgt.
b. Bitte bestätigen Sie, dass sich das Gerät im
Verbindungsmodus befindet. (Die Anzeigeleuchte
des EZ-Modus blinkt alle 0,5 Sekunden.)
c. Bitte bestätigen Sie, dass das WLAN-Netzwerk 2,4
GHz und nicht 5 GHz ist.
d. Bitte überprüfen Sie, ob die Batterie schwach ist.
e. Bitte überprüfen Sie, ob das Gerät im Gateway
hinzugefügt wurde.
01 02 03 04 05 06 07 08 09 10 11 12 13 14
15 16 17 18 19 20 21 22 23
24 25 26 27
28 29 30 31 32 33 34 35 36 37 38 39 40
41 42 43 44 45 46 47 48 49 50 51 52 53
54 55 56 57 58 59 60 61 62 63 64 65 66

6
Warme Tipps
2
1
3
Q1: Warum müssen Sie die Standortberechtigung
aktivieren?
Q2.Die Gründe für eine fehlgeschlagene Verbindung
A2. Überprüfen Sie, ob:
a. Das Gerät sollte innerhalb der Reichweite des
Routersignals platziert werden. Stellen Sie sicher,
dass der Abstand zwischen dem Gerät und dem
Router weniger als 15 m beträgt.
b. Bitte bestätigen Sie, dass sich das Gerät im
Verbindungsmodus befindet. (Die Anzeigeleuchte
des EZ-Modus blinkt alle 0,5 Sekunden.)
c. Bitte bestätigen Sie, dass das WLAN-Netzwerk 2,4
GHz und nicht 5 GHz ist.
d. Bitte überprüfen Sie, ob die Batterie schwach ist.
e. Bitte überprüfen Sie, ob das Gerät im Gateway
hinzugefügt wurde.
Q3: Warum ändern sich die Temperatur- und
Feuchtigkeitswerte nicht?
A3: Überprüfen Sie, ob
a. Bitte überprüfen Sie, ob das Gerät online ist.
b. Bitte überprüfen Sie, ob die Batterie schwach ist.
c. Die Umgebungstemperatur ändert sich nicht.
d. Stellen Sie sicher, dass der Abstand zwischen dem
Gerät und dem Telefon weniger als 15 m beträgt.
Der Sensor sollte in einer Umgebung mit einer
Temperatur im Bereich von -20~60℃ (-4~140
℉) und einer Lufeuchtigkeit im Bereich von
0-100% RH funktionieren.
Tauchen Sie den Sensor nicht in Wasser und
legen Sie ihn in den Kühlschrank. Der Kühl-
oder Gefrierschrank blockiert das Signal.
Die beste Reichweite zwischen dem
Thermo-Hygrometer und dem WLAN-Hub liegt
innerhalb von 15 m im offenen Bereich.
Q3: Pourquoi les valeurs de température et
d'humidité ne changent pas ?
01 02 03 04 05 06 07 08 09 10 11 12 13 14
15 16 17 18 19 20 21 22 23 24
25 26 27
28 29 30 31 32 33 34 35 36 37 38 39 40
41 42 43 44 45 46 47 48 49 50 51 52 53
54 55 56 57 58 59 60 61 62 63 64 65 66
4
5
6
7
Wenn Sie Fragen zum Produkt haben, klicken
Sie bitte auf der App-Seite auf “Contact”, um
uns zu kontaktieren.
7
Kundendienst
1
A3: Überprüfen Sie, ob
a. Bitte überprüfen Sie, ob das Gerät online ist.
b. Bitte überprüfen Sie, ob die Batterie schwach ist.
c. Die Umgebungstemperatur ändert sich nicht.
d. Stellen Sie sicher, dass der Abstand zwischen dem
Gerät und dem Telefon weniger als 15 m beträgt.
Der Sensor erkennt die Lutemperatur und
Lufeuchtigkeit durch die Löcher vorne und
unten, bitte decken Sie die Löcher nicht ab.
Bitte stellen Sie sicher, dass sich der WLAN-Hub
so nah wie möglich am Router befindet.
Bitte stellen Sie sicher, dass das Signal nicht
durch mehr Wände, Schmutz oder dicke
Stahlbarrieren läu.
Bitte tauschen Sie die Batterien aus, wenn die
Anzeige für niedrigen Batteriestand auf dem
Display erscheint.
Le capteur détecte la température et l'humidité
de l'air à travers les trous à l'avant et en bas,
veuillez ne pas couvrir les trous.
Assurez-vous que le concentrateur Wi-Fi est
aussi proche que possible du routeur.
Assurez-vous que le signal évite de traverser
plus de murs, de saleté ou d'épaisses barrières
en acier.
Veuillez remplacer les piles lorsque l'indicateur
de pile faible s'affiche à l'écran.
Q3: Pourquoi les valeurs de température et
d'humidité ne changent pas ?
01 02 03 04 05 06 07 08 09 10 11 12 13 14
15 16 17 18 19 20 21 22 23 24 25
26 27
28 29 30 31 32 33 34 35 36 37 38 39 40
41 42 43 44 45 46 47 48 49 50 51 52 53
54 55 56 57 58 59 60 61 62 63 64 65 66

Das Thermo-Hygrometer hat 1 Jahr Garantie ab
Kaufdatum. Bei Fragen wenden Sie sich bitte an
[email protected]om. Wir werden innerhalb
von 24 Stunden nachfassen und antworten.
Probleme treten aufgrund der Verwendung für
andere Zwecke oder unsachgemäße Verwendung
oder Verwendung von Komponenten auf, die nicht
von Diivoo geliefert wurden.
Schäden, die durch unsachgemäßen Gebrauch
verursacht werden, z. B. falsche Batterieinstalla-
tion, künstliche Beschädigung usw.
Folgende Bedingungen sind nicht enthalten:
3
2
Company: E-CrossStu GmbH
Address: Mainzer Landstr.69,60329 Frankfurt am Main
Company Name: YH Consulting Limited
Address: C/O YH Consulting Limited Office
147, Centurion House, London Road,
Staines-upon-Thames, Surrey
, TW18 4AX
01 02 03 04 05 06 07 08 09 10 11 12 13 14
15 16 17 18 19 20 21 22 23 24 25 26
27
28 29 30 31 32 33 34 35 36 37 38 39 40
41 42 43 44 45 46 47 48 49 50 51 52 53
54 55 56 57 58 59 60 61 62 63 64 65 66
Thermo-hygromètre avec WiFi Hub
Manuel de l'Utilisateur
Modèle: ITH-02/WG02
01 02 03 04 05 06 07 08 09 10 11 12 13 14
15 16 17 18 19 20 21 22 23 24 25 26 27
28 29 30 31 32 33 34 35 36 37 38 39 40
41 42 43 44 45 46 47 48 49 50 51 52 53
54 55 56 57 58 59 60 61 62 63 64 65 66
Trou de lanière
Trou du capteur de
température et d'humidité
Voyant
Commutateur de réseau
PULL OFF
Tirez la pièce isolante pour
alimenter le thermo-hygromètre
1
Apparence du produit
Lumière LED
Bouton de
contrôle
Thermo-Hygromètre
Écart de température -20~60℃(-4~140℉)
Modèle ITH-02
Plage d'humidité 0~100 % HR
Modèle de batterie CR2450/3V
Vie de la batterie Environ 6 mois
Temps de réponse Toutes les 6 secondes
Temp ±0.2℃/Humidité ±1.8%RHPrécision
Concentrateur Wi-Fi
APP
Smart Life
Model WG02
Protocole
2.4Ghz uniquement
Protocol
IEEE 802.11b/g/n & Bluetooth
Entrée du concentrateur Wi-Fi
100V~250V~50/60Hz
Humidité de travail
10 % à 90 % HR (sans condensation)
01 02 03 04 05 06 07 08 09 10 11 12 13 14
15 16 17 18 19 20 21 22 23 24 25 26 27
28
29 30 31 32 33 34 35 36 37 38 39 40
41 42 43 44 45 46 47 48 49 50 51 52 53
54 55 56 57 58 59 60 61 62 63 64 65 66
Lumière LED
Bouton de
contrôle
2
Découvrez l'écran d'accueil de l'application Diivoo
Nom du produit
Date actuelle
Sélection de la courbe
de température et d'humidité
Sélection de l'heure
Barre de menu
Modifier le nom de l'appareil
Affichage de puissance
Température et
humidité actuelles
Sélection de cycles
Données en virgule fixe
13:00
27.3℃
01 02 03 04 05 06 07 08 09 10 11 12 13 14
15 16 17 18 19 20 21 22 23 24 25 26 27
28 29
30 31 32 33 34 35 36 37 38 39 40
41 42 43 44 45 46 47 48 49 50 51 52 53
54 55 56 57 58 59 60 61 62 63 64 65 66
3
Configuration initiale de l'application Smart Life
Découvrez l'écran d'accueil de l'application Diivoo
Scannez le code QR et téléchargez et installez
l'application gratuite Android ou IOS.
Téléchargez l'application Smart Life2
Alimentez le hub WiFi et le thermo-hygromètre
1
Étape 1: ranchez le Wi-Fi Hub sur une prise
intérieure.
Étape 2: Tirez la pièce isolante pour alimenter le
thermo-hygromètre.
Note: (La distance entre le Wi-Fi Hub et le
thermo-hygromètre ne doit pas dépasser 49,2
pieds/15 m). Veuillez ne pas placer les capteurs là
où votre signal Bluetooth sera obstrué.
Étape 1: Activez le Bluetooth et le Wi-Fi du
téléphone.
Étape 2: Appuyez longuement sur le bouton du hub
WiFi pendant 5 à 10 secondes jusqu'à ce que les
voyants verts clignotent pour rester en mode
d'appairage.
Étape 3: Cliquez sur "Ajouter un appareil" ou en
haut à droite "+", sélectionnez "Contrôle de la
passerelle">"Passerelle de Socket (BLE)"> pour
ajouter le WiFi Hub dans l'application.
Étape 4: Attendez que la connexion soit terminée à
100 %.
Remarque:(ne prend en charge que le Wi-Fi 2.4
Ghz)completed.
01 02 03 04 05 06 07 08 09 10 11 12 13 14
15 16 17 18 19 20 21 22 23 24 25 26 27
28 29 30
31 32 33 34 35 36 37 38 39 40
41 42 43 44 45 46 47 48 49 50 51 52 53
54 55 56 57 58 59 60 61 62 63 64 65 66
Configuration initiale de l'application Smart Life
Étape 1: ranchez le Wi-Fi Hub sur une prise
intérieure.
Étape 2: Tirez la pièce isolante pour alimenter le
thermo-hygromètre.
Note: (La distance entre le Wi-Fi Hub et le
thermo-hygromètre ne doit pas dépasser 49,2
pieds/15 m). Veuillez ne pas placer les capteurs là
où votre signal Bluetooth sera obstrué.
Associer le concentrateur Wi-Fi
3
Étape 1: Activez le Bluetooth et le Wi-Fi du
téléphone.
Étape 2: Appuyez longuement sur le bouton du hub
WiFi pendant 5 à 10 secondes jusqu'à ce que les
voyants verts clignotent pour rester en mode
d'appairage.
Étape 3: Cliquez sur "Ajouter un appareil" ou en
haut à droite "+", sélectionnez "Contrôle de la
passerelle">"Passerelle de Socket (BLE)"> pour
ajouter le WiFi Hub dans l'application.
Étape 4: Attendez que la connexion soit terminée à
100 %.
Remarque:(ne prend en charge que le Wi-Fi 2.4
Ghz)completed.
Méthode de connexion
Étape 1: Une fois la passerelle connectée, cliquez
sur l'icône de la passerelle dans la page Passerelle
pour ajouter un capteur.
Étape 2: appuyez longuement sur le capteur «
Commutateur de réseau » pendant 5 à 10 secondes
jusqu'à ce que les voyants verts clignotent pour
maintenir le thermo-hygromètre en mode
appairage.
Étape 3: Cliquez sur « Ajouter un appareil » pour
ajouter les capteurs dans la passerelle, puis
sélectionnez « Search for Devices ».
Étape 4: Cliquez sur "Light is in a flash" pour
connecter le ème capteur et confirmez.
01 02 03 04 05 06 07 08 09 10 11 12 13 14
15 16 17 18 19 20 21 22 23 24 25 26 27
28 29 30 31
32 33 34 35 36 37 38 39 40
41 42 43 44 45 46 47 48 49 50 51 52 53
54 55 56 57 58 59 60 61 62 63 64 65 66
Appairage thermo-hygromètre avec WiFi Hub
4
Méthode de connexion
Étape 1: Une fois la passerelle connectée, cliquez
sur l'icône de la passerelle dans la page Passerelle
pour ajouter un capteur.
Étape 2: appuyez longuement sur le capteur «
Commutateur de réseau » pendant 5 à 10 secondes
jusqu'à ce que les voyants verts clignotent pour
maintenir le thermo-hygromètre en mode
appairage.
Étape 3: Cliquez sur « Ajouter un appareil » pour
ajouter les capteurs dans la passerelle, puis
sélectionnez « Search for Devices ».
Étape 4: Cliquez sur "Light is in a flash" pour
connecter le ème capteur et confirmez.
①
Méthode de connexion
Étape 1: Une fois la passerelle connectée, ajoutez un
capteur à l'application.
Étape 2: appuyez longuement sur le capteur «
Commutateur de réseau » pendant 5 à 10 secondes
jusqu'à ce que les voyants verts clignotent pour
maintenir le thermo-hygromètre en mode
d'appairage.
Étape 3: cliquez sur le coin supérieur droit "+",
“sélectionnez Capteurs" > "Capteur (BLE)” pour
ajouter le thermo-hygromètre.
Étape 4: Cliquez sur l'icône de la passerelle, appuyez
sur "Add device" et sélectionnez >"Add existing" >"
ajoutez le thermo-hygromètre déjà connecté dans la
passerelle.
Método de conexión
Paso 1: después de conectar la puerta de enlace,
agregue un sensor a la aplicación.
Paso 2: mantenga presionado el sensor "Interruptor
de red" durante 5 a 10 segundos hasta que las luces
verdes parpadeen para mantener el termohigrómetro
en el modo de emparejamiento.
Paso 3: haga clic en la esquina superior derecha "+",
seleccione "Sensor de protecci" > "Sensor (BLE) para
agregar el termohigrómetro.
Paso 4: haga clic en el ícono de Gateway, toque "Add
device" y seleccione > "Add existing" > "agregue el
termohigrómetro ya conectado en Gateway.
01 02 03 04 05 06 07 08 09 10 11 12 13 14
15 16 17 18 19 20 21 22 23 24 25 26 27
28 29 30 31 32
33 34 35 36 37 38 39 40
41 42 43 44 45 46 47 48 49 50 51 52 53
54 55 56 57 58 59 60 61 62 63 64 65 66
②
Méthode de connexion
Étape 1: Une fois la passerelle connectée, ajoutez un
capteur à l'application.
Étape 2: appuyez longuement sur le capteur «
Commutateur de réseau » pendant 5 à 10 secondes
jusqu'à ce que les voyants verts clignotent pour
maintenir le thermo-hygromètre en mode
d'appairage.
Étape 3: cliquez sur le coin supérieur droit "+",
“sélectionnez Capteurs" > "Capteur (BLE)” pour
ajouter le thermo-hygromètre.
Étape 4: Cliquez sur l'icône de la passerelle, appuyez
sur "Add device" et sélectionnez >"Add existing" >"
ajoutez le thermo-hygromètre déjà connecté dans la
passerelle.
Remarque: Assurez-vous que le Bluetooth et le Wi-Fi
de votre téléphone sont activés pendant l'associa-
tion. Veuillez vérifier les étapes ci-dessus et réessayer
si l'appariement échoue.
Les capteurs avec hub wifi peuvent être utilisés avec
Alexa et Google Assistant. Vous pouvez trouver les
instructions via les étapes ci-dessous :
1. Cliquez sur "Profil" --- "Icône Alexa et Assistant
Google" --- "Afficher d'autres façons de créer un
lien" --- "Instructions", de la même manière que
l'Assistant Google.
a. Si vous travaillez avec Google Assistant, veuillez
suivre la commande ci-dessous.
①OK Google, quelle humidité affiche <nom de
l'appareil>?
②OK Google, quelle est la température de <nom de
l'appareil>?
③Ok Google, quel est le pourcentage d'alimenta-
tion de mon appareil ont?
Método de conexión
Paso 1: después de conectar la puerta de enlace,
agregue un sensor a la aplicación.
Paso 2: mantenga presionado el sensor "Interruptor
de red" durante 5 a 10 segundos hasta que las luces
verdes parpadeen para mantener el termohigrómetro
en el modo de emparejamiento.
Paso 3: haga clic en la esquina superior derecha "+",
seleccione "Sensor de protecci" > "Sensor (BLE) para
agregar el termohigrómetro.
Paso 4: haga clic en el ícono de Gateway, toque "Add
device" y seleccione > "Add existing" > "agregue el
termohigrómetro ya conectado en Gateway.
Nota: asegúrese de que Bluetooth y WiFi en su
teléfono estén encendidos durante el
emparejamiento. Verifique los pasos anteriores y
vuelva a intentarlo si falla el emparejamiento.
01 02 03 04 05 06 07 08 09 10 11 12 13 14
15 16 17 18 19 20 21 22 23 24 25 26 27
28 29 30 31 32 33
34 35 36 37 38 39 40
41 42 43 44 45 46 47 48 49 50 51 52 53
54 55 56 57 58 59 60 61 62 63 64 65 66

Sensoren mit WLAN-Hub können mit Alexa und
Google Assistant verwendet werden. Sie finden
die Anweisungen über die folgenden Schritte:1.
Klicken Sie auf "Profil" --- "Alexa-Symbol und
Google Assistant" --- "Weitere Möglichkeiten zum
Verknüpfen anzeigen" --- "Anleitungen", genauso
wie bei Google Assistant.
a. Wenn Sie mit Google Assistant arbeiten, folgen
Sie bitte dem folgenden Befehl.
①Ok Google, welche Lufeuchtigkeit zeigt
<Gerätename> an?
②OK Google, wie ist die Temperatur von
<Gerätename>?
③Ok Google, wie viel Prozent Strom hat mein
Gerät?
Amazon Alexa and Google Assistant
Méthode de connexion
Étape 1: Une fois la passerelle connectée, ajoutez un
capteur à l'application.
Étape 2: appuyez longuement sur le capteur «
Commutateur de réseau » pendant 5 à 10 secondes
jusqu'à ce que les voyants verts clignotent pour
maintenir le thermo-hygromètre en mode
d'appairage.
Étape 3: cliquez sur le coin supérieur droit "+",
“sélectionnez Capteurs" > "Capteur (BLE)” pour
ajouter le thermo-hygromètre.
Étape 4: Cliquez sur l'icône de la passerelle, appuyez
sur "Add device" et sélectionnez >"Add existing" >"
ajoutez le thermo-hygromètre déjà connecté dans la
passerelle.
Remarque: Assurez-vous que le Bluetooth et le Wi-Fi
de votre téléphone sont activés pendant l'associa-
tion. Veuillez vérifier les étapes ci-dessus et réessayer
si l'appariement échoue.
Les capteurs avec hub wifi peuvent être utilisés avec
Alexa et Google Assistant. Vous pouvez trouver les
instructions via les étapes ci-dessous :
1. Cliquez sur "Profil" --- "Icône Alexa et Assistant
Google" --- "Afficher d'autres façons de créer un
lien" --- "Instructions", de la même manière que
l'Assistant Google.
a. Si vous travaillez avec Google Assistant, veuillez
suivre la commande ci-dessous.
①OK Google, quelle humidité affiche <nom de
l'appareil>?
②OK Google, quelle est la température de <nom de
l'appareil>?
③Ok Google, quel est le pourcentage d'alimenta-
tion de mon appareil ont?
4
Método de conexión
Paso 1: después de conectar la puerta de enlace,
agregue un sensor a la aplicación.
Paso 2: mantenga presionado el sensor "Interruptor
de red" durante 5 a 10 segundos hasta que las luces
verdes parpadeen para mantener el termohigrómetro
en el modo de emparejamiento.
Paso 3: haga clic en la esquina superior derecha "+",
seleccione "Sensor de protecci" > "Sensor (BLE) para
agregar el termohigrómetro.
Paso 4: haga clic en el ícono de Gateway, toque "Add
device" y seleccione > "Add existing" > "agregue el
termohigrómetro ya conectado en Gateway.
Nota: asegúrese de que Bluetooth y WiFi en su
teléfono estén encendidos durante el
emparejamiento. Verifique los pasos anteriores y
vuelva a intentarlo si falla el emparejamiento.
01 02 03 04 05 06 07 08 09 10 11 12 13 14
15 16 17 18 19 20 21 22 23 24 25 26 27
28 29 30 31 32 33 34
35 36 37 38 39 40
41 42 43 44 45 46 47 48 49 50 51 52 53
54 55 56 57 58 59 60 61 62 63 64 65 66
Sensoren mit WLAN-Hub können mit Alexa und
Google Assistant verwendet werden. Sie finden
die Anweisungen über die folgenden Schritte:1.
Klicken Sie auf "Profil" --- "Alexa-Symbol und
Google Assistant" --- "Weitere Möglichkeiten zum
Verknüpfen anzeigen" --- "Anleitungen", genauso
wie bei Google Assistant.
a. Wenn Sie mit Google Assistant arbeiten, folgen
Sie bitte dem folgenden Befehl.
①Ok Google, welche Lufeuchtigkeit zeigt
<Gerätename> an?
②OK Google, wie ist die Temperatur von
<Gerätename>?
③Ok Google, wie viel Prozent Strom hat mein
Gerät?
Remarque: Assurez-vous que le Bluetooth et le Wi-Fi
de votre téléphone sont activés pendant l'associa-
tion. Veuillez vérifier les étapes ci-dessus et réessayer
si l'appariement échoue.
Les capteurs avec hub wifi peuvent être utilisés avec
Alexa et Google Assistant. Vous pouvez trouver les
instructions via les étapes ci-dessous :
1. Cliquez sur "Profil" --- "Icône Alexa et Assistant
Google" --- "Afficher d'autres façons de créer un
lien" --- "Instructions", de la même manière que
l'Assistant Google.
a. Si vous travaillez avec Google Assistant, veuillez
suivre la commande ci-dessous.
①OK Google, quelle humidité affiche <nom de
l'appareil>?
②OK Google, quelle est la température de <nom de
l'appareil>?
③Ok Google, quel est le pourcentage d'alimenta-
tion de mon appareil ont?
b. Si vous travaillez avec Amazon Alexa, veuillez
suivre la commande ci-dessous.
①Alexa, quelle est la <nom de l'appareil>batterie?
②Alexa, quelle est l'humidité <nom de l'appareil>?
③Alexa, quelle est la température de <nom de
l'appareil> ?
Q1: Pourquoi avez-vous besoin d'activer
l'autorisation de localisation?
A1: Si vous n'activez pas l'autorisation de localisa-
tion sur votre téléphone, les fonctions de la liaison
intelligente ne peuvent pas fonctionner.
Q2.Les raisons de l'échec de la connexion
A2. Vérifier si:
a. L'appareil doit être placé dans la zone de
couverture du signal du routeur. Assurez-vous que la
distance entre l'appareil et le routeur est inférieure à
15 m/49,2 pieds.
b. Veuillez confirmer que l'appareil est en mode de
connexion. (Le voyant du mode EZ clignote toutes les
0,5 secondes.)
c. Veuillez confirmer que le réseau Wi-Fi est de 2,4
Ghz et non de 5 Ghz.
d. Veuillez vérifier si la batterie est faible.
e. Veuillez vérifier si l'appareil est ajouté à la
passerelle.
Nota: asegúrese de que Bluetooth y WiFi en su
teléfono estén encendidos durante el
emparejamiento. Verifique los pasos anteriores y
vuelva a intentarlo si falla el emparejamiento.
b. Si trabaja con Amazon Alexa, siga con el
siguiente comando.
①Alexa, cuál es la batería de <nombre del
dispositivo>?
②Alexa, cuál es la humedad del <nombre del
dispositivo>?
③Alexa, cuál es la temperatura de <nombre del
dispositivo>?
01 02 03 04 05 06 07 08 09 10 11 12 13 14
15 16 17 18 19 20 21 22 23 24 25 26 27
28 29 30 31 32 33 34 35
36 37 38 39 40
41 42 43 44 45 46 47 48 49 50 51 52 53
54 55 56 57 58 59 60 61 62 63 64 65 66

5
FQA
b. Si vous travaillez avec Amazon Alexa, veuillez
suivre la commande ci-dessous.
①Alexa, quelle est la <nom de l'appareil>batterie?
②Alexa, quelle est l'humidité <nom de l'appareil>?
③Alexa, quelle est la température de <nom de
l'appareil> ?
Q1: Pourquoi avez-vous besoin d'activer
l'autorisation de localisation?
A1: Si vous n'activez pas l'autorisation de localisa-
tion sur votre téléphone, les fonctions de la liaison
intelligente ne peuvent pas fonctionner.
Q2.Les raisons de l'échec de la connexion
A2. Vérifier si:
a. L'appareil doit être placé dans la zone de
couverture du signal du routeur. Assurez-vous que la
distance entre l'appareil et le routeur est inférieure à
15 m/49,2 pieds.
b. Veuillez confirmer que l'appareil est en mode de
connexion. (Le voyant du mode EZ clignote toutes les
0,5 secondes.)
c. Veuillez confirmer que le réseau Wi-Fi est de 2,4
Ghz et non de 5 Ghz.
d. Veuillez vérifier si la batterie est faible.
e. Veuillez vérifier si l'appareil est ajouté à la
passerelle.
Q3: Por qué los valores de temperatura y humedad
no cambian?
01 02 03 04 05 06 07 08 09 10 11 12 13 14
15 16 17 18 19 20 21 22 23 24 25 26 27
28 29 30 31 32 33 34 35 36
37 38 39 40
41 42 43 44 45 46 47 48 49 50 51 52 53
54 55 56 57 58 59 60 61 62 63 64 65 66

6
Conseils chaleureux
2
1
Le capteur doit fonctionner dans un environne-
ment avec une température allant de -20 ~ 60 ℃
(-4 ~ 140 ℉) et une humidité allant de 0 à 100%
HR.
Ne plongez pas le capteur dans l'eau et
mettez-le au réfrigérateur. Le réfrigérateur ou le
congélateur bloquera le signal.
La meilleure distance entre le thermo-hy-
gromètre et le concentrateur Wi-Fi est de 49,2
pieds/15 m dans la zone dégagée.
3
A2. Vérifier si:
a. L'appareil doit être placé dans la zone de
couverture du signal du routeur. Assurez-vous que la
distance entre l'appareil et le routeur est inférieure à
15 m/49,2 pieds.
b. Veuillez confirmer que l'appareil est en mode de
connexion. (Le voyant du mode EZ clignote toutes les
0,5 secondes.)
c. Veuillez confirmer que le réseau Wi-Fi est de 2,4
Ghz et non de 5 Ghz.
d. Veuillez vérifier si la batterie est faible.
e. Veuillez vérifier si l'appareil est ajouté à la
passerelle.
Q3: Pourquoi les valeurs de température et
d'humidité ne changent pas ?
A2: Vérifiez si
a. Veuillez vérifier si l'appareil est en ligne.
b. Veuillez vérifier si la batterie est faible.
c. Il n'y a pas de changement de température
ambiante. ré.
d. Assurez-vous que la distance entre l'appareil et
le téléphone est inférieure à 15 m/49,2 pieds.
Q3: Por qué los valores de temperatura y humedad
no cambian?
01 02 03 04 05 06 07 08 09 10 11 12 13 14
15 16 17 18 19 20 21 22 23 24 25 26 27
28 29 30 31 32 33 34 35 36 37
38 39 40
41 42 43 44 45 46 47 48 49 50 51 52 53
54 55 56 57 58 59 60 61 62 63 64 65 66
4
5
6
7
Le capteur détecte la température et l'humidité
de l'air à travers les trous à l'avant et en bas,
veuillez ne pas couvrir les trous.
Assurez-vous que le concentrateur Wi-Fi est
aussi proche que possible du routeur.
Assurez-vous que le signal évite de traverser
plus de murs, de saleté ou d'épaisses barrières
en acier.
Veuillez remplacer les piles lorsque l'indicateur
de pile faible s'affiche à l'écran.
Si vous avez des questions sur le produit,
veuillez cliquer sur "Contact" sur la page de
l'application pour nous contacter.
7
Service après-vente
1
Q3: Pourquoi les valeurs de température et
d'humidité ne changent pas ?
A2: Vérifiez si
a. Veuillez vérifier si l'appareil est en ligne.
b. Veuillez vérifier si la batterie est faible.
c. Il n'y a pas de changement de température
ambiante. ré.
d. Assurez-vous que la distance entre l'appareil et
le téléphone est inférieure à 15 m/49,2 pieds.
Q3: Por qué los valores de temperatura y humedad
no cambian?
El sensor detecta la temperatura y la humedad
del aire a través de los orificios en la parte
delantera y en la parte inferior, no cubra los
orificios.
Asegúrese de que el concentrador wifi esté lo
más cerca posible del enrutador.
Asegúrese de que la señal evite viajar a través
de más paredes, suciedad o barreras de acero
gruesas.
Reemplace las baterías cuando el indicador de
batería baja aparezca en la pantalla.
01 02 03 04 05 06 07 08 09 10 11 12 13 14
15 16 17 18 19 20 21 22 23 24 25 26 27
28 29 30 31 32 33 34 35 36 37 38
39 40
41 42 43 44 45 46 47 48 49 50 51 52 53
54 55 56 57 58 59 60 61 62 63 64 65 66

TLe thermo-hygromètre est garanti 1 an depuis le
jour de l'achat. Si vous avez des questions,
n'hésitez pas à nous contacter via
[email protected]om. Nous suivrons et
répondrons dans les 24 heures.
Des problèmes surviennent du fait de son
utilisation à d'autres fins, d'une mauvaise
utilisation ou de l'utilisation de composants non
fournis par Diivoo.
Damages caused by improper use,for example,
incorrect battery installation,artificial
damage,etc.
Les conditions suivantes ne sont pas incluses:
3
2
Company: E-CrossStu GmbH
Address: Mainzer Landstr.69,60329 Frankfurt am Main
Company Name: YH Consulting Limited
Address: C/O YH Consulting Limited Office
147, Centurion House, London Road,
Staines-upon-Thames, Surrey, TW18 4AX
Los termohigrómetros tienen 1 año de garantía
desde el día de la compra. Si tiene alguna
pregunta, no dude en ponerse en contacto a
través de [email protected]om. Haremos
un seguimiento y responderemos dentro de las
24 horas.
01 02 03 04 05 06 07 08 09 10 11 12 13 14
15 16 17 18 19 20 21 22 23 24 25 26 27
28 29 30 31 32 33 34 35 36 37 38 39
40
41 42 43 44 45 46 47 48 49 50 51 52 53
54 55 56 57 58 59 60 61 62 63 64 65 66

Termohigrómetro con WiFi Hub
Manual de usuario
Modelo: ITH-02/WG02
01 02 03 04 05 06 07 08 09 10 11 12 13 14
15 16 17 18 19 20 21 22 23 24 25 26 27
28 29 30 31 32 33 34 35 36 37 38 39 40
41 42 43 44 45 46 47 48 49 50 51 52 53
54 55 56 57 58 59 60 61 62 63 64 65 66
Orificio para cordón
Orificio del sensor de
temperatura y humedad
Luz indicadora
Conmutador de red
PULL OFF
Extraiga la pieza aislante para
encender el termohigrómetro
1
Apariencia del producto
LED-Light
Control Button
Termo higrómetro
Rango de temperatura -20~60℃(-4~140℉)
Modelo ITH-02
Rango de humedad 0~100%HR
Modelo de batería CR2450/3V
Duración de la batería alrededor de 6 meses
Tiempo de respuesta cada 6 segundos
Temperatura ±0,2 ℃/Humedad ±1,8 % HRPrecisión
Concentrador WiFi
APP
Smart Life
Modelo WG02
WiFi Band
Solo 2,4 GHz
Protocolo
IEEE 802.11b/g/n & Bluetooth
Entrada de concentrador WiFi
100V~250V~50/60Hz
Humedad de trabajo
10%-90% HR (sin condensación)
01 02 03 04 05 06 07 08 09 10 11 12 13 14
15 16 17 18 19 20 21 22 23 24 25 26 27
28 29 30 31 32 33 34 35 36 37 38 39 40
41
42 43 44 45 46 47 48 49 50 51 52 53
54 55 56 57 58 59 60 61 62 63 64 65 66
Control Button
Conozca la pantalla de inicio de la aplicación Diivoo
nombre del producto
Fecha actual
Selección de curva de
temperatura y humedad
Selección de tiempo
Barra de menús
Editar nombre del dispositivo
Pantalla de potencia
Temperatura y
humedad actuales
Selección de ciclo
Datos de punto fijo
01 02 03 04 05 06 07 08 09 10 11 12 13 14
15 16 17 18 19 20 21 22 23 24 25 26 27
28 29 30 31 32 33 34 35 36 37 38 39 40
41 42
43 44 45 46 47 48 49 50 51 52 53
54 55 56 57 58 59 60 61 62 63 64 65 66
3
Conozca la pantalla de inicio de la aplicación Diivoo
Configuración inicial de la aplicación Smart Life
Escanee el código QR y descargue e instale la
aplicación gratuita para Android o IOS.
Descarga la aplicación Smart Life2
Encienda el concentrador WiFi y el termohigrómetro1
Paso 1: conecte el concentrador de Wi-Fi a una
toma de corriente interior.
Paso 2: Saque la pieza aislante para encender el
termohigrómetro.
Nota: (La distancia entre el concentrador Wi-Fi y el
termohigrómetro no debe exceder los 49,2 pies/15
m). No coloque los sensores donde se obstruya su
señal Bluetooth.
Paso 1: Encienda el bluetooth y WiFi del teléfono.
Paso 2: mantenga presionado el botón en el
concentrador WiFi durante 5-10 segundos hasta que
las luces verdes parpadeen para mantener el modo
de emparejamiento.
Paso 3: Haga clic en "Agregar dispositivo" o en la
esquina superior derecha "+", seleccione "Control de
puerta de enlace">"Pasarela de socket (BLE)"> para
agregar el WiFi Hub en la aplicación.
Paso 4: Esperando a que la conexión se complete al
100%.
Nota: (Solo admite WiFi de 2,4 Ghz)
01 02 03 04 05 06 07 08 09 10 11 12 13 14
15 16 17 18 19 20 21 22 23 24 25 26 27
28 29 30 31 32 33 34 35 36 37 38 39 40
41 42 43
44 45 46 47 48 49 50 51 52 53
54 55 56 57 58 59 60 61 62 63 64 65 66
3
Configuración inicial de la aplicación Smart Life
Paso 1: conecte el concentrador de Wi-Fi a una
toma de corriente interior.
Paso 2: Saque la pieza aislante para encender el
termohigrómetro.
Nota: (La distancia entre el concentrador Wi-Fi y el
termohigrómetro no debe exceder los 49,2 pies/15
m). No coloque los sensores donde se obstruya su
señal Bluetooth.
Emparejar el concentrador WiFi
Paso 1: Encienda el bluetooth y WiFi del teléfono.
Paso 2: mantenga presionado el botón en el
concentrador WiFi durante 5-10 segundos hasta que
las luces verdes parpadeen para mantener el modo
de emparejamiento.
Paso 3: Haga clic en "Agregar dispositivo" o en la
esquina superior derecha "+", seleccione "Control de
puerta de enlace">"Pasarela de socket (BLE)"> para
agregar el WiFi Hub en la aplicación.
Paso 4: Esperando a que la conexión se complete al
100%.
Nota: (Solo admite WiFi de 2,4 Ghz)
01 02 03 04 05 06 07 08 09 10 11 12 13 14
15 16 17 18 19 20 21 22 23 24 25 26 27
28 29 30 31 32 33 34 35 36 37 38 39 40
41 42 43 44
45 46 47 48 49 50 51 52 53
54 55 56 57 58 59 60 61 62 63 64 65 66

4
①
Paso 1: Encienda el bluetooth y WiFi del teléfono.
Paso 2: mantenga presionado el botón en el
concentrador WiFi durante 5-10 segundos hasta que
las luces verdes parpadeen para mantener el modo
de emparejamiento.
Paso 3: Haga clic en "Agregar dispositivo" o en la
esquina superior derecha "+", seleccione "Control de
puerta de enlace">"Pasarela de socket (BLE)"> para
agregar el WiFi Hub en la aplicación.
Paso 4: Esperando a que la conexión se complete al
100%.
Emparejamiento termohigrómetro con WiFi Hub
Método de conexión
Paso 1: después de conectar la puerta de enlace,
haga clic en el icono de la puerta de enlace en la
página de la puerta de enlace para agregar un
sensor.
Paso 2: mantenga presionado el sensor
"Interruptor de red" durante 5-10 segundos hasta
que las luces verdes parpadeen para mantener el
termohigrómetro en modo de emparejamiento.
Paso 3: Haga clic en "Agregar dispositivo" para
agregar los sensores en Gateway, luego
seleccione "Search for Devices".
Paso 4: Haga clic en "Light is in a flash" para
conectar el sensor y confirmar.
Método de conexión
Paso 1: después de conectar la puerta de enlace,
agregue un sensor a la aplicación.
Paso 2: mantenga presionado el sensor "Interruptor
de red" durante 5 a 10 segundos hasta que las luces
verdes parpadeen para mantener el termohigrómetro
en el modo de emparejamiento.
Paso 3: haga clic en la esquina superior derecha "+",
seleccione "Sensor de protecci" > "Sensor (BLE) para
agregar el termohigrómetro.
Paso 4: haga clic en el ícono de Gateway, toque "Add
device" y seleccione > "Add existing" > "agregue el
termohigrómetro ya conectado en Gateway.
Metodo di connessione
Passaggio 1: Dopo che il gateway si è connesso,
aggiungi un sensore all'APP.
Passaggio 2: Premere a lungo il sensore "Interrut-
tore di rete" per 5-10 secondi fino a quando le luci
verdi non lampeggiano per mantenere la modalità di
associazione termo-igrometro.
Passaggio 3: Fare clic sull'angolo in alto a destra "+",
selezionare "Sensore di protezione" > "Sensor (BLE)
per aggiungere il termoigrometro.
Passaggio 4: Fare clic sull'icona del gateway, toccare
"Add device" e selezionare >"Add existing" >"
aggiungere il termoigrometro già collegato nel
gateway.
01 02 03 04 05 06 07 08 09 10 11 12 13 14
15 16 17 18 19 20 21 22 23 24 25 26 27
28 29 30 31 32 33 34 35 36 37 38 39 40
41 42 43 44 45
46 47 48 49 50 51 52 53
54 55 56 57 58 59 60 61 62 63 64 65 66
②
Método de conexión
Paso 1: después de conectar la puerta de enlace,
agregue un sensor a la aplicación.
Paso 2: mantenga presionado el sensor "Interruptor
de red" durante 5 a 10 segundos hasta que las luces
verdes parpadeen para mantener el termohigrómetro
en el modo de emparejamiento.
Paso 3: haga clic en la esquina superior derecha "+",
seleccione "Sensor de protecci" > "Sensor (BLE) para
agregar el termohigrómetro.
Paso 4: haga clic en el ícono de Gateway, toque "Add
device" y seleccione > "Add existing" > "agregue el
termohigrómetro ya conectado en Gateway.
Nota: asegúrese de que Bluetooth y WiFi en su
teléfono estén encendidos durante el
emparejamiento. Verifique los pasos anteriores y
vuelva a intentarlo si falla el emparejamiento.
Los sensores con concentrador wifi se pueden
usar con Alexa y Google Assistant. Puede
encontrar las instrucciones a través de los
siguientes pasos: 1. Haga clic en "Yo" --- "Icono de
Alexa y Asistente de Google" --- "Ver más formas
de vincular" --- "Instrucciones", de la misma
manera que el Asistente de Google.
a. Si trabaja con el Asistente de Google, siga con
el siguiente comando.
①OK Google, qué humedad muestra <nombre del
dispositivo>?
②OK Google, cuál es la temperatura de < nombre
del dispositivo>?
③Ok Google, cuál es el porcentaje de energía de
mi dispositivo?
Metodo di connessione
Passaggio 1: Dopo che il gateway si è connesso,
aggiungi un sensore all'APP.
Passaggio 2: Premere a lungo il sensore "Interrut-
tore di rete" per 5-10 secondi fino a quando le luci
verdi non lampeggiano per mantenere la modalità di
associazione termo-igrometro.
Passaggio 3: Fare clic sull'angolo in alto a destra "+",
selezionare "Sensore di protezione" > "Sensor (BLE)
per aggiungere il termoigrometro.
Passaggio 4: Fare clic sull'icona del gateway, toccare
"Add device" e selezionare >"Add existing" >"
aggiungere il termoigrometro già collegato nel
gateway.
01 02 03 04 05 06 07 08 09 10 11 12 13 14
15 16 17 18 19 20 21 22 23 24 25 26 27
28 29 30 31 32 33 34 35 36 37 38 39 40
41 42 43 44 45 46
47 48 49 50 51 52 53
54 55 56 57 58 59 60 61 62 63 64 65 66

Amazon Alexa y Asistente de Google
Método de conexión
Paso 1: después de conectar la puerta de enlace,
agregue un sensor a la aplicación.
Paso 2: mantenga presionado el sensor "Interruptor
de red" durante 5 a 10 segundos hasta que las luces
verdes parpadeen para mantener el termohigrómetro
en el modo de emparejamiento.
Paso 3: haga clic en la esquina superior derecha "+",
seleccione "Sensor de protecci" > "Sensor (BLE) para
agregar el termohigrómetro.
Paso 4: haga clic en el ícono de Gateway, toque "Add
device" y seleccione > "Add existing" > "agregue el
termohigrómetro ya conectado en Gateway.
Nota: asegúrese de que Bluetooth y WiFi en su
teléfono estén encendidos durante el
emparejamiento. Verifique los pasos anteriores y
vuelva a intentarlo si falla el emparejamiento.
Los sensores con concentrador wifi se pueden
usar con Alexa y Google Assistant. Puede
encontrar las instrucciones a través de los
siguientes pasos: 1. Haga clic en "Yo" --- "Icono de
Alexa y Asistente de Google" --- "Ver más formas
de vincular" --- "Instrucciones", de la misma
manera que el Asistente de Google.
a. Si trabaja con el Asistente de Google, siga con
el siguiente comando.
①OK Google, qué humedad muestra <nombre del
dispositivo>?
②OK Google, cuál es la temperatura de < nombre
del dispositivo>?
③Ok Google, cuál es el porcentaje de energía de
mi dispositivo?
Metodo di connessione
Passaggio 1: Dopo che il gateway si è connesso,
aggiungi un sensore all'APP.
Passaggio 2: Premere a lungo il sensore "Interrut-
tore di rete" per 5-10 secondi fino a quando le luci
verdi non lampeggiano per mantenere la modalità di
associazione termo-igrometro.
Passaggio 3: Fare clic sull'angolo in alto a destra "+",
selezionare "Sensore di protezione" > "Sensor (BLE)
per aggiungere il termoigrometro.
Passaggio 4: Fare clic sull'icona del gateway, toccare
"Add device" e selezionare >"Add existing" >"
aggiungere il termoigrometro già collegato nel
gateway.
Nota: assicurati che Bluetooth e Wi-Fi sul telefono
siano attivi durante l'associazione. Controllare i
passaggi precedenti e riprovare se l'associazione
non riesce.
01 02 03 04 05 06 07 08 09 10 11 12 13 14
15 16 17 18 19 20 21 22 23 24 25 26 27
28 29 30 31 32 33 34 35 36 37 38 39 40
41 42 43 44 45 46 47
48 49 50 51 52 53
54 55 56 57 58 59 60 61 62 63 64 65 66
4
Nota: asegúrese de que Bluetooth y WiFi en su
teléfono estén encendidos durante el
emparejamiento. Verifique los pasos anteriores y
vuelva a intentarlo si falla el emparejamiento.
b. Si trabaja con Amazon Alexa, siga con el
siguiente comando.
①Alexa, cuál es la batería de <nombre del
dispositivo>?
②Alexa, cuál es la humedad del <nombre del
dispositivo>?
③Alexa, cuál es la temperatura de <nombre del
dispositivo>?
Q1: Por qué necesita habilitar el permiso de
ubicación?
Q2.Las razones de la conexión fallida
A2. Comprobar si:
a. El dispositivo debe colocarse dentro de la
cobertura de la señal del enrutador. Asegúrese de
que la distancia entre el dispositivo y el enrutador
sea inferior a 15 m/49,2 pies.
b. Confirme que el dispositivo está en modo de
conexión. (La luz indicadora del modo EZ parpadea
cada 0,5 segundos)
c. Confirme que la red WiFi es de 2,4 Ghz, no de 5
Ghz.
d. Please check whether the battery is running low.
e. Compruebe si la batería se está agotando.
Verifique si el dispositivo está agregado en la puerta
de enlace.
b. Se lavori con Amazon Alexa, segui il comando
seguente.
①Alexa, qual è la batteria di <nome dispositivo>?
②Alexa, qual è l'umidità di <nome dispositivo>?
③Alexa, qual è la temperatura di <nome
dispositivo>?
01 02 03 04 05 06 07 08 09 10 11 12 13 14
15 16 17 18 19 20 21 22 23 24 25 26 27
28 29 30 31 32 33 34 35 36 37 38 39 40
41 42 43 44 45 46 47 48
49 50 51 52 53
54 55 56 57 58 59 60 61 62 63 64 65 66

5
FQA
Q1: Por qué necesita habilitar el permiso de
ubicación?
A1: Si no habilita el permiso de ubicación en su
teléfono, las funciones de enlace inteligente no
pueden funcionar.
Q2.Las razones de la conexión fallida
A2. Comprobar si:
a. El dispositivo debe colocarse dentro de la
cobertura de la señal del enrutador. Asegúrese de
que la distancia entre el dispositivo y el enrutador
sea inferior a 15 m/49,2 pies.
b. Confirme que el dispositivo está en modo de
conexión. (La luz indicadora del modo EZ parpadea
cada 0,5 segundos)
c. Confirme que la red WiFi es de 2,4 Ghz, no de 5
Ghz.
d. Please check whether the battery is running low.
e. Compruebe si la batería se está agotando.
Verifique si el dispositivo está agregado en la puerta
de enlace.
Q3: Por qué los valores de temperatura y humedad
no cambian?
A3: Compruebe si
a. Compruebe si el dispositivo está en línea.
b. Compruebe si la batería se está agotando.
c. No hay cambios en la temperatura ambiente.
d. Asegúrese de que la distancia entre el dispositivo
y el teléfono sea inferior a 15 m/49,2 pies.
Q3: Perché i valori di temperatura e umidità non
cambiano?
01 02 03 04 05 06 07 08 09 10 11 12 13 14
15 16 17 18 19 20 21 22 23 24 25 26 27
28 29 30 31 32 33 34 35 36 37 38 39 40
41 42 43 44 45 46 47 48 49
50 51 52 53
54 55 56 57 58 59 60 61 62 63 64 65 66

6
Consejos cálidos
2
1
3
Q1: Por qué necesita habilitar el permiso de
ubicación?
A1: Si no habilita el permiso de ubicación en su
teléfono, las funciones de enlace inteligente no
pueden funcionar.
A2. Comprobar si:
a. El dispositivo debe colocarse dentro de la
cobertura de la señal del enrutador. Asegúrese de
que la distancia entre el dispositivo y el enrutador
sea inferior a 15 m/49,2 pies.
b. Confirme que el dispositivo está en modo de
conexión. (La luz indicadora del modo EZ parpadea
cada 0,5 segundos)
c. Confirme que la red WiFi es de 2,4 Ghz, no de 5
Ghz.
d. Please check whether the battery is running low.
e. Compruebe si la batería se está agotando.
Verifique si el dispositivo está agregado en la puerta
de enlace.
Q3: Por qué los valores de temperatura y humedad
no cambian?
A3: Compruebe si
a. Compruebe si el dispositivo está en línea.
b. Compruebe si la batería se está agotando.
c. No hay cambios en la temperatura ambiente.
d. Asegúrese de que la distancia entre el dispositivo
y el teléfono sea inferior a 15 m/49,2 pies.
El sensor debe funcionar en un entorno con
una temperatura que oscile entre -20 y 60 ℃
(-4 y 140 ℉) y una humedad que oscile entre 0
y 100 % de HR.
No sumerja el sensor en agua y guárdelo en el
refrigerador. El refrigerador o congelador
bloqueará la señal.
El mejor rango entre el termohigrómetro y el
concentrador wifi es de 49,2 pies/15 m en un
área abierta.
Q3: Perché i valori di temperatura e umidità non
cambiano?
01 02 03 04 05 06 07 08 09 10 11 12 13 14
15 16 17 18 19 20 21 22 23 24 25 26 27
28 29 30 31 32 33 34 35 36 37 38 39 40
41 42 43 44 45 46 47 48 49 50
51 52 53
54 55 56 57 58 59 60 61 62 63 64 65 66
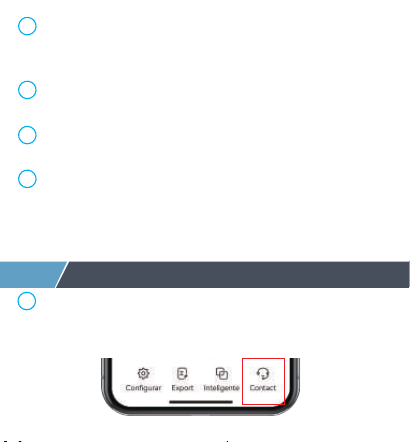
4
5
6
7
7
Servicio postventa
1
Q3: Por qué los valores de temperatura y humedad
no cambian?
A3: Compruebe si
a. Compruebe si el dispositivo está en línea.
b. Compruebe si la batería se está agotando.
c. No hay cambios en la temperatura ambiente.
d. Asegúrese de que la distancia entre el dispositivo
y el teléfono sea inferior a 15 m/49,2 pies.
El sensor detecta la temperatura y la humedad
del aire a través de los orificios en la parte
delantera y en la parte inferior, no cubra los
orificios.
Asegúrese de que el concentrador wifi esté lo
más cerca posible del enrutador.
Asegúrese de que la señal evite viajar a través
de más paredes, suciedad o barreras de acero
gruesas.
Reemplace las baterías cuando el indicador de
batería baja aparezca en la pantalla.
Si tiene alguna pregunta sobre el producto,
haga clic en "Contact" en la página de la
aplicación para contactarnos.
01 02 03 04 05 06 07 08 09 10 11 12 13 14
15 16 17 18 19 20 21 22 23 24 25 26 27
28 29 30 31 32 33 34 35 36 37 38 39 40
41 42 43 44 45 46 47 48 49 50 51
52 53
54 55 56 57 58 59 60 61 62 63 64 65 66

3
2
Company: E-CrossStu GmbH
Address: Mainzer Landstr.69,60329 Frankfurt am Main
Company Name: YH Consulting Limited
Address: C/O YH Consulting Limited Office
147, Centurion House, London Road,
Staines-upon-Thames, Surrey, TW18 4AX
Los termohigrómetros tienen 1 año de garantía
desde el día de la compra. Si tiene alguna
pregunta, no dude en ponerse en contacto a
través de [email protected]om. Haremos
un seguimiento y responderemos dentro de las
24 horas.
Las siguientes condiciones no están incluidas:
Los problemas ocurren debido a su uso para otros
fines, o uso inadecuado o uso de componentes no
suministrados por Diivoo.
Daños causados por un uso inadecuado, por
ejemplo, instalación incorrecta de la batería,
daños artificiales, etc.
01 02 03 04 05 06 07 08 09 10 11 12 13 14
15 16 17 18 19 20 21 22 23 24 25 26 27
28 29 30 31 32 33 34 35 36 37 38 39 40
41 42 43 44 45 46 47 48 49 50 51 52
53
54 55 56 57 58 59 60 61 62 63 64 65 66

Termoigrometro con Hub WiFi
Manuale d'uso
Modello: ITH-02/WG02
01 02 03 04 05 06 07 08 09 10 11 12 13 14
15 16 17 18 19 20 21 22 23 24 25 26 27
28 29 30 31 32 33 34 35 36 37 38 39 40
41 42 43 44 45 46 47 48 49 50 51 52 53
54 55 56 57 58 59 60 61 62 63 64 65 66

Intervallo di temperatura -20~60℃(-4~140℉)
Modello
ITH-02
Intervallo di umidità 0~100%UR
Modello a batteria CR2450/3V
Durata della batteria Circa 6 mesi
Tempo di risposta Ogni 6 secondi
Temperatura ±0,2℃/Umidità ±1,8%URPrecisione
APP
Smart Life
Modello WG02
WiFi Band
Solo 2,4 GHz
Protocollo
IEEE 802.11b/g/n & Bluetooth
Ingresso hub Wi-Fi
100V~250V~50/60Hz
Umidità di lavoro
10%-90% UR (senza condensa)
Misuratore di temperatura e umidità
Foro per cordino
Foro sensore
temperatura e umidità
Spia
Switch di rete
PULL OFF
Estrarre il pezzo isolante per alimentare il termoigrometro
1
Aspetto del prodotto
Luce a led
Pulsante di
controllo
WiFi Hub
01 02 03 04 05 06 07 08 09 10 11 12 13 14
15 16 17 18 19 20 21 22 23 24 25 26 27
28 29 30 31 32 33 34 35 36 37 38 39 40
41 42 43 44 45 46 47 48 49 50 51 52 53
54
55 56 57 58 59 60 61 62 63 64 65 66
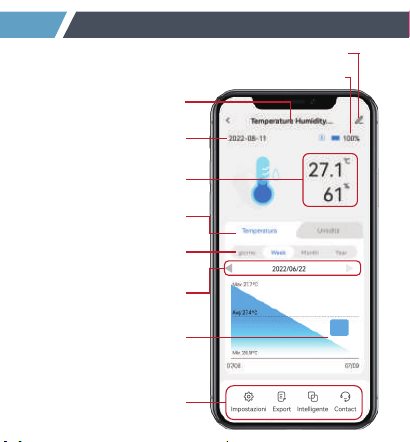
Estrarre il pezzo isolante per alimentare il termoigrometro
Pulsante di
controllo
nome del prodotto
Data odierna
Selezione della curva di
temperatura e umidità
Selezione del tempo
Barra dei menu
Modifica il nome del dispositivo
Display di potenza
Temperatura e
umidità attuali
Selezione del ciclo
Dati a virgola fissa
13:00
27.3℃
2
Scopri la schermata iniziale dell'app Diivoo
01 02 03 04 05 06 07 08 09 10 11 12 13 14
15 16 17 18 19 20 21 22 23 24 25 26 27
28 29 30 31 32 33 34 35 36 37 38 39 40
41 42 43 44 45 46 47 48 49 50 51 52 53
54 55
56 57 58 59 60 61 62 63 64 65 66
Scansiona il codice QR e scarica e installa l'app
gratuita per Android o IOS.
Scarica l'app Smart Life2
Alimenta l'hub WiFi e il termoigrometro1
Passaggio 1: Collegare l'hub Wi-Fi a una presa
interna.
Passaggio 2:
estrarre il pezzo isolante per alimentare
il termoigrometro.
Nota: (la distanza tra l'hub Wi-Fi e il termoigrometro
non deve superare i 15 m/49,2 piedi). Si prega di non
posizionare i sensori dove il segnale Bluetooth sarà
ostruito.
3
configurazione iniziale dell'app Smart Life
Scopri la schermata iniziale dell'app Diivoo
Passaggio 1: Turn on the phone's bluetooth and
WiFi.
Passaggio 2: Premere a lungo il pulsante sull'hub
WiFi per 5-10 secondi finché le luci verdi non
lampeggiano per mantenere la modalità di
associazione.
Passaggio 3: Fai clic su "Aggiungi dispositivo" o in
alto a destra su "+", seleziona "Controllo
Gateway">"Socket Gateway (BLE)"> per aggiungere
l'hub WiFi nell'app.
Passaggio 4: In attesa che la connessione sia
completata al 100%.
01 02 03 04 05 06 07 08 09 10 11 12 13 14
15 16 17 18 19 20 21 22 23 24 25 26 27
28 29 30 31 32 33 34 35 36 37 38 39 40
41 42 43 44 45 46 47 48 49 50 51 52 53
54 55 56
57 58 59 60 61 62 63 64 65 66
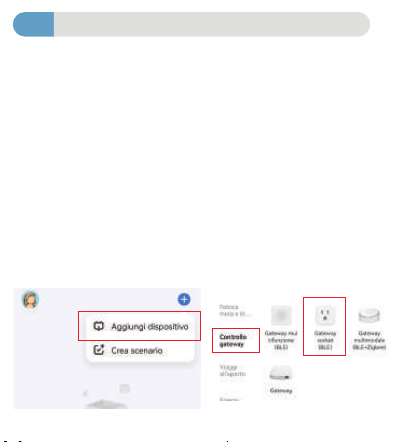
Scansiona il codice QR e scarica e installa l'app
gratuita per Android o IOS.
Passaggio 1: Collegare l'hub Wi-Fi a una presa
interna.
Passaggio 2: estrarre il pezzo isolante per alimentare
il termoigrometro.
Nota: (la distanza tra l'hub Wi-Fi e il termoigrometro
non deve superare i 15 m/49,2 piedi). Si prega di non
posizionare i sensori dove il segnale Bluetooth sarà
ostruito.
configurazione iniziale dell'app Smart Life
Associa l'Hub Wi-Fi
3
Passaggio 1: Turn on the phone's bluetooth and
WiFi.
Passaggio 2: Premere a lungo il pulsante sull'hub
WiFi per 5-10 secondi finché le luci verdi non
lampeggiano per mantenere la modalità di
associazione.
Passaggio 3: Fai clic su "Aggiungi dispositivo" o in
alto a destra su "+", seleziona "Controllo
Gateway">"Socket Gateway (BLE)"> per aggiungere
l'hub WiFi nell'app.
Passaggio 4: In attesa che la connessione sia
completata al 100%.
Nota: (supporta solo Wi-Fi a 2,4 Ghz)
01 02 03 04 05 06 07 08 09 10 11 12 13 14
15 16 17 18 19 20 21 22 23 24 25 26 27
28 29 30 31 32 33 34 35 36 37 38 39 40
41 42 43 44 45 46 47 48 49 50 51 52 53
54 55 56 57
58 59 60 61 62 63 64 65 66
Abbinamento termoigrometro con WiFi Hub
4
Metodo di connessione
Passaggio 1: Dopo che il gateway si è connesso, fai
clic sull'icona del gateway nella pagina del gateway
per aggiungere un sensore.
Passaggio : Premere a lungo il sensore "Interruttore
di rete" per 5-10 secondi fino a quando le luci verdi
non lampeggiano per mantenere il termoigrometro
in modalità di associazione.
Passaggio 3: Fai clic su "Aggiungi dispositivo" per
aggiungere i sensori nel gateway, quindi seleziona
"Search for Devices".
Passaggio 4: Fare clic su "La luce è in un lampo" per
collegare il sensore th e confermare.
①
Passaggio 1: Turn on the phone's bluetooth and
WiFi.
Passaggio 2: Premere a lungo il pulsante sull'hub
WiFi per 5-10 secondi finché le luci verdi non
lampeggiano per mantenere la modalità di
associazione.
Passaggio 3: Fai clic su "Aggiungi dispositivo" o in
alto a destra su "+", seleziona "Controllo
Gateway">"Socket Gateway (BLE)"> per aggiungere
l'hub WiFi nell'app.
Passaggio 4: In attesa che la connessione sia
completata al 100%.
Metodo di connessione
Passaggio 1: Dopo che il gateway si è connesso,
aggiungi un sensore all'APP.
Passaggio 2: Premere a lungo il sensore "Interrut-
tore di rete" per 5-10 secondi fino a quando le luci
verdi non lampeggiano per mantenere la modalità di
associazione termo-igrometro.
Passaggio 3: Fare clic sull'angolo in alto a destra "+",
selezionare "Sensore di protezione" > "Sensor (BLE)
per aggiungere il termoigrometro.
Passaggio 4: Fare clic sull'icona del gateway, toccare
"Add device" e selezionare >"Add existing" >"
aggiungere il termoigrometro già collegato nel
gateway.
01 02 03 04 05 06 07 08 09 10 11 12 13 14
15 16 17 18 19 20 21 22 23 24 25 26 27
28 29 30 31 32 33 34 35 36 37 38 39 40
41 42 43 44 45 46 47 48 49 50 51 52 53
54 55 56 57 58
59 60 61 62 63 64 65 66
Los sensores con concentrador wifi se pueden
usar con Alexa y Google Assistant. Puede
encontrar las instrucciones a través de los
siguientes pasos: 1. Haga clic en "Yo" --- "Icono de
Alexa y Asistente de Google" --- "Ver más formas
de vincular" --- "Instrucciones", de la misma
manera que el Asistente de Google.
a. Si trabaja con el Asistente de Google, siga con
el siguiente comando.
①OK Google, qué humedad muestra <nombre del
dispositivo>?
②OK Google, cuál es la temperatura de < nombre
del dispositivo>?
③Ok Google, cuál es el porcentaje de energía de
mi dispositivo?
Metodo di connessione
Passaggio 1: Dopo che il gateway si è connesso, fai
clic sull'icona del gateway nella pagina del gateway
per aggiungere un sensore.
Passaggio : Premere a lungo il sensore "Interruttore
di rete" per 5-10 secondi fino a quando le luci verdi
non lampeggiano per mantenere il termoigrometro
in modalità di associazione.
Passaggio 3: Fai clic su "Aggiungi dispositivo" per
aggiungere i sensori nel gateway, quindi seleziona
"Search for Devices".
Passaggio 4: Fare clic su "La luce è in un lampo" per
collegare il sensore th e confermare.
Metodo di connessione
Passaggio 1: Dopo che il gateway si è connesso,
aggiungi un sensore all'APP.
Passaggio 2: Premere a lungo il sensore "Interrut-
tore di rete" per 5-10 secondi fino a quando le luci
verdi non lampeggiano per mantenere la modalità di
associazione termo-igrometro.
Passaggio 3: Fare clic sull'angolo in alto a destra "+",
selezionare "Sensore di protezione" > "Sensor (BLE)
per aggiungere il termoigrometro.
Passaggio 4: Fare clic sull'icona del gateway, toccare
"Add device" e selezionare >"Add existing" >"
aggiungere il termoigrometro già collegato nel
gateway.
②
01 02 03 04 05 06 07 08 09 10 11 12 13 14
15 16 17 18 19 20 21 22 23 24 25 26 27
28 29 30 31 32 33 34 35 36 37 38 39 40
41 42 43 44 45 46 47 48 49 50 51 52 53
54 55 56 57 58 59
60 61 62 63 64 65 66

Los sensores con concentrador wifi se pueden
usar con Alexa y Google Assistant. Puede
encontrar las instrucciones a través de los
siguientes pasos: 1. Haga clic en "Yo" --- "Icono de
Alexa y Asistente de Google" --- "Ver más formas
de vincular" --- "Instrucciones", de la misma
manera que el Asistente de Google.
a. Si trabaja con el Asistente de Google, siga con
el siguiente comando.
①OK Google, qué humedad muestra <nombre del
dispositivo>?
②OK Google, cuál es la temperatura de < nombre
del dispositivo>?
③Ok Google, cuál es el porcentaje de energía de
mi dispositivo?
Amazon Alexa e Assistente Google
I sensori con hub wifi possono essere utilizzati con
Alexa e Google Assistant. Puoi trovare le istruzioni
tramite il seguente passaggi: 1. Fai clic su "Mi" ---
"Icona Alexa e Assistente Google" --- "Visualizza
altri modi per collegare" --- "Istruzioni", allo stesso
modo dell'Assistente Google.
a. Se lavori con l'Assistente Google, segui il
comando seguente.
①OK Google, quale umidità mostra <nome
dispositivo>?
②OK Google, qual è la temperatura di <nome
dispositivo>?
③Ok Google, qual è la percentuale di alimentazi-
one del mio dispositivo?
Metodo di connessione
Passaggio 1: Dopo che il gateway si è connesso,
aggiungi un sensore all'APP.
Passaggio 2: Premere a lungo il sensore "Interrut-
tore di rete" per 5-10 secondi fino a quando le luci
verdi non lampeggiano per mantenere la modalità di
associazione termo-igrometro.
Passaggio 3: Fare clic sull'angolo in alto a destra "+",
selezionare "Sensore di protezione" > "Sensor (BLE)
per aggiungere il termoigrometro.
Passaggio 4: Fare clic sull'icona del gateway, toccare
"Add device" e selezionare >"Add existing" >"
aggiungere il termoigrometro già collegato nel
gateway.
Nota: assicurati che Bluetooth e Wi-Fi sul telefono
siano attivi durante l'associazione. Controllare i
passaggi precedenti e riprovare se l'associazione
non riesce.
4
01 02 03 04 05 06 07 08 09 10 11 12 13 14
15 16 17 18 19 20 21 22 23 24 25 26 27
28 29 30 31 32 33 34 35 36 37 38 39 40
41 42 43 44 45 46 47 48 49 50 51 52 53
54 55 56 57 58 59 60
61 62 63 64 65 66
A2. Comprobar si:
a. El dispositivo debe colocarse dentro de la
cobertura de la señal del enrutador. Asegúrese de
que la distancia entre el dispositivo y el enrutador
sea inferior a 15 m/49,2 pies.
b. Confirme que el dispositivo está en modo de
conexión. (La luz indicadora del modo EZ parpadea
cada 0,5 segundos)
c. Confirme que la red WiFi es de 2,4 Ghz, no de 5
Ghz.
d. Please check whether the battery is running low.
e. Compruebe si la batería se está agotando.
Verifique si el dispositivo está agregado en la puerta
de enlace.
I sensori con hub wifi possono essere utilizzati con
Alexa e Google Assistant. Puoi trovare le istruzioni
tramite il seguente passaggi: 1. Fai clic su "Mi" ---
"Icona Alexa e Assistente Google" --- "Visualizza
altri modi per collegare" --- "Istruzioni", allo stesso
modo dell'Assistente Google.
a. Se lavori con l'Assistente Google, segui il
comando seguente.
①OK Google, quale umidità mostra <nome
dispositivo>?
②OK Google, qual è la temperatura di <nome
dispositivo>?
③Ok Google, qual è la percentuale di alimentazi-
one del mio dispositivo?
Q1: Perché è necessario abilitare l'autorizzazione
alla posizione?
b. Se lavori con Amazon Alexa, segui il comando
seguente.
①Alexa, qual è la batteria di <nome dispositivo>?
②Alexa, qual è l'umidità di <nome dispositivo>?
③Alexa, qual è la temperatura di <nome
dispositivo>?
01 02 03 04 05 06 07 08 09 10 11 12 13 14
15 16 17 18 19 20 21 22 23 24 25 26 27
28 29 30 31 32 33 34 35 36 37 38 39 40
41 42 43 44 45 46 47 48 49 50 51 52 53
54 55 56 57 58 59 60 61
62 63 64 65 66

A2. Comprobar si:
a. El dispositivo debe colocarse dentro de la
cobertura de la señal del enrutador. Asegúrese de
que la distancia entre el dispositivo y el enrutador
sea inferior a 15 m/49,2 pies.
b. Confirme que el dispositivo está en modo de
conexión. (La luz indicadora del modo EZ parpadea
cada 0,5 segundos)
c. Confirme que la red WiFi es de 2,4 Ghz, no de 5
Ghz.
d. Please check whether the battery is running low.
e. Compruebe si la batería se está agotando.
Verifique si el dispositivo está agregado en la puerta
de enlace.
Q2.I motivi della connessione non riuscita
Q3: Perché i valori di temperatura e umidità non
cambiano?
A2. Controlla se:
a. Il dispositivo deve essere posizionato all'interno
della copertura del segnale del router. Assicurati che
la distanza tra il dispositivo e il router sia inferiore a
15 m/49,2 piedi.
b. Confermare che il dispositivo è in modalità di
connessione. (La spia della modalità EZ lampeggia
ogni 0,5 secondi.)
c. Si prega di confermare che la rete WiFi è 2,4 Ghz,
non 5 Ghz.
d. Si prega di verificare se la batteria si sta esauren-
do.
e. Si prega di verificare se il dispositivo è stato
aggiunto nel gateway.gateway.
A2: Verificare se:
a. Verifica se il dispositivo è online.
b. Si prega di verificare se la batteria si sta esaurendo.
c. Non vi è alcun cambiamento nella temperatura
ambiente.
d. Assicurati che la distanza tra il dispositivo e il
telefono sia inferiore a 15 m/49,2 piedi.
Q1: Perché è necessario abilitare l'autorizzazione
alla posizione?
A1: Se non si abilita l'autorizzazione alla posizione
sul telefono, le funzioni di Intelligent Linkage non
possono funzionare.
5
FQA
01 02 03 04 05 06 07 08 09 10 11 12 13 14
15 16 17 18 19 20 21 22 23 24 25 26 27
28 29 30 31 32 33 34 35 36 37 38 39 40
41 42 43 44 45 46 47 48 49 50 51 52 53
54 55 56 57 58 59 60 61 62
63 64 65 66

A2. Comprobar si:
a. El dispositivo debe colocarse dentro de la
cobertura de la señal del enrutador. Asegúrese de
que la distancia entre el dispositivo y el enrutador
sea inferior a 15 m/49,2 pies.
b. Confirme que el dispositivo está en modo de
conexión. (La luz indicadora del modo EZ parpadea
cada 0,5 segundos)
c. Confirme que la red WiFi es de 2,4 Ghz, no de 5
Ghz.
d. Please check whether the battery is running low.
e. Compruebe si la batería se está agotando.
Verifique si el dispositivo está agregado en la puerta
de enlace.
Q3: Perché i valori di temperatura e umidità non
cambiano?
A2. Controlla se:
a. Il dispositivo deve essere posizionato all'interno
della copertura del segnale del router. Assicurati che
la distanza tra il dispositivo e il router sia inferiore a
15 m/49,2 piedi.
b. Confermare che il dispositivo è in modalità di
connessione. (La spia della modalità EZ lampeggia
ogni 0,5 secondi.)
c. Si prega di confermare che la rete WiFi è 2,4 Ghz,
non 5 Ghz.
d. Si prega di verificare se la batteria si sta esauren-
do.
e. Si prega di verificare se il dispositivo è stato
aggiunto nel gateway.gateway.
A2: Verificare se:
a. Verifica se il dispositivo è online.
b. Si prega di verificare se la batteria si sta esaurendo.
c. Non vi è alcun cambiamento nella temperatura
ambiente.
d. Assicurati che la distanza tra il dispositivo e il
telefono sia inferiore a 15 m/49,2 piedi.
Q1: Perché è necessario abilitare l'autorizzazione
alla posizione?
6
Suggerimenti caldi
2
1
Il sensore dovrebbe funzionare in un ambiente
con una temperatura compresa tra -20~60℃
(-4~140℉) e un'umidità compresa tra
0-100%UR.
Non immergere il sensore in acqua e metterlo in
frigorifero. Il frigorifero o il congelatore
bloccheranno il segnale.
3
La migliore portata tra il termoigrometro e l'hub
wifi è entro 15 m/49,2 piedi nell'area aperta.
01 02 03 04 05 06 07 08 09 10 11 12 13 14
15 16 17 18 19 20 21 22 23 24 25 26 27
28 29 30 31 32 33 34 35 36 37 38 39 40
41 42 43 44 45 46 47 48 49 50 51 52 53
54 55 56 57 58 59 60 61 62 63
64 65 66
A2: Verificare se:
a. Verifica se il dispositivo è online.
b. Si prega di verificare se la batteria si sta esaurendo.
c. Non vi è alcun cambiamento nella temperatura
ambiente.
d. Assicurati che la distanza tra il dispositivo e il
telefono sia inferiore a 15 m/49,2 piedi.
4
5
6
7
Il sensore rileva la temperatura e l'umidità
dell'aria attraverso i fori nella parte anteriore e
in basso, si prega di non coprire i fori.
Assicurati che l'hub wifi sia il più vicino
possibile al router.
Assicurati che il segnale eviti di viaggiare
attraverso più muri, sporcizia o spesse barriere
di acciaio.
Sostituire le batterie quando l'indicatore di
batteria scarica appare sul display.
In caso di domande sul prodotto, fare clic su
"Contact" nella pagina dell'app per contattarci.
7
Assistenza post-vendita
1
01 02 03 04 05 06 07 08 09 10 11 12 13 14
15 16 17 18 19 20 21 22 23 24 25 26 27
28 29 30 31 32 33 34 35 36 37 38 39 40
41 42 43 44 45 46 47 48 49 50 51 52 53
54 55 56 57 58 59 60 61 62 63 64
65 66

Il termoigrometro ha 1 anno di garanzia dal
giorno dell'acquisto. In caso di domande, non
esitare a contattare tramite
[email protected]om. Ti risponderemo e
risponderemo entro 24 ore.
Si verificano problemi dovuti al suo utilizzo per
altri scopi, o all'uso improprio o all'uso di
componenti non forniti da Diivoo.
Danni causati da un uso improprio, ad esempio
installazione errata della batteria, danni artificiali,
ecc.
Non sono incluse le seguenti condizioni:
3
2
In caso di domande sul prodotto, fare clic su
"Contact" nella pagina dell'app per contattarci.
Company: E-CrossStu GmbH
Address: Mainzer Landstr.69,60329 Frankfurt am Main
Company Name: YH Consulting Limited
Address: C/O YH Consulting Limited Office
147, Centurion House, London Road,
Staines-upon-Thames, Surrey, TW18 4AX
01 02 03 04 05 06 07 08 09 10 11 12 13 14
15 16 17 18 19 20 21 22 23 24 25 26 27
28 29 30 31 32 33 34 35 36 37 38 39 40
41 42 43 44 45 46 47 48 49 50 51 52 53
54 55 56 57 58 59 60 61 62 63 64 65
66
