
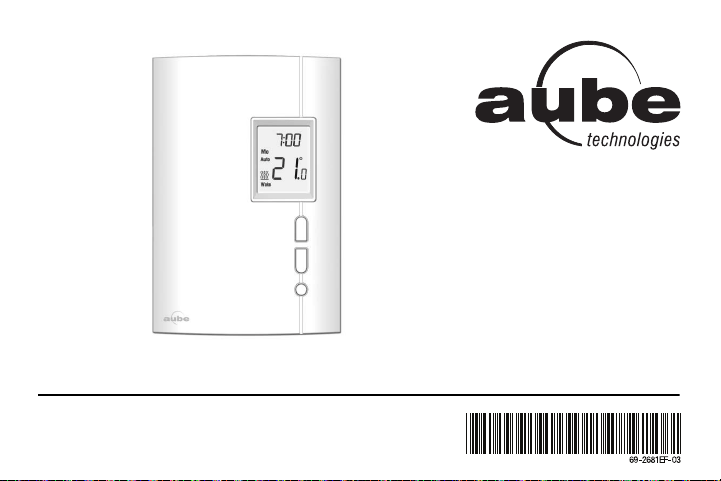
TH404
Programmable Thermostat
Owner’s Guide
69-2681EF-03.book Page -1 Tuesday, February 26, 2013 1:16 PM

Overview
About your new thermostat .............. 1
Quick reference to controls .............. 2
Quick reference to screen display.... 3
Installation
Removing the faceplate.................... 4
Wiring ............................................... 5
Installing the thermostat ................... 6
Quick start-up / Setting the clock...... 7
Operating modes
Automatic (Auto) mode..................... 8
Manual (Man) mode ......................... 9
Away mode..................................... 10
Countdown mode ............................11
Configuration
Default schedule............................. 12
Modifying the schedule................... 13
Setup menu .................................... 14
Setup procedure ............................. 16
Appendices
In case of difficulty .......................... 17
Specifications.................................. 18
3-year limited warranty ................... 19
Customer assistance...................... 20
Table of contents
69-2681EF-03.book Page 0 Tuesday, February 26, 2013 1:16 PM
TH404
1
This thermostat has been designed to control an electric heating system such as
a baseboard heater, a radiant ceiling, a convector or a fan-forced heater.
The thermostat CANNOT be used with:
• a resistive load under 0.83 A
• a resistive load over 10.4 A
• a system driven by a contactor or a relay (inductive load)
• a central heating system
SUPPLIED PARTS
• One (1) thermostat
• Two (2) 6-32 mounting screws
• Two (2) solderless connectors
About your new thermostat
69-2681EF-03.book Page 1 Tuesday, February 26, 2013 1:16 PM
Owner’s Guide
2
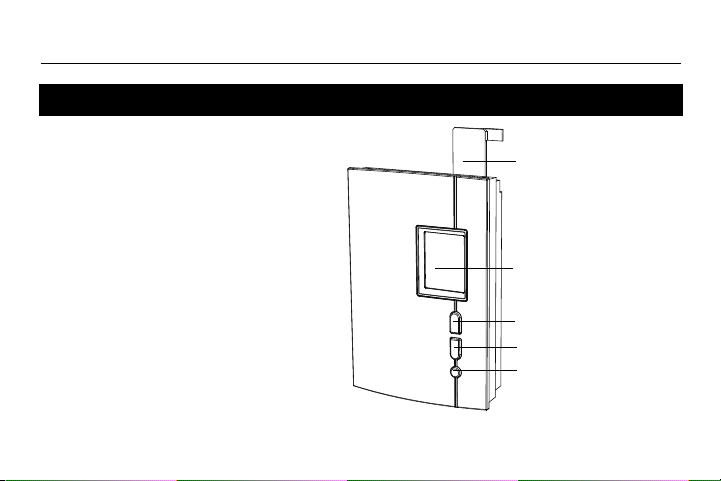
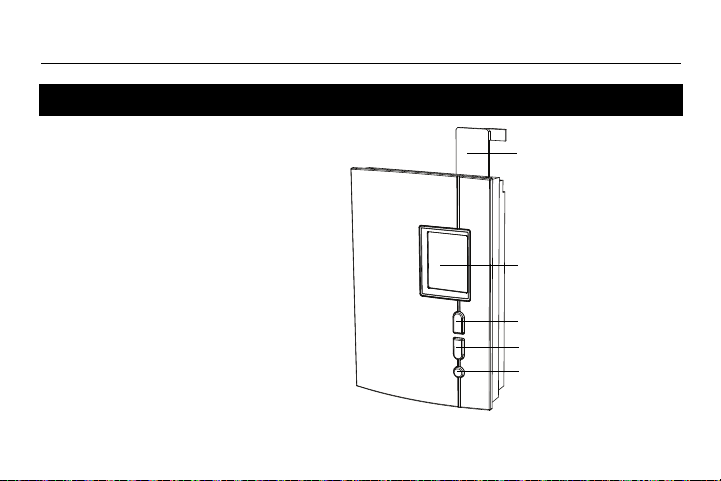
• To turn the screen backlight on,
press the Select button once. The
backlight will remain on for 12
seconds.
• To display the setpoint
temperature, press the Up or
Down button once. The setpoint
will be displayed for 5 seconds.
• To modify the setpoint
temperature, press the Up or
Down button until the desired value
is displayed.
• To enter or exit the programming
mode, press the Select button and
hold for 3 seconds.
Quick reference to controls
Up button
Down button
Select button
Help tab
Slide up at the
right and remove
to view information
on both sides.
Screen
69-2681EF-03.book Page 2 Tuesday, February 26, 2013 1:16 PM
TH404
3
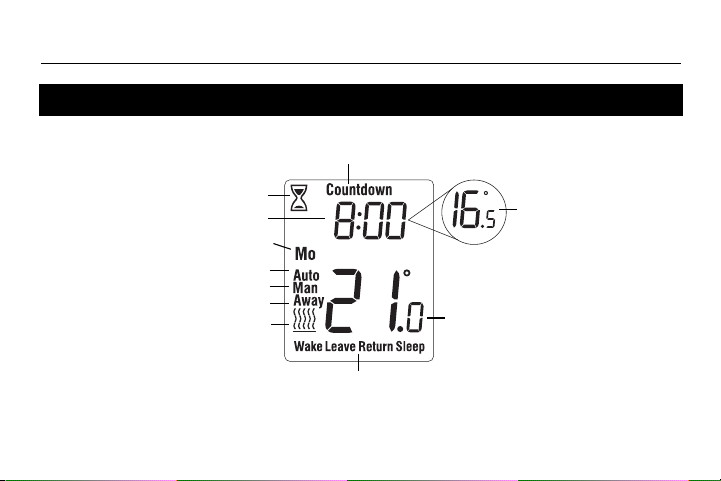
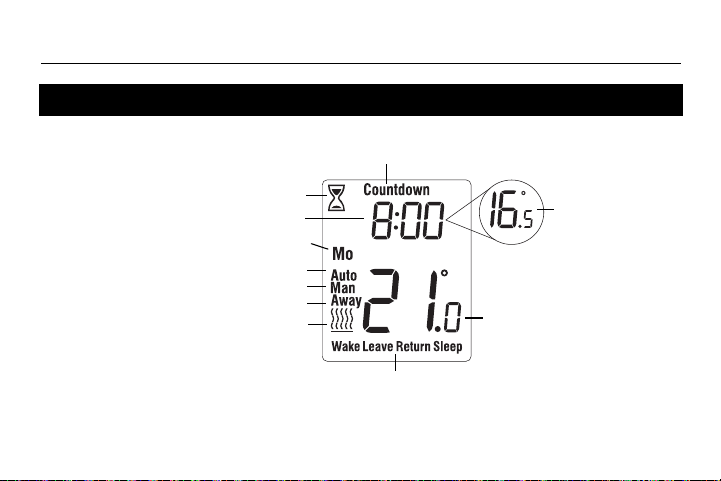
Quick reference to screen display
Ambient temperature
Heating intensity indicator
(No icon appears when
heating is off.)
Time
Periods (see page 12)
Countdown mode (see page 11)
Manual mode (see page 9)
Day
Automatic mode (see page 8)
Away mode (see page 10)
Setpoint temperature
(see page 2)
Flashes during
Countdown mode
69-2681EF-03.book Page 3 Tuesday, February 26, 2013 1:16 PM
Owner’s Guide
4
TURN OFF POWER OF THE HEATING
SYSTEM AT THE MAIN ELECTRICAL
PANEL TO AVOID ELECTRIC SHOCK.
WARNING: Installation must be carried
out by a certified electrician and must
comply with national and local electrical
codes.
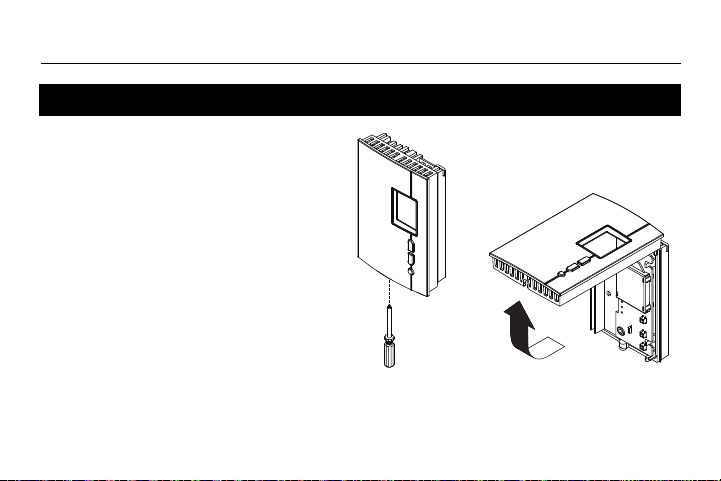
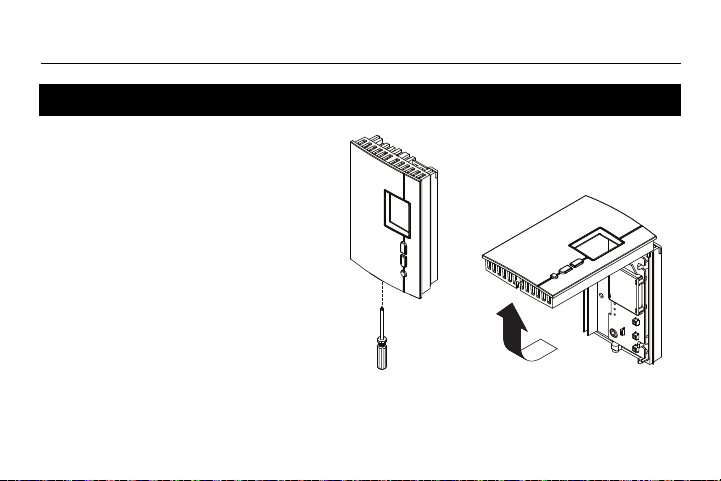
Loosen the screw holding the faceplate to
the base. The screw cannot be completely
removed and remains captive on the base.
Remove the faceplate from the base by
pulling the bottom section.
Removing the faceplate
69-2681EF-03.book Page 4 Tuesday, February 26, 2013 1:16 PM

TH404
5
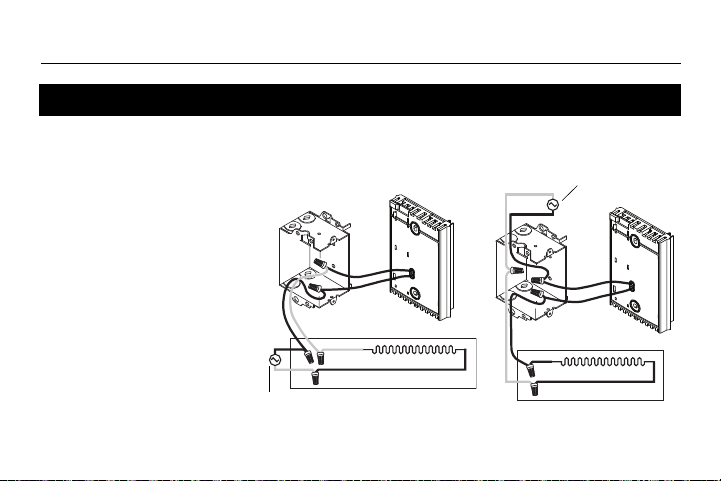
Connect either one of the
thermostat wires to the
heater wire and the other
one to the power supply
wire using solderless
connectors for copper wires.
NOTE: Special CO/ALR
solderless connectors must
be used when connecting
with aluminium conductors.
Wiring
2-wire installation
4-wire installation
Power supply
Power supply
69-2681EF-03.book Page 5 Tuesday, February 26, 2013 1:16 PM
Owner’s Guide
6
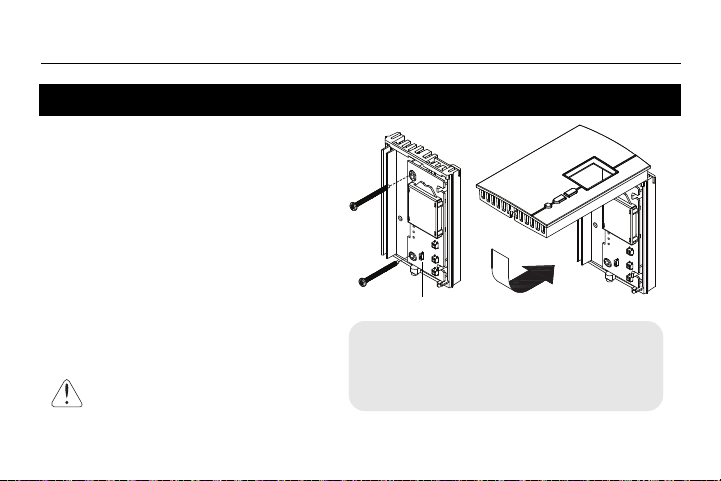
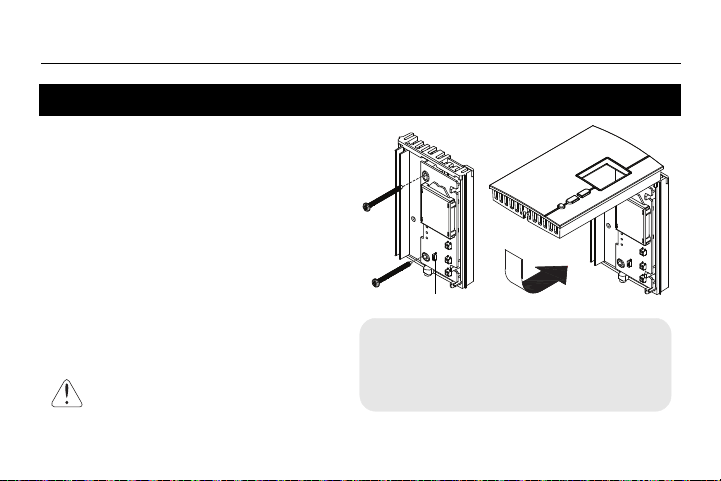
1) Install the base onto an electrical box.
2) Place the FAN switch as follows:
Place at Yes if you have a fan-forced
heater (to prevent premature burnout
of the motor).
Leave at No for better temperature
regulation if you do not have a
fan-forced heater.
3) Reinstall the faceplate on the base and
secure it in place with the screw.
4) Apply power to the thermostat at the
main electrical panel.
Installing the thermostat
Keep air vents at top and
bottom of thermostat clean and
unobstructed at all times.
FAN switch
If you change the FAN switch position after you
have already applied power to the thermostat,
disconnect power to the thermostat at the
electrical panel for 3 seconds. The thermostat
will use the new setting when you reapply power.
69-2681EF-03.book Page 6 Tuesday, February 26, 2013 1:16 PM
TH404
7
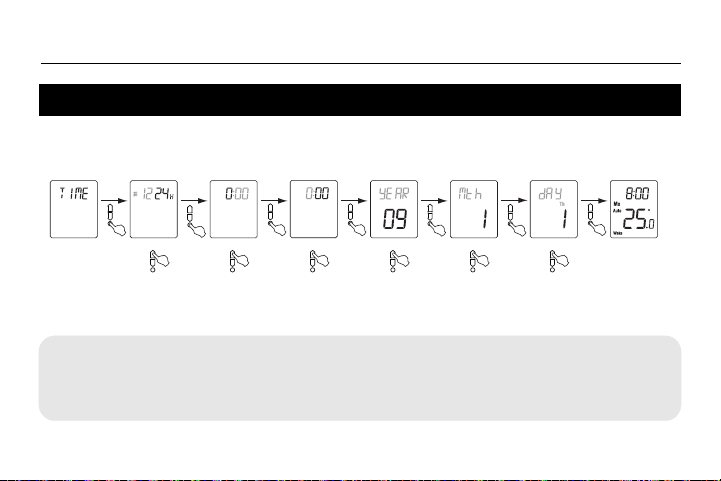
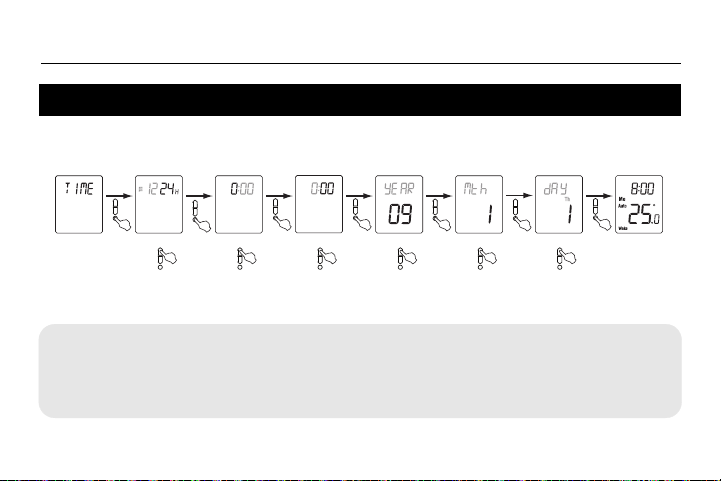
When you power the thermostat, the Time menu flashes on the screen. Set the
thermostat’s clock and date as follows:
NOTE: At any time, you can access the Time menu by pressing the Select button
for 3 seconds and then pressing the Down button once.
Quick Start-up / Setting the clock and date
Time Menu
Select the format Set the hour
Set the minutes
Set the year
Set the month
Set the date
Normal display
Your new thermostat is already preprogrammed
and is now controlling the temperature!
69-2681EF-03.book Page 7 Tuesday, February 26, 2013 1:16 PM
Owner’s Guide
8
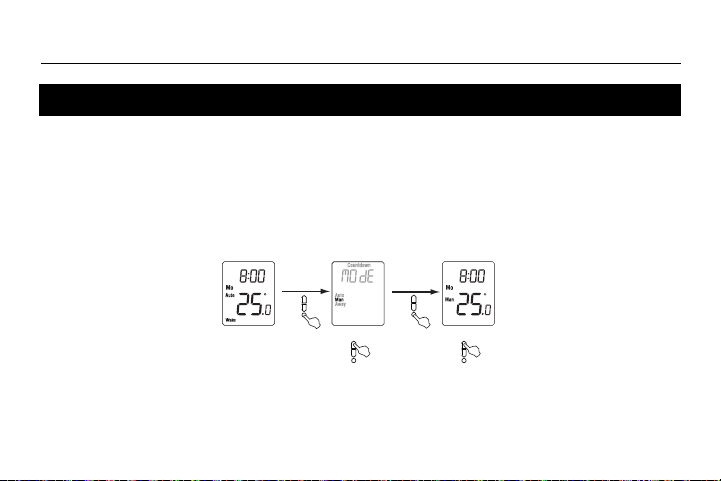
In Automatic mode, the thermostat follows the programmed schedule (see page 12).
To place the thermostat in Automatic (Auto) mode:
Temporary override
While the thermostat is in Automatic mode, you can press the Up or Down button to modify
the temperature. The new temperature will be used until the end of the current period. Auto
will flash during the override. You can cancel the override by pressing the Select button twice
to return to Automatic mode.
Automatic (Auto) mode
Normal display
Auto mode
Select Auto
69-2681EF-03.book Page 8 Tuesday, February 26, 2013 1:16 PM
TH404
9
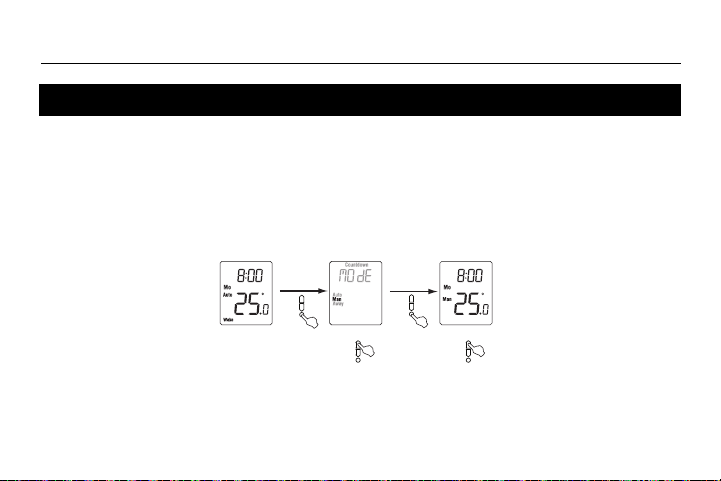
Use the Manual mode if you wish to keep the thermostat at the same
temperature indefinitely. In this mode, the thermostat will remain at this
temperature until you press the Up or Down button to change it.
To place the thermostat in Manual (Man) mode:
Manual (Man) mode
Set temperature
Normal display
Manual mode
Select Manual
69-2681EF-03.book Page 9 Tuesday, February 26, 2013 1:16 PM

Owner’s Guide
10
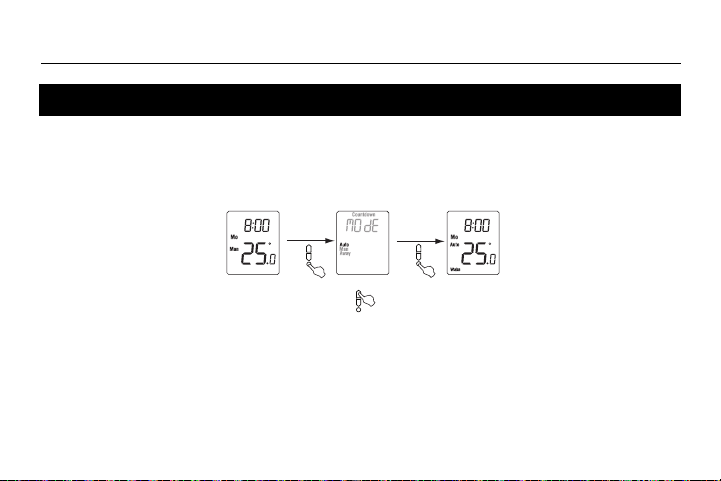
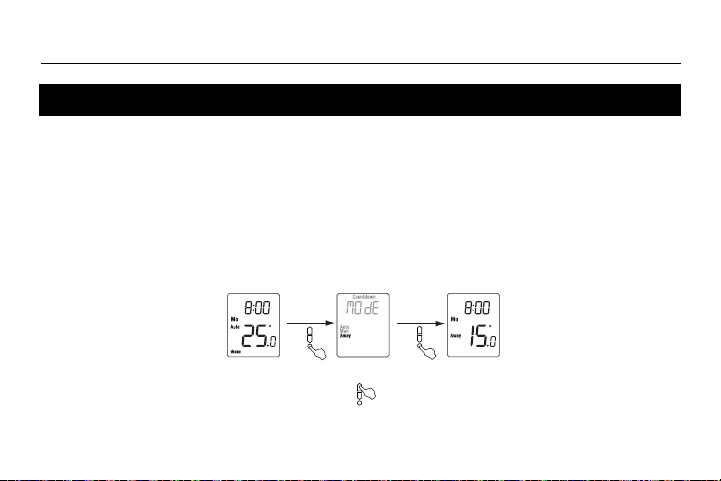
The Away mode can be used when you are away for an undetermined length of time. For frost
protection while saving energy, the Away temperature is set by default at 15°C (59°F) and
cannot be modified by simply pressing the Up or Down button. To modify the Away
temperature, see page 16.
NOTE: The Away mode can also be used to prevent tampering of the setpoint temperature in
the summer season when heating is not required.
To place the thermostat in Away mode:
Away mode
Normal display
Away mode
Select Away
69-2681EF-03.book Page 10 Tuesday, February 26, 2013 1:16 PM

TH404
11
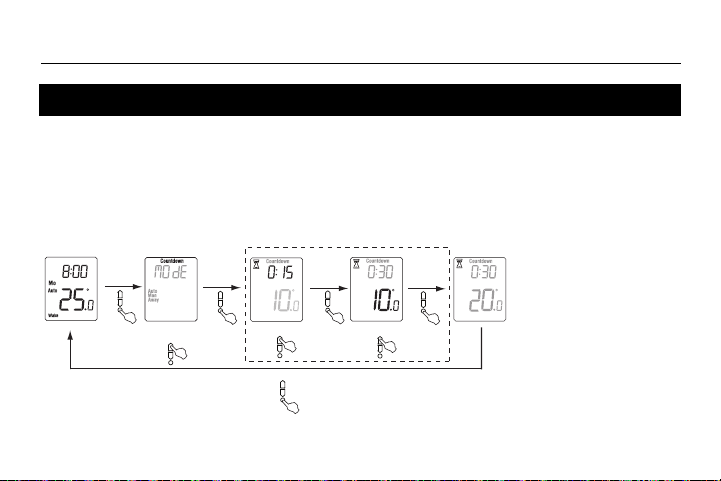
Use the Countdown mode if you wish to keep the same temperature for a predetermined length of
time. The choices of countdown times are: 15, 30 or 45 min, or 1, 2, 4, 8, 12 or 18 hr, or 1 to 14 days.
At the end of the countdown, the thermostat automatically returns to the previous mode and uses the
temperature programmed for that mode. At any time, you can cancel the Countdown mode by
pressing the Select button.
To place the thermostat in Countdown mode:
Countdown mode
Set time
Normal display
Select Countdown
Set temperature
Countdown
mode
To cancel the Countdown mode
Optional (last settings are used by default)
NOTE:
At any time during the
Countdown mode, you
can adjust the count-
down time and tem-
perature by perform-
ing the steps shown
inside the dotted rect-
angle.
69-2681EF-03.book Page 11 Tuesday, February 26, 2013 1:16 PM
Owner’s Guide
12
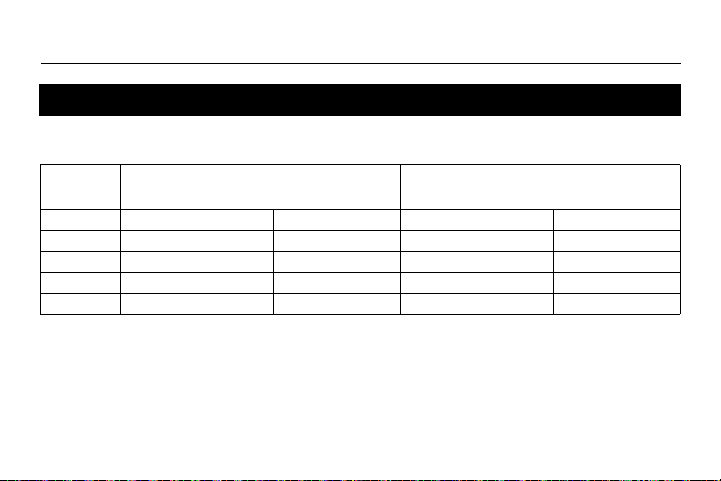
When placed in Automatic mode (see page 8), the thermostat follows the programmed
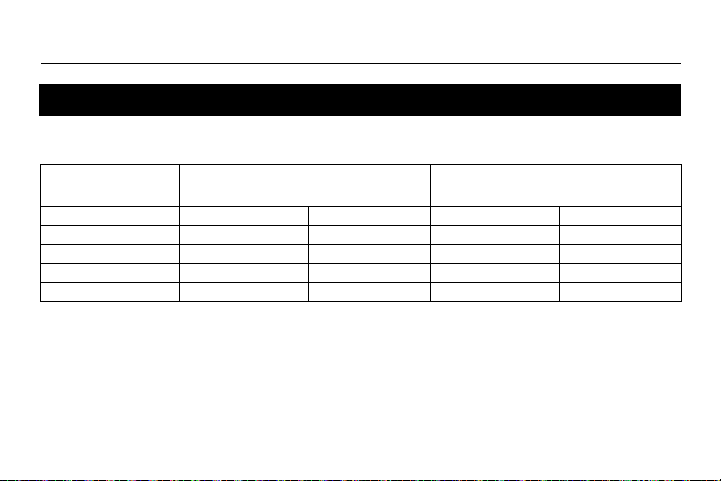
schedule. By default, the thermostat is programmed with the following schedule:
The schedule consists of 4 periods per day, which represents a typical work day. However, you
can program the thermostat to skip (cancel) the periods that do not apply to your situation. For
example,
Leave
and
Return
periods are skipped for the weekend in the default schedule.
You can choose a different program every day; i.e., each period can have a different starting
time and a different temperature every day.
Default schedule
Monday to Friday
(Mo, Tu, We, Th & Fr)
Saturday and Sunday
(Sa & Su)
Period Starting time Temperature Starting time Temperature
Wake 6:00 (6:00 AM) 21.0°C (70°F) 6:00 (6:00 AM) 21.0°C (70°F)
Leave 8:00 (8:00 AM) 16.5°C (62°F) -:-- -
Return 18:00 (6:00 PM) 21.0°C (70°F) -:-- -
Sleep 22:00 (10:00 PM) 16.5°C (62°F) 22:00 (10:00 PM) 16.5°C (62°F)
69-2681EF-03.book Page 12 Tuesday, February 26, 2013 1:16 PM

TH404
13
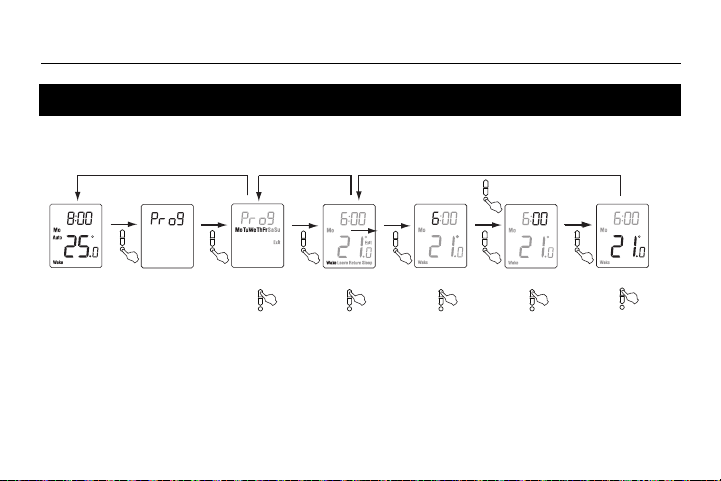
To modify the schedule, proceed as follows:
To skip a period
: When the hour or the temperature of the period is flashing, press the
Up
and
Down
buttons at the same time. (Alternatively, set its hour between 23:00 [11:00 PM] and 0:00 [midnight] or
its temperature below 5°C [41°F].) Its time and temperature display will be replaced by dashes (-).
NOTE:
If you do not press any button for one minute,
the thermostat will automatically save any
changes you have made and will
return to its normal display
.
Modifying the schedule
Program menu
(3 sec.)
Select the days*
Normal display
Select the period
Set the hour
Set the minutes
Set the temperature
Select Exit to return to
the day selection menu
Select Exit to return
to normal display
* The days can be selected collectively (Monday to Friday, Saturday & Sunday, or Monday to Sunday) or individually.
69-2681EF-03.book Page 13 Tuesday, February 26, 2013 1:16 PM

Owner’s Guide
14
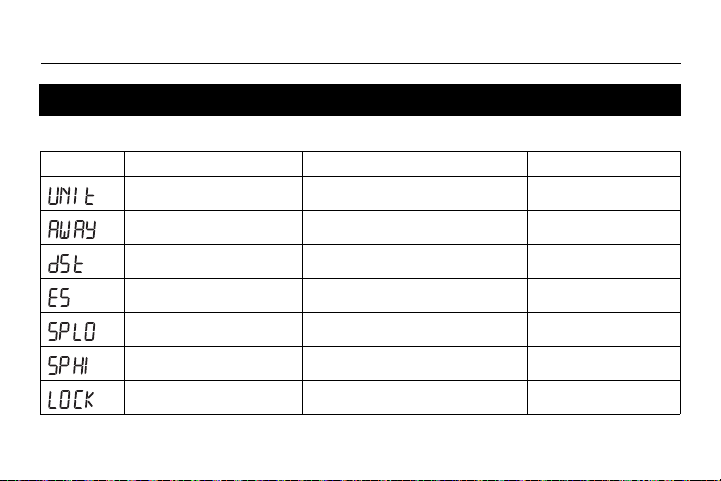
To modify the menu parameters, see page 16.
Setup menu (1/2)
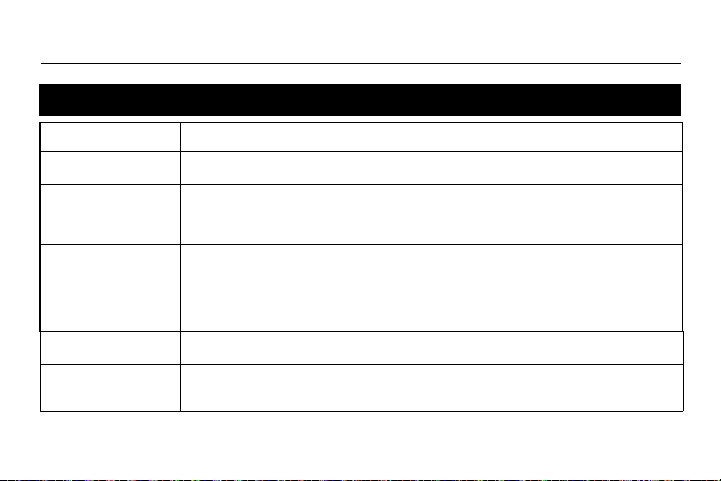
Display Parameter Options Default setting
Temperature unit °C / °F °C
Away temperature
1
5°C - 30°C (41°F - 86°F) 15°C (59°F)
Daylight Saving Time
2
On / Off On
Early Start
3
On / Off Off
Minimum setpoint
4
5°C - 30°C (41°F - 86°F) 5°C (41°F)
Maximum setpoint
4
5°C - 30°C (41°F - 86°F) 30°C (86°F)
Keypad lock
5
On / Off Off
69-2681EF-03.book Page 14 Tuesday, February 26, 2013 1:16 PM

TH404
15
1
Away temperature
Set the temperature you wish to use when the thermostat is in Away mode (see page 10).
2
Daylight Saving Time
When the Daylight Saving Time function is enabled (On), the thermostat automatically switches to Daylight
Saving Time on the second Sunday of March and to normal time on the first Sunday of November.
3
Early Start
Early Start is used in Automatic mode only. When Early Start is enabled (On), the thermostat determines
when to start heating so the desired temperature is attained at the beginning of Wake and Return periods.
When Early Start is disabled (Off), heating starts only at the beginning of Wake and Return periods; thus
there is a delay before you reach the desired temperature.
4
Minimum and maximum setpoints
These parameters are used to modify the setpoint range and are applicable in all operating modes.
5
Keypad Lock
When keypad lock is enabled (On), no other setting change is permitted on the thermostat. The message
Lock appears when you try to change any other setting.
Setup menu (2/2)
69-2681EF-03.book Page 15 Tuesday, February 26, 2013 1:16 PM
Owner’s Guide
16
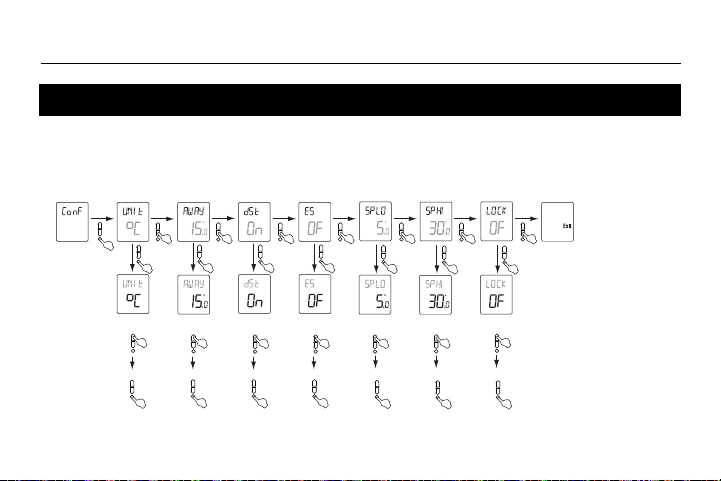
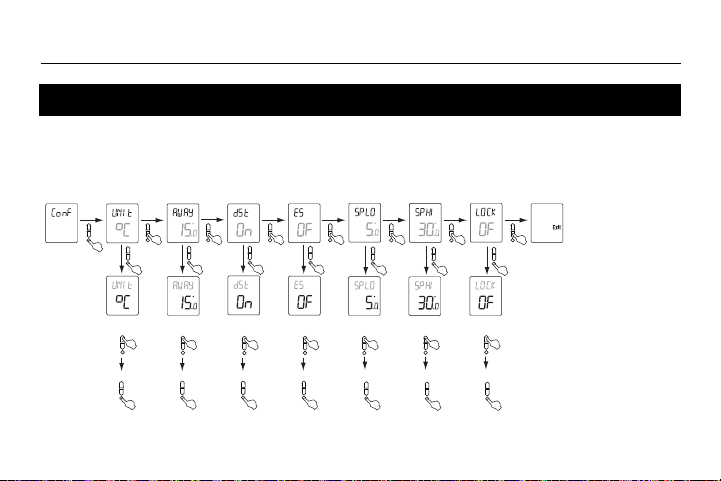
The Configuration menu is shown below.
1) Press the Select button for 3 seconds to enter the main menu.
2) Press the Up button twice to enter the Configuration (Conf) menu.
Setup procedure
Configuration
Menu
Set unit of
temperature
Set Away
temperature
Set Daylight
Saving Time
Set
Early Start
To confirm To confirm To confirm
To confirm
Set
keypad lock
Set minimum
setpoint
Set maximum
setpoint
To confirm To confirm
To confirm
NOTE
: If you do not
press any button for one
minute,
the thermostat
will automatically save
any changes you have
made and will
return to
its normal display
.
69-2681EF-03.book Page 16 Tuesday, February 26, 2013 1:16 PM
TH404
17
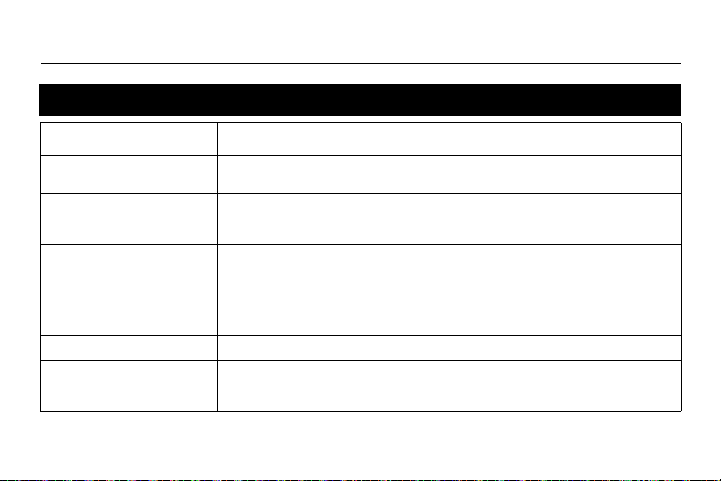
In case of difficulty
PROBLEMS SOLUTIONS
Thermostat is hot.
This is normal. Ensure that the heater capacity does not exceed the thermostat’s maximum
load. Keep thermostat air vents clean and unobstructed at all times.
Displayed temperature is incor-
rect.
Remediate if any the following conditions exists:
• The thermostat is exposed to air draft.
• The thermostat is located near or above a heat source such as a light dimmer.
• The thermostat displays LP
instead of the temperature.
• The screen is blank.
The thermostat is currently without power. This can happen in either condition:
• There is a power outage.
• The thermal protection device on the heater is opened. This can happen if the heater is
obstructed by furniture or curtain and has overheated, or if the heater’s thermal protection
device is too sensitive.
LP appears for the first five minutes. Then the screen becomes blank.
TIME is flashing. The thermostat was without power for more than 4 hours. Set its clock and date (Time menu).
Temperature does not change
according to the programmed
schedule.
• Ensure the thermostat is in Automatic mode.
• Check the clock (Time menu) and the schedule (Prog menu). If the thermostat is config-
ured for 12-hour format, ensure that AM or PM appears on the screen.
69-2681EF-03.book Page 17 Tuesday, February 26, 2013 1:16 PM

Owner’s Guide
18
- Supply: 120/240 VAC, 60 Hz
- Minimum load: 0.83 A (resistive only)
200 W @ 240 VAC
100 W @ 120 VAC
- Maximum load: 10.4 A (resistive only)
2500 W @ 240 VAC
1250 W @ 120 VAC
- Setpoint range: 5°C to 30°C (41°F to 85°F)*
- Display range: 0°C to 37°C (32°F to 99°F)
- Setpoint/display resolution: ±0.5°C (±1°F)
- Operation: 0°C to 50°C (32°F to 120°F)
- Storage: -20°C to 50°C (-4°F to 120°F)
- Permanent memory: You do not need to adjust the temperature settings or the thermostat’s configurations
following a power outage. However, you might need to set the thermostat’s clock and
date if the outage lasts more than 4 hours.
* The setpoint range can be modified by setting the minimum and maximum setpoints (see page 14).
Specifications
69-2681EF-03.book Page 18 Tuesday, February 26, 2013 1:16 PM
TH404
19
Honeywell warrants this product, excluding battery, to be free from defects in the workmanship or materials, under normal use and
service, for a period of three (3) years from the date of purchase by the consumer. If at any time during the warranty period the
product is determined to be defective or malfunctions, Honeywell shall repair or replace it (at Honeywell's option).
If the product is defective,
(i) return it, with a bill of sale or other dated proof of purchase, to the place from which you purchased it, or
(ii) contact Honeywell. Honeywell will make the determination whether the product should be returned, or whether a replace-
ment product can be sent to you.
This warranty does not cover removal or reinstallation costs. This warranty shall not apply if it is shown by Honeywell that the defect
or malfunction was caused by damage which occurred while the product was in the possession of a consumer.
Honeywell's sole responsibility shall be to repair or replace the product within the terms stated above. HONEYWELL SHALL NOT
BE LIABLE FOR ANY LOSS OR DAMAGE OF ANY KIND, INCLUDING ANY INCIDENTAL OR CONSEQUENTIAL DAMAGES
RESULTING, DIRECTLY OR INDIRECTLY, FROM ANY BREACH OF ANY WARRANTY, EXPRESS OR IMPLIED, OR ANY
OTHER FAILURE OF THIS PRODUCT. Some provinces, states or regions do not allow the exclusion or limitation of incidental or
consequential damages, so this limitation may not apply to you.
THIS WARRANTY IS THE ONLY EXPRESS WARRANTY HONEYWELL MAKES ON THIS PRODUCT. THE DURATION OF ANY
IMPLIED WARRANTIES, INCLUDING THE WARRANTIES OF MERCHANTABILITY AND FITNESS FOR A PARTICULAR PUR-
POSE, IS HEREBY LIMITED TO THE THREE-YEAR DURATION OF THIS WARRANTY. Some provinces, states or regions do not
allow limitations on how long an implied warranty lasts, so the above limitation may not apply to you.
This warranty gives you specific legal rights, and you may have other rights which vary from one province, state or region to
another.
3-year limited warranty
69-2681EF-03.book Page 19 Tuesday, February 26, 2013 1:16 PM
Owner’s Guide
Printed in USA 20 02-2013
If you have any questions about the product, contact us at:
705 Montrichard
Saint-Jean-sur-Richelieu, Quebec
J2X 5K8
Canada
Tel: 1-800-831-AUBE (2823)
Email: aube.service@honeywell.com
For more information on our products, go to
www.aubetech.com
Customer assistance
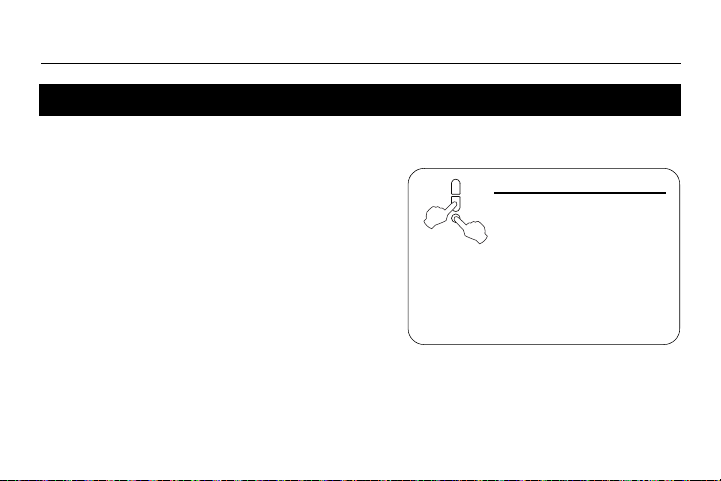
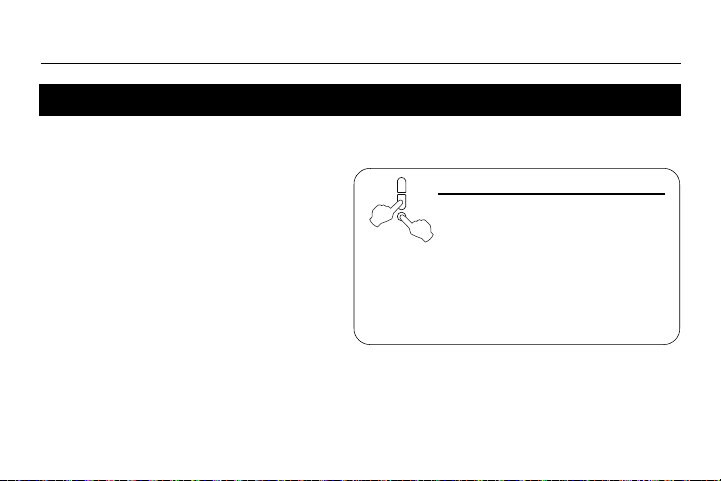
To reset the thermostat,
press both Down and
Select buttons and hold.
After 3 seconds, RST
appears. After the next 5 seconds,
when RST disappears, release the
buttons. Except for the time and
date, the thermostat has now
returned to its default settings.
69-2681EF-03.book Page 20 Tuesday, February 26, 2013 1:16 PM
TH404
Thermostat programmable
Guide du propriétaire
69-2681EF-03.book Page -1 Tuesday, February 26, 2013 1:16 PM

Aperçu
À propos du thermostat ............................. 1
Coup d’œil rapide sur les commandes...... 2
Coup d’œil rapide sur l’affichage............... 3
Installation
Enlever la façade ...................................... 4
Branchement............................................. 5
Installer le thermostat................................ 6
Démarrage rapide / Réglage de l’horloge . 7
Modes de fonctionnement
Mode Automatique (Auto) ......................... 8
Mode Manuel (Man).................................. 9
Mode Absence (Away) ............................ 10
Mode Compte à rebours (Countdown).....11
Configuration
Horaire par défaut....................................12
Modification de l’horaire........................... 13
Menu de configuration.............................14
Étapes de configuration........................... 16
Annexes
En cas de difficulté .................................. 17
Fiche technique ....................................... 18
Garantie limitée de 3 ans ........................ 19
Service à la clientèle ............................... 20
Table des matières
69-2681EF-03.book Page 0 Tuesday, February 26, 2013 1:16 PM
TH404
1
Ce thermostat a été conçu pour commander un appareil de chauffage électrique tel
qu’une plinthe chauffante, un plafond radiant, un convecteur ou un ventilo-convecteur.
Ce thermostat NE PEUT être utilisé avec :
• une charge résistive inférieure à 0,83 A
• une charge résistive supérieure à 10,4 A
• un appareil muni d’un contacteur ou d’un relais (charge inductive)
• un système de chauffage central
PIÈCES FOURNIES
• Un (1) thermostat
• Deux (2) vis de montage 6-32
• Deux (2) connecteurs sans soudure
À propos du thermostat
69-2681EF-03.book Page 1 Tuesday, February 26, 2013 1:16 PM
Guide du propriétaire
2
• Pour activer le rétroéclairage,
appuyer une fois sur le bouton
Sélection. Le rétroéclairage restera
activé pendant 12 secondes.
• Pour visualiser la température de
consigne, appuyer une fois sur le
bouton Haut ou Bas. La consigne
s’affichera pendant 5 secondes.
• Pour modifier la température de
consigne, appuyer sur le bouton
Haut ou Bas jusqu’à ce que la
valeur désirée soit affichée.
• Pour entrer ou sortir du mode de
programmation, appuyer sur le
bouton Sélection et le maintenir
enfoncé pendant 3 secondes.
Coup d’œil rapide sur les commandes
Bouton Haut
Onglet d’aide
Glisser vers le
haut et retirer pour
voir l’information
sur les deux côtés.
Bouton Sélection
Bouton Bas
Écran
69-2681EF-03.book Page 2 Tuesday, February 26, 2013 1:16 PM
TH404
3
Coup d’œil rapide sur l’affichage
Température ambiante
Indicateur de l’intensité du chauffage
(L’absence de l’icône indique l’arrêt
du chauffage.)
Heure
Périodes (voir la page 12)
Mode Compte à rebours (voir la page 11)
Mode Manuel (voir la page 9)
Jour
Mode Automatique (voir la page 8)
Mode Absence (voir la page 10)
Température
de consigne
(voir la page 2)
Clignote durant le
mode Compte à rebours
69-2681EF-03.book Page 3 Tuesday, February 26, 2013 1:16 PM
Guide du propriétaire
4
METTRE LE SYSTÈME DE CHAUF-
FAGE HORS TENSION À PARTIR DU
PANNEAU ÉLECTRIQUE AFIN D’ÉVI-
TER TOUT RISQUE DE CHOC ÉLEC-
TRIQUE.
MISE EN GARDE
: L’installation doit être
effectuée par un électricien certifié et doit
être conforme aux codes nationaux et
locaux de l’électricité.
Desserrer la vis qui retient la façade du
thermostat à la base. La vis ne peut être
complètement enlevée et reste captive
sur la base. Séparer la façade de la base
en tirant sur la partie inférieure du
thermostat.
Enlever la façade
69-2681EF-03.book Page 4 Tuesday, February 26, 2013 1:16 PM
TH404
5
Relier n’importe quel fil du
thermostat au fil de l’appareil
de chauffage et l’autre fil au
fil de l’alimentation en utili-
sant des connecteurs sans
soudure pour fils de cuivre.
NOTA
: Pour le raccordement
à des fils en aluminium,
employer des connecteurs
conçus à cette fin et identifiés
CO/ALR.
Branchement
Alimentation
Alimentation
Installation à 2 fils
Installation à 4 fils
69-2681EF-03.book Page 5 Tuesday, February 26, 2013 1:16 PM
Guide du propriétaire
6
1) Installer la base sur une boîte électrique.
2) Placer le sélecteur FAN comme suit:
Placer à Oui (Yes) si vous utilisez un
ventilo-convecteur (pour éviter que le
moteur s’use prématurément).
Laisser à Non (No) pour une meilleure
régulation de la température si vous
n’utilisez pas un ventilo-convecteur.
3) Remettre la façade du thermostat sur la
base et resserrer la vis.
4) Mettre le thermostat sous tension à partir du
panneau électrique.
Installer le thermostat
Garder les ouvertures d’aération au
dessus et en dessous du thermostat
propres et dégagées en tout temps.
Sélecteur FAN
Si vous changez la position du sélecteur FAN
après que le thermostat ait été mis sous tension,
mettez le thermostat hors tension pendant 3
secondes. Le thermostat utilisera le nouveau
réglage lorsqu’il sera remis sous tension.
69-2681EF-03.book Page 6 Tuesday, February 26, 2013 1:16 PM
TH404
7
Lorsque le thermostat est mis sous tension, le menu de l’heure (Time) clignote à l’écran.
Régler l’heure et la date comme suit :
NOTA
: À tout moment, vous pouvez accéder au menu de l’heure (
Time
) en appuyant sur le
bouton
Sélection
pendant 3 secondes et, par la suite, en appuyant une fois sur le bouton
Bas
.
Démarrage rapide / Réglage de l’horloge et de la date
Menu de
l’heure
Sélectionner le format Régler l’heure
Régler les minutes
Régler l’année
Régler le mois
Régler le jour
Affichage
normal
C’est parti ! Votre nouveau thermostat est déjà préprogrammé
et contrôle maintenant la température.
69-2681EF-03.book Page 7 Tuesday, February 26, 2013 1:16 PM

Guide du propriétaire
8
En mode Automatique, le thermostat suit l’horaire programmé (voir la page 12).
Pour placer le thermostat en mode Automatique (Auto) :
Dérogation temporaire
Lorsque le thermostat est en mode Automatique, vous pouvez appuyer sur le bouton Haut ou
Bas pour modifier la température. La nouvelle température sera utilisée jusqu'à la fin de la
période en cours. Auto clignotera pendant la dérogation. Vous pouvez annuler la dérogation
en appuyant deux fois sur le bouton Sélection pour retourner au mode Automatique.
Mode Automatique (Auto)
Affichage normal
Mode Automatique
Sélectionner Auto
69-2681EF-03.book Page 8 Tuesday, February 26, 2013 1:16 PM
TH404
9
Utiliser le mode Manuel si vous désirez maintenir la même température
indéfiniment. Dans ce mode, le thermostat gardera cette température
jusqu’à ce que vous la modifiez à l’aide du bouton Haut ou Bas.
Pour mettre le thermostat en mode Manuel (Man) :
Mode Manuel (Man)
Régler la température
Affichage normal
Mode Manuel
Sélectionner Manuel
69-2681EF-03.book Page 9 Tuesday, February 26, 2013 1:16 PM
Guide du propriétaire
10
Le mode Absence peut être utilisé lorsque vous quittez pour une durée indéterminée. Pour la
protection contre le gel ainsi que pour l’économie d'énergie, la température Absence est
réglée à 15 °C (59 °F) par défaut. Elle ne peut être modifiée en appuyant simplement sur le
bouton Haut ou Bas. Pour modifier la température Absence, voir la page 16.
NOTA
: Le mode Absence peut aussi être utilisé pour empêcher qu’on modifie la température
de consigne durant la saison estivale lorsque le chauffage n'est pas requis.
Pour placer le thermostat en mode Absence :
Mode Absence (Away)
Mode Absence
Sélectionner
Away (Absence)
Affichage normal
69-2681EF-03.book Page 10 Tuesday, February 26, 2013 1:16 PM
TH404
11
Utiliser le mode Compte à rebours si vous désirez maintenir la même température pour une durée
prédéterminée. Les choix sont : 15, 30 ou 45 minutes, ou 1, 2, 4, 8, 12 ou 18 heures, ou de 1 à 14
jours. À la fin du compte à rebours, le thermostat revient automatiquement au mode précédent et
utilise la température qui a été programmée pour ce mode. À tout moment, vous pouvez annuler le
mode Compte à rebours en appuyant sur le bouton Sélection.
Pour placer le thermostat en mode Compte à rebours :
Mode Compte à rebours (Countdown)
Régler l’heure
Affichage
normal
Sélectionner le mode
Compte à rebours
Régler la température
Mode Compte
à rebours
Pour annuler le mode Compte à rebours
Optionnel (les derniers réglages sont utilisés par défaut)
NOTA :
À tout moment durant
le mode Compte à
rebours, vous pouvez
ajuster la durée et la
température en exécu-
tant les étapes dans le
rectangle pointillé.
69-2681EF-03.book Page 11 Tuesday, February 26, 2013 1:16 PM
Guide du propriétaire
12
Lorsque le thermostat est placé en mode Automatique (voir la page 8), il suit l’horaire
programmé. Par défaut, le thermostat a été programmé avec l’horaire suivant :
L’horaire est composé de 4 périodes par jour, représentant normalement une journée de tra-
vail. Cependant, vous pouvez programmer le thermostat pour annuler les périodes qui ne
s'appliquent pas à votre situation. Par exemple, dans l’horaire par défaut, les périodes Départ
(Leave) et Retour (Return) sont omises pour la fin de semaine.
Vous pouvez choisir un programme différent chaque jour; c.-à-d. que chaque période peut
avoir une heure différente et une température différente chaque jour.
Horaire par défaut
Lundi au vendredi
(Mo, Tu, We, Th & Fr)
Samedi et dimanche
(Sa & Su)
Période Début Température Début Température
Réveil (Wake) 6:00 (6 h AM) 21.0 °C (70 °F) 6:00 (6 h AM) 21.0 °C (70 °F)
Départ (Leave) 8:00 (8 h AM) 16.5 °C (62 °F) -:-- -
Retour (Return) 18:00 (6 h PM) 21.0 °C (70 °F) -:-- -
Coucher (Sleep) 22:00 (10 h PM) 16.5 °C (62 °F) 22:00 (10 h PM) 16.5 °C (62 °F)
69-2681EF-03.book Page 12 Tuesday, February 26, 2013 1:16 PM
TH404
13
Pour modifier l’horaire, procéder comme suit :
Pour annuler une période
: Lorsque l’heure ou la température de la période clignote, appuyer sur les boutons
Haut
et
Bas
en même temps. (Alternativement, faire défiler l’heure entre 23:00 [11 h PM] et 0:00 [minuit] ou la
température sous 5 °C [41 °F].) L’heure et la température affichées seront remplacées par des tirets (-).
NOTA
: Si vous n'appuyez sur aucun bouton pendant une minute, le thermostat enregistrera automatiquement toutes
les modifications que vous avez apportées et reviendra à son affichage normal.
Modification de l’horaire
Menu de
programmation
(3 sec.)
Sélectionner les jours*
Affichage normal
Sélectionner la période
Régler l’heure
Régler les minutes
Régler la température
Sélectionner Exit pour
revenir à la sélection du jour
Sélectionner Exit pour
revenir à l’affichage normal
* Les jours peuvent être sélectionnés collectivement (lundi au vendredi, samedi et dimanche, ou lundi au dimanche) ou individuellement.
69-2681EF-03.book Page 13 Tuesday, February 26, 2013 1:16 PM
Guide du propriétaire
14
Pour régler les paramètres du menu, voir la page 16.
Menu de configuration (1/2)
Affichage Paramètre Options Réglage par défaut
Unité de la température °C / °F °C
Température Absence
1
5 °C - 30 °C (41 °F - 86 °F) 15 °C (59 °F)
Heure avancée
2
Activée (On) / Désactivée (Off)On
Démarrage anticipé
3
Activée (On) / Désactivée (Off)Off
Consigne minimale
4
5 °C - 30 °C (41 °F - 86 °F) 5 °C (41 °F)
Consigne maximale
4
5 °C - 30 °C (41 °F - 86 °F) 30 °C (86 °F)
Verrouillage du clavier
5
Activée (On) / Désactivée (Off)Off
69-2681EF-03.book Page 14 Tuesday, February 26, 2013 1:16 PM

TH404
15
1
Température Absence
Régler la température désirée lorsque le thermostat est en mode Absence (Away) (voir la page 10).
2
Heure avancée
Lorsque cette fonction est activée (On), le thermostat passe automatiquement à l’heure avancée le deuxième
dimanche de mars et à l’heure normale le premier dimanche de novembre.
3
Démarrage anticipé
Le démarrage anticipé ne peut être utilisé qu’en mode Automatique. Lorsque le démarrage anticipé est activé
(On), le thermostat détermine l’heure du démarrage du chauffage afin que la température désirée soit atteinte
au début des périodes Réveil (Wake) et Retour (Return). Lorsque le démarrage anticipé est désactivé (Off),
le chauffage ne démarre qu’au début des périodes Réveil (Wake) et Retour (Return); il y a donc un délai
avant que la température désirée soit atteinte.
4
Consigne minimale / Consigne maximale
Ces paramètres servent à modifier la plage de réglage de la température et sont applicables dans tous les
modes de fonctionnement.
5
Verrouillage du clavier
Lorsque cette fonction est activée (On), aucun autre réglage n’est permis sur le thermostat. La mention Lock
apparaît lorsque vous essayez de changer tout autre réglage.
Paramètres de configuration (2/2)
69-2681EF-03.book Page 15 Tuesday, February 26, 2013 1:16 PM
Guide du propriétaire
16
Le menu de configuration est illustré ci-dessous.
1) Appuyer sur le bouton Sélection pendant trois secondes pour accéder au menu principal.
2) Appuyer sur le bouton Haut deux fois pour accéder au menu de configuration (Conf).
Étapes de configuration
Menu de
configuration
Unité de
température
Température
Absence
Heure
avancée
Démarrage
anticipé
Pour confirmer
Pour confirmer
Pour confirmer
Pour confirmer
Pour confirmer
Pour confirmer
Pour confirmer
Consigne
minimale
Consigne
maximale
Verrouillage
du clavier
NOTA
: Si vous n'appuyez
sur aucun bouton pendant
une minute, le thermostat
enregistrera automatique-
ment toutes les modifica-
tions que vous avez
apportées et reviendra à
son affichage normal.
69-2681EF-03.book Page 16 Tuesday, February 26, 2013 1:16 PM
TH404
17
En cas de difficulté
PROBLÈMES SOLUTIONS
Le thermostat est chaud.
Ceci est normal. S’assurer que l’appareil de chauffage n’excède pas la charge maximale du
thermostat. Garder les ouvertures d’aération du thermostat propres et dégagées.
La température affichée
est erronée.
Si l’une des situations suivantes existe, y remédier :
• Il y a un courant d’air à proximité.
• Le thermostat est situé près ou au-dessus d’une source de chaleur telle qu’un gradateur de
lumière.
• Le thermostat affiche
LP à la place de la
température.
• L’écran est vide.
Le thermostat est hors tension. Ceci peut être causé par l’une des conditions suivantes:
• Il y a une panne de courant.
• La protection thermique de la plinthe était temporairement ouverte. Ceci peut se produire après
une surchauffe lorsque la plinthe est obstruée par un meuble ou un rideau, ou si la protection
thermique de la plinthe est trop sensible.
LP apparaît pendant les cinq premières minutes. Ensuite, l’écran devient vide.
TIME clignote.
Le thermostat est resté hors tension pendant plus de 4 heures. Régler l'horloge et la date (menu
Time).
La température ne
change pas en fonction
de l’horaire programmé.
• S’assurer que le thermostat est en mode Automatique.
• Vérifier l’horloge (menu Time) et l’horaire (menu Prog). Si le thermostat est configuré en format
12 heures, s’assurer que AM ou PM apparaît à l’écran.
69-2681EF-03.book Page 17 Tuesday, February 26, 2013 1:16 PM
Guide du propriétaire
18
- Alimentation : 120/240 Vca, 60 Hz
- Charge minimale : 0,83 A (résistive seulement)
200 W @ 240 V c.a.
100 W @ 120 V c.a.
- Charge maximale : 10,4 A (résistive seulement)
2500 W @ 240 V c.a.
1250 W @ 120 V c.a.
- Plage de réglage : 5 °C à 30 °C (41 °F à 85 °F)*
- Plage d’affichage : 0 °C à 37 °C (32 °F à 99 °F)
- Résolution de réglage et d’affichage : ±0.5 °C (±1 °F)
- Fonctionnement : 0 °C à 50 °C (32 °F à 120 °F)
- Entreposage : -20 °C à 50 °C (-4 °F à 120 °F)
- Mémoire permanente : Il n’est pas nécessaire d’ajuster les réglages de température ou les configurations
du thermostat après une panne de courant. Cependant, il se peut que vous ayez à
régler l'horloge et la date du thermostat si la panne dure plus de 4 heures.
* La plage de réglage peut être modifiée à l’aide de la consigne minimale et de la consigne maximale.
Fiche technique
69-2681EF-03.book Page 18 Tuesday, February 26, 2013 1:16 PM

TH404
19
Honeywell garantit ce produit, à l'exception des piles, contre tout vice de fabrication ou de matière dans la mesure où il en est fait une
utilisation et un entretien convenables, et ce, pour trois (3) ans à partir de la date d'achat par le consommateur. En cas de défectuosité
ou de mauvais fonctionnement pendant la période de garantie, Honeywell remplacera ou réparera le produit (au gré de Honeywell).
Si le produit est défectueux,
(i) le retourner, accompagné d'une preuve d'achat indiquant la date d'achat, à l’endroit où il a été acheté, ou
(ii) contacter Honeywell. Honeywell déterminera alors si le produit doit être retourné ou si un produit de remplacement peut vous
être expédié.
La présente garantie ne couvre pas les frais de retrait ou de réinstallation. La présente garantie ne s'appliquera pas s'il est démontré
que la défectuosité ou le mauvais fonctionnement est dû à un endommagement du produit alors que le consommateur l'avait en sa
possession.
La responsabilité de Honeywell se limite à réparer ou à remplacer le produit conformément aux modalités susmentionnées.
HONEYWELL N'EST EN AUCUN CAS RESPONSABLE DES PERTES OU DOMMAGES, Y COMPRIS LES DOMMAGES
INDIRECTS OU ACCESSOIRES DÉCOULANT DIRECTEMENT OU INDIRECTEMENT D'UNE VIOLATION QUELCONQUE D'UNE
GARANTIE, EXPRESSE OU TACITE, APPLICABLE AU PRÉSENT PRODUIT NI DE TOUTE AUTRE DÉFECTUOSITÉ DU
PRÉSENT PRODUIT. Certaines provinces ou régions ne permettent pas l'exclusion ou la restriction des dommages indirects et, par
conséquent, la présente restriction peut ne pas s'appliquer.
LA PRÉSENTE GARANTIE TIENT LIEU DE TOUTES LES AUTRES GARANTIES, EXPRESSES OU TACITES, ET LES GARANTIES
DE VALEUR MARCHANDE ET DE CONFORMITÉ À UNE FIN PARTICULIÈRE SONT PAR LES PRÉSENTES EXCLUES APRÈS LA
PÉRIODE DE TROIS ANS DE LA PRÉSENTE GARANTIE. Certaines provinces ou régions ne permettent pas de limiter la durée des
garanties tacites et, par conséquent, la présente limitation peut ne pas s'appliquer.
La présente garantie donne au consommateur des droits légaux spécifiques et peut-être certains autres droits qui peuvent varier d'une
province ou région à une autre.
Garantie limitée de 3 ans
69-2681EF-03.book Page 19 Tuesday, February 26, 2013 1:16 PM
Guide du propriétaire
Imprimé aux É.-U. 20 02-2013
Pour toute question concernant ce produit, prière de nous joindre à :
705, avenue Montrichard
Saint-Jean-sur-Richelieu (Québec)
J2X 5K8
Canada
Tél. : 1 800 831-AUBE (2823)
Courriel : aube.[email protected]
Pour de plus amples informations sur nos produits, visiter le
www.aubetech.com
Service à la clientèle
Pour réinitialiser le thermostat,
appuyer sur les boutons Bas et
Sélection et les tenir enfoncés.
Après 3 secondes, RST apparaît.
Cinq secondes plus tard, lorsque RST
disparaît, relâcher les boutons. À l’exception
de l'heure et de la date, le thermostat est
maintenant revenu à ses réglages par
défaut.
69-2681EF-03.book Page 20 Tuesday, February 26, 2013 1:16 PM