BPM200 - Blood Pressure Monitor
PLEASE READ ALL THE INSTRUCTIONS BEFORE USE

2

3
English Manual
Manuel d’utilisation en français
Gebrauchsanleitung auf Deutsch
Manual de Instrucciones en Español
Manuale D’istruzioni In Italiano
Instrukcja obsługi. Polski
5
32
55
78
101
124
Contents

4

5
English Manual

6
Thank you for selecting SHINEMART arm type blood pressure monitor.
The monitor features blood pressure measurement, pulse rate measurement and
auto-save the result. The design provides you with two years of reliable service.
Readings taken by the blood pressure monitor are equivalent to those obtained
by a trained observer using the cuff and stethoscope auscultation method. This
manual contains important safety and care information, and provides step by step
instruction for using the product.
Read the manual thoroughly before using the product.
Features:
• 59x47mm Digital LCD display
• Maximum 99 x 2 groups records
• Inating measuring technology
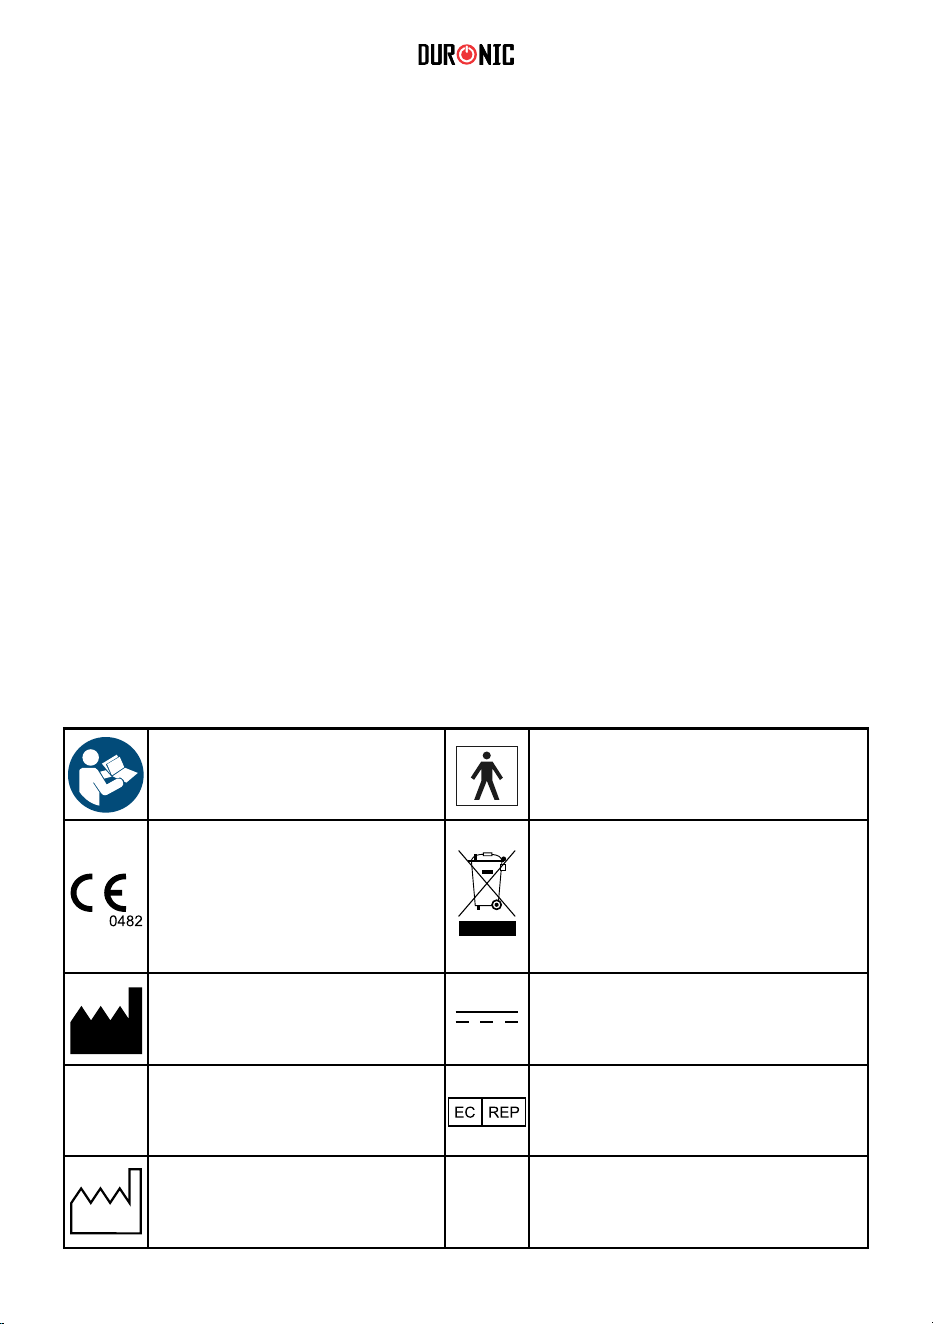
The symbols shown below may appear in the user manual, labeling or other
components. They are the standard requirement.
Icon Key
THE OPERATION GUIDE
MUST BE READ
Type BF Applied Parts
This product complies with the
MDD93/42/EEC requirements.
DISPOSAL: Do not dispose this
product as unsorted municipal
waste. Collection of such waste
separately for special treatment is
necessary.
Manufacturer Direct Current
Species Serial Number
Wellkang Ltd
Suite B, 29 Harley Street,
London, W1G 9QR,UK
Manufacture Date
Degree of protection against the
ingress of water.
IP21
SN

7
• This device is intended for adult use only. Do not use this device on children.
• This device should not be used on any female who is, or is suspected of
being, pregnant. Besides providing inaccurate readings, the effects of this
device on the foetus are unknown.
• This device is intended for non-invasive measuring and monitoring of arterial
blood pressure. It is not intended for use on any extremities other than the
arm and should not be used for any other functions other than obtaining a
blood pressure measurement.
• Contact your doctor if you are concerned about your blood pressure. This
device is for self-monitoring and should not be used for self-diagnosis.
• Do not adjust, begin or end medical treatment or medication without asking a
doctor for treatment advice.
• If you are taking medication, consult your doctor to determine the most
appropriate time to measure your blood pressure.
• When this device is used to measure patients who have common arrhythmias
such as atrial or ventricular premature beats or atrial brillation, the results
from this device may vary.
• If you are concerned about your blood pressure result, please consult your
doctor.
• If the arm cuff pressure exceeds 40 kPa (300 mmHg), the unit will
automatically deate the cuff. Should the cuff not deate when pressure
exceeds 40 kPa (300 mmHg), detach the cuff from the arm and press the
‘START/STOP’ button to stop ination.
• The device is not AP/ APG equipment and is not suitable for use in the
presence of a ammable anaesthetic mixture of air with oxygen or nitrous
oxide.
Safety Information

8
• To avoid measurement errors, please avoid using the device in areas with
a strong electromagnetic eld radiated interference signal or electrical fast
transient/ burst signals.
• The user must check that the equipment functions safely and see that it is in
proper working condition before being used.
• This device is not suitable for continuous monitoring during medical
emergencies or operations. Otherwise, the patient’s arm and ngers can
become numb, swollen and even purple due to a lack of blood.
• Please use the device as instructed in this user manual. If you do not do
so, the performance and lifetime usage of the device will be impacted and
reduced.
• During use, the user/patient will be in contact with the cuff. The materials
of the cuff have been tested and found to comply with the requirements of
ISO 10993-5:2009 and ISO 10993-10:2010, therefore should not cause any
irritation.
• Use only Duronic authorised parts and accessories. Parts and accessories
not approved for use with the device may result in operational failure.
• The device should not need to be calibrated within the rst two years of use.
• If you have any problems with this device, such as setting up, maintaining
or using the device, please contact the Duronic Customer Care Team for
assistance.
• Do not open or repair the device by yourself. If you experience any problems
with your device, contact Duronic for assistance.
• When cleaning the device, please use a soft cloth to clean the whole unit. Do
not submerge it in water or any other liquid, and do not use any abrasive or
volatile cleaners.

9
When using Batteries
• The operator or user of this device should not touch the output of batteries
and the patient simultaneously.
• If using batteries in the device, please ensure that the correct size batteries
are used, as described in this manual. Do not use any other type of battery as
this may damage the device.
• If any battery uid should leak and get into your eyes, rinse your eyes with
plenty of clean water and contact a doctor immediately.
When using a Power Adaptor
• If using a power adaptor with this device, please ensure that you do not
handle the power cable or plug with wet hands.
• Do not use a power adapter if the cable or plug is damaged.
• Do not yank the power cable to remove it from the plug socket. Always grasp
the plug and pull it out to disconnect it.
• When plugging the device into a mains socket, please ensure the power
supply is 220-240V ~ 50/60Hz.
Contact Information
Distributed by: Shine-mart Ltd
Manufactured by: Shenzhen Jumper Medical Equipment Co. Ltd
Authorised European Representative: Wellkang Ltd

10
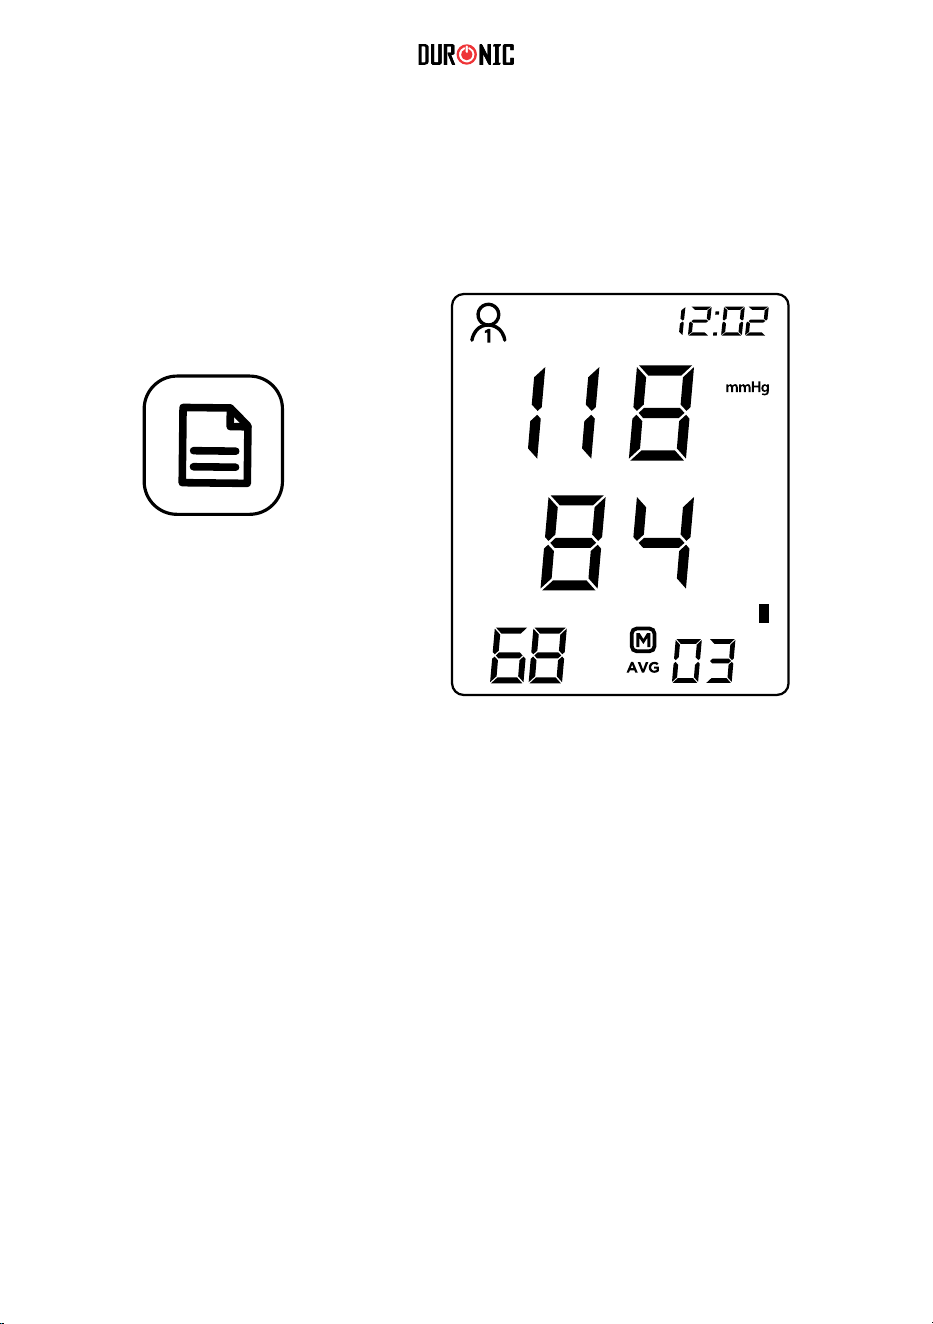
1. User Icon
2. Sound on
3. Systolic Pressure
4. Diastolic Pressure
5. Heartbeat
LCD Display
6. Pulse
7. Arrhythmia
8. Date/Time Display
9. Low Battery
10. Unit
11. Blood Pressure / Level
Indicator
12. Memory Icon
13. Memory Number
14. Average Reading
Value
1
2
6
7
4
3
5
10
9
11
12
13
14
8
Symbol Description
SYS Systolic blood pressure
DIA Diastolic blood pressure
Pul/min Pulse per minute
Time (hour:minute)
Memory log value
mmHg mmHg (unit of mesurement)
Low battery
Arrhythmia / irregular heartbeat

11
Components Included
Choice of Power Supply
1. Air Jack
2. User/Set Button
3. Start/Stop Button
4. USB External Power Supply
5. Memory Button
1. Battery powered mode: 4*AAA batteries
2. DC adaptor powered mode: 5V through a USB cable (not included)
Cuff
22~36cm
(Type BF applied part)
Blood Pressure Monitor
4*AAA Batteries
1
2
3
4
5
Caution: It is important to ensure that you use the correct batteries or
power adapter in your machine to avoid any damage incurring.
12
Caution:
• Remove batteries if the device is not likely to be used for some
time.
• Old batteries are harmful to the environment, do not dispose them
with other daily rubbish. Remove the old batteries from the device
and follow your local recycling guidelines. Do not dispose of
batteries in re; batteries may explode or leak.
Arrhythmia / Irregular Heartbeat Detector
This blood pressure monitor is equipped with Irregular Heartbeat
(IHB) Detection. During each measurement this monitor records
the heartbeat intervals and works out the standard deviation. If
the calculated value is larger than or equal to 15, this equipment
will light up the ‘IHB’ symbol on the screen when displaying the
measured result.
Caution: The appearance of the ‘IHB’ icon indicates that a pulse irregularity
consistent with an irregular heartbeat was detected during measurement.
Usually this is NOT a cause for concern. However, if the symbol appears often,
we recommend you seek medical advice. Please note that the device does not
replace a cardiac examination, but serves to detect pulse irregularities at an early
stage.
The Installment and Replacement of Battery
1. Slide off the battery cover.
2. Install the batteries by matching the correct polarity, as shown.
3. Replace the cover.
Replace the batteries when the following occurs:
• The icon shows
• The display dims
• The display does not light up

13
Setting the Date, Time and Unit
It is important to set the clock before using your blood pressure monitor, so that a
time stamp can be assigned to each record that is stored in the memory.
(Year: 2000-2050, Time: 24 H)
1. When the monitor is off, press and hold down the ‘USER/SET’ button for 5
seconds. The ‘User 1’ icon will ash.
2. Press the ‘USER/SET’ button to change the year. Srcoll through the year
using the ‘MEMORY’ button.
3. Press the ‘USER/SET’ button to change the date (month/day). Scroll through
the year using the ‘MEMORY’ button.
4. Press the ‘USER/SET’ button to change the time (hour/minute). Scroll
through the time using the ‘MEMORY’ button.
5. Press the ‘USER/SET’ button to change the unit of measurement (mmHg/
KPa). Srcoll through the time using the ‘MEMORY’ button.
USER/SET
BUTTON
MEMORY
BUTTON

14
Selecting or Changing Users
Clearing the Memory
To clear the memory and delete all of the saved records, press and hold the
‘MEMORY’ button for 3 seconds. When it shows ‘M’ on the screen, continue to
hold the ‘MEMORY’ button and press the ‘USER/SET’ button at the same time.
The screen will show ‘ALL EE’. This means the records have all been deleted.
When there are no records stored, the screen will show ‘NO’.
When the monitor is off, press and hold down the ‘USER/SET’ button for 5
seconds. The ‘User 1’ icon will ash, then you can press the ‘MEMORY’ button to
change the setting to ‘User 2’.
USER/SET
BUTTON

15
Accessing the Memory
The reading measured will save automatically. To access and scroll through the
saved readings, press the ‘MEMORY’ button. You can switch between ‘User 1’
and ‘User 2’ by pressing the ‘USER/SET’ button.
The blood pressure monitor can automatically store 99 measurements for two
users, and automatically replace the 99 measurement data when the memory is
full.
After the blood pressure monitor has been used several times, press the
‘MEMORY’ button in the shutdown state to display the average blood pressure of
the last three measurements.
Press the ‘MEMORY’ button again to display the rst group of blood pressure
measurement values and look up the memory group number next to it.
MEMORY
BUTTON
16
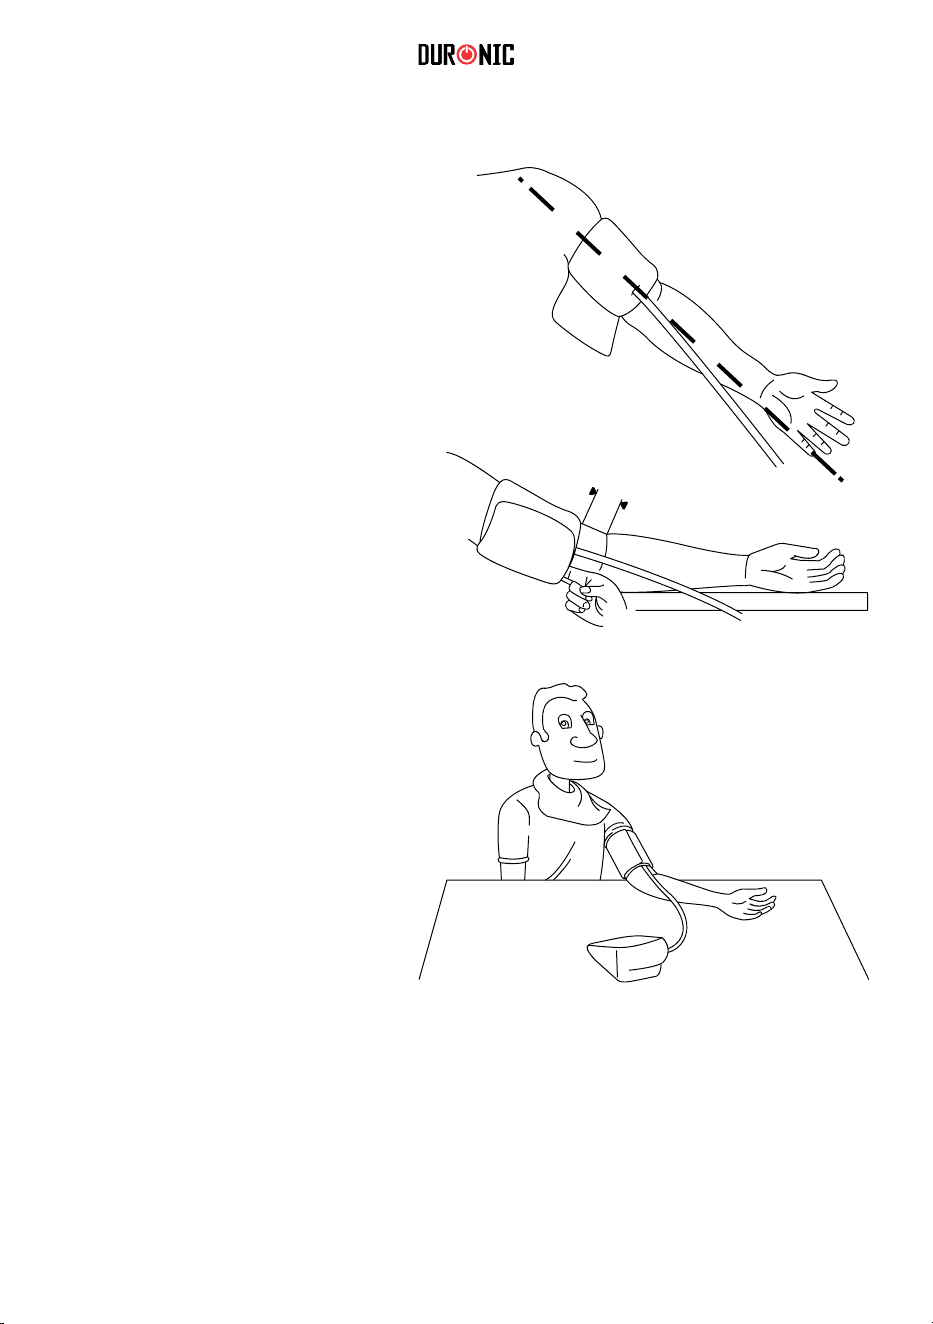
How to Use
1. Tie the cuff on your upper arm,
then position the tube off-center
toward the inner side of arm in
line with the little nger.
Fastening the Arm Cuff
2. The cuff should be snug but
not too tight. You should be able
to insert one nger between the
cuff and your arm.
3. Sit comfortably with your left
arm resting on a at surface.
Tips
• Rest for 5 minutes before measuring.
• Wait at least 3 minutes between measurements. This allows your blood
circulation to recover.
• For a meaningful comparison, try to measure under similar conditions. For
example, take daily measurements at approximately the same time, on the
same arm, or as directed by a medical professional.

17
How to Take a Measurement
1. Ensure that the cuff is tted properly on your arm. Press the
‘START/STOP’ button to turn on the monitor. The device will
nish the whole measurement automatically.
2. The cuff will inate. When fully inated the cuff can feel slightly tight or
uncomfortable. This is normal. If it is intollerable or you have any concerns,
press the ‘START/STOP’ button to stop the machine and seek professional
medical advice.
Display when cuff inates
When the pulse is detected, the screen will display the “heart” symbol and ash to
your pulse rhythm.
Display when cuff deates.
3. Your reading is nished. The screen will
continue to display the measurement results,
unless you press ‘START/STOP’ button to turn
off the machine. Otherwise, the machine will
shutdown automatically after 30 seconds.
The reading measured will save automatically.
To access and scroll through the saved readings,
press the ‘MEMORY’ button.

18
Tips for Obtaining an Accurate Measurement
Wait at least 1 hour after eating or
drinking.
Do not measure immediately after
consuming caffeinated drinks such as
tea and coffee, or after smoking.
Do not take a measurement when
talking or moving your ngers.
Wait at least 20 minutes after taking a
bath.
Do not take a measurement in a very
cold environment.
Do not take a measurement
when you
need to use the toilet.
Please follow the below tips to ensure you achieve an accurate measurement:
19
Maintenance
In order to get the best performance, please follow the below instructions.
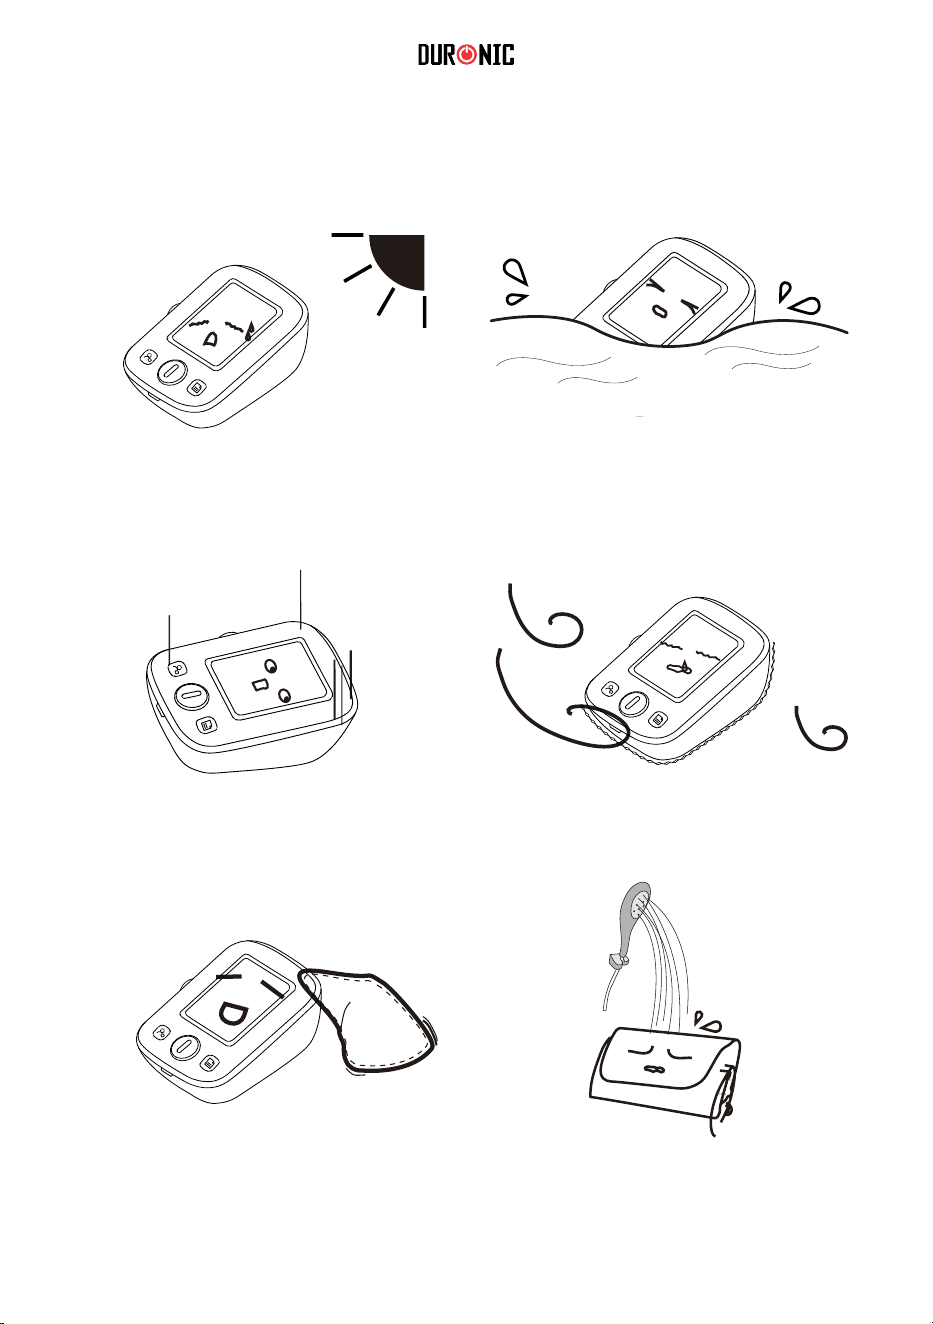
Store in a dry place and avoid direct
sunlight.
Avoid the monitor touching water.
If the machine gets wet, dry
immediately afterwards.
Avoid dusty environments and
unstable temperatures.
Avoid intense shaking and collision.
Use a wet (well wrung) cloth to remove
any dirt.
Do not clean the cuff with water and
never immerse the cuff in water or
any other liquid.

20
Why does my blood pressure vary throughout the day?
Why do I get a different blood pressure at home compared to
the hospital?
Individual blood pressure varies naturally
multiple times during the day. It is also
affected by the way you tie your cuff around
your arm and the position of your arm during
measurement. For this reason, we advise you
take measurement at the same time of day and
in the same position.
Please note: If the user takes medication the
pressure will vary more.
If you wish to measure a second time, wait
at least 3 minutes before taking another
measurement.
Blood pressure is different even throughout the day due to weather, emotions,
exercise etc.
Also, there is the “white coat” effect, which means blood pressure usually
increases in clinical settings due to anxiety or nerves.
What you need to pay attention to when you measure your blood pressure at
home:
- If the cuff is tied properly.
- If the cuff is too tight or too loose.
- If the cuff is tied on the upper arm.
- If you feel anxious.
Advice: Take 2-3 deep breaths before beginning a measurement as this will help
get a more accurate result. If you are particular anxious or upset, relax yourself for
4-5 minutes until you calm down.

21
Which arm should I use to take measurements?
It is ne to use the cuff on either arm, but
some people will experience a difference in
measurement results.
For this reason, we recommend using the
same arm every time.
Understanding the Result
Systolic pressure (SYS): The highest level of
your blood pressure – when your heart beats, it
contracts to pump blood through your arteries.
Diastolic pressure (DIA): The lowest level of
your blood pressure – when your heart relaxes
between beats.
Pulse: Number of heartbeats per minute. Most
adults have a resting heart rate between 60
and 100bpm. Athletes are likely to have a lower
resting heart rate.

22
Standard Blood Pressure Classication
Below illustrates the standard blood pressure classication for adults made by
World Health Organisation (WHO) and International Society of Hypertension (ISH)
in 1999.
DIA (mmHg)
60
80
90
100
110
90 120 140 160 180
SYS (mmHg)
Low
Normal
Pre-High
High (mild)
Grade 1: Hypertension
High (moderate)
Grade 2: Hypertension
High (severe)
Grade 3: Hypertension
SYS DIA
Low <90 <60
Normal 90-120 60-80
Pre-High 120-140 80-90
High
(mild)
140-160 90-100
High
(moderate)
160-180 100-110
High
(severe)
>180 >110
Caution:
• Only a doctor can tell you your normal blood pressure range and
the point at which you are at risk. Consult your doctor to obtain
these values.
• If the measurements taken with these products fall outside the
range, consult your GP/doctor for advice.

23
Troubleshooting
LCD Display
Information
Reason / Meaning
Err is displayed in the
SYS area, 1 is displayed
in the DIA area
The leakage is too fast or the pulse signal is too
weak. Please check the cuff, re-fasten it around
your arm and try again.
Err is displayed in the high
SYS area, 2 is displayed
in the DIA area.
The blood pressure signal cannot be detected
due to too much noise. Please remove the noise
sources and measure again.
Err is displayed in the
SYS area, 3 is displayed
in the DIA area.
The test result is abnormal. Please measure again.
Err is displayed in the
SYS area, P is displayed
in the DIA area.
The ination fails. Please check the cuff, re-fasten it
around your arm and try again.
HI is displayed in the DIA
area.
The ination pressure is greater than 307±8 mmHg
( 41 kPa±1 kPa ). Please measure again.
This section includes a list of error messages and frequently asked questions for
problems you may encounter with your blood pressure monitor. If the monitor is
not operating as you think it should, check here before arranging for servicing.

24
Problem Check/Test Solution
No Display when
pressing ‘START/
STOP’ Button
Check whether the
batteries are low
Replace batteries or plug
Micro USB cable into
device
Are the batteries inserted
correctly?
Install in accordance with
the positive and negative
poles of the batteries
No pressure in the
cuff
Is it plugged in correctly?
Insert the cuff
into the air jack tightly
Is the cuff or tube broken
or leaking?
Buy a new cuff
Error display,
unable to
measure
Did your arm move when
taking the reading?
Remain still and try again
Did you talk when taking
the reading?
Keep quiet and try again
The cuff leaks
Is the cuff wrapped too
loose?
Please tighten the cuff
The airbag in the cuff is
broken
Replace with a new cuff
Troubleshooting
Caution: If blood pressure still cannot be measured normally with
the above method, please contact Duronic. Do not disassemble it by
yourself.

25
Product Specications
Product Name Electronic Blood Pressure Monitor
Model BPM200
Display Mode Digital Display
Measuring Method Oscillographic
Measuring Part Upper Arm
Measuring Range
Blood Pressure Value
30mmHg - 255mmHg
(5.3kPa-37.3kPa)
Pulse Rate
40-199 pulse rates /
minute
Static
measurement
accuracy
Pressure Value ±3mmHg (±0. 4kPa)
Pulse Rate ±5% of the read value
LCD Display
Pressure Unit: mmHg / kPa.
Pulse
Pulse rate per minute,
showing three digits
Memory
Capacity
99 groups of measurement data for each of two users.
Power
Supply
4 AAA dry batteries or DC 5V USB external power
supply
Power off mode Manual shutdown / 30s delayed automatic shutdown

26
Body weight
(excluding batteries
About 195g±5g
Dimensions 120mm(length) 90mm(width) 43mm(height)
Screen Size 59mm(length) 47mm(width)
Cuff
Upper arm cuff (measuring arm circumference 22-
36cm or 22-42cm )
Accessories Cuff, User manual
Battery Life
High performance dry batteries can be used about 300
times under
Service Life 5 years
Date of
environment
See the label
Working
environment
Temperature
Condition
5°C - 40°C
If the product is
stored or used
outside the
specied
temperature and
humidity range,
it will not work
properly.
Humidity
Condition
15% -
90%RH
Atmospheric
Condition
70kPa -
106kPa
Storage and
transportation
environment
Strong impact, direct collision, exposure to the sunlight
or rain should be avoided during transportation.
The packaged blood pressure monitor should be stored
in an environment with temperature ranging from -20°C
to 55°C, relative humidity ranging from 10% to 93%,
and atmospheric pressure ranging from 70 kPa to 106
kPa, with no corrosive gas and positive ventilation.

27
EMC Guidance
Guidance and manufacturer’s declaration – electromagnetic emissions
The BPM200 Electronic Blood Pressure Monitor is intended for use in the
electromagnetic environment specied below. The customer or the user of the
Blood Pressure Monitor should assure that it is used in such an environment.
Emissions test Compliance
Electromagnetic environment -
guidance
RF emissions
CISPR 11
Group 1
The BPM200 Electronic Blood
Pressure Monitor uses RF energy
only for its internal function.
Therefore, its RF emissions are
very low and are not likely to
cause any interference in nearby
electronic equipment.
RF emissions
CISPR 11
Class B
The BMP200 Electronic Blood
Pressure Monitor is suitable for
use in all establishments,including
domestic establishments and
those directly connected to the
public low-voltage power supply
network that supplies buildings
used for domestic purposes.
Harmonic emissions
IEC 61000-3-2
Not applicable
Voltage uctuations/
icker emissions
IEC 61000-3-3
Not applicable
Table 1 Guidance and MANUFACTURER’s declaration – ELECTROMAGNETIC
EMISSIONS- for all ME EQUIPMENT and ME SYSTEMS

28
Guidance and manufacturer’s declaration – electromagnetic immunity
The device is intended for use in the electromagnetic environment specied
below. The customer or the user of the device should assure that it is used in
such an environment.
IMMUNITY test
IEC 60601 test
level
Compliance
level
Electromagnetic
environment -
guidance
Electrostatic
discharge
(ESD)
IEC 61000-4-2
±6 kV contact
±8 kV air
±6 kV contact
±8 kV air
Floors should be wood,
concrete or ceramic
tile. If oors are
covered with synthetic
material, the relative
humidity should be at
least 30%.
Electrical fast
transient/burst
IEC 61000-4-4
±2 kV for power
supply lines ±1
kV for input/
output lines
±2 kV line(s) to
line(s)
Mains power quality
should be that of a
typical commercial or
hospital environment.
Voltage dips,
short
interruptions
and voltage
variations on
power supply
input lines
IEC 61000-
4-11
<5% UT
(>95% dip in UT)
for 0.5 cycle 40%
UT
(60% dip in UT )
for 5 cycles
70% UT
(30% dip in UT )
for 25 cycles
<5% UT
(>95% dip in UT )
for 5 s
<5% UT
(>95% dip in UT)
for 0.5 cycle
40% UT
(60% dip in UT )
for 5 cycles
70% UT
(30% dip in UT )
for 25 cycles
<5% UT
(>95% dip in UT )
for 5 s
Mains power quality
should be that of a
typical commercial or
hospital environment. If
the user of the device
requires continued
operation during power
mains interruptions, it
is recommended that
the device be powered
from an uninterruptible
power supply or a
battery.
Power
frequency
(50/60Hz)
magnetic eld
IEC 61000-4-8
3A/m 3A/m
Power frequency
magnetic elds
should be at levels
characteristic of a
typical location in a
typical commercial or
hospital environment.
NOTE UT is the a.c. mains voltage prior to application of the test level.
Table 2 Guidance and MANUFACTURER’s declaration – ELECTROMAGNETIC
IMMUNITY – for all ME EQUIPMENT and ME SYSTEMS
29
Guidance and manufacturer’s declaration – electromagnetic immunity
The device is intended for use in the electromagnetic environment specied
below. The customer or the user of the device should assure that it is used in
such an environment.
IMMUNITY
test
IEC 60601
test level
Compliance
level
Electromagnetic
environment - guidance
Conducted RF
IEC 61000-4-6
Radiated RF
IEC 61000-4-3
Electrical fast
transient/burst
IEC 61000-4-4
3 Vrms
150 kHz to
80 MHz
3 V/m
80 MHz to
2.5 GHz
3 Vrms
3 V/m
Portable and mobile
RFvcommunications equipment
should be used no closer to
any part of the device, including
cables, than the recommended
separation distance calculated
from the equation applicable to the
frequency of the transmitter.
Recommended separation
distance:
d=1.167√P
d=1.167√P 80MHz to 800MHz
d=2.333√P 800MHz to 2,5GHz
where P is the maximum output
power rating of the transmitter
in watts (W) according to the
transmitter manufacturer and d
is the recommended separation
distance in metres (m).
Field strengths from xed RF
transmitters, as determined by
an electromagnetic site survey,
a
should be less than the compliance
level in each frequency range.
b
Interference may occur in the
vicinity of equipment
marked with the
following symbol:
Table 4 Guidance and MANUFACTURER’s declaration – ELECTROMAGNETIC
IMMUNITY – for ME EQUIPMENT and ME SYSTEMS that are not LIFE-
SUPPORTING
30
Recommended separation distances between portable and mobile RF
communications equipment and the device.
The device is intended for use in an electromagnetic environment in which
radiated RF disturbances are controlled. The customer or the user of the device
can help prevent electromagnetic interference by maintaining a minimum
distance between portable and mobile RF communications equipment
(transmittters) and the device as recommended below, according to the
maximum output power of the communications equipment.
Rated
maximum
output power
of transmitter
(W)
Separation distance according to frequency Rated
maximum output of transmitter (m)
150 kHz to 80 MHz
d=1.167√P
80 MHz to 800 MHz
d=1.167√P
800 MHz to 2.5 GHz
d=2.333√P
0.01 0.117 0.117 0.233
0.1 0.369 0.369 0.739
1 1.167 1.167 2.333
10 3.690 3.690 7.378
100 11.67 11.67 23.33
For transmitters rated at a maximum output power not listed above, the recommended
separation distance d in metres (m) can be estimated using the equation applicable to
the frequency of the transmitter, where P is the maximum output power rating of the
transmitter in watts (W) according to the transmitter manufacturer. NOTE 1 At 80MHz
and 800MHz, the separation distance for the higher frequency range applies. NOTE 2
These guidelines may not apply in all situations. Electromagnetic propagation is affected
by absorption and reection from structures, objects and people.
Table 6 Recommended separation distances between portable and mobile RF
communications equipment and the ME EQUIPMENT or ME SYSTEM – for ME
EQUIPMENT and ME SYSTEMS that are not LIFE-SUPPORTING
NOTE 1 At 80 MHz and 800 MHz, the higher frequency range applies. NOTE 2 These
guidelines may not apply in all situations. Electromagnetic propagation is affected by
absorption and reection from structures, objects and people.
a Field strengths from xed transmitters, such as base stations for radio (cellular /
cordless) telephones and land mobile radios, amateur radio, AM and FM radio broad-
cast and TV broadcast cannot be predicted theoretically with accuracy. To assess the
electromagnetic environment due to xed RF transmitters, an electromagnetic site
survey should be considered. If the measured eld strength in the location in which the
device is used exceeds the applicable RF compliance level above, the device should
be observed to verify normal operation. If abnormal performance is observed, additional
measures may be necessary, such as re-orienting or relocating the device.
b Over the frequency range 150 kHz to 80 MHz, eld strengths should be less than
3V/m.
31
Warranty
1 Year Guarantee from Shine-Mart Ltd, Trademark owners of Duronic Products.
NOTE: THESE STATEMENTS DO NOT AFFECT YOUR STATUTORY RIGHTS AS A
CONSUMER
This product has been manufactured under the strictest or quality control procedures, and
using the highest quality of materials, to ensure excellent performance and reliability. It will
give very good and long lasting service, provided it is properly used and maintained. The
product is guaranteed for 1 years from the date of original purchase. If any defect arises due
to a faulty materials or poor workmanship, the faulty product must be returned to the original
place of purchase. Refund or replacement is at the discretion of that company.
Duronic Products are offered with a 1 year guarantee under the following conditions:
1. The product must be returned to the retailer with original proof of purchase.
2. The product must be installed and used in accordance with the instructions
contained in this operating manual.
3. It must be used only for domestic purposes.
4. It does not cover wear and tear, malicious damage, misuse, neglect,
inexpert repairs or consumable parts.
5. Shine-Mart Ltd has no responsibilities for accidental or consequential loss or damage.
6. Shine-Mart Ltd are not liable to carry out any type of servicing work,
under the guarantee
7. Valid in the UK only
This product is tted with CE:1363 plug and fuse
Imported by Shine-Mart Ltd, RM3 8SB
Information on waste Disposal for Consumers of
Electrical & Electronic Equipment.
This mark on a product and/or accompanying documents indicates that when it
is to be disposed of, it must be treated as Waste
Electrical & Electronic Equipment, (WEEE).
Any WEEE marked products must not be mixed with general household waste,
but kept separate for the treatment, recovery and recycling of the materials used.
For proper treatment, recovery and recycling; please take all WEEE marked
waste to your Local Authority Civic waste site,
where it will be accepted free of charge.
If customers dispose of Waste Electrical & Electronic Equipment correctly, they
will be helping to save valuable resources and preventing any potential negative
effects upon human health and the environment, of any hazardous materials that
the waste may contain.
Follow Us

32
Manuel d’utilisation en français

33
Nous vous remercions d’avoir choisi le tensiomètre électronique pour bras
Duronic.
Ce tensiomètre permet de mesurer la pression artérielle, les pulsations et de
garder en mémoire les résultats obtenus. Ce design vous procure un service
fiable pendant deux ans. Les lectures données par le BPM200 sont équivalentes
à celles obtenus avec un personnel entrainé en utilisant la méthode brassard /
stéthoscope. Ce manuel contient d’importantes informations de sécurité et
maintenance et il fournit des instructions étape par étape pour utiliser ce produit.
Lisez ce manuel soigneusement avant d’utiliser ce produit.
•
Caractéristiques :
•
Ecran digital LCD 59 x 47 mm
•
Mémorisation de 99 lectures x 2 utilisateurs maximum
Technologie de mesure par inflation et déflation
Icones clés
Les icônes suivantes peuvent apparaître dans ce manuel d’utilisation, sur
l’emballage ou tout autre élément de ce produit. Il s’agit des exigences standards.
Wellkang Ltd
Suite B, 29 Harley Street,
London, W1G 9QR,UK
Le manuel d’utilisation doit
être lu
Ce produit est conforme aux
exigences MDD93/42/EEC
Fabriquant
Spécifie le numéro de série
Date de fabrication
Pièce de type BF
RECYCLAGE : ne jetez pas ce
produit dans une poubelle
municipale. La collecte de ce
genre de produit doit être
organisée séparément pour
traitement spécial.
Courant continu
Degré de protection contre
l’infiltration d’eau
IP21
SN

34
• Cet appareil est conçu pour être utilisé par des adultes uniquement. Ne l’utilisez
pas sur des enfants.
• Cet appareil ne devrait pas être utilisé sur des personnes qui sont, ou qui
pensent être, enceintes. En plus de fournir des résultats inexacts, les effets de
cet appareil sur le fœtus ne sont pas connus.
• Cet appareil est conçu pour des mesures et une surveillance non invasive de la
tension artérielle. Il n’est pas conçu pour l’utilisation sur une extrémité autre que
le bras et pour une fonction autre que pour obtenir une tension artérielle.
• Contactez votre docteur si vous êtes inquiets pour votre tension. Cet appareil
est pour l’auto surveillance et ne doit pas servir de base pour un diagnostic sur
soi-même.
• Ne commencez ou arrêtez pas de traitement médical sans prendre conseil
auprès d’un professionnel de la santé.
• Si vous êtes sous médicamentation, consultez votre docteur pour déterminer le
moment le plus approprié pour mesurer votre pression artérielle.
• Lorsque l’appareil est utilisé pour mesurer la tension de patients qui souffrent
généralement d’arythmies telles que des arythmies auriculaires, des
extrasystoles ventriculaires ou des fibrillations auriculaires, les résultats de cet
appareil peuvent varier. Veuillez consulter votre médecin traitant au sujet de ces
résultats.
• Si la pression du brassard excède 40 kPa (300 mmHg), le brassard se
dégonflera. Si le brassard ne se dégonfle pas lorsque la pression excède 40 kPa
(300 mmHg), détachez le brassard du bras et pressez la touche START/STOP
pour interrompre l’inflation.
• L’équipement fourni n’est pas AP/APG et ne convient pas à la présence de
mélange d’anesthétique inflammable d’air avec de l’oxygène ou de dioxyde
nitrique.
• Pour éviter des erreurs de mesures, veuillez éviter les champs
électromagnétiques ou les zones transitant des bruits électriques tout en utilisant
une alimentation externe.
• L’utilisateur doit vérifier que l’appareil fonctionne sans risques avant de l’utiliser.
Informations de sécurité

35
• Ce produit ne convient pas à la surveillance de pression artérielle en cas
d’urgence médicale ou d’opérations chirurgicales. Les bras et doigts du patient
pourraient s’anesthésier, gonfler et devenir bleus en raison de la pauvre
circulation du sang.
• Veuillez utiliser cet appareil comme indiqué dans ce manuel d’utilisation. Si
vous ne suivez pas les instructions, les performances et la durée de vie de cet
appareil seront impactées et réduites.
• Les matériaux utilisés pour le brassard ont été testés et sont conformes avec
les spécifications générales ISO 10993-5 : 2009 et ISO 10993-10 : 2010. Les
matériaux utilisés ne provoqueront pas de réactions allergiques ou de blessures
aux contacts de l’utilisateur.
• Veuillez uniquement utiliser les accessoires spécifiés / autorisés par Duronic.
Des accessoires non approuvés pour cet appareil peuvent causer des
dommages à l’appareil.
• L’appareil ne requiert aucune calibration pendant les deux premières années
d’utilisation.
• Si vous avez un quelconque problème avec cet appareil, tel que le
paramétrage, la maintenance ou l’utilisation, veuillez contacter le service client
de Duronic pour obtenir l’assistance nécessaire.
• N’utilisez ou ne réparez pas ce produit par vous-même. Si vous rencontrez un
problème avec cet appareil, contactez le service client de Duronic pour obtenir
l’assistance nécessaire.
• Lorsque vous nettoyez l’appareil, veuillez utiliser un tissu doux sur tout le
produit. Ne le submergez pas dans de l’eau ou tout autre liquide et n’utilisez pas
de produits chimiques ou abrasifs.

36
•
Utilisation avec piles
L’opérateur ou l’utilisateur ne doit pas toucher la sortie de batterie et le patient
simultanément.
• Si vous utilisez des piles pour cet appareil, veuillez vous assurer d’utiliser les
piles correspondantes, comme décrit dans ce manuel. N’utilisez pas d’autres
types de piles car cela peut endommager l’appareil.
• Si du liquide fuite des piles et tombe dans vos yeux, rincez-les abondamment
avec de l’eau clair et contactez votre médecin immédiatement.
• Si
Utilisation avec un chargeur
vous utilisez cet appareil avec un chargeur, assurez-vous de ne pas
manier le câble d’alimentation ou la prise avec des mains mouillées.
• N’utilisez pas le chargeur si le câble d’alimentation ou la prise est
endommagée.
• Ne tirez pas sur le câble d’alimentation pour le débranchez de la prise
murale. Empoignez toujours à la prise et tirez dessus pour la débrancher.
• Lorsque vous branchez cet appareil à une prise, assurez-vous que la tension
soit 220 – 240 V ~ 50/60Hz.
Contact
Fabriqué par Shenzhen Jumper Medical Equipment Co. Ltd
Représentant européen autorisé : Wellkang Ltd
Distribué par Shine-mart Ltd

37
1. Icône de l’utilisateur
2. Son allumé
3. Pression systolique
4. Pression diastolique
5. Battement de cœur
6.
Affichage LCD
Pouls
7. Arythmie
8. Affichage de la date et
heure
9. Etat de la batterie
10. Unité de mesure
Pression artérielle /
indicateur de niveau
12. Icône de sauvegarde
13. Numéro de sauvegarde
14. Valeur de lecture
moyenne
11.
1
2
6
7
4
3
5
10
9
11
12
13
14
8
Symbole Description
SYS
DIA
Pul/min
mmHg
Pression systolique
Pression diastolique
Pouls par minute
Heure (heure : minutes)
Valeur de la sauvegarde
mmHg (unité de mesure)
Batterie faible
Arythmie / battement de cœur irrégulier

38
1. Prise
Composants inclus
Choix de la source d’alimentation
jack
2. Touche d’utilisateur / programmation
3. Touche d’alimentation
4. Alimentation externe USB
5. Touche de sauvegarde
Brassard
22~36cm
(partie
1
2
3
4
5
appliquée de type BF)
4 piles de types AAA
Tensiomètre
Fonctionnement sur pile : 4 x AAA
Fonctionnement par chargeur : 5V via câble USB (non inclus)
Attention : Il est important de vous assurer que vous utilisez les
bonnes piles ou le bon chargeur pour éviter d’endommager l’appareil.
39
Attention :
• Retirez les piles si l’appareil ne sera pas utilisé pendant quelques
temps.
• Des vieilles piles peuvent être novices pour l’environnement. N’en
disposez pas avec le reste de vos déchets. Retirez les anciennes
piles de l’appareil et disposez en en suivant les règles en application
dans votre localité. Ne les jetez pas dans du feu : les piles risquent
d’exploser ou fuiter.
Détecteur d’arythmie / Battements de cœur irréguliers
Ce tensiomètre est équipé d’une fonction intelligente détectant les
battements irréguliers (détecteur IHB). Durant chaque mesure, cet
équipement enregistrera les intervalles entre chaque battement
pour calculer les déviations normales. Si la valeur calculée est plus
grande ou égale à 15, cet équipement s’illuminera et le symbole
IHB s’affichera avec le résultat des mesures.
Attention : L’apparence de l’icône IHB indique qu’une pulsation irrégulière
résultant de battements de cœur irréguliers a été détecté durant la mesure.
Ce n’est toutefois souvent PAS une raison de s’inquiéter. Si toutefois le
symbole apparait souvent, nous recommandons que vous contactiez votre
docteur. Veuillez noter que cet appareil ne remplace pas un examen
cardiaque, mais sert à détecter les irrégularités de pulsations à un stage
préliminaire.
Installer et remplacer les piles
1. Faites glisser le couvercle du compartiment à pile.
2. Installez les piles en respectant les pôles positifs et négatifs, comme indiqué.
3. Replacez le couvercle.
•
Remplacez les piles dans les cas suivants :
L’icône batterie faible s’affiche
• L’affichage s’assombrit
• L’affichage ne s’allume pas

40
Veuillez configurer la date et l’heure avant d’utiliser ce produit, pour vous assurer
que chaque sauvegarde soit correctement enregistrée avec un marqueur
temporel.
1.
Configurer la date, l’heure et l’unité de mesure
(Année : 2000 – 2050, Heure : 24H)
Lorsque l’appareil est éteint, maintenez appuyée la touche « utilisateur /
programmation » pendant 5 seconds. L’icône « utilisateur 1 » clignotera.
2. Appuyez sur la touche « utilisateur / programmation » pour changer l’année.
Faites défiler les années avec la touche de sauvegarde.
3. Appuyez à nouveau sur la touche « utilisateur / programmation » pour changer
la date (mois/jour). Faites défiler les jours avec la touche de sauvegarde.
4. Appuyez sur la touche « utilisateur / programmation » pour modifier l’heure
(heure/minutes). Faites défiler les heures et minutes avec la touche de
sauvegarde.
5. Appuyez sur la touche « utilisateur / programmation » pour modifier l’unité de
mesure (mmHg/KPa).
Touche « utilisateur
/ programmation »
Touche de
sauvegarde

41
Pour effacer toutes les sauvegardes, maintenez appuyée la touche de
sauvegarde pendant 3 secondes. Lorsqu’un « M » s’affiche à l’écran, continuez
d’appuyer sur la touche de sauvegarde et appuyez en même temps sur la
touche « utilisateur /programmation ».
La mention « ALL EE » s’affichera à l’écran pour indiquer que toutes les
sauvegardes ont été supprimées.
Lorsqu’il n’y a pas de sauvegardes, l’écran affichera la mention « NO ».
Lorsque l’appareil est éteint, maintenez appuyée la touche « utilisateur /
programmation » pendant 5 seconds. L’icône « utilisateur 1 » clignotera.
Appuyez ensuite sur la touche de sauvegarde pour sélectionner l’utilisateur 2.
Sélectionner ou changer l’utilisateur
Touche « utilisateur
/ programmation »
Effacer les sauvegardes
42
Accéder aux sauvegardes
Les mesures s’enregistrent automatiquement. Pour y accéder et faire défiler les
mesures enregistrées, appuyez sur la touche de sauvegarde. Vous pouvez
changer d’utilisateur en appuyant sur la touche « utilisateur / programmation ».
Touche de
sauvegarde
Le tensiomètre peut enregistrer automatiquement 99 mesures pour les deux
utilisateurs et les remplacer lorsque la mémoire est pleine.
Après que le tensiomètre ait été utilisé plusieurs fois, appuyez sur la touche
de sauvegarde lorsque l’appareil est éteint pour recevoir une moyenne de
votre tension lors des trois dernières mesures.
Appuyez à nouveau sur la touche de sauvegarde pour afficher les mesures du
second utilisateur.

43
1. Serrez le brassard sur le haut
de votre bras. Le tuyau d’air doit
être légèrement excentré vers
l’intérieur du bras dans la lignée
de votre petit doigt.
2. Le brassard doit être serré
sans être trop tendu. Vous
devriez être en mesure d’insérer
un doigt entre le brassard et votre
bras.
3. Installez-vous confortablement
avec le bras posé sur la table.
• Reposez-vous
Ajuster le brassard
Conseils
pendant 5 minutes avant de commencer la mesure.
• Attendez au moins 3 minutes entre chaque mesure. Cela permet à votre circulation
sanguine de récupérer.
• Pour une comparaison censée, essayez de mesurer votre pression artérielle sous
les mêmes conditions. Prenez par exemple votre mesure à une heure spécifique,
sur le même bras, sauf contre-indication du docteur.

44
Comment prendre une mesure
1. Assurez-vous que le brassard soit correctement ajusté.
Appuyez sur la touche “START/STOP” pour allumer le
tensiomètre. Celui-ci finira ensuite la mesure automatiquement.
2. Le brassard va gonfler pendant la prise de mesure. Lorsqu’il est tout à
fait gonflé, vous pouvez sentir la pression du brassard qui peut être
inconfortable. Cela est normal. Si cependant vous ne tolérez pas cette
sensation ou si vous êtes inquiets, appuyez à nouveau sur la touche «
START/STOP » pour éteindre l’appareil et consultez un professionnel.
Lorsque le pouls est détecté, l’écran affichera le symbole d’un cœur clignotant en
rythme avec votre rythme cardiaque.
Affichage lorsque le
brassard dégonfle.
3. La prise de mesure est terminée. Les résultats
resteront affichés à l’écran à moins que vous
n’appuyiez sur la touche « START/STOP » pour
éteindre l’appareil. Autrement, l’appareil s’éteindra
automatiquement après 30 secondes.
Les mesures seront sauvegardées automatiquement.
Pour y accéder, appuyez sur la touche de
sauvegarde.
Affichage lorsque le
brassard gonfle.

45
Conseils pour obtenir des mesures précises
Veuillez suivre les conseils ci-dessous pour obtenir des mesures précises.
Attendez au moins 1 heure
après avoir bu ou mangé.
Ne mesurez
pas directement après
avoir consommé
des boissons
énergisantes
comme du thé ou du
café ou
après avoir fumé.
Attendez au moins 20 minutes
après avoir pris un bain.
Ne prenez pas une mesure lorsque
vous parlez ou bougez vos doigts.
Ne prenez pas de mesures
dans un environnement très
froid.
Ne prenez pas de mesures lorsque
vous devez aller à la toilette.

46
Maintenance
Afin d’obtenir les meilleurs performances de votre appareil, suivez les instructions
ci-dessous.
Evitez de secouer ou faire tomber
l’appareil.
Rangez dans un endroit sec et à
l’abri du soleil.
Ne laissez pas l’appareil entrer en
contact avec de l’eau. Si l’appareil est
mouillé, séchez-le immédiatement.
Evitez les endroits poussiéreux et
les températures variables.
Utilisez un tissu légèrement humide
(bien essoré) pour retirer la
poussière.
Ne nettoyez pas le brassard avec
de l’eau et ne l’immergez pas dans
de l’eau ou toute autre liquide.

47
Pourquoi ma tension varie au cours de la journée ?
La pression individuelle varie naturellement au
cours de la journée. Elle est également affectée
par la manière dont vous serrez votre brassard
et votre position. Ainsi, il est préférable de
toujours prendre sa tension dans des conditions
similaires.
Veuillez noter : La variation de la pression est
plus grande si la personne est sous
médicamentation.
Si vous souhaitez prendre une seconde mesure,
attendez au moins 3 minutes avant de
recommencer.
La tension varie au long de la journée en fonction de la météo, l’état émotif,
l’exercice physique, etc.
De plus, l’effet ‘blouse blanche’ de l’hôpital augmente votre niveau de nervosité,
ce qui augmente votre tension comparé aux mesures prises chez soi.
Ce à quoi vous devez faire attention lorsque vous mesurez votre tension à la
maison :
- Si le brassard est correctement ajusté.
- Si le brassard est trop ou pas assez serré.
- Si le brassard est placé sur le haut du bras.
- Si vous vous sentez nerveux.
Conseil : prenez deux ou trois grandes inspirations avant de mesurer votre
tension, cela vous donnera des résultats plus fidèles. Si vous êtes
particulièrement anxieux, détendez-vous pendant 4 à 5 minutes avant de prendre
une mesure.
Pourquoi les mesures que j’obtiens à la maison sont-elles
différentes de celles obtenues chez le médecin ?

48
L’utilisation d’un bras ou de l’autre est
égale, bien que les mesures puissent
être différentes d’un bras à l’autre.
C’est pourquoi nous recommandons de
toujours utiliser le même bras d’une
mesure à l’autre.
Sur quel bras placer le brassard pour prendre une mesure ?
Pouls : Nombre de battements de cœur par
minute. La plupart des adultes ont un pouls au
repos entre 60 et 100 battements par minute.
Des athlètes sont susceptibles d’avoir un pouls
plus bas que la moyenne.
Comprendre les résultats
Pression systolique (SYS) : Le niveau le plus
haut de la tension – Lorsque le cœur bat, il se
contracte pour pomper le sang dans les artères.
Pression diastolique (DIA) : Le niveau le plus
bas de la tension – Lorsque le cœur se relâche
entre les battements.

49
Ci-dessous sont illustrées les classifications des normes de pression artérielle
pour les adultes réalisées par l’Organisation Mondiale de la Santé (OMS) et la
Société Internationale de l’Hypertension (ISH) crée en 1999.
DIA (mmHg)
60
80
90
100
110
90 120 140 160 180
SYS (mmHg)
Normal
Pré-élevé
Classe 1: Hypertension
Classe 2: Hypertension
Classe 3: Hypertension
Classification des normes de pression artérielle
Elevé (sévère)
Elevé (modéré)
Elevé (faible)
Bas
SYS DIA
<90 <60
Normal 90-120 60-80
Pré-élevé 120-140 80-90
140-160 90-100
160-180 100-110
>180 >110
Bas
Elevé
(faible)
Elevé
(modéré)
Elevé
(sévère)
Avertissement :
• Seulement un docteur peut vous indiquer quelle est votre éventail
de tension artérielle normale et à partir de quel point vous courez un
risque.
• Si les mesures prises avec cet appareil sont au-delà de cet
éventail, veuillez consulter votre docteur.

50
Résolution des problèmes
L’inflation échoue. Ajustez le brassard et
réessayez.
Cette section inclue une liste de messages d’erreurs et questions
fréquemment posées pour des problèmes que vous êtes susceptibles de
rencontrer avec cet appareil. Si votre moniteur n’opère pas comme il le devrait,
veuillez consulter cette section avec de contacter notre service client.
Informations
affichées
Raison / Signification
L’air s’échappe trop rapidement ou le pouls est
trop faible. Ajustez le brassard et réessayez.
Les résultats sont anormaux. Veuillez mesurer
à nouveau.
Err est affiché dans la
zone SYS et 1 est
affiché dans la zone DIA
Err est affiché dans le
haut de la zone SYS et
2 est affiché dans la
zone DIA
La pression artérielle ne peut pas être détectée
à cause d’un excès de bruit. Retirez la source
du bruit et essayez à nouveau.
Err est affiché dans la
zone SYS et 3 est
affiché dans la zone DIA
Err est affiché dans la
zone SYS et P est
affiché dans la zone DIA
HI est affiché dans la
zone DIA
La pression de gonflage est supérieur à 307±8
mmHg ( 41 kPa±1 kPa ). Mesurez à nouveau.

51
Problème
Test
Solution
Troubleshooting
Rien ne s’affiche
à l’écran lorsque
vous appuyez sur
la touche «
START/STOP »
Le brassard fuite
Le brassard est-il
correctement
branché ?
Achetez un
nouveau
brassard.
Restez immobile
et réessayez.
Restez silencieux
et réessayez.
Veuillez réajuster
le brassard.
Remplacez le brassard.
Avertissement : Si la pression artérielle ne peut toujours pas être
mesurée normalement malgré les recommandations ci-dessus,
veuillez contacter Duronic. N’effectuez pas de réparations sur le
produit par vous-même.
Il n’y a pas de
pression dans le
brassard
Affichage d’un
message d’erreur,
incapacité de
mesurer
Vérifiez l’état de la
batterie.
Est-ce que les piles
sont insérées
correctement ?
Le brassard ou son
tube sont-ils cassés
ou fuitent-ils ?
Avez-vous bougé votre
bras au cours de la
prise de mesure ?
Avez-vous parlé au
cours de la prise de
mesure ?
Est-ce que le brassard
est suffisamment serré ?
La poche d’air dans le
brassard est cassée.
Remplacez les piles ou
branchez le chargeur
de l’appareil.
Insérez les piles en
respectant les pôles
positifs et négatifs.
Insérez le brassard
dans la prise Jack
fermement.

52
Spécifications du produit
Modèle BPM200
Oscillographique
30mmHg - 255mmHg
(5.3kPa-37.3kPa)
40-199 Battements
±3mmHg (±0. 4kPa)
±5% de
Pression
Unité : mmHg / kPa.
Pouls
Nom du produit
Mode d’affichage
Méthode de mesure
Partie mesurée
Ecart des mesures
Affichage LCD
Capacité de
mémorisation
Source de
puissance
Hors tension
Tensiomètre électronique
Ecran digitale
Haut du bras
Valeur de la tension
Valeur de la tension
Rythme cardiaque
Rythme cardiaque
/
minute
la valeur
mesurée
Battements / minutes,
3 chiffres
99 groupes de données pour chaque utilisateur
4 piles AAA ou chargeur USB DC 5V
Arrêt manuel ou arrêt automatique
après 30 secondes d’inactivités
Précision des
mesures

53
Poids (piles
non inclues)
Environ 195g±5g
Dimensions 120mm(longueur) 90mm(largeur) 43mm(hauteur)
59mm(longueur) 47mm(largeur)
Brassard pour le haut du bras (circonférence 22-
36cm ou 22-42cm )
Accessoires
5 ans
5°C - 40°C
15% -
90%RH
70kPa -
106kPa
Taille de l’écran
Brassard
Durée de vie
de la batterie
Durée de vie
Brassard, manuel d’utilisation
Voir l’étiquette
Si le produit est
gardé ou utilisé en
dehors des
conditions
spécifiées, l’appareil
ne fonctionnera pas
correctement.
Date
d’environnement
Environnement de
fonctionnement
Environnement
de rangement et
déplacement
Des piles à hautes performances peuvent
être utilisées jusqu'à 300 fois
Conditions de
températures
Conditions
d’humidité
Conditions
atmosphériques
Un impact fort, une collision, l’exposition directe au
soleil ou à la pluie doivent être évitées lors des
déplacements de l’appareil.
Le tensiomètre emballé doit être rangé dans un
environnement avec une température allant de , avec
une humidité relative allant de et une pression
atmosphérique allant de , sans gaz corrosifs et une
aération positive.
54
Garantie et service après-vente
1 an de garantie de la part de Shine-Mart Ltd, propriétaire de la marque Duronic.
NOTE : CES DÉCLARATIONS N’AFFECTENT EN RIEN VOTRE DROIT STATUTAIRE EN
TANT QUE CONSOMMATEUR
Ce produit a été produit en suivant les procédures de contrôle de qualité les plus strictes en
utilisant des matériaux de qualité pour assurer une excellente durabilité et performance.
Cette centrifugeuse vous offrira de longues années de service tant que vous utilisez
correctement cette machine et suivez les instructions de maintenance contenues dans ce
manuel. Ce produit est garanti pour 1 an à partir de la date originelle d’achat. Si ce produit
était endommagée en raison d’un problème électrique ou d’une fabrication imparfaite,
le produit défectueux peut être remplacé au vendeur à la discrétion de la marque sous
conditions:
1
. L
e produit doit être retourné avec la preuve originale d’achat.
2
. L
e produit doit être installé et utilisé en accord avec les instructions contenue
s
d
ans ce manuel d’utilisation.
3
. L
e produit doit être réservé à un usage privé.
4
. L
a garantie ne protège pas contre les dommages dus à l’usure normale
,
l
’utilisation malveillante, la mauvaise utilisation, la négligence, les réparation
s
c
onduites par des non-experts ainsi que les pièces consommables.
5
. S
hine-Mart Ltd ne porte pas de responsabilité pour tout dommage ou pert
e
a
ccidentel ou conséquent causé par ce produit.
6
. S
hine-Mart Ltd se dégage de toute responsabilité en matière de réparatio
n
d
urant la période de garantie.
7
. V
alide dans toute l’Union Européenne.
Ce produit est fourni avec une prise européenne
et un fusible de 3 ampères.
Importé par Shine-Mart Ltd, RM3 8SB.
Ce symbole apparaît sur le produit et/ou les documents accompagnant ce
produit pour indiquer que pour procéder à la destruction de ce produit, celui-ci
doit être traité comme un déchet électrique et électronique (WEEE).
Les produits marqués WEEE ne doivent être mélangés avec les déchets
ménagers et doivent être séparés pour traitement et recyclage des composants.
An de traiter et recycler ce produit, veuillez déposer tous les composants
marqués WEEE au site de recyclage le plus proche où ce produit sera repris
gratuitement. Si les clients jettent les déchets électriques et électroniques
WEEE correctement, ce geste aidera la préservation de ressources précieuses
et prévient les potentiels effets négatifs que ces composants ou tout autre
composant dangereux ont sur la santé humaine et l’environnement.
Garantie
suivez nous
www.duronic.com @Duronic_FranceDuronic France@duronic_france

55
Gebrauchsanleitung auf Deutsch
56
Danke, dass Sie sich für das Bluthochdruckmessgerät von SHINEMART
entschieden haben.
Das Gerät kann ihren Blutdruck und Puls messen und speichert die Ergebnisse
automatisch ab. Es wird Ihnen zwei Jahre lang ein zuverlässiger Service
geliefert. Die Messergebnisse sind gleichwertig mit denen eines geschulten
Umgangs mit Manschette und Stethoskops. Diese Anleitung beinhaltet wichtige
Sicherheitshinweise und Informationen zur Betreuung. Mit einer Schritt für Schritt
Anweisung lernen Sie den Umgang mit dem Produkt kennen.
Bitte lesen Sie die Anleitung aufmerksam durch bevor Sie das Produkt benutzen.
Stellen Sie sicher, dass Sie den Umgang mit dem Produkt verstanden haben.
Eigenschaften:
• 59 x 47 mm digitales LCD
• Maximum 99 x 2 Gruppenakten
• Aufblasende Messtechnologie
Die unten aufgeführten Symbole werden im Handbuch, oder an den
Komponenten dargestellt. Bitte befolgen Sie die Anweisungen der
einzelnen Symbole.
Symbolverzeichnis
Die Bedienungsanleitung
muss gelesen werden.
Für den Blutkreislauf
eingesetzte Teile.
Dieses Produkt entspricht der
MDD93/42EEC Voraussetzung
Entsorgung: Dieses Produkt darf
nicht im normalen Hausmüll
entsorgt werden. Bitte entsorgen
Sie es in einer geeigneten
Mülltrennungsanlage.
Hersteller Gleichstrom
Festgelegte Seriennummer
Wellkang Ltd
Suite B, 29 Harley Street,
London, W1G 9QR,UK
Herstellerdatum
IP zertifizierter Schutz vor
Wasser.
IP21
SN

57
• Dieses Gerät ist für Erwachsene. Benutzen Sie es nicht an Kindern.
• Das Gerät sollte nicht an schwangeren Frauen, oder Frauen, die womöglich
Schwanger sind, genutzt werden. Es könnten falsche Messergebnisse
angezeigt werden und mögliche Auswirkungen auf einen Fötus sind nicht
bekannt.
• Dieses Gerät ist für die nicht-invasive Messung und Überwachung von
arteriellem Blutdruck. Es ist nicht für andere Extremitäten als dem Arm
vorgesehen und sollte nicht für andere Zwecke, als dem Messen des
Blutdrucks, genutzt werden.
• Bitte kontaktieren Sie Ihren Hausarzt, wenn Sie das Messergebnis
verunsichert. Dieses Gerät dient nur der Selbstüberwachung des Blutdrucks
und ist in keinster Weise für eine Selbstdiagnose geeignet.
• Regulieren Sie auf keinen Fall eine laufende Behandlung, und starten oder
beenden Sie auch keine Behandlung auf Basis ihrer Messwerte. Konsultieren
Sie immer Ihren Hausarzt für eine individuelle Behandlung.
• Wenn Sie Medikamente einnehmen, fragen Sie Ihren Arzt, zu welcher Uhrzeit
Sie Ihren eigenen Blutdruck messen können.
• Wird das Gerät bei Patienten mit Herzrhythmusstörungen, wie etwa
Vorhofflimmern oder ventrikuläre Extrasystole, eingesetzt, können die
Messergebnisse variieren.
• Bitte kontaktieren Sie Ihren Hausarzt, wenn Sie von Ihrem Blutdruck
verunsichert sind.
• Wenn die Armmanschette einen Druck von 40 kPa (300 mmHg) erreicht, wird
das Gerät den Druck automatisch wieder ablassen. Sollte das Gerät den
Druck nicht wieder ablassen, wenn er 40 kPa (300 mmHg) erreicht hat,
nehmen Sie die Manschette vom Arm und betätigen Sie den "Start/Stop"
Knopf, um die Pumpvorgang zu unterbrechen.
• Das Gerät ist nicht in Räumen mit Explosionsgefahren zu benutzen. Dazu
zählen u.a. leicht entzündliche anästhetische Gase, wie z.B. Lachgas.
Sicherheitshinweise

58
• Um falsche Messergebnisse zu vermeiden, benutzen Sie dieses Gerät
außerhalb von Umgebungen mit starkem Strahleneinfluss, wie z.B. Radio-
und Mikrowellen.
• Vor der Benutzung stellen Sie bitte sicher, dass das Gerät keinerlei Schäden
hat und ein sicherer Umgang gewährt ist.
• Dieses Gerät ist nicht für eine Überwachung während eines medizinischen
Notfalls oder einer Operation geeignet. Es könnten Symptome von wie ein
Taubheitsgefühl in Fingern und Arm entstehen. Zudem könnte der Arm
anschwellen und blau anlaufen, da der Arm mit zu wenig Blut versorgt wird.
• Bitte benutzen Sie das Gerät so, wie es Ihnen die Bedienungsanleitung
vorgibt. Wenn Sie sich nicht daran halten, kann eine Fehlbedienung die
Funktionalität und Lebensdauer des Gerätes stark beeinträchtigen.
• Während der Benutzung hat der Anwender oder Patient einen direkten
Kontakt mit der Manschette. Die Materialien wurde ausgiebig getestet, um
der ISO 10993-5:2009 und der ISO 10993-10:2010 zu entsprechen. Somit
sollten keine Probleme während der Nutzung auftreten.
• Benutzen Sie nur von Duronic autorisierte Teile und Zubehör mit dem
BPM200. Teile und Zubehör, die nicht von Duronic sind, können bei dem
Produkt zu fehlerhaften Ergebnissen führen, oder gar das Gerät
beschädigen.
• Das Gerät sollte innerhalb der ersten 2 Jahre nicht kalibriert werden müssen.
• Wenn Sie irgendwelche Probleme mit dem Produkt haben, etwa dem
Einrichten, oder der Benutzung des Gerätes, kontaktieren Sie unseren
Duronic Kundenservice. Wir helfen Ihnen gern weiter.
• Versuchen Sie das Gerät nicht eigenständig zu reparieren. Bei Problemen
mit dem Gerät wenden Sie sich bitte direkt an Duronics technischen Service.
• Bitte reinigen Sie das Gerät mit einem weichen Tuch. Halten Sie das Gerät
nicht unter Wasser, oder reinigen Sie es auch nicht mit starken Chemikalien,
die die Oberfläche des Geräts angreifen können.

59
Batteriebetrieb
• Der Benutzer des Geräts sollte unter keinen Umständen die Batteriepole und
die zu behandelnde Person zu gleichen Zeit anfassen.
• Bitte benutzen Sie die richtigen Batterien für Ihr Gerät. Batterien anderer
Größe können das Gerät beschädigen. Das Gerät benötigt 4 x AAA Batterien
(Microzellen).
• Batterien haben eine ätzende Flüssigkeit. Wenn diese austritt und Sie
Augenkontakt haben, spülen Sie gründlich Ihre Augen aus und
benachrichtigen Sie umgehend einen Arzt.
Netzbetrieb
• Wenn Sie das Gerät mit einen Netzteil betreiben, stellen Sie sicher, dass
Ihre Hände nicht nass sind, wenn Sie das Netzteil in die Steckdose stecken.
• Benutzen Sie kein Netzteil, wenn Sie äußerliche Schäden am Netzteil oder
Kabel feststellen.
• Wenn Sie das Gerät vom Stromnetz trennen, ziehen Sie niemals direkt am
Netzkabel. Greifen Sie immer das Netzteil, um es aus der Steckdose zu
ziehen, um Schäden am Kabel und Netzteil zu vermeiden.
• Wenn Sie das Gerät mit einem Netzteil verbinden, stellen Sie sicher das die
Netzspannung 230 V ~ 50 Hz beträgt. Der BPM200 wird mit 5V
Gleichspannung versorgt. Das Netzteil wandelt die Spannung an diese
Anforderung um.
Kontaktinformation
Vertrieben durch
: Shinemart GmbH (EU) / Shine-mart Ltd (UK)
Hergestellt durch: Shenzhen Jumper Medical Equipment Co. Ltd
Autorisierter europäischer Vertreter: Wellkang Ltd

60
1. Benutzer
2. Ton an
3. Systolischer
Druck
4. Diastolischer
Druck
5. Herzschlag
LCD
6. Puls
7. Arrhythmie
8. Datum/Uhrzeit
9. Geringer
Batteriestand
10. Einheit
11. Blutdruck Level
Anzeige
12. Speicheranzeige
13. Speichernummer
14. Durchschnittlicher
Anzeigewert
1
2
6
7
4
3
5
10
9
11
12
13
14
8
Symbol
Beschreibung
SYS
Systolischer Blutdruck
DIA
Diastolischer Blutdruck
Pul/min
Puls in der Minute
Uhrzeit (Stunde:Minute)
Gespeicherter Wert
mmHg
Einheit für das Messergebnis
Geringer Batteriestand
Arrhythmie / Herzrhythmusstörungen

61
Mitgeliefertes Zubehör
Wahl der Spannungsversorgung
1. Manschettenanschluss
2. Benutzer/Einstellung-Knopf
3. Start/Stopp-Knopf
4. USB-Anschluss für
externes Netzteil
5. Speicher-Knopf
1. Batteriebetrieb: Benötigt 4 x AAA Batterien
2. Netzbetrieb: 5V Netzteil mit USB-Anschlusskabel (Micro USB B)
Manschette
22 - 36 cm
(Für den Blutkreislauf
eingesetzte Teile)
Blutdruckanzeige
4 x AAA Batterien
1
2
3
4
5
Achtung: Benutzen Sie nur die dafür vorgesehenen
Spannungsquellen, wie die AAA Batterien oder ein 5V USB-Netzteil.
Abweichende Spannungsquellen können das Gerät beschädigen.

62
Achtung:
• Entfernen Sie die Batterien, wenn das Gerät für einen längeren
Zeitraum nicht benutzt wird.
• Altbatterien sind schädlich für die Umwelt. Entsorgen Sie
Altbatterien nicht mit dem Hausmüll. Bringen Sie die Batterien zu
Sammelstellen, um sie zu entsorgen. Werfen Sie die Batterien auf
keinen Fall ins Feuer. Es besteht Explosionsgefahr und die
Batterien können auslaufen und die Umwelt stark belasten.
Arrhythmie-/Herzrhythmusstörungsdetektor
Dieses Blutdruckmessgerät ist mit einem Herzrhythmus Detektor
ausgestattet (IHB). Während jeder Messung zeichnet das Gerät die
Herzfrequenz mit auf und registriert, ob das Herz normal schlägt oder
ob es Abweichungen gibt. Wenn der kalkulierte Wert größer oder
gleich 15 ist, wird auf dem Display das Arrhythmie-Symbol (7)
aufleuchten, sobald alle Messergebnisse angezeigt werden.
Einlegen und Wechseln der Batterien
1. Schieben Sie die Abdeckung in Pfeilrichtung, um das Batteriefach zu öffnen.
2. Legen Sie neue Batterien in das Fach und achten Sie auf die Polarität.
3. Schließen Sie das Batteriefach wieder.
Ersetzen Sie die Batterien bei folgenden Eigenschaften:
• Das Symbol ist sichtbar
• Die Anzeige wird blasser.
• Die Anzeige schaltet sich nicht ein.
Achtung: Das Aufleuchten des Arrhythmie-Symbols zeigt an, das während der
Messung es zu einer Herzrhythmusstörung gekommen ist. So etwas kann schonmal
vorkommen und ist kein Grund zur Sorge. Sollten Sie jedoch regelmäßig das Symbol
angezeigt bekommen, sollten Sie einen Arzt oder Kardiologen aufsuchen. Bitte
beachten Sie, dass dieses Gerät keinen Ersatz für eine ärztliche Untersuchung
darstellt. Es zeigt lediglich Störungen in der Herzfrequenz in einem frühen Stadium
an.

63
Einstellen von Datum, Uhrzeit und Einheiten
Es ist wichtig, die Uhrzeit richtig einzustellen bevor Sie das Gerät nutzen.
Dadurch können die gespeicherten Messergebnisse mit einem Zeitstempel
versehen werden.
(Jahr: 2000-2050, Zeit: 24 Stunden)
1. Wenn das Display aus ist, drücken und halten Sie den Benutzer/Einstellung-
Knopf für 5 Sekunden. Das "Benutzer 1" Symbol wird dann aufblinken.
2. Drücken Sie den Benutzer/Einstellung-Knopf, um das Jahr zu wechseln.
Blättern Sie mit dem Speicher-Knopf durch die Jahre.
3. Drücken Sie den Benutzer/Einstellung-Knopf, um das Datum (Monat/Tag) zu
wechseln. Blättern Sie mit dem Speicher-Knopf durch die Tage.
4. Drücken Sie den Benutzer/Einstellung-Knopf, um die Uhrzeit (Stunde/Minute)
zu wechseln. Blättern Sie mit dem Speicher-Knopf durch die Uhrzeit.
5. Drücken Sie den Benutzer/Einstellung-Knopf, um die Maßeinheit (mmHg/
KPa) zu wechseln. Blättern Sie mit dem Speicher-Knopf durch die
Maßeinheiten.
Benutzer/Einstellung
Knopf
Speicher
Knopf

64
Den Speicher löschen
Um im internen Speicher alle Daten zu löschen, drücken und halten Sie den
Speicher-Knopf für 3 Sekunden. Wenn auf der Anzeige ein "M" angezeigt wird,
lassen Sie den Speicher-Knopf weiterhin gedrückt und drücken Sie zusätzlich
den Benutzer/Einstellung-Knopf.
Auf der Anzeige erscheint nun der Hinweis "ALL EE", was bedeutet, dass der
Speicher gelöscht wurde.
Wenn es keine gespeicherten Daten gibt, zeigt das Gerät stattdessen "NO" an.
Benutzer auswählen
Wenn das Display aus ist, drücken und halten Sie den Benutzer/Einstellung-
Knopf für 5 Sekunden. Das "Benutzer 1" Symbol wird dann aufblinken. Jetzt
können Sie mit einem Tastendruck auf den Benutzer/Einstellung-Knopf zum 2.
Benutzer wechseln und Einstellungen vornehmen.
Benutzer/Einstellung
Knopf

65
Auf den Speicher zugreifen
Die erfassten Messwerte werden automatisch auf dem Gerät gespeichert. Um
die Daten einzusehen, drücken Sie den Speicher-Knopf. Mithilfe des Benutzer/
Einstellung-Knopf lässt sich zwischen den beiden Benutzerprofilen wechseln.
Das Blutdruckmessgerät speichert bis zu 99 Einträge für 2 Benutzer automatisch
ab. Wenn der Speicher voll ist, werden die ältesten Einträge automatisch mit
den neuen überschrieben.
Wenn das Blutdruckgerät bereits einige Male benutzt worden ist, lassen sich mit
einem Druck auf den Speicher-Knopf die letzten drei Messwerte anzeigen, wenn
das Gerät ausgeschaltet wird.
Drücken Sie erneut den Speicher-Knopf, um die erste Gruppe von Blutdruck-
messwerten anzuzeigen und sehen Sie auch die anderen Speichergruppen
direkt daneben.
Speicher
Knopf

66
Bedienung
Bringen Sie die Manschette an
1.
Machen Sie den Oberarm frei und
bringen Sie die Manschette oberhalb
der Armbeuge an. Drehen Sie die
Manschette, dass der
Schlauchausgang eine Linie zu
Ihrem kleinen Finger bildet.
2. Die Manschette sollte fest sitzen,
aber nicht zu straff. Es sollte noch
etwa ein Finger unter die Manschette
geschoben werden können.
3. Setzen Sie sich bequem hin und
legen Sie den Arm entspannt auf
einen Tisch.
Tipps
• Machen Sie in den nächsten 5 Minuten nichts anstrengendes, bevor Sie
Ihren Puls messen.
• Warten Sie mindestens 3 Minuten, wenn Sie sich erneut messen wollen.
Dadurch kann sich der Blutkreislauf wieder normalisieren.
• Um Ihre Messergebnisse besser vergleichen zu können, achten Sie
darauf, dass die Tests mit gleichen Voraussetzungen stattfinden.
Wechseln Sie nicht die Arme, führen Sie Messungen zu ähnlichen
Uhrzeiten durch. Halten Sie sich stets an die Empfehlungen Ihres Arztes.

67
Wie man eine Messung durchführt
1. Stellen Sie sicher, dass die Manschette fest am Arm sitzt.
Betätigen Sie dann den Start/Stopp-Knopf und starten Sie den
Vorgang. Das Gerät wird die gesamte Messung automatisch
durchführen.
2. Die Manschette wird nun aufgeblasen. Wenn die Manschette vollständig
aufgeblasen worden ist, kann sich diese etwas unangenehm anfühlen. Das ist
völlig normal und ist kein Grund zur Sorge. Sollten Sie es dennoch als
schmerzhaft wahrnehmen, oder Sie haben andere Bedenken, unterbrechen Sie
den Messvorgang, indem Sie den Start/Stopp-Knopf erneut betätigen. Suchen
Sie sich gegebenenfalls medizinischen Rat.
Anzeige wenn die Manschette
aufgepumpt wird
Wenn der Puls erkannt wird, ist auf der Anzeige ein Herz-Symbol zu erkennen,
welches im Rhythmus mit dem Herzen aufblinkt.
Anzeige wenn die Manschette
abgepumpt wird
3.
Ihre Messung ist fertig. Die Anzeige wird Ihre
Messwerte so lange anzeigen, bis das Gerät mit
dem Start/Stopp-Knopf ausgeschaltet wird. Nach
einer Dauer von 30 Sekunden schaltet sich das
Gerät auch automatisch aus.
Das Messergebnis wird automatisch gespeichert
und kann über den Speicher-Knopf wieder
abgerufen werden.

68
Mit diesen Tipps bekommen Sie ein akkurateres Messergebnis
Warten Sie mindestens 1 Stunde
nach dem Essen oder Trinken.
Führen Sie keine Messung durch,
wenn Sie gerade koffeinhaltige
Getränke zu sich genommen haben.
Sie sollten davor auch nicht rauchen.
Vermeiden Sie es, während der
Messung zu sprechen, oder
telefonieren und bewegen Sie
sich nicht.
Warten Sie mindestens 20 Minuten
nach einem heißen Bad, oder einer
heißen Dusche.
Sorgen Sie für ein angenehmes
Raumklima. Eine kalte Umgebung
führt zu falschen Messergebnissen.
Sie sollten das stillsitzen bei der
Messung nicht mit dem stillsitzen auf
der Toilette kombinieren.
Bitte befolgen Sie folgende Hinweise für ein besseres Messergebnis.

69
Pflege des Gerätes
Um über einen langen Zeitraum zuverlässige Ergebnisse zu bekommen, halten Sie
sich bitte an folgende Weisungen.
Lagern Sie das Gerät trocken und
schützen Sie es vor direkter
Sonneneinstrahlung.
Vermeiden Sie den Kontakt mit
Wasser. Wenn das Gerät Nass
wird, trocknen Sie es sofort.
Vermeiden Sie staubige Umgebun-
gen und extreme Temperaturen.
Vermeiden Sie Stöße und Stürze.
Benutzen Sie ein feuchtes Tuch, um
das Gerät zu reinigen.
Reinigen Sie die Manschette nicht
mit Wasser und tauchen Sie sie
niemals unter Wasser oder
anderen Flüssigkeiten.

70
Warum variiert mein Blutdruck den Tag über?
Warum habe ich Zuhause einen anderen Blutdruck als im
Krankenhaus?
Der Blutdruck ändert sich über den Tag
permanent. Außerdem kann eine zu lockere
oder falsch angelegte Manschette ebenfalls
das Ergebnis beeinflussen. Aus diesem Grund
empfehlen wir, dass Sie eine die Messungen
immer zur gleichen Uhrzeit und in gleicher,
ruhiger Position tätigen.
Bitte beachten Sie: Wenn der Anwender
Medikamente einnimmt, kann sich dies auf den
Blutdruck auswirken.
Wenn Sie eine zweite Messung durchführen
möchten, warten Sie bitte mindestens 3
Minuten nach der ersten Messung.
Der Blutdruck ist von vielen Faktoren abhängig. Auswirkungen können
haben: Wetter, Emotionen, körperliche Betätigungen, etc.
Zudem gibt es einen Kitteleffekt, der dafür sorgt, dass das Herz vor
Aufregung und Angst schneller schlägt.
Auf folgendes sollten Sie zu Hause achten, wenn Sie den Blutdruck messen:
- Ist die Manschette richtig festgeschnallt?
- Ist die Manschette nicht zu locker und nicht zu straff?
- Ist die Manschette am Oberarm befestigt?
- Sind Sie aufgeregt?
Hinweis: Nehmen Sie vor der Messung 2-3 tiefe Atemzüge, um bessere
Ergebnisse zu erhalten. Wenn Sie besonders aufgeregt oder nervös sind,
kommen Sie zunächst für 4-5 Minuten zur Ruhe.

71
Welcher Arm ist für die Messung geeignet?
Generell sind beide Arme geeignet. Es
kann bei einigen Anwendern jedoch zu
verschiedenen Messergebnisse kommen.
In diesem Fall sollten Sie sich für einen
Arm entscheiden, den Sie dauerhaft für
Messungen benutzen möchten.
Messergebnisse verstehen
Systolischer Druck (SYS): Der höchste Wert
des Blutdrucks. Wenn das Herz schlägt, wird
das Blut durch die Arterien gepumpt.
Diastolischer Druck (DIA): Der niedrigste
Wert des Blutdrucks. Wenn das Herz zwischen
den Schlägen ruht.
Puls: Anzahl an Herzschlägen pro Minute. Die
meisten Erwachsenen haben einen Ruhepuls
von 60 - 100 bpm. Bei Athleten kann der Wert
darunter liegen.
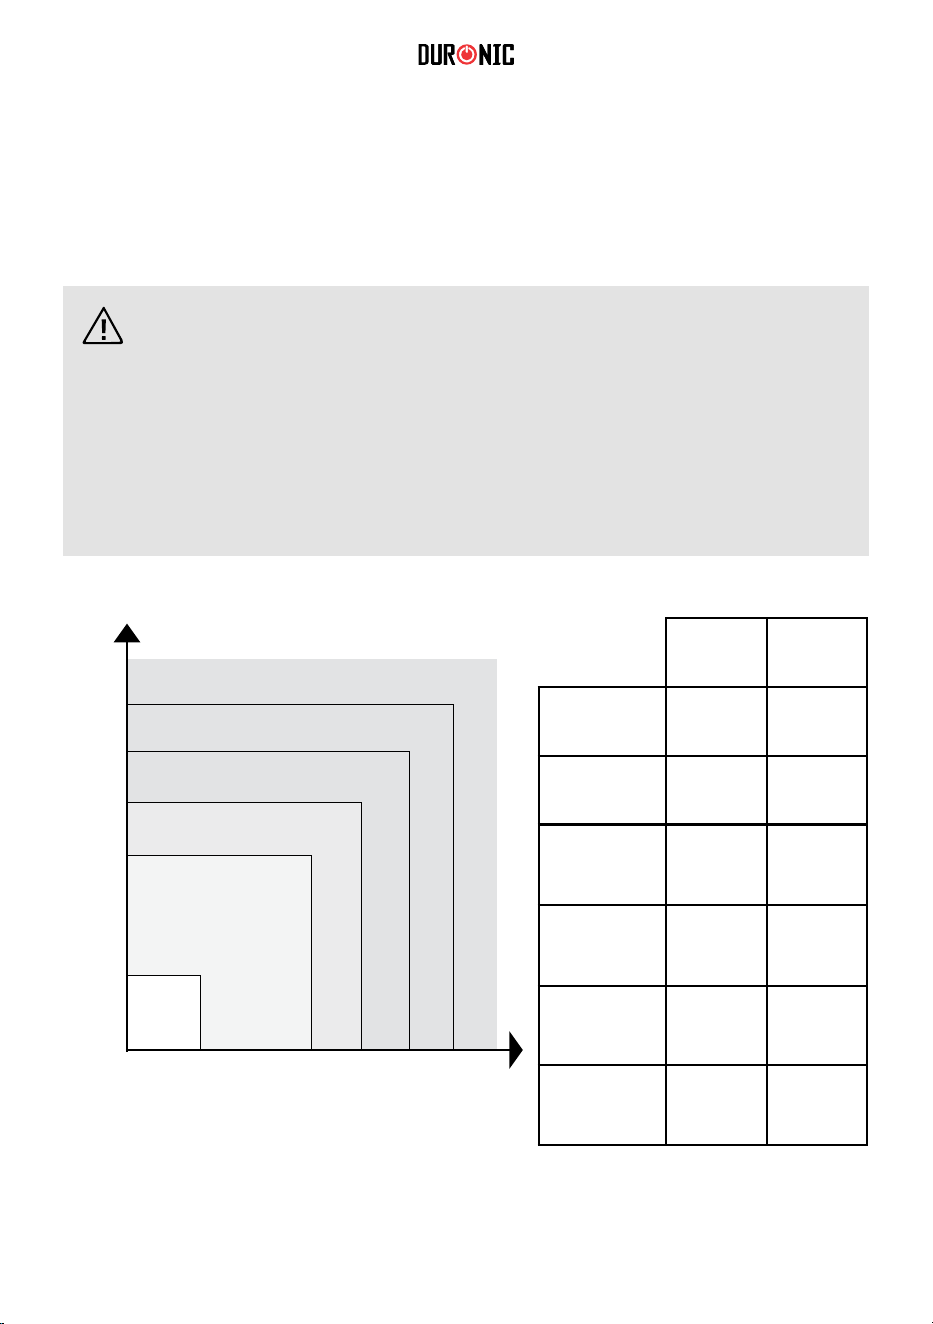
72
Standard Blutdruck Klassifizierungen
Unten finden Sie die Standard Blutdruck Klassifizierungen für Erwachsene,
welche von der Weltgesundheitsorganisation (WHO) und der Internationalen
Gesellschaft für Hypertension im Jahre 1999 veröffentlicht worden ist.
DIA (mmHg)
60
80
90
100
110
90 120 140 160 180
SYS (mmHg)
Nie-
drig
Normal
Erhöht
Hoch (Mild)
Stufe 1: Hypertension
Hoch (Mäßig)
Stufe 2: Hypertension
Hoch (Ernst)
Stufe 3: Hypertension
SYS DIA
Niedrig
<90 <60
Normal 90-120 60-80
Erhöht
120-140 80-90
Hoch
(
Mild)
140-160 90-100
Hoch
(
Mäßig)
160-180 100-110
Hoch
(
Ernst)
>180 >110
Achtung:
• Nur ein Arzt kann Sie über Ihren normalen Blutdruck informieren
und welcher Wert für Sie gefährlich ist. Konsultieren Sie Ihren
Arzt, um Ihre persönlichen Messwerte zu ermitteln.
• Wenn die Messwerte, die Ihnen das Gerät anzeigt, Ihre
eigentlichen Werten übersteigen, konsultieren Sie Ihren Arzt und
befolgen Sie seine Hinweise.

73
Fehlerbehebung
LCD Information
Grund/Bedeutung
Err wird im SYS Bereich
angezeigt, eine 1 wird im
DIA Bereich angezeigt.
Es gibt einen zu großen Verlust und der Puls
kann nicht genau gemessen werden. Bitte
kontrollieren Sie, ob die Manschette korrekt
und fest am Oberarm sitzt.
Err wird im SYS Bereich
angezeigt, eine 2 wird im
DIA Bereich angezeigt.
Der Blutdruck kann nicht richtig ermittelt
werden, da es zu viele Nebengeräusche gibt.
Bitte suchen Sie einen ruhigen Ort auf, an dem
es keine störenden Geräusche gibt.
Err wird im SYS Bereich
angezeigt, eine 3 wird im
DIA Bereich angezeigt.
Das Testergebnis ist ungewöhnlich. Bitte starten
Sie einen erneuten Test.
Err wird im SYS Bereich
angezeigt, eine P wird im
DIA Bereich angezeigt.
Das Aufpumpen bereitet einen Fehler. Bitte prüfen
Sie die Manschette und bringen Sie sie erneut in
korrekter Weise am Oberarm an.
HI wird im DIA Bereich
angezeigt.
Der Luftdruck ist größer als 307+- 8 mmHg (41
kPa +- 1 kPa). Bitte führen Sie eine erneute
Messung durch.
Diese Tabelle ist eine Liste von Fehlermeldungen und häufig gestellten Fragen
von Schwierigkeiten, die bei dem Blutdruckmessgerät auftreten können. Wenn Ihr
Gerät nicht reibungslos funktioniert, schauen Sie bitte zuerst in diese Tabelle.

74
Problem
Testen Lösung
Die Anzeige
bleibt aus wenn
der Start/Stopp-
Knopf gedrückt
wurde.
Prüfen Sie den
Ladestand der
Batterien.
Ersetzen Sie die
Batterien oder versorgen
Sie das Gerät via USB-
Kabel mit Spannung.
Liegen die Batterien
richtig gepolt im Gerät?
Legen Sie die Batterien
korrekt ins Batteriefach
ein.
Die Manschette
baut keinen Druck
auf.
Ist die Manschette korrekt
am Gerät angeschlossen?
Stecken Sie den
Schlauch richtig fest
in das Gerät.
Ist der Schlauch der
Manschette beschädigt?
Kaufen Sie eine neue
Manschette.
Eine
Fehleranzeige,
es ist nicht
möglich zu
messen.
Haben Sie den Arm
während der Messung
bewegt?
Halten Sie den Arm still
und probieren Sie es
erneut.
Haben Sie Gespräche
während der Messung
geführt?
Achten Sie auf eine ruhige
Umgebung und probieren
Sie es erneut.
Die Manschette
verliert an
Luftdruck.
Sitzt die Manschette
zu locker?
Bringen Sie die
Manschette fester an
Ihren Arm an.
Der Luftbehälter der
Manschette ist
beschädigt.
Ersetzen Sie die
Manschette mit einer
Neuen.
Troubleshooting
Achtung: Wenn der Blutdruck noch immer nicht korrekt gemessen
werden kann, kontaktieren Sie Duronic. Öffnen Sie nicht
eigenständig das Gerät.

75
Produkteigenschaften
Produktname
Electronic Blood Pressure Monitor
Model BPM200
Anzeige Digitale Anzeige
Messmethode Oszillographisch
Messobjekt Oberarm
Messbereich
Blutdruckwert
30 mmHg - 255 mmHg
(5.3 kPa -
37.3 kPa)
Pulswert
40 -
199 Herzschläge
pro Minute
Statische
Messgenauigkeit
Blutdruckwert ±3 mmHg (±0.4 kPa)
Pulswert
±5%
des ermittelten
Wertes
LCD
Blutdruck
Einheit: mmHg / kPa
Puls
Puls in der Minute, wird
mit 3 Digits angezeigt
Speicherkapazität
99 Plätze für die Messwerte für
jeden der beiden Benutzer
Spannungs-
versorgung
4 AAA Batterien oder über eine 5V
Gleichspannungsquelle mit USB-Anschluss
Ausschalten Gerät schaltet sich nach 30 Sekunden automatisch ab

76
Leergewicht
Etwa 195 g ± 5 g
Maße
120 mm (Länge) x 90 mm (Breite) x 43 mm (Höhe)
Bildschirmgröße
59 mm (Länge) x 47 mm (Breite)
Manschette
Oberarm-Manschette (Umfang des Oberarms: 22
- 36 cm bis 22 - 42 cm)
Zubehör
Manschette, Bedienungsanleitung
Batteriedauer
Im Batteriebetrieb kann das Gerät bis zu 300
Messungen durchführen.
Betriebsdauer
5 Jahre
Herstellungsdatum
Siehe Kennzeichnung
Umgebungs-
voraussetzungen
Temperatur
5°C - 40°C
Wenn das Gerät
außerhalb der
Umgebungsvor-
aussetzungen
eingesetzt wird,
kann es zu fal-
schen Messwerten
kommen.
Luftfeuchtigkeit
15% -
90% RH
Witterung
70kPa -
106kPa
Lagerung und
Transport
Starke Erschütterungen, Stöße, Sonnen-
einstrahlungen, oder Regen sollten während des
Transportes vermieden werden.
Das eingepackte Blutdruckmessgerät sollte in
Umgebungen mit einer Temperatur von -20° C - 55° C,
einer Luftfeuchtigkeit von 10% - 93% und einer
Witterung von 70 kPa - 106 kPa, ohne schädliche
Gase und mit einer guten Belüftung, gelagert werden.
77
Shine-Mart Ltd, der Markeninhaber von Duronic Produkten, bietet 1 Jahr Gewährleistung.
HINWEIS: DIESE BEDINGUNGEN BEEINFLUSSEN IHRE GESETZLICHE RECHTE ALS
VERBRAUCHER NICHT
Dieses Produkt wurde unter strengen Qualitätskontrollen produziert und aus hochwertigen
Materialien hergestellt, um ausgezeichnete Leistung und Zuverlässigkeit zu gewährleisten.
Sofern das Produkt korrekt benutzt und gewartet wird, kann eine langlebige Lebensdauer
erwartet werden.
Das Produkt hat eine Gewährleistung von einem Jahr ab Kaufdatum. Beim Auftreten eines
Schadens, der von fehlerhalten Materialien oder Verarbeitung verursacht wurde, sollte das
defekte Produkt an den ursprünglichen Verkäufer zurückgegeben werden. Die Erstattung
oder Umtausch erfolgt nach Vorschriften des Unternehmens.
Duronic Produkte haben 1 Jahr Gewährleistung unter folgenden Bedingungen:
1. Das Produkt muss mit dem Kaufnachweis zurückgegeben werden.
2.
D
as Produkt muss unter den Anweisungen und Anleitungen installiert und benutz
t
w
orden sein.
3.
E
s muss ausschließlich für den Hausgebrauch genutzt worden sein.
4.
N
atürliche Abnutzung oder Verschleiß, böswillige Beschädigung, Missbrauch,
Vernachlässigung und unsachgemäße Reparaturen sind von der Gewährleistung
ausgeschlossen.
5.
S
hine-Mart Ltd übernimmt keine Verantwortung für zufällige oder Folgeschäden.
6. Shine-Mart Ltd ist nicht für Wartungsarbeiten zuständig. Diese fallen nicht unter die
Ge
währleistung.
7.
G
ültig in der EU
Dieses Produkt ist mit tted CE geprüfte Typ-F
Euro Stecker/BS Stecker ausgestattet
Von Shine-Mart Ltd, RM3 8SB importiert
Information über Abfalllagerung für Verbraucher von elektronischen Geräten.
Dieses Zeichen auf dem Produkt und/oder auf mitgelieferte Dokumenten
zeigt, dass, wenn eine Entsorgung erfolgt, das Gerät an einer Elektro- und
Elektronikgeräte-Abfall-Sammelstelle (WEEE) abgegeben werden muss.
Um eine weitere Behandlung und Weiterverarbeitung der Materialien zu
gewährleisten dürfen diese WEEE-markierten Produkte nicht mit dem Hausmüll
vermischt werden.
Für die korrekte Behandlung, Aufbereitung und Wiederverwendung geben Sie
alle WEEE-markierten Produkte zur kommunalen Abfallbeseitigungsanlage.
Dort können Sie diese kostenlos abgeben.
Wenn die Beseitigung von Elektro-und Elektronik-Altgeräten korrekt
durchgeführt wird, tragen Sie zur Gewinnung von wertvollen Ressourcen
bei, sowie einer möglichen Vermeidung von negativen Auswirkungen auf
Gesundheit und Umwelt.
Gewährleistung
Folgen Sie Uns

78
Manual De Instrucciones En Español

79
Gracias por elegir el tensiómetro de brazo Duronic BPM200.
•
Con este tensiómetro puede medir la presión arterial, medir la frecuencia del
pulso y auto-guardar los resultados registrados. Este modelo le garantiza al
menos dos años de resultados fiables. Las medidas tomadas por el tensiómetro
son equivalentes a las obtenidas por un profesional que usa el método de
auscultación con estetoscopio y manguito. Este manual de instrucciones
contiene información importante sobre seguridad y cuidado, y, proporciona
instrucciones paso a paso para el uso del producto.
Lea detenidamente el manual antes de utilizar el producto.
Características:
•
Pantalla LCD Digital de 59x47mm.
•
Guarda hasta un máximo de 99x2 registros grupales.
Tecnología de medición de
inflado.
Símbolos
Los símbolos que aparecen a continuación pueden aparecer en el manual
de instrucciones:
Wellkang Ltd
Suite B, 29 Harley Street,
London, W1G 9QR,UK
DEBE LEERSE EL
MANUAL DE
INSTRUCCIONES
Marcado CE: se ajusta a los
requisitos esenciales de la
Directiva 93/42/CEE relativa a
los productos sanitarios.
Fabricante
Número de serie
Fecha de fabricación
Partes aplicadas tipo BF
DESECHO: No desechar este
producto como residuos
municipales sin clasificar. Es
necesario separar estos
residuos para su tratamiento
especial.
Corriente continua
IP21 Grado de protección
IP21
SN

80
•
•
Este dispositivo está diseñado para uso exclusivo en adultos. No utilice
este dispositivo en niños.
Este dispositivo no debe ser utilizado por mujeres que estén o se
sospeche que estén en estado de embarazo. Además de proporcionar
lecturas inexactas, se desconocen los efectos de este dispositivo en el
feto.
•
Este dispositivo está diseñado para la medición y el control no invasivos
de la presión arterial. No está diseñado para usarse en ninguna
extremidad que no sea el brazo y no debe usarse para ninguna otra
función que no sea la medición de la presión arterial.
•
Comuníquese con su médico si le preocupa su presión arterial. No
confunda la automonitorización con el autodiagnóstico.
•
•
No comience o termine un tratamiento sin consultar a un médico.
Si está tomando medicamentos, consulte a su médico para
determinar la hora más apropiada del día para medir su tensión.
•
Cuando el dispositivo se utiliza para tomar la tensión de pacientes con
arritmias comunes como latidos prematuros auriculares o ventriculares o
fibrilación auricular, el mejor resultado puede ocurrir con la desviación.
•
•
Por favor, si está preocupado por el resultado de su presión arterial,
consulte a su médico.
Si la presión del manguito supera los 40 kPa (300 mmHg), la
unidad se desinflará automáticamente. Si el manguito no se
desinfla cuando la presión supera los 40 kPa (300 mmHg),
quíteselo y pulse el botón START/STOP para detener el inflado.
•
El equipo no es adecuado para su uso en presencia de compuestos
anestésicos inflamables con aire o con oxígeno u óxido nitroso.
Información de seguridad

81
•
Para evitar errores de medición, evite exponer la máquina a una señal
de interferencia de radiación de campo electromagnético fuerte o a una
señal eléctrica de ráfagas rápidas.
•
El usuario debe comprobar que el equipo funciona de forma segura y que
está en buenas condiciones de funcionamiento antes de utilizarlo.
•
No se recomienda un uso continuo de este tensiómetro para
emergencias médicas u operaciones. De lo contrario, el brazo y
los dedos del paciente se entumecerán, se hincharán e incluso se
pondrán morados debido a la falta de sangre.
•
Por favor, utilice el dispositivo tal y como se indica en el manual de
instrucciones, de lo contrario, el rendimiento y la vida útil del dispositivo
se verán afectados y reducidos.
•
Durante su uso, el paciente estará en contacto con el manguito, cuyos
materiales se han probado y cumplen con los requisitos de las normas
ISO 10993-5:2009 e ISO 10993-10:2010. Por lo tanto, no causará
ninguna reacción potencial de sensibilización o irritación.
•
Por favor, utilice los accesorios y piezas desmontables especificados o
autorizados por Duronic. De lo contrario, podría dañar el producto o
poner en peligro al paciente.
•
No es necesario calibrar el dispositivo dentro de los dos años de servicio
fiable.
•
Si tiene algún problema con este dispositivo, como, por ejemplo, su
configuración, mantenimiento o uso, póngase en contacto con el equipo
de atención al cliente de Duronic.
•
No abra ni repare el dispositivo usted mismo. Si tiene algún problema con
su dispositivo, comuníquese con el equipo de atención al cliente de
Duronic para obtener ayuda.
•
Para limpiarlo, utilice un paño suave para limpiar toda la unidad. No lo
sumerja en agua ni en ningún otro líquido y no utilice productos de limpieza
abrasivos o volátiles.

82
•
USO DE PILAS.
•
El operador o usuario de este dispositivo no debe tocar la salida de las
baterías y al paciente simultáneamente.
•
Si usa baterías en el dispositivo, asegúrese de usar baterías del tamaño
correcto, como se describe en este manual. No utilice ningún otro tipo de
batería, ya que podría dañar el dispositivo.
•
Si el líquido de la batería se derrama y entra en contacto con los ojos,
enjuáguelos con abundante agua limpia y comuníquese con un médico
de inmediato.
USO DE ADAPTADOR DE CORRIENTE
•
Si utiliza un adaptador de corriente con este dispositivo, asegúrese
de no manipular el cable de alimentación o el enchufe con las manos
mojadas.
•
No use el adaptador de corriente si el cable o el enchufe
están dañados.
•
No tire del cable de alimentación para desconectarlo del enchufe. Agarre
siempre el enchufe y tire de él para desconectarlo.
Distribuido por: Shine-mart Ltd
Fabricado por: Shenzhen Jumper Medical Equipment Co. Ltd
Representante europeo autorizado: Wellkang Ltd
Cuando conecte el dispositivo a una toma de corriente, asegúrese de
que la fuente de alimentación sea de 220-240V ~ 50 / 60Hz.
Información de contacto

83
1.
2.
Icono de usuario.
3.
Sonido ON.
4.
Presión Sistólica
5.
Presión Diastólica.
6.
PANTALLA LCD
Latido.
Pulso.
7.
8.
Arritmia.
9.
Fecha/Hora.
10. Unidad
Batería baja.
1
1.
de medida.
12. Memoria
Indicador de nivel de
tensión arterial.
13. Número
de icono.
14. Valor
de memoria.
1
2
6
7
4
3
5
10
9
11
12
13
14
8
medio.
Símbolo
SYS
DIA
Pul/min
Hora (hora:minuto)
mmHg mmHg (unit de medida)
Presión sistólica
Presión diastólica
Pulso por minuto
Valor del registro de memoria
Batería baja
Arritmia / latido irregular
Descripción

84
1.
Componentes del tensiómetro
Elegir la fuente de alimentación
Toma
2.
de aire.
Botón
3.
de ajuste.
Botón
4.
de encendido/apagado.
Entrada
5.
USB.
Botón memoria.
Manguito
22~36cm
(Partes aplicadas tipo
BF)
1
2
3
4
5
Tensiómetro
4x Pilas AAA
1. Por pilas: 4* Pilas AAA
2. Por adaptador de CC: 5 V a través de un cable USB (no incluido)
Precaución: Es importante asegurarse de utilizar las pilas o el
adaptador de corriente correctos en su aparato para evitar daños.

85
Advertencia:
•
•
Quite las pilas si el tensiómetro no se usa durante un largo
periodo de tiempo.
Las pilas muy usadas son dañinas para el medio ambiente, no
las arroje con la basura diaria. Si las pilas se han agotado,
quítelas y llévelas a un punto limpio. No ponga las pilas en
contacto con el fuego ya que pueden explotar o gotear.
Arritmia/ Detector de latido irregular
Este monitor de presión arterial está equipado con detección
de latidos cardíacos irregulares (IHB). Durante cada medición,
este monitor registra los intervalos de latidos y calcula la
desviación estándar. Si el valor calculado es mayor o igual a
15, este equipo iluminará el símbolo "IHB" en la pantalla
cuando muestre el resultado medido.
Advertencia: La aparición del icono "IHB" indica que se detectó una
irregularidad en el pulso durante la medición. Por lo general, esto NO es
motivo de preocupación. Sin embargo, si el símbolo aparece con
frecuencia, le recomendamos que busque atención médica. Tenga en
cuenta que el dispositivo no reemplaza un examen cardíaco, pero sirve
para detectar irregularidades en el pulso en una etapa temprana.
1.
Colocación y cambio de pilas
Quite
2.
la tapa del compartimento.
Coloque
3.
las pilas correctamente.
Vuelva
•
a poner la tapa.
Cambie las pilas en el caso de que:
El símbolo aparezca
•
•
La pantalla se atenúe
La pantalla no se encienda

86
Es importante ajustar el reloj antes de usar el tensiómetro, para que se pueda
asignar una fecha y hora a cada registro que esté almacenado en la memoria.
1.
Configurar fecha y hora
(Año: 2000 – 2050; Hora: 24 h / 12 h)
Cuando el tensiómetro esté apagado, pulse el botón «USER/SET» y
manténgalo pulsado durante 5 segundos para activar el modo de ajuste
del año. El icono “USER 1” parpadeará.
2.
3.
Presione el botón "USER / SET" para cambiar el año. Desplácese por
el año con el botón "MEMORY".
4.
Presione el botón "USER / SET" para cambiar la fecha (mes / día).
Desplácese por la fecha con el botón "MEMORY".
Presione el botón "USER / SET" para cambiar la hora (hora /
minuto). Desplácese por la hora con el botón "MEMORY".
5. Presione el botón "USER / SET" para cambiar la unidad de medida
(mmHg / KPa). Desplácese por la hora con el botón "MEMORY".
BOTÓN USER/SET BOTÓN MEMORY

87
Para borrar la memoria y borrar todos los registros guardados, presione y
mantenga presionado el botón "MEMORY" durante 3 segundos. Cuando
muestre "M" en la pantalla, continúe presionando el botón "MEMORY" y
presione el botón "USER/SET" al mismo tiempo.
Cuando no hay registros almacenados, la pantalla mostrará "NO".
SELECCIONAR O CAMBIAR USUARIO
Cuando el tensiómetro esté apagado, presione y mantenga presionado
el botón "USER / SET" durante 5 segundos. El icono "Usuario 1"
parpadeará, luego puede presionar el botón "MEMORIA" para cambiar
la configuración a "Usuario 2".
BORRAR MEMORIA
La pantalla mostrará "ALL EE". Esto significa que todos los registros se han
eliminado.
USER/SET
BOTÓN

88
Después de que el monitor de presión arterial se haya utilizado varias veces,
presione el botón "MEMORY" en el estado de apagado para mostrar la presión
arterial promedio de las últimas tres mediciones.
MEMORIA
Acceder a la Memoria
La lectura medida se guardará automáticamente. Para acceder y
desplazarse por las lecturas guardadas, presione el botón "MEMORY".
Puede cambiar entre "User 1" y "User 2" presionando el botón "USER/SET".
BOTÓN
El tensiómetro puede almacenar automáticamente 99 mediciones para dos
usuarios y reemplazar automáticamente los 99 datos de medición cuando la
memoria está llena.
Presione el botón "MEMORY" nuevamente para mostrar el primer grupo de
valores de medición de la presión arterial y busque el número del grupo de
memoria que se encuentra a su lado.

89
1.
2. El
3. Siéntese
Consejos
•
INSTRUCCIONES DE USO
Como ponerse el manguito
Envuelva el manguito
alrededor de la parte superior
del brazo y luego coloque el
tubo fuera del centro hacia la
parte interna del brazo, en línea
con el dedo meñique.
manguito debe estar
ajustado, pero no demasiado
apretado. Debe ser capaz de
insertar un dedo entre los
botones el manguito y el brazo.
cómodamente con
el brazo izquierdo apoyado
sobre una superficie plana.
•
Repose durante 5 minutos antes de realizar la medición.
•
Espere un mínimo de 3 minutos entre cada medición. Esto permite
que su circulación sanguínea se recupere.
Para una comparación más precisa y significativa, trate de medir la
tensión bajo condiciones similares. Por ejemplo, tome medidas diarias
aproximadamente a la misma hora, en el mismo brazo o según las
indicaciones de un profesional médico.
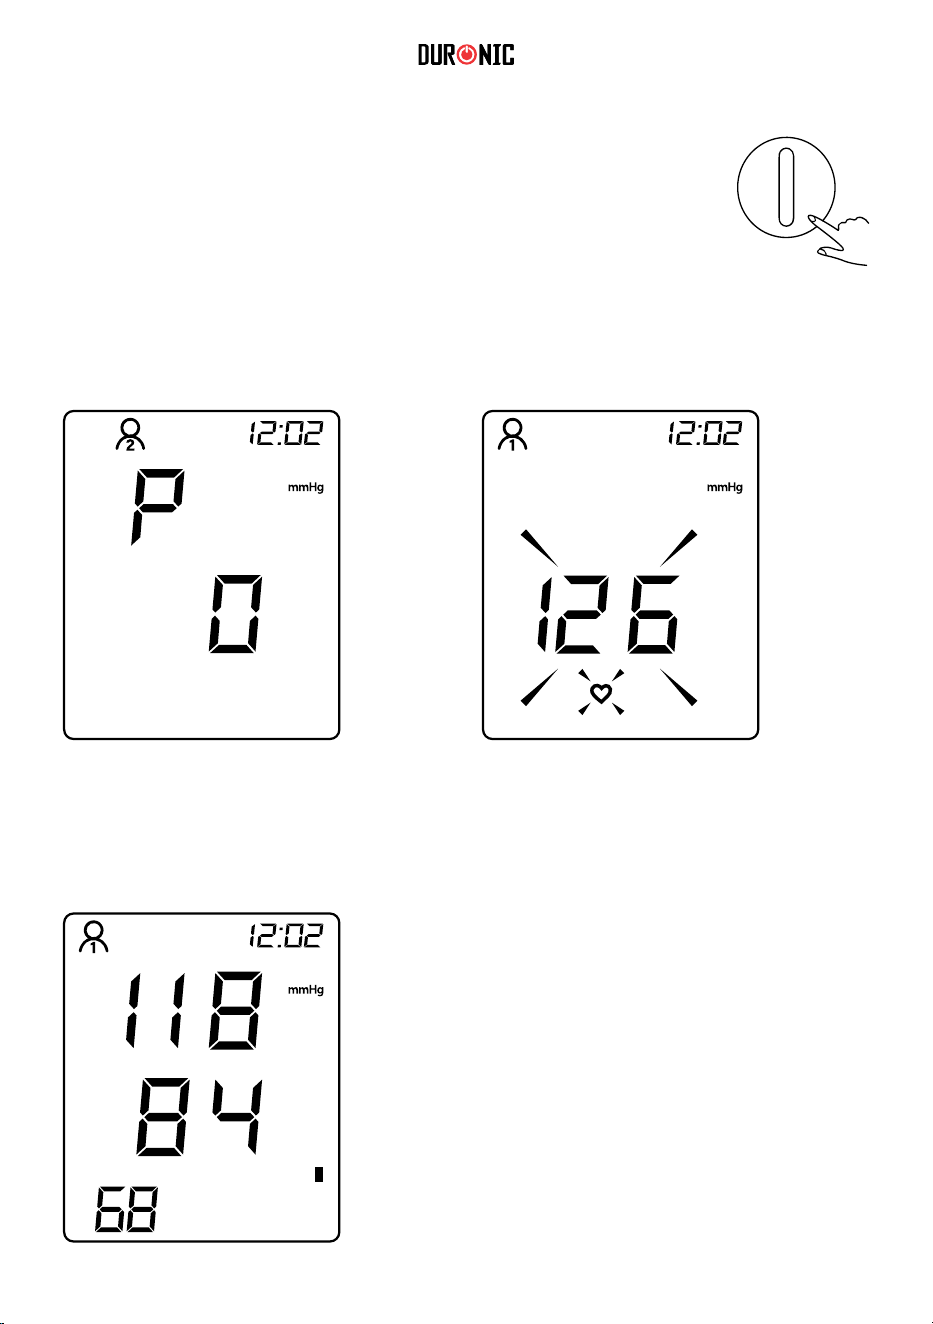
90
Como iniciar una medición
1. Asegúrese
2. El
Pantalla durante desinflado
3. La
La medición se guardará automáticamente.
Para acceder y desplazarse por las mediciones
guardadas, pulse el botón “MEMORY”.
de que el manguito este correctamente
ajustado a su brazo. Pulse el botón “START/STOP” para
encender el tensiómetro. El aparato comenzará y terminará
la medición completa de manera automática.
manguito se inflará. Una vez que esté completamente inflado, el
manguito puede sentirse ligeramente apretado o incómodo. Esto es
normal. Si es intolerable o si tiene alguna inquietud, presione el botón
"START / STOP" para detener el aparato y busque consejo médico
profesional.
Cuando se detecte el pulso, la pantalla mostrará el símbolo del corazón y
parpadeará con el ritmo de su pulso.
medición se ha completado. La
pantalla continuará mostrando los
resultados de la medición a menos que
presione el botón “START/STOP” para
apagar el dispositivo. De lo contrario, el
aparato se apagará de manera
automática una vez pasados 30
segundos.
Pantalla durante inflado

91
Consejos para medir correctamente
Las mediciones pueden ser inexactas si se toman durante las siguientes
circunstancias:
En las primeras 2 horas después
de comer o beber.
Inmediatamente después de tomar
té o café, o después de fumar.
A los 20 minutos después de
bañarse.
Al hablar o mover los dedos.
En un ambiente muy frío.
Cuando necesite ir al servicio/ orinar.

92
Mantenimiento
Para obtener un mejor resultado, por favor siga las siguientes
instrucciones.
Almacénelo en un lugar seco y
evite la luz solar directa.
Evite que el monitor toque el
agua. Si la máquina se moja,
séquela inmediatamente
después.
Evite sacudidas y colisiones
intensas.
Evite ambientes polvorientos
y temperaturas inestables.
Utilice un paño húmedo (bien
escurrido) para eliminar la suciedad.
No limpie el manguito con agua y
nunca lo sumerja en agua ni en
ningún otro líquido.

93
- Si
- Si
- Si
- Si
¿Por qué mi presión arterial va variando a lo largo del día?
La presión arterial individual varía de
naturalmente varias veces a lo largo del
día. También puede verse afectada por la
manera en la que se ata el manguito
alrededor del brazo y la posición de este
durante la medición. Por este motivo, le
aconsejamos que mida la presión arterial
a la misma hora del día y en la misma
posición.
Nota: si el usuario toma medicación, la
presión arterial variará más a menudo.
Si desea realizar una segunda medición,
espere al menos 3 minutos antes de
realizarla.
¿Por qué si mido mi tensión en casa difiere de la del
hospital?
La presión arterial puede variar a lo largo del día debido al clima, las
emociones, el ejercicio, etc.
Además, existe el efecto de la «bata blanca», lo que significa que la
presión arterial suele aumentar en entornos clínicos debido a la
ansiedad o a los nervios.
A qué debe prestar atención cuando se mide la tensión en casa:
el manguito está bien colocado.
el manguito aprieta de más o de menos.
el manguito está en la parte superior del brazo.
está angustiado.
Consejo: respire profundamente 2 o 3 veces antes de comenzar una medición,
ya que esto ayudará a obtener un resultado más preciso. Si usted está
especialmente ansioso o alterado, siéntese durante 4-5 minutos hasta que se
calme.

94
¿Qué brazo debo usar para realizar las mediciones?
Se puede usar el manguito en cualquier
brazo, pero algunas personas
experimentarán una diferencia en los
resultados de la medición.
Por esta razón, recomendamos utilizar
siempre el mismo brazo.
Entendiendo los resultados.
Presión sistólica (SYS): El nivel más alto de
presión arterial: cuando su corazón late, este
se contrae para bombear sangre a sus
arterias.
Presión diastólica (DIA): El nivel más bajo
de presión arterial: cuando su corazón se
relaja entre latidos.
Pulso: número de latidos por minuto. La
mayoría de los adultos tienen una frecuencia
cardíaca en reposo entre 60 y 100 lpm. Es
probable que los atletas tengan una
frecuencia cardíaca en reposo más baja.

95
DIA (mmHg)
60
80
90
100
110
90 120 140 160 180
SYS (mmHg)
Normal
Alta leve
Grado 1: Hipertension
Alta (moderado)
Grado 2: Hipertension
Alta (severo)
Grado 3: Hipertension
Clasificación estándar de presión arterial
A continuación, se ilustra el modelo de clasificación de la presión arterial
(1999) según la Organización Mundial de la Salud (OMS) y la Sociedad
Internacional de Hipertensión (ISH):
Pre-alta
Baja
SYS DIA
<90 <60
Normal 90-120 60-80
Pre-Alta 120-140 80-90
Alta
(leve)
140-160 90-100
Alta
(moderado)
160-180 100-110
Alta
(severa)
>180 >110
Baja
Advertencia
•
•
Sólo un médico puede decirle su rango normal de presión
arterial y el punto en el cual usted está en riesgo.
Póngase en contacto con su médico para que le aconseje si
las medidas tomadas con este monitor están fuera del
rango.

96
Resolución de problemas
Esta sección incluye una lista de mensajes de error y preguntas frecuentes
sobre los problemas que puede encontrar con su tensiómetro. Si el monitor no
funciona como usted cree que debería, compruebe aquí antes de hacer los
arreglos necesarios para su funcionamiento.
Información
Pantalla LCD
Significado
“Err” en el área SYS, 1
en el área DIA
La fuga es demasiado rápida o la señal de
pulso es demasiado débil. Por favor revise el
manguito, vuelva a abrocharlo su brazo y
vuelva a intentarlo.
“Err” en la parte alta del
área SYS, 1 en el área
DIA
La señal de la presión arterial no puede ser
detectada debido al exceso de ruido. Por favor,
retire las fuentes del ruido y realice la medición
de nuevo.
“Err” en el área SYS, 3
en el área DIA
El resultado del test es anormal. Por favor realice
la medición de nuevo.
“Err” en el área SYS, P
en el área DIA
Fallo en el inflado. Por favor, compruebe el
manguito, abrócheselo de nuevo e inténtelo otra
vez.
“HI” en el área DIA
La presión de inflado es mayor de 307 8 mmHg
(…). Por favor, inténtelo de nuevo.

97
Problema
Solucion
Reemplace las pilas o
enchufe el micro cable
USB al aparato
Resolución de problemas
Comprobar si
No se enciende la
pantalla al pulsar
el botón
de “START/STOP”
Las pilas están
agotadas.
Las pilas están
colocadas correctamente
Instale correctamente los
polos positivos y
negativos de las pilas
No hay presión en
el manguito.
¿Está correctamente
enchufado?
¿Está el manguito o el
tubo roto o goteando?
Inserte el manguito en la
toma de aire
herméticamente
Compre un nuevo
manguito
Error en la
pantalla, no
se puede
realizar
medición.
¿Ha movido el brazo
durante la medición?
¿Ha hablado durante la
medición?
Manténgase quieto y
vuelva a intentarlo.
Manténgase en silencio
y vuelva a intentarlo.
El manguito
gotea
¿Está el manguito
demasiado suelto?
El airbag del manguito
está roto.
Por favor, apriétese el
manguito
Reemplace el manguito
por uno nuevo.
Advertencia: si la tensión arterial sigue sin poder ser medida con
normalidad a través de los métodos anteriores, por favor contacte
con Duronic. No trate de desmontarlo por sí solo.

98
Especificaciones
Modelo BPM200
Oscilográfico
30mmHg - 255mmHg
(5.3kPa-37.3kPa)
Pulso
40-199 pulsos / minuto
±3mmHg (±0. 4kPa)
Pulso ±5% valor
Unidad: mmHg / kPa.
Pulso
Nombre producto
Tensiómetro electrónico
Tipo de pantalla Pantalla digital
Modo de medición
Parte medida Parte superior del brazo
Rango medición
Valor presión arterial
Precisión
de medición
estática
Valor presión arterial
leído
Pantalla LCD
Presión arterial
Pulso por minuto, en
3 dígitos
Capacidad
de memoria
99 grupos de datos de medición para cada uno de
los dos usuarios.
Fuente de
alimentación
4 pilas AAA o adaptador USB AC 5V para fuente
alimentación externa
Modo apagado Apagado manual / 30 s de apagado automático con
retraso.

99
Peso
(excluyendo pilas):
Sobre 195g±5g
Dimensiones 120mm(largo 90mm(ancho) 43mm(alto)
59mm(largo) 47mm(ancho)
Manguito (medida circunferencia brazo
22- 36cm or 22-42cm )
Accessorios
5 años
Temperatura
5°C - 40°C
Humedad
15% -
90%RH
70kPa -
106kPa
Impactos fuertes, colisiones directas y exposición a la
luz solar o a la lluvia deben ser evitados durante el
transporte.
El
Tamaño pantalla
Manguito
Manguito, manual de instrucciones
Duración pilas
Las pilas de alto rendimiento pueden ser usadas
hasta 300 veces.
Vida de servicio
Fecha de fabricación
Mirar etiqueta
Condiciones
de trabajo
Condición
atmosférica
Si el producto es
utilizado o almacenado
fuera de las
condiciones de
temperatura y
rango de humedad
especificadas, este no
funcionará
correctamente.
Condiciones
de almacenaje
y transporte
tensiómetro empaquetado debería de ser
almacenado bajo las condiciones de humedad relativa
de 10% a 93% y presión atmosférica de 70 kOa a 106
kPa, lejos de gases corrosivos y ventilación positiva.
100
NOTA: ESTAS DECLARACIONES NO AFECTAN SUS DERECHOS LEGALES COMO
CONSUMIDOR
Este producto ha sido fabricado bajo las más estrictas control de calidad y utilizando
materiales de
alta calidad para asegurar conabilidad y excelente funcionamiento. Le dará buen servicio y
una larga duración, siempre y cuando se utilice correctamente y sea bien mantenido.
El producto está garantizado por 1 año desde la fecha de compra original. Si surge
cualquier defecto debido a un error/defecto de fábrica o mano de obra, entonces el producto
debe ser devuelto al lugar original de compra. Reembolso o reemplazo es a discreción de la
compañía.
Productos Duronic se ofrecen con una garantía de 1 año bajo las siguientes condiciones:
1. El producto debe ser devuelto al vendedor con comprobante de compra original.
2. El producto debe instalarse y usarlo según las instrucciones
contenidas en este manual.
3. Este aparato es únicamente de uso doméstico.
4. No cubre desgaste, daños maliciosos, uso indebido, negligencia,
reparaciones inexpertas o partes consumibles.
5. Shine-Mart Ltd no será responsable por cualquier daño consecuente,
accidentes o pérdidas.
6. Shine-Mart Ltd no es responsable ah llevar a cabo cualquier tipo de
servicio, bajo la garantía.
7. Valido solamente dentro de la (EU).
Este producto esta equipado con enchufe/fusible Europeo
Importado por Shine-Mart Ltd, RM3 8SB
Información sobre la eliminación de residuos para los consumidores
de equipos eléctricos y eléctricos:
Esta marca en un producto y/o documentos adjuntos indica que cuando se va a
desechar, se debe tratar como equipos residuos eléctricos y electrónicos (RAEE)
Cualquier producto marcado (RAEE) no debe ser mezclado con la basura
doméstica, sino separado para el tratamiento, recuperación y reciclaje
de los materiales utilizados.
Para el tratamiento adecuado, recuperación y reciclaje; por favor, tome todos los
productos (RAEE) y llévelo al sitio de residuos de su
Autoridad Local, donde será aceptado de forma gratuita.
Si los clientes desechan los residuos eléctricos y electrónicos correctamente,
ayudar a ahorrar valiosos recursos y prevenir los efectos negativos sobre la salud
humana y el medio ambiente, de materiales peligrosos que pueden
contener los residuos
Garantía
Síguenos

101
Manuale D’istruzioni In Italiano

102
Grazie per aver acquistato il misuratore automatico di pressione arteriosa da
braccio SHINEMART.
•
Il monitor è dotato di misurazione della pressione sanguigna, misurazione della
frequenza cardiaca e salvataggio automatico del risultato. Il design offre due anni
di servizio affidabile. Le letture rilevate dal misuratore di pressione sanguigna sono
equivalenti a quelle ottenute da un osservatore esperto utilizzando il metodo di
auscultazione con bracciale e stetoscopio. Questo manuale contiene importanti
informazioni sulla sicurezza, la cura e fornisce istruzioni passo passo per l'utilizzo
del prodotto.
Leggere attentamente il manuale prima di utilizzare il prodotto.
Caratteristiche:
•
Display LCD digitale 59x47mm
•
Massimo 99 misurazioni x 2 gruppi
Bracciale gonfiabile
Guida icone
I simboli mostrati di seguito possono apparire nel manuale dell'utente,
nelle etichette o in altri componenti. Sono il requisito standard.
Parti applicate di tipo BF
Questo prodotto è conforme
ai requisiti MDD 93/42/EEC.
Produttore Corrente continua
Numero di serie specifico
Data di produzione
IP21
SN
È NECESSARIO LETTERE
LA GUIDA OPERATIVA
SMALTIMENTO: Non smaltire
questo prodotto come rifiuto
indifferenziato. È necessaria la
raccolta differenziata di tali rifiuti
per un trattamento speciale.
Wellkang Ltd Suite B, 29 Harley
Street, Londra, W1G 9QR, Regno
Unito
Grado di protezione contro
l'ingresso di acqua.

103
•
•
Questo dispositivo è destinato esclusivamente all'uso da parte di adulti.
Non utilizzare questo dispositivo sui bambini.
Questo dispositivo non deve essere utilizzato su donne che sono o si
sospetta che siano in stato di gravidanza. Oltre a fornire letture
imprecise, gli effetti di questo dispositivo sul feto sono sconosciuti.
•
Questo dispositivo è destinato alla misurazione e al monitoraggio non
invasivo della pressione arteriosa. Non è destinato all'uso su estremità
diverse dal braccio e non deve essere utilizzato per altre funzioni se non
per la misurazione della pressione sanguigna.
•
Rivolgersi al proprio medico se si è preoccupati per la pressione sanguigna.
Questo dispositivo è per l'automonitoraggio e non deve essere utilizzato per
l'autodiagnosi.
•
•
Non modificare, iniziare o terminare cure mediche o farmaci senza
chiedere consiglio a un medico.
Se si assumono farmaci, consultare il medico per determinare il momento
più appropriato per misurare la pressione sanguigna.
•
Quando questo dispositivo viene utilizzato per misurare pazienti che hanno
aritmie comuni come battiti prematuri atriali o ventricolari o fibrillazione
atriale, i risultati di questo dispositivo possono variare.
•
•
Se si è preoccupati per il risultato della misurazione della pressione
sanguigna, consulta un medico.
Se la pressione del bracciale supera i 40 kPa (300 mmHg), l'unità sgonfierà
automaticamente il bracciale. Se il bracciale non si sgonfia quando la
pressione supera i 40 kPa (300 mmHg), staccare il bracciale dal braccio e
premere il pulsante "START/STOP" per interrompere l'inflazione.
•
Il dispositivo non è un'apparecchiatura AP/APG e non è adatto per l'uso in
presenza di una miscela anestetica infiammabile di aria con ossigeno o
azoto
Informazioni sulla sicurezza

104
•
Per evitare errori di misurazione, evitare di utilizzare il dispositivo in aree
con un forte segnale di interferenza irradiato da un campo elettromagnetico
o segnali elettrici transitori/burst veloci.
•
Verificare che l'apparecchiatura funzioni in modo sicuro e che sia in
condizioni di funzionamento corretto prima di essere utilizzata.
•
Questo dispositivo non è adatto per il monitoraggio continuo durante le
emergenze o operazioni mediche. Braccio e dita del paziente possono
diventare insensibili, gonfie e persino viola a causa della mancanza di
sangue.
•
Si prega di utilizzare il dispositivo come indicato in questo manuale
utente. In caso contrario, le prestazioni e l'utilizzo a vita del dispositivo
ne risentiranno e si ridurranno.
•
Durante l'uso, l'utente/paziente sarà in contatto con il bracciale. I
materiali del bracciale sono stati testati e trovati conformi ai requisiti
della norma ISO 10993-5: 2009 e ISO 10993-10: 2010, quindi non
dovrebbero causare alcuna irritazione.
•
Utilizzare solo parti e accessori autorizzati da Duronic. Parti e accessori non
approvati per l'uso con il dispositivo possono causare guasti operativi.
•
Non dovrebbe essere necessario calibrare il dispositivo entro i primi due
anni di utilizzo.
•
In caso di problemi con questo dispositivo, come la configurazione, la
manutenzione o l'utilizzo del dispositivo, contattare il team di assistenza
clienti Duronic per assistenza.
•
Non aprire o riparare il dispositivo da soli. In caso di problemi con il
dispositivo, contattare Duronic per assistenza.
•
Quando si pulisce il dispositivo, utilizzare un panno morbido per pulire
l'intera unità. Non immergerlo in acqua o altri liquidi e non utilizzare
detergenti abrasivi o volatili.

105
•
Utilizzo con batterie
L'operatore o l'utente di questo dispositivo non deve toccare
contemporaneamente l'uscita delle batterie e il paziente.
•
•
Se si utilizzano batterie nel dispositivo, assicurarsi di utilizzare batterie della
dimensione corretta, come descritto nel manuale. Non utilizzare nessun
altro tipo di batteria in quanto ciò potrebbe danneggiare il dispositivo.
Se il liquido della batteria dovesse fuoriuscire e venire in contatto con gli
occhi, sciacquare gli occhi con abbondante acqua pulita e contattare
immediatamente un medico.
•
Utilizzo con adattatore di alimentazione
Se si utilizza un adattatore di alimentazione con questo dispositivo,
assicurarsi di non maneggiare il cavo di alimentazione o la spina con mani
bagnate.
•
Non utilizzare un adattatore di alimentazione se il cavo o la spina sono
danneggiati.
•
Non tirare il cavo di alimentazione per rimuoverlo dalla presa di corrente.
Afferrare sempre la spina ed estrarla per scollegarla.
•
Quando si collega il dispositivo a una presa di corrente, assicurarsi
che l'alimentazione sia 220-240V ~ 50/60Hz.
Informazioni di contatto
Distribuito da: Shine-Mart Ltd
Prodotto da: Shenzhen Jumper Medical Equipment Co. Ltd
Rappresentante Europeo Autorizzato: Wellkang
Ltd
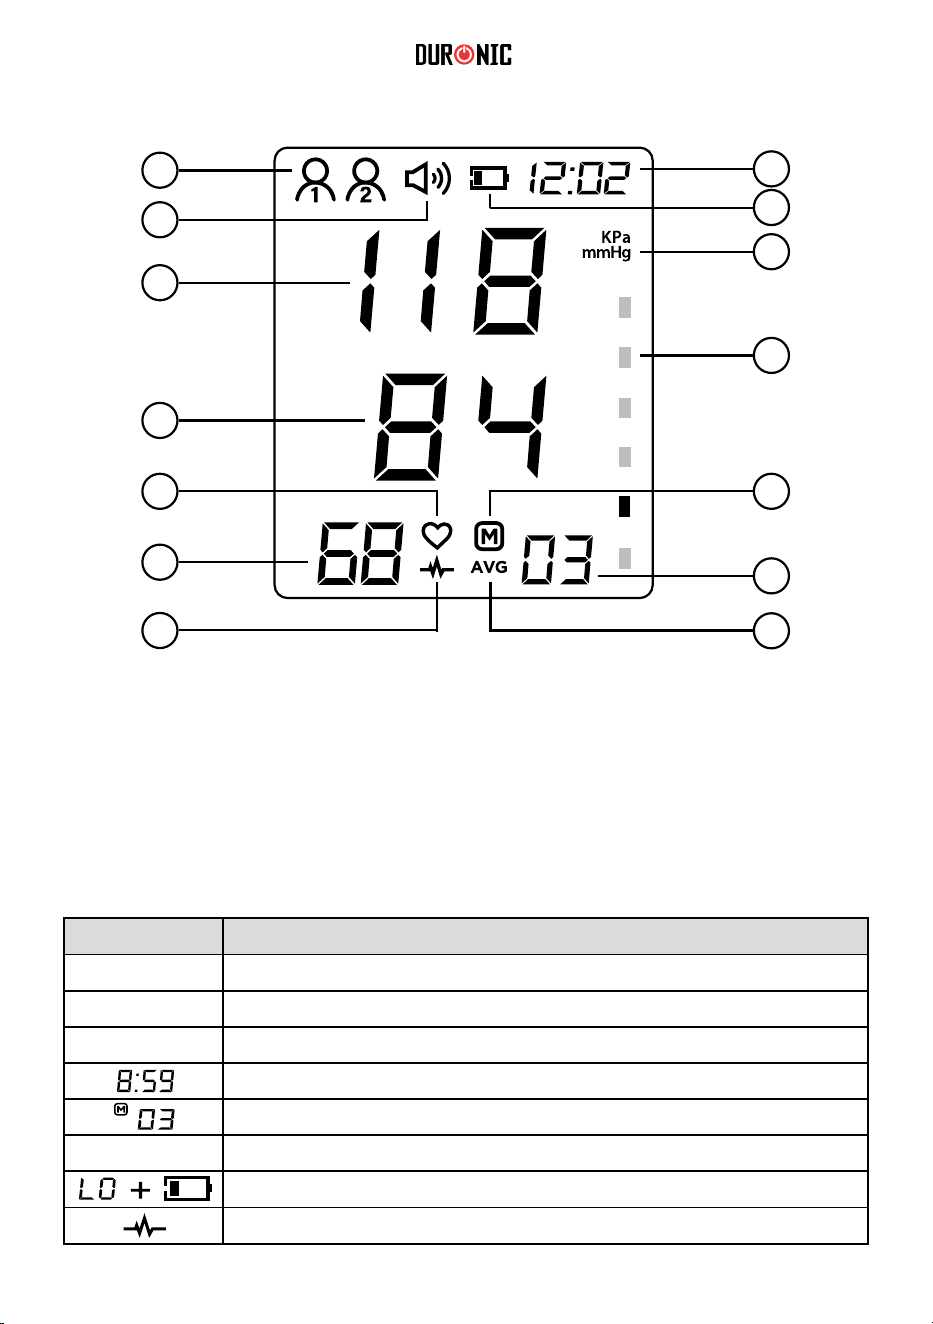
106
1. Icona
2.
utente
Suono
3.
attivo
Pressione sistolica
5.
4. Pressione diastolica
Indicatore
6.
Display LCD
battito
cardiaco (Lampeggia
durante la misurazione.)
Indicatore
7.
pulsazioni
Aritmia
8. D
9.
ata / ora
B
10.
atteria in esaurimento
Unità
11.
12.
Indicatore del livello di
pressione arteriosa
Icona
13.
memoria
Numero
14.
di memoria
Valore
1
2
6
7
4
3
5
10
9
11
12
13
14
8
di lettura
medio
Simbolo
SYS
DIA
Pul/min
Orario (ora:minuti)
mmHg mmHg (unità di misura)
Aritmia / battito irregolare
Descrizione
Pressione sistolica
Pressione diastolica
Battiti al minuto
Numero di memoria
Batteria scarica

107
1.
Componenti inclusi
Scelta dell'alimentatore
Presa
2.
per il tubo dell’aria
Utente
3. Start/Stop
4. Presa
5.
per alimentatore
Memoria
Bracciale
22~36cm
(Tipo BF)
Batterie 4*AAA
1
2
3
4
5
Misuratore
1. Modalità alimentata a batteria: 4 batterie AAA
2. Modalità di alimentazione con adattatore CC: 5 V tramite cavo USB (non incluso)
Attenzione: è importante assicurarsi di utilizzare le batterie o
l'adattatore di alimentazione corretti nella per evitare danni.
108
Attenzione:
•
•
Rimuovere le batterie se il dispositivo non viene utilizzato per
un periodo di tempo lungo.
Le batterie vecchie sono dannose per l'ambiente, non smaltirle
con gli altri rifiuti quotidiani. Rimuovere le vecchie batterie dal
dispositivo e seguire le linee guida locali per il riciclaggio. Le
batterie possono esplodere.
Rilevatore di aritmia / battito cardiaco irregolare
Questo misuratore di pressione sanguigna è dotato di
rilevamento del battito cardiaco irregolare (IHB). Durante ogni
misurazione questo monitor registra gli intervalli di battito
cardiaco e calcola la deviazione standard. Se il valore calcolato
è maggiore o uguale a 15, questa apparecchiatura illuminerà il
simbolo "IHB" sullo schermo durante la visualizzazione del
risultato misurato.
Attenzione: L'icona "IHB" indica che durante la misurazione è stata
rilevata un'irregolarità del polso coerente con un battito cardiaco
irregolare.
Di solito questo NON è motivo di preoccupazione. Tuttavia, se il simbolo
compare spesso, consigliamo di consultare un medico. Si prega di notare
che il dispositivo non sostituisce un esame cardiaco, ma serve a rilevare
le irregolarità nei battiti in una fase iniziale.
1.
Installazione della batteria
Rimuovere
2.
il coperchio del vano batterie.
Inserire
3.
nel vano batterie 4 batterie “AA” come indicato.
Richiudere
•
il coperchio del vano batterie.
Rimuovere le batterie quando vien visualizzata la seguente icona sul display
L'icona viene visualizzata
•
•
Il display si oscura
Il display non si illumina

109
Impostare l’ora e la data corrette sul misuratore prima di eseguire la prima
misurazione
(Anno: 2000-2050, Ora: 24 H)
1.
Impostazione di data e ora
Quando il monitor è spento, premere e tenere premuto il pulsante
"USER/SET" per 5 secondi. L'icona "Utente 1" lampeggerà.
2.
3.
Premere il pulsante "USER/SET" per modificare l'anno. Selezionare
l'anno utilizzando il pulsante "MEMORIA".
4.
Premere il pulsante "USER/SET" per modificare la data (mese/giorno).
Selezionare la data utilizzando il pulsante "MEMORIA".
5.
Premere il pulsante "USER/SET" per modificare l'ora (ore/minuti).
Selezionare l'ora utilizzando il pulsante "MEMORIA".
Premere il pulsante "USER/SET" per modificare l'unità di misura
(mmHg/KPa). Selezionare l'ora utilizzando il pulsante "MEMORIA".
USER/SET
PULSANTE
PULSANTE
MEMORIA

110
Per eliminare tutti i dati salvati, tenere premuto il pulsante "MEMORY" per 3
secondi. Quando viene visualizzato "M" sullo schermo, continuare a tenere
premuto il pulsante "MEMORY" e premere contemporaneamente il pulsante
"USER/SET".
Quando non ci sono dati salvati, lo schermo mostrerà "NO".
Quando il monitor è spento, premere e tenere premuto il pulsante "USER/SET"
per 5 secondi. L'icona "Utente 1" lampeggerà, quindi è possibile premere il
pulsante "MEMORIA" per selezionare "Utente 2".
Selezione o modifica utente
PULSANTE
USER/SET
Cancellazione di tutti i valori conservati in memoria
Sullo schermo verrà mostrato il seguente messaggio "ALL EE". Ciò significa
che i dati sono stati tutti eliminati.

111
Dopo che il misuratore di pressione sanguigna è stato utilizzato più volte,
premere il pulsante "MEMORIA" nello stato di spegnimento per visualizzare la
pressione sanguigna media delle ultime tre misurazioni.
Premere di nuovo il pulsante "MEMORIA" per visualizzare il primo gruppo
di valori di misurazione della pressione sanguigna e cercare il numero del
gruppo di memoria accanto ad esso.
Uso della funzione di memoria
Il risultato della misurazione verrà salvata automaticamente. Per accedere ai
dati salvati, premere il pulsante "MEMORIA". È possibile passare da "Utente
1" a "Utente 2" premendo il pulsante "UTENTE/SET".
PULSANTE
MEMORIA
Il misuratore di pressione può memorizzare automaticamente fino a 99
misurazioni per due utenti e sostituire automaticamente i 99 dati di
misurazione quando la memoria è piena.

112
1. TApplicare il bracciale sulla
parte superiore del braccio
sinistro, in modo da farlo aderire
bene.
2. Il bordo inferiore del bracciale
deve trovarsi al di sopra del gomito,
a una distanza compresa tra 1 e 2
cm. Il tubo dell’aria si trova
all’interno del braccio, allineato con
il dito medio.
3. Sedersi comodamente con il
braccio sinistro appoggiato su
una superficie grassa.
•
Uso del dispositivo
Applicazione del bracciale
Suggerimenti
•
Riposare per 5 minuti prima di misurare la pressione sanguigna.
•
Attendere almeno 3 minuti tra le misurazioni. Ciò consente alla
circolazione del sangue di riprendersi.
Ripetere le misurazioni in condizioni simili. Ad esempio, misurare la
pressione sanguigna giornalmente allo stesso orario, sullo stesso
braccio o come indicato da un medico.

113
Misurazione
1. Assicurarsi che il bracciale sia posizionato correttamente.
Premere il pulsante "START/STOP" per avviare la misurazione. Il
dispositivo terminerà automaticamente l'intera misurazione.
2. Il bracciale inizia a gonfiarsi automaticamente.
Quando il bracciale si sarà completamente gonfiato, Potrebbe risultare
leggermente stretto o doloroso. E' normale. Se è intollerabile, premere il
pulsante "START/STOP" per fermare la misurazione e consultare un
medico.
Non appena verrà rilevato il battito cardiaco, comparirà il simbolo del "cuore"
che lampeggiera a intermittenza.
Display quando il bracciale
si sgonfia.
3. Una volta terminata la misurazione, il risultato
verrà mostrato direttamente sul display. Dopo di
che il misuratore di pressione si spegnerà
automaticamente, altrimenti è possibile premere il
pulsante "START/STOP" per spegnere il
misuratore di pressione.
Il risultato della misurazione verrà salvato
automaticamente.
Per accedere e scorrere tra le misurazioni
salvate, premere il pulsante "MEMORIA".
Display quando il bracciale
si gonfia

114
Suggerimenti per ottenere una misurazione accurata
Non effettuare misurazioni
quando si parla o si muovono le
dita.
Si prega di seguire i seguenti suggerimenti per assicurarsi di ottenere una
misurazione accurata:
Attendere almeno 1 ora dopo aver
mangiato o bevuto.
Non misurare subito dopo aver
consumato bevande contenenti
caffeina come tè e caffè, o dopo
aver fumato.
Attendere almeno 20 minuti dopo
aver fatto il bagno.
Non effettuare misurazioni in un
ambiente molto freddo.
Non effettuare misurazioni quando
è necessario utilizzare il bagno.

115
Manutenzione
Per proteggere il dispositivo da eventuali danni, si prega di osservare le
precauzioni descritte di seguito:
Evitare forti scosse e collisioni.
Evitare ambienti polverosi e
temperature instabili.
Conservare in un luogo asciutto ed
evitare la luce solare diretta.
Non lavare né immergere in
acqua il dispositivo o i rispettivi
componenti.
Utilizzare un panno morbido e asciutto
oppure un panno
morbido inumidito e del sapone neutro
per pulire il
misuratore e il bracciale
Non pulire il bracciale con acqua
e non immergere mai il bracciale
in acqua o altri liquidi.

116
- Se
- Se
- Se
- Se
Perché la mia pressione sanguigna varia durante il giorno?
La pressione sanguigna varia durante il giorno. È
anche influenzato dal modo in cui leghi il bracciale
al braccio e dalla posizione del braccio durante la
misurazione. Per questo motivo, consigliamo di
effettuare la misurazione alla stessa ora del giorno
e nella stessa posizione.
Nota: se l'utente assume farmaci, la
pressione varierà di più.
Se si desidera misurare una seconda
volta, attendere almeno 3 minuti prima di
eseguire un'altra misurazione.
Perché ho una pressione sanguigna diversa a casa rispetto
all'ospedale?
La pressione sanguigna può variare durante il giorno per vari motivi, come il
tempo, emozioni, esercizio fisico, ecc.
Inoltre, esiste il così detto effetto "camice bianco", il che significa che la
pressione sanguigna di solito aumenta in contesti clinici a causa di ansia.
A cosa si deve prestare attenzione quando misuri la pressione sanguigna a casa:
il bracciale è fissato correttamente.
il bracciale è troppo stretto o troppo largo.
il bracciale è posizionato sulla parte superiore del braccio.
ti senti ansioso.
Suggerimento: Prima di effettuare una misurazione fare 2 – 3 respiri profondi,
ciò aiuta ad ottenere un risultato più accurato. Se si è particolarmente ansiosi o
nervosi, consigliamo di rilassarsi per almeno 4-5 minuti prima di effettuare la
misurazione.

117
La misurazione può essere effettuata su
entrambi i bracci. Consigliamo di
effettuare le misurazioni sempre allo
stesso braccio, dato che i risultati possono
variare.
Quale braccio devo usare per effettuare la misurazione?
Battiti: numero di battiti cardiaci al minuto.
La maggior parte degli adulti ha una
frequenza cardiaca a riposo compresa tra 60
e 100 bpm. È probabile che gli atleti abbiano
una frequenza cardiaca a riposo più bassa.
Risultato della misurazione
Pressione sistolica (SYS): il livello più alto
della pressione sanguigna: quando il cuore
batte, si contrae per pompare il sangue
attraverso le arterie.
Pressione diastolica (DIA): il livello più
basso della pressione sanguigna, quando il
cuore si rilassa tra i battiti.

118
Di seguito vengono illustrati i valori standard della pressione sanguigna per
gli adulti effettuata dall'Organizzazione Mondiale della Sanità (OMS) e dalla
Società Internazionale dell'Ipertensione (ISH) nel 1999.
DIA (mmHg)
60
80
90
100
110
90 120 140 160 180
SYS (mmHg)
Normale
Valori standard della pressione sanguigna
Alto (grave)
Alto (moderato)
Alto (lieve)
Pre-alta
Bassa
Grado 1: Ipertensione
Grado 2: Ipertensione
Grado 3: Ipertensione
SYS DIA
<90 <60
Normale 90-120 60-80
120-140 80-90
140-160 90-100
160-180 100-110
>180 >110
Bassa
Pre-alta
Alto
(lieve)
Alto
(moderato)
Alto
(grave)
Attenzione:
•
•
Solo un medico può indicare il normale intervallo di pressione
sanguigna di un individuo. Consultare il proprio medico per
ottenere questi valori.
Se le misurazioni effettuate con questi prodotti non rientrano
nell'intervallo, consultare il proprio medico di famiglia.

119
Risoluzione dei problemi
Causa / Significato
L'inflazione del bracciale è fallita. Si prega di
controllare il bracciale, riallacciarlo al braccio e
riprovare.
Indicazione
di errore
Questa sezione include un elenco di messaggi di errore e domande frequenti
per problemi che si possono riscontrare con il misuratore di pressione
sanguigna.
Il risultato è anomalo. Si prega di misurare di
nuovo.
Err viene visualizzato
nell'area SYS, 1 viene
visualizzato nell'area
DIA
Err viene visualizzato
nell'area SYS alto, 2
viene visualizzato
nell'area DIA.
Err viene visualizzato
nell'area SYS, 3 viene
visualizzato nell'area
DIA.
Err viene visualizzato
nell'area SYS, P viene
visualizzato nell'area
DIA.
HI viene visualizzato
nell'area DIA.
La perdita di pressione è troppo rapida o il
segnale a impulsi è troppo debole. Si prega di
controllare il bracciale, riallacciarlo al braccio e
riprovare.
Il segnale della pressione sanguigna non può
essere rilevato a causa di un rumore
eccessivo. Si prega di allontanarsi dalle fonti
di rumore e misurare di nuovo.
La pressione di gonfiaggio è maggiore di
307±8 mmHg ( 41 kPa±1 kPa ). Si prega di
misurare di nuovo.
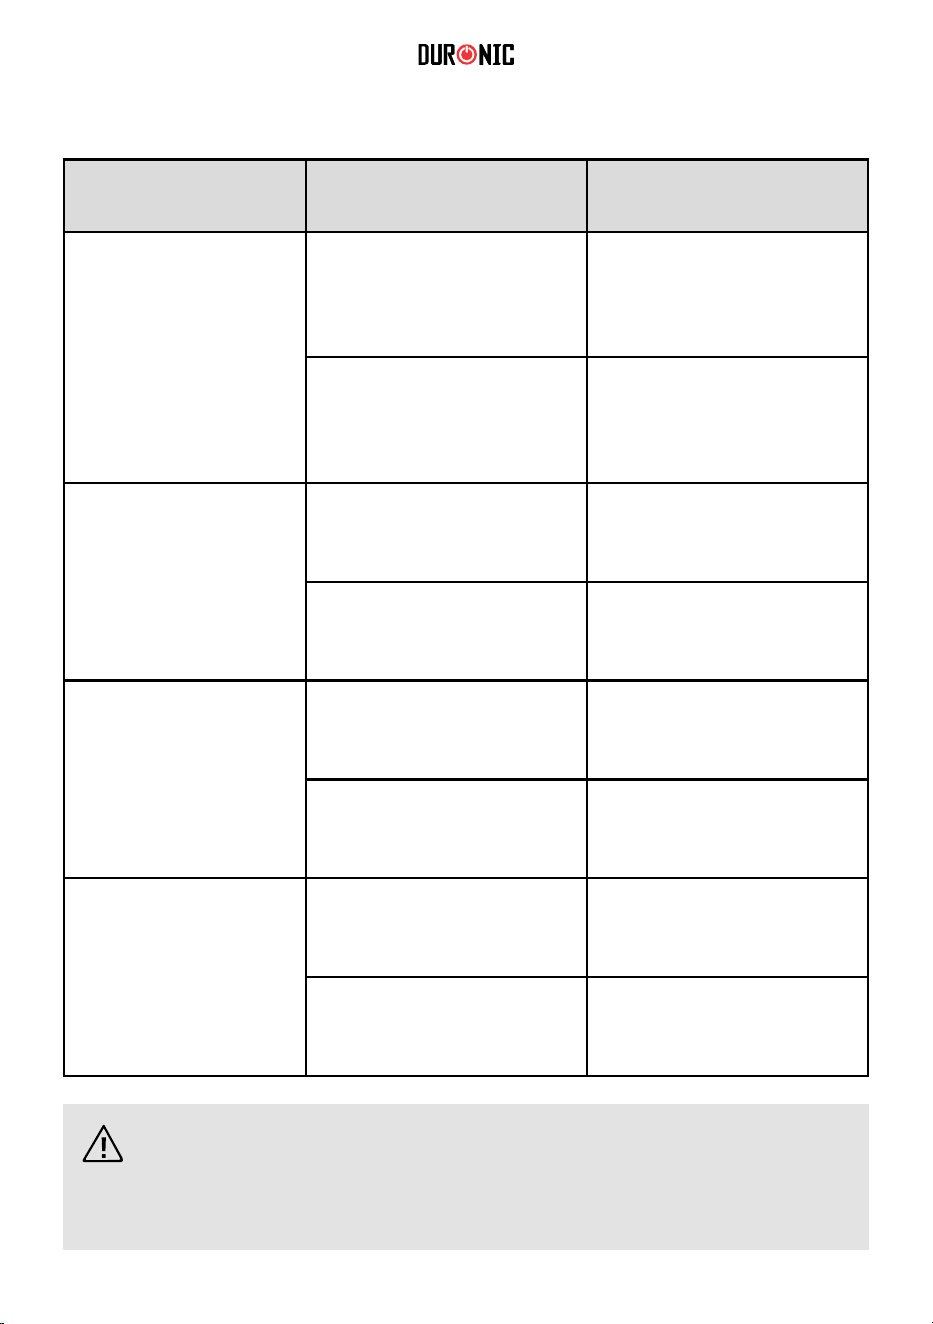
120
Risoluzione dei problemi
Problema
Soluzione
Controllare
Nessuna
visualizzazione
quando si preme
"START/
Pulsante STOP'
È collegato
correttamente?
Acquistare un nuovo
bracciale
Il tuo braccio si è mosso
durante la lettura?
Hai parlato durante la
lettura?
Rimani fermo e riprova
Evitare di parlare
e riprovare
Il bracciale perde
L'airbag nel bracciale è
rotto
Si prega di stringere il
bracciale
Sostituire con un nuovo
bracciale
Attenzione: se la pressione sanguigna ancora non può essere
misurata normalmente con le soluzioni spra indicate, contattare
Duronic.
Controllare se le
batterie sono scariche
Le batterie sono
inserite correttamente?
Sostituire le batterie o
collegare il cavo Micro
USB a dispositivo.
Inserire le batterie
Nessuna
pressione nel
bracciale
Il bracciale o il tubo
sono rotti o perdono?
Inserire saldamente il
bracciale nel jack
dell'aria
Visualizzazione
errore,
impossibile
misurare
Il bracciale è fissato
troppo largo?

121
Specifiche del prodotto
BPM200
Display digitaleDisplay
30mmHg - 255mmHg
(5.3kPa-37.3kPa)
40-199 battiti / minuto
±3mmHg (±0. 4kPa)
±5% del
LCDDisplay
Unità: mmHg / kPa.
Memoria
Nome prodotto
Modello
Metodo di
misurazione
Misurazione
Campo di misura
Alimentazione
Modalità di
spegnimento
Misuratore elettronico della pressione sanguigna
Oscillografico
Braccio superiore
Valore della pressione
sanguigna
Battiti
Valore di pressione
Battiti
Pressione
Battiti
valore rosso
99 dati da salvare per ciascuno utente.
Spegnimento manuale / spegnimento automatico
entro 30 secondi
Precisione di
misurazione
statica
Battiti al minuto, con
tre cifre
4 batterie AAA o alimentatore esterno USB DC 5V

122
Peso
(batterie escluse)
Intorno 195g±5g
Dimensioni 120mm (lunghezza) 90mm (larghezza) 43mm
Misura display 59mm (lunghezza) (larghezza) 47mm
5 anni
5°C - 40°C
15% -
90%RH
70kPa -
106kPa
Durante il trasporto evitare forti urti, collisioni dirette,
esposizione alla luce solare o alla pioggia.
Il misuratore di pressione imballato deve essere
conservato in un ambiente con temperatura compresa
tra -20°C e 55°C, umidità relativa compresa tra 10% e
93% e pressione atmosferica compresa tra 70 kPa e
106 kPa, senza gas corrosivi e ventilazione positiva.
Bracciale
Accessori
Durata delle batterie
Funzionamento
Data
dell'ambiente
(altezza)
Bracciale, Manuale utente
Controllare l'etichetta
Temperatura
Umidità
Condizioni
atmosferiche
Se il prodotto viene
conservato o
utilizzato al di fuori
dell'intervallo di
temperatura e
umidità specificato,
non funzionerà
correttamente.
Temperatura/umidità
di esercizio
Conservazione
e trasporto
Bracciale per braccio superiore (circonferenza del
braccio 22-36 cm o 22-42 cm)
Le batterie a secco ad alte prestazioni possono
essere utilizzate circa 300 volte sotto
123
Questo prodotto è garantito per una durata determinata con il distributore a partire dalla data
di acquisto contro ogni difetto derivante da difetti di fabbricazione o dei materiali. Questa
garanzia non copre difetti o danni derivanti da installazione impropria, uso improprio o usura
anomala del prodotto.
L’apparecchio deve essere restituito nella sua confezione originale e accompagnato dalla
ricevuta e deve essere stato utilizzato in modo corretto. È importante rispettare le istruzioni
per l’uso e le precauzioni di sicurezza indicate di seguito. Inoltre, non possiamo garantire
l’apparecchio se è stato modicato o riparato dall’acquirente o da terzi.
1 anno di garanzia da Shine-Mart Ltd, proprietari del marchio commerciale Duronic.
NOTA: QUESTE DICHIARAZIONI NON INFLUISCONO SUI DIRITTI LEGALI DEL
CONSUMATORE
Questo prodotto è stato realizzato con le rigorose procedure del controllo qualità, e
utilizzando materiali di altissima qualità, per garantire afdabilità e prestazioni eccellenti.
Vi regalerà un servizio ottimo e a lungo termine, purchè venga opportunamente usata e
mantenuta. Il prodotto è garantito per 1 anno dalla data di acquisto. Se sorge qualche
difetto a causa di materiali difettosi o scarsa manodopera, il prodotto difettoso dovrà essere
restituito al luogo originale di acquisto. Il rimborso o la sostituzione sono a discrezione
dell’azienda. I prodotti Duronic offrono 1 anno di garanzia alle seguenti condizioni:
1. Il prodotto deve essere restituito al rivenditore con la prova d’acquisto originale
2. Il prodotto deve essere installato e usato seguendo le istruzioni contenute nel manuale.
3. Il prodotto va utilizzato solo per scopi domestici. Non è da utilizzarsi per uso commerciale.
4. La garanzia non copre usura, danni volontari, abuso, negligenza, riparazioni
inesperte o consumo dei materiali.
5. Shine-Mart Ltd non è responsabile per Danni accidentali o consequenziali.
6. Shine-Mart Ltd non è tenuta a eseguire qualsiasi tipo di riparazione, ai sensi
della garanzia.
7. Termini validi in tutta l’unione europea *Ci riserviamo il diritto di modicare le sopracitate
condizioni Per parti di ricambio si prega di consultare il sito www.duronic.com
Corretto smaltimento del prodotto.
Qusto prodotto è inclusivo di spina certicata CE
importata da Shine-Mart Ltd, RM3 8SB
Questo segno su un prodotto o su documenti indica che quando deve essere
smaltito, deve essere trattato come i riuti elettrici ed elettronici (WEEE)
Tutti I prodotti marcati WEEE non devono essere buttati nei riuti domenistici
generici, ma separati per il trattamento, il recupero
e il riciclaggio dei materiali utilizzati.
Per un corretto trattamento, recupero e riciclaggio; si prega di portare tutti I
prodotti marcati WEEE al Vostro centro smaltimenti riuti autorizzato, dove
saranno accettati gratuitamente.
Se i consumatori sono propensi allo smaltimento corretto di riuti elettrici ed
elettronici, aiuteranno a salvare risorse importanti e a prevenire i potenziali
effetti negativi sulla salute umana e sull’ambiente di tutti i materiali pericolosi
che i riuti possono contenere.
Garanzia
Seguici

124
Instrukcja obsługi. Polski

125
Dziękujemy za wybranie ciśnieniomierza firmy SHINEMART.
•
Urządzenie wyświetla oraz zapisuje informacje na temat cisnienia krwi i pulsu.
Zaprojektowane urządzenie gwarantuje przynajmniej dwa lata działania. Odczyty
pobrane przez ciśnieniomierz są równoważne do tych uzyskanych przez
wyszkolonego obserwatora za pomocą mankietu, czy metodą osłuchiwania
stetoskopem. Niniejsza instrukcja zawiera ważne informacje dotyczące
bezpieczeństwa i konserwacji oraz zapewnia instrukcje krok po
kroku korzystania z produktu.
Przed użyciem dokładnie przeczytaj instrukcję.
Specyfikacja:
Cyfrowy wyświetlacz 59 x 47 mm
• Maksymalna ilość zapisanych odczytów 99 dla
•
dwóch użytkowników
Technologia pomiaru: metoda oscylograficzna
Poniższe symbole mogą pojawiać się w instrukcji obsługi, na etykiecie lub
innym elemencie. Są standardowym wymogiem.
Symbole
Część aplikacyjna typu BF
Data produkcji
PRZED UŻYCIEM
PRZECZYTAJ INTRUKCJĘ
Znak CE: potwierdza
zgodność z normą dla
urządzenia medycznego z
dyrektywy 93/42/EEC
Utylizacja zgodnie z dyrektywą
WE w sprawie zużytego
sprzętu elektrycznego i
elektronicznego – WEEE
(Waste Electrical and
Electronic Equipment)
Producent Prąd stały
Numer Seryjny
Stopień ochrony IP
IP21
SN
Wellkang Ltd Suite B, 29 Harley
Street, London, W1G 9QR,UK

126
•
•
Urządzenie jest przeznaczone do pomiaru osób dorosłych. Nie
stosować u dzieci.
Stosowanie tego urządzenia przez kobiety w ciąży lub podejrzewających
ciążę jest niewskazane ze względu na brak danych odnośnie oddziaływania
urządzenia na płód.
•
Produkt został zaprojektowany jako nieinwazyjny ciśnieniomierz mierzący i
rejestrujący ciśnienie krwi. Nie jest przeznaczony do użycia na innych
częściach ciała niż ramię lub do funkcji innych niż uzyskanie pomiaru
ciśnienia krwi.
•
Skontaktuj się z lekarzem, jeżeli jesteś zaniepokojony rezultatem
pomiaru ciśnienia. Nie należy mylić samokontroli z autodiagnozą.
•
•
Nie zmieniaj, nie zaczynaj ani nie kończ leczenia bez zgody lekarza.
Jeśli zażywasz leki, skonsultuj się z lekarzem, aby ustalić najbardziej
odpowiedni czas pomiaru ciśnienia tętniczego.
•
Jeżeli urządzenie było używane do mierzenia pacjentów z powszechnymi
zaburzeniami rytmu, takimi jak pobudzenia przedwczesne przedsionkowe
lub komorowe oraz migotanie przedsionków, najlepszy wynik może
wystąpić z odchyleniem.
•
•
Skontaktuj się z lekarzem, jeżeli jesteś zaniepokojony rezultatem pomiaru
ciśnienia.
Jeśli ciśnienie w mankiecie przekroczy 40 kPa (300 mmHg), urządzenie
automatycznie ulegnie deflacji. Jeżeli mankiet nie ulegnie opróżnieniu, gdy
ciśnienie przekroczy 40 kPa (300 mmHg), odłącz mankiet od ramienia i
naciśnij przycisk START / STOP, aby zatrzymać pompowanie.
•
Urządzenie nie jest sprzętem klasy AP/APG i nie nadaje się do użytku
w obecności palnych mieszanin substancji znieczulających z
powietrzem lub podtlenkiem azotu.
Bezpieczeństwo użytkowania

127
•
Aby uniknąć błędów pomiarowych, należy unikać działania silnego pola
elektromagnetycznego sygnałów zakłócających lub przejściowych /
impulsowych sygnałów elektrycznych.
•
Użytkownik odpowiada za bezpieczeństwo użytkowania produktu i
sprawdzenie jego poprawnego działania przed użyciem.
•
Urządzenie nie nadaje się do ciągłego monitorowania w nagłych
wypadkach lub operacjach medycznych. W takich przypadkach
nadgarstki i palce pacjenta mogą stać się opuchnięte, a nawet
purpurowe z powodu braku krwi.
•
Urządzenia należy używać w warunkach wskazanych w instrukcji
obsługi. W przeciwnym wypadku działanie i trwałość urządzenia mogą
ulec ograniczeniu.
•
Podczas użytkowania Pacjent ma kontakt z mankietem. Materiały, z
których wykonano mankiet, zostały przebadane i stwierdzono, że są
zgodne z wymaganiami norm ISO 10993-5:2009 oraz ISO 10993-10:2010.
Kontakt z nimi nie powoduje uczulenia ani podrażnienia.
•
Należy używać akcesoriów i wyposażenia wskazanego/autoryzowanego
przez Producenta. W przeciwnym wypadku może dojść do uszkodzenia
urządzenia i zagrożenia dla Użytkownika.
•
Urządzenie nie musi być kalibrowane w okresie dwóch lat niezawodnego
użytkowania.
•
W razie problemów z urządzeniem dotyczących konfiguracji,
konserwacji lub użytkowania należy skontaktować się z Biurem Obsługi
Klienta firmy Duronic.
•
Nie wolno otwierać obudowy urządzenia ani dokonywać w nim
samodzielnych napraw. W razie zauważenia nieprawidłowości działania
należy powiadomić o tym producenta.
•
Do czyszczenia urządzenia należy używać miękkiej szmatki. Nie stosować
ściernych ani lotnych środków czyszczących, nie zanurzaj w wodzie lub
innych płynach.

128
•
Zasilanie bateriami
Operator nie powinien dotykać jednocześnie wyjścia baterii i pacjenta.
•
•
Upewnij się, że zastosowano baterie zgodne ze specyfikacją zawartą w
instrukcji obsługi. Nie używaj baterii innego typu, ponieważ może to
spowodować uszkodzenie urządzenia.
Jeśli płyn z baterii wycieknie i dostanie się do oczu, przemyj oczy dużą
ilością czystej wody i natychmiast skontaktuj się z lekarzem.
•
Zasilanie poprzez zasilacz
Nie trzymaj przewodu zasilacza mając mokre ręce.
•
Nie używaj zasilacza jeżeli przewód lub wtyczka są uszkodzone.
•
Nie pociągaj za przewód zasilający, aby odłączyć urządzenie. Zawsze
pociągaj za wtyczkę, aby odłączyć urządzenie.
•
Przed podłączeniem urządzenia do gniazdka upewnij się, czy napięcie
domowej sieci elektrycznej jest zgodne ze standardem 220-240V~
50/60Hz.
Dystrybutor: Shine-mart Ltd
Producent: Shenzhen Jumper Medical Equipment Co. Ltd
Autoryzowany Przedstawiciel w UE: Wellkang Ltd
Informacje kontaktowe
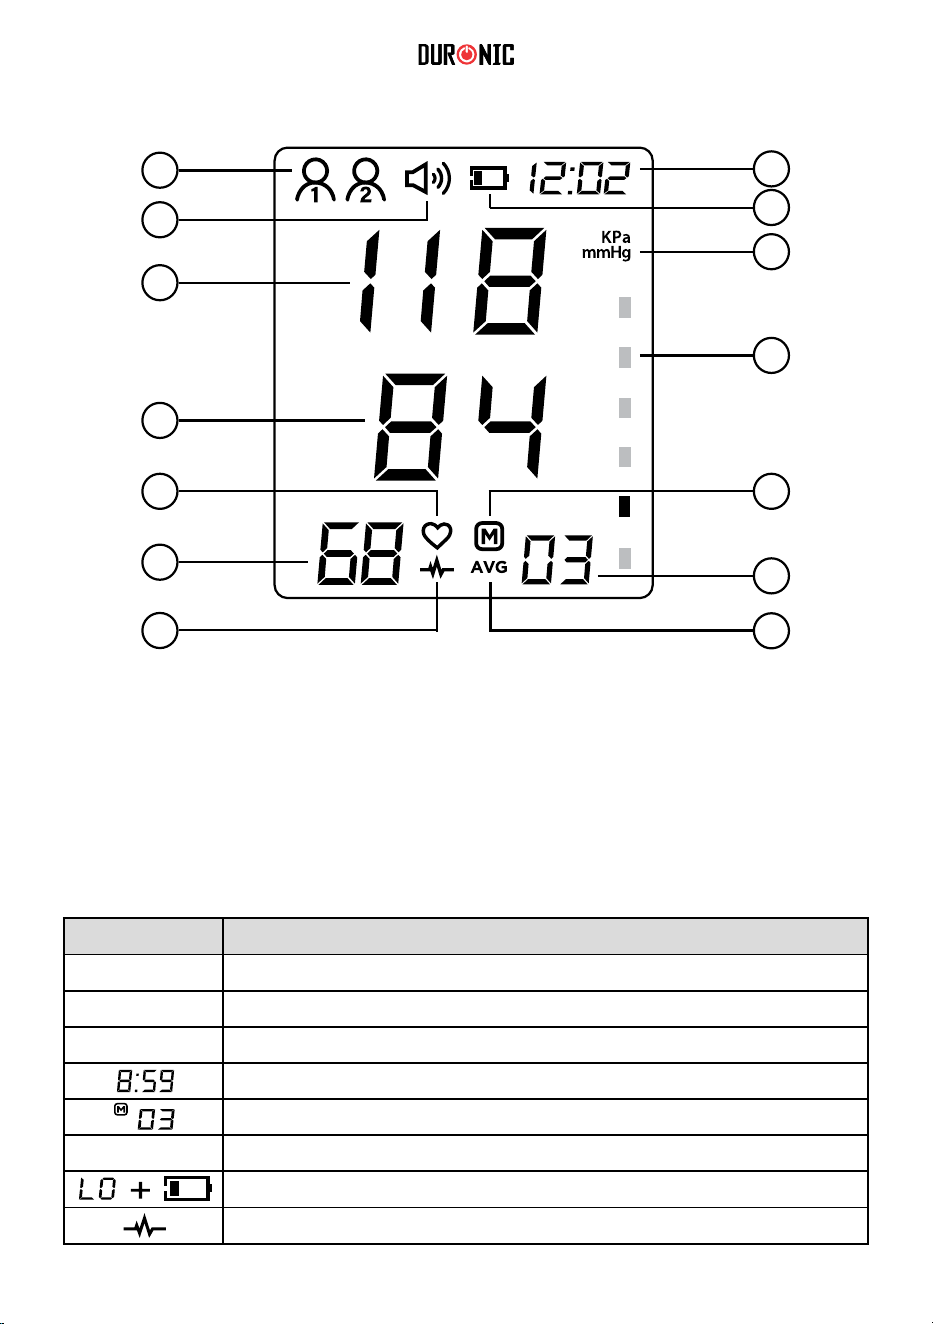
129
1. Ikona
2.
użytkownika
Włączony
3.
dźwięk
Ciśnienie
4.
skurczowe
Ciśnienie
5.
rozkurczowe
Bicie
6.
Informacje wyświetlacza
serca
Puls
7. Arytmia
8. Data / Godzina
9. Niski
10.
poz. baterii
Jednostki
11.
12.
Standardowa
klasyfikacja ciśnienia
Ikona
13.
pamięci
Numer
14.
odczytu
Średnia
1
2
6
7
4
3
5
10
9
11
12
13
14
8
wartość
odczytu
Symbol
SYS
DIA
Pul/min
mmHg mmHg (Jednostka miary ciśnienia krwi)
Skurczowe ciśnienie krwi
OPIS
Rozkurczowe ciśnienie krwi
Tętno - Liczba uderzeń na minutę
Czas (godzina:minuty)
Nr odczytu z pamięci
Słaba bateria
Arytmia / nieregularne bicie serca
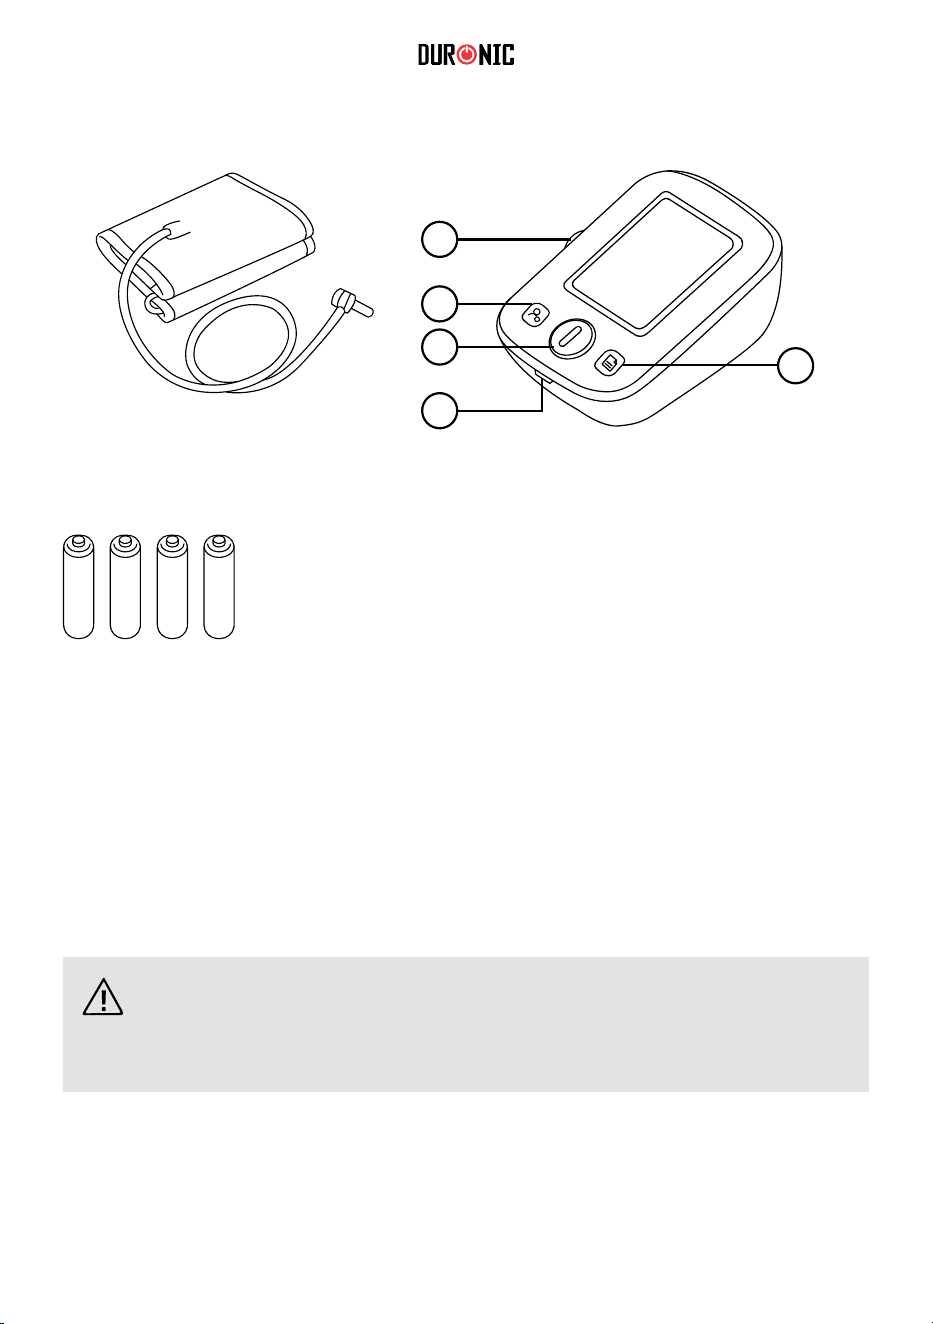
130
1.
Elementy urządzenia
Sposoby zasilania
Wejście
2.
przewodu powietrza
Przycisk
3.
Użytkownika / Ustawień
Przycisk
4.
włącz / wyłącz
Zewnętrzny
5.
zasilacz USB
1.
Przysick Pamięci
Zasilanie
2.
poprzez baterie: 4 x AAA
Sposób
Mankiet
22~36 cm
(Typ ochrony BF)
Baterie: 4 x AAA
1
2
3
4
5
Ciśnieniomierz
zasilania z zasilacza DC: 5V przez kabel USB
(niedołączony w zestawie).
Uwaga: Ważne jest, aby stosować właściwe baterie lub zasilacz,
aby uniknąć uszkodzeń.
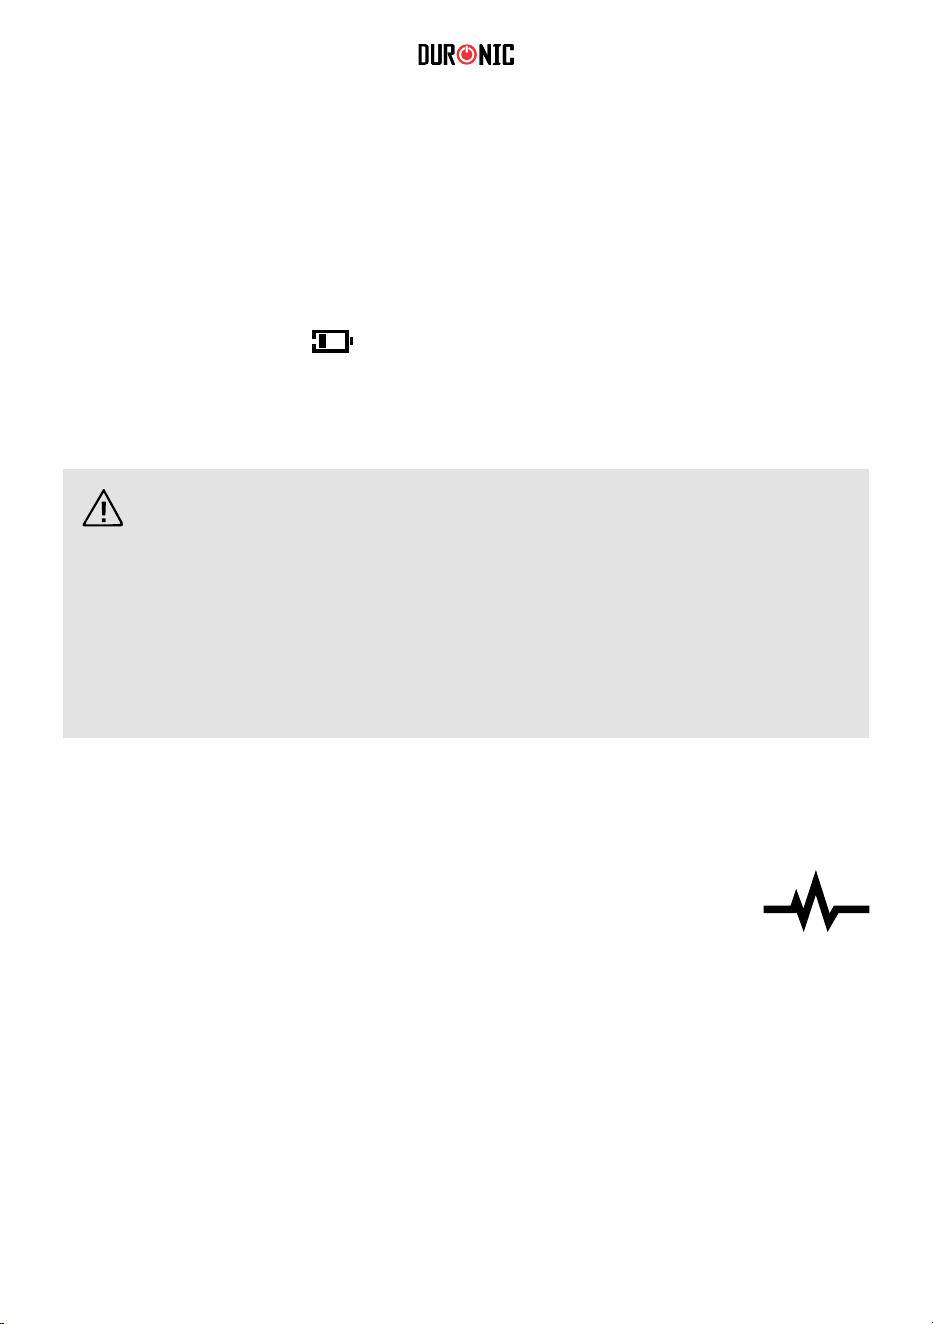
131
Uwaga:
•
•
Wyjmij baterie, jeśli urządzenie nie będzie przez jakiś czas
używane.
Wyjmij baterie, jeśli urządzenie nie będzie przez jakiś czas
używane. Zużyta bateria jest szkodliwa dla środowiska, nie
wyrzucaj jej razem z innymi odpadkami. Wyjmij starą baterię z
urządzenia i postępuj zgodnie z lokalnymi wytycznymi
dotyczącymi recyklingu. Nie wrzucaj baterii do ognia. Baterie
mogą eksplodować lub wyciekać.
Arytmia / nieregularne bicie serca
Ciśnieniomierz jest wyposażony w system wykrywania arytmii.
Podczas każdego pomiaru urządzenie rejestruje odstępy
pomiędzy uderzeniami serca i oblicza odchylenie standardowe.
Jeżeli wartość jest większa lub równa 15, na wyświetlaczu
pojawi się symbol świadczący o wystąpieniu arytmii.
Uwaga: Pojawienie się symbolu arytmii nie jest równoznaczne z występowaniem
arytmii. Zwykle NIE jest to powodem do niepokoju. Jednakże, jeżeli symbol
często się pojawia zalecamy skonsultowanie się z lekarzem. Należy pamiętać, że
urządzenie nie zastąpi badania lekarskiego, służy jedynie do wczesnego
wykrycia nieprawidłowości.
1.
Instalowanie i wymiana baterii
Usuń
2.
klapę baterii.
Zainstaluj
3.
baterie zgodnie z polaryzacją.
Nałóż
•
klapę baterii.
Wymień baterie w przypadku, gdy:
Pojawia się ikona:
•
•
Wyświetlacz ściemnia się
Urządzenie nie włącza się

132
Ustawienie prawidłowej godziny i daty przed użyciem ciśnieniomierza jest
istotne dla zapamiętywania odczytów w pamięci urządzenia.
1.
Ustawianie daty, godziny i jednostek
(zakres ustawienia roku: 2000- 2050, czasu: 24 godz.)
Kiedy urządzenie jest wyłączone przyciśnij przycisk "Użytkownika /
Ustawień" przez 5 sekund. Ikona "User 1" zacznie migać.
2.
3.
Przyciśnij przycisk "Użytkownika / Ustawień", aby zmienić rok. Przewiń
rok za pomocą przycisku „Pamięci”.
4.
Przyciśnij przycisk "Użytkownika / Ustawień", aby ustawić datę (miesiąc /
dzień). Przewiń za pomocą przycisku „Pamięci”.
5.
Przyciśnij przycisk "Użytkownika / Ustawień", aby ustawić czas
(godzina / minuty). Przewiń za pomocą przycisku „Pamięci”.
Przyciśnij przycisk "Użytkownika / Ustawień", aby zmienić jednostki
(mmHg / KPa). Przewiń za pomocą przycisku „Pamięci”.
Przycisk
Pamięci
Przycisk
Użytkownika
Ustawień
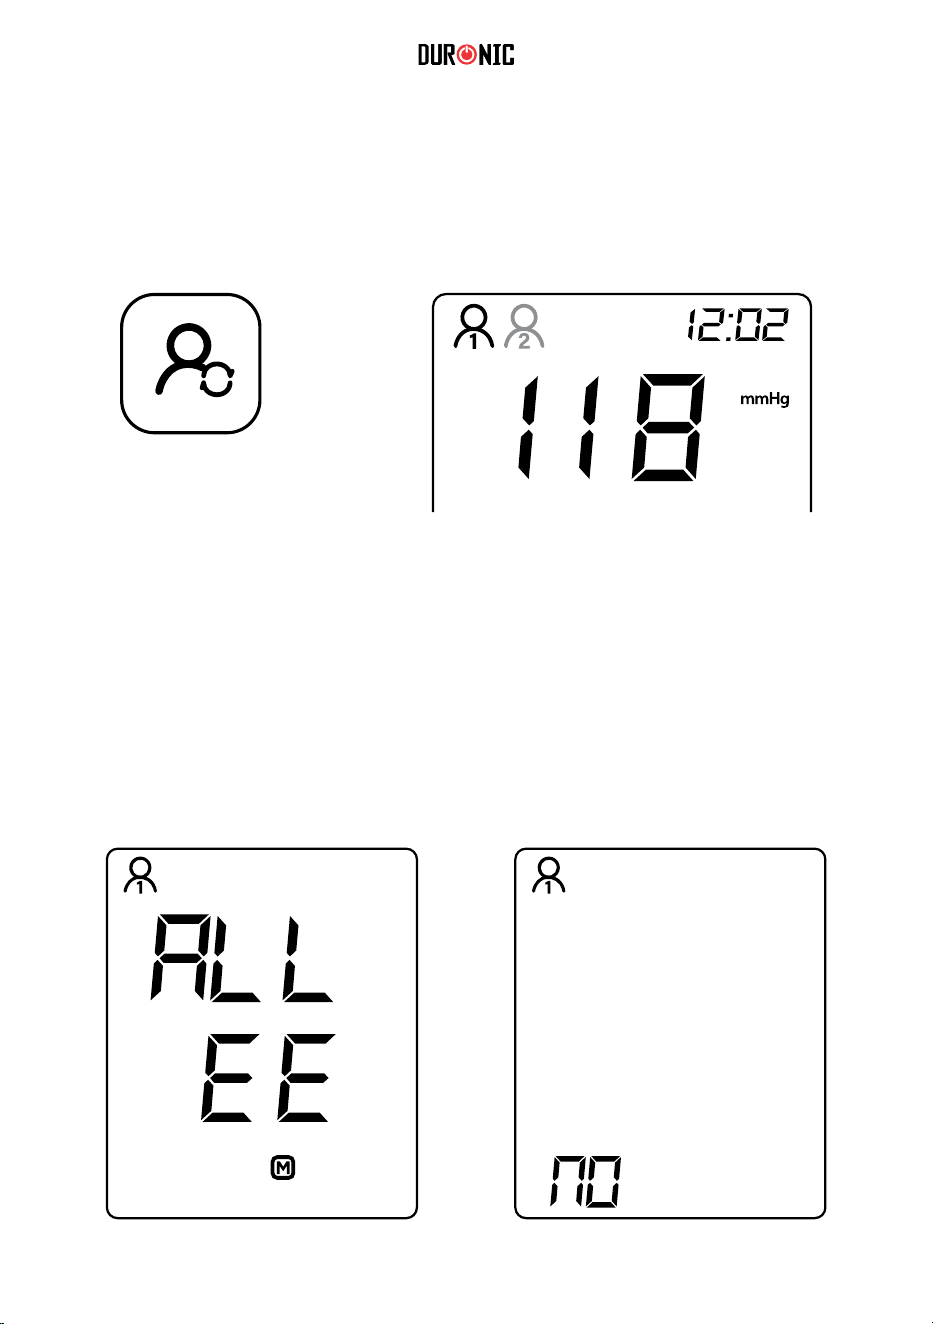
133
W celu wyczyszczenia pamięci i usunięcia wszystkich odczytów, przyciśnij i
przytrzymaj Przycisk Pamięci przez 3 sekundy. Kiedy na ekranie pojawi się "M"
przytrzymuj jednocześnie Przycisk Pamięci i Przycisk Użytkownika / Ustawień.
Na ekranie pojawi się "ALL EE" co jest jednoznaczne z usunięciem wszystkich
zapisów.
Gdy nie ma zapisanych żadnych rekordów, na ekranie pojawi się „No”.
Kiedy urządzenie jest wyłączone przyciśnij przycisk "Użytkownika / Ustawień"
przez 5 sekund. Ikona "User 1" zacznie migać. Przyciśnij Przycisk Pamięci,
aby zmienić ustawienia dla innego użytkownika ("User 2")
Wybór lub zmiana użytkowników
Przycisk
Użytkownika
Ustawień
Czyszczenie pamięci

134
Kiedy ciśnieniomierz używany jest kilkakrotnie, przyciśnij Przycisk Pamięci
w stanie wyłączenia, aby wyświetlić średnią z trzech ostatnich pomiarów.
Naciśnij ponownie Przycisk Pamięci, aby wyświetlić pierwszą grupę
wartości pomiaru ciśnienia krwi i odszukaj numer odczytu.
Zapisane pomiary
Pomiary są automatycznie zapisywane. Aby przeglądać zapisane odczyty
przyciśnij Przycisk Pamięci. Możesz przełączyć pomiędzy Użytkownikiem 1
i Użytkownikiem 2 poprzez naciśniecie Przycisku Użytkownika / Ustawień.
Przycisk
Pamięci
Ciśnieniomierz automatycznie zapisuje do 99 pomiarów dla każdego z
dwóch użytkowników. Po przekroczeniu wartości 99 pomiarów najstarszy
pomiar jest usuwany z pamięci.

135
1. Załóż mankiet powyżej zgięcia
łokciowego, a następnie umieść
przewód powietrza pośrodku w
kierunku wewnętrznej strony
ramienia zgodnie z małym
palcem.
2. Mankiet powinien przylegać,
ale nie być zbyt ciasny.
Powinieneś być w stanie
wsunąć jeden palec pomiędzy
mankiet i ramię.
3. Usiądź wygodnie z lewą
ręką uniesioną na płaskiej
powierzchni.
•
Użytkowanie
Zakładanie mankietu
Porady
•
Odpocznij 5 min przed przystąpieniem do pomiaru.
•
Odczekaj przynajmniej 3 minuty pomiędzy kolejnymi pomiarami. To pozwoli
twojemu krwiobiegowi zregenerować się.
Dla zwiększenia porównywalności pomiarów postaraj się dokonywać
ich w podobnych warunkach np. o tej samej godzinie, na tym samym
ramieniu lub według zaleceń lekarza.

136
Rozpoczęcie pomiaru
1. Upewnij się, że mankiet jest prawidłowo założony. Wciśnij
przycisk Start / Stop, aby włączyć urządzenie, a
ciśnieniomierz automatycznie dokona pomiaru.
2. Mankiet wypełni się powietrzem. Po całkowitym napełnieniu mankiet
może być lekko ciasny lub niewygodny. To normalne. Jeżeli napełnienie
jest nie do zniesienia lub masz jakiekolwiek wątpliwości, naciśnij przycisk
„START/STOP”, aby zatrzymać urządzenie i zasięgnij profesjonalnej
porady lekarskiej.
Kiedy zostanie wykryty puls, na wyświetlaczu zacznie mrugać ikona
bijącego serca.
Wyświetlacz podczas
opróżniania mankietu
3. Pomiar zakończony. Wynik pomiaru będzie
wyświetlony na ekranie aż do momentu
przyciśnięcia przycisku Start / Stop, który wyłączy
urządzenie. Bo 30 sekundach bezczynności
urządzenie wyłączy się automatycznie.
Wynik pomiaru zostanie automatycznie
zapisany. Aby przeglądać zapisane pomiary
przyciśnij Przycisk Pamięci.
Wyświetlacz podczas
napełniania mankietu

137
Wskazówki dotyczące uzyskania dokładnego pomiaru
gdy mówisz lub poruszasz
palcami
Możesz uzyskać nieprawidłowy odczyt wyników, jeżeli dokonałeś pomiaru w
następujących warunkach:
Przed upływem 1 godziny od
posiłku lub picia
Zaraz po wypiciu herbaty, kawy,
paleniu
gdy upłynęło poniżej 20 min. od
wzięcia kąpieli
w bardzo chłodnym pomieszczeniu
gdy bardzo potrzebujesz do toalety

138
Konserwacja
Dla osiągnięcia najlepszych wyników postępuj według poniższej instrukcji:
Przechowuj urządzenie w suchym Unikaj kontaktu z wodą. Jeżeli
urządzenie zamoknie
natychmiast je osusz.
Unikaj intensywnego potrząsania i
uderzania
Unikaj przechowywania w
zakurzonych miejscach z
dużymi wahaniami
temperatury
Używaj wilgotnej (dobrze wykręconej) Nie czyść mankietu przy użyciu
wody i nigdy nie zanurzaj w
wodzie lub innych płynach.
miejscu, unikaj bezpośredniego
nasłonecznienia
ściereczki do usuwania zabrudzeń

139
Uwaga: Podczas
- Czy
- Czy mankiet jest umieszczony w górnej części ramienia.
- Czy
Porada: Przed rozpoczęciem pomiaru warto jest wziąć 2–3 głębokie oddechy.
Jeżeli jesteś zdenerwowany lub smutny, poświęć 4-5 min, aby się zrelaksować..
Dlaczego ciśnienie krwi zmienia się w ciągu dnia?
Ciśnienie krwi każdego człowieka ulega
zmianom w ciągu dnia. Wpływa na nie ma
także sposób ułożenia mankietu i pozycja
ciała podczas wykonywania pomiaru. Z tego
względu zalecamy wykonywanie pomiarów w
takich samych warunkach.
przyjmowania leków
ciśnienie może się zmieniać.
Należy odczekać co najmniej 3 minuty
przed kolejnym pomiarem.
Dlaczego pomiar wykonany w szpitalu różni się od
pomiaru w domu?
Ciśnienie krwi zmienia się w ciągu doby z powodu oddziaływania pogody,
emocji, wysiłku fizycznego itp.
Obecność personelu medycznego w szpitalu zwykle powoduje
podwyższenie ciśnienia krwi w stosunku do pomiarów wykonywanych
w domu.
Na co powinienieś zwarać uwagę dokonując pomiaru w domu:
mankiet jest prawidłowo założony.
- Czy mankiet nie jest zbyt ciasny lub zbyt luźny.
podczas pomiaru nie jesteś zdenerowany.
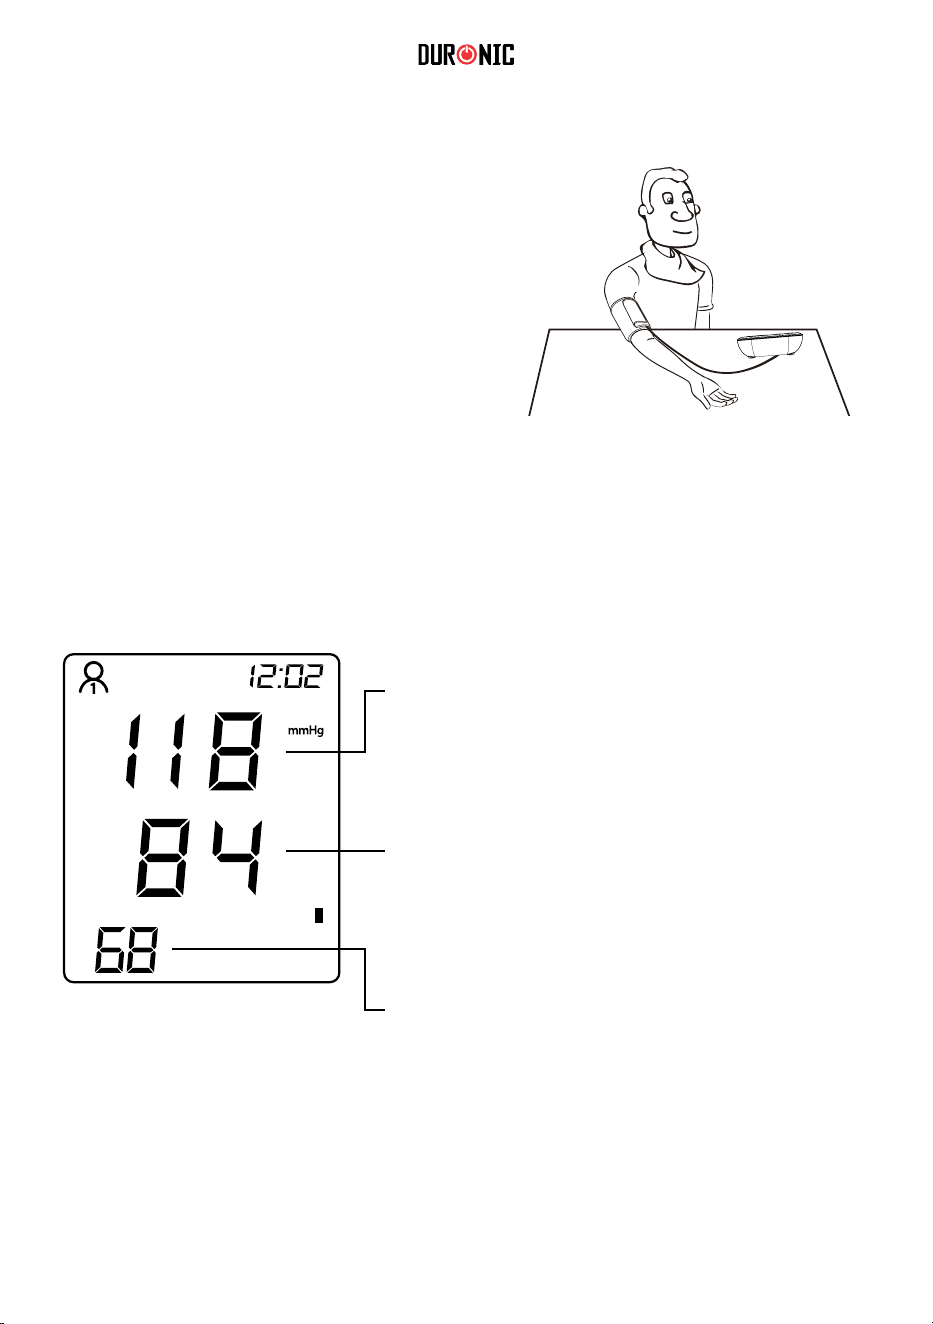
140
Mankiet można stosować na obu
ramionach, jednakże w przypadku
niektórych osób odczyt może się różnić
pomiędzy prawą a lewą ręką.
Na którym ramieniu dokonywać pomiaru?
Z tego względu zalecamy używania
ciśnieniomierza na tej samej ręce.
Puls: ilość uderzeń serca na minutę.
Większość osób dorosłych posiada puls
spoczynkowy w przedziale 60 -100 uderzeń /
min. Sportowcy zwykle mają niższy puls
spoczynkowy.
Objaśnienie odczytu
Ciśnienie skurczowe (SYS) - Najwyższa
wartość ciśnienia tętniczego - bijące serce
obkurcza się, aby przepompować krew przez
tętnice.
Ciśnienie rozkurczowe (DIA) - Najniższa
wartość ciśnienia tętniczego - serce rozluźnia
się między uderzeniami.

141
Poniższe ilustracje przedstawiają klasyfikację ciśnienia tętniczego stworzoną
przez Światową Organizację Zdrowia (WHO) oraz Międzynarodowe
Towarzystwo Nadciśnienia Tętniczego (International Society of Hypertension
– ISH) w roku 1999.
DIA (mmHg)
60
80
90
100
110
90 120 140 160 180
SYS (mmHg)
3R]LRP 1: 1DGFLĞQLHQLH
3R]LRP 2: 1DGFLĞQLHQLH
3R]LRP 3: 1DGFLĞQLHQLH
Standardowa Klasyfikacja Ciśnienia?
Niskie
Prawidłowe
Prawidłowe -
podwyższone
:\VRNLH (Łagodne)
:\VRNLH (Umiarkowane)
:\VRNLH (Ciężkie)
SYS DIA
<90 <60
90-120 60-80
120-140 80-90
140-160 90-100
160-180 100-110
>180 >110
Niskie
Prawidłowe
Wysokie
Wysokie
Uwaga:
•
•
Tylko lekarz może określić Twój normalny zakres ciśnienia krwi
i wartość będącą zagrożeniem. Skonsultuj się z lekarzem, aby
uzyskać te dane.
Jeśli zmierzone wyniki wykraczają poza zakres, należy
skontaktować się z lekarzem.
Prawidłowe
podwyższone
(Łagodne)
(Umiarkowane)
Wysokie
(Ciężkie)

142
5R]ZLą]\ZDQLHSUREOHPyZ
W mankiecie nie zachodzi inflacja powietrza.
Sprawdź mankiet, nałóż i spróbuj ponownie.
W tym rozdziale zawarta jest lista wszystkich komunikatów o błędzie oraz
najczęściej zadawane pytania odnośnie ciśnieniomierza. Jeżeli uważasz, że
produkt nie działa prawidłowo sprawdź informacje zawarte w tym dziale, przed
próbą napraw.
Informacja na
wyświetlaczu
Powód / Znaczenie
W obszarze SYS
wyświetla się Err, W
obszarze DIA
wyświetla się 1
Przepływ powietrza jest zbyt szybki lub puls
jest za słaby.
Sprawdź mankiet, nałóż i spróbuj ponownie.
W obszarze SYS
wyświetla
się Err, W obszarze DIA
wyświetla się 2
Sygnał ciśnienia krwi nie może zostać wykryty
ze względu na nadmierny hałas.
Usuń źródło hałasu i ponów pomiar.
Wynik pomiaru jest nieprawidłowy.
Ponów pomiar.
W obszarze DIA
wyświetla się HI
Ciśnienie w mankiecie jest powyżej 307±8 mmHg
(41 kPa±1 kPa).
Powtórz pomiar.
W obszarze SYS
wyświetla się Err,
W obszarze DIA
wyświetla się P.
W obszarze SYS
wyświetla się Err,
W obszarze DIA
wyświetla się 3
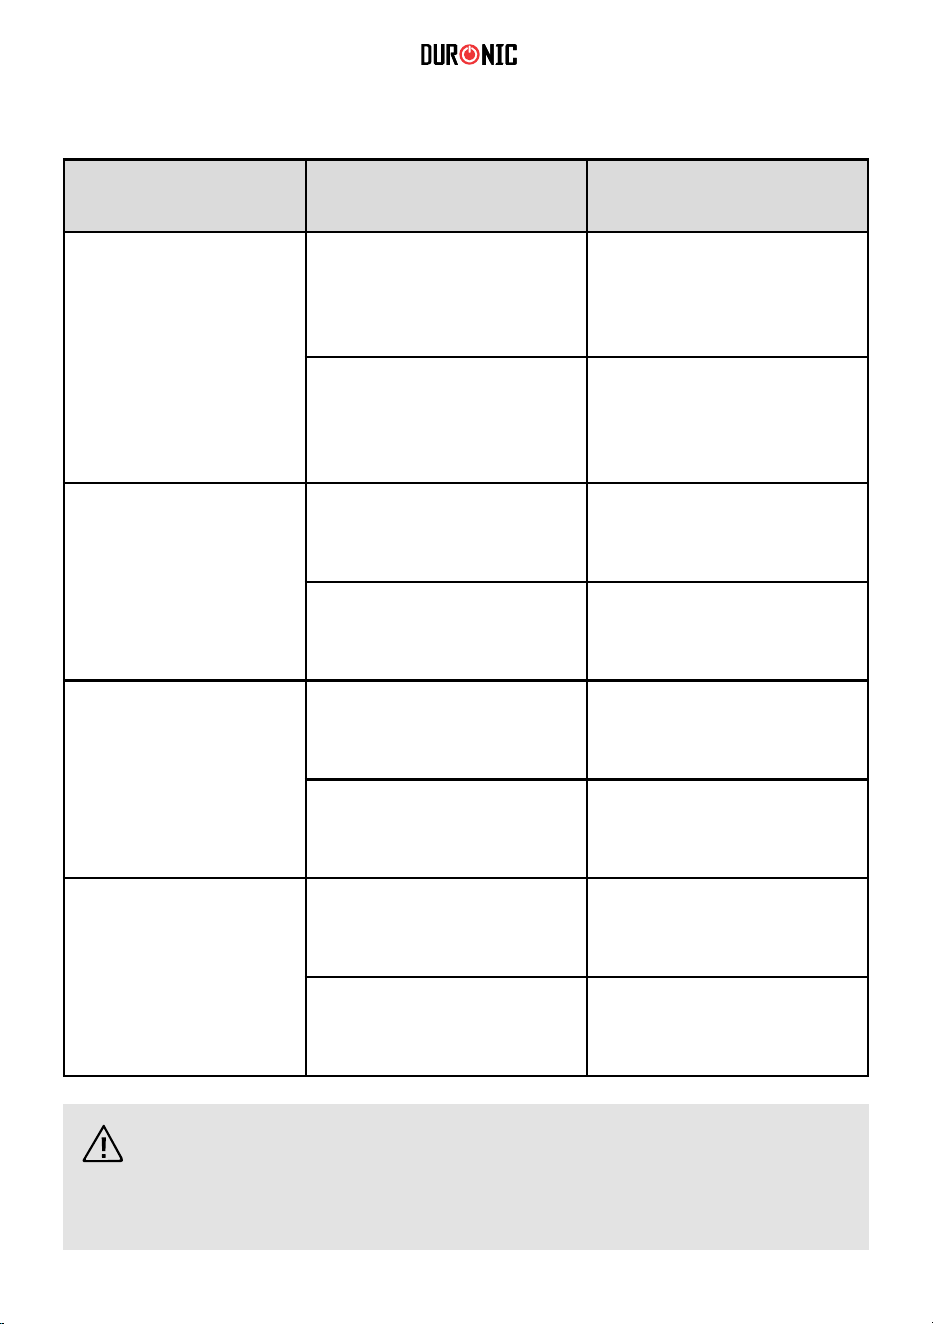
143
Problem
Wymień baterie lub
podłącz zasilacz na
micro USB.
Po naciśnięciu
włącznika
urządzenie nie
uruchamia się
Brak ciśnienia
Komunikat błędu.
Brak możliwości
pomiaru
Powietrze
wycieka z
mankietu.
Sprawdź czy baterie nie
są wyczerpane
Czy baterie są
prawidłowo włożone?
Czy przewód mankietu
jest prawidłowo
zamontowany?
Włóż baterie zgodnie z
polaryzacją (+/-).
Dociśnij wtyki
przewodu
mankietu.
Zakup nowy
mankiet
OBJAW
ROZWIĄZANIE
/ KONTROLA
Możliwy ruch podczas
pomiaru.
Prawdopodobna
rozmowa podczas
pomiaru.
Utrzymuj swoje ciało i
ramię w stałej pozycji
Powstrzymaj się od
mówienia i kontynuuj
pomiar
Dociśnij mankiet
Wymień mankiet
Czy mankiet nie jest
zbyt luźny?
Mankiet jest nieszczelny
Rozwiązywanie problemów
UWAGA: Jeżeli w dalszym ciągu nie możesz dokonać pomiaru
ciśnienia przy użyciu powyższych wskazówek, skontaktuj się z
dystrybutorem. Nie demontuj samodzielnie.
w mankiecie
Czy przewód mankietu
jest uszkodzony lub
nieszczelny?

144
Specyfikacja
Model BPM200
30 mmHg - 255 mmHg
(5.3 kPa-37.3 kPa)
40-199 uderzeń/
±3 mmHg (±0. 4 kPa)
±5% odczytu
Nazwa produktu
Elektroniczny ciśnieniomierz
Rodzaj wyświetlacza
Cyfrowy
OscylograficznaMetoda pomiaru
Miejsce pomiaru
Ramię
Zakres pomiaru
Dokładność
pomiaru
Wyświetlacz
Pojemność
pamięci
Zasilanie
Wyłącznik
Manualny (Start/Stop), automatyczne wyłączenie
po 30 sek. bezczynności
Baterie: 4 x AAA, zasilacz DC: 5V USB
99 pomiarów dla każdego z dwóch użytkowników
Wartość ciśnienia
Puls
Wartość ciśnienia
Puls
Puls
Wartość ciśnienia
min.
Jednostka: mmHg / kPa
Liczba uderzeń na minutę,
pokazywana jako
wartość 3-cyfrowa

145
Waga produktu
(bez baterii)
ok. 195 g ± 5 g
120 mm (długość) x 90 mm (szerokość) x
43 mm(wysokość)
5°C - 40°C
15% -
90%RH
70 kPa -
106 kPa
Podczas transportu należy unikać silnego uderzenia,
bezpośredniego zderzenia, ekspozycji na światło
słoneczne lub deszcz.
Zapakowany ciśnieniomierz powinien być
przechowywany w środowisku o temperaturze od
-20°C do 55°C wilgotności względnej od 10% do
93% i ciśnieniu atmosferycznym od 70 kPa do 106
kPa, bez żrącego gazu i dodatniej wentylacji.
Wymiary
Rozmiar ekranu 59 mm (długość) x 47mm (szerokość)
Mankiet
Akcesoria
Żywotność
baterii
Żywotność
urządzenia
Data
produkcji
Środowisko
pracy
Warunki
przechowywania
i transportu
Mankiet naramienny (pomiar na ramieniu 22-36
cm lub 22-42 cm)
Mankiet, instrukcja obsługi
5 lat
Zobacz naklejkę
Temperatura
Wilgotność
Ciśnienie
atmosferyczne
Jeżeli urządzenie
będzie użytkowane
lub przechowywane
w innych warunkach
niż zalecono, nie
będzie działać
prawidłowo
Wydajne, suche baterie mogą być używane ok. 300
razy w standardowej temperaturze
146
Warunki Gwarancji
1 Rok Gwarancji rmy Shine-Mart LTD, marki handlowej Duronic Products.
UWAGA: ten dokument nie wpływa na twoje ustawowe prawo jako konsumenta.
Ten produkt został wykonany zgodnie z restrykcyjnymi normami kontroli i wykorzystuje
najwyższej jakości materiały dla uzyskania doskonałej wydajności i niezawodności.
Długotrwałość produktu zostaje osiągnięta przez właściwe użytkowanie i konserwację.
Gwarancja obejmuje 1 rok od daty zamówienia. Jeżeli jakikolwiek defekt powstanie ze
względu na wadliwość materiału lub niewłaściwe wykonanie to uszkodzony produkt musi
zostać dostarczony do miejsca, z którego został zamówiony. Zwrot pieniędzy lub wymiana
produktu jest w gestii rmy.
Duronic Products oferuje jeden rok gwarancji na podstawie poniższych warunków:
1. Produkt musi zostać zwrócony do sprzedawcy z oryginalnym dowodem zakupu.
2. Produkt był instalowany i użytkowany zgodnie z instrukcją obsługi.
3. Produkt użytkowany był wyłącznie w celach domowych.
4. Gwarancja nie obejmuje naturalnego zużycia się produktu, celowego uszkodzenia,
niewłaściwego użycia, zaniedbania, niewłaściwych napraw lub części
eksploatacyjnych.
5. Shine-Mart Ltd. nie ponosi odpowiedzialności za przypadkowe albo celowe zgubienie
produktu lub jego uszkodzenie.
6. Firma Shine-Mart Ltd nie jest zobowiązana do przeprowadzania jakichkolwiek prac
serwisowych w ramach gwarancji.
7. Obowiązuje na obszarze Unii Europejskiej.
Ten produkt jest wyposażony we wbudowaną wtyczkę typu Euro-Plug / BS z
certykatem CE importowaną przez Shine-Mart Ltd, RM3 8SB
Informacja o odpadach i utylizacja dla użytkowników sprzętu elektrycznego i
elektronicznego.
Usuwanie wyeksploatowanych urządzeń elektrycznych i elektronicznych (dotyczy
krajów Unii Europejskiej i innych krajów europejskich z wydzielonymi systemami
zbierania odpadów). Ten symbol na produkcie lub jego opakowaniu oznacza, że
produkt nie powinien być zaliczany do odpadów domowych. Należy go przekazać
do odpowiedniego punktu, który zajmuje się zbieraniem i recyklingiem urządzeń
elektrycznych i elektronicznych. Prawidłowe usunięcie produktu zapobiegnie
potencjalnym negatywnym konsekwencjom dla środowiska naturalnego i zdrowia
ludzkiego, których przyczyną mogłoby być niewłaściwe usuwanie produktu.
Recykling materiałów pomaga w zachowaniu surowców naturalnych.
Śledź Nas